LED lamps are switchable. LED brightness adjustment
The ability to change the brightness of lighting and create different lighting scenarios is becoming as necessary for a modern home as connecting to an electrical outlet or the Internet. Therefore, it is recommended to install luminous flux regulators or dimmers for LEDs every time you update the wiring in the apartment.
Dimmer functions
The functionality of dimmers depends on the complexity of the device. The simplest ones, which you can do yourself, are used only for stepwise or smooth changes in the intensity of the lamp. More modern models equipped with microcontrollers can perform other tasks:
- Fine-tuning lighting. A dimmer helps to adjust the comfortable brightness of lighting fixtures depending on the intensity of natural light throughout the day, the orientation of the room to the cardinal points, the design of the window opening, and the habits and preferences of the owners. This is much more convenient than selecting lamps of the required power for each group of lamps.
- Automatic shutdown at a specified time. This feature saves the owner from having to check each room before going to bed/leaving and helps reduce electricity bills.
- Saving money on lamps. Working in reduced brightness mode, LED lamps and incandescent lamps are able to perform their functions 3–5 times longer than planned.
- Simulation of the presence of owners. The device turns on and off, and also changes the brightness of the lamps connected to it, imitating the actions of people living in the house. The program is designed specifically for those who regularly leave their homes and are afraid of burglars.
- Remote control of light: via remote control, voice commands, application on a smartphone. This is convenient not only in large rooms, but also in bedrooms when you don’t want to get out of bed in the evening.
Dimmers can be installed both for an individual lamp/chandelier and for a group of lamps. More often, a separate dimmer is provided for each group of lighting fixtures in each functional area.
In addition to living rooms, concert venues, theater halls, circus arenas and other rooms where smooth adjustment of lighting is necessary for visual effect are equipped with devices of this type.
How does an LED dimmer work?
The principle of operation of the device is based on changing the current voltage in such a way as to cut off the leading (“leading edge adjustment”) or trailing (“falling edge adjustment”) edge of the alternating current sinusoid (“phase cutoff principle”). Thus, when dimmed at 50%, the lamp uses only half of its possible power.
Leading edge dimming is used with low voltage lamps, fluorescent and 230V LED lamps complete with electromagnetic type transformers. Trailing edge dimming is used for the same lamps in tandem with electronic transformers.
The task is performed using a rheostat or a complex of electronic elements. Rheostat-type dimmers are characterized by low efficiency (efficiency factor) and do not reduce energy consumption when lighting decreases, so they are gradually falling out of use. Electronic dimmers work by using a bidirectional thyristor and a PWM (pulse width modulation) system that delays the load activation signal. There is no delay when operating at full power; at 10 percent luminosity it is 9 milliseconds. Thus, the dimmable lamp is constantly turned off and turned on with a slight delay.
For normal operation, the device is equipped with protection against overheating and short circuit.
A dimmer is able to prevent damage to the lamp due to regular voltage drops.
Comparing the advantages and disadvantages
| pros | Minuses |
| Allows you to reduce the energy consumption of the room. | They are expensive, especially programmable models with touch and remote control. |
| They extend the life of lamps by reducing the intensity of operation, as well as smooth starting when turned on. | They lead to malfunctions and destruction of lamps if the devices are selected incorrectly. |
| Protect the premises from intrusion by strangers. | Low-cost devices generate electromagnetic interference, which impairs the performance of radio devices. |
| Provide a decorative effect and eye-pleasing illumination in any room. | Not suitable for use with fluorescent/energy-saving/halogen lamps, since the latter are equipped with a compensation system for a stable glow. |
| They make the lighting design of the room more interesting and varied. | If the load on the dimer becomes less than the minimum permissible (for example, an incandescent lamp is replaced with an LED), the device will quickly deteriorate without the possibility of replacement under warranty. |
If you decide to use a dimmer in your home or office, try not to skimp on devices and use the advice of a sales consultant to choose the best dimmers and lamps for each other. Then you are guaranteed to avoid unpleasant effects.
Types and characteristics of dimmers for LED lamps
When buying a dimmer, keep in mind that devices for incandescent lamps, energy-saving lamps and LEDs differ from each other. Therefore, you need to take either a specialized device, or select LED lamps marked “DIMMABLE”/circular icon to match the standard one.
This icon on the box means that the LED lamp will work with a universal dimmer. Minimum luminosity level may vary or not specified
Demonstration of working with different types of lamps
Classification of regulators
Depending on the control principle of the devices, dimmers for LED lamps are:
- Turn-push. The most common type of dimers, such devices are easy to operate, have a low price and simple design. The controls are intuitive: the brightness is changed by turning the knob, turning on/off is done by pressing. Users appreciate the ability to turn lights on and off without changing the selected brightness setting.
- Keyboards. The devices resemble ordinary switches, which allows you to choose the most suitable dimmers, switches and sockets for your design. The desired degree of brightness is set with the +/- key, switching on and off with the I/O button (or the unlabeled key).
- Sensory. The devices are controlled using a tactile-sensitive screen, on which auxiliary information can be displayed. Dimmers of this type are distinguished by a modern, sometimes even futuristic design, and therefore are often installed in modern interiors.
- Remote. Such devices are not installed in the user’s direct access area; they are mounted near the lamp or in the electrical panel of the apartment. Control occurs using a remote control or from any gadget via WiFi (you will need to download and install the appropriate application).
Choosing the right type of dimmers depends on your convenience, the design of the room and the budget allocated for the devices.
Devices are also classified according to installation method:
- Modular ones are designed for installation in a distribution panel on a DIN rail (next to circuit breakers). Such devices can be installed or replaced at any time; you only need to provide a separate wire for it during repairs.
- Wall mounted ones are installed in the same way as sockets and switches directly in the room where the light flux will be regulated. Installation is carried out upon completion of repairs simultaneously with the specified devices. Adding such a dimmer after renovation is very difficult, since it will require chipping the wall and destroying the finish coating.
- Remote ones look like miniature (2–3 cm long) blocks with three control sensors. Since they can be controlled remotely, they are installed under a suspended/stretch ceiling next to a chandelier or inside the housing of a lighting fixture. Dimmers of this type can be installed simultaneously with the lamp (there is no need to ditch the walls, so no repair work is required).
If you are planning to equip a smart home system, modular models are suitable for you; If you are planning a renovation without a smart home, prefer wall-mounted ones; if the repairs have already been made, only remote ones can be installed without any risk to the finishing.
Popular dimmer manufacturers
- Legrand (Legrand). The French company offers products of European quality, certified according to GOST. Advantages of Legrand dimmers: ease of installation, reliable operation, attractive design (colors: ivory, white, aluminum). The manufacturer offers models of rotary, push-button and touch types.
- Schneider Electric (Schneider Electric). The German manufacturer is known for the quality and high reliability of its dimmers. Several series of devices have been developed with different designs and seven color variations. The devices are equipped with mounting tabs and guides that facilitate the installation procedure.
- Makel (Makel). The Turkish brand has a more loyal pricing policy than European manufacturers. Experts recommend using devices of this brand in low-load areas, where they demonstrate sufficient reliability.
Each manufacturer includes information on their dimmers about their compatibility with various types of lighting devices. It is usually provided by brand representatives or point-of-sale consultants.
How to choose a device
When selecting a dimmer, it is necessary to take into account the following parameters:
- Planned load (total power of connected lamps). The documentation for the dimmer indicates the load power of the device; it should be one third greater than the sum of the powers of the lamps it controls. It is no longer worth making a power reserve, as this will lead to damage to the dimmer.
- Mains voltage. LED lamps are designed for 220V or 12V circuits (operate through a transformer). Dimmers for them are produced differently, so make sure that the box is marked 220V.
- Compatible with lighting fixture. The instructions for the device should state that it works specifically with LED lamps (not diodes or strips), and not with incandescent lamps.
The choice of dimmer by type of installation and brand is described above. For maximum compatibility of devices, we recommend buying a set of dimmers and lamps at the same time and checking their joint operation in the store.
DIY connection
Installing a dimmer is not difficult for an ordinary electrician or even a person who is only slightly familiar with such work. To connect an external dimmer, it is enough to connect the wires, connecting one side to the wiring, and the opposite side to the lamp (so that the “phase” and “zero” do not get confused, all wires are marked). Modular, as already mentioned, are mounted on a DIN strip in the electrical panel. It is better to entrust this work to a professional so as not to accidentally disrupt the operation of neighboring elements.
The procedure for installing a wall regulator is similar to working with a regular outlet. Let us describe in more detail the operating rules and safety requirements:
- identify the phase wire with an indicator screwdriver;
- turn off the power supply to the room/apartment (depending on the capabilities of the panel);
- connect the phase conductor and the dimmer wire with the “L” marker, and connect the neutral conductor to the wire marked “N”. This can be done by twisting (provides a larger contact area for the conductors) or with special clamps (more convenient and faster, especially for beginners).
- place the device in the socket and adjust its position using the adjusting bolts;
- install the decorative cover;
- connect the power and carry out the experiment.
If your dimmer allows you to turn the light on/off, it is installed instead of a standard switch; if the model only supports the mode of changing the degree of illumination, it is mounted in series with the switch (in front of it).
Detailed instructions for connecting a dimmer (video)
With this knowledge, you can easily find the right dimmer and make your home more comfortable and technologically advanced.
Adjusting the brightness of the lighting in a room where a chandelier with several incandescent lamps is installed is not difficult. We take a switch with several buttons and, if necessary, turn on or off some of the lamps.
Even if the chandelier is designed for one lamp, its brightness can be varied within a wide range by increasing or decreasing the supplied voltage. The LED operates in a very narrow voltage range and when it decreases it simply goes out.
To change the brightness of LED lamps, a dimmer is used, which is a PWM controller (controller with pulse-width modulation of power).
Principle of pole width modulation (PWM)
Changes in the power of the supply voltage when using a PWM controller are ensured by supplying signals with varying duty cycle to the switching element (in the case of LEDs - a field-effect transistor, triac or dinistor).
Duty factor (S)– the relationship between the duration of the pulses and the pause between them.
S=T/T1, where T is the period of pulses, T1 is the period of the positive front.
In a PWM controller, pulses follow at a constant frequency, only the duration of the pauses changes.
Below is a schematic diagram of a PWM controller:
![]()
Increasing the pulse width increases the time it takes for the current to flow through the transistor to the load, and therefore the current passed through. The pulse repetition rate is much higher than what the eye can detect, usually 100-200Hz, so we don’t feel the flickering of the LEDs. The advantage of load regulators based on PWM controllers is a significantly higher efficiency compared to resistive ones, since the excess load is extinguished rather than consumed.
![]()
Connecting a dimmer to the power supply circuit of an LED lamp
There are two connection options:
- Connection diagram in front of the power driver when the AC voltage is dimmed;
- Connection after the power driver, with PWM constant voltage regulation.

Industrial dimmer options for LED lamps
Dimmer control type:
- Infrared;
- Radio;
- Stationary.
Controlled Voltage:
- 220V.
 Dimmer mounted instead of a switch, with remote control. Typically installed when converting conventional lighting from incandescent lamps to LED strips.

Dimmer installed in front of the power driver LEDs on remote control with infrared control.
 Sample with radio control. Unlike an infrared transmitter, such a remote control can turn on the lighting even from the street.
They produce samples with mechanical or touch controls. There are even models that allow you to control the lighting using your smartphone via WiFi.
The main disadvantage of all devices is the fairly high price.
If you do not want to overpay for unnecessary functions, making a dimmer for 220V LED lamps with your own hands is not at all difficult.
Assembling a dimmer with your own hands
Triac circuit:

In this circuit, the master oscillator is built on two triacs, triac VS1 and diac VS2. After turning on the circuit, the capacitors begin to charge through the resistor chain. When the voltage across the capacitor reaches the opening voltage of the triac, current begins to flow through them, and the capacitor is discharged. The lower the resistance of the resistor, the faster the capacitor charges, the lower the pulse duty cycle.
Changing the resistance of the variable resistor adjusts the gating depth over a wide range. This circuit can be used not only for LEDs, but also for any network load.
Connecting a dimmer as a switch
Connection diagram for AC mains:


The N555 chip is an analog-to-digital timer. Its most important advantage is the ability to operate over a wide range of supply voltages. Ordinary microcircuits with TTL logic operate from 5V, and their logical unit is 2.4V. CMOS series are higher voltage.
But the generator circuit with the ability to change the duty cycle is quite cumbersome. Also, for microcircuits with standard logic, increasing the frequency reduces the voltage of the output signal, which does not make it possible to switch powerful field-effect transistors and is only suitable for low-power loads.
The timer on the N555 chip is ideal for PWM controllers, since it simultaneously allows you to adjust both the frequency and duty cycle of the pulses. The output voltage is about 70% of the supply voltage, due to which it can even control Mosfett field-effect transistors with a current of up to 9A. With the extremely low cost of the parts used, assembly costs will be 40-50 rubles.
And this circuit will allow you to control a 220V load with a power of up to 30 W:

The ICEA2A chip, after a little modification, can be painlessly replaced with the less scarce N555. Difficulty may cause the need to wind the transformer yourself. You can wind the windings on a regular W-shaped frame from an old burnt-out 50-100W transformer. The first winding is 100 turns of enameled wire with a diameter of 0.224 mm. The second winding is 34 turns with 0.75mm wire (the cross-sectional area can be reduced to 0.5mm), the third winding is 8 turns with 0.224 - 0.3mm wire.
Dimmer on thyristors and dinistors
LED dimmer 220V with load up to 2A:

This is a two-bridge half-wave circuit consisting of two mirror cascades. Each half-wave of voltage passes through its own thyristor-dinistor chain. The duty cycle depth is controlled by a variable resistor and capacitor.
When a certain charge is reached on the capacitor, it opens the dinistor, through which current flows to the control thyristor. When the polarity of the half-wave changes, the process is repeated in the second chain.
Dimmer for LED strip
Dimmer circuit for LED strip on an integrated stabilizer of the KREN series.

In the classic circuit for connecting a voltage stabilizer, the stabilization value is set by a resistor connected to the control input. Adding capacitor C2 and a variable resistor to the circuit turns the stabilizer into a kind of comparator.
The advantage of the circuit is that it combines both the power driver and the dimmer at once, so the connection does not require additional circuits. The disadvantage is that with a large number of LEDs on the stabilizer there will be significant heat generation, which requires the installation of a powerful radiator.
How to connect a dimmer to an LED strip depends on the dimming task. Connecting the LED power supply in front of the driver will allow you to regulate only the overall illumination, but if you assemble several dimmers for the LED with your own hands and install them on each section of the LED strip after the power supply, it will be possible to regulate zone lighting.
"Dimmer" with a fixed brightness level

Resistor value 100-500 kOhm, power 1-2 W.
This is not even a dimer, since there is no PWM controller here. But it’s ideal for those who picked up a soldering iron for the first time.
To adjust the brightness of incandescent lamps, special controls are used. These devices are also called dimmers. They exist in different modifications, and if necessary, you can always select the required model in the store. They basically replace the switch in an incandescent lamp. The simplest modification includes one rotary controller with a knob. When adjusting the brightness, the electricity consumption indicator also changes.
If we remember the old days, we didn't use knobs to adjust the brightness. Instead, special rheostats were installed. With their help it was also possible to regulate fluorescent lamps. In general, they coped with their duties well, but they had one drawback. It is connected with As mentioned earlier, modern regulators consume less electricity if they are not used at full capacity. In the case of rheostats, this rule does not apply. At minimum power, electricity is consumed in the same way as at maximum. The excess in this case is converted into heat.
Conventional regulator circuit
A simple dimmer circuit involves the use of a linear-type potentiometer, as well as a pair of low-power transistors. To suppress high frequencies, capacitors are used in the system. Cores in devices of this type are needed only of the ferrite type. A dinistor with a thyristor is installed directly in front of the terminals.

How to install a rotary control in a lamp?
In order for a table lamp with a dimmer to work properly, you should check the voltage on the semiconductor. This can be done using a regular tester. Next, you should inspect the incandescent lamp board. If it is installed as a single-channel type, then everything is quite simple to do. It is important to connect the output semiconductors to output ports that have negative polarity. In this case, the maximum resistance should be 3 ohms. To check the device, you need to turn the controller and monitor the brightness of the incandescent lamp.
Installing a push-button regulator into a lamp
In order for the incandescent lamp brightness control to work properly, it is important to carefully familiarize yourself with the control board of the device. Next you need to connect all the contacts. If a multi-channel circuit is used, then the voltage on it is checked with a tester. Direct connection of contacts is carried out using soldering. It is important not to touch the resistors during operation. Additionally, care must be taken to insulate the wiring. Before turning on the regulator, you need to check the reliability of all connections. After turning on the power, you should try changing the brightness by pressing the button.

High Voltage Dimmers
High voltage dimmers are typically found in theaters. There, incandescent lamps are quite powerful, and the devices must be able to withstand heavy loads. High-voltage triacs (marked KU202) are used for this purpose. Bipolar transistors are used, but conventional modifications are also installed.
They are soldered near the thyristors and are necessary for fast signal transmission. Zener diodes can most often be found marked D814. They are quite expensive in the store, and this should be taken into account. in the system are capable of withstanding at 60 ohms. At this time, conventional analogues are fused with only 5 Ohms.
Models with precision resistors
A dimmer with resistors of this type is designed for medium-power incandescent lamps. Zener diodes in this case are used at 12 V. Variable resistors in regulators are quite rare. Low frequency modifications can be used. In this case, the conductivity coefficient can be increased by increasing the number of capacitors. Behind the triac they must be located in pairs. In this case, heat losses will be minimal. Negative resistance in a network can sometimes be a serious problem. Ultimately, overload leads to breakage of the zener diode. Electrolytic capacitors cope with low-frequency interference quite successfully. The main thing is not to apply a sharply high voltage to the lamp.

Regulator circuit with high-megaohm resistors
This type of dimmer can be used to control different types of lamps. Its circuit includes high-ohm resistors as well as a regular zener diode. The thyristor in this case is installed next to the capacitor. To reduce the limiting frequency, specialists often use fuses. They are capable of withstanding a load of 4 A. In this case, the maximum output frequency will be a maximum of 50 Hz. General purpose triacs can withstand an input voltage of 15 V.
Switches with field-effect transistor regulators
Switches with a brightness control are not characterized by good protection. Short circuits in the system occur quite rarely, and this is undoubtedly an advantage. Additionally, it should be taken into account that zener diodes for regulators can only be used with the KU202 marking. In this case, they are able to work with low-frequency resistors and cope well with interference. Triacs in circuits are located behind resistors. The maximum resistance in the system must be maintained at 4 ohms. The resistors keep the input voltage at approximately 18 V. The limit frequency, in turn, should not exceed 14 Hz.
Regulator with trimmer capacitors
A dimmer with trimmer capacitors can be successfully used to adjust the power of fluorescent lamps. The switches in this case should be located behind the diode bridge. Zener diodes in the circuit are needed to suppress interference. Variable type resistors, as a rule, have a maximum resistance of 6 ohms.
When used exclusively to maintain voltage at the proper level. Triacs are capable of passing current through themselves at a level of approximately 4 A. Fusible type fuses in regulators are quite rare. The problem with electrical conductivity in such devices is solved using a variable resistor at the output.

Model with a simple thyristor
A dimmer with simple thyristors is most suitable for push-button models. As a rule, there is no protection system. All contacts in the regulator are made of copper. The maximum input resistance of a conventional thyristor can withstand 10 V. They are not suitable for rotary controllers. Precision resistors are not capable of working with such regulators. This is due to the high level of negative resistance in the circuit.
High frequency resistors are also installed quite rarely. In this case, the level of interference will be significant and will lead to overload of the zener diode. If we talk about ordinary table lamps, then it is best to use an ordinary thyristor paired with wirewound resistors. Their current conductivity is at a fairly high level. They rarely overheat, the average power dissipation fluctuates around 2 W.

Using variable capacitors in a circuit
Thanks to the use of variable capacitors, it was possible to achieve a smooth change in the brightness of incandescent lamps. However, electrolytic models work completely differently. Transistors for such capacitors are most suitable for 12 W. The input voltage must be maintained at 19 V. The use of fuses should also be considered. Thyristors are usually used with the marking KU202. They are well suited for rotary modifications. To increase the conductivity coefficient, potentiometers are used with network switches.

Single-junction regulator device
The single-junction dimmer is renowned for its simplicity. The resistors in it are usually used at 4 W. At the same time, it is capable of maintaining a maximum voltage of 14 V. When using it, it is important to take into account that the light bulb may flicker during operation. Fuses are rarely used in devices.
At the input, the maximum rated current can be 4 A. Thyristors of the KU202 type are capable of operating in such a system only in conjunction with a diode bridge. The triac in the device must be connected behind the resistor. To connect the dimmer to the lamp, you need to clean all contacts. It is important to use a dielectric housing for the device. In this case, work safety will be guaranteed.
Dimming in English is translated as “darkening”. What a dimmer is, what they are and where else they can be used we will tell you in this article. From origins to final implementation. The most important question is: can LED lamps be used with a dimmer?
What is a dimmer and why is it needed?
A dimmer is an electronic device capable of regulating power by regulating the voltage supplied to the load. The definition is very dry and boring, let's explain the principle of operation in simpler language.
Power depends on the voltage and current in the load. This means that if you reduce one of the components, the power will also decrease. Voltage and current are related by Ohm's law, which means you can reduce the power of your device (brightness of the lamp) by increasing the total load resistance. That is, use ballast resistors, chokes or capacitors.
Ballast power absorbers - convert excess energy into heat and have low efficiency. To regulate the power of the device, in our case the brightness of the light bulb, you need another device - a dimmer.
Is it possible to connect LED lamps via a dimmer? Can. But not everything will be consistently regulated. Here you need special LED lamps for dimmer.
LED lamps, dimmable , Suitable for use with any regulator. But there are some nuances in the difference between the type of voltage regulation. This is determined by the dimmer's circuitry; the differences will be described in detail in the following sections of the article. The type of dimmer determines how well the LEDs will be regulated.
Which LED lamps can be used with a dimmer? In this matter, everything is extremely individual. It all depends both on the circuit of the light bulb itself and on the circuitry of the regulator. In general, the so-called dimmable LED lamps.
What types of dimmers are there?
Power regulators can be divided into two large groups:
- For work in alternating voltage circuits (220V);
- for operation in constant voltage circuits (for 12V LED strip).
Drills also need a regulator to adjust the speed; it is located in the button.

It can be used for a variety of purposes, listed in order of popularity:
- Light brightness adjustment, dimming of LED and incandescent lamps;
- adjusting the heating element temperature in various heaters;
- adjusting the speed of the commutator motor.
What are the differences between dimmers?
If you are going to use a switch with brightness control, you first need to find out what they are. And in general, can all LED lamps be dimmed?
Dimmers differ according to the following criteria:
- By type of installation;
- on execution and method of management;
- according to the method of regulation.
Let's take a closer look at each of them.
By installation type
For outdoor installation– surface-mounted switch with dimmer for LED lamps. To install such a device, you do not need to drill a niche in the wall; it is simply mounted on top of the wall. It is very convenient to use in cases where the interior is not a priority or external wiring is installed.

For indoor installation– will fit perfectly into any interior, such as this one.

For DIN rail mounting are very specific and at first may seem that they are not practical. However, this dimmer for LED lamps works with a remote control, and is hidden from prying eyes in the electrical panel.

By execution
According to the design, the light controller for LED and incandescent lamps can be:
- Rotary;
- rotary-push type;
- push-button;
- sensory;
Turning- one of the simplest options for dimming an LED lamp, it looks unpretentious and has the simplest functionality.

Turn-push looks almost the same as the rotary one. Thanks to its design, when you press it, the light turns on with the same brightness as it was set the last time you turned it on.

Push-button regulator for LED lighting it looks more technologically advanced and will fit organically into a modern apartment. Like this switch with a dimmer for LED lamps.

Touch models and can be completely different - from luminous circles to smooth one-color panels for adjusting the voltage of LED lamps.

According to the adjustment method
Dimmers vary not only in their design, but also in their operating principle. E This applies specifically to AC dimmers.
The first type of dimmers is more common and cheaper, due to the simplicity of its circuit - this is leading edge cutoff dimmer(English) leading edge). A little further on, its operating principle and circuit will be discussed in detail; for comparison, take a look at the type of voltage at the output of such a regulator.

The graph shows that the remainder of the half-wave is supplied to the load, and its beginning is cut off. Due to the nature of the load switching on, interference is generated in the electrical networks, which interferes with the operation of televisions and other devices. A voltage of the set amplitude is applied to the lamp, and then it fades out when the sine wave passes through zero.
Can a leading edge dimmer be used for LED lamps? Can. LED lamps with a dimmer of this type will only be well adjustable if they were originally designed for this. This is evidenced by the symbols on its packaging. They are also called “dimmable”.
The second type works differently, creates less interference and works better with different light bulbs - this trailing edge cutoff dimmer(English) falling edge).

LED lamps with this type of dimmer adjust better, and its design better supports non-dimmable light sources. The only drawback is that these lamps can adjust their brightness not from “zero”, but within a certain range. At the same time, dimmable LED lamps are simply superbly adjustable.
The best solution is to use a Falling Edge LED dimmer.
A special word can be said about ready-made LED lamps with adjustable brightness. This is a separate class of lighting devices that do not require the installation of additional regulators, but have them in their design. Their adjustments are made using buttons on the case or from the remote control.

Dimmer circuits
Dimmer for 220V voltage, with leading edge cut-off, works on the principle of phase-pulse voltage control. During operation, the elements of such a dimmer supply voltage to the load at certain moments, cutting off part of the sinusoid. This is depicted in detail and more clearly in the graphs.

The area of the sinusoid shaded in gray is the area of the voltage or its effective value that is supplied to the load (a lamp or any other device described above).
The red dotted line shows the voltage waveform at the dimmer input for LED lamps. In this form, it is supplied through a regular switch without adjustments .
How to connect LEDs via a dimmer?

Component ratings and all information are indicated on the dimmer diagram.
The device is installed in a break in the wire going to the light source, motor, heating element or any other device.
The logic of the circuit is as follows: capacitor C1 is charged through chain R1 and potentiometer R2. Depending on the position of the potentiometer, the capacitor is charged to the opening voltage of the dinistor VD1.
The circuit used a DB3 dinistor, which is approximately 30V. Through an open dinistor, a control pulse for opening a triac (bidirectional thyristor) is supplied to its control electrode.
The greater the resistance set by the potentiometer knob, the longer it takes for the capacitor to charge, respectively, the later the dinistor-triac circuit will open, and the voltage will be lower, since most of the sine wave will be cut off. And vice versa - less resistance means more voltage at the output of the regulator.

There are many options for circuits on the Internet with all sorts of modifications, all of them are good. Here is a simple diagram; the figure shows the installation of this version of the scheme.
How to adjust LED lighting
What light bulbs can be used with a dimmer? When mainly incandescent lamps were used for lighting, everything was simple - a regular dimmer could easily cope with adjusting the brightness.
Incandescent light bulbs were replaced by energy-saving fluorescent light bulbs and could not be dimmed at all. Of course, there were electronic ballasts for tubular fluorescent light bulbs with dimmable capabilities, but they were extremely rare and they were expensive.
Now energy-saving lamps are being replaced by LED lamps. The process of emitting light quanta, although complex, is, from a regulatory point of view, perhaps simpler than regulating gas-discharge light sources.
Dimmable LED lamps - what are they?
What does dimmable LED lamp mean? This is a light bulb that can be dimmed using ANYONE dimmer, which is designed for alternating or direct current (depending on the type).
Its power circuit includes functions for changing brightness, depending on the supply voltage. Dimmable LED lamps work with dimmer circuits like the one shown above.
The network dimmer regulates the supplied voltage. This means that at any voltage values, within the range specified by the manufacturer (it is indicated on the light bulb box), the lamp circuit will strive to maintain the specified current. Brightness in turn depends on current.
Regular LED lamps cannot be adjusted; at best, they will simply turn on and off; at worst, they will burn out at low values set on the dimmer.
The cheapest LED lamps have a quenching capacitor. Even if they are regulated, it will be only within very narrow limits, which means they are also not suitable. For an example of dimming conventional LED light bulbs, watch the video.
Dimmable LED lamps 220 Volt
Adjusting the brightness of 220V LED lamps is difficult because there is a current stabilization circuit installed on a specialized driver. Its task is to stabilize the output current to ensure a uniform and long-lasting glow of the LEDs, regardless of the supply voltage.
Conventional LED lamps are not very dimmable. To choose the right LED lamp for a dimmer, you need to carefully study the description and symbols indicated on the box and body of the light bulb.

LED lamps with dimming can be recognized by the inscription: “for dimmer”, “adjustable” or something similar; perhaps a conventional image of a dimmer will simply be drawn, as in the examples below.
Is it possible to adjust the brightness of LED lamps running on DC?
The photo shows a led dimmer for a 12V LED strip. Let's figure out how such a dimmer works with LED lamps.

For DC circuits, the operating principle of the regulator is different. Here, a bipolar or field-effect transistor is used as a metering element, and a pulse generator with a variable duty cycle is used as a metering element.
The method of this control is called pulse width modulation (PWM). To understand how this works you need to look at the graphs.
![]()
Vcc is the voltage at the DC dimmer input, Vaverage is the output voltage. You can see how the average voltage changes. As the pulse duration increases and the pause length decreases (we increase the duty cycle), the output voltage increases.
![]()
Above is a circuit diagram of a “PWM dimming controller for LED lamps on NE555.” It can act as a device for dimming LEDs. It works like this:
NE555 is a timer, connected here in the pulse generator mode, the frequency and duration of which is set by an RC circuit consisting of R2, potentiometer R1 and capacitor C5, as in the previous circuit, the potentiometer regulates the charging rate of the capacitor, and the pulse width is formed in accordance with the charging speed.
Initially, the circuit produces symmetrical pulses, that is, the pause length is equal to the pulse length. But thanks to the presence of a potentiometer and a chain of two diodes VD1 and VD2, the capacitance is charged and recharged through different resistances of the potentiometer, or rather through different pairs of its contacts.
Therefore, PWM adjustable pulses are generated with a constant frequency, but a variable duty cycle.
If you use it in a car or for dimming an LED strip, you can eliminate the additional 9 volt power supply based on the 7809 linear regulator and supply power to the first point after it in the circuit.
But here are photos of a homemade dimmer for LEDs, if necessary, you can copy the location of the tracks and repeat it. Or assemble it on a breadboard.

A video of how dimming LED lamps works using this circuit, using a side-glow strip as an example, is located below.
Using this circuit, it is possible to dim 12V LED circuits and any other DC load. For example, adjust the speed of revolutions of a PC cooler, brushed motors, heaters, in general, anything you can think of. In one of the articles we already talked about.
What dimmer is needed for LED light bulbs?
To select a dimmer for LED lamps and ensure their compatibility, you must first decide which lamps you will use. If you are planning to buy 220V LED light bulbs, phase-pulse devices, which were discussed at the beginning of the article, are suitable for this. Take models with trailing edge cut-off.
For low-voltage DC lamps (for example, 12V, which are used in spotlights, table lighting or car lamps), any PWM controller or dimmer for LED strips will do. They all work on the principle of pulse-width modulation; linear regulation is already a thing of the past.
It is also better to buy special LED lamps for dimmer. Although they are more expensive, there will be no problems with their adjustment. You will create the desired lighting solution only if you choose the right dimmer and LED lamps for it.
Share your experience in adjusting the brightness of LEDs and LED lamps in the comments!
Very often there is a need to regulate the brightness of the lamp within a certain value, usually from 20% to 100%. Setting the brightness lower does not make sense, since most lamps simply do not work in this mode or provide a tiny amount of light, which is only enough to glow the lamp, but it will not illuminate anything. You can go to the store and buy a ready-made device, but now the prices for these devices are very high and do not correspond to the product received. Since we are jacks of all trades, we will make these devices ourselves. Today we’ll look at several diagrams that will help you understand how to make a 12 V and 220 V dimmer with your own hands.
On a triac
First, let's look at the circuit of a dimmer operating from a 220-volt network. This type of device operates on the principle of phase shifting the opening of a power switch. The heart of the dimmer is the RC circuit. The control pulse generation unit, which is a symmetrical dinistor. And in fact, the power switch itself that controls the load is a triac.
Let's consider the operation of the circuit. Resistors R1 and R2 form. Since R1 is variable, it changes the voltage in the R2C1 circuit. Dinistor DB3 is connected to the point between them and when the voltage reaches its opening threshold on capacitor C1, it is triggered and supplies a pulse to the power switch - triac VS1. It opens and passes current through itself, thereby producing voltage at the output. The position of the regulator determines which part of the wave will go to the lamp. The faster it charges, the faster the key opens, and most of the wave and power will go to the load. Thus, the circuit literally cuts off part of the sine wave. Below is the operating schedule of the device.

The value (t*) is the time during which the capacitor is charged to the opening threshold of the power element. This dimmer circuit is simple and easy to repeat in practice. It works best on incandescent lamps, due to the fact that the spiral in the lamp is inert, but problems may arise with LED and other lamps, so it is necessary to check the functionality of the circuit specifically on your consumers before final installation. We recommend watching the video below, which clearly shows how to make a dimmer on a triac:
Triac power regulator 1000 W
On thyristors
You don’t have to buy a triac, but make a simple dimmer using thyristors, which can be easily obtained from old non-working equipment and boards, like TVs, tape recorders, etc. The circuit is slightly different from the previous one in that each half-wave has its own thyristor, and thus its own dinistor for each switch.
Let us briefly describe the regulation process. During the positive half-wave, capacitance C1 is charged through the chain R5, R4, R3. When the opening threshold of dinistor V3 is reached, the current through it enters the control electrode of thyristor V1. The key opens, passing a positive half-wave through itself. When the phase is negative, the thyristor is turned off, and the process is repeated for another switch V2 and capacitor C2, which is charged through the chain R1, R2, R5.
Phase regulators - dimers can be used not only to adjust the brightness of incandescent lamps, but also to regulate the rotation speed of the hood fan; you can make an attachment for a soldering iron and thus regulate the temperature of its tip to improve the quality of soldering.
Video assembly instructions:
Thyristor dimmer assembly
Important! This control method is not suitable for working with fluorescent, energy-saving compact and LED lamps due to the nature of their operation.
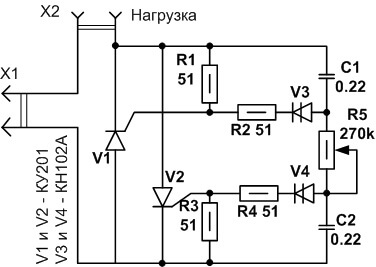
Capacitor dimmer
Along with smooth regulators, capacitor dimmers have become widespread in everyday life. The operation of this device is based on the dependence of alternating current transmission on the capacitance value. The larger the capacitor's capacity, the more current it passes through itself. Thus, using a capacitor, you can reduce the power supplied to the lamp, but this method does not allow for smooth adjustment. This type of homemade dimmer can be quite compact, it all depends on the required brightness parameters, and therefore on the capacitance of the capacitor, which is related to its size.

As can be seen from the diagram, there are three positions: 100% power, through a quenching capacitor (power reduction) and off. The device uses a non-polar paper capacitor, which can be obtained from old equipment. We talked about that in the corresponding article!
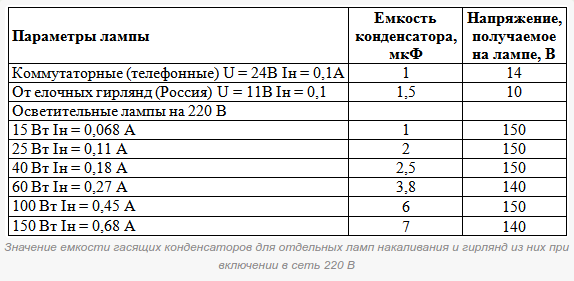
Below is a table relating capacitance and lamp voltage.
Based on this circuit, you can assemble a simple night light yourself and use a toggle switch or switch to control the brightness of the lamp.
On the chip
To regulate the power supplied to the load in 12 Volt DC circuits, integral stabilizers - KRENKs - are often used. The use of a microcircuit simplifies the development and installation of devices due to the small number of radio components. This homemade dimmer is easy to set up and has some protection functions.
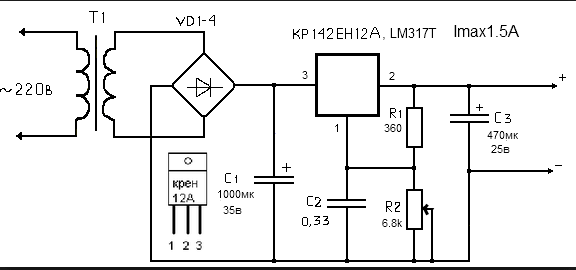
Using variable resistor R2, a reference voltage is created at the control electrode of the microcircuit. Depending on the set parameter, the output value is adjusted from a maximum of 12 V to a minimum of tenths of a volt. The disadvantage of these regulators is low efficiency and the maximum possible power of the connected load; as a result, there is a need to install an additional radiator for good cooling of the KREN, since part of the energy is released on it in the form of heat. However, it is ideal for low power DC and low voltage circuits due to its simplicity and versatility.
This lighting controller was repeated by me and did an excellent job with a 12 Volt LED strip, three meters long, and made it possible to adjust the brightness of the LEDs from zero to maximum.
An excellent option is a dimmer on an integrated timer 555, which controls the KT819G power switch and short PWM pulses. By setting the circuit to a high frequency, you can get rid of flickering, which often occurs due to cheap commercial dimmers and causes rapid fatigue and irritation of the human eye.
In this mode, the transistor is in two states: completely open or completely closed. The voltage drop across it is minimal, which allows you to connect a more powerful load and use a circuit with a small radiator, which compares favorably with the previous circuit with a ROLL regulator in terms of size and efficiency.
![]()
Making a 12 Volt light controller
That's all the ideas for assembling a simple dimmer at home. Now you know how to make a dimmer with your own hands for 220 and 12V.