How to set up an outgoing mail server on an iphone. Setting up Rambler mail account on iPhone
E-mail today for the majority of people serves as a simple exchange of messages for communication with any people, for transactions, to receive mailings from their subscriptions and any other interesting letters on any business. Many people ask a very interesting question: "How to set up Mail.ru mail on the iPhone?" The answer to this question turned out to be very simple and we will tell you how to do it in just one or two minutes!Let's start with the fact that initially iOS does not support mail.ru mail, so we will have to enter full settings. The main thing is not to be alarmed, there are few settings and all these actions will take a little time. To set up Mail.ru mail on the iPhone in any zone (@ bk.ru, @ mail.ru, @ list.ru and @ inbox.ru), you need to follow these steps:1. Open the phone menu and go to the "Mail" section by clicking on a certain bluish icon. You will be prompted to select your mailbox, but it is not in the list, so select "Others".2. In the "Enter account information" window that opens, fill in the fields:- In the field "Name" you can enter your name, it will be used by your name when sending messages.- In the "Address" field you need to enter the full address of your mailbox, for example: [email protected] - In the field "Password", respectively, you must enter the password for your mailbox.- In the "Description" field, you can leave everything as it is, it will be automatically filled in in the form of an address to your mailbox.After filling in all the fields, click on the "Save" button.3. Further, in the window that opens, you will see the choice "IMAP | POP ". Select "POP" and continue to customize the fields.4. In the category "Incoming mail server", fill in the "Hostname" and "Username" fields.In the field "Hostname" you need to enter pop3 server:- For mailboxes in the Mail zone ( [email protected]): pop3.mail.ru- For mailboxes in the Inbox zone ( [email protected]): pop3.inbox.ru- For mailboxes in the Bk zone ( [email protected]): pop3.bk.ru- For mailboxes in the List zone ( [email protected]): pop3.list.ruIn the field "Username" you need to enter your login (for example: username, natali91, roma90), that is, what is written before the "@" sign in the e-mail address.5. In the category "Outgoing mail server" you need to fill in the "Hostname" field, the rest of the fields in this category are optional!In the "Hostname" field, enter the smtp server and port:- For mailboxes in the Mail zone ( [email protected]): smtp.mail.ru:25- For mailboxes in the Inbox zone ( [email protected]): smtp.inbox.ru:25- For mailboxes in the Bk zone ( [email protected]): smtp.bk.ru:25- For mailboxes in the List zone ( [email protected]): smtp.list.ru:25Next, click on the "Save" button. During the addition, after clicking the "Save" button, a window will appear in which it will be written "Unable to connect using SSL. Try to set up an account without SSL? " - Press "YES".After a few minutes of waiting, you will hear an interesting sound. A list of incoming messages appears on the phone 🙂
That's all,
The emergence of smart technology obliges owners to use all its capabilities to the maximum. The variety of all kinds of applications allows you to do not only without paper media (for example, a diary), but even exclude the possibility of using a browser. Setting up mail on an iPhone is easy, but it requires careful attention.
Automatically set up mail on iPhone
Synchronizing mail for gmail, yahoo, outlook, aol, exchange mailboxes for an iPhone user is an easy procedure, since they are all used by their own or friendly resources. IN operating system the phone already has a built-in mail client, which will allow you not to use manual input of settings, but will automatically pull up all the necessary data.

Even when you open the settings, you can see that the above mailers are highlighted separately.
Setting up any box on the iPhone, including setting gmail on iPhone starts with "Settings" => "Mail" => "Accounts" ... Must click "Add account" and select the required mailbox At this stage, you will need a username, an e-mail address, a password from it and a description of the mailbox.

After all the data has been entered, click "Further"
, the mailbox will connect automatically. Setting up Russian-language mail servers is done in a similar way.
Automatically set up mail on iPad
To synchronize an e-mail box in automatic mode on other devices, the scenario is different from the previous one.
If the e-mail is synchronized on the iPad, then at the next stage you will need to enter the phone number for this gadget. The phone must support 3G. You will also need a cellular data system number. You can find it out by going to the section "Settings" their postal service. The information will be in the " General "=>" Details "=>" Cellular data transmission system number " .
Then you need to choose a service provider. If the telecom provider is not indicated in the list, you will need to send a link to your e-mail box, which is tied to a phone number.
After that, you need to enter the password for the e-mail box. Then the inscription appears "Confirmed" and you can press "Ready" .
Additional mail settings
To use the e-mail box as comfortable as possible, after installation, you can continue to configure the program. Using the Drawer Behavior section, you can configure the correspondence of folders in a drawer on an iPhone to folders on a server. The section "Where to move unnecessary messages" will allow you to create a move to the "Trash" or "Archive" folder. In order not to clog the e-mail box with deleted messages, you can ensure their complete destruction after a selected period of time.
It is best if messages are sent over a secure protocol. This will require enabling SSL. In addition to password authentication, you can also use NTLM, MD5 Challenge response, HTTP MD5 Digest.
Additionally, you can synchronize the server port, path prefix and encryption standard. After securing the last option, all messages will be sent encrypted, so the recipient must have a digital certificate.
How to delete an email account
To delete e-mail from the phone, you need to use the same algorithm as with the synchronization of the mailbox. That is, log in through "Settings" => "Mail" => "Accounts" ... After selecting the entry you need to delete, you need to click on it. Going to the next window, click "Remove Account" => "Remove from iPhone" .
After receiving confirmation, the entry will be deleted from the phone, messages will stop coming.
Setting up mail on iPhone is really easy. Especially if it is mail from the mail provider Mail.ru. Carefully repeat each step of our instructions, and in a few minutes you will be able to receive emails directly to your smartphone.
How to set up / install Mail.ru mail on iPhone
1. First of all, we will need to go to the menu item " Settings"

3. As shown by the arrow in the figure, press the " Add"

4. In the window that appears, there are no preferable settings for "Mail.ru" mail, so you have to add it yourself. Scroll down the page and click on the " Other"

5. Then go to the " New account"

6. When creating a new account you have to fill in only 4 fields with the following names:
- Name- here we enter any account name you like
- The address- you need to enter the email address of the mailbox that you registered earlier.
- Password- enter the password from your email address
- Description- in this field you can enter a description of your account convenient for you

7. If you entered everything correctly, your Mail.ru mailbox will work immediately. It remains only to click on the icon Mail and check incoming emails.

Conclusion:
Setting up Mail.ru mail on iPhone will take you no more than 5 minutes of free time. Instructions for setting up, checked several times. If something doesn't work out for you, ask questions.
Stay with us.
A mobile device should be comfortable and useful. And how can you do without fast and convenient mail? Achieving the interaction of the iPhone with the desired mailbox will allow its competent setting.
Not sure how to create and add a new email? In this article, we will tell you how to set up mail on iPhone (5, 6, 7, 8, X): Yandex, Rambler, Outlook, Mail.ru, Gmail and any other mailbox.
How to set up Gmail (Google) mail on iPhone 5, 6, 7, 8, X
Integration with Google is easier to do than with others. Those who limit themselves to this service will have the least hassle, because everything will happen almost instantly. Here's what you need to do to set up mail on iPhone to the owners of this mailbox:
1. Select the "Mail" icon on the smartphone desktop (if mail is the first one).
2. Select "Google".
3. Enter the mailbox address and password.

That's the whole uncomplicated process. Additionally, you can specify your name and add a description, this can make using mail on iPhone more comfortable. It remains only to save the result. It couldn't be easier.
Setting up Yandex mail on iPhone 5, 6, 7, 8, X
This inconvenience has already been corrected in new iOS, but users with older devices remain at a disadvantage. In this case, everything will be a little more complicated, but you will not have to face anything really difficult. All that an iPhone user needs to do to integrate with the service:
1. Select "Settings".
2. Click on "Accounts and Passwords".
3. Select "Add Account".
4. Click "Other".
5. Select "New Account".
6. Enter your e-mail and password.
7. Change the IMAP protocol to POP.
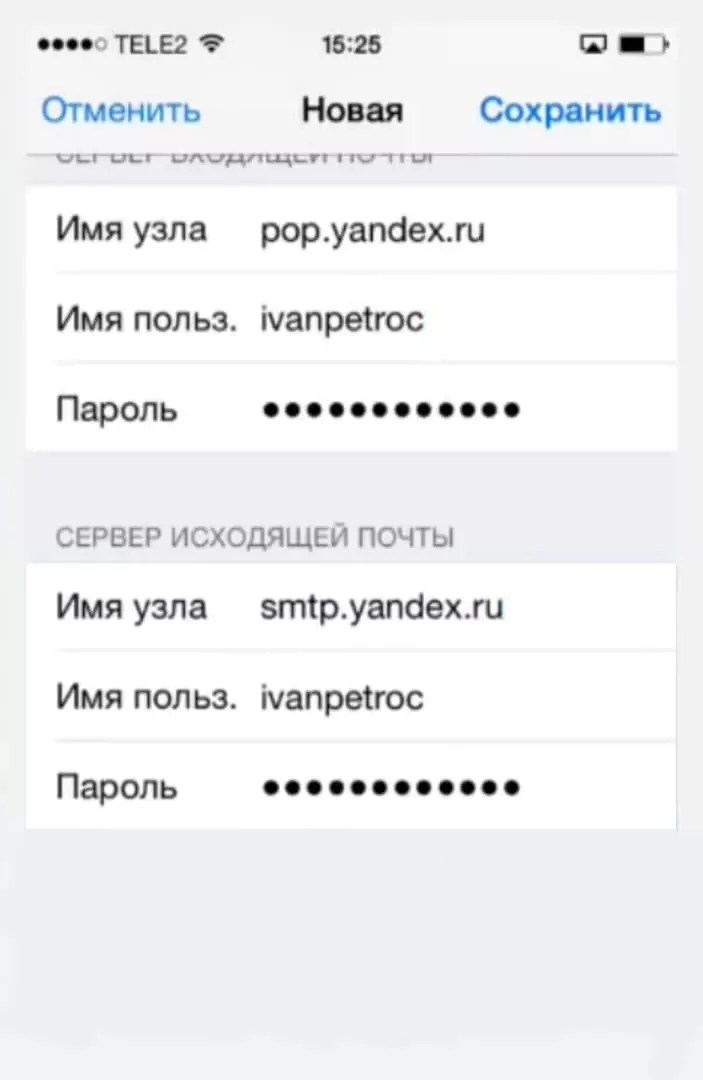
- In the section "Incoming mail server", in the line host name we write: "pop.yandex.ru" and in the section "Username" we erase everything up to and including the dog.
- In the "Outgoing mail server" section, in the line host name we write: "smtp.yandex.ru" and in the "Username" section we erase everything up to and including the dog.


Setting up Mail, Rambler and other Russian-language mail on iPhone
In older versions of iOS, Russian postal services are not available by default. Therefore, as with Yandex, you will have to make more efforts to integrate in comparison with Google.
We will consider the three most popular Russian-language mails available for iPhone. Rest Russian services will integrate with the iPhone in the same way as Yandex, Mail.ru and Rambler. The only difference from popular foreign counterparts is that you have to enter the data yourself.
Mail.ru mail settings
When adding an account for this service, you will have to do almost everything the same as with Yandex. The only difference is in the names of the nodes of outgoing and incoming correspondence.
This is how the outgoing mail hostname should look like: smtp.mail.ru. The name of the host of incoming letters should be made like this: pop3.mail.ru. Now the service is ready to work, and the user only needs to save the result.

Rambler Mail Setup
Ideally, when using this service, all data should be registered automatically, but there are times when this does not happen. It is easy to enter them yourself. The algorithm of actions is the same.
It is necessary to change the names of the nodes. In this case, for the server of incoming letters, this name will look like this: pop.rambler.ru. The hostname for the outgoing mail server will be smtp.rambler.ru.
For the Rambler service, you can also use the IMAP protocol. It is more difficult to set up than POP3, but it has whole line pluses. Help articles of the service will help you to activate the protocol.
Adding a second email on iPhone
Very often, people start using not one, but several mailboxes on the iPhone to achieve greater convenience. For example, one mail can be used for Twitch and YouTube mailings, for games and other entertainment industry. The other can be working and limited only business letters and invitations. I think you understand the essence of the message, so let's look at how to connect a second mail on an iPhone.
1. To get started, go to "Settings" and find the section "Accounts and Passwords" (the name may be different, depending on the version of iOS).
2. Select the "Add Account" tab.
3. Now, just repeat all the steps described in the previous step.


Important: the second mail will be located under the first and in order to go to it, you will need to scroll down the page.
How to find out your mail settings through the Apple website
In order to find out what the mail settings are, you can simply use the Apple website. To do this, do the following (or just go to):
1. Select "Support".
2. Click iPhone.
3. Scroll down the page and select the Programs tab.
4. Click Mail.
5. Tap Search for Mail settings.
6. Enter your mailbox address.

As a result, the user will receive the Mail program settings. It is comfortable and quick way, which allows you to easily find out which mailboxes have already been integrated, how filters are configured, and so on.
How to set up mail on iPhone, making it more convenient?
With the integration and basic settings, everything is clear. But it's important to know how to set up the rest as well. To achieve convenience and save time, attention should be paid to, among other things, the following aspects:
- Incoming letters;
- Outgoing letters;
- Spam;
- Drafts;
- Profile settings.
How to organize and sort a large number of incoming emails?
It is convenient to organize message groups by topic. This will significantly save time and add convenience. This can be done in several mailboxes at once using the Mail program. Here's what to do:
1. Click on "Settings".
2. Select "Mail".
3. Click on "Processing themes".
You can select Collapse Read, Sort By Topic, End Topics, or Last Letter Above. Which of all this is more convenient? Depends solely on the priorities of the user.
It is convenient to reply to messages if they are all sorted into groups. IN otherwise, the user runs the risk of getting confused and sending the message to the wrong place. This is especially true for business people.
Configuring email notifications
It is important to configure notifications about replies to letters. To do this, through the "Settings" you need to go to "Notifications", and then to "Mail". There you can configure the "Notify me" function.
In our previous articles, you learned how to create mail on your iPhone, and if not yet, then you. This article will be useful to those who have already set up mail for themselves, and then suddenly remembered that he has two, or eight, whoever likes it. And so let's get started ...
Set up multiple mailboxes on iPhone
Since you are already experienced gurus in setting up mail, we will not dwell on trifles and immediately go to the menu item "Settings" -> "Mail, addresses, calendars", there we see the account we have already created, do not touch it, but click "Add ".
Next, we follow the usual instructions for setting up mail, who forgot how, and repeat. After we have added the second account, we need to go into each and check that they are both active, as shown in the figure.

Then we exit the settings and go to our mail.

There we already see several mailboxes, each with a separate Inbox. In the same way, you can configure as many mailboxes as you like. The number above the "Mail" button will notify you of the arrival of new letters, thus regularly checking your mail will be as easy for you as receiving SMS. Any questions you are interested in setting up mail can ask us, we will solve your problem together.