How to make a homemade compass at home. Production of a homemade compass when survival in an extreme situation, homemade compass from needles, pins and razors
Magnetic compass - a strategically important thing in tourist campaign, Moreover, in emergency survival. That is why you need to know how in the conditions of wildlife, for example, in the forest, make a homemade compass, using only scribe materials: you can never be sure that all the necessary equipment will be at hand in a difficult moment.
The easiest compass from the girlfriend - here the needle plays the role of arrows, and the plug and water are needed in order for the "arrow" itself practically did not experience resistance.
On the Internet and some survival textbooks describe how to create a self-made compass, however, a careful analysis of this information revealed in them a lot of inaccuracies, delusions and frank nonsense. Therefore, I propose to consider not only how the compass can be made, but also to understand numerous delusions associated with this very popular topic.
How to make a homemade compass
Speaking about the design of a self-made compass, one could simply bring the algorithm for its creation and to complete. However, it seems to me, despite the simplicity of this approach, it limits the reader in diversity and forces it to look at the question narrowly, eliminating the possibility of improvisation in a situation where it will be necessary to make a compass with your own hands.
In this regard, I propose to consider not a specific algorithm for creating a compass, and its stages that could be told in more detail, having understood in their essence and intricacies, and thereby completely revealing their potential.
So, the whole process of creating a compass is divided into several stages:
- At the very beginning, the item is searching to perform the role of arrows.
- In the second stage there is a magnetization of this subject.
- Then the self-made arrow of the compass provides the conditions for the smallest friction so that it can turn around, locating along the power lines magnetic field Earth and indicate the direction for magnetic north and south.
If necessary, protection from wind is used for correct operation of the arrows, because it is most likely not to work with such a compass, but in nature, where windy weather is the norm.
By the way, one of the first compasses appeared in Europe was a magnetized arrow floating on a plug in a vessel with water.
Material for Compass Arrow
To create a primitive navigation tool, which is a magnetic compass, you need to have an item from a ferromagnet - a material that is able to have magnetic properties in the absence of an external magnetic field. Such material is easy to determine, bringing a permanent magnet to it - ferromagnets will be easily magnifying.
In fact, diamagnetics can interact with the magnetic field, but for this you need to create a very strong magnetic field. For example, an experiment is well known where a frog levitizes in a magnetic field. It is shown in the video:
Famous "household" ferromagnets include basically products from iron and its alloys. Such objects like a nail, steel knife and scissors, safety pin, sewing needle And the fishing hook is all products from ferromagnets, and all of them are suitable for homemade arrow.
The most convenient of them will be those that have a smaller mass and size. This will be quite obvious when we consider the following stages.
However, in the absence of a miniature "arrows", it is quite possible to use more cumbersome options.
Considering the next stages, for example, we imagine that a sewing needle was chosen as a magnetic arrow - the most popular version of the arrows for a homemade compass.
Magnetizing improvised arrows
To the needle - the future arrow of the compass - turned in the magnetic field of the Earth, it must be namagnichene.
Often, ferromagnetic items used as an arrow can already be magnetized.
It is with that, as it seems to me that most delusions are connected, where people believe that they could make the subject, applying the methods completely unsuitable for this. For example, try to magnetize the needle, rubbing her hair. In other words, in this case there is a mistake in determining causal relationships.
IN field conditions Check, the item is magnetized or not, just enough: you need to make a compass from it and see whether the arrow turns. About how this is done, we will tell further.
At the same time, it is necessary after the "arrows" to turn it into one direction, then to another. If such an arrow is constantly returning to the same position, it means it is namagnichene and additionally make it not necessarily. By the way, the level of compass made in production is checked in the same way.
If the arrow was not namagnichene, then it can be magnetized in two ways.
Method number 1 - with a magnet. This is the easiest and fastest way.
To do this, it is enough to put an arrow next to the magnet. In wild conditions, it is often offered to remove a magnet from the speakers of headphones or telephone. However, as for me, it is irrational: the phone can still come in handy. Everything is much easier: enough arrow put on the phone itself or a radio, so that it is magnetized, but it is even easier to put it on a steel knife, which, as a rule, has magnetic properties.
For a long time to keep the arrow near such a magnet, you do not need: usually enough a few seconds.
The definition of the sides of the improvised arrow occurs empirically by the stars or the sun. That is, the sides of the light are determined by the luminas, and then it is determined which part of the arrow where it shows. And we were told on how to determine the side of the world on the sun and the stars here (orienteering through the Sun) and here (orientation on the polar star).
Method number 2 - with the help of coil and current. This method is more complicated and requires an isolated wire and current source.
In this method, an insulated wire is wedged around the needle in the form of a coil in one layer. If the wire turned out to be uninsulated, then the needle can be covered with dry toilet paper or piece of polyethylene to isolate it from contact with the wire, and the turns do so that they do not come into contact with each other.
Through the coil is skipped electricityAs a result, inside the coil arises a magnetic field, and the needle becomes the core of this electromagnet.
Where to take electricity for this method? Everything is simple: Most often, a battery from a flashlight or a battery from a phone is as a source of power supply in the wilderness, although there are other sources. The main thing is that the current is permanent, and not alternating, that is, the socket without additional schemes that level the electric current is not suitable for this.
To determine which side of the needle shows north, you can use the method proposed in the first method. However, there is another option.
To do this, we need to recall the physics and the rule of the bull. With regard to this case, focusing on this rule, it can be said that the Brascover will move to the other side where the improvised arrow will have the northern end. It is this end of the arrow will show in the direction on the northern magnetic pole of the Earth.
Now that the bulk of the work has been done, it remains for small - to give the opportunity to rotate easily. To do this, it is necessary to secure it correctly.
How to fix the arrow in the compass
In fact, in contrast to factory models, some special way to mount the arrow is not at all necessary. Usually, to reduce friction, the needle is either put on the water, or suspended on a thin thread or fishing line. But here there are nuances that we will talk about.
For an option with water, you can use puddle or other natural reservoirs. But in the second case, the needle loss due to its drowning arises.
Also good options are tanks, for example, plastic plate Or an aluminum bowler in which you can pour water and lower the needle on it. In this case, it is important to ensure that the dishes do not have ferromagnetic parts. For example, the pot can be steel handles, causing changes in the readings of the self-made compass.
The photo below shows a disposable plastic plate with water, in which the needle swims, fixed on a piece of waterproof fabric - this is the compass of their primary materials:

A good option for the "water" compass - polyethylene, placed in the recess in the ground or sand and filled with water.
It is necessary to ensure that the surface of the water remains clean, because the film formed by any substances or microscopic alive organisms can also effectively affect the work of the self-made compass, without giving the opportunity to rotate the arrow.
If the needle is very small and, accordingly, light, then it can be slowly putting on the water - and it will remain afloat at the expense of the forces of the surface tension. For this, it is important that before the needle turns out to be in water, its surface remained dry.
However, it will not be possible to keep the Gypsy needle on the water in this way because of its large mass. Therefore, such a needle can be put on a sheet of wood or shrub, or to push into a hollow dry stem of some plant with sufficient buoyancy to keep the needle on the surface of the water.
Also, a piece of foamwork, a plastic tube from a bottle and many other lightweight materials that do not cause magnetic deviations that we told in detail here (magnetic compass) were told about the needle.
It is important that during the measurements of the needle on the "ship" failed the walls of the vessel or the "shores" of the puddles, because in this case the friction will not give a needle to rotate freely.
Thus, due to the water, it is possible to achieve the smallest resistance, and the needle itself turns and points to the north and south, even being weakly magnetized.
If you plan to hang a needle on a thread, then you can make a running simple knot on a thread, which will be additionally tightened under the weight of the needle, without giving it hard to slip. At the same time, hang the needle is needed about the middle with a little displacement towards the ear, that is, more hard parts. The exact location of the fastening of the thread to the needle is generated by an experimental way.
By the way, instead of a thread or fishing line, a long human hair is quite suitable. I managed to achieve good results using this particular material. The video shows how to do it:
In order for the needle to slightly slipped out of the loop, I wrapped it with two and three layers toilet paper. In addition, this option due to sailing allows the arrow to "calm down" faster, which significantly speeds up work with the compass.
It is very important for this option to use as thin and long thread or fishing line as possible, since only in this case it will be possible to sufficiently minimize the effect of twisting the material that can cause a large error in measurements.
From these two options with water, rightfully can be called the best, since it is it that gives minimal errors and allows the improvised arrow to quickly stabilize.
So we reviewed the device of the simplest magnetic compass. However, in this version, the compass will be able to work mainly only at home: in nature, the design of the homemade compass will have to be supplemented with windproof. It is especially important for the compass using the arrow mounting scheme.
Wind protection
Most often, a plastic transparent bottle is proposed as a windproof. Such an option, as for me, is not very convenient for no "water", nor for the "native" compass. In the first case, the needle will be difficult to keep in the center of volume, and it can come into contact with the walls, which, as you remember, leads to errors in measurements. In the second case, due to the too short thread on the needle, the forces associated with the thread resistance to twist will act, which will also negatively affect the testimony.
As a windproof personally, I would personally offer natural shelters combined with additional wind protection with your own body. Also, the aluminum bowler is perfectly coping with, representing both water containers and wind protection. However, this option is effective only for the "water" compass. For a needle on a thread, you can use a carimat, twisting it into a tuber and putting it vertically: thus it turns out good protection against wind with a sufficiently long thread, to which the needle is suspended.
If the carimat, polyethylene or other materials for creating an artificial windproof is not available, the area does not have natural shelters, and the weather leaves much to be desired, then you need to use what is, or wait when the weather subsides or clears out to go to the orientation methods on heavenly luminaries.
And now, as promised, we will analyze the most common delusions associated with this topic.
Misconceptions and their refutations
As a source of the most popular delusions, I chose a well-known book on the survival "Book, which will save you the life" of an equally well-known Soviet tourist-extremal Andrei Aleksandrovich Ilina. Who knows, perhaps it was she who caused the people of myths spreading and consolidated in the minds.
So, consider the "magnificent seven" the most common myths associated with the design of a self-made compass.
DISCUSLATION # 1. When building a self-made magnetic compass, you can use a needle as an axis for an arrow, which must be stuck in the base of the compass.
Discover: in the compass design there should be no ferromagnetic elements except the arrow itself. Otherwise, distortions arise in the compass testimony associated with magnetic deviations.
Conception number 2. In order to magnetize the needle in the coil through which the electric current flows, you need to spend at least 10 minutes.
Denial: Experience has shown that there is no more than 5-10 seconds to magnetize the needle. At the same time, in order to join the needle and change its poles to the opposite, not more than 10 seconds. It is not only possible to spend extra time, but it is harmful, because in addition to temporary losses, the power supply is discharged, which could be consolidated for other purposes, for example, for burning fire.
Dogulation number 3. The northern end of the magnetized needle the needle will be the end, from which the negative battery terminal was supplied.
Refutation: The northern end of the needle is determined by the Rule of the Brasser, also known, as a rule right hand. And according to this rule, the Northern End will be the one, from which a negative terminal was connected: the direction of the winding turns will also play the role.
DISCUSLATION № 4. To the needle lay on the water, held by the forces of the surface tension, it must be lost on the hair or between the fingers.
Revitalization: Even completely skimmed with ethanol needle will be held on the surface of the water. If her mass is too large for this, as in the case of a gypsy needle, then no friction about hair and skin will help the cause.
Conclusion number 5. Cannot be used for a homemade compass Metal containers.
Discover: The point is not whether the dishes are metallic, and whether the material from which the dishes are made, ferromagnet. Thus, it is possible to use metal dishes. For example, neither aluminum, nor magnesium nor copper, which, in essence, are not ferromagnets, and para- and diamagnets, will not affect the accuracy of measurements of the homemade compass.
Discussion number 6. You can not use salty water.
Discover: on the readings of the homemade compass, the presence of salt in water does not have a noticeable influence. This is also easy to make sure that herself spent its own experiment with salt water and magnetized needle.
It is also worth telling about one very common misconception, which is not directly related to the book mentioned, but firmly rooted in the heads of many tourists and survivalors.
Conception number 7. Magnify the needle, losing it about the hair or a woolen product.
Refutation: Magnetize this way the metal needle does not work out, which is easy to make sure that the experiment.
Other types of homemade compasses
Of course, in addition to the magnetic compass, you can independently do other types of compasses. For example, on the Internet you can find schemes and instructions for the manufacture of digital and electronic compasses.
However, for such designs, "straight" hands and special details are needed. And if a person can be right with straight hands, then details, such as a magnetometer, in the wild, can hardly be found.
Such compasses are conveniently made at home in the presence of all necessary parts and tools, but not in the hike, and even more so in emergency conditions. Here, the model of a magnetic compass, on which we made an emphasis, stands at first place.
Summing up the foregoing, it can be argued that the most simple and use of the self-made compass model will be a sewing needle or a fishing hook, magnetized from contact with a knife and lowered to aquatic surface. It is this option that will give the most accurate and "fast" testimony, including due to the fact that it is much easier to protect such a design from the wind than in the case of a suspended arrow. Yes, and repair, as such, this compass is not required, because there is nothing to break here.
If you wish, you can try to supply the homemade compass scale, but I do not see much sense in this, because approximate angles can be determined without special scales and tools.
It can also be adopted by the idea before each campaign to magnetize needles and hooks, which will be taken with them among Remkomplekt, fishing gear and Naz. To do this, it is enough to put for a few seconds on a permanent magnet. Such simple actions will help to give needles and hooks another feature, and the multifunctionality of equipment is one of the fundamental principles of the backpack configuration for distant hiking.
However, it is necessary to understand that the homemade compass is only an extreme measure: it is very uncomfortable in operation compared to the "real", released in the factory. therefore right choices It will be used to buy a ready-made compass, and the magnetized needles and hooks leave only in the extreme case when the trouble found out the surprise, and the compass was purchased nearby.
It happens that it is necessary to know exactly what side is the south, and in which the north. At home, it can be useful when setting up an antenna, and travelers without such knowledge, especially in wildlife conditions, do not do at all. Of course, the easiest way to use the usual compass. And what if it is not at hand? How to make a compass at home and in nature? It turns out that it is very simple. You will not need special devices - only the fool's materials that every home have, or easily get them in the forest.
How to make a compass at home
1. In order to make an indispensable attribute of the tourist, need a needle, a small piece of foam rubber and a mug with water. For a start, you should take the foam rubber, about 3x3 centimeters. It will take us that the needle keeps on the water and not tone. Porolon piercing the needle in the center and put simple design in a mug with water.
2. In order for it to become a real compass, it remains to magnify one needle tip. Find a magnet in the apartment is very simple. It is in the headset, holding the door or in the dynamics of the music center. To demagnetize the needle, it is enough to bring one of her tip to gas burner. And hold over the fire for 20 seconds. Thus, the magnetized tip of the needle will show us the north, the molded edge will tell you where the south. We again put our design into the water.
3. To understand where the north is located, and where the south, stand up the face of the needle. Remember, at which window in the morning you have the sun (it will be the East), respectively, the sun sits down in the opposite side - this is the West. Now stand up the needle in such a way that the East is to the left, and the West is right. So you will face south, and back to the north.

Outdoors
Sometimes in the campaign, for example, in the forest, it is important to know the exact direction of the path so as not to get lost. It turns out, to understand where the north, and where the south is also easy to use the remedies. Consider two options of how to create your compass in extreme conditions.
1. For the first option, you need to find something metallic. Suitable any nail, wire or needle. To magnify our arrow, it is enough to lose it about the hair. Next, nails must be tied to a thread or fishing line and hang on a static surface (for example, a tree branch). It is important that the length of the thread is at least 40 centimeters, otherwise the result will be inaccurate. Now the arrow will definitely show the magnetized end to the north. How to determine the rest of the directions you already know.
2. For the second option, you need a bowl with water. Magnetize one end of the arrow and put in a bowl, putting on a piece of the bark. The arrow will surely tell you where the north is located.

So now you know how to make a compass in any situation. This procedure does not take much time at least in conditions modern apartment, even in the dense forest. Enough to show a little smeezhalka, find suitable materials, with your own hands to create a simple device, and you will always know for sure in which direction should move. Now you are not afraid of any trouble in the journey.
In the event of a compass breakdown, it is easiest to remove the compass arrow from it and make a homemade compass taping the arrow on the edge of the vertically assigned needle. Then wait when it turns out in the North-South line. But in this case it will be very difficult to navigate in a degrees. Therefore, it is advisable to save not only the arrow of the compass who has become unusable, but also the scale that can be used with the help of the thread or resin to the flat piece of the cortex or foam.
In the center of the improvised homemade compass, the ear must be plugged with a small needle or acute, dry fish bone to which put on the arrow. The main inconvenience of such a compass is that after each use, the arrow has to be removed from the axis and securely hide.
To use the homemade compass constantly, you need it working surface Close the protective glass. To do this, in the crust or foam, cut a recess, a diameter greater than 1-2 mm, the length of the arrow with such a calculation so that the arrow illuminated on the axis is 0.5-1 mm below the scale of the scale. This is necessary in order for the arrow on one side to be clung to the scale during rotation. On the other hand, it did not slow down the protective glass with a protective glass. The working plane is closed by a fragment of any glass planted on the resin. Or is delayed by a transparent polyethylene filmwhich is fixed on the edge of the compass using a circular thread or gum.
The film will protect the homemade compass from the water, wind and at the same time will not give the opportunity to jump from the axis. The role of the brake can perform a thread or a thin gum, stretched over the film, and a piece of cork, foam, cortex, gum, leafing into the center of arrows attached under it.
Homemade compass made of steel needle or pins.
In addition, steel needles and pins can help navigate in light frames. To do this, before going around, all the needles and pins should be magnetized, jogging for several tens of minutes to any existing magnet, and verifying with the workers, mark the northern end of the paint. In emergency conditions, it is possible for this purpose to use a magnet in the dynamics of any portable receiver. In the headphones of the audio player or try to magnetize the needle with the help of electricity.
To do this, you need to have a power source (battery, battery, battery from a powerful calculator or another portable electronic device, lantern-bug, etc.) with a voltage of at least 2 volts (some sources indicate 6 volts), as well as a piece of wire in isolation . When working with lacquer isolation, maximum caution should be observed, as it is easily damaged. If the wire is naked, then the needle before magnetization should be wrapped in several layers of dry paper, plastic film or other insulating material.

The wire is wound with turns around the needle and joins the battery terminals for no less than 10 minutes. At the same time, we must try to turn the turns as much as possible. The northern end of the magnetized needle will be the one where the wire is suited from the negative battery terminal. In case of doubt, the northern end of the arrow can be determined by referring it along the polar star. If necessary, the magnetized needle or "sting" of a broken pins is enough to lose between the fingers or hair and carefully to put on the surface of calm water. Holded by the forces of the surface tension, the needle will gradually unfold in the North-South line.
If the needle is sinking, it should be additionally graspted by any food or technical oil and omitted on the surface of water on two filament loops. Thicker needles and pins to give them extra buoyancy can be plugged into a piece of cork, bark, foam, straw or two or three matches and also omitted. You can have a needle to completely shove in the straw. I remember that I look at the northern end. Finally, you can neatly put on a piece of paper or a sheet of a tree, floating on the surface of the water. Or simply hang on a thin thread, tightening at the point of equilibrium of a small loop, or stuck in the knot in advance.


Remember that the containers used for water in such primitive compasses should not be non-metal, but from glass, plastic, wood. Or the like non-magnetic materials. The proximity of the metal distorts the testimony of the magnetic arrow. And the water itself must be unsalted.
Homemade compass made of safe razor blade.
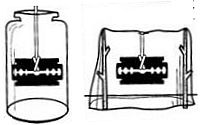
In addition to the needles and pins, you can use a safe razor blade or half a half as a compass arrows. Pre-magnetized and suspended with a thin thread or stuck in the bark of a tree floating on the surface of the water. The thread on which the blade will hang, you should use only single, as the double, passed through the central hole and retained for both ends, will prevent the free cutting of the blade!

In emergency conditions, it is possible to magnetize the razor blades using magnets in the speakers and headphones of radio and radio and radio tape recorder described above the electrical support. As a last resort, you need to put the blade perpendicularly revealed palm and spend several times on the skin back and forth. Or in the same way through the hair. True, there is enough such electrostatic magnetization very briefly. And his power is not so great to expand the cork float on the water. But here to scroll on the thread, it is enough.
Working with shaving blades is complicated by the fact that, unlike needles, they have a significant area and therefore a very sensitive react to any breeze blow, any movement and even human breathing. Without providing a magnetic blade absolute peace in a place protected from drafts, it is impossible to expect a reliable measurement result from it. Therefore, hang such a homemade compass is better in glass bank or plastic bottle With a sliced \u200b\u200bneck, either in a stretched spicy in the position upside down with a polyethylene bag, skipping the thread through a small, cutting down in the bottom of the hole.
For more accurate measurements from a piece of bark or soft tree You can try to make a "liquid" homemade compass. For this, as described earlier, cut the container - the deepening in the form of the right circle, in the center of which to stick the axis. On the circumference of the "glass" of the compass cut a degree screen or paste the scale drawn on paper, cardboard, fabric.
For the convenience of execution, the scale is better to split into larger Rumba. In the "glass" of the compass, pour water to the surface of which, slightly naked on the axis, omit a piece of cortex, corks, foam with a magnetic needle stuck into it. In the absence of a compass and the full impossibility of its manufacture, refers to methods for determining the parties to the light, for example, on the stars.
Based on the book "School of Survival in Natural Conditions".
Andrei Ilyin.
We will need:
Any capacity, except for metal, filled with water (metal will not fit, as they will distort the magnetic field).
In order to make a compass, we take a floating material and cut the needle platform from it. The main parameters are a piece of the less, the better, but the needle should not be above the surface of the water.
As you already understood, the needle performs the role of arrows. In order for using our homemade compass, it was possible to determine the parties of the world, one end of the needle must be magnetized. If there are magnets at hand (they are present in the speakers, the receiver, in the electric motors, etc.), then you can magnetize the needle-arrow with their help. If there are no magnets, you can simply hold one end of the needle over the flame for 25-35 seconds, after which this tip will be modified. So, the arrow is ready. Its the magnetized end will be the pointer to the server, and the ridiculous south.
Fresh needle arrow to float. It is most convenient to gently pierce the float with a needle along the symmetry axis (if the float is volumetric). Such a fastening is simple and at the same time reliable. Next, we place the float with a needle into a container with water so that they do not touch the walls of the vessel. Compass with your own hands, it remains to calibrate it.
If you know which tip of your needle was magnetized, and what is not, you can immediately judge where the north on the position of the magnetized tip is located. If you do not know, it is possible to determine where the north and south will help you such facts: the place where the sun is boiling and where it comes (the sunrise-east, the west of the West) or the position of the polar star. Using these signs, you can easily calibrate your homemade compass.
Sometimes in addition to the needle, there is no floating material at hand. In this case, for the manufacture of a compass, you can disrupt any piece of leaf that can keep the needle over the water. Again, the less it will be in size the better.
Made a similar compass, but at home.
one). The sharp end of the sewing needle of the Potcher about the magnet.
2). He pushed the needle through a wide cork from the bottle (from the thermos) so that it came out from the sides, and not from the cork ends.
3). I lowered the cork with a needle into the water with water so that it does not touch the walls of the precision.
In the forest you can use puddle with water.
The plug has become a kind of float in water and it turned out that the sharp end of the needle began to point to the north.
I also tried to make a similar water and a magnet.
one). Sharp end needle artificial fabric From clothes on which there are static.
2). To the center of the needle tied a thread so that the needle hung exactly - none of the ends out of the other.
3). I lowered the thread with a needle to the jar (there may be a wind on the street).
The result is the same - the sharp end of the needle began to point to the north.
In an emergency, it is possible to navigate the terrain without a compass. For example:
In a clear night of the stars (polar star for the northern hemisphere, the southern cross for the southern hemisphere).
Moss grows on tree trunks, stones, stones on the north.
Crown of trees lush from the south side.
Snow in spring does not melt long on the northern side of the slopes of ravines, trees, large stones, any items of creating a shadow.
Via watchmakers with arrows on a sunny day. Watch the hour arrow towards the sun. Split an angle formed between the clockwise and the number 1 in half and this line will be a direction pointer to the south. The only condition is this angle should be less than 90 degrees.
And of course, you can build a primitive compass from undergraduate materials. For its manufacture, you will need a steel item (sewing needle, nail, screw or a piece of wire) and any floating object in water in which you can stick or attach a piece of steel to it (a piece of foam, cardboard paper sheets or a trimmed with wood, cork tube from Bottles of wine or thermos, pinch Finally, and of course, water container (not steel) in which it is necessary to place the steel item attached to a floating object with such a condition so that they do not drown together. Floating steel item is oriented by the South-North direction. The meaning of all this The fact that steel objects have a weak magnetization from the magnetic field of the Earth, sufficient for use as a primitive compass. The only difficulty that may occur is what end shows to the north, and what - south. In this case, can help the day only the sun, At night - stars or moon.
A small steel needle can be forced to swim on the surface of the water at all on their own. To do this, it needs to be a little rubbed with his fingers (the greater thumbnails, the better) and gently put on the surface of the water. With due accurate accuracy of this procedure, it will float the water tension held by the surface tension.

Children's compass shows that the tip of the needle is directed toward the south. With a needle, no manipulations were made (such as magnetized with a magnet or heat the tip).