Do-it-yourself candle at home. How to make beautiful candles at home
This post-instruction is for those who prefer really nice-smelling candles to the chemistry that is sold in our stores. Of course, there are manufacturers who add really natural oils to their products, but these candles are very expensive. So if you have a desire to tinker a little and try yourself in candle making, there is patience and, of course, free time, this post is just for you.
Ingredients
I will try to give you as concise and clear instructions for the manufacture of scented candles.
You will need:
- wax or paraffin (old candles can be used);
— essential oils of your choice;
- lace;
- scissors;
- small glass jars into which candles will be poured;
- heat-resistant ware for melting wax;
- a special thermometer for measuring the temperature of molten wax (optional);
- a thin wooden stick;
- tape measure or ruler;
— cutting board;
- nut for holding the cord.
Manufacturing
1. Wash and dry the containers in which you are going to pour candles. These can be small glass jars, tall glasses different shapes, ceramic or porcelain cups.
2. Cover work surface baking paper. Since the wax will be soft, it can stick to the table and be difficult to remove.
3. Break a block of wax or an old candle into small pieces - this will melt faster.
4. Now you need to prepare the candle wick - make a "seed". This will ensure that the wick matches the color of the candle, burns more slowly, and is easier to install. So, first you need to melt the wax! Pour a small amount of small pieces of wax or paraffin into a bowl and place in a water bath. When the wax melts, place the wick of the desired length in there for 20-30 seconds. Then remove from the bowl with tweezers and place on baking paper. Straighten the wick, align it and roll it a little on the table, as if you are making a plasticine sausage. Leave to dry for 10 minutes.
5. After the wick is dry, thread it through the nut to help hold the bottom end of the wick to the bottom of the candle. It can be found either in craft stores or borrowed from tea candles.

© photo
6. Heat the wax again, add the remaining pieces there and melt. Then add a few drops of your favorite essential oil. You can make mono scents, or you can try mixtures. For example, a few drops of cedar nut oil, a couple of drops of eucalyptus and three drops of citrus essential oil. Stir the wax well with a wooden spatula.
7. Remove wax from heat. Pour about 1/4 of the wax into an ovenproof dish.
8. Pour some wax into the prepared candlesticks, making sure that the wick is in the middle all the time. Leave to harden for 20-25 minutes. This will help keep the wick in the middle as the candle is being poured all the way.
9. Heat the remaining wax, pour it into a heat-resistant dish and fill the candles to the end.
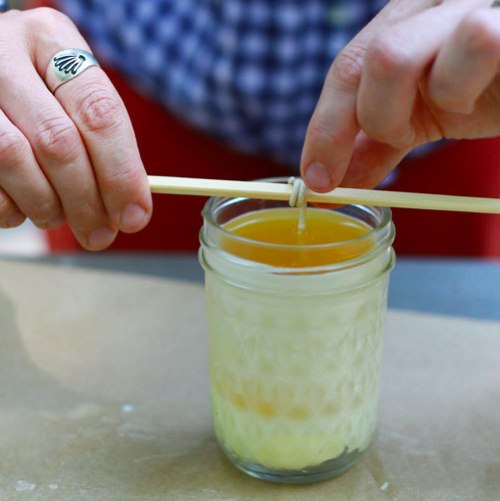
10. Gently screw the remaining top of the wick onto the wooden stick so that the tension is not very strong. Otherwise, you can pull the nut from the bottom and you will have to redo everything again. Attach the wick to a stick and place it on the edges of the candlestick so that the wick remains in the center of the candle.
© photo
11. When the candle has cooled completely, cut the wick so that a small tail, about 5 mm long, remains above the surface.
Trim the tail of the wick every time you use the candle. This is especially true for candles with glass candlesticks, which can burst from overheating if the wick is too long.
Useful Tips
V modern world candles are used more as part of the decor, decorating the interior and creating a cozier overall atmosphere. To make a candle at home, you need to know a few rules, for example, that properly made wick It has great importance, since evenness of candle burning depends on it.
It is also worth knowing that the thickness of the candle depends on the number of threads that are used in its preparation. For example, to make a candle with a thickness of 2 to 7 cm, you need to prepare 15 threads, and for a candle with a diameter of 10 cm, you need 24 threads. A candle with a diameter exceeding 10 cm needs 30 threads.
Go to the desired section:
Some useful information about candle making

Use a double boiler to melt the wax. It can be replaced electric oven. IMPORTANT: do not use glassware.
There are many types of wax, but almost all of them melt at 90 degrees Celsius.
Also it is advisable to have a thermometer nearby to help keep track of the temperature. Better to use a thermometer with a steel stem and a scale on top. It can be purchased from specialized laboratory equipment stores. A steel stem thermometer can be used to stir the wax.
Use caution if you decide to melt the wax over an open fire, as this could cause the wax to catch fire.
Use baking soda for stewing, not water. It is also worth knowing that overheated wax will start to release acrolein is a toxic by-product... Do not forget to take care of good ventilation in the room.
How to make a candle with your own hands

Prepare:
An old pan for melting paraffin;
Old bowl;
Heat-resistant forms in which future candles will be located;
Multiple wicks, which can have either paper or wire cores;
Stick;
Special holder to tighten the wick in the molten paraffin wax.
To make 3 candles, prepare:
40 g stearin powder;
400 g of granulated paraffin;
Dye to add color to the wax;
Fragrance (you can replace it with essential oil).
1. We make a base for candles:
Place a bowl in a saucepan of boiling water and pour stearic powder into it;
Wait for the stearin to melt and add 1/4 tablet of wax dye to the same bowl;
Put paraffin in a bowl and heat the water to 80C;
Stir well all the time;
After melting the whole mass, drip a few drops of essential oil or fragrance.
2. Preparing the wick
Immerse the wick in molten paraffin for 5 minutes;
Let it dry on foil.
3. We proceed directly to the manufacture of candles

Cut the wick - its length should be slightly more than the height of the mold;
Pass one end of the wick through a special holder, and clamp it with pliers, and the other must be wrapped around a stick (pencil, for example) and secured;
Lower the holder together with the wick to the bottom of the mold and start pouring in paraffin;
After you have poured paraffin to the brim, you need to put the stick on the edges of the mold in such a position that the wick is in the very center;
Wait for the mass to harden;
Cut off the wick.
4. Something special
If you want to make your candle unique, you can use your favorite flower, souvenir, or spruce twig or pine cone if the candle is for the new year. You can also depict something on the form (you can use a festive stencil).
Useful Tips
It is better to look for the wax that is usually used in the manufacture of church candles;
Use powder paints (the best option), oil-based aniline paints, or natural substances to paint the candle.
How to make a gel candle at home

When making candles, you need to be careful and follow all safety rules, especially if you want to put some kind of decoration inside the candle. Also choose the type carefully aromatic oil and dye.
Now you need to decide what kind of candle you want to cook. Gel candles are different, and are divided into several groups:
Aquariums, Terrariums and Treasure Candles;
Beer glasses and cappuccino with foam;
Coca-Cola and other cocktails;
Rainbows, swirls, fireworks and neon lights;
Canned fruit;
Ice cream and desserts;
Festive decoration.
After that you have decided on the topic, choose a suitable glass container for the candle. Alternatively, you can take a square vase, glass, jam jar or mug.

It is better to use forms that have a diameter of at least 5 centimeters (which will prevent the flame from being too close to the edges of the vessel);
Look for a transparent or colored shape (the candle will look nice);
Your mold glass must be strong.
For cooking you will need:
Flavoring agent;
Dye.
Example of a gel candle
As an example, consider preparing an aquarium candle that will contain marine decorations.

Prepare:
Candle gel (several colors possible);
Several clean decorative items that will be inside the candle and decorate it. Since the theme is marine, you can use, for example, seashells or marine-themed toys.
1. Put the gel for the candles in a water bath;
2. use a slow fire to heat the gel to 100C;

3. fix the wick with the stem at the bottom of the mold with glue so that the wick is in the middle, which will ensure best burning candles; you also need to fix the wick on top of the mold (you can use ordinary threads);
4. it's time to use decorative objects that you can, as you want to lay out on the bottom of the form - of course, all of them should not be flammable; you can put several items at the initial stage, and others a little later;
5. decorative items inside the candle should not be placed closer than 6 millimeters to the wick, and preferably closer to the walls of the mold so that they can be better seen;
6. before you start pouring the gel, it is advisable to warm up the mold, and this can be done with a hair dryer - this way you can get rid of the bubbles;
7. watch the temperature of the gel, and when you cool it down to 80-90C, you can start slowly pouring in the candle;
* the most the best option will fill with layers, i.e. first, fill in a little gel and after a while, when the gel at the bottom of the mold hardens a little, you can fill in a new layer, and so on until the mold is filled;
* you shouldn't wait long if you don't want to see the boundaries of the layers;
* if you use several colors, then you can make them smoothly overflow in the form, while you also need to wait a little until the bottom layer hardens a little, otherwise the paints will mix;
8. you can use the candle in a day.
VERY IMPORTANT

* melt the wax only in a water bath and follow the instructions of the mold or wax, as the temperature at which the wax melts depends on factors such as: the quality of the wax and the shape, as well as the type of candle you want to make;
* overheating of the wax is hazardous to health and its vapor can ignite if the temperature reaches 180C;
* for extinguishing burning wax DO NOT use water- use a rag.
* use a clean and dry form;
* the souvenirs you want to decorate the candle with must be clean and non-flammable (you can wash them with warm mineral oil).
Learn how to make candles with your own hands at a low cost and have fun.

Interest is more common among women today, but making this device is a masculine skill that can be traced back to many years. Especially in medieval times, the trade in them was vital to kingdoms and villages because light was a necessity.

Today, when candles are not carried practical value, they can add an atmosphere of comfort, coziness, romance to any room. They have a very meditative, relaxing effect, and can prompt reflection. Their main disadvantage is their rather high cost. What do you need to do on your own?
Materials: what is required for manufacturing

The process will not take you more than two hours, but the resulting products will complement your home or work interior, become good gift for loved ones.
Wax
This is the heart of the candle, of which there are three main types.
Paraffin. Traditional, used for hundreds of years to make a lamp. Now it continues to be the most common of all species. It's cheap, you can easily add color and smell to it. The main problem with paraffin remains its potentially toxic nature. Paraffin is a by-product of oil, which automatically gives it a poor performance for most consumers. If natural products are your credo, it is best to look for an alternative.

- Soy. New to the market, it is becoming an increasingly popular main ingredient. Soy was created in the 90s when the natural foods movement was gaining momentum. It is usually made from soybean oil, but sometimes it is mixed with paraffin and other wax (palm, beeswax, etc.) It also easily takes on colors and odors.
- Beeswax... Oldest crafting ingredient; candles from beeswax were found in the great pyramids of Egypt. As the name suggests, it is produced by bees and is a by-product of the honey process. Because of this, it has a natural golden color and subtle sweet aroma. This is a completely natural product, but you cannot add other flavors to it. The natural smell will overpower the rest of the aromas. Bee is also the most expensive option.

Most of the varieties sold in the store are sold in the form of pellets. This makes work easier as the granules melt faster. If you bought a block, use a sharp knife to cut it into small pieces.
Wick

The wrong wick can ruin your homemade candle. The main problem is the size, or rather the width. For container containers, which will be discussed, a wide wick is needed. The length of the wick is not important - you can trim it.
Aroma oils

Without a smell, your wax just burns. It looks pretty but doesn't create the subtle scent that candles are used for. There are thousands of scents to choose from - just search the internet. You can use essential oils, but the final product will not be as good with them. Men are better off choosing from such "masculine" scents as a mixture of cloves, amber and sandalwood, apple and maple bourbon, blue spruce, butter rum, coffee, whiskey.
Melting pot
A pan with a double bottom will do the job best. Melting directly over the flame in a regular saucepan will be too strong, so use a steam bath.
The form

Coffee mugs, glassware, jars - anything that can withstand heat is used as a container. With a lid, they can be transported, sent, so that you can easily give to loved ones.
Accessories: thermometer, spatula, old pen

With a thermometer close at hand, you can quickly measure your temperature. When you buy wax, especially the one used for making wax, it has instructions on what temperature the aroma oil is added to, when to pour it into the container, etc. Use a spatula or spoon to dilute it and dissolve large chunks. You will learn later why old pens / pencils are good helpers for homemade candles.
Workflow: how to do it?

Prepare your work area
Working with wax is a messy business. It melts, drops can go anywhere, you won't even know until it dries. Place newspaper or paper towels around your work area. Use them to set a thermometer, putty knife - be careful, they will probably stick a little. Fortunately, the wax is not that difficult to clean, you can simply scrape it off with your fingernail. Get your molds and wicks ready.
Melt the wax

Using a double-bottomed pot or water bath, melt the wax. Place about 200-300 grams, watch it melt by breaking it into pieces with a spatula and stirring it. It melts for about 10-15 minutes. Do not forget to monitor the temperature - you need to keep it between 70 - 75 degrees. If the temperature starts to rise, remove it from the heat.
Fasten the wick

While it is melting, attach the wick to the container. Rare wicks have a small sticker embedded on the bottom, but the main body doesn't. One option is super glue, but you can use an old candle trick: Dip the metal tab of the wick into the melted wax, then quickly attach it to the bottom of the container in the center. After a couple of minutes, when it hardens, the wick will fix at the bottom.
Add aroma oils, stir

When completely melted, add the desired aroma oils. Each species is different and requires a different amount per kilogram, so follow the directions on the package. Taking a block that is suitable for different purposes, remember the following proportion: 60 grams of oil per kilogram of wax. Pour it into a saucepan, stir for one minute to ensure even distribution.
Add color if desired

This step is optional. Your candles will come out natural milky white, but you can add some color using a non-toxic colored pencil or block. For example, you can add half a millimeter of red crayon to 500 grams of wax for a soft pastel shade. Want to bright color? Use more pencil.
The color will be much brighter in the melted mixture, but it will turn milky as it cools.
Let the mixture cool.

After adding the scented oil, turn off the heat and let cool for a couple of minutes. Optimum temperature for pouring into a container is about 55-60 degrees. It doesn't take long - just a few minutes, so pay attention to your thermometer. Once it has cooled properly, pour it into a container. Hold the wick so that it stays in the center, do not overtighten it. We advise you to leave a little in the pan - it will come in handy at the end.
The secret to attaching the wick

The wick attached to the bottom may swing slightly in the liquid wax at first. You definitely want it to stay level, centered, while everything solidifies. Just place the handle on top of the mold, tie a wick to it, and let it set for a few hours.
When the candle has cooled down, you will notice a slight dip at the wick. The wax will also pull away from the edges of the can. Reheat the remaining mixture in the saucepan, fill the holes that appear.
Cut the wick

You will probably have a few extra inches of the wick sticking out. A fuse that is too long will burn with too much bright flame. Light it up and check it out: if the flame is more than 2.5 centimeters, cut the thread.
Admire homemade candles
Chill the candles when room temperature to avoid cracking.
Beeswax has long been considered a valuable material, and it was not easy to get it. It was originally used to make candles, which were quite expensive. With the widespread development of beekeeping, everything has become much more accessible. However, real wax is still common only in narrow circles of beekeepers. But if you yourself or your relatives are engaged in beekeeping, it will not be difficult for you to get material to create wax candles with your own hands, which will serve as interesting decor elements or excellent gifts for loved ones.
Natural beeswax has many advantages over paraffin or gel, for example. Wax candles do not form soot when burned, do not emit carcinogens. They also contain propolis and natural essential oils, which have a beneficial effect on our body when it burns.
Among other advantages, it is worth noting that with the spread of industry and industry, urban life, people began to lose touch with nature and therefore appreciate even small news from the green world more. And candles made from natural beeswax have every right to be considered connecting link between urbanization and craft origins.

Rules for working with wax
In order to avoid force majeure that can overtake you when working with wax, remember a few simple rules:
- Always use an apron. It is desirable that it be made of thick canvas fabric.

- Do not wear revealing clothing when handling wax. It is best to wear a sweater or long-sleeved shirt to avoid scalding if hot wax gets on your body.
- The wax begins to melt at a temperature of 65o, you need to make sure that the wax does not overheat, otherwise it may ignite. This can be easily prevented by heating the material in a water bath, when the condition of the wax can be constantly monitored.
- When warming up the wax, you need to constantly be nearby, you cannot leave.
- In the event of a fire, the wax must never be extinguished with water, otherwise an explosion may occur. Always have baking soda on hand for this case.
Observing all the rules of working with wax, this activity will bring you only joy and pleasure.
Materials and preparation for work
To make original candles, you need to choose their design and color in advance, decide whether they will be scented or ordinary.
For work we need the following materials and tools:
- a pot for a water bath;
- container for melting wax;
- forms for candles. It is better to lubricate them before work. liquid soap, dishwashing detergent or vegetable oil;
- baking soda;
- wick. For wax candles, the use of natural cotton threads is recommended;
- dyes for wax. Natural wax crayons, food colors (but not water-based) are suitable, you can also use gel pigments;
- stick or pencil. It will be needed to secure the wick;
- weight for the wick;
- natural wax. It can be purchased in specialized stores in the form of foundation or granules.

Manufacturing progress
The process of making wax candles is fairly straightforward. If everything is done correctly and all the simple conditions are met, you will enjoy not only the work itself, but also the excellent result. This master class will help you navigate the choice of a product and perform it in the best possible way.
First you need to melt the wax in a water bath.
On a note! If you have purchased large pieces of material, then it is better to cut it into smaller pieces.

Next, we proceed to fixing the wick. We attach a weight to the lower end of the thread so that the future wick does not dangle when filling the mold with wax. If it is possible to make a hole in the bottom of the container, then the thread is threaded there and a knot is tied at its end; a weight is not required in this case. It is advisable to wax the thread itself. Tie the upper end of the wick to a pencil or stick, as shown in the photo:


Now you can start filling the mold with wax. We leave the wax to harden. There is no need to rush to pull the finished candle out of the mold, let it be better for it to stay in it longer.
When the product has hardened well, you can pull it out of the container by pulling on the end of the wick. This will work if a weight is attached to the wick. If the thread is attached to the form with a knot, you just need to cut it off.
If desired, you can easily and simply give the candle any color and shape. The color is created with the help of dyes, the shape can be initially chosen curly. The easiest option is to use silicone molds for baking. They are easy to use, easy to get a ready-made candle, and can be found in a large selection at any hardware store:

You can also give an unusual look to the candle using paper gluing:

It is possible to use a split form:
The option of using ice to create an openwork candle is very simple and interesting. When filling the mold with wax, pieces of ice are added to it, which then flows out through the holes, leaving an unusual ornament:

It is possible to make a magnificent rose from wax with your own hands. This does not require special skills. Making the petals themselves is not difficult. It is necessary to pour the melted wax on a saucer in a thin layer, then start wrapping the plates that are not completely frozen around the wick.

Related videos
The videos below will help you get the job of making wax candles correct and hassle-free:
The perfect way to decorate on almost any festive event – beautiful candles, how to quickly, easily do which you yourself will learn by reading detailed instructions... Today, candles in the interior can both bring aesthetic pleasure to the owners and guests of the house, and become an assistant in the event of an unexpected power outage.
Also, self-made candles can easily become an interesting gift for relatives, friends, who will certainly appreciate the work and time spent.

Someone thinks that candles are an exceptionally cute element of decor, which is really so, except for those cases when scented candles are placed in the house, because they can replace the most expensive psychotherapeutic tool, creating the right atmosphere for relaxation.

Can you make beautiful candles with your own hands?
Of course, candles are sold today in almost all souvenir shops, however, if this time you have planned to present it as a gift to a loved one, it is much more pleasant to make this piece of furniture yourself.


If you are thinking about how to make candles with your own hands, then do not worry, because the lesson only at first may seem quite difficult. With the right approach, you will quickly understand that the process of creating a candle is quite easy.

You can confirm this fact simply by contacting people who decided to start producing candles, but got involved so quickly that it became not just an additional income, but also an exciting activity. The more often you practice creating candles yourself, the better every day you will get them.

To create a candle at home, you will not need large financial costs, therefore, in addition to the pleasure that you get from the creation process, you will additionally be able to save a lot.

What materials are needed to make candles?
Really making candles at home without special materials will not work. You should prepare:
- A vessel (wax will melt in it);
- Shapes used for candles;
- A saucepan (useful during a water bath);
- Two sticks;
- Various decorative elements(this is how the candle will look original);
- Wax crayons;
- Cinders from used candles
- Paper thread


Sequence of work
First, you need to lower the prepared paper thread into the mold that you took to pour the wax / paraffin melted later. With help wooden stick, which should end up on top of your shape, you need to fix the upper end at the future wick.

Secondly, cut into small pieces of paraffin (wax), put in the prepared dish. Next, a pan with clean water you need to put on a slow fire, put a dish with wax in it and melt it. The main thing is not to forget to stir regularly so that no lumps form.

Third, pour a little bit of the previously melted wax into the mold, position the lower end of the wick right in the center. It remains to wait until all the wax thickens slightly.

Fourth, fill in the remaining wax that has been melted into the mold, and as soon as the candle is completely solidified, cut off the part of the wick that will be superfluous. It is advisable to do this in no case earlier than twenty-four hours later.

An important point. You should not light ready-made candles in your opinion until they are completely hardened. Remember that at least a day must pass from the moment the candle is created until its first use for the first time.

Decorating candles
The real pinnacle of craftsmanship when creating candles on their own is not at all their aromatization or coloring, but decoration with a variety of natural materials from coffee beans to pine cones, seashells or herbs with an incredible aroma.

An important point. The materials should be placed on the bottom of the prepared candle mold before the molten wax is poured into it.

Another popular way of decoration today is the decoupage technique, which is decoration with napkins of different shades.


How to turn an old candle into a new one?
If you liked the instructions on how to make a candle with your own hands, then first of all you should know that to create new candle you will need essential oils.


To give the decor element a scent, it is enough to add a couple of drops of oil to the already melted wax just before pouring the mold.

If you want to achieve the relaxing effect of candles, then you can use a combination of bergamot and lavender oils.

Wanting to get rid of bad thoughts, it is better to choose oils of rosemary, lemon. For peace of mind No better option than a rose or geranium.

How to create a gel candle?
In order to create a candle, you must purchase a special gel in advance, which will be used instead of paraffin. It has a number of advantages:
- It is completely transparent. In practice, this makes it possible to achieve interesting contrast with various decorating techniques;
- During burning, the gel does not emit an odor, soot, unpleasant for households.

Any technology for creating gel candle in general, it is similar to the process of creating a wax, but there is a difference: it is necessary to pour the gel melted in advance into the prepared form, and not paraffin. Moreover, this must be done in compliance with a couple of nuances.


First, before the gel is poured into the mold, it must be heated. This will prevent unwanted bubbles from forming on the candle.


Secondly, the form for creating any gel candle must always be not only transparent, but also beautiful. After all, in the future, the candle does not get out of it.

Man's fantasy with creative nature practically unlimited: the cost of materials that are necessary to create candles with your own hands is quite affordable today.

The process is quite interesting, it does not take much time, as it might initially seem when you see a photo of candles made with your own hands. Having created a beautiful, unusual candle once, you will definitely decide to repeat the experiment.

Knowing how to make truly exclusive candles on your own, getting inspired interesting works talented people, you will always have an idea of what to present to your friends, and how to decorate the table for the holiday, creating an incredible atmosphere of comfort.


DIY photo of candles


