Photoboxes, lightcubes. We make a photobox for subject and macro photography with our own hands Lightbox for subject photography
If you, like me, do not want to spend money, then you can make a lightbox yourself and get good results. I was visiting a local photography store one day and I came across some lightboxes. These were collapsible white boxes with a hole in the front and three lights - they are used to photograph small objects in photo studios (like the chocolate deer shot at the end of the article).
I was about to buy one lightbox until I saw the $100 price tag. I personally would never spend $100 for a small amount of fabric and 3 lamps, because material is much cheaper. So, I went home to do boxing, which ended up being pretty good.
Necessary materials:
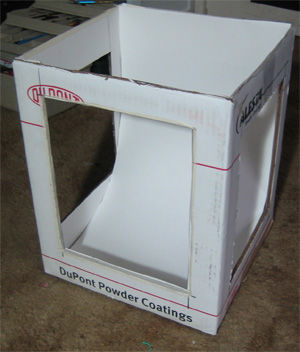
1.) Box - the box can be taken in any size and shape, decide for yourself. I suggest taking a square one. You can take boxes anywhere, and for free. I brought this box from work, it really bothered me there. You can find boxes of goods in any store, or buy one. Choose which option is best for you (and cheaper).
2.) Fabric - Any type of fabric will work. I used white muslin fabric, which can be found in art studios or workshops, after all, at home or in textile stores. Buy enough fabric to fill the entire box. Other fabrics, such as white nylon or white lambswool, can also be used. If you are looking for the cheapest way, use old white shirts. Trim the sleeves and cut into two halves at the seam. If using colored shirts, make sure the colored areas overlap.
3.) Tape - I use tape to attach the fabric to the box. Adhesive tape must be selected in accordance with the fabric. I use regular masking tape (1 US dollar per skein).
4.) Glue - You can use glue stick ($1 each) or spray ($5 per bottle) to stick the lining to the box.
5.) White Bristol cardboard (whatman paper) will line the inside of the box and will also serve as a backdrop. I suggest buying 2 or 3 sheets as you will need 2 sheets for the box (depending on the size of your box) and one for the background. Bristol is a fairly thick paper that is used for drawing. The name comes from the name of the city of Bristol, England. If you want to get a colored background, then, of course, use a colored drawing paper.
6.) Lamp - You will need to light this box and this can become the most expensive part of the box if you don't have a lamp. In my opinion, lighting is the most important part of this box. Without a lamp, you will not get the desired picture. I went to the local hardware store and bought some fluorescent lights. By using the right light bulbs, yellow light can be avoided. I bought "n:vision" bright 90 watt daylight bulbs. In principle, any "full-spectrum" light bulbs will do.
Also install lighting fixtures. If you have a table lamp, then this is fine. If you do not have one, then you can use reflectors. I could only find 2 types of reflectors in my city: small (5 inches) and large (10.5 inches).
7.) Other tools - a tape measure or ruler, scissors and a clerical knife.

Now that you have all the necessary materials, I will show you how to create a lightbox step by step. When you're done, you can try boxing.
Step by step process:

1) Take the box and use a tape measure and a marker to measure 5 cm from each side of the box. Connect all the marks to form a square/rectangle on each side of the box with a 5cm wide border. The top and bottom of the box should not be marked.
2) Cut along the drawn lines. Once you're done, completely cut off the top of the box or cut off the top flaps. Don't touch the bottom!
3) Take your Whatman paper and cut 16 strips 5 cm wide.
4) Glue the cut strips inside the box. Glue the strips with the cleanest and whitest side inward.

5) Cut out a rectangle from whatman paper that fits into the box in width and is longer than the box itself.
6) Insert a piece of paper into the box so that it is rounded towards the bottom. The photo clearly shows how it should look. Cut off any excess paper that extends beyond the top edge.
Cut three pieces of fabric to fit the side openings and one large piece of fabric for the top opening of the box.
8) Glue the fabric over the holes so that the right side of the fabric is inside the box. Then glue the top of the box.
Ready!
Now you can put the lamp on top of the box and start shooting!

There are many options to get the photo you want. If you have problems with the shadow, I advise you to additionally highlight the box from the sides. If you get a vignette, then move the camera further into the box, or stop down the aperture. You can also fix all this with Photoshop. Since my lenses and camera are not the cleanest, I try to remove dust in Photoshop. I also use levels to increase the brightness.
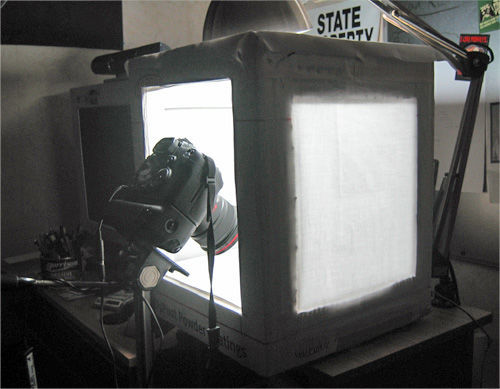
Camera in a box.

Lightbox in action

A different result of the above lightbox.
Original (English):
Do you do needlework and need high-quality photos of your products? Or are you just fond of subject photography, but so far at an amateur level and all the necessary tools for this are not available? Be that as it may, your faithful assistant will be lightbox made.
In contact with
This item has many names - "photobox", "photocube", "light box". Call it what you want, but by making a lightbox with your own hands, you will understand that this is an impromptu mini-studio with which you can get high-quality photos at home. Lightbox is a cube, on five sides of which a white or loose fabric is stretched. They scatter light and get rid of harsh shadows, which allows you to focus the viewer's attention directly on the subject itself.
What to make a light box?
To make a light box, you will need the following materials at hand:

Photobox with your own hands. Master classes
Lightbox out of the box
The size of the box will depend on what you are going to shoot. If these are miniature items, for example, jewelry, then you don’t need a large box. It will simply take up extra space. But if you are shooting various products for an online store, then it is better to use a larger base.

Photobox made of plastic pipes
Another way to make a photobox with your own hands - is the use of plastic pipes. This method is more complex and will require certain skills and tools, but this box looks much more aesthetically pleasing.

Styrofoam light box
The simplest and most practical light box you can do it yourself from foam sheets, such as those used for finishing ceilings. You will need four sheets in total.
- Using adhesive tape, glue together three sheets of foam with the letter P. That is, you should get the back and side walls.
- Place another sheet on top, but attach it only to one of the sides to make it look like a lid, and the top sheet opens and closes.
- Open the top side and attach the paper to the back wall. You can just bend the sheet a little and it will already be held on the frame. The paper should be of such a size that it also covers the bottom of the photo box. Close the top to keep out the light.
- Install lamps.
 The practicality of such a light box lies in the fact that if the paper gets dirty, you want to change the background color or make it textured, then just open the top wall and attach another sheet. In the same way, you can hang various decor that will complement the composition.
According to this master class, you can make a cheaper version of a lightbox out of thick paper, such as watercolor, cardboard or wooden boards.
Ready-made lightboxes cost several hundred dollars., but with a minimum of funds and effort, you can make a small photo studio at home with your own hands. The most expensive of all materials will be good light bulbs with bright white light. For high-quality photos, you should not save on light.
 With a photo box, you no longer have to wait for good sunny weather. and shoot only in daylight. Yes, and the time for processing photos will be significantly reduced. There is no need to adjust the white balance, contrast, remove harsh shadows, or, as happens in some cases, completely change the background, which requires special skills when working in graphic editors. Another plus is that the quality of the photo will not be affected by surrounding objects, which can sometimes very much distort the colors of the photographed object.
If you use a light box and know how to correctly compose compositions, then even pictures taken on a mobile phone will not differ much from studio photos. So that don't spend big money to something that you can easily do with your own hands with the help of detailed master classes.
Photographers, especially beginners, often ask this question to studio equipment specialists. As in any other case, when it comes to what to choose, you need to decide why you need to make this choice. It is necessary to reshoot only a few things for the site, or constant artistic object photography is supposed.
First you need to figure out what it is (photo box).
A special design, close to a cubic shape, with fabric walls made of white fabric. It keeps its shape thanks to four flexible rings that are sewn into the walls.

The simplest form of a table with an elastic and durable white plastic sheet. Usually there is an adjustable backrest.

In a photo box, three sides are equal, for example 60x60x60 cm, and therefore can be found in the description "photo box 60 cm" when all other sides are not indicated. It is because of its shape, close to cubic, that the photo box is also called the photo cube, light cube, light cube or light box.
In the tables, the main size indicates the size of the plastic sheet. For example, 60x130 cm means that the table has legs, with a back, and the length of the canvas is 130 cm, it is distributed on the front “tongue” - directly the platform where the object and the back are placed. The width of the canvas is 60 cm.
In order to competently answer the main question of the article, it is still worth deciding on the following problems.
The first problem is what is required as a result? Everyone who is looking for an answer to the question of what to prefer for work says about the same thing: photos for a catalog on the Internet or on paper. But the question is not where the photos will go.
For example, a photo box will illuminate the object being photographed with diffused light and will allow you to get only such a picture that will give an idea of just the very presence of the product.

The second problem is how prepared the photographer is. Shooting on a table with a backlight on the right, controlling the light, creating an image - for thoughtful and creative work, less suitable for getting a quick technical shot.

The third problem is the budget. A product shooting table is more expensive than a photo box. Moreover, to illuminate the photobox, simple and inexpensive illuminators are enough. At the same time, to work with a table, it is desirable to have two or three illuminators with the ability to control the light (tube, stripbox or color filters).

- How to choose a studio background for work?
The choice of background is not a problem. As for the table, you can use plastic backgrounds, and you can install a plastic background in the photo box. In addition, the set with the photobox includes four fabric backgrounds - white, black, red and blue. This is already almost a standard that most manufacturers support. Nevertheless, it is quite possible to install a plastic background inside the photobox for convenience.
- Interchangeability
With the help of a table and a couple of photoboxes, you can get lighting similar to that of a light cube - making the illumination even a little easier, because an object that is located on the table can be illuminated from the side, from below, and with the help of a crane - even from above. The photo box limits the possibilities - it is blocked on all sides by white matter and one can only dream of making beautiful light with shadows, accents and controlled highlights.
- Place to work
In principle, a place for a studio must be allocated, both with a photo box and with a table. It all depends on the size of the subject. Photoboxes range in size from 30-40 cm to 120-150 cm. Tables can be found from 20x20 cm to 1x2 meters. The light is usually placed quite compactly in both cases, with some tables being a structure that is already adapted to set the light around the subject being photographed. But there is a peculiarity here! If for shooting with a photo box, the light is set once, then for shooting with a table, the light is usually set more strictly, and therefore the photographer has to walk around the table, which means that more space is needed for the table.

How to choose the size of a photobox or table? Usually guided by the dimensions of the subject. That is, if the task is to remove spare parts for cars, then you can imagine the dimensions of the boxes in which they are located. Let's say everything that needs to be shot in a photo box has a size of up to 50 cm. With such parameters, you should pay attention to photo boxes sized 80-90 cm, because do not forget - the object is not flat, it will block a lot of the background. Plus, it will be necessary to shoot not only “on the forehead”, but also slightly at an angle to show the volume. Approximately also it is necessary to choose the width of the table, with the only difference that there are fewer basic table formats. If photo boxes come in sizes of 30, 40, 60, 80, 90, 110, 120 and 150 cm, then tables are usually 20x20 (for jewelry), 50x100, 60x130, 100x120 cm.

- Settling speed or stationarity
Like all studio equipment, the photography table and photobox fold and unfold. But the photo box can be unfolded and folded in a minute or less, but assembling a table is sometimes more difficult than assembling a regular office table.
Based on all of the above, everyone should conclude that both accessories for product photography are not a panacea and there is no need to make a cult out of them either. Both the subject table and the photo box are tools for the photographer and you need to choose what will help make the work more convenient and easier.
A factory-made shadowless photo box is a necessary thing, but quite expensive. For us, far from being professional photographers, a home-made lightcube is quite suitable, which can be made from literally anything. Among the most inexpensive and simple options are thick cardboard boxes, plastic photo frames, foam ceiling tiles, PVC corners and ordinary paper.
I decided to make myself a light cube out of an ordinary mesh toy basket, once bought on AliExpress at a ridiculous price. Over time, the need for such a “capacity” disappeared, and for what else to adapt it, I just didn’t think until the idea was born to make a photo box with my own hands. For a folding option, such a basket is an ideal basis. The work, however, is more painstaking, but the product turns out to be neat, light, compact. Yes, and it practically does not take up space - even roll it behind the back of the sofa, even slide it onto the “roof” of the cabinet!

Manufacturing cost and components
The total cost of a home-made lightcube did not exceed $7: a basket cost $1.50, 2 mini lamps on clothespins - $3.0, and a pair of 15 W LED bulbs with an initial power of 100 W - $2.5 . Well, the old calico sheet, which is not a pity to cut, is sure to be found in any chest of drawers. Of the tools, only threads with a needle, a sewing ripper, a soft measuring tape (“centimeter”), large pins and sharp tailor's scissors are useful. Now spit in the palm of your hand and let's get to work!
Making a photobox
We carefully disassemble our design - we simply unpick the seams connecting all 4 sides of the basket. Then we remove the meshes and get light metal frames. As you can see, these scaffolds, when released from the fabric, suddenly take on a round shape. A surprise, of course, but quite acceptable - we will work not with ovals, but with rings.
With a flexible "centimeter" we cover one ring and determine the length of the future inlay. In my case, 146 cm came out around the perimeter, to which I added 4 cm for the edge hem. In total, you should get 4 inlays one and a half meters long, and make the width a little more than the standard one - about 3-3.5 cm.

Now you need to cut out the “cores” of these rings - 4 fabric circles that will act as diffusers. We just measure the diameter of the rings and look for some kind of basin or other thing with suitable sizes at home. I had such a thing turned out to be a boil-out cover with a diameter of 47 cm. I carefully outlined it, and added 3 cm each when cutting it out (that is, I increased the diameter to 50 cm so that it was enough to sew on the inlay). Important: do not try to draw a circle on the fabric with a compass - you will spoil the material in vain.

When all the details are ready, we begin to process each of the rings with an inlay in turn. You grab the edges bent on both sides with pins - there is no point in basting with threads, because we will need to insert the cores into the inlay.

This is what we will do now: we take out 2-3 pins, insert the edge of the core with a margin of a couple of centimeters and tack “through” with white threads. So we continue in a circle until we process all 4 frame rings.

The finished circles turned out very neat, right? Here, for example, how it turned out for me: I fastened all 4 circles with ordinary clerical clips (binders). For clarity, I turned the design upside down.
Now we return the box to its “natural position” and prepare it for shooting. Opposite the side walls, we install a lamp. If you are going to photograph on a table, the lamps can be fixed with clothespins along the edge of the tabletop, but since my table is too narrow, I have to do this on the floor. And so that the lamps do not stagger due to clothespins, I attached trimmings from a plastic window sill to them - they hold up very well, by the way!

The first shot came out so-so because it's white on white.

But here it is already better: everything is clearly visible, right down to the inscriptions on the bottles.

The elephant in double packaging (cellophane + organza bag) also turned out to be quite “readable”.
Note: I covered the bottom of my light box with a piece of the same sheet, but in order not to mess around every time before shooting, smoothing this cut, you can replace it with a 50-cm strip of whatman paper, and hang the “holes” in the corners of the structure with pieces of fabric from the outside.
And another moment. For my purposes - to photograph handicrafts and dishes for photorecipes, this light is enough. But if you plan to shoot something small (detailed), then 15 W LED bulbs will not be enough, you will have to buy a couple of more powerful lamps. Good luck with your shooting!
If you don't want to spend money on something you can make yourself, then you are like me. One day I was in the store and saw pictures of these accessories. They consisted of a folding base covered with white fabric with a hole in the front wall. Photoboxes are used to capture subjects in a photo studio (such as this chocolate deer).
I was about to buy a photo box until I saw the $100 price tag. Spending $100 on a few pieces of translucent fabric and a frame?! All this can be done much cheaper. So, I built myself a similar light tent (as they are also called), and it turned out quite well.
Necessary materials:
1. Cardboard box.
It can be of any size, depending on what subjects you are going to shoot and what is the power of the light sources. I prefer boxes in the shape of a cube or close to it. Boxes can be found everywhere for free. I brought mine from work, where they throw them away anyway. You can also find boxes in the backyard of various malls, shops. Thicker boxes are better.

2. Fabric
Any white fabric can be used. For this box I used white muslin. You need to buy enough so that you can close all the walls. I spent $4 on fabric. Some people use other fabrics such as nylon or white fleece. It is better to use one type of fabric from one cut, otherwise there may be slight color changes and the final result may upset you.
3. Adhesive tape
I use duct tape to secure the fabric to the sides of the box. Thus, you can easily change the fabric to another if necessary. I use masking tape ($1 per roll).
4. Glue
You can use any glue to stick the strips of paper inside the box
5. Thick white paper (drawing paper)
Thick white paper or whatman paper will be stuck in strips inside the box to make the surface white, and will also be used as a background. I suggest buying 2 or 3 sheets so that you have enough for both. Whatman paper is sold in stationery departments and is used for drawing or drawing. If you want to use colored backgrounds, then you need to purchase a similar colored paper.
6. Lighting
The most expensive thing a photobox needs is lighting. It is good if you already have a sufficiently powerful table lamp. In my opinion, lighting is the most important component - without it, you will not get the right picture. I went to the nearest hardware store and looked at what I could buy for this purpose. I ended up buying a fixture with an energy-saving lamp equivalent to 90 watts. Beware of using incandescent bulbs as they give off a yellow tint. It is better if the lamp is with a round reflector.
7. Other tools
You will also need a tape measure, ruler, scissors, a knife and a marker.

Step by step
1. Mark up.
Take a tape measure, ruler and marker. Set back about 2 inches (5 cm) from the edges of the box. Draw lines to make a square inside.

2. Cut out the windows.
Repeat markings on all sides except the bottom and top. Then, with a sharp knife, cut out the windows in the box according to the markings. Remove the top cover flaps. Don't touch the bottom of the box. You should have four windows.
3. Cut strips of paper.
Mark the lines on the Whatman paper every two inches. Then cut the strips to fit the inside of the box.
4. Glue the strips of paper.
Stick strips of paper on the inside of the box to cover the cardboard and make the inside white. Make sure the side of the strip of paper where you marked the lines with the marker is facing the cardboard.

5. Making the background.
Cut out a blank for the background from whatman paper. The width should be the same as the inner size of the box, and the length is much larger than the box.
6. Place the background inside.
Place the strip of paper in the box so that it curves smoothly. Do not bend the sheet, do not score, as this will be noticeable in the picture. Cut off the excess paper from the top.

7. Cover the windows with a cloth
Mark and cut the fabric to cover the windows on the sides and back, except for the front wall. Then cut out a piece to cover the top.