Cutting tabletops under the cooking panel. How to install a cooktop in the table top with your own hands
In case you need to save place in the kitchen, it makes no sense to install gas stoveHaving been involved in a lot of space. Moreover, not everything comes with an oven, especially with the advent of a large number of microwaves and electric Oven at an affordable price. For the most part, the cooking surface is used directly. There are no fundamental difference in the installation of gas and electric cooking panels, only some nuances that will be discussed later in the article.
Required tools, materials
To install the panel, there is no expensive and wondrous tool or the passage of special courses. Everything is simple enough, to mask the process under the power of any little bit, who is friends with the hands of a person. In the process of work, you will need:
- roulette;
- drill with a drill with a diameter of 8 mm to sew a pair of holes in which the pubsik hat crawls;
- electric jigsaw (can be cut and manually, but it turns out longer and tedious);
- sealant;
- special plasticine, self-adhesive seal or aluminum tape.
This list includes accessories that will be unambiguous. Also, depending on the type of surface, other materials will be needed, for example, teflon or panel to wind the thread, terminals, tape for contacts. The main thing is to get into battle, and there it will be clear what else you need.
Measures
 The easiest option is to mark up - carefully cover the contours of the panel directly on the tabletop, providing an equal indentation from its edges. You can go and other way:
- first transfer the shellf's contours countertop on which it is located;
- find the center of the received rectangle, mark on the tabletop cross and make it a middle contour under the stove;
- after measuring, with the help of the roulette of the plates, it is additionally 5 millimeters of an allowance from each side to the prepared hole, the intended cross - the intersection point of the diagonals and the middle of the hole (it is desirable to make sure the markup accuracy, drawn diagonally on the image).
Condition
 To carry out the logs, it is necessary in the corners of the outlined circuit to fly with the help of a drill hole so that the pedal has come to them freely. It is enough to make two holes located diagonally relative to each other. From each hole make two cuts according to the markup. The most clearly similar slits are made by means of a manual millingrer, but it is far from everyone, so the electrolovka is a more realistic option. Carefully, on the markup, on medium-sized turns, do not rush to learn the jigsaw clearly on the markup, controlling so that it does not go to the side. It is strongly recommended to try to perform a few marbles on some unnecessary bar.
An important nuance - Some advise marking and engage in trimming on back side Countertops. The problem is that the laminate, which is covered with the front side, can be writing, and the stove will not block the chip. Therefore, it's easier to make marking with a marker on facial side, and drill and saw too face up.
Installation and sealing
 After it was carried out propyl, the edges of the slot are treated with silicone or other sealant, to protect against moisture. In the perimeter, the holes prepared in this way from the upper side are glued incoming, as a rule, included with the slab seal. Then the plate is inserted and aligned along the contour of the hole, after which it is pressed on the back fastener. If the sealant acts over the edges of the surface, gently cut off its excess with a knife, trying not to scratch the worktop.
Features of the installation of the gas and electric panel
Important! According to the safety regulations, when using gas devices, unauthorized connection is prohibited. gas devices, including hob surfaces.
This provision is enshrined in the current legislation. Connection is usually carried out by Gorgaz employees, for the appropriate remuneration. You can install the device on your own and risk yourself, but you should expect possible sanctions from the organization supplying the gas, up to it to turn off and seal the valve. All mounts gas equipment It is necessary to exercise in coordination with the relevant organizations.
If still a desire to hurt themselves, act in such a sequence:
- a flexible hose to the gas valve is connected through a blessing;
- prepared a hole in the furniture for the hose;
- checking the presence of jets for the main connection of the slab if they are not installed - it is necessary to make them install;
- the nut gas supply is connected to the stove, and be sure to with a sealing ring, a connection corner is usually included.
 Checking the absence of gas leakage is carried out by applying a soap solution. He should not bubble, if there are bubbles, this testifies to leakage, as well as the presence of a characteristic smell of gas.
Installation of the electric hob is carried out strictly according to the scheme shown in the manual. If experience with electrical devices Little - you should not experiment, it is better to contact the specialists. With incorrect connection of the power supply, both incorrect operation of the instrument and the output of it, as well as wiring in the apartment, is out of order. Connection of the power supply is carried out before mounting the tile in the nest prepared in the worktop.
In various models, there are options for connecting the wire or into the outlet, or directly to the electrical panel. It should be remembered that electric cooking plate consumes pretty a large number of Electricity, and take care that the wiring corresponds to power consumption requirements.
Idea independent installation The cooking panel can be somewhat scared. After all, it will have to deal with either electricity or gas and at the same time working with quite expensive kitchen equipment. However, none of the steps on installing the cooking panel is not particularly difficult. Just need to do everything carefully and in proper sequence From self-dried to the end.
Steps
Installation of the electrical cooking panel
- To disconnect the hose, scroll its nut in the direction counterclockwise.
-
Attach the gas hose to the new cooking panel. Use the sealant for gas connections, applying it to the threads in the place of connecting the hose and the cooking panel. Generously apply sealant on the thread, but so that it does not get inside the hose. Ground key screw the gas hose nut to the cooking panel.
Place a new cooking panel in your place. Carefully lower the cooking panel into the hole so as not to damage any connections in its lower part. Before you lower the hob in the hole, you need to spend the gas hose in it.
Attach the gas hose to the stationary gas pipe. Apply the sealant on the fitting thread gas pipe. Then tighten wrench Gas hose nut. Be sure to tighten the nut tight.
Prepare a soap solution. Prepare a solution of 1 piece of soap for washing dishes and 1 part of the water to test possible gas leaks. Carefully stirrer, and then either spray it into the locations of the gas connections or apply a brush. Turn on the gas supply faucet by putting it to a position in which it indicates the direction of supply of gas.
Turn on the burner and check their work. If check soapy solution did not reveal leaks, try to light the burner. It may be necessary to take a few seconds to come up with gas and caught fire, as ordinary air must first come out of the hose.
-
Connect the hob mounting brackets to the tabletop. When you see the performance of the hob, attach it to the mounting brackets to the worktop. Now your cooking panel is fully installed.
- Return to the door of the door and the cabinet boxes under the cooktop, as well as all its contents.
Remove old hobs panelif there is such. If you replace the old cooking panel, then first you need to remove it. Disconnect electricity In the camshaft. Remove any fixtures installed on it from the cooking panel, as well as consider the existing sealant. Disconnect the wires, remembering how the old cooking panel was connected, and remove the cooking panel from the hole in which it was sitting.
Make sure you have enough space in the location selected for the cooking panel. Ideally, you should have a gap over a cooking panel in the amount of 76 cm, and on the sides of it should be free place About 30-60 cm. You also need to make sure that there is enough space under the table top to accommodate your new model of the cooking panel.
Make sure the place you have gotten there is junction box To connect the cooking panel to the power grid. Most electrical cooking panels require connections directly to the network via a junction box 220 V. If you replace the hob, then probably the junction box is already available.
Measure the enabers of the hob and make sure that it fit into the old hole. If you replace the cooking panel, then the opening must already have a hole, and you just need to make sure that it is suitable for a new cooking panel.
Adjust the hob opening so that it can enter it. The hole should be on each side by 1.5-2.5 cm less than the hob of the hob. If you still do not have a hole under the cooking panel, or it is too small, then you will need to cut it the desired size. If the existing hole is too large, then for its decrease, metal sheets can be screwed down.
Remove all removable items from the cook panel to make it easier to put it in place. The hob can be removable burners, protective screens and other parts that should be temporarily deposited aside. You also need to not forget to remove all packaging materials from the cooking panel.
Install clamps. They are designed to fix the cooking panel. You should hang them from the top edge of the slot, and then fasten with screws.
Lower the cooking panel into the hole. Lower the new cooking panel into the hole, not forgetting primarily the wires in it. Press the cooking panel until you hear the click of fixing clamps.
Connect the wiring panel wires to the network. Electricity still should be turned offWhen you will do this in order not to get a shock. Connect the wiring panel wires to the appropriate wires of the junction box.
Install the removable details on the cooking panel. Return to the place of the burner, protective screens and other removable parts.
Turn on the electricity and check the work of the cooking panel. Turn on the power supply of the woor panel to check that everything works fine.
Open all the burners for a few minutes. Despite the fact that you have turned off the gas, in the hose it can still stay. Open all the burners to release the gas. Do not set up it. All gas will be released in a few minutes.
Disconnect the flexible gas supply hose from the stationary gas line using two wrench keys. Take one wrench and install on the hose nut, and the second key is on the nuthouse of the stationary gas line.
Remove all removable items from the cooking panel. Remove the burners, protective screens and other removable parts before moving on. This will facilitate the task of moving the hob.
Remove the clamps fixing the existing hob on the spot. Unscrew the clips from the bottom side of the old cooking panel.
Push the cooking panel from the bottom to lift it. Remove the cooking panel from the table top and put in a safe place. Do not forget that the gas hose is still connected to it.
Disconnect the gas hose from the old cooking panel. If you use the old gas hose to connect a new cooking panel, you should disconnect it from the old panel. Use two wrench for this by setting one on the cooking panel, and the second on the hose nut.
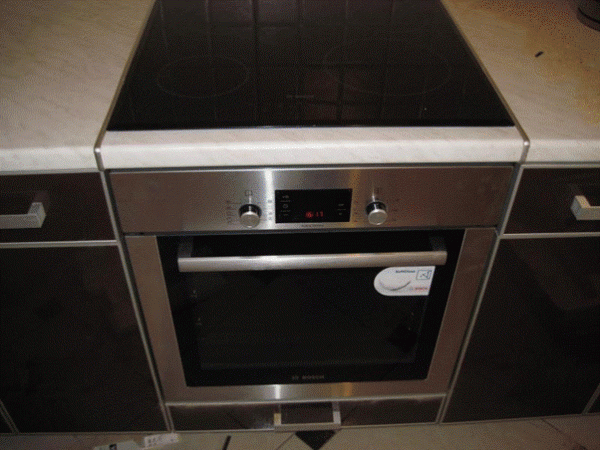
The cooking panels allow you to save space in the kitchen, and they work in the same way as bulky plates. To all of the time the installation of the cooking panel is absolutely easy, it happens quite quickly, and any adult can cope with it in the presence of certain tools.
For those who have started repairs in the kitchen, it is possible to replace the plate to the surface. You can also make a combination of surface and separate ovenand thus absolutely nothing to lose.
Dusting hole
If you have ever done repairs in the house or did somehow construction workThe process of installing the cooking panel in the worktop should not be difficult for you. So, let's begin.
- To set the surface in the tabletop with your own hands, first of all, you need to know its size. All the necessary sizes are indicated in the scheme in the instructions, do not invent anything. It accelerates work and significantly reduces the probability of error when measurements. Meanimals can be made with their own hands, turning the panel, and with the help of a roulette, determining its width and length of the inner edges.
- Please note that the instructions are the values \u200b\u200bof the minimum indentation from the edges of the tabletop. You can only change them in the most side, since too narrow edge can break it over time.
- Make markup on the tabletop, according to the gaps of the cooking panel. In this place she will be embedded. In order for the lines not to be erased and were better noticeable on a dark surface, glue paper scotch strips and transfer the lines to it.
- Next, drill the hole from which the cut will begin. Make cut with electric jigsika. So that the cut turned out to be smooth, did not crumble, it is recommended to use the Pilka with small teethnot blued. Even better to use manual frezer, Corners round up with a radius cutter, and cut slices.
- Formed sawdust can be collected using a vacuum cleaner.
When the hole is ready, try on the cooking surface to make sure everything is done correctly.
Seal and sealing
Treat cuts silicon hermetic or nitroloma. This will allow to protect the tabletop from dirt, wetting, swelling and premature damage. You can also use the self-adhesive seal, which performs the same function. It is glued from above, so that the edges of the panel lay on it.
Even for edge seals, an aluminum ribbon can be used, which will protect the tabletop from the temperature difference. The presence of a high-quality seal will lead to the fact that your countertop will last long, and it will not require repair or replacement.
Connecting an electric panel
Modern electric panels are very comfortable, with a good assembly, they rarely fail, which means that they will not need repair for a long time. If still the repair is required, the panel is easy to disconnect and take it on its own to the workshop, thereby saving on the call of the wizard.


Before embelling electric surface, It is necessary to put it on the worktop, flip and connect according to the scheme. The diagram is shown right on the panel from the back, so that you can be comfortable. When you do this procedure on your own, be careful. If the wires are incorrectly connected, you will not be able to adjust the inclusion of the burners and the heating temperature.
If it is provided for connecting the electrical cooking panel separate wire From the shield, the plug and socket are not needed. Just connect the wire to the panel.
Turn the panel and set it into the hole. She is ready for work, it remains only to check whether it turns on and heats up.
Connecting a gas panel
When installing the gas hob at first, look at how it is attached. Install the panel, align it on the edge of the table and secure. Usually for attachment from the bottom complete with the panel there are staples. The electrical wire must be included in the outlet.
To connect the gas with your own hands, you need to know the safety rules. Cross gas and connect the cooking surface to the pipe by means of a flexible hose. In the nuts will definitely post paronit gaskets. Open the gas, turn on the burners and check the hose connection locations for leakage. To do this, they need to be laid. If the foam is not bubble, then there are no leaks, you did everything right. You can also use a gas analyzer to check.
Installing the cooking panel is a convenient and practical option For your kitchen. Thus, you can significantly save space, which is very relevant for standard small kitchens Domestic Khrushchev. In addition, the cooking panels operate on the same principle as massive plates - so why not replace them with a more convenient option. It is important to note that the installation of the cooktop in the worktop is a completely simple process and anyone who has a certain set of tools can cope with it.
In order to understand the installation process and competently embody it in life, it is worth it to be subject to each of the steps of repair work.
Creating a hole
Those who once come across such works should know that there is nothing difficult in installing the cooking panel in the worktop. Video about this work, which is at the end of the article - a real confirmation of this. In order to highlight all the nuances of the installation, it is worth considering the process in detail.
- The first thing you need to know before installing the countertops is its size, which will avoid possible errors When measurements. In order to independently do them, it is necessary to have to have to be used and determine the width and length with a roulette;
- We make markup on the tabletop. It must correspond to the hob parameters;
- With the help of electric jigsaw, we drill a hole from which we will start cut. In order for the cut does not crumble - it is better to use a logs with small teeth.
Sealing process
Sections that were formed after the propyl should be treated with sealant. It is necessary that the countertop does not swell, as well as the dirt did not get into it.
Important! To seal the edge, you can always use aluminum tape. In addition to its main protective qualities, she will be able to protect the tabletop from sharp drop temperatures. Detach special attention choice of sealer, as the safety depends on this external view Countertops and its functionality.

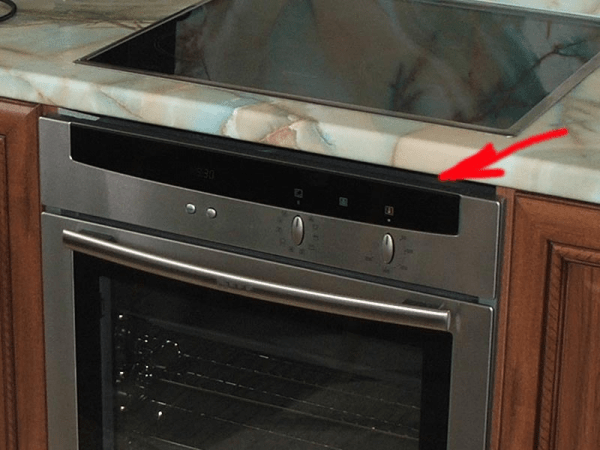
From what kind of cooking panel acquired - electrical or gas - will depend on the installation method. Consider separately both options.
How to connect the electrical panel?
The demand for electrical panels is invariably high. This fact is easy to explain that such devices are very reliable, high-quality and durable. Nevertheless, if such a stove is repaired, it can be disconnected without any problems and attributed to the workshop.
Before starting to embed the electrical cooking panel, it must be turned over and put on the worktop. FROM inner Plates will draw a reverse connection scheme. Be particularly attentive if you have to work with the connection of the stove yourself. Here it is important to find the wires correctly.
In the event that for connecting electric panel There is a separate wire of the shield, then there is no need for a fork and a socket. Just connect the wire and install the panel in the worktop. After that, it will be fully ready for work.
How to connect the gas panel?
Initially, it is worth paying attention to how the panel is attached. Install it in the worktop, then align and secure. To do this, at the bottom of the model there are special brackets and turn on electric wire In the outlet.
Important! Before independent connection Gas must be familiar with the basic safety rules. Gas should be blocked. Make sure that only after, connect the cooking surface to the pipe with a flexible hose.
In the nuts it is worth putting paronitic gaskets. Then, open the gas and turn on the burner in order to check the connection strength and eliminate possible gas leaks. For convenience, use the gas analyzer.
Warm panel installation rules over a brass cabinet
Induction cooking panel has many positive characteristics. Among them:

As you can see, the benefits of such an option mass. Therefore, it is very not surprising that you also wanted to establish this kind of slab at home. How to do it right? Installing the cooking panel over the oven has a specific sequence and rules. In order to deal with more detail in this matter, it is worth considering all the features of the panel installation.
- If you started such a process as the installation of an induction cooking panel over a brass cabinet, you should know that it should be equipped with forced ventilation and cooling system;
- Remember that the mount should be made on an ideally smooth surface. IN otherwisemay arise deformations that violate proper work boilers.
Installation order
- Take short stupid screws and screw 4 springs into the holes that are located on the sides of the device;
- Insert the cooking panel into the kitchen module, align it and slightly press the center - this will provide the maximum setting;
- If she has side profiles, after you insert it into the kitchen module you need to insert 4 mounting hooks. Note that the screw springs are not available available.
Important! When installing a cooking panel over a brass cabinet, electrical connection And embedding the hasty itself is made separately. Ettune should be followed on the basis of safety regulations when working with electricity.

Before connecting the electrician to check:
- socket status: It must be grounded and comply with all technical standards and standards;
- corresponds to the variable voltage when connected;
- does the socket correspond to the plug.
Remember that the installation of the cooking panel in the table top with your own hands or installing the panel over the brass cabinet requires you marginal care. You must certainly take into account a large number of requirements that will help you competently, quickly and efficiently install it. Guided by the above-described instructions, you will not need to attract specialists to carry out this operation.
In the conditions of the apartment, the location of the gas panel is determined by the location of the gas pipe. On the gas pipe, the overlapping valve must be installed. It is worth noting that the transfer of a gas pipe for any distances should be done only by specialists of a gas company. At the same time, no one forbids installing the gas panel at some distance from the pipe, using a flexible supply for this gas (gas hose).
Sylphonic hose, flexible gas supply
Measures
Before purchasing a panel, you need to know the width of the table top. The dimensions of most panels are standard and do not go beyond 55-57 cm. In the documentation for the panel, not only the dimensions of the panel, but also the hole size in the table top for installing the panel must be listed.
 Panel installation circuit
 To protect the surface of the table top from the movement of the sole of the jigsaw and from the chipsers during feeding, the larger tape is glued next to the markup or on the markup.
In order for the propyl did not fall and did not break the tabletop, it is necessary to maintain it from below, as in the photo, clamps.
 Speed \u200b\u200btable tops Lobzik
 Preparation of the installation panel
The panel includes jets for the main connection. If they are not installed, they need to be installed in place. The installation diagram of the jaws is glued to the bottom of the panel or indicated in the passport.
If a gas panel Connects to K. gas cylinder, the jackets need to buy others.
 Gypsum