Homemade table for manual milling. Milling table for manual milling hand
Application of various devices for manual milling Significantly expands the capabilities of this unit, and also improves comfort and safety when working with it. There are already ready-made models of devices intended for use in a pair with a milling mill, but, as a rule, they are expensive. Therefore, many masters prefer to make devices for this aggregate with their own hands.
If you fix a manual milling machine with a special way under the table, you will get a universal carpentry machine that allows you to produce accurate and fast processing of long and short wood blanks. To make a table for a milling hand, you first need to prepare the necessary parts for the assembly of the entire design. The figure below shows the cutting card, on which all the details of the future milling table are located. They are cut with a circular or format-cutting machine.
The device can be made from plywood, LDSP or MDF.On the map of the cutting indicated the thickness of the material is 19 mm, but this is not a prerequisite. The table can also be collected from plates with a thickness of 16 or 18 mm. Of course, for the manufacture of table tops it is better to use laminated or plastic sheet materials that will allow you to easily slide the billet on the surface.
It should also be considered that this homemade table is intended. for installation on goats. If you need desktop version, then the kings (5) need to do much wider than 150 mm. Their width should be slightly greater than the height of the device so that it can accommodate under the table top.
If the details of the table are filled out of plywood or MDF, their ends should be polished. The ends of the details made from LDSP will need to be covered with a melamine edge using an ordinary iron.
Making countertops
Installing the milling meter can be done as using mounting plankAnd without it. Training countertops for direct fastening It occurs to it as follows.

Fastening an aggregate using a mounting plate
When installing the apparatus on the main plate, its thickness significantly reduces the departure of the cutter. Therefore, to install an aggregate on thick countertops, it is customary to use thinner mounting plates from durable materials (Steel, Duralumin, Polycarbonate, Ghetinaks or Gydalkorstolitis). The plate is manufactured as follows.

Improvement of the stop
Parallel stop can be finalized that the setting of the milling table occurred more conveniently and quickly: for this you need to embed with C-shaped guides in the worktop. The profile can be made of aluminum. For the insert, a direct groove milling mill is used. The profile is stacked in the prepared groove and fastened with screws.


Next, you should choose a bolt with a hex hats of this size so that it can be included in the C-shaped profile and not turn it into it. Drill 2 holes at the base parallel stopcorresponding to the diameter of the bolt.

It should also be embedded with a C-shaped profile and to the front strip of the stop for fixing various clamps and protective housings on it.

The stop is screwed to the tabletop with the help of nut-bars.

On the back of the stop can be made camera for connecting a vacuum cleaner. To do this, it is enough to cut the square from plywood, drill a hole in it under the nozzle of the vacuum cleaner and fasten the resulting lid to the skins.

Also, you can add safety flap, Made of MDF or LDSP and a small rectangle of plexiglas. For sampling, the grooves can be used a jigs or a milling mill with a mold installed.

To have the opportunity to handle small parts, It is necessary to make clamps and fitness from plywood or MDF.

It is manufactured on a circular with a pitch between the cuts of 2 mm.

If desired, you can make the milling table with tool boxes.

Making table base
If required from a manual milling stationary machinethen without making durable foundation not enough. Below is a cutting card with details deposited on it that will be required to assemble the base of the table. Dimensions of parts will need to be corrected if used sheet Material Another thickness.


All desktop parts for manual milling are collected using confirmates. For the convenience of moving the table to his bottom, you can attach rollers. If you expand this table slightly and attach a disk hand saw in his free part, it will turn out universal table for milling and circular.

In order for the machine to occupy less space, it can be made on the principle of table books with countertops descending from both sides.

Homemade Milling Devices
To expand the functionality of this unit, there are quite expensive devices on sale. But the owners of the milling products in order to save funds are trying to produce various adolescents with their own hands that work is not worse than factory.
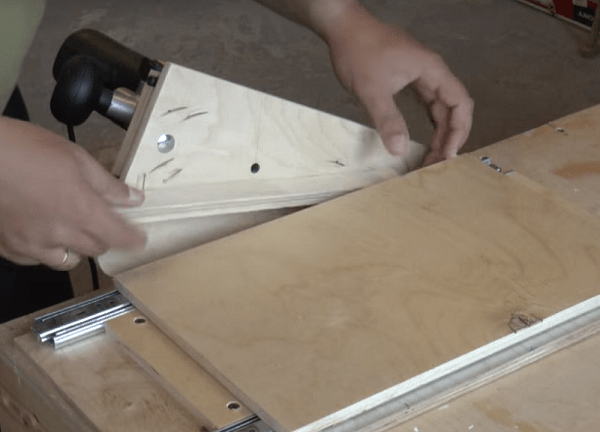
A simple clipped for a milling mill is made of two pieces of plywood and pairs of furniture telescopic guides. The milling mill is installed on a platform having a hole for the tool. The playground is attached to the workbench at an angle (for more convenient positioning of the equipment in height), as shown in the photo below.


So, the nipseral device is manufactured in the following order.
- Cut from plywood 2 platforms of the same sizes. The size of the adaptation can be any.
- Place the two telescopic guides parallel to each other and screw them along the edges of the first site and screw them with screws.

- For more accurate positioning of the guides, you can fasten the two equal to the length of the plank between them.

- It is necessary to put forward the retaliatory planks and put the second area in the second place with the first. Parameters on the second platform of the point through the bar, then spend the line through them.
- Remove the response planks from the guides by clicking on the plastic "mustache" located on their reverse side.
- Put the checkpoint on the platform to the site so that the line passes through the center of the holes for fasteners, and screw them with screws.

- Gently align 2 guides and push them (you must hear click). If you insert the part with a breakdown, you will break the telescopes, and balls will be hurt.

- Between the vertical focus with the aggregate and the mobile table must be to withstand a certain distance.This is done in order for when lowering the cutter, it does not hurt the table. Since in this case the maximum cutter departure will be about 25 mm, then you can temporarily lay between the table and the stubborn bar of the same width, that is, 25 mm. Planck allows you to place the design parallel to the vertical
 .
. - At the next stage, holding the device, drill 2 holes for the seasons. They will allow you to quickly position the clicks on the workbench. When the holes are ready, insert a couple of shots in them. Now you can remove the bar, laid between the focus and the device.

- Now that the mobile table is fixed, on the upper platform it is necessary to install the vertical stop, as shown in the following figure. For stiffness, the focus is maintained by two jams.

- When all elements of the clicks are fixed, you can proceed to tests. Put the workpiece on the table of the device and press it to the slope. Install the required height of the cutter, turn on the unit and promoter the workpiece.

- After the first pass, turn over the workpiece 180 degrees and repeat the processing.

- Turn the blank by 90 degrees, putting it on the edge, and again repeat the operation.

- Rotate the part 180 degrees and make the final treatment of spike.

As a result, you will get smooth and high-quality spike.

By changing the height of the cutter relative to the site of the adhesive, you can get the spikes of different thickness.
Copy sleeve
If in the configuration to your mill, there was no copying sleeve, then it can be made literally in 30 minutes from the remedies. For the homemade, you will need a metal or duralumin puck, which can be made of sheet metal, and a plumbing threaded extension.

The copier bushing is manufactured in the following way.
- Pick up the nuts suitable for the threader and cut it with a grinder so that it turns out a thin ring. After that, align it on the grinding machine.

- It is necessary to make a round pad for a shell of sheet metal or aluminum 2 mm thick. Depending on the model of the unit, the hole in its sole may have various shapes. In this case, the site should have sections on the sides that are rated on a sharpening machine.

- Streeting the washer on both sides, place it on the sole of the unit.

- Put the unit without removing the washer, vertically and make a pencil space for fasteners through the holes in the apparatus sole.

- Places marked with a pencil must be laid for accurate positioning of the drill.


- First, drill holes with a thin drill, and then the drill corresponding to the diameter of the fastening bolt.


- Dress the puck on the threaded extension and tighten the wrench. Help the part in the vice and cut the extra thread in a nut with a nut with a grinder.


- Helm the item in the vice with the other side and a little shorten it.

- Align the detail on grinding CircleInsert the apparatus in the sole and secure it with screws. The nut-ring should be slightly lower than the sole of the unit.


Milling guides
If you want to choose a very long groove in the workpiece, then you will need a device for a milling driver called a bus. Ready metal tires can be bought in specialized stores. But they are also easy to make with their own hands from plastic, plywood or MDF.
The thickness of the material should be about 10 mm so that the parts can be pulled by screws.
The guide for the aggregate is done very simply.
- Cut on the circular three stripes. One wide, order of 200 mm, and 2 narrow - 140 and 40 mm each.
- Also make a small bar from the same material, about 300 mm long and 20 mm width.
- Put on a wide band the part 140 mm wide, align it along the edge and twist both parts with screws.
- Put on top of a wide band, opposite the screw part, a narrow strip of a width of 40 mm. For accurate positioning, run between the upper parts of the bar width of 20 mm and screw the narrow strip with screws to the bottom part. Thus, it turns out a long tire with a groove of 20 mm wide.
- Take a strip 20 mm wide and screw it to the sole of the machine, as shown on next photo. For sampling, the groove is selected straight or Figured Line Cutter and fixes in the Cangga of the device.

When all fixtures are prepared, follow these steps. Put the workpiece on the workshop that needs to be processed along the entire length, position the bus on it, securing the clamps. Insert the bar attached to the sole of the mill in the groove of the guide. Run the unit and promoter the workpiece along the entire length.
If you want to choose a deep groove, then the processing occurs in several goals so that the equipment is immersed in the workpiece gradually.


From this article, you can find out how at home to make a milling machine on wood with your own hands to perform basic operations with blanks. The text sets out a step-by-step tool technology: analysis structural features the device and all components required for its installation, drawings with dimensions and detailed descriptionsthat will help create each of these items and collect them together.
Milling machines on wood can have various appointment. Some devices are designed to perform only one operation, others are multifunctional. Buying a professional tool - expensive pleasure, so many masters resort to the manufacture of a wood machine with their own hands. Most often, such a mill is used in small furniture workshops.

The milling mills are usually used to handle wood along a direct or curve contour. As a working element in the design, the knife head protrudes, which performs rotational movements. In most cases, this item is located vertically. There are many varieties of milling mills, each of which has its own structural features.
Most popular types of devices:
- standard single spindle (spindle is located vertically);
- single spindle structures, where the spindle or homemade milling table bends;
- copy mills with spindle having upper placement;
- copy designs with spindle having horizontal accommodation (the tool is designed to process aerial screws from a tree).
Note! In all listed structures, in addition to the latter, the material is applied manually.
Milling machine device: single-spindle structures
The design of the one-starring machine includes horizontal table With pair of tongue nests intended for fixing guide lines. It is installed on the bed of cast iron. Under the table there are sleds that move on the guides. They have a spindle on the spying and a pair of bearings. At the top of this element there is another spindle - insertion. It is intended for mounting cutting parts.

Salazki with a spindle can be raised if necessary. To do this, use a conical gear transmission with flywheel or screw. The belt transmission allows the spindle to move. And for this can be used counter-use, motor or motor shaft.
To make such a mill on a tree with your own hands, you need to take into account some nuances. In some cases, do not do without additional spindle strengthening. Such a need arises if it is necessary to process high height blanks or serious loads affect the part. To do this, you need to install the machine on the table and secure the upper stop. This element is fixed on the bracket. To control the movement of the workpiece during the milling process, it is desirable to use the guide ring or ruler.
Machines in which the spindle or table bends allow you to perform more wide spectrum Wood works with their own hands. In addition to standard operations, such structures allow you to obtain higher quality processing, getting a clean and uniform surface. This result can be achieved by treating wood at an angle, using mills with a very small diameter. The device with the tilting spindle is much safer and more convenient.
Device of a copy homemade machine on a tree with top spindle accommodation
These devices are used to perform copiers. It does not require high power. Such structures allow milling and drilling work to create openwork products.

The copier is able to replace three tools at once:
- Mill.
- Drilling machine.
- Lobzik.
Wood processing is performed using cutting cutters. The spindle develops a large number of revolutions, due to which the treated surface is very clean.
A homemade woodworking machine can be used for various purposes:
- calibration of bobers;
- production of openwork frames;
- stretching walls ribs, etc.
As a basis for such a design, a bed is used made of cast iron. Its upper part is bent in the form of a sickle. This zone is used for mounting an electric motor.

Note! The bed performs the function binder linkon which all elements of the homemade milling machine are installed. The stronger and more reliable its design, the better.
The engine is installed on the guides. Due to the levers system, it can move along these elements down and up. This plot is driven by pressing the pedal, which is equipped with a special stopper. The rotary motor shaft is connected to the spindle, where the cartridge with the tool is fixed. This cartridge can be self-centritable or American.
The bottom area of \u200b\u200bthe bed is mounted on the table on the movable bracket. Such a design can move around the guides vertically using the handwheel. There are other options for the manufacture of a homemade milling machine on a tree with their own hands, the drawing of such a design involves the vertical movement of the table also during operation by pressing the pedal. In such models, the electric motor and spindle remain motionless.
How to make a lathe on wood with your own hands: Drawings and technology
The easiest way to personally make a tool at home is to construct a lathe or a fluster from a drill or an electric motor removed from another tool. This process is not so complicated, so each master is able to cope with its execution. This will require an electric motor, the power of which does not exceed 500 watts, and infirm materials. Drill can be used as a drive. Of course, for the manufacture of a lathe, some skills will be required.

For the construction of the machine, the following items are necessary:
- metal Stanna;
- electric motor;
- girlfriend;
- rear grandmother.
It will not hurt to acquire a drawing that will help navigate in size and properly make all the design elements for subsequent assembly.
How to make a homemade drilling machine with your own hands with a motor
First you need to prepare an electric motor shaft. To do this, it is installed onto a tablebuck, a steel center with carvings is also suitable. Installation of the second center is carried out in the backstand tube. For the manufacture of the bed, a pair of corners of 5x3 cm in size will be required, their length is 15 cm. To the bed with bolted joint Motor attached.

Note! The central part of the backstone must necessarily coincide with the middle of the electric motor shaft.
At the next stage of manufacture homemade machine With their own hands, a grandmother is assembling. This element is formed from a pair of horizontal and pairs of vertical corners. It is attached to the pipe designed for the spindle. It is necessary to insert a bolt, the diameter of which is 1.2 cm. Previously its head is sharpened at right angles. Thus, the central part of the spindle is indicated. After that, the grandmother is installed on the bed. On the top rack, which connects with horizontal corners, it is necessary to secure the welding method.
For the manufacture of a girlfriend you need to take a steel rod with a chamfer. Also, this element must have a hole that will be used to secure the support line. It is necessary to vertically welcome the tube with a locking screw to a long corner. Then inserts the brief of the girlfriend.
As a spindle of the front grandmother, the motor rotor will be used, on which the topplack is fixed. It needs to perform several holes. In the central part will be inserted fork. Holes along the edges are designed to fix the part with screws.

How to make with your own hands from a tree lathe on a tree
Having a workbench with a solid and smooth working surface at hand, a lathe can be built without resorting to the construction of the bed. In this case, the electric drill will perform the function of the rotational drive and the front headstock. According to the simplest drawing of the machine, this tool is enough to fasten on the surface of the workbench through the neck. Clamps and clamp are suitable for fixing.
This element is mounted opposite the drill. To create it, you can take two vessels from the tree and the adjusting screw, sharpened from one end to the cone. If the machine is assumed to process massive wooden blanks, it is desirable to fix the stop on the table using clamps.
For the manufacture of the instrument with your own hands enough inexpensive materials. Lathe Based on a drill, you can use to pull different parts:
- doorknobs;
- stair design details;
- decorative products, etc.

Note! The machine with a wooden clamp is suitable exclusively for processing wood blanks. It is not allowed to use such a tool to work with the metal.
To expand functionality The tool, its design can be supplemented by nozzles and other devices capable of improving the quality of work.
Such improvements can be attributed to:
- performing winding on transformers;
- applying the coloring composition over the rotating part to create patterns;
- application of spiral notches on the workpiece, etc.
Installing a special console in the form of a copier will allow you to use the machine to create a whole series of identical details or product products.

How to make a milling machine on wood with your own hands: drawings, video, instruction
- Decide with the type of design, and what tasks will perform the tool.
- Decide on the materials that will be used for the construction of each element and methods of fixation.
- Calculate the necessary technical and operational parameters necessary for the full function.
- Pick up a CNC milling machine with a carpet on a tree drawings with dimensions of all parts.
To work with complex elements, a high power mill will be required. large quantity revolutions. Experts recommend to give preference to devices having a manual spindle setting and automatic stabilization. We can no longer features such as fast stop and smooth start. In ideal designs for replacing the electromotor brushes, disassembly of the body of the tool is not required.
Article on the topic:
Instructions for use. Parts components. Recommendations for the selection of structures and an overview of the best models.

The design of the freesome consists of the following items:
- countertops;
- beds;
- spindle;
- parallel stop;
- feed sled;
- vacuum cleaner.

Helpful advice! The recommended engine power for the machine is 2 kW and more. The tool with smaller indicators will not be able to process blanks from solid wood.
Selection of materials for the manufacture of woodworking machine with their own hands
In order for the bed to withstand high dynamic loads, it is desirable to use metal as a material for its manufacture. Most. suitable option is a pipe with square or rectangular cross section. It is allowed to use a massive metal corner.
The choice of such materials allows you to create a design without applying a welding machine. All elements are connected by bolts. The design is collapsible, which facilitates its transfer and transportation. In addition, using the appropriate drawing of the milling table, you can create adjustable legs with your own hands. Movable supports will be allowed to adjust the machine horizontally.
For the manufacture of countertops, such materials will be suitable:
- multilayer plywood sheets;
- planed board;
- MDF, OSB or chipboard.

The countertop must have a smooth surface. Any irregularities will affect the quality of work. In addition, it is necessary to exclude all the factors that can cause scratches during the processing of blanks.
In the manufacture of a table for a milling mill, with your own hands, a smooth surface can be achieved in several ways:
- decoration with plastic;
- careful fit and grinding planed boards;
- finishing with metal.
For the manufacture of a milling mill, you can use an asynchronous or collector engine. The first option is quite unpretentious in operation and does not impose restrictions on the size of the cutters used. Among the shortcomings - high level noise. The collector engine is more accessible, but its brushes wear out faster.

How to make fixtures for a milling driver with your own hands
Self-made wood cutters are able to effectively process wood, however, when contacting with solid materials, the cutting elements are quickly blinking. Therefore, the spectrum of the application of such parts is significantly limited.
To make a milling cutter with your own hands, you need to take a cylindrical blank and cut off half of its diameter on the site where the cutting zone will be located. After that, it is necessary to smooth out the resulting transition. From the cut part of the workpiece you need to remove another 1/4 diameter and perform a similar operation. Then you should give the treated cutter section of the rectangular shape. To do this, cut its lower part. Thickness obtained working area Must be 2-5 mm.
Helpful advice! To cut a metal blank under the cutter, you can use a drill or a grinder, adapting this tool to perform this task. The cutting edge can be made using a sharpening machine.

- The sharpening of the cutting part is desirable to perform at an angle of 7-10 °. More acute edge will cut much worse and quickly will lose sharpening.
- Via grinding machine Angular type, equipped with metal discs, you can give the cutting part of the cutter the required configuration. For these purposes, the noodles covered with diamond spraying are suitable.
- If the cutter is a complex configuration, you can flatten it or bend it.
How to make a milling machine with your own hands
The simplest milling machine can be made by the same principle as the turning tool described earlier. There are several ways to issue a leading construction center.
In the first case, a steel tube with thin walls is located on the shaft. This method is considered the simplest, but it is not devoid of flaws. The operator will not be able to process the workpiece, the diameter of which is less than the inner cross section of the pipe. In addition, this design will not be able to quickly dismantle, if there is a need for this.

In the second case, the billet will be attached to the table cheeper. To do this, you can use screws for which you need to pre-make holes. This method also has drawbacks. The diameter of the processed blanks is limited to the size of the facebuck. To simplify this process, you can make a special cartridge, although in this case it will not be possible to avoid some restrictions.
Rear center, which will be used to fix long blanks, you need to install on the backstone. Installation of an electric motor is carried out on the frame. In general, the simplest designs of the turning and milling tools are largely similar. If you wish to get a more functional device, you can make a CNC milling machine with your own hands, but for this you will need additional technical knowledge.
Table manufacturing technology for milling hand with hand drawings
There are several design options that can be used to install a CNC desktop mill. Tables can be stationary or portable. In addition, there is also an aggregate variety. This design allows you to expand the surface of the table to use the mill.
Most often, the masters prefer stationary structures having a metal frame. Dutch plywood is suitable as a material for the countertop.

Note! Making a table for a manual milling woman with your own hands, be sure to take into account the growth of a person who will work for it.
List required tools and materials include:
- metal parts for frame (tube or corner);
- aluminum guides;
- axis for fixing milling;
- putty, as well as primer and coloring compositions;
- self-tapping screw;
- furniture bolts (60x6 mm);
- hexagon control bolts with nuts (4 pcs.);
- finnish laminated plywood with moisture-resistant properties (sheet thickness of 1.8 cm);
- material for the manufacture of parallel stop (plywood or board);
- drill and drill set;
- screwdriver I. electric logsik;
- welding machine;
- auxiliary devices (brushes, rags, spatula).

Having everything you need can easily make the design of the milling table with your own hands, video reviews of technologies that are quite a few in the network will help to visually familiarize themselves with this process.
CNC machine manufacturing technology: Drawings and assembly
CNC mill differs from the usual tool in the presence of a program that controls its operation. On many videos, homemade machines are made on the basis of a beam with a rectangular cross section, which is fixed on the guides. CNC milling mill is an exception. In the process of mounting carrier design It is advisable not to use welded connections, fixation is better done with bolts.
The fact is that welds We are vulnerable to vibrational effects, which is why the frame will be subjected to gradual destruction. As a result of a geometric dimensional change, the equipment will lose its accuracy and quality of processing. It is desirable that the drawing of the table involves the possibility of moving the tool vertically. For these purposes will suit screw transmission. The rotational movement will be transmitted using a toothed belt.
Vertical axis is the most important element Designs. For its manufacture, you can use the aluminum stove. It is very important that the size parameters of the axis correspond to the dimensions of the future machine.

Helpful advice! Using a muffle furnace, you can cast a vertical axis of aluminum, taking into account the dimensions specified in the drawing.
The machine assembly should be started from the installation of two stepping type electric motors. They are installed behind the vertical axis directly on the housing. One engine will control the movement of the milling head horizontally, the other - vertically. Then you need to go to the installation of the rest of the design nodes.
The rotational movement will be transmitted to the node elements of the tool using belt gears. Before connecting to the finished milling program control, it is necessary to check its performance and in the presence of flaws to eliminate them. Many masters use video reviews to build the machine, where this process is considered in detail.
Equipment for creating a milling machine with a CNC on wood with your own hands
To create a CNC milling machine at home, be sure to use stepper motors. They provide the possibility of moving the tool in 3 planes. Electrical engines present in the matrix printer are ideal for creating a homemade machine. It is necessary to trace the motors to have sufficient power. In addition to engines, steel rods will be required.

In the matrix printer there is only a pair of engines, and three will be required to create a mill. Therefore, several old printing devices will be required. It is desirable that the engines have 5 control wires. Due to this, the functionality of the tool increases.
Other engine settings are important:
- degree rotation in one step;
- winding resistance;
- voltage level.
To assemble the drive, the hairpin and nut will be required. The size of these parts is selected taking into account the drawing. To secure the motor shaft and the hairpin, you can use a thick winding of rubber from electric cable. The nylon sleeve is suitable as a retainer, the screw should be inserted into it. You can use a drill and file as auxiliary tool.
Management tool will be managed software. The required element of the machine is the LPT port, which provides the connection of the control system to the Filtray through electrical engines. From the quality of components used to assemble the machine, its deadlines depend on the service and the quality of the executed technological operations. Therefore, the choice of parts should be made thoroughly. When all the electronic components of the machine will be installed and connected, it will only be downloaded to drivers and software.

How much will buy the purchase of a CNC milling machine: tool prices
If almost any master can cope with the manufacture of a manual milling and stationary table, then the assembly of the CNC machine for many will seem unlevued task. Moreover homemade structures Do not have such capabilities that the factory production tool can offer.
Helpful advice! If it is assumed to use a milling mill to perform complex woodwork, it is better to prefer precisely factory structures that are accurately calibrated and have many functions.
Rates for them vary depending on the functionality, the size of the table, power, manufacturer and other parameters.
Average rates for milling machines with CNC factory production:
| Name of the machine | Stamp length, mm | price, rub. |
| LTT-K0609 (LTT-K6090A) | 900 | 228970 |
| Woodtec MH-6090 | 246780 | |
| LTT-P6090. | 329120 | |
| RJ 1212. | 1300 | 317000 |
| Woodtec MH-1212 | 347350 | |
| Ruijie RJ 1200. | 399200 | |
| Woodtec MH 1325. | 2500 | 496350 |
| Woodtec MH-1625 | 540115 | |
| Woodtec VH-1625 | 669275 | |
| RJ 2040. | 3000 | 1056750 |
| Woodtec VH-2030 | 1020935 | |
| Woodtec VH-2040 | 1136000 |
Assembling the machine with software is a rather complex process that requires certain skills and knowledge. This work cannot be performed without a suitable drawing and necessary parts. Elements such as loops designed to transmit signals, stepper motors and microprocessor boards can be removed from outdated equipment or purchased on the network. Many online stores offer ready-made sets for assembling milling machines for homemade workshops.
Production of a milling machine on a tree with their own hands: video instruction
From this article, you can find out how at home to make a milling machine on wood with your own hands to perform basic operations with blanks. The text describes the step-by-step technology of creating a tool: analysis of the structural features of the device and all the components necessary for its installation, drawings with dimensions and detailed descriptions that will help create each of these elements and collect them together.
Wood milling machines can have different purposes. Some devices are designed to perform only one operation, others are multifunctional. Buying a professional tool - expensive pleasure, so many masters resort to the manufacture of a wood machine with their own hands. Most often, such a mill is used in small furniture workshops.
The milling mills are usually used to handle wood along a direct or curve contour. As a working element in the design, the knife head protrudes, which performs rotational movements. In most cases, this item is located vertically. There are many varieties of milling mills, each of which has its own structural features.
Most popular types of devices:
- standard single spindle (spindle is located vertically);
- single spindle structures, where the spindle or homemade milling table bends;
- copy mills with spindle having upper placement;
- copy designs with spindle having horizontal accommodation (the tool is designed to process aerial screws from a tree).
Note! In all listed structures, in addition to the latter, the material is applied manually.
Milling machine device: single-spindle structures
The design of the mon-shunting machine includes a horizontal table with a pair of tongue sockets designed to fix the guide lines. It is installed on the bed of cast iron. Under the table there are sleds that move on the guides. They have a spindle on the spying and a pair of bearings. At the top of this element there is another spindle - insertion. It is intended for mounting cutting parts.
Salazki with a spindle can be raised if necessary. To do this, use a conical gear transmission with flywheel or screw. The belt transmission allows the spindle to move. And for this can be used counter-use, motor or motor shaft.
To make such a mill on a tree with your own hands, you need to take into account some nuances. In some cases, do not do without additional spindle strengthening. Such a need arises if it is necessary to process high height blanks or serious loads affect the part. To do this, you need to install the machine on the table and secure the upper stop. This element is fixed on the bracket. To control the movement of the workpiece during the milling process, it is desirable to use the guide ring or ruler.
Machines in which the spindle or the table bends, allow you to perform a wider range of wood works with your own hands. In addition to standard operations, such structures allow you to obtain higher quality processing, getting a clean and uniform surface. This result can be achieved by treating wood at an angle, using mills with a very small diameter. The device with the tilting spindle is much safer and more convenient.
Device of a copy homemade machine on a tree with top spindle accommodation
These devices are used to perform copiers. It does not require high power. Such structures allow milling and drilling work to create openwork products.
The copier is able to replace three tools at once:
- Mill.
- Drilling machine.
- Lobzik.
Wood processing is performed using cutting cutters. The spindle develops a large number of revolutions, due to which the treated surface is very clean.
A homemade woodworking machine can be used for various purposes:
- calibration of bobers;
- production of openwork frames;
- stretching walls ribs, etc.
As a basis for such a design, a bed is used made of cast iron. Its upper part is bent in the form of a sickle. This zone is used for mounting an electric motor.
Note! The bed performs the function of the binder, which is installed all the elements of the homemade milling machine on the tree. The stronger and more reliable its design, the better.
The engine is installed on the guides. Due to the levers system, it can move along these elements down and up. This plot is driven by pressing the pedal, which is equipped with a special stopper. The rotary motor shaft is connected to the spindle, where the cartridge with the tool is fixed. This cartridge can be self-centritable or American.
The bottom area of \u200b\u200bthe bed is mounted on the table on the movable bracket. Such a design can move around the guides vertically using the handwheel. There are other options for the manufacture of a homemade milling machine on a tree with their own hands, the drawing of such a design involves the vertical movement of the table also during operation by pressing the pedal. In such models, the electric motor and spindle remain motionless.
How to make a lathe on wood with your own hands: Drawings and technology
The easiest way to personally make a tool at home is to construct a lathe or a fluster from a drill or an electric motor removed from another tool. This process is not so complicated, so each master is able to cope with its execution. This will require an electric motor, the power of which does not exceed 500 watts, and infirm materials. Drill can be used as a drive. Of course, for the manufacture of a lathe, some skills will be required.
For the construction of the machine, the following items are necessary:
- metal Stanna;
- electric motor;
- girlfriend;
- rear grandmother.
It will not hurt to acquire a drawing that will help navigate in size and properly make all the design elements for subsequent assembly.
How to make a homemade drilling machine with your own hands with a motor
First you need to prepare an electric motor shaft. To do this, it is installed onto a tablebuck, a steel center with carvings is also suitable. Installation of the second center is carried out in the backstand tube. For the manufacture of the bed, a pair of corners of 5x3 cm is required, their length is 15 cm. Motor is fastened to the bed with a bolted connection.
Note! The central part of the backstone must necessarily coincide with the middle of the electric motor shaft.
At the next stage of the manufacture of a homemade machine, a grandmother is assembling with their own hands. This element is formed from a pair of horizontal and pairs of vertical corners. It is attached to the pipe designed for the spindle. It is necessary to insert a bolt, the diameter of which is 1.2 cm. Previously its head is sharpened at right angles. Thus, the central part of the spindle is indicated. After that, the grandmother is installed on the bed. On the top rack, which connects with horizontal corners, it is necessary to secure the welding method.
For the manufacture of a girlfriend you need to take a steel rod with a chamfer. Also, this element must have a hole that will be used to secure the support line. It is necessary to vertically welcome the tube with a locking screw to a long corner. Then inserts the brief of the girlfriend.
As a spindle of the front grandmother, the motor rotor will be used, on which the topplack is fixed. It needs to perform several holes. In the central part will be inserted fork. Holes along the edges are designed to fix the part with screws.
How to make with your own hands from a tree lathe on a tree
Having a workbench with a solid and smooth working surface at hand, a lathe can be built without resorting to the construction of the bed. In this case, the electric drill will perform the function of the rotational drive and the front headstock. According to the simplest drawing of the machine, this tool is enough to fasten on the surface of the workbench through the neck. Clamps and clamp are suitable for fixing.
This element is mounted opposite the drill. To create it, you can take two vessels from the tree and the adjusting screw, sharpened from one end to the cone. If the machine is assumed to process massive wooden blanks, it is desirable to fix the stop on the table using clamps.
For the manufacture of the tool with their own hands, sufficiently inexpensive materials. Drains-based lathe can be used to pull different parts:
- doorknobs;
- stair design details;
- decorative products, etc.
Note! The machine with a wooden clamp is suitable exclusively for processing wood blanks. It is not allowed to use such a tool to work with the metal.
To expand the functionality of the tool, its design can be supplemented by nozzles and other devices capable of improving the quality of work.
Such improvements can be attributed to:
- performing winding on transformers;
- applying the coloring composition over the rotating part to create patterns;
- application of spiral notches on the workpiece, etc.
Installing a special console in the form of a copier will allow you to use the machine to create a whole series of identical details or product products.
How to make a milling machine on wood with your own hands: drawings, video, instruction
- Decide with the type of design, and what tasks will perform the tool.
- Decide on the materials that will be used for the construction of each element and methods of fixation.
- Calculate the necessary technical and operational parameters necessary for the full function.
- Pick up a CNC milling machine with a carpet on a tree drawings with dimensions of all parts.
To work with complex elements, a milling mill will be required with a high level of power and a large number of revolutions. Experts recommend to give preference to devices having a manual spindle setting and automatic stabilization. We can no longer features such as fast stop and smooth start. In ideal designs for replacing the electromotor brushes, disassembly of the body of the tool is not required.
Article on the topic:
Instructions for use. Parts components. Recommendations for the selection of structures and an overview of the best models.
The design of the freesome consists of the following items:
- countertops;
- beds;
- spindle;
- parallel stop;
- feed sled;
- vacuum cleaner.
Helpful advice! The recommended engine power for the machine is 2 kW and more. The tool with smaller indicators will not be able to process blanks from solid wood.
Selection of materials for the manufacture of woodworking machine with their own hands
In order for the bed to withstand high dynamic loads, it is desirable to use metal as a material for its manufacture. The most suitable option is a pipe with a square or rectangular cross section. It is allowed to use a massive metal corner.
The choice of such materials allows you to create a design without applying a welding machine. All elements are connected by bolts. The design is collapsible, which facilitates its transfer and transportation. In addition, using the appropriate drawing of the milling table, you can create adjustable legs with your own hands. Movable supports will be allowed to adjust the machine horizontally.
For the manufacture of countertops, such materials will be suitable:
- multilayer plywood sheets;
- planed board;
- MDF, OSB or chipboard.
The countertop must have a smooth surface. Any irregularities will affect the quality of work. In addition, it is necessary to exclude all the factors that can cause scratches during the processing of blanks.
In the manufacture of a table for a milling mill, with your own hands, a smooth surface can be achieved in several ways:
- decoration with plastic;
- careful fit and grinding planed boards;
- finishing with metal.
For the manufacture of a milling mill, you can use an asynchronous or collector engine. The first option is quite unpretentious in operation and does not impose restrictions on the size of the cutters used. Among the disadvantages - a high level of noise. The collector engine is more accessible, but its brushes wear out faster.
How to make fixtures for a milling driver with your own hands
Self-made wood cutters are able to effectively process wood, however, when contacting with solid materials, the cutting elements are quickly blinking. Therefore, the spectrum of the application of such parts is significantly limited.
To make a milling cutter with your own hands, you need to take a cylindrical blank and cut off half of its diameter on the site where the cutting zone will be located. After that, it is necessary to smooth out the resulting transition. From the cut part of the workpiece you need to remove another 1/4 diameter and perform a similar operation. Then you should give the treated cutter section of the rectangular shape. To do this, cut its lower part. The thickness of the obtained working area should be 2-5 mm.
Helpful advice! To cut a metal blank under the cutter, you can use a drill or a grinder, adapting this tool to perform this task. Cutting edge can be made using.
- The sharpening of the cutting part is desirable to perform at an angle of 7-10 °. More acute edge will cut much worse and quickly will lose sharpening.
- Using an angular type grinding machine, equipped with metal discs, you can give the cutting part of the cutter the required configuration. For these purposes, the noodles covered with diamond spraying are suitable.
- If the cutter is a complex configuration, you can flatten it or bend it.
How to make a milling machine with your own hands
The simplest milling machine can be made by the same principle as the turning tool described earlier. There are several ways to issue a leading construction center.
In the first case, a steel tube with thin walls is located on the shaft. This method is considered the simplest, but it is not devoid of flaws. The operator will not be able to process the workpiece, the diameter of which is less than the inner cross section of the pipe. In addition, this design will not be able to quickly dismantle, if there is a need for this.
In the second case, the billet will be attached to the table cheeper. To do this, you can use screws for which you need to pre-make holes. This method also has drawbacks. The diameter of the processed blanks is limited to the size of the facebuck. To simplify this process, you can make a special cartridge, although in this case it will not be possible to avoid some restrictions.
Rear center, which will be used to fix long blanks, you need to install on the backstone. Installation of an electric motor is carried out on the frame. In general, the simplest designs of the turning and milling tools are largely similar. If you wish to get a more functional device, you can make a CNC milling machine with your own hands, but for this you will need additional technical knowledge.
Table manufacturing technology for milling hand with hand drawings
There are several design options that can be used to install a CNC desktop mill. Tables can be stationary or portable. In addition, there is also an aggregate variety. This design allows you to expand the surface of the table to use the mill.
Most often, the masters prefer stationary structures having a metal frame. Dutch plywood is suitable as a material for the countertop.
Note! Making a table for a manual milling woman with your own hands, be sure to take into account the growth of a person who will work for it.
The list of necessary tools and materials includes:
- metal parts for frame (tube or corner);
- aluminum guides;
- axis for fixing milling;
- putty, as well as primer and coloring compositions;
- self-tapping screw;
- furniture bolts (60x6 mm);
- hexagon control bolts with nuts (4 pcs.);
- finnish laminated plywood with moisture-resistant properties (sheet thickness of 1.8 cm);
- material for the manufacture of parallel stop (plywood or board);
- drill and drill set;
- screwdriver and electric jigsaw;
- welding machine;
- auxiliary devices (brushes, rags, spatula).
Having everything you need can easily make the design of the milling table with your own hands, video reviews of technologies that are quite a few in the network will help to visually familiarize themselves with this process.
CNC machine manufacturing technology: Drawings and assembly
CNC mill differs from the usual tool in the presence of a program that controls its operation. On many videos, homemade machines are made on the basis of a beam with a rectangular cross section, which is fixed on the guides. CNC milling mill is an exception. In the process of installing the supporting structure, it is desirable not to use welded connections, the fixation is better to perform with bolts.
The fact is that the welds are vulnerable before the vibrational impact, which is why the frame will be subject to gradual destruction. As a result of a geometric dimensional change, the equipment will lose its accuracy and quality of processing. It is desirable that the drawing of the table involves the possibility of moving the tool vertically. For these purposes, a screw transmission is suitable. The rotational movement will be transmitted using a toothed belt.
The vertical axis is an essential element of the design. For its manufacture, you can use the aluminum stove. It is very important that the size parameters of the axis correspond to the dimensions of the future machine.
Helpful advice! Using a muffle furnace, you can cast a vertical axis of aluminum, taking into account the dimensions specified in the drawing.
The machine assembly should be started from the installation of two stepping type electric motors. They are installed behind the vertical axis directly on the housing. One engine will control the movement of the milling head horizontally, the other - vertically. Then you need to go to the installation of the rest of the design nodes.
The rotational movement will be transmitted to the node elements of the tool using belt gears. Before connecting to the finished milling program control, it is necessary to check its performance and in the presence of flaws to eliminate them. Many masters use video reviews to build the machine, where this process is considered in detail.
Equipment for creating a milling machine with a CNC on wood with your own hands
To create a CNC milling machine at home, be sure to use stepper motors. They provide the possibility of moving the tool in 3 planes. Electrical engines present in the matrix printer are ideal for creating a homemade machine. It is necessary to trace the motors to have sufficient power. In addition to engines, steel rods will be required.
In the matrix printer there is only a pair of engines, and three will be required to create a mill. Therefore, several old printing devices will be required. It is desirable that the engines have 5 control wires. Due to this, the functionality of the tool increases.
Other engine settings are important:
- degree rotation in one step;
- winding resistance;
- voltage level.
To assemble the drive, the hairpin and nut will be required. The size of these parts is selected taking into account the drawing. To secure the motor shaft and the hairpin, you can use a thick winding from rubber from an electrical cable. The nylon sleeve is suitable as a retainer, the screw should be inserted into it. You can use a drill and file as auxiliary tool.
The instrument management will be implemented by software. The required element of the machine is the LPT port, which provides the connection of the control system to the Filtray through electrical engines. From the quality of components used to assemble the machine, its service life and the quality of the technological operations performed are dependent. Therefore, the choice of parts should be made thoroughly. When all the electronic components of the machine will be installed and connected, it will only be downloaded to drivers and software.
How much will buy the purchase of a CNC milling machine: tool prices
If almost any master can cope with the manufacture of a manual milling and stationary table, then the assembly of the CNC machine for many will seem unlevued task. Moreover, homemade structures do not possess such capabilities that the factory-proceeding tool can offer.
Helpful advice! If it is assumed to use a milling mill to perform complex woodwork, it is better to prefer precisely factory structures that are accurately calibrated and have many functions.
Rates for them vary depending on the functionality, the size of the table, power, manufacturer and other parameters.
Average rates for milling machines with CNC factory production:
| Name of the machine | Stamp length, mm | price, rub. |
| LTT-K0609 (LTT-K6090A) | 900 | 228970 |
| Woodtec MH-6090 | 246780 | |
| LTT-P6090. | 329120 | |
| RJ 1212. | 1300 | 317000 |
| Woodtec MH-1212 | 347350 | |
| Ruijie RJ 1200. | 399200 | |
| Woodtec MH 1325. | 2500 | 496350 |
| Woodtec MH-1625 | 540115 | |
| Woodtec VH-1625 | 669275 | |
| RJ 2040. | 3000 | 1056750 |
| Woodtec VH-2030 | 1020935 | |
| Woodtec VH-2040 | 1136000 |
Assembling the machine with software is a rather complex process that requires certain skills and knowledge. This work cannot be performed without a suitable drawing and necessary parts. Elements such as loops designed to transmit signals, stepper motors and microprocessor boards can be removed from outdated equipment or purchased on the network. Many online stores offer ready-made sets for assembling milling machines for homemade workshops.
Production of a milling machine on a tree with their own hands: video instruction
2. Stick the right leg FROM To the support In (Fig. 1)and further consolidate with screws. Postpone the assembly to the side. Drink Tsargi I.. Then make in the middle support cutouts for the CARG. How to neatly make such cuts, described in "".
3. Using medium support cuts IN, mark the width of the upper separation shelf F (photo a).Obilitate the shelf to the final width. Then determine the width of the bottom shelf G. and opilitate it (Photo B).
To accurate fittings, place some details using others.
Put the lower shelf G on the middle support in, aligning the edges. Taking this cutout as a template, mark the shelf width.

Align one edge of the top shelf F with a cut and mark its width by putting a label from the opposite cutout.
4. Stick up the top shelf F. to medium support IN, aligning her lower side with the upper edges of cuts (Photo C).When the glue dries, stick to the bottom of the bottom shelf G..

Drink two strokes with a length of 108 mm from trimming and, aligning the lower shelf with them, stick it to the middle support V.

The combined drill allows you to make a divided mounting and guide holes for one operation without changing the tool.
5. Drilling mounting and guide holes, glue left leg D. To the assembled node B / f / g and additionally secure screws (PhotoD.).
Short advice! With the help of glue and screws, you can immediately make several parts of the base. Screws accelerate the assembly, as you do not have to wait for the complete drying of the glue before attaching the next part.Drink the rear wall J. And, having experienced it to the way, make sure that the upper edge is located in the neck with a medium support cut IN. Enclose the back wall in place and fix the clamps.
6. Stick to the place of the Tsargi I.fixing their clamps (photo E).Then fasten the last support with glue and screws IN. When the glue dries, mark the exact length of the top plank N (photoF.) and glue the item in place (Fig. 1).

Blues of the Tsargi I in cutouts in the neck with the upper shelf F. Then glue the left support in place, securing it additionally with screws.

In order for Tsargi I to be parallel to each other along the entire length, mark the exact length of the top plank N by attaching it to the left side of the base.
7. Take the right support with the leg again. V / S. and attach to the assembled left part of the base V / D / F-Jusing glue and screws (Fig. 1).Then stick to the left and right supports IN Planks E.fixing their clamps. With the help of a grinding pads, make the left plank with a radius of 3 mm on the upper external rib.

Milling table blueprints
Measuring and placing project details with a roulette and ruler, it is difficult to achieve accuracy, especially if the real plywood thickness differs from the nominal. Instead, for accuracy, it is better to use the parts themselves or trimming of the material for the dimensional settings of the machines. To make accurate cutouts for CARG I in the middle support in, follow this method.

To adjust the width of the cut, you cut off in trimming plywood, raising the disk so that a small burr remains on the edge.

Adjusting the depth of propyl, measure the distance from the stop to the outer side of the teeth of the saw disk.

Attach a wooden pad to the head of the transverse (angular) stop and cut the cutout into the details for several passes. The longitudinal focus serves as a limiter with the last passage.
Take a lid
1. Take the cover dropped earlier BUT And mark its center by connecting the opposite corners with straight lines. Via ring saw Make a hole in the center of the cover with a diameter of 38 mm (PhotoG.).

Clamps secure the cover and on the workbench, laying the chalkboard to prevent chips. Drill in the center of the cover hole for the cutter.

Put on the cover and plastic lining of the soles of the milling and align it in the center, placing it so that the controls of the power tools are available in front.
2. Remove the milling soles that you intend to install in the table, plastic lining and, using it as a pattern, mark on the cover of mounting holes on the lid (Photo H).Drill holes and spin them.

3. Drink the lid bar TO. Statches on one of the planks of the centers of three holes (Fig. 2).Drill holes with a diameter of 6 mm (Photo I).Stick the planks to the lid BUT And fix clamps.

Secure both planks to the workbench, folding them into a stack and putting the board from the bottom to avoid chipping.

Drill the hole with a diameter of 5 mm through the axial opening. Then make a hole with a diameter of 6 mm on the right. The depth of the holes must correspond to the length of the fastener.
4. Put the cover A / K. On the basis and align the axial hole in the middle of the end of the bar E., focusing on the middle layer of plywood veneer. Then through the holes of the top plank TO Drill a hole with a diameter of 5 mm for axial screw and a hole with a diameter of 6 mm for the right shut-off screw (Fig. 1, photoJ.). Add the washers and screw the screw-deaf with 6 × 35 mm into the axial hole. Lift the lid and drill a hole with a diameter of 6 mm for a locking screw that locks the cover in the raised position.
Add longitudinal focus
1. Drink the front wall and the base of the stop L.. Locate the same semicircular cuts (Fig. 3).Then, as described in the "Master Council", carefully drink them with an electroll bison. Stick the front wall to the base and secure clamps.

2. Drink spacers M. And Prints N.. Enclose spacers to clips. When the glue dries, put the stop L / L. on assembled comments M / N., Align the parts and drill through holes with a diameter of 6 mm (Fig. 3, photoL.).

By laying the chalkboard to prevent chips, align the L / L stop over the assembled m / n clams. Fixing all parts of the clamps, drill through the hole, then do the same on the other side.

Adjust the transverse stop at an angle of 45 ° and pump up two jams from both ends of the strip. Reinstall angle 90 ° again to sprinkle two more jams.
3. From the plywood strip in size 19x76x305 mm drank triangular jams O (photo m).Stick them to the collected (Fig. 3).
Make durable boxes
1. From 19 mm plywood cut two blanks with dimensions of 100 × 254 mm for the front and rear walls R. From one billet, drink two rear walls and set them aside. On the second blank, mark the front wall cuts (Fig. 4)and carefully drink them (see the "Master Board" below), before split the workpiece into two front walls.

Short advice! It is more convenient to make cutouts before you begin to drink the front walls so that the sole of the electrolovka does not rest in clamps, pressing the workpiece.
Method of drinking steep bends with electric bison
Even by installing a pylon with the smallest teeth into the electric bissor, make neat cuts with a small radius is not easy, since the fender is stuck in the propylene, heats up and fastened.
Test this method: Before drinking a cutout along the contour, make frequent straight rods from the edge of the part, as shown in the photo on the right. Then cut the cutout, leading the pink with a small indent from the contour line. As the shelter moves forward, small pieces formed by straight propuls will fall out one by one, without preventing the movement of the peel and giving space for the maneuver if it is necessary to change the trajectory slightly. Severy edges of the cutout to the contour line using trim plastic pipewrapped with sandpaper.
2. Of the 12-millimeter plywood cut the side walls Q. and bottoms R.. Set these details to the side.
3. Secure the milling mill on the bottom of the lid. BUT. If the original fastening screws are too short, replace them longer with the same thread.
4. Insert into the collet milling mill for folding 12 mm wide. Install the stop as shown on fig. 3. Twink 15 × 12 mm folding along three sides of the front and rear walls R. Replace the cutter and make roundings with a radius of 3 mm at the edges of the semicircular cuts of the front walls.


5. Collect the boxes, gluing the details and fixing them with clamps (Fig. 5).From trimming 6 mm plywood Make turning constipation S. And polish on the corners of the rounding radius of 6 mm. Drill mounting holes with cekcords and attach constipation to the front edge of the middle support In (Fig. 1).Now insert the boxes, fill them with boxes with millions and you can start milling.


Milling is a processing process that requires high accuracy and quality. That is why special tables are used for such works. To date, available great amount Tables for the millingrer, but their price is very high. That is why homemade craftsmen are increasingly trying to make a milling table with their own hands. Let's talk about how to implement this idea and what to pay attention to.
About Design Design
Often the milling table is installed on the work workshop, nevertheless it makes sense to create separate design. At the same time, the product should be tough and stable. Some design elements need to sneak in stainless steel to increase strength, as well as use a metal profile to impart stiffness. The mill itself is mounted at the bottom of the table top. When working, no design elements should interfere with it. It is also worth noting that if you are going to make a milling table with your own hands, then install the mounting plate. A milling mill will be attached to it, so it should be very strong and stable. It is advisable to use such a material as textolite or a metal sheet. In general, the assembly is simply simply, but not fast. Let's talk about everything in order.
Required tool for work
Before you start something to design, you need to get a tool so that in the process of execution do not run there and here. You will be very useful to electric jigsaw. If there is no such, then you can do the usual hacksaw, however, the complexity in this case will increase significantly. It also applies to the plane. It is suitable for usual, but better electrical, as it is much easier to work with it and faster. The chisel is also necessary attribute. Sanding lumps can successfully replace the grinding machine. In addition, it is desirable to have a screwdriver and an electric drill in arsenal.

After that you can proceed to assembly work. I would like to draw attention to the fact that if you want to get accurate products, then put a ruler on the table. Often, the manufacture of the milling table passes with their own hands without problems, but before starting it is desirable to get the drawings that you can find in this article.
We are determined with the view of the table
First of all, you need to decide on the installation site of the milling table. In addition, there are various types of such products. For example, there are portable milling tables that are distinguished by their ergonomics and small sizes. In addition, there are stationary, they are assembled specifically under the mill and are the most preferred option if large amounts of work are planned. There are still aggregate milling tables. In this case, the milling mill is installed as an expansion of the saw table. It saves a place, but not always convenient and appropriate.
If you plan to use the milling table not too often, then the portable option is suitable for you. It will not take much space and if necessary, it can easily move it. If there is plenty of place in the workshop, then the stationary table is better. For the convenience of moving, equip it with wheels.

Production of the milling table with their own hands: Part 1
First of all, we take 2 clamps. After that, we make the main hole under the cutter. As a guide, you can use the Phaneur of a small thickness attached to the bolts. After that, go to the bed. This element is a stationary element of any milling table. By and large, this is a frame on the supports, at the top of which the tabletop is located. For the manufacture of a frame, almost any material can be taken, starting with plywood and ending with a steel sheet. The most important requirement is to achieve maximum stiffness and stability, so it makes sense to take care of a reliable fastener. The size of the bed must be seamless according to the maximum size of the billets that you intend to process.
We continue work
At the next stage, it is necessary to take care of the lower part of the bed. It must be deepened by 10-20 centimeters relative to the scene of the table top. Often the beds in 150 centimeters wide is enough to process overall blanks. For example, on such a bed you can work with door lining, ends of the billets of facades, etc. The height of the bed in this case should be about 80-100 cm, and its depth is about 50 cm.

It is imperative to pay attention to the height of the bed. As noted above, the optimal is considered the height of 80-100 cm. But it is best to try to make adjustable supports. In this case, you can adjust the height as it is convenient for you. As a material of the table, the most common, such as a chipboard. For example, a tabletop is suitable with usual kitchen table, Thickness can be from 26 to 36 mm. It is desirable that the coating is wear-resistant. But all this is not enough to make the milling table with your own hands. Drawings or at least a sketch are a mandatory attribute.
About the mounting plate
The milling mill is not attached to the table, but to a special plate. As a material, it is best to use something durable, but at the same time is thin. Let's say steel sheet will be not the worst decision. This is a rather durable, but not the most convenient option. If you appreciate comfort, then prefer textolite with a thickness of 4-8 mm. In the center of the mounting plate, it is necessary to drill a hole with a diameter that will be equal to the hole in the sole of the mill. The sole is equipped with threaded holes that are necessary for fastening. If there are no holes, they need to be made independently. Of course, special brackets can be used for the clamp. Any solution is suitable for a reliable and strong connection.

Assembly instructions
At the first stage, the tabletop is attached to the bed. A mounting plate is installed on the bed. Before fixing it, you must attach to the table and cover the contour pencil. Then the landing place is selected. In the priority of angles landing Must be a little rounded. Next, with the help of a cutter, which is more plate thickness, a through hole is made on the shape of the soles of the mill. At this stage, accuracy is not too important. Under the tabletop, take the place under the dust collector and other devices.
The milling mill starts, after which it is attached to the plate. With the help of screws, the mounting plate joins the bed. Hats with selflessness need to be drowning so that they do not interfere in the process. In principle, we practically produced the milling table with their own hands. Homemade table It is advisable to equip the upper and lower pressure device.

Brief about the mounting drive
If you are engaged in assembling a full-fledged milling table, then you need to take care of the electric drive. In particular, you need to choose the right power. The minimum should start with 500 watts, but it will only be enough for a shallow sample. The optimal solution will be a 100 watt electric motor. In this case, it will be possible to process the wood of any thickness due to the use of any cutters.
The engine of the engine installation itself should not cause any difficulties. Note that if you connect the three-phase motor to single-phase networkThe engine efficiency will fall twice. Therefore, it is better to use single-phase motor. If the engine is three-phase, then use a zero-triangle star connection scheme.
Milling table with your own hands: photo and something else

After you have collected the milling table, do not rush to start work. Take a test start and check how well everything works. After that, familiarize yourself with all safety rules. For example, it is desirable to use a protective screen. But along with this it is necessary to use glasses. In the most accessible location, an emergency shutdown button is set to "fungus". At the same time, it is necessary to think everything competently, it is desirable that there was no possibility of accidental pressing.
Take care of the backlight setting near the workplace. Since the workspace near the cutter is the most dangerous, it should be clearly visible. If you have a little free time, then do not be lazy and install the mechanism of lifting and lowering the cutter. If necessary, you can even make rotary table do it yourself. Milling Machine In this case, it will be possible to use more conveniently. It is useful when working with billets of various dimensions. In principle, it's all that can be told about how to make a milling table with your own hands.