Installation chandelier on the ceiling with your own hands. Fastening chandeliers to the ceiling using a mounting plank
So, you need to replace either from scratch to hang the chandelier on the ceiling in the house. At first glance, this event causes a slight concern and seems difficult for an electrician-novice. But everything is much easier than you think, because mounting work It is not more than half an hour and at the same time special efforts No need.
In order to hang a chandelier to the ceiling with your own hands, you need:
- familiarize yourself with the safety appliance;
- prepare tools and materials;
- correctly select the fastening method;
- install the product;
- check the correct connection.
Now consider it in detail each of the stages.
Safety technique
Any electric installation work Not safe, because a person deals with a high voltage current. To do not hit the current when connected, it did not fail at the time, we recommend to take into account the following rules and tips:
- Before hanging the luminaire on the ceiling, turn off the power in the network (just disconnect in the shield).
- Make sure there is no electricity in the room, turning on / off the light.
- Check with an indicator screwdriver voltage on the veins running from the ceiling. If current is missing, proceed to work.
- Perform with terminal blocks. "Dedovskaya" twist with insulation is not safe.
- Do not acquire Chinese low quality products, because Most often, they are in order.
- Take care of quality.
If you comply with these security measures, consolidate the chandelier on the ceiling can be quickly and without any particular problems.
Tools and materials
In order to carry out installation, you will need such tools:
- electric drill or perforator;
- ladder;
- screwdriver either screwdriver;
- indicator screwdriver;
- passatia.
From materials need to be prepared:
- connecting pads or (not always they are included, especially if the product is cheap);
- fastening element (hook or anchor);
- saws with dowels.
As for the latter, it should be clarified here. If the chandeling is carried out to the concrete ceiling, it is necessary to purchase anchor, they are better installed in the wall. In order to hang the housing on wooden ceiling You can do without a hook, use a tree screws (if a low weight lamp). It can only be fixed to the plasterboard only if you get on the frame from profiles using the metal screws.
Installation methods
In order to independently hang the chandelier to the ceiling in the house, one of three ways can be used, each of which is provided in advance by the manufacturer. If the product is not heavy, it can be hung on the hook. When weighing more than 5 kg, you must use anchor bolts. The design of some chandeliers requires the installation of a special plank (bracket). Well last method - Fastening the rear cover of the lamp directly to the ceiling or wall. Now we will consider in detail each of the above methods.
Hook
For installation light chandeliers You can buy an inexpensive hook with a dowel (as shown in the picture) and screw it into the ceiling, after which you hang on the hook of the loop provided for the design of the lamp.

We draw your attention to the fact that this method is suitable only if the ceiling is either concrete, because Then you can drill a hole in it and insert a dowel. If the plasterboard is plasterboard, apply this species Installations are prohibited, because the hook is simply abandoned after hanging the lamp.
If the chandelier is big and heavy, you can hang it on an anchor hook. Its design is represented in the photo:
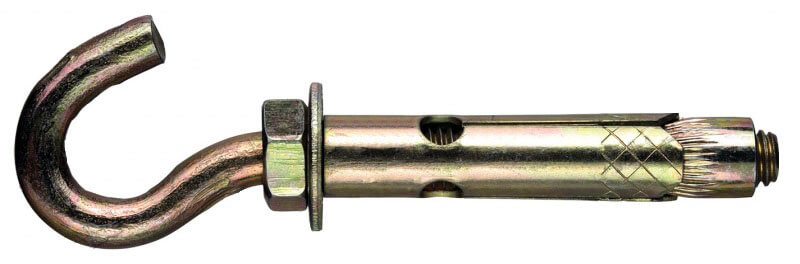
All you need is to drill the hole of the required diameter in the ceiling, then screw the hook. Anchor "will break", thanks to which the reliable fastening of the product is even more weight.
This connection can spoil the interior of the room, so it is recommended to buy lamps having a decorative bowl that will hide all fixing elements.
Bracket
If the manufacturer has provided a plank fastening, it will be necessary to spend a little more time on the installation.

Included there is a metal plank and 2 screws with nuts. All you need is to fix the bar (bracket), after which the chandelier itself is tightly to the ceiling.
This option is more laborious, but at the same time nothing complicated. The main thing is to correctly adjust the distance between the screws (it must match the distances between the holes in the luminaire case itself).
Back cover
If you wish to hang a chandelier to the ceiling without drilling a perforator, you need to choose special view Lamp, whose plastic can be attached by self-draws. In this case, you just need to screw several screws through the holes in the back cover. Most often, this method of fastening is used if the product is easy and installed on the wall (as shown in the picture).


Connection
So, each of the ways of connection will be understood, we will provide the appropriate step by step instructions for Dummies.
If you use a hook, sufficiently sew a hole in the ceiling, drive a dowel (or anchor) into it, then screw the hook itself. Next, you need to connect the wires between the case and the supplying cores, carefully draw them (if required) and only after that hang to the chandelier on the hook. This needs to be stopped in more detail for you to know how to connect the chandelier on the ceiling.
If the design of the lamp does not provide grounding, you need to connect two wires to the case - phase and zero. As a rule, metal lamps provide additional grounding, so in this case you will deal with three wires - phase, zero and grounding. Each vein must be connected in the terminal block according to color marking wires as well conventions. If there are 4 wires from the housing of the lamp, it means the chandelier to two light bulbs and it is necessary to connect it by analogy with two lamps.
Video Course on Connection
If you are installing wiring from scratch, then you need yet. You can get acquainted with technology by simply by clicking on the link.
In order to even hang the chandelier on the bracket, you must first set the screws at a suitable distance. Then fix the bracket using a dowel-nail. Next, the body is necessary to turn through the studs, and with the help of decorative nuts, it is securely fix the product on the bar. As in the previous case, the wire connection must be carried out in advance.
We also pay your attention to very important moment. When connecting the chandelier, the veins must be properly connected: phase with phase, zero with zero, and ground grounding. If you confuse contacts, it will happen. To this not happen, we recommend familiar with.
Well, the last way is to fasten the back cover directly to the ceiling. In this case, the design of the product has several holes on the back cover, which are simply fixed by self-drawing. There is nothing complicated, the only advice that I would like to give - all holes are not necessary to use. If the lamp is light, but 4-5 holes are provided, then three screws can be enough to hang the case.

Connect the socket, switch and light bulbs in distribution box
Control check
When you complete the connection of the electrician, you need to check all the work. First, visually - so that it is not visible to the wires (hide veins in the case). After that, you need to shake the lamp to make sure that the fastening is reliable. Well, in the end, turn on the machine and if it does not choose, and the lamp itself does not convince, it means everything is done correctly! As you can see, hang the chandelier to the ceiling you can easily at one person and even a woman! The main thing to comply with all the rules that we told you about!
Non-standard situations
Above, we provided you instructions for installing chandeliers in the most standard conditions - when the ceiling is smooth and without defects. At the same time, sometimes you have to fix in non-standard conditions, which we will talk briefly.
To hang a chandelier on the stretch ceiling, you can use the bar, as shown below in the photo. In this case, the mount can be carried out even if the ceiling is already stretched and besides the replacement of the lamp can be made without danger to damage the film coating. 
If you decide to hang the product on the beveled ceiling, in this case it is best to use hanging on a chain. When for some reason you have to change the location of the chandelier in the apartment, the main thing is not to get into the wiring when drilling a new hole in the ceiling. To do this, it is recommended to use which will show where the wires pass.
If there is already a hole in the ceiling, be sure to use it to re-drill the hole to the perforator. Too big hole You can hide a special plaster flange that is sold in most construction stores.
If there are three wires of the same with the holes, then in order to find a phase, zero and grounding will have to use a multimeter. With a two-wire electrical wiring, things are easier - to find a phase and zero can be an ordinary indicator screwdriver (when touching the phase, the light lights up).
Did you like the article? Add "" to bookmarks and we will delight you new affordable instructions with visual video examples as well electrical circuits. We hope you it became clear how to hang a chandelier on the ceiling of plasterboard, concrete either tree!
Similar materials:
Video Course on Connection
The chandelier is not only the light source, but also effective designer reception. The truth is decorative element It has its own characteristics of the installation that directly depend on the chandelier device. At first glance, it may seem that the chandelier hang is very simple, but in fact there are many nuances in this procedure, which is very important to take into account.
Methods of fastening chandeliers
On a hanging hook
How to hang a chandelier on the ceiling? Such fasteners are often mounted directly to the ceiling at the stage of construction or repair of the room. Before installing chandeliers for suspended ceilings, make sure that the hook will withstand its weight. To do this, there is a cargo to him, by weight equal to the lamp or simply pulls for it. After you make sure that this mount is reliable, you can start setting the chandelier.
To install the hook, it is necessary to drill a hole in the ceiling, screw the anchor into it or the hook self most. The first fastening type is used for concrete floors, the second - for wooden. After that, the anchor or self-tapping screw is necessarily wrapped with an insulating tape in two layers. The chandelier is suspended on a special ring.
On the bar
In this case, the chandelier is suspended not on the hook, but directly to the bar, which is fixed on the ceiling. To install it, you need to place the place where you want. Then in the ceiling drilled holes in which a dowel is clogged. They must coincide with the holes on the fastening bar, which is fixed with the help of screws. The lamp, in turn, is fixed to the bar. It is mounted so that the element covering the wires and the fastening place is tightly faced to the ceiling.
How to hang a chandelier on the ceiling
The setting chandelier to the stretch ceiling should be carried out very carefully, since the canvas sensitive to various kinds of mechanical damage. Therefore, it is necessary to do everything very carefully (more details: "").
There are several ways to install chandeliers on suspended ceiling:

To create durable mounting on the ceiling, special plastic rings are used. Their size depends on the type and size of the chandelier itself. Such a ring is glued to the stretched canvase. After that, by its inner diameter, the hole is cut on the wiring and hook.
How to hang a chandelier on the ceiling from GLC? Everything is simple enough. Mount the chandeliers ceiling suspended better with the help of special fasteners - butterfly dowels. When screwing into them, self-pressing, the dowel is folded into the hole and is able to keep a fairly large weight. On the canvas itself, the places of fastening of the chandelier are placed in advance with accurate indication of drilling points. The holes are made by 3-4 mm more than the diameter of the dowel.

What if the chandelier is heavy
The method of fixing a large and heavy chandelier depends on the material of the ceiling itself.
Concrete overlap
How to hang a chandelier to the ceiling of concrete? The surface is drilled by a perforator how to hang a chandelier on concrete ceiling With the help of an ordinary drill it will not work (read: "How to hang a chandelier to a concrete ceiling - options and rules of fastening"). An anchor pad hook is inserted into the resulting hole. It is fixed until it stops, while it is necessary to put on the end of the threaded part of the coupling. Due to this, it is possible to create a strong and reliable fastening of the chandelier, regardless of its weight.
If the ceiling is made of drywall, the lamp is fixed to the base base.

To do this, you will need:
- anchor-collet;
- rhy-nut;
- threaded stud, with a diameter of 10 mm.
How to fix a Chinese chandelier
In order to hang the Chinese chandelier, you do not need to use mounting hooks. The entire set of fasteners is already included with the lighting device.
The place designated on the ceiling is applied with a bracket. With the help of a drill or perforator, a hole is done in which the dowels are inserted. And with the help of screws, the bracket is fixed to the ceiling.

How to hang the chandelier to the ceiling? The above-mentioned bracket has a special mount to which the chandelier is suspended by means of a decorative plate.
It would seem that it could be easier than hanging a chandelier? But even in the very simple case Some nuances may arise. Consider several variations of fasteners used for reliable mounting chandeliers.


The installation of most types of fasteners is very simple. Most often used screws. The diameter of the self-press will be completely dependent on the mounting hole, which is located on the mounting bar. Their length should be at least 4 cm and no more than 6 cm. If your dwelling is quite pretty low ceilingsYou're better to buy chandeliers-plaffones that do not have a rod.
Note! Working on hill with electrical wires, Note that even light electric shock can lead you to fall and injury.
Caution! We work with electricity!

Before installing a electric life, check the presence of phases. Zero wire will always be common. Phase, in turn, are connected through the switch to the lamp. The indicator will help you determine the zero phase. As for the indicator, it can be two species: electronic or with a quenching resistor having a neon light bulb. Externally, it resembles an ordinary screwdriver. In the process of using the indicator, slightly clamp it with your fingers (index and middle). In this case, use only right hand. As a rule, the clamping place is indicated by color or has special notches. It is also equipped with a special safety cuff, which separates it from the sting. It is not recommended to be touched before the sting when determining the phases.
- Initially turn off all the plugs.
- The ends of the wires on the ceiling are dense and be sure to spread them to the side to avoid short circuit.
- Then the plugs are turned on.
- If you have a double switch, then the phase wires will be two, and if one is single, respectively, one. In order to check the phases, you only need to disable the switch. In this case, the indicator does not respond. If the phase is detected, then the phase is required. The neutral wire is started directly if it comes to a unipolar switch. In fact, this process is not so complicated as it may seem first. However, if you have not previously worked with electricity - do not risk.
Location of wiring in the basic ceiling

Before you start drilling holes for mounting fasteners, you need to determine where the wiring is located. IN otherwise The probability is that you will overcome it. Search need in wires under electric shock. This procedure takes place in such a sequence:
- First of all, traffic jams on the counter are disconnected.
- Temporarily connects the cartridge under the light bulb.
- After that, you can turn on the plugs and, accordingly, the switch. Now you can search for wiring.
Note! To achieve the most quick result, it is better to use the electronic indicator, because its analogue with an neon lamp operates only with direct contact with the elements leading the current.
There are special devices designed for this purpose. However, they have a fairly high price. If your wiring has been recessed in the shoes, the error in the instrument readings can be five centimeters. In contrast, the indicator gives the result with the maximum accuracy where the error is up to two centimeters.
Drive the device on the ceiling, putting a finger on the button. The movement of the device should be carried out perpendicular to the intended direction of wiring. If the phase icon appears on the display, then make a label in this place. Continue to keep the indicator. When the phase icon disappears, re-mark. Then the same procedure should be repeated in the opposite direction. In the middle between the internal marks is the wiring. Next, you should continue the process according to the same scheme. So, you need to do before the completion of the working area.
Standard types of fasteners

Installation chandelier on conventional fasteners is reduced to what you need to breed the eating wiring in the lamps sections. To make the wires in the chandelier, is checked in which of the phase. Ground wire must simply bend. Usually in chandeliers grounding wire is indicated yellow, along which the green strip passes. In addition, all wires will be headed into a connector or terminal.
Zero wire Connect first, connect together all zero wires that are from cartridges and combine them with zero wire network. Now you can start connecting phase wires. Connection runs similarly. Phase wires are connected to the phase wire that goes from the switch. Sign in place cap, and work on connecting chandeliers to electrical network It will be completed.
No wire marking?
If there is no labeling and terminal on your chandelier on your chandelier, then the chandelier should be squeezed. The procedure is carried out using an ordinary tester. Remember that the chandelier can be called a chandelier from a 220V network can be dangerous for your life. Do not make experiments with electricity! In order to spend a call, screw the same light bulbs into all the cartridges not only in power, but also the brand. It is better in this case to use low-power incandescent lamps - no more than 25 W. Just do not use economy lamps, because it is impossible to carry out a call with them!

In the image of the chandelier scheme, it can be seen that if the resistance of one lamp is equal to R, then it will be, between zero and FI will be R. Accordingly, between zero and FII - 0.5 R, between the phases there will be 1.5 R. for three wires, You should spend six measurements. To understand this scheme, you need to remember the Ohm law, which everyone passed through the school program.
Non-standard chandelier

Nowadays, there are often chandeliers that are equipped with a remote control. remote control. So, you can regulate the degree of illumination of the room. Some chandeliers are equipped with an air ionizer, a fan or even the evaporative unit from the air conditioner. If you comply with some rules when choosing light fixtures of this type, then you can correctly hang even a non-standard chandelier.
- Choosing a chandelier, see what way it should be connected. In addition to the terminal box may be present in the device and other wires. If you do not know their purpose, then ask the instructions from the seller and carefully read it.
- Suppose that according to the instructions are not entirely clear how to independently install non-standard chandeliers. Then this work is better to entrust the qualified specialist.
- Remember that chandeliers equipped with additional features, It will cost much more than the usual analogs of them. Often it is very difficult to find specialists who could connect them.
Inspire chandeliers in difficult situations
How to hang a chandelier on the ceiling, if there is no typical mount, or it is impossible to use it? To do this, you need a tool for working on wood, stone, plasterboard or concrete. Now you can proceed to work.
First Difficulty: Low Ceiling
The most acceptable option with a low ceiling will be fastening the chandelier chandelier chandelier. How to be if there is no desire to mount the ceiling in a low room? 10-15 cm can be added, hanging the chandelier having a rod, on the ceiling, without using the hook.

To do this, the standard mounting bar you need to straighten, and after cutting up so that it hides under the cap. In the bar, drill new holes that will be intended to screw the screws. Now you need to improve the chandelier:
- Remove the plaffones and all existing fragile parts. If possible, immediately remove the rod.
- Pull the wires from the terminal bar.
- Immediately for carvings, drill 3 holes along the rod, with a diameter of 4-5 mm. Make sure that all the holes are hidden under the hood.
- In these holes, stretch the fishing line - 3 segments. Screw it to the ends of the wires, and after tight wrap the non-scotch.
- Put the rod to its former place. Take it carefully on the wires, in parallel tightening the slices of the fishing line. Continue to do it until the ends of the wires will come out of the holes. If the wire closed, then correct it with a tweezers or a wire crochet.
- If it is impossible to remove the rod on your chandelier, then enter the slices of the fishing line in the holes alternately. Start from the bottom and in the same way to print the wires.
- Now the wires re-enter the terminal bar.
This refinement is necessary in order to display the wire on the side. Thus, they will be as close as possible to the ceiling. If the rod on the chandelier cannot be removed or it is made in the form of some kind of figure, then do not remove the cap. Otherwise, to wear it will not work out due to the heading of the wires.
At this stage, the rod located between two standard nuts, you will need to install the mounting bar, which will help subsequently attach lighting To the ceiling with the help of self-tapping screws. Now connect the wires. If the terminal bar does not have enough space, then remove it.
Note! To avoid problems with flashing lighting, you should not connect the wires of the twist. To achieve the most expected result, you will have to connect the wires of the wire, and the junctions to be insulated by applying a simple isolent.
Second difficulty: Plasterboard ceiling

Luster weight playing important role in the process of hanging it. For example, if the lighting device weighs no more than 3 kg, then it is best to fix it with a butterfly. This fastener has a plastic clip and, moreover, a helical hook. In accordance with the hole holes, drill holes in the ceiling. Then screw the hook into the clip of several revolutions. Insert the clip until it stops into the appropriate hole and thoroughly tighten the hook. Plastic clip opens from the inside into the petals that fix the hook.

If the chandelier you purchased is weight in the area of \u200b\u200b5-7 kg, then you can consolidate it on the so-called console planks. For each attachment point, it is recommended to use a butterfly dowel. In the process of twisting the self-press, from the inside the butterfly is gradually revealed, so that a reliable fastening is formed.
If the chandelier bought is heavy and exceeds 7 kg, then in order to suspend it, you will need to use a collet stiletto, the diameter of which should be 1.2 cm.

In order to establish a collet stud, drill a hole in the basic concrete ceiling (through drywall) corresponding to the diameter and length of the sleeve. Put it into the hairpin, and then insert it into the hole until you stop, screw. Now the collet will disdain and turn inside the ceiling. Outside there will be a threaded end. You should screw the hook with a threaded nest.
It is worth it, however, considering that the suspension chandelier on the hook through a layer of plasterboard can be unreliable. This is explained by the fact that Tsang runs about the sheet of plasterboard, thereby destroying it. In view of this, it is better to choose chandeliers equipped with a console fortification.
Third difficulty: stretch ceiling

The most difficult to hang a chandelier on the stretch ceiling. The first thing is important to take into account, incandescent lamps cannot be screwed into the chandeliers installed on the stretch ceilings. Even 40 W incandescent lamps a month later, stains are formed on the ceiling, and after three months - it will be mounted at all. In addition, it should be noted that the economy light bulbs in the ceiling chandeliers are quickly blown up. This is due to poor heat exchange. Most good option - Installation of LED lamps.
Note! In the already installed stretch ceiling, install the chandelier is impossible! Any attempt to make a hole in it is susceptible to collapse, because the fabric either film will instantly disperse, because of what you have to change it.

The best option is to call specialists who mounted stretch ceilings. However, before that, you still have to prepare the basis for the fastening of the chandelier. Ordinary fasteners are not designed for the installation of chandeliers in the stretch ceiling. In view of this, if you are going to hang a hook chandelier, it should be fixed in the ceiling in advance. If there is a boutique or mounting plan as an attachment, then it is necessary to attach a pillow to a concrete ceiling, which is made from the waterproof MDF or BS plywood. Its thickness should be at least 1.6 cm. Do not install a wooden pillow from ordinary plywood. This is due to the fact that this material has sucked over time, which can lead to an accident.

Before making a hole in the tension ceiling film, you need to measure the pillow. After, the hole must be framed by chalk. Using long fasteners suspended chandelier. The gap to the "game" of the stretch ceiling should be taken into account. In the event that a larger hole is required, you can additionally secure spider.
Note! If you want to drown a chandelier to the ceiling, then the chandelier is installed first, and then the ceiling itself. However, remember, the chandelier as lighting in the composition with the stretch ceiling is not the most the best way. Why? The fact is that due to the uneven load, the ceiling will overcome, because of which it appearance will be lost.
Fourth difficulty: no hook on the ceiling

If you consider below the presented sequence of work, you can successfully install a reliable hook screw.
- For starters, drill the hole. It should be a little more fastening bolt.
- Two wires having a diameter of 0.8-1.2 mm are screwed into the hooks of the hooks. At the same time, from two sides, leave the mustache for 1 cm, divert them by 90 ° from each other. Visually, they should be perpendicular to each other and disperse four different sides.
- Hole, previously drilled in the ceiling, you must smoke.
- After preparing gypsum Solution. By its consistency, he must remind the sour cream.
- Then the hole must be filled with this mixture. While the solution did not have time to grab, the hook is carefully inserted, which previously screwed the wire.
- It remains only to wait for complete drying. It will take approximately 2 hours. To achieve the most effective result, better wait for a day. After you can hang a chandelier.

If the hook you use should be attached by self-drawing, then make the sockets for them as well as described above. However, take the wire thinner, it can be 0.4-0.6 mm. For each nest, you need to make a solution separately, due to the fact that it quickly hards. Interestingly, such nests can not serve one century. They, unlike plastic, do not breathe. Moreover, with a three-time screwing and twisting the hook, the socket does not break. If necessary, it can simply be cleaned of the old aggregate, using a narrow point and update. If you need to stack the surface of the ceiling, then the gypsum-alabastron socket is also shrank. After hardening, you can again make a hole for the hook.
You have experience fixing devices for lighting to different types Ceiling? Maybe you faced unforeseen difficulties in the process of performing work? How did you cope with them? Share with us experience! We appreciate your knowledge! Write us your comments on the article!
Video
Look detailed video How to hang and connect to the chandelier:
Schemes


The choice of lighting devices for the apartment must be considered responsibly. When purchasing a lamp, first of all, it is necessary to figure out how to properly fasten the chandelier to the ceiling and attach it to the power grid.
In order to cope with the task and make it all correctly needs to prepare tools so that in the process of mounting the chandelier on the ceiling, nothing distracts the wizard:
- need enough strife height (you can do the table);
- manual electric drill or perforator;
- pliers and nippers or booths (from electric shock, handles must be isolated);
- various screwdrivers (including with the function of the indicator);
- coil isol;
- several mounting blocks (with a margin), for wire clips;
- the necessary fasteners, to which the chandelier chandelier will be made.


 Elegant chandeliers
Before fixing the ceiling chandelier, be sure to check out the instructions for connecting it to the power grid. Usually given in it detailed description All operations, therefore, special difficulties at the master, a little disassembled in electricity, should not arise.
Types and attachment methods
Choosing your lamp, still in the store you need to pay attention to the attachment methods.
Modern ceiling lighting devices are available with several alleged fastening types for chandeliers:
- the loop on the fixture of the lamp, which allows you to install it to the ceiling hook. This is one of the main types of fastening. ceiling chandelier. In this case, the base should be as fast as possible, for example, concrete floors.

Hook mounting scheme

- fastening the ceiling chandelier to the bracket or a special mounting bar. With such a fasteners, the load from the weight of the lamp is divided into several different points. The bracket is attached to the ceiling by a dowel with screws screwed into them. In this case, the weight of the chandelier should not exceed 1.5-2.0 kg.

Mounting scheme for mounting bar

- cross or Double perpendicular bar allows you to hang the lamp adjacent to the ceiling, for example, a chandelier. The cross plank is not much different from the bracket, except that the mount is carried out in larger quantities Points and lighting can have a large mass.

The attachments on the cross-shaped bar applies, as a rule, when installing square lamps

- reliable 2-way platform for attaching a massive heavy chandelier. Allows fasteners at several points.

Fastening a heavy chandelier on the platform
Installation work on hanging the lamp usually do not cause great difficulties. As a rule, a dowel with self-draws is used to attach chandeliers on the ceiling. The diameter of the screws must correspond to the magnitude of the opening of the fastening plate, in length they should not be shorter than 4 cm and not longer than 6 cm.
Having considered the types and methods of fasteners, you can decide how to install a chandelier on the ceiling correctly, without unnecessary and unpleasant consequences.
Installation with the ceiling hook
Usually the hook for fixing the lighting devices is mounted yet when construction work. In this case, before hanging the chandelier on the ceiling, it is necessary to check it on strength.

Mounting hook
For checking, for some time the load is suspended to the installed hook, appropriate weight or a little heavier chandelier. In case the fixed load has not shifted, you can safely hang the chandelier to place. If the fastener has shifted, and even more so it fell, you can independently carry out installation work.

Test hook weigh chandelier
For this you need:
- the perforator is done by the desired hole (if it has not yet been);
- it is inserted correctly selected metal anchor or folding spring dowel with a ring. He must fit tightly to internal surface drilled hole;
- in a wooden ceiling, it is enough to screw the durable hook-self-tapping screw.
This is the simplest method describing how to attach chandeliers to the ceiling.

Sketchy mount holding element
In case the ceiling is trimmed with plasterboard or installed stretch clothWorking on fastening chandeliers on the hook can complicate.
Plasterboard sheets are pretty durable, so the mounting of a small lamp can be carried out directly to the material itself, but it is worth considering small nuances:
- the mass of the attached lighting device should not exceed 6 kg;
- it is worth paying attention to the fact that when replacing the lamps you can damage sheets or accidentally touch the low luminaire.
So when installing the ceiling from plasterboard sheets It is necessary to think over the lighting of the room in advance, and make a hole in the material under the mounted hook.
If this was not done, you can suspend the chandelier on the spring dowel or a special butterfly installed in drilled hole. The dowel will be necessary to twisted a special nut, and pull the butterfly strut tighten the screw to the click. All fasteners should be equipped with a pin or hook, which is fixed by the chandelier.

One of the options for fastening the chandelier, if the ceiling of plasterboard
When installing the stretch ceiling, you must take care of how to fix the lamp. It must be remembered that the stretched canvas cannot serve as a fastening base for the chandelier. By mounting the stretch ceiling, workers, before cutting the hole to attach the lamp, glued the thermocole in advance. If this is not done, it will be impossible to hang the chandelier to the ceiling, since the stretched canvas will rush. Through the cut-cut hole, connective wires are displayed.
With this option, you first need to suspend the chandelier on the hook, and then attach electric wiresAfter which the mounting place is covered with a decorative cap of the lamp.

Fastening diagram with stretch ceiling
Video instruction installation chandeliers on hook
Installation with mounting plank
Before mounting the chandelier to the ceiling with a fixing plate, it is necessary:
- touch the place where it will presumably hang. At the same time, the decorative components of the lamp covering the place of attachment and wires should fit tightly to the ceiling;
- if this is the center of the room where the mounted hook is located, then it should be beaten, but not to cut. Perhaps in the future, upon subsequent replacement of the lamps, it is still useful.

Try on a bar for future position
- marking under the fastening of the plank. For this, the bar is applied to the ceiling and rub the pencil so that the attached elements do not interfere with the connection to the power grid. We are planned drilling places. Plastic dowels are neatly driven into the drilled holes. The plastic must be the ribbed, which will prevent him over time to fall out and start falling out of the nest;
- with the help of screws or screws fastening bar attach to the ceiling.

Fresh bar and bending a hook (maybe it is still useful in the future)
- after mounting the connecting wires, the bowl or other decorative element is applied to the installed bar, combining the connecting holes.

Connect wires
- twist the whole design with decorative nuts, after which you can screw the bulbs and set the plaffones or other components of the lamp.

Ending work - ready chandelier in the interior
It is worth noting that it is difficult to hang a chandelier to the ceiling. For connecting wires, one more hands are needed. Therefore, when connecting the lamp to the mains, one person holds a chandelier, the other is engaged in wires.
In case of installation stretch ceilings, The base for mounting the plank must be installed in advance. It can be ordinary wooden barber, necessary thickness, Which before mounting the canvas is attached to the ceiling overlap, and then the plank is mounted on it.

Barbed under the stretch ceiling
It is necessary to consider how to properly install the lighting device on the ceiling of plasterboard. It was already noted that with a small weight chandelier, it can be fixed directly on the sheets. With a more massive version of the lamp, you need to take care of the additional substrate in the form of a bar or metal profileTo which the mounting plank will be attached.
Correctly hang a chandelier on a cross or a foreign platform in the same way as in the case of a mounting plate. It is worth considering that this option provides heavy lamps, so you need to take a dowel and self-samples of greater length and diameter.
Mount the chandelier on the ceiling with your own hands without problems, the main thing is to prepare required Material and tool, explore the accompanying instructions for connecting and constantly have an assistant.
Video instructions for mounting chandeliers on the bar
Traditionally it is believed that the chandelier connection is a complicated business that the professional electrician should perform. But, there is nothing difficult in connecting two or four wires, so any man may well hang a new chandelier in his own house.
Connect chandelier in a new house
If it is just built a private house, And if it is built on his own, then everything starts with wiring. Usually, it is made internal. Although, you can use the outer wiring, which is removed into the decorative casing.
Internal wiring
In concrete, brick or wooden wall Special groove is done under the electric wires. This groove is called a stroke. You can make it or a special device, a stroke cutter, or an ordinary chisel. In case of wooden wall - chisel. The same groove is done in the ceiling overlap.
Channel Channel
The wire is placed in a special casing, which is closed from above during interior decoration premises. No need to forget about the distribution box, from which the wires should be dispelled on the chandelier, to other lamps, on the outlet and on the switch.

Junction box
The availability of a junction box will facilitate a fragment replacement electric wiring If necessary.
External wiring
The principle of laying external wiring is the same, with the only difference that the stroke is not done, and the wire is fixed directly on the wall in the insulative decorative casing.

Wires in the insulating casing hide in the wall
If the one-block switch, then two wires go to the chandelier. And if two-blocks are four. Usually, pairs of wires in the chandelier itself different colorSo there are no problems with the connection.

Single Collaborator Connection Scheme
When conducting wiring, it should be borne in mind that it is necessary to leave enough long ends to connect the chandelier. So it will be more convenient to connect. Surplus can always be hidden or in a hole in the wall, or behind the decorative lid of the chandelier.
Types of fastening chandeliers
There are chandeliers that are pretty heavy. And on how well it is fixed, the safety of people under it depends. The way it will be attached, you need to decide, looking at the manufacturer provided by the manufacturer. Usually, it happens two types:
- fastening using a plank;
- fastening with hook.
How to hang a chandelier with a plank
Almost all modern chandeliers are attached with the help of a plank. It is a strip of metal that is fixed on the ceiling by self-draws. So that the fastening is reliable, you need to drill two holes in the ceiling overlap. Plastic choppers are clogged into the holes, to which the plank is attached by self-draws. Self-tapping screw, entering into chops, expand them, which is why this fastening becomes even more reliable.

Photo: Fastening chandelier using a plank
After the strap is fixed on the ceiling, you must connect to the chandelier of the wire. It is better to use the services of an assistant who will keep the product. Although, you can temporarily suspend the chandelier at some distance from the ceiling with a strong and thin capron rope. And connecting the wires, outweigh it as it should hang. In this case, one person can do all the work.

You always need to use a ladder for such work. No need to put on one another stools, a table, etc. It is dangerous for your health.
Wiring mounts can be different. On modern products, special clutches are sometimes made at the ends of the wires. Wires that come out of the ceiling are inserted into these clutches and secured the bolt. If there is no couplings, then the ends of the wiring and the chandeliers are simply twisted with each other. It is twisted. You can not connect the wires simply making hooks at their ends, since the connection must be durable.

Photo: Wiring connections using terminal bar
All is isolated using high-quality insulating tape. If the wires are copper, consisting of many lived, then before connecting all the veins need to be twisted. Of course, the ends of the wires must first be cleaned of isolation.

On the modern chandeliers At the ends of the wires there are special coupling for connecting: it is enough just to press the spring with a button or lever, insert the wire and everything!
After the wires are fastened and exhausted, you need to raise the chandelier and hang it on the bar. Usually, no difficulties arise with this. Each chandelier has a decorative casing, with which the electrical ends can be closed. This work is facilitated when when the chandelier is hanging, in the place where the chandelier will hang, provide additional recess.
How to hang a chandelier on the hook
If the mounting on the bar is not provided, then the hole is thrown into the ceiling, the plastic chopper is driven into it, and the hook is screwed into it. Usually, the wreck is equipped with a special retainer, which is driven into the drilled hole and further turns the struts. The concrete ceiling is brightdled by a winning drill to a depth of about 7-8 cm.