Brick oven baby for a summer residence. Oven baby
Cooking oven "Swedish"

Having listened to the wishes of the hostess of the house and having estimated the volume of the room where the stove was supposed to be installed, I offered a choice of two options for the Swede: with a hood or a "three-way". I showed a photo of my stoves, and opted for a Swede with a hood.
The foundation for the furnace was poured in the same autumn, and the purchase of basic materials and equipment began in the spring, at the beginning of May. I bought a furnace, ash and cleaning doors, a two-burner hob, two latches, three grates and a brick of the Kemma brand 1. I always advise my clients to use ovens for masonry ceramic brick of this particular brand, since this is a guarantee of the durability of any properly folded stove.
By the time I delivered all the materials to the jobsite, the construction team had already installed a heat-insulating screen on the wall of the house adjacent to the oven. This screen is a wall-mounted, lightweight frame structure from standard metal profiles(they are usually used for mounting drywall panels). The space between them is filled with mineral wool slabs, and galvanized steel sheets are attached on top of the slabs. The task of the screen is simple - steel sheet reflects infrared radiation and mineral wool slab works as a heat insulator, protecting the wall of the house from direct heating.

In the course of the preparatory work, some changes had to be made to the design of the furnace. The fact is that the former builders, who began to build the house, did not arrange airflows in the foundation, which is why it was constantly wet and damp under the floor. Therefore, they decided to use natural draft in the smoke channels of the stove for ventilation of the underground. This in itself is nonsense, since using a chimney for ventilation lowers the temperature. flue gas and leads to excessive consumption of firewood, but in our case it was impossible to correct the mistake of the builders in another way.
To organize forced ventilation underground, during the pouring of the foundation for the furnace, a plastic (PVC) pipe had to be laid in it, which plays the role of a ventilation duct for the underground. On the orders it is clear that in rows 1 to 5, a special broadening is made in the masonry, where this plastic pipe from underground, and in the 2nd row a valve is installed, which allows you to control the draft and the intensity of ventilation. During a test fire, I checked the presence of draft in the ventilation duct - everything turned out as planned.

We lay out the stove in accordance with the orders. There are no special tricks in individual rows. After installing the hob, we erect a cooking chamber open on both sides above it. Unlike the Swedish ovens that I built earlier, here I decided to make the ceiling above the cooking chamber in the form of an arched vault, without supporting corners or any other metal.
The procedure for erecting the arch is usual - first we lay out all the side walls (up to the level of the 18th row), and then we set it over hob circled, the leading edge of which should protrude beyond the front wall by about 2 cm. It is best to fix the circle on stacks of bricks and set it on a level, placing wedges under its edges.
On the right and left, we cut the edges of the bricks adjacent to the arched arch at the desired angle. When laying out the arch between the bricks installed on the edge, we lay the pieces of brick wedging them so that the gaps are the same everywhere, and then we fill the joints with mortar. To do this, it is better to use a special heat-resistant mixture with the addition of cement, then the roof will be more durable and resistant.

Higher, above arched vault cooking chamber, lay out the hood with cleaning doors. True, in this oven, its height had to be made a couple of rows less than usual. They were not allowed to raise the cap higher load-bearing beams ceiling slab. The pipe also had to be slightly displaced and turned 90 ° in order to bypass the floor beams, observing all the rules and fire safety requirements. As expected, I raised the pipe above the ridge, and on top, to protect it from rain and snow, I laid out a "house". The pipe with the "house" turned out to be original and unusual, which was very much liked by the owner herself and all her neighbors. Tatiana even came up with a name for this "house" on the pipe - "Teremok".

After drying, the test furnace was successful without any comments.
Stove order Swedish

Oven "Swedish baby"

The Swedes can be called the most popular ovens. This is primarily due to their versatility. In the structure of the Swede, a cast-iron stove is provided, on which it is possible to cook food, and through a complex of chimneys that permeate the mass of the stove, it evenly warms up during the heating period, and then slowly transfers the accumulated heat to the room.
The stove is usually located in the cooking chamber - with open or closed doors. The doors closed after heating help to better retain heat, which allows you to simmer food in the cooking chamber. Often, the stove is complemented by an oven, in which you can bake pies, bake meat, fish or vegetables. Swedish can be used to dry mushrooms, apples and herbs.

Front conventional stove with a Swedish shield - like heating stove- has a significant advantage. With the same occupied area, it has a more developed convection zone, smoke flows are located not only at the base of the furnace and on the side, but also above the cooking chamber. Therefore, its efficiency and heat transfer are much higher.
The Swedish stove can be placed in any part of the heated room, but the most convenient place for it is in the opening of the wall or partition between the room and the kitchen. The main thing is that the chimney comes out of the roof closer to the ridge. This will improve traction in the oven and facilitate waterproofing around the pipe.
You can heat a Swede with wood, peat and coal - depending on the design of the firebox. But it is not recommended to transfer this stove to gas fuel. Even in case of minor equipment malfunctions, gas can accumulate in the smoke circuits and hoods and, during the next firebox, explode. In practice, there have been such cases.

Fig 1. General form
An example of a small Swedish woman is a stove (Fig. 1) with dimensions in plan 89x63.5 cm and a height of 189 cm. The convection zone of this stove is successive duct smoke flows (chimneys). Their compact arrangement creates conditions for uniform heating of the entire furnace mass. Horizontal chimneys are located below the blower, at the very base of the stove, and above the cooking chamber, at the very top of the stove. After two hours of the furnace (the generally accepted mode of the furnace of heating and cooking furnaces), the entire outer surface of the furnace heats up. Despite its small size, the stove heats a room with an area of 25 m2.
The stove can be fired in summer and winter modes., which are regulated by valves 1 and 2 (Fig. 2). In summer mode, both smoke dampers are open. When switching to winter mode the valve of the summer furnace 2 must be closed, leaving only the main valve 1 open. Hot flue gases, having changed their direction, will enter the lower smoke channels 8. By moving counterclockwise along the perimeter, the gases will warm up its lower mass, then will enter the lifting channel (well) 13. Warming up the well, flue gases will enter the upper chimney 9. Moving clockwise along the perimeter of the furnace, they will warm up its upper massif and only after that they will enter the chimney.
The stove is equipped with a single-burner cast iron stove. The oven is not provided in the design of the oven. In fig. 1 shows general form Swedes, and in fig. 2 - cross-sections of the furnace and its ordering.
The first two rows of the stove are laid with small protrusions. It does appearance more interesting. The 1st row is laid out solidly, and on the 2nd, the lower chimneys begin, which are covered with two rows of bricks (on the 4th and 5th rows). In rows 6 and 7, a blower is formed, above which - on the 8th row - a grate is installed.
Starting from the 7th row, part of the masonry is carried out with fireclay bricks. The firebox in the stove has a height of 40 cm. This is enough to maintain normal firewood burning. This firebox is not suitable for the use of coal and peat.
Above the stove, installed on the 13th row, the cooking chamber begins. Its height is 42 cm: it is quite enough to easily put and remove from the stove a saucepan or even a bucket of water. To mount the slab in the bricks on which it lies, quarters are cut out. Temperature gaps are left between the edge of the slab and the brick.
A valve is installed in the overlap of the cooking chamber (on the 21st row) for its ventilation. On the same row, a summer run valve is also provided. Above the overlap of the cooking chamber, there are horizontal chimneys that help warm up the upper part of the oven. The main oven valve is located on the 27th row.
Furnace construction order
: You cannot download files from our server
Heating cooking stoves of the last century
Content:
For a garden insulated house, a small compact economical "Baby" stove with a height of no more than 2.2 m is convenient. If desired, the stove can be made higher by adding several rows between the 18th and 19th. The oven is equipped with a cooking and two drying chambers. Due to its small size and mixed (flat and edge) masonry, only 250 bricks are required (up to the chimney).
The design of the furnace is simple, and with little skills it is not difficult to build it, however, a lot of curly bricks are required.
The stove is placed on a solid foundation, which should be 5-10 cm larger than its size. In a foundation pit, dug to solid ground, poured brick breakage, rubble stone and poured with cement in a ratio of 1: 5 with the cement grade M-400. The foundation should not reach the floor level for 1-2 rows.
First, a brick is picked up dry in each row, then put on a clay-sand mortar. Rows are counted on the right side, from the side of the valves. The width of the gas ducts along the walls is not less than 7.2 cm. It should be borne in mind that the summer gas duct in the rear wall is always hot. Above its valves, the gas duct is made square, for which the bottom of the 24th row is cut off (see section B — B).


Heating stove "Baby-5"
Stove for any solid fuel. If necessary, the firebox can be rearranged to the side wall, where the latch and cleaning door are located. The oven can be folded lower or higher. To do this, after the 17th row, you need to subtract or add from one to eight rows of masonry. The firebox is lined (i.e. lined on the edge) with refractory bricks. If you do not heat with coal, then you can lead the entire masonry from red brick. If you heat with wood, then the grate needs to be made smaller, it is laid out and blown over it.
For the oven you need:
red brick - 370 pieces,
refractory bricks - 16-21 pieces,
gate valve with a hole 12x21 cm - one,
piece grates 30 cm long - 10 pieces.
The simplest oven suitable for summer kitchen, according to the principle of which you can add whole line similar. Oven without blower. There are openings in the door for air access. The gases from the firebox go directly into the nozzle tube-1, which can be made of any height, gradually narrowing it. The stove can be connected to a gas duct in brick wall or to a free-standing pipe. The oven can be placed directly on a solid floor. For fire-fighting purposes, it is necessary to install through holes-trenches-2 from below, from which it will come out warm air, allocated by the hearth of the furnace. The slab is pushed into the brick.
For the oven you need:
red brick - 240 pieces,
furnace door with holes 21x25 cm - one,
gate valve 12x21 cm or 13x13 cm - one.


Heating and cooking stove without doors and furnace hole
The stove is suitable for a summer kitchen; fuel is loaded through big hole in stove-1, in which the mugs can be replaced with a lid from an old saucepan. You can only heat such a stove with wood. The furnace has a blowing hole without a door-2. For better burning in the firebox there are grate bars made of whole bricks-3, which are installed on the fourth row. The gases from the furnace go through the pass wall-4, go down, heating the walls of the furnace, and rise up into the riser-pipe. There is a soot cleaning window-5, which is laid with a brick on the edge. A homemade sheet iron-6 valve can be installed where it is convenient for the owners. For the valve at the base of the 27th row, a slot with a depth of 0.3-0.5 cm is pushed out. The height of the slot is made according to the thickness of the iron valve so that there is no more than 0.2 cm of clearance above the valve and the valve moves freely. The slab is laid on the 11th row. The stove is heated to the floor and has a minimum of stove appliances.
For the oven you need:
red brick - 260 pieces,
cast iron plate 41x71 cm - one,
gate valve.


Heating and cooking stove with a tank
Coal oven. The gases from the furnace go through the pass wall-1. Falling down, they heat the water in tank-2. If you do not need a lot of hot water, then the tank can be installed in another place-3, here the water will heat up longer, but it will stay hot longer. Gases, bypassing the tank, heating the stove to the bottom, go into the riser-pipe. For convenience and safety, it is better to install the tank as shown in fig. 42.6 (3). On the 11th row, a slab and an iron corner are laid. An oven can be installed in the oven (fig. 42.6).
For the oven you need:
red brick - 220 pieces,
refractory bricks - 20 pieces,
furnace door 25x21 cm - one,
cleaning door 14x14 cm - one,
blower door 14x14 cm - one,
cast iron plate 41x71 cm - one,
piece grate bars 25 cm long, a latch 12x21 cm - one, a homemade cistern 15x37x28 cm - one, a homemade oven 30x37x27 cm.


Heating and cooking stove with a shield
Furnace for coal. For heating with wood, the masonry is made of red brick, in this case the door is lowered one row lower, and two rows of masonry are placed above it. If the oven does not warm up well from below, then you need to lay a hole in the ninth row behind the cabinet with a piece of iron.
You can install one latch, but then you need to close all doors after heating the stove.
A plate and a corner are placed on the tenth row. If there is no corner, then the slab is inserted into the brick.
For better heating it is more convenient to install partitions flush with shield-1, or the shield should protrude 25 cm.
For the oven you need:
red brick - 400 pieces,
refractory bricks - 17 pieces,
slab 41x71 cm - one,
furnace door 21x25 cm - one,
blower door 14x14 cm - one,
cleaning door 14x14 cm - four,
piece grates, length 30 cm,
gate valve 12x21 cm - two.


If you are thinking about building country house, as comfortable as possible for comfortable stay in it, then it usually cannot do without a small oven, especially if it is planned to use it for most of the year. Lack of experience in furnace work should not stop the owners who want to invest in the furnace on their own. You just need to choose a suitable, not particularly complicated option, the design of which is simple and straightforward.
In addition, for a large heating structure with an intricate configuration of internal channels, as a rule, there is simply not enough space in a country house. Consider simple options that are also suitable for small house, and for a novice stove-maker – in a word, laying a stove with your own hands is simple and practical.
To make it easier to decide on a suitable model, it is necessary to highlight several conditions that are important for making the right choice. Well, then, consider several options, focusing on the optimal one for a specific area and configuration of the premises of the house.
General requirements for brick ovens
The conditions that the selected design must meet will directly affect the quality of heating the house, so you should not neglect the information, which, on the contrary, should be paid close attention to. These factors include:
- The dimensions of the furnace structure must correspond to the area on which it is installed, since heat transfer largely depends on this parameter.
- In addition, it is necessary to choose the correct form of the furnace structure. The side walls of the oven, warming up, give large quantity heat, while the indicator of the front and rear walls is 3 ÷ 4 times lower. Therefore, if you need to heat two rooms at once, you should choose a narrow and long stove that can be built into the wall between the rooms.

For heating efficiency, a T-shaped version of the furnace is often installed. It can be designed for heating only, or it can perform two functions if a model is selected in which a hob is provided. Such a stove is capable of heating up to four rooms with a small area.

- The next condition that is important to consider is the location of the building inside the house, it should be as rational as possible. For the oven to be functional, to work as a heating and cooking appliance, it must be installed so that the hob faces the kitchen, and one or both side walls look into the living rooms.
- When choosing a stove, it is very important to take into account its heat transfer - this parameter should correspond not only to the area of the rooms, but also to their location and number outer walls... This table will help to determine the choice of the stove by the area of its surfaces, depending on the characteristics of the room:
| Room area, m2 | Not a corner room, inside the house | Room with one outer corner | Room with two outer corners | Hallway |
|---|---|---|---|---|
| Oven surface opening into the room, m2 | ||||
| 8 | 1.25 | 1.95 | 2.1 | 3.4 |
| 10 | 1.5 | 2.4 | 2.6 | 4.5 |
| 15 | 2.3 | 3.4 | 3.9 | 6 |
| 20 | 3.2 | 4.2 | 4.6 | - |
| 25 | 4.6 | 6.9 | 7.8 | - |
- No need to play it safe and choose for small house a massive furnace, since it will take a lot of time and a fairly large amount of fuel to warm it up, despite the fact that a significant part of the generated heat will simply be “thrown into the chimney”. In addition, small structures sometimes work even more efficiently than structures that occupy half a room, since heat transfer largely depends on the internal design of the furnace, and not only on its massiveness.
- Any stove, even the most heat-intensive, will be ineffective if the house is not insulated, since all the heat generated by it will go through walls, windows and ceilings. These will require a very large amount of fuel to maintain the temperature in the rooms at an acceptable level for living.

If you plan to save on fuel, getting high-quality heating, you should insulate the building well and choose the bell-type stove, which, thanks to the numerous channels, will keep the heat transferred to the living quarters for a long time.
How to choose the right place for your oven?
The location of the stove in the house is determined in advance, even before its construction, when drawing up a project, so you can install a heating structure in the right area, where the heat from its walls will be rationally distributed throughout the house. In addition, it is much easier to equip a foundation for a stove before building a house, both in terms of calculations and in the amount of work. It must be said right away that the base for the furnace must be installed separately from the foundation of the house, that is, there must be a distance of at least 150 mm between their walls. Otherwise, during shrinkage (and it will definitely be uneven for structures of different mass and area), one of the foundations may begin to collapse, and the walls installed on it may deform.

- If several rooms are planned in the house, then the stove must be installed so that it is located at the crosshairs of the walls dividing the house into rooms. But, since the foundations of buildings should not be in contact with each other, interior walls will have to be made light, without foundations. This option is presented in the above diagram.
- In some cases, home owners prefer to install the stove near the entrance from the street, since the heat radiation from the walls creates an excellent curtain against cold streams.
- Placing a combustion hatch near the front door will get rid of excess debris in living rooms, since they do not have to bring firewood or other fuel into them. However, when installing the stove in this way, it is necessary to position the firebox door so that it is impossible to burn yourself against it.
- The walls of the heating structure should not adjoin the walls of the house closely, that is, free access must be provided to any of them, since they require periodic monitoring for safety reasons, and the internal channels of the furnace require cleaning the chambers. Sometimes the stove is part of the wall of the house, in this case, a reliable heat insulation is laid between it and the end of the partition.

- If the stove is installed in an already built house, then, when planning its location, it is necessary to provide for the chimney to fall between the attic floor beams, which should be at least 150 mm away from it, with the creation of a heat-insulating "gasket" filled with heat-resistant material. To do this, most often a metal box is fixed around the pipe, which is filled with fine expanded clay, mineral wool, vermiculite or just sand.
- The area in front of the furnace must be covered with a heat-resistant material - it can be a metal sheet or ceramic tiles.
You may be interested in information about what constitutes
Models of simple design small brick ovens
Small brick ovens do not lose their relevance today. And this despite the emerging alternative options heating, since many of these new products are too expensive, while others are inaccessible in the countryside. A stove, traditional for Russian houses, will either help out in any situations - it will warm the house and cook food. Therefore, if gas is not supplied to the house, and the electricity is often cut off or you just want to save money on it, you should choose a stove that includes a hob. Knowing about the demand for models of small furnaces, engineers have developed a lot of their options. Some of them will be discussed below.
Oven "Krokha"
The name of the model "Krokha" in itself speaks of the dimensions of this stove, and it is suitable for a residential building with any area. Moreover, with correct installation design, it is quite capable of heating not one, but two whole rooms and a kitchen. For a country house, this compact stove will be an ideal option, as it is able to create comfort in it in spring and autumn, as well as in damp or cold weather in summer.

This stove is called "simpleton", because it is simple in design, and with a serious approach it may well be built even by a novice craftsman. The stove has very small dimensions, only 640 × 770 mm at the base, therefore it is suitable even for small room, where it will be decided to allocate a corner for her.
The designer of the stove A. Sushkov has successfully combined compactness, elegance and functionality in it, therefore "Krokha" will perfectly fit not only into the dacha room, but also decorate the interior of a private house with its cozy look. This stove is designed to heat one or two rooms with an area of 18 ÷ 20 m², and has the following characteristics:
| Furnace parameters | Numeric parameter values |
|---|---|
| Width and length at base | 3 × 2.5 bricks or 640 × 770 mm |
| Height of structure to pipe | 2030 mm |
| Furnace weight | 1260-1280 kg |
| Furnace depth | 746 mm |
| Efficiency | Up to 70-75% |
| Heat transfer with a disposable firebox | 1760 Wt |
| With a three-time firebox | 2940 Wt |
| Hob | Single burner |
The designer has well thought out the rationality of the stove, therefore, for its small size, it gives excellent heat transfer. In the process of stoking this model, its lower section warms up, and the “cap” located in the upper part retains the released heat well and slows down its escape into the chimney. The oven is equipped with a "summer" run, which allows you to heat only the hob without heating the entire structure, which is especially important in the warm season. "Krokha" has three design options, differing from each other in the location of the hob relative to the firebox, but most often an improved and most convenient version is used, in which the stove and the firebox are located on the same side. This arrangement is convenient in that the stove can be installed in such a way that the firebox and stove will be in the kitchen, and the other two walls, if built into the partition, will heat two rooms located through the wall from the kitchen.

In order for the stove to last as long as possible and be safe, its fuel chamber is lined with fire-resistant fireclay bricks. Such walls can withstand not only wood heat, but also those of such fuels as coal, briquettes and peat.
Up to the level of the slab, the oven has smooth walls, and above the furnace door, under the hob, around the entire perimeter of the structure, a row protruding forward by 30 ÷ 35 mm is laid out, which divides the structure into two sections: upper, air-gas and lower - fuel. In the upper part of the furnace, there are channels for the circulation of heated air. They contribute to the maximum long-term retention of heat in the oven, preventing it from immediately going into the pipe.

According to the developer's idea, this furnace should be equipped with a furnace door with refractory glass, through which the tongues of flame are perfectly visible. Therefore, if desired, "Krokha" can be used as a small fireplace. Such a door may well be replaced with a conventional cast iron version.
Since the oven is small around the perimeter, it will require fewer consumables.
| Dimensions in mm | Quantity, pcs. | |
|---|---|---|
| Fireclay brick SHA-8 | 21 | |
| Red brick (without chimney | 352 | |
| Shaped (rounded) red brick | 124 | |
| 350 × 250 | 1 | |
| Glass furnace door in a cast iron frame (DP-308-1S) | 210 × 250 | 1 |
| Cast iron blower door | 140 × 140 | 1 |
| 410 × 340 | 1 | |
| Metal sheet for flooring in front of the firebox | 500 × 700 | 1 |
| Chimney damper | 130 × 250 | 1 |
| Steel corner | 40 × 40 × 5 × 520 | 4 |
Compact stove model - "Malyshka"

The main advantage of the model is its small size, which is 505 × 760 mm at the base. Well, the low weight, only 360 ÷ 365 kg, allows the installation of the structure on a strong heat-insulated wooden floor. A small stove has relatively thin walls, therefore, when heated, it quickly begins to give off heat to the room, in which a comfortable temperature is created in a short period.
When laying this model of the furnace, it is important to take into account one point - in the first lower row of the back wall, the middle brick must be left free, that is, it must be laid without mortar. This must be done so that after the completion of the laying, the brick can be pulled out and the bottom of the furnace can be cleaned from the fallen mortar. In addition, the resulting hole will help to dry faster finished structure... Then, the brick can be installed in place already on the mortar.
If the stove is planned to be installed on a wooden or concrete floor, then a heat-resistant layer is laid on it before laying. Usually, for this, an asbestos sheet with a thickness of 5 mm is used, which is closed from above with a metal sheet or roofing material and an additional continuous layer brickwork... In addition, it must be remembered that a metal sheet or ceramic floor tiles must be laid and fixed in front of the stove.
First fire finished oven it must be carried out with light fuel - it can be paper or straw. After the oven is heated, its doors and latch are opened for ventilation and final drying, which should be carried out for at least 7 ÷ 9 days.
After drying, it is recommended to whitewash the oven. The question arises: . On the whitewash layer, smoke will immediately appear if there are small gaps that are not visible to the eye between the mortar and the brick. The smoke will leave black or gray streaks on the whitewash, which will stretch upward from the rejected seam. When such traces appear, the seam from which they emanate must be completely cleaned of the frozen solution and filled with a new one, but more carefully and accurately.
You might be interested in information on how to do with step by step instructions
If you plan to make decorative finishing of the outer walls of the "Malyshka", then you can start this only after two or three months of operation of the stove.

The chimney of this model has such a design that it can be brought out into the street in three ways:
- Having raised the brickwork of the chimney to the ceiling, bring it out through the attic and the roof of the house;
- Immured into it steel pipe and connecting it to the main chimney;
- The embedded pipe can be brought out through the wall, having previously secured the opening of its passage with heat-resistant material.

This diagram will help you understand the design of this model. brick oven, since the number of rows and the configuration of the chimney ducts are clearly visible on it.
The main characteristics of the "Baby" stove are as follows:
| Furnace parameters | Numeric parameter values |
|---|---|
| Width and length at base | 505 × 760 mm |
| Height of structure to pipe | 725 mm |
| Furnace weight | 360 ÷ 370 kg |
| Furnace depth | 737 mm |
| Chimney channel cross-section | 100 × 100 mm |
| Efficiency | Up to 70-75% |
| Heat dissipation | 1210 Wt |
| Hob | single-burner |
For the construction of the "Baby" stove, the following materials and ready-made elements will be required (excluding the chimney):
| Name of materials and components | Dimensions in mm | Quantity, pcs. |
|---|---|---|
| Fireclay brick SHA-8 for the furnace | 37 | |
| Red brick | 62 | |
| Cast iron blower door | 140 × 140 | 1 |
| Cast iron furnace door | 210 × 250 | 1 |
| Single burner cast iron plate | 410 × 340 | 1 |
| Cast iron grate | 350 × 200 | 1 |
| Chimney damper | 130 × 250 | 1 |
| 550 × 800 | 1 |
Fireclay brick prices
fireclay brick

It should be noted that this model is easily improved, despite its compactness. Some craftsmen manage to add an oven and a water heating tank to its design. In this configuration, "Baby" can be used as a sauna stove.
You may be interested in information about what mini
Heating stove with a small footprint
This mini oven model has only one heating function. It can be used for installation in the country if, in addition to it, an electrical or gas stove for cooking, and there is no need for hob... Otherwise, its installation will be irrational.

It is also suitable for a private house in which you need to heat two adjacent rooms by building a stove into the wall between them.

The advantage of this model can be safely called its compactness and high heat transfer. The side walls of the stove have a fairly large area, therefore, when heated, they become a kind of "battery" half a wall in size, which will quickly and efficiently transfer heat to the premises. The total heat transfer from this model is about 2000 W, moreover, the front and rear walls of them account for 210 W, and the side ones - 895 W.
The heating stove has a more complex internal structure, consisting of several channels, which provide excellent heat transfer from the walls. Since the oven has a decent height, more material will be required for it.

The characteristics of this mini oven model consist of the following parameters:
In this case, the design of the furnace, as well as the structure of the "Krokhi", can be divided into two sections: the upper one is for the gas outlet, and the lower one is for the furnace. The upper part of the furnace - the "bell", consists of vertical channels, interconnected by horizontal ones. Thanks to this feature, warm air stays inside the structure longer, warming up the entire area of its side walls.
To build this model, you will need the materials listed in this table:
| Name of materials and components | Dimensions in mm | Quantity, pcs. |
|---|---|---|
| Red brick | 260 | |
| Fireclay brick SHA-8 for the combustion section | 130 | |
| Cast iron grate | 250 × 400 | 1 |
| Cast iron blower door | 140 × 200 | 1 |
| Cast iron furnace door | 200 × 300 | 1 |
| Cleaning doors | 140 × 200 | 2 |
| Chimney damper | 130 × 310 | 2 |
| Roofing material sheet for waterproofing | 1000 × 600 | 2 |
| Metal sheet for flooring under the stove and in front of the firebox | 500 × 700 | 1 |
For ease of work, craftsmen use special ordering schemes, which must be guided by when laying each row.
Chimney valves prices
chimney valves

This ordering diagram shows the laying of the stove from the first to the twelfth row. Construction can be carried out on a well-equipped foundation or on a prepared waterproofed concrete floor... Since the structure is quite massive and bulky in height, it will not work to install it on a wooden floor.
- Roofing material is laid under the masonry in two layers, and in order to simplify the alignment of the first row, on waterproofing material can be drawn with chalk using a long ruler, the border of the base.
- When laying the first row, one must not forget that the horizontal and verticality of the furnace walls will depend on its quality and accuracy. Therefore, before starting work, it is necessary to prepare control instruments - a plumb line and building level... Some craftsmen also practice stretching horizontal cords for each of the rows.
- As you can see in the diagram, a blower door is mounted on the second row, a vertical chimney channel is formed.
- On the fifth row of masonry, a grate is being installed, which will block the blower chamber and mark the bottom of the combustion chamber. From the fifth to the 15th row, the masonry is made with fireclay bricks.
- On the sixth row, in front of the grate, the combustion door is installed and fixed with wire.
Roofing material prices
roofing felt

- The following diagram shows the ordering from the 13th to the 24th row. This shows the gradual formation of vertical channels and a combustion chamber, therefore it is very important to lay the masonry in accordance with the scheme. Otherwise, the entire work may be ruined, and it will have to be redone.
- Having finished the laying of the fifteenth row and the walls of the sixteenth, a clay-cement mixture is laid out in the formed space, and the door of the cleaning chamber is installed. Further, up to 25 rows, laying is made according to the ordering scheme.

- On the 25th row, the bottom of the second cleaning chamber is formed. To do this, a layer of clay-sand mixture is laid on top of the brickwork of the 24th row. Then the door of the cleaning chamber is mounted.
- On the 28th and 32nd rows, two chimney valves are laid, with which it will be possible to regulate the draft.
- The rest of the rows are laid according to the scheme, and the laying of the chimney begins from the 35th row.
Heating and cooking "Swede" - a detailed description of the oven masonry
General description and required materials
In the final section, a fairly popular model of the Swedish stove will be presented. It was chosen for a detailed description, since with its simplicity of design and compact dimensions, it is multifunctional and very comfortable to use.

This version of the heating and cooking oven has a good arrangement of all functional elements - they are located on one front side structures. Therefore, such a "Swede" is usually installed in such a way that the hob, oven, drying niches and, of course, the combustion chamber face the kitchen, and the flat rear brick wall, which warms up perfectly during the heating, into the living room.
The dimensions of this structure are 1020 × 885 × 2030 mm, with a power of 2750 kcal / hour, so the stove is capable of heating one or two rooms with an area of up to 30 square meters. m.
The presented version of the "Swedish" was created for certain operating conditions. So, it was created for heating country house, 4000 × 7000 mm in size, erected from silicate bricks or blocks. However, this model is also suitable for houses with other sizes, as evidenced by the parameters of its heat transfer.
- Firewood and other types of solid fuels can be used as fuel for this stove.
- With this model, only the inner lining of the combustion chamber and the areas located next to it is carried out. Therefore, fireclay bricks will not interfere with the aesthetic appearance of the front of the stove, made of high-quality red bricks. Its external finishing is not provided.
- In order for the oven to be efficient and meet the heat transfer characteristics, its walls must be relatively thick (half a brick), therefore, placing bricks on spoons is not allowed.
- In this construction, the masonry drying chamber required.
If you decide to use this development, first you should consider the table of necessary materials and calculate their cost for your region of residence.
You may be interested in information about which one is better to use when building fireplaces and stoves.
Table of materials that are needed to build a heating and cooking "Swedish":
| Name of materials and components | Size (mm) | Quantity (pcs.) |
|---|---|---|
| Red corpulent oven brick (excluding pipe height) | 250 × 120 × 60 | 551 |
| Fireclay refractory brick Sh-8 | 250 × 124 × 65 | 31 |
| Blower door | 140 × 250 | 1 |
| Furnace door | 210 × 250 | 1 |
| Doors for cleaning chambers | 140 × 140 | 3 |
| Oven | 450 × 250 × 290 | 1 |
| Cast iron cooking two-burner stove | 410 × 710 | 1 |
| Grate | 200 × 300 | 1 |
| Chimney damper | 130 × 250 | 1 |
| Steam exhaust valve | 130 × 130 | 1 |
| Steel corner | 45 × 45 × 5 × 1020 | 1 |
| Steel strip | 45 × 45 × 5 × 700 | 1 |
| Steel strip | 45 × 45 × 5 × 905 | 5 |
| Steel strip | 50 × 5 × 650 | 2 |
| Dryer shelf | 190 × 340 | 1 |
| Drying chambers overlap sheet | 800 × 905 × 0.5 ÷ 1 | 1 |
| Pre-furnace metal sheet | 500 × 700 × 1.5 ÷ 2 | 1 |
| Asbestos sheet or twine for laying between brick and metal elements. | 5mm thick | 1 |
Step-by-step instructions for laying a heating and cooking "Swedish"

| Illustration | Description of the order of work |
|---|---|
 | The first continuous row, consisting of 28 red bricks, should have a perfectly flat surface and right angles, since it is the basis on which all other vertical and horizontal planes and rows will be oriented. |
 | The second row is laid out with 28 ½ red bricks, also solid masonry, but its pattern has a slightly different configuration. This point must be taken into account when carrying out work, because the seams between the masonry of the lower first row should not coincide with the seams between the bricks of the upper second row. In other words, the bricks must be laid apart, with overlapping joints. |
 | On the third row, the formation of the bottom heating chamber begins, which will be located under the oven, and the blower. Vertical flue ducts also begin to form. Laying out the row, they leave peculiar windows for installing the doors of the cleaning chambers for the vertical channels, as well as the blower and the bottom heating chamber. After completing the installation of this row, cast-iron doors are fixed in the windows. After that, work is done inside the structure - two whole and two three-quarter bricks are mounted on spoons. Moreover, a brick, installed in the right vertical channel, has a shallow angle, for more unhindered air circulation. In addition, the fourth part of the fire-resistant fireclay bricks is installed in the first chimney channel - in the figure it is highlighted in yellow. For laying this row, ½ fireclay bricks and 14½ red bricks are required. |
 | Fourth row. At this stage, the channels and chambers continue to form, according to the scheme, and the chimney channels remain united for the time being. For a row, you need ½ fireclay bricks and 14½ red ones. |
 | When working on the fifth row, previously installed doors are overlapped. The side walls of the bottom of the combustion chamber are laid with fireclay bricks. Moreover, in the brick that will be laid on the sides, it is necessary to cut out steps for laying the grate. The second and third vertical channels remain combined, but split with the first right channel. To install this row, you need to prepare 8 fireclay and 16 red bricks. |
 | The sixth row is laid out according to the picture. At this stage, the second and third flue ducts are separated from each other, and now three separate channels should form at the rear of the furnace. The base for the oven and the inner walls of the firebox are laid out with fireclay bricks - it is placed on a spoon. The wall between the niche for oven and the fuel chamber is erected from chamotte brick quarters. Next comes the stage of installing the firebox door, also in the window left for it between the bricks. The frame of the door must be wrapped with asbestos material so that an expansion gap remains between it and the brick for expansion of the metal when it heats up. Temporarily, the door can be supported with stacks of free bricks until it is rigidly fixed by the next rows of masonry. In addition to the door, an oven is installed, which is also previously wrapped in asbestos. For laying this row and interior arrangement niches need 13 red and 3½ fireclay bricks. |
 | For greater clarity, this figure shows the laid out sixth row with installed box oven. |
 | On the seventh row, the furnace and oven chambers continue to form - the inner lining is fire-resistant, and outdoor masonry- red brick. Fireclay brick is installed on a spoon, red on the bed (flat). For work, you need 13 red and 4 fireclay bricks. |
 | On the eighth row, the first chimney channel is separated from the chamber where the oven box is installed with fireclay bricks. The rest of the masonry goes according to the presented scheme, and it uses 5 fireclay and 13 red bricks. |
 | Ninth row. At this stage, the door of the combustion chamber is blocked by a brick. The rest of the work is carried out according to the shown scheme, and for them it is necessary to prepare 5 fireclay and 13½ red bricks. |
 | On the tenth row, the oven is covered with masonry. The wall between the oven and the firebox is not laid out. A 10 × 10 mm step is cut in the refractory brick installed along the inner perimeter of the front part of the furnace, intended for laying a cast iron hob. This row will require 4½ fireclay and 15 red bricks. |
 | Laying out the tenth row, on a step cut in fireclay brick, around the perimeter interior space lay an asbestos cord. Then, the hob itself is mounted - it should be located at the same level with the outer walls of the oven, built of red brick. In front of the laid slab, on the front wall, a steel angle (45 × 45 × 1020 mm) is mounted, designed to protect brick corner from damage and overall strengthening row. |
 | On the 11th row, the walls of the cooking chamber are formed. The gap that has formed between the hob and the right wall of the oven is filled with bricks, which are mounted across the 10th row masonry. For work, you need to prepare 16 pieces of red bricks. |
 | For the 12th row, 15 red bricks will be required - the masonry goes according to the presented scheme. |
 | The 13th and 14th rows are laid out according to the shown ordinal scheme. For the 13th row 15½ bricks are required, and for the 14th - 14½ bricks. Here it must be borne in mind that the seams between the bricks of the lower row must be covered with a whole brick, which means that the 14th row will have a pattern different from the 13th. |
 | The 15th and 16th rows are also stacked according to the ordering scheme. For them you need to prepare: for the 15th row - 16, and for the 16th - 14½ red bricks. |
 | After completing the masonry of the 16th row, the cooking chamber must be covered with three steel corners measuring 45 × 45 × 905 mm. In the middle part of the space above the chamber, two corners are stacked side by side, with vertical walls facing each other, and one corner at the end of the chamber. In addition, the front part of the chamber is covered with a strip of 45 × 45 × 700 mm. These elements form a reliable support for overlapping the chamber with bricks, therefore the corners should be laid at a distance of 255 mm from each other. |
 | The masonry of the 17th row consists of 25½ bricks that cover the space of the cooking chamber. Moreover, a hole is left in the far left corner of the overlap for extracting vapors from the cooking chamber - its size should be half a brick. In addition to overlapping, the laying of vertical channels continues. |
 | The 18th row is laid out almost solid, but the exhaust and vertical channels remain open. To work, you need 25 bricks. |
 | After that, a steel angle 45 × 45 × 905 mm is installed on the front edge of the masonry. This element is intended to strengthen the ceiling of the exhaust chamber window, as it must withstand two rows of upper masonry. |
 | On the 19th row, small and large drying niches begin to form, as well as the continuation of the ventilation duct, designed to remove vapors from the lower cooking chamber. The work is proceeding according to the scheme, and 16 red bricks need to be prepared for laying. |
 | The 20th row also consists of 16 bricks and is mounted according to the shown diagram. |
 | The 21st row consists of 16½ red bricks. He is laid out according to the shown scheme. |
 | The 22nd row is laid out with 16 red bricks. |
 | After laying out the 22nd row, a 190 × 340 mm metal plate is mounted on a small drying chamber, which will act as a heated shelf. |
 | 23rd row. At this stage, the walls of the chimney ducts and drying chambers continue to rise. A cut-out is made on the brick laid above the steam outlet, into which a valve will be installed to regulate the heating of the cooking chamber. The next step on the prepared seat is a valve with a size of 140 × 140 mm. For this row, you need to prepare 17 red bricks. |
 | On the 24th row, the ventilation valve is closed, as well as the first and second chimney ducts are being combined. This row will require 15½ bricks to work on. |
 | On the 25th row, three vertical channels are combined into one. For this row, 15½ red bricks must be prepared. |
 | The 26th row consists of 16½ bricks and is laid according to the shown pattern. |
 | Further, on the same 26th row, the drying chambers are overlapped with a steel corner having a size of 45 × 45 × 905 mm and two steel strips measuring 50 × 5 × 650 mm. The corner, laid on the front side of the drying chambers, is intended to increase the rigidity of the structure, and also, together with steel strips, to create a base for the steel sheet overlapping the chambers. |
 | On top of the steel strips and the corner, a sheet of metal 800 × 905 mm is laid. It covers the surface of cameras and vertical ventilation ducts, except for one chimney channel, which will receive smoke from all other channels. A chimney will be erected above it. |
 | On the 27th row from the top sheet metal a solid brickwork is arranged. It should protrude 25 mm beyond the perimeter of the furnace section. For the laying of this row, 32 bricks are required. |
 | The 28th row completely overlaps the previous one and protrudes beyond its limits by another 25 mm. The chimney opening remains open. To lay out this row, 37 red bricks will be needed. |
 | Row 29 requires 26½ red bricks. They are laid out with an inward indentation of 50 mm from the edge of the previous row, essentially bringing it to the size of the perimeter of the base of the oven. |
 | The 30th row of the kiln masonry is already the first row of the chimney overhead pipe. The row consists of 5 red bricks. In the upper part of the side bricks laid in this row, a 10 × 10 mm step is cut out - it will serve seat for a chimney damper, measuring 250 × 130 mm. Further on clay mortar the valve frame itself is also mounted. |
 | The 31st row is the second row of the chimney. It overlaps the edges of the chimney damper, thus fixing it from above. The row also consists of 5 bricks. Above, work will already go on the construction of a chimney. |
The lower diagram with a section of the structure of this furnace shows the direction of circulation of fuel combustion products. It clearly shows that the hot streams of gases, thanks to the vertical channels, cover the entire surface of the furnace, heating it, and from a well-heated surface, heat is effectively transferred to the heated room.
If you want to know how to put a baby brick oven with your own hands, detailed diagram will help in the work. In the cold season, it is comfortable when the house is warm, especially in the country, where there is no central heating... This is why it is so important to build a good oven.
The design of the "Baby" oven.
Preparation for work
Making a good and solid rough (stove) for a country house is an expensive business. For housing that is not permanent for a stay, a baby stove is best suited. It can also heat the main dwelling, which has an area of no more than 50 m². Its manufacture can be mastered by a person who does not even have special skills. It is built of red brick. Baby is a new modification of the Swedish stove. In the baby, you can select the desired dimensions in width and depth, but keeping the height unchanged.
To build it, you need to purchase refractory bricks: fireclay and red ceramic. They are ecologically clean materials, which is also important for your home. Beautiful colour burnt fireclay will perfectly fit into the overall design. The baby can serve not only as a heating object, but also as a stove for cooking.
For work, you will need to prepare the following materials:
- ceramic bricks - 210 pieces;
- fireclay - 76 pieces;
- sand;
- refractory (chamotte) clay or simple;
- metal sheet for the firebox;
- doors for the firebox and blower;
- 2 latches;
- 2 sheets of roofing material;
- cement grade M300 for mortar;
- grate grate;
- reinforcing bar;
- cast iron stove with burners.
From necessary tools not to do without:
- level;
- trowel;
- trowels;
- picks and hammer;
- a plumb line to control even corners;
- even laying cannot be done without a rule - a ruler made of wood, having a section of 15 x 60 mm up to 1.5 m in length with parallel planes;
- roulette.
Preliminary work
Choose a suitable place for the baby. To prevent heat loss, the rough walls should not come into contact with the outer walls of the house. It should not be located in the center of the room, this will not contribute to a uniform heat flow.
A baby does not need a powerful foundation, as for a large stove. It is possible to build a brick oven without a foundation. A rectangular hole is cut under it with a grinder. If the floor is equipped with water or electric heating, then it is necessary to remove the screed. The hole must be deepened by 350 mm and ensure that the pit has the most even edges. Then they begin to create a pillow. To do this, the hole is covered with sand to a height, not reaching 70 mm to the border of the location of the floors, filled with water and left. Wait several days before final drying. Then the pit is closed with roofing felt or roofing sheets.
Next, you need to make the crate. You can take rods of large cross-section and lay them in one layer. But experts recommend making it two-layer by taking thinner reinforcement. Spread out 7 rods 800 mm long, spaced 100 mm apart. On top, strictly perpendicularly, 8 rods 700 mm long are placed in the same way. They can be secured with wire or welding. Further, in a similar way, place a second same crate. At the end, 9 rods are taken along a length of 250 mm. 4 pieces are placed in the corners of the frame, 4 for each edge and 1 in the center. The net is hidden in a sand pillow.
Preparing for the foundation cement mortar... A pit is poured with it, not reaching the location of the floor 50 mm. This condition further excludes the ingress of cold air masses into the lower part of the stove. When the concrete is completely poured, it must be pierced with reinforcement or a special tool to get rid of the air. This procedure improves the strength of the foundation.
The concrete must then dry completely for at least 30 days. At 1 week, you need to water the solution with water so that it does not crack. Cover the layer with burlap and pour water over it. After drying, remove the burlap and replace it with aluminum foil so that her reflection is above. On this preparatory work ended. Next is the scheme of laying the stove.
DIY rude masonry
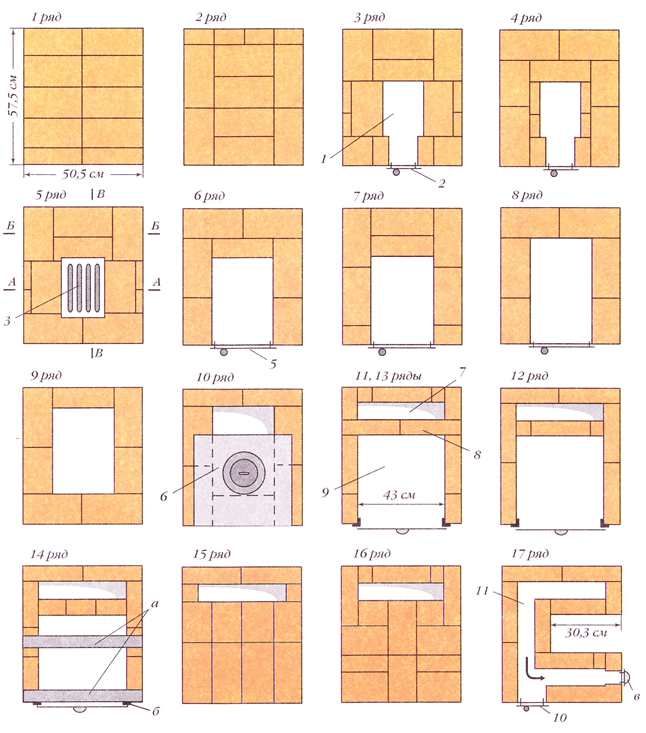
Layout of the masonry oven "Baby".Start by creating 2 starting rows. It is necessary to ensure that the rows and corners are even, the edge of each brick must coincide with the neighboring one, since the entire structure will be held on the starting masonry. A clay solution is used.
In the 3rd row, a blower door is installed and forms the base of the chimney.
4 - placed in the same way as the third.
At 5 - the chimney is divided in the center into 2 channels and the blower is closed with a door.
At 6 - they put the grate above the blower door.
At 7 - the base of the firebox is laid out and its door is installed.
From 8 to 9 - laying is done, similar to the previous one.
10 - the door of the firebox is closed and a window is installed from the combustion compartment to the inside of the furnace channel.
At 11 - a cooking panel is mounted.
12 - the hole laid on the 10th row is closed and the wall of the cooker is formed.
13 - similar to the last one.
14 - to create a second horizontal channel, the cleaning hatch is removed from the rear side.
15 row repeats 14.
16 layer - the hole formed in the 14th row is closed, in the opposite direction from the channel, which is in the 12th row, a branch is left.
17 is put in the same way, forming a cover for the brewing device and a drying compartment.
18th row - the formation of 3 horizontal channels, from which the smoke will go into the chimney. A cleaning hatch should be provided at the end of the channel.
Layer 19 repeats 18.
20 - the final horizontal channel is led out to the chimney pipe.
21 - a connection to the chimney is created and the construction of a structure for removing smoke.
From the 22nd row and above - chimney masonry.
Next comes the finishing. But you can neglect it or just paint the stove. A baby made of refractory bricks will look very aesthetically pleasing.
Thus, a do-it-yourself baby oven is built quickly, in reality this work can be done in one day.
//www.youtube.com/watch?v=K5qgPXeDKDo
But do not rush, it is better to take a longer and more careful attitude to the goal. The clay for the mortar should not be greasy. It is better to take a medium fat content, its solution will ensure the reliability of the structure for many years.
The "Baby" oven, shown in fig. 1, - small, compact, economical and convenient for a garden insulated house. If desired, the oven can be made higher by laying similar rows between the 18th and 19th rows. The oven is equipped with a cooking chamber and two drying chambers: lower and upper. The lower drying chamber is closed and is located on the right side of the oven above the slab overlap. Four hooks made of thick wire are laid in the masonry of its overlap (threads with mushrooms or fruits are hung on them for drying).
A thermometer can be installed on the chamber door. This drying chamber maintains a constant temperature for a long time. The camera door is mounted on a frame made of metal corners. Instead of a door, an L-shaped flap can be installed. Hooks, if necessary, are replaced with U-shaped wire or a shelf-type stand for baking trays. The upper drying chamber is open, but a damper can also be installed in it. To do this, a metal plate is pushed into the ceiling, deepening it in front by 1-1.5 cm so that the damper can be set with an inclination. It is undesirable to plaster the walls of the drying chambers, you just need to grind the seams.
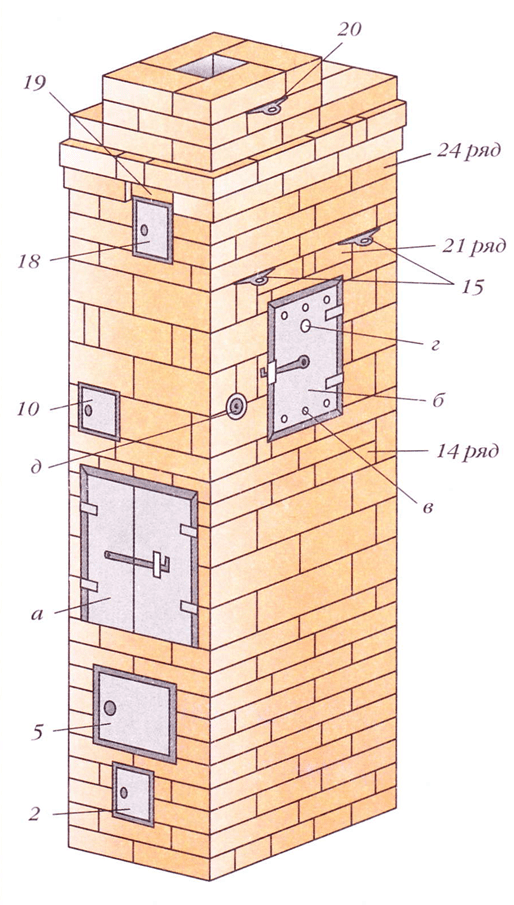
Rice. 1a. Oven "Baby" (front view): a - cooking chamber; b - drying chamber; в - holes with a diameter of 7 mm in the door of the drying chamber; d - thermometer; d - a branch pipe for a samovar

Rice. 1b. Oven "Baby" (back view)
The design of the stove is simple and with little skills it is not difficult to build it, but for an inexperienced craftsman it is considered difficult. The stove can be folded under any solid fuel, but since coal, peat and dung emit a lot of smoke, the stove must be cleaned annually due to clogging of the gas ducts with soot.

Rice. 1c. Oven "Baby", A-A, B-B and V-V sections: a - drying chamber; b - laying of the back wall with a ladder (with protrusions)
The stove is placed on a solid (monolithic) foundation. A blower is laid out from the 3rd row 1
with a window in which the door is installed 2.
The 5th row overlaps a window with a door. A grate is installed on top of the 5th row 3.
Before starting laying the 6th row, you need to think about how to lay the back wall, since the grate can be shorter or longer. The wall can be cut off from the grate or from a brick thickness of 12 cm, as shown in the section along B-B with a dotted line 4
. It is possible to lay the wall using a ladder (see Fig. 1c). To do this, from the top wall, which runs to the edge, to the grate, in four rows, you need to make the same projections. In our case, each ledge is about 4 cm.In the 6th row, a firebox door is installed 5.
Having laid out the firebox in the 6-8th rows, block the firebox door with the 9th row and fix the overlap with the 10th row. Now you need to cover with a slab 6
firebox and, so that gases come out of the firebox, make a hailo 7,
the size of which should be in the range of 7-7.2 cm. For this, it is first more convenient to make the back wall, which is installed on the edge. After that, a stove is placed above the firebox so that it does not reach the back wall and the distance from it to the stove is at least 11.5-12 cm (this is necessary so that there is an opportunity to make a hail near the back wall 7
and install the partition 8,
separating hailo 7
and the gas duct coming from it from the cooking chamber 9).
The board is placed directly on the mortar without a groove. It should be noted that a standard plate with two holes is large for this oven, so it is shortened to the right size(cut off, leaving a smaller hole) and placed above the firebox, flush with the front wall. On the 10th row, a frame with doors is installed in front of the cooking chamber. The frame is secured with wire or plates. The fixing wire is bent under the side walls of the oven. They do it like this: pull the wire with one hand, put a brick of the side walls on it with the other and, so that the door does not weaken, fold the wire up close to the brick. The frame in the upper part can be tied not with the side walls, but with the overlapping masonry. If the corners of the frame come into contact with the plate, the part that touches the plate is sawn off. On top of the frame in the 15th row, the overlap of the cooking chamber is made along the iron plates or corners installed on the 14th row (see section along B-B and a general view of the oven). Before performing the overlap, the 14th row is first adjusted in height, that is, it is cut so that the upper 15th row lies flush with the side walls without undercutting. With the 16th row, the two previous rows are fixed and the masonry is fastened to the back wall, and a frame with a door for a drying chamber designed for a small amount of food or herbs and a cleaning door are installed 10.
The 17th row along the entire perimeter is placed on the edge. A samovar pipe is inserted into the middle of the 17th and 18th rows. The 18th row is blocking the cleaning door. If necessary, the brick is hewn out over the door. As a result of the masonry of the 17-19th rows, a drying chamber is formed, the size of which is limited by the size of the gas duct, the width of which should be 7-7.2 cm. window 11
for additional passage of gases and faster heating of the left wall and the lower part of the drying chamber. In the 19th row, the gas duct is once again blocked, as a result of which a window is formed 12
and a small flue 13
for heating the front wall and drying chamber. On top of the overlap, the front wall is fastened to the drying chamber using a wire not thicker than 4 mm, bent on both sides. The 20th row is placed along the perimeter on the edge to the drying chamber, and the overlap above the drying chamber is placed on a die, doing this so that the size of the gas ducts at the walls is still 7-7.2 cm. Hooks are placed in the seams of the overlap 14
from thick wire (if it is very thick, then grooves-recesses are cut out for it in the brick). The 21st row is placed on a die end-to-end to the masonry on the edge, which was made in the 20th row. After that, it is leveled with the top of the masonry - hung up. In this row, constriction is made, expanding the flue from 7-7.2 to 13 cm (see section along B-B). On top of the 21st row, two valves are installed 15,
after which they put the 22nd row, which secures the valves. In the 23rd row, they begin to lay out a flue in the middle of the oven 16
and in the left wall one more (open) drying chamber 17.
In the 23rd and 24th rows, lay out the cleaning window and install the cleaning door 18.
In the 24th and 25th rows, extrusion is made to fit the size of the square gas duct 16.
After that, the inside of the flue will not decrease diagonally. The 25th row overlaps the back and middle parts of the gas duct 16,
leaving only an opening for the outlet of gases (the size of the opening must correspond to the size of the gas duct of the pipe). A corner or plate is inserted into the same row to cover the upper part of the drying chamber.
Rice. 1d. Oven "Baby". Ordering (rows 1-17): a - iron plates; b - door frame; в - a branch pipe for a samovar
In a three-quarter 19
covering the cleaning door 18,
make a constriction of the protrusion hanging over the gas duct so that it does not interfere with the movement of gases coming from below (they will hit it, which is undesirable). As a result of masonry, the entire 25th row will have an overlap of the cornice around the stove, with the exception of the three-quarter 19,
which is laid flush with the front wall of the stove, forming a gap in the cornice. In the 26th row, above this three-quarter, there will be a cornice canopy in the size of two laps (the measure is the cornice inlet in the 25th row). The 26th row overlaps a small drying chamber. On the 27th row, the masonry of the stove is fixed - it is laid flush with its walls. From the 28th row, pipe laying begins and a valve is laid on top of this row 20.
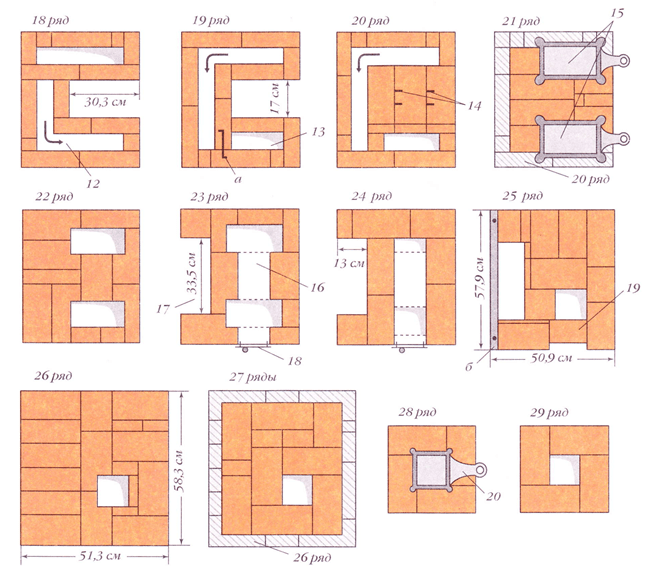
Rice. 1d. Oven "Baby". Ordering (rows 18-29): a - fastening wire; b - iron corner
The oven works like this. Fuel is put into the firebox, the valve is opened 20
in the pipe and valve 15
over the samovar pipe. In this position, gases from the firebox rise upward, reaching another valve 15
near the back wall. This valve is closed, and gases leave through the windows to the left wall, make a turn and above the cooking chamber (see orders from 17th to 20th rows) enter the front wall. Since the furnace is small and the gas ducts are without partitions, they serve as guides for the gases, so the gases from the left wall do not seem to reach the top of the furnace. But it is known that warm air is lighter than cold air, so over time it will rise up and heat the masonry.
If it is necessary to reduce the heat transfer of the furnace, then you can use a summer flue, which is clearly visible in the section along B-B. Although it is slightly, it will still reduce the heat transfer of the stove. To do this, you need to open the latch. 20
in the pipe and valve 15
near the back wall. Then the gases will go from the firebox through the valve 15
into the gas duct 16
and through the valve 20
into the pipe. During operation in this variant, gases will heat only the rear wall of the furnace and one of the walls of the lower and upper drying chambers; the rest of the oven will remain cold.
For the samovar to work, you need to open the latch at any time. 20
in the pipe and valve 15
over the samovar pipe. The gases from the samovar will go straight into the pipe.
For laying the stove, you will need (pcs.): Red brick - 250, cast iron stove 41 × 39 cm - 1, furnace door 21 × 25 cm - 1, blower door 14x 14 cm - 1. cleaning door 14 × 14 cm - 2, latch 13 × 13 cm - 1, latch with holes 12 × 23 cm - 2, frame with a door for the cooking chamber 37 × 43 cm - 1, frame for the drying chamber 17 × 37.5 cm - 1, metal corner 4-5 cm wide and a length of 50 cm - 2, a metal plate 58 cm long - 1, a grate 17 × 25.5 cm - 1, a branch pipe for a samovar - 1.