Do-it-yourself flowerpots for a garden made of plastic. How to make a hanging outdoor flower pots with your own hands
Let's see how you can transform your favorite indoor flowers? For example, if you create a planter for flowers with your own hands, then such a decor will delight the eye and add zest to the interior. In addition, by equipping stands and / or shelves for flowers with your own hands, it will also become convenient for you to take care of your pets.
Design options for pots for indoor flowers
What is the difference between a planter and a regular flower pot? Translated from French cache-pot means to hide the pot. Thus, the flowerpot is a decorative "wrapper". Of course, the best home there will be a clay pot for flowers, but it quickly loses its attractive appearance, since ceramics allows water to pass through and stains appear on its surface that cannot be removed. Often as protective film glaze is used, but it also cracks and crumbles over time, and then the pot will either have to be replaced or decorated. In this case, the pots come to the rescue - with its help you can easily hide unsightly places and create decor in the same style.
If you have a couple or three pots, then the easiest way is to arrange them beautifully on the windowsill. But if there are more than a dozen colors, then placement can be a problem. The most common way to hang the planter is by using ready-made hanging hooks or making holes for the rope. But you can make the attachment method creative.
You can organize a simple crossbar or build a whole structure under the ceiling, on which, for example, hang several.


The design of a one-piece planter does not provide for drainage holes, and openwork does not retain excess moisture, so this must be taken into account when watering.
Or here is such an idea for hanging a pots, it can be carried out even by those who do not know how:
If you need to small space place a lot flower pots then this idea is for you!

Using simple techniques from wooden bars and rope, you can make a whole shelf for flowers with your own hands, by equipping suspended structures... More detailed instructions in this video:
Imagine, combine different ways, how more colors you can accommodate, the more comfortable your home will be.
Making pots with your own hands from scratch: materials and master classes
In this section, we will consider options for independent "cases" that are made separately, and then a flower pot is "populated" in them. For indoor planters, the choice of materials is unlimited and relates only to the overall design and your preferences. The most common and used for hand made:
- cardboard,
- paper tubes,
- felt,
- recyclable materials.
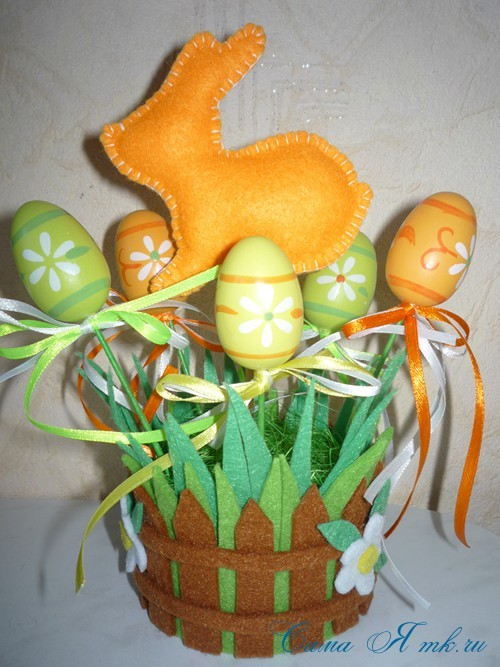
From felt
From simple materials for needlework and children's creativity, wonderful things turn out, you just have to use your imagination. Here's a look, a charming flower pot made of.

Stands and shelves for pots with their own hands
Making a planter or decorating a pot is not all. This beauty must be put somewhere! You can't do without special shelves and stands. You can build a structure on the wall.

Or you can order a whole bookcase on the floor.

Or just such a stepladder bookcase.

And you don't have to ask someone. If you buy in a store cut-to-size parts-blanks, then even a gentle female hand can cope with the assembly. Here's how in this video:
But it is much more interesting to turn on the imagination and adapt unusual items to the shelves for placing the pots. For example, pallets. Paint it with wood stain or dark paint and now - an excellent shelf is ready.

And in this trolley for the tool, they get along well various plants creating a mini.

"Cross" will not advise bad! :)
Categories,Hanging flower pots are extremely popular in our country and are widely used both in interior decoration and in the design of garden areas and courtyards. It is not difficult to arrange very beautiful and spectacular hanging flower beds in the country house or balcony and loggia with your own hands. Hanging flower arrangements for the street are created from the most unpretentious decorative crops.
The most practical and popular today are plastic hanging outdoor flower pots. Such pots are favorably distinguished by their low weight, as well as sufficient strength and unpretentiousness in care. Impermeable walls allow good moisture retention and protect the soil from drying out. Hanging decorative pots can be plastic, metal, ceramic or wood, but the wicker, lightweight pots are especially popular.
- traditional clay pots are attractive, but it can be difficult to provide plants with high-quality drainage;
- for street version often applied a natural stone, characterized by durability and high decorativeness, but having too high weight;
- wooden hanging planters perfectly retain the warmth of the soil, but after a certain period of time insect pests can start in them, and besides, the wood is subject to decay;
- metal hanging containers are characterized by high rates strength, but must be used in combination with heat-insulating materials.

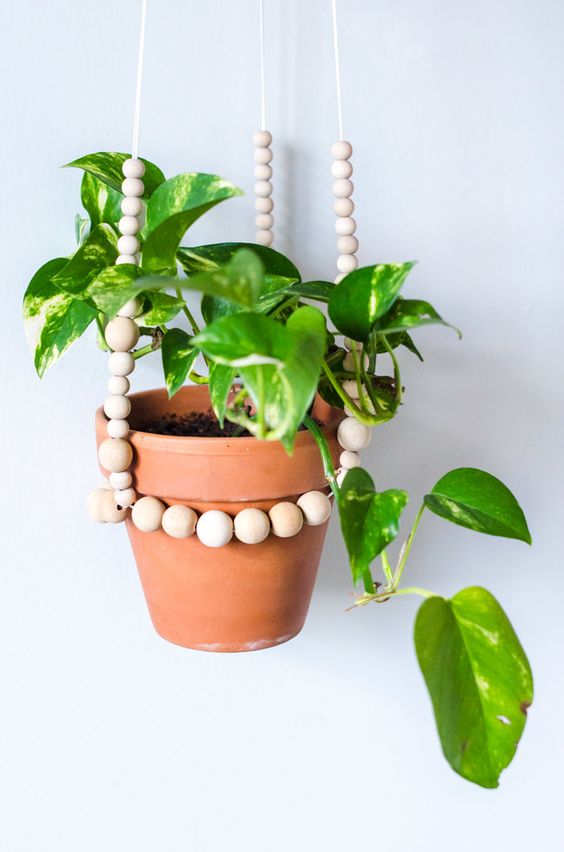
If financial capabilities do not allow you to purchase a ready-made hanging flowerpot for growing ornamental plants, then you can easily make such a pots with your own hands. Recently, weaving in the macrame style has been increasingly used to create hanging planters. Such an exclusive option will be a great addition to any design, and the knitting pattern can be standard.
The advantage of hanging planters
Despite the fact that in modern landscape design, traditional flower beds are most often used by domestic flower growers, suspended planting tanks have a number of advantages:
- decorative hanging flowerpot can be moved freely;
- the possibility of forming landscape groups or stationary flower arrangements;
- saving time and rational use of a small landing area;
- the best option for growing ampelous flowering plants;
- the ability to carry out the most effective regulation of indicators of illumination, humidity and temperature conditions.
How to make a planter with your own hands (video)
Common types
Today for vertical gardening can be used different kinds hanging pots:
- hinged structures with attachments in the form of a plastic tripod, which is included in the kit;
- structures with small metal chains rigidly attached to the edge of the flower pot;
- decorative planting containers equipped with a twine suspension or a sufficiently strong rope;
- models equipped with a special suspension located directly in the middle.
Forged flowerpots are a real work of art, in which the stand is most often represented by openwork highly decorative elements.

Macrame outdoor pots
Among the variety of hanging flowerpots, very interesting hanging pots made using the macrame technique stand out, according to the following guidelines:
- cut a dense and strong enough rope into an even number of equal segments;
- connect all the segments, align in length and tie on one side into one large knot;
- divide the ropes collected in a knot in pairs, and also knot the pairs;
- combine in pairs two segments from different pairs and tie them also with a knot.
In a similar way, weaving is performed along the entire length. This method is the simplest and does not require special knowledge. At the remaining long ends, a loop is formed for hanging, after which a flower pot with a plant is placed inside the weaving.

Plant selection rules
To get the most decorative flower arrangement, you need to know what types of indoor and horticultural crops look most impressive in hanging-type planting containers. As a rule, amateur gardeners tend to plant ampelous and bushy varieties in such pots and pots, which are perfect for decorating an opening, an arch or niche, a balcony and a veranda, as well as an outdoor gazebo and a terrace. In such containers, the most unpretentious and decorative crops are most often planted:
- shade-tolerant begonias can be placed in places with insufficient lighting, and big choice varieties and hybrid forms are used to create multi-colored and variegated, flowering plant ensembles;
- densely branched petunias are distinguished by extremely abundant and variegated flowering, lasting from the first decade of summer to a strong cold snap. The plant is unpretentious, therefore it is one of the most popular in landscape design;
- heat-loving balsams are placed in well-lit areas where they are able to form a large number of graceful flowers and neat, dense foliage;
- it is possible to arrange inexpensively hanging pots with the help of light-loving achimenes, characterized by long and thin branches, as well as funnel-shaped flowers. large sizes... Having planted several bushes of this plant, there is great opportunity get a lush bouquet with long flowering.
How to weave a pots (video)
Hanging flower pots and decorative hanging planters can also be decorated with attractive chlorophytums, asparagus, pelargoniums, marigolds, or pansies.
Basic rules for the care of vertical gardening
When growing garden ornamental plants in hanging containers, the grower must provide blooming culture proper care, which is due to the limited size of the flower pot food area.
Features of the soil substrate
For filling pendant landing tanks heavy and clayey soil substrates, which are prone to rapid compaction and are characterized by low friability, are completely unsuitable. Such soil can greatly complicate the cultivation of an ornamental crop. It is possible to optimize air permeability and permeability by introducing expanded clay and vermiculite.

Irrigation and feeding
The soil, subject to vertical gardening, is able to dry out much faster, therefore, for the cultivation of decorative flowering plant you will need to balance the irrigation regime. To minimize the risk of decay of the root system, it is imperative to remove the water accumulating in the pan. Irrigation should be sufficiently frequent and abundant., and for watering you need to use well-settled or boiled, warm water... Intensively washed out from the soil nutrients must necessarily be replenished by additional application of complex fertilizers.

Make an original hanging planter for garden flowers with your own hands, perhaps from almost any available materials. Most often, these outdoor flowerpots are created from plastic containers:
- clear empty plastic bottles from labels and glue residues, then rinse the container under running water;
- using sharp scissors or a knife, cut off the bottom, even part of a clean plastic bottle;
- make several symmetrically located hanging holes along the edge and insert into the holes a sufficiently strong rope of the length necessary for hanging the structure;
- put in received plastic planter flower pot with plant.
Planters in home decor (video)
Street ready plastic flowerpots at the last stage of creation, they are most often painted or decorated with a variety of elements, including pieces ceramic tiles, beads, small pebbles or shells.
In specialty stores, supermarkets and markets you can buy flower pots of all sizes, colors and shapes, but there is always the possibility that you will see the same product from your girlfriend or at work. If you want originality, you can make the pots yourself using materials at hand.
How to make DIY pots
The idea of \ u200b \ u200bmaking flower pots for a home or garden with your own hands is wonderful way recycle some unnecessary things, give free rein to your imagination, have a good time, and then enjoy the fruits of your labors for a long time. I will not list all possible options materials that can be used in this case, since there are a lot of them and this list can be started, but continued indefinitely. I'll tell you about several options that have already been tried by me or my friends.
Flower pots from tin cans
The simplest material that can be found in every house can easily turn into a wonderful element of the decor of your house, apartment or summer cottage.
You will need:
- metal cans;
- white enamel;
- color pigment;
- multi-colored cords;
- glue "Moment".
Manufacturing:
- Prepare materials.
Prepare everything you need for work in advance
- Wash the jars and dry thoroughly.
Wash and dry cans before applying paint and glue
- In the bottom of each jar, make several holes for the water to drain off when you water it.
- Gently paint the jars with white enamel, leave to dry completely. In this case, we used enamel for painting radiators.
Choose the type of paint suitable for working with metal for work
- Dilute the pigment of the desired color in a small amount of white enamel and apply the paint to part of the cans as your imagination tells you.
Choose your favorite colors and combine them with each other
- Decorate the remaining jars with multi-colored cords or thick threads. To do this, gradually apply glue to the jar and tightly, end-to-end, wrap the jars with cords of the desired color.
Use cords or thick threads to decorate the jars.
- Transplant your plants and arrange your homemade pots on your windowsill or deck. It is recommended to use such products indoors or outdoors without direct contact. sun rays and precipitation, since under the influence of these factors, the pots will quickly lose their beauty.
Flower pots made from tin cans look neat and beautiful
The note. You can use cans of any size by coloring them in different colors and decorating as you wish.
Below I suggest you get acquainted with another way to make a flower pot using a metal can.
Video: a flower pot from a tin and plaster
Flower pots from plastic bottles
Plastic soda or water bottles can also be used to make unusual containers for planting your favorite flowers.
You will need:
- transparent plastic bottles;
- acrylic paints;
- indelible marker;
- ornamental varnish.
Manufacturing:
- Lay out the necessary equipment and materials on the table. You can immediately prepare the plant and soil.
Making the cutest flower pots will require materials available to everyone and a little patience.
- Using sharp scissors, cut off each bottle, forming the front of the cat ears and the back of the tail. You can also cut out cubs, frogs, or other animals in the same way.
To easily attach the workpieces required forms, use sharp scissors
- Carefully melt the edges of the workpieces so that they lose their sharpness.
- In the lower part of the future pots, make holes for excess water.
- Outside and inside paint plastic blanks acrylic paints of your choice, let dry.
- With a marker, draw the cat's face: eyes, nose, mouth, whiskers. If you don't have a permanent marker, use a brush and acrylic paints.
Animal muzzles can be drawn with a marker or paint brush
- Cover the pots with non-toxic craft varnish.
- When the varnish is dry, fill the pots with soil.
Let them dry well before adding soil to the pots.
- Transplant your plants.
Cat pots fill the house with kindness and comfort
Video: a flower pot from a plastic bottle
Flower pots made of cement and burlap
Creative flower pots will not go unnoticed by guests and will delight the owners for a long time.
You will need:
- sand;
- cement;
- crushed stone;
- water;
- cloth;
- plastic containers for the base.
Manufacturing:
- Prepare a mortar of sand, cement, gravel and water, based on the proportions of 1: 3: 5: 1/2.
Mix the components of the solution thoroughly
- Select containers of the required size and suitable pieces of cloth.
- Place the banner in cement mortar and soak for 1 minute to soak well.
- Throw pieces of cloth on containers that act as frames, and leave for 12 hours.
It will take at least half a day to completely dry the workpieces.
- After the specified time has elapsed, turn the pots over and let them dry completely from the inside.

Even the brightest need framing - "outfits" that will further emphasize their beauty. The most spectacular and at the same time simple "outfits" are rightfully considered to be street pots. Making them with your own hands will not be difficult. Would you like hanging bottle pots, wicker wicker pots or ground planters from a tree stump? No problem! Read instructions on how to make pots from these and other materials, as well as watch educational photos and videos - they will help you transform your garden beyond recognition.
We make pots from rags and cement
To make such a planter, you will need:
- cement;
- old tablecloth;
- vase, pot or other mold vessel;
- water;
- bucket;
- "Mixer" - drill attachment;
- dye.
The procedure for creating a planter is very simple. First you need to cook cement mix... To accurately determine its volume, take a tablecloth, place it in a bucket and mark on the walls how much space it takes - at this mark and pour water for the solution. Add cement to the water and mix them with a "mixer". The result should be a cement milk that resembles a little liquid sour cream in consistency.
Then, when the mixture is ready, place a tablecloth in it and let it sit for a couple of minutes so that it is completely soaked. Then remove the material and make sure there are no dry spots left on it.
Next, take a prepared container for the mold and hang a wet tablecloth on it. Unfold material gently and leave to dry. When the cement slurry has completely hardened, remove the product from the mold container and paint. Use special paints for concrete - they are stronger and more durable. Once the paint is dry, you can use the planter as directed.
We make pots from plastic bottles with our own hands
Plastic containers - universal material for flower pots, since several models of "outfits" can be made from it at once.
The first option is a classic planter. Get a plastic bottle, two CDs, sandpaper, scissors, glue, and paint. Cut the bottle into two equal pieces using a wavy line. Clean up sandpaper both disks. Take the bottom of the bottle and glue it to the cleaned first disc. Then take the top: first unscrew the cap and glue it onto the second disc, and once the glue is dry, screw the plastic part of the bottle back onto the cap. When finished, paint the blanks.
The second option is a hanging planter. Here you will need: bottle, rope, paints, scissors. First, cut off the neck of the bottle - only the straight bottom of the container will be used in the work. Then cut on the sides small holes for the rope. Then decorate the structure: paint, cut out patterns, draw an animal, cut off the top edge - whatever you can do neatly. And then thread a rope through the holes, put a flowerpot in the planter and hang the structure on strong nails.
We make wooden flower pots
The easiest way to make a flower pot is from a tree stump or log. Take:
- wood;
- drill: drill length - at least 25 cm, diameter - at least 20 cm;
- chisel;
- protective impregnation for wood.
- Select a log or stump of the required diameter. Measure a piece to the height of a flower pot or flowerpot and cut it off - this is a planter again.
- Drill a series of holes in the top plane of the wood to break the core.
- Use a chisel to remove the wood - you should end up with an empty container. The edges need to be aligned.
- Process the inner walls of the planter protective compound and place a pot of flowers in it.
Advice. The wooden planter itself can also act as a pot, but for this you need to put strong polyethylene in the container and fill it with drainage on top. And only after that you can place the soil mixture with the flower.
More difficult option- pots made of boards and beams. You will need:
- bars with a section of 25x25 mm;
- boards 15 m thick;
- self-tapping screws;
- joiner's glue;
- drill;
- protective impregnation for wood.
The algorithm for making pots is as follows:
- Assemble a cube-shaped frame from the bars.
- Cut out parts for the bottom and sides from the boards. Sand the panels on all sides.
- Drill some drainage holes in the bottom.
- Assemble the design of the planter together: attach the side and bottom panels to the cube frame using self-tapping screws. In order to make the product even more reliable, carefully glue all the joints.
- Cover the surface finished structure protective composition.
Weaving vines pots
Another simple one but interesting option flower "dress" - a pots from a vine. Prepare for work:
- flexible vine - it can be either fresh or dried;
- plywood sheet;
- moisture-proof impregnation;
- drill;
- awl;
First, soak the vine in water to give it the extra flexibility it needs to weave easily. Cut a blank for an oval or round bottom from a plywood sheet. Along the edge of the resulting bottom, drill the same holes with a diameter slightly smaller than the diameter of the vine. All holes must be at the same distance from the edge of the bottom. Then insert a strong twig into each hole - this will be a blank for the frame of the planter.
The next step is direct weaving: lay the vine between the twigs, gently pressing each new row with an awl. Wrap the twigs until the product reaches the height you need. Laying methods can and even need to be changed through a row - this way you will achieve a multi-textured surface of the pots.
At the end of the weaving, either cut the twigs or weave them into the main rows of the vine. Then let the structure dry out a little and get stronger. Final stage- processing of pots with moisture-proof impregnation and varnishing.
We make pots from plaster
To make such a pots, prepare:
- gypsum;
- wire;
- textile strips no more than 10 cm wide;
- paint;
- bucket;
- protective varnish.
The first step is to prepare the wireframe. Turn the bucket upside down and wrap the wire around the surface. Tuck the edges and hide. Carefully remove the finished frame from the bucket.
The second step is to dilute the gypsum solution. Take gypsum and mix it with water until the composition begins to resemble sour cream.
The third step is the construction of the "body" of the pots. Dip all strips in plaster of paris and soak for 3 minutes. Then take out the tapes one at a time and apply them to the frame layer by layer. The thickness of the walls should be at least 2 cm.Then carefully process the walls of the structure with the remaining gypsum solution... After that, the planter should dry completely - set it aside for 10-12 hours.
The fourth step is the design of the structure. The planter can not only be painted, but also decorated with a variety of glass, beads, pebbles - any small details that you like.
Advice. After drying, the walls of the pots will not be entirely even, so the paint will fall poorly. To avoid this, carefully clean the surface with sandpaper and treat the structure with a white water-based emulsion composition, and then apply the paint of the required color to the planter with the second layers.
Now you know that you can make a beautiful flowerpot from almost any material without spending a lot of time or big finances. The main thing is to turn on your imagination and be smart. So if you want to effectively decorate your garden, do not rush for store pots - take the initiative into your own hands and do not be afraid to experiment.
How to make a pots: video
Planters for the garden: photo


Elegant flower arrangements are the decoration of any site. Colorful flower beds, striking the imagination with a variety of colors and shapes of flowers, do not leave anyone indifferent. But it is impossible to highlight the flower garden against the background of the lush vegetation of the site and emphasize its beauty without a decent frame. Do-it-yourself decorative pots for the garden can not only transform the site, but also give the flower beds a complete look.
A distinctive feature of the pots from the traditional plant pot is the absence of drainage holes in the bottom of the container, which are necessary for the drainage of excess water. In addition to the decorative function, a properly selected container can facilitate the care of a green pet.
Since the main purpose of decorative planters for the garden is to decorate the interior, outer surface containers in most cases are more beautiful and attractive
Depending on the material for making flower pots for the garden, there are the following types:
- Plastic. One of the cheapest options for pots, the main advantage of which is light weight and ease of care.
- Wooden. The natural base of the containers protects plant roots from hypothermia and drying out, and also maintains optimal conditions for growth.
- Metallic. Modern material durable, perfect for outdoor gardening.
- Clay. A material with a rough or smooth surface is a universal basis for painting with paints and decoration with modeling. But its moisture permeability limits its scope.
- Ceramic. Natural material, treated with a special glaze, is widely used both for interior decoration and for garden design.
The main requirements for pots for garden decoration are the ability to maintain the shape set by the master and high resistance to high humidity soil and temperature extremes.

If we take the location of an improvised flower garden as a basis, then there are floor structures and hanging pots for the garden
Unusual use of old things
Outdoor pots can be made from anything. Old rubbish, carefully stored "just in case", furniture, dishes ...

Unusual hanging pots can be made from old teapots, which are enough to be placed along the stairs, hanging on a wire

In the hands of a creative owner, even an old one can find a second life travel bag without a handle, which, as the saying goes, is hard to carry, but it's a pity to throw it away
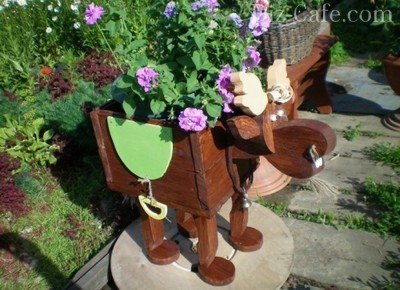
A wooden box, opened with stain and decorated in the form of a cute fabulous calf, will become a worthy frame for a flower garden
Filling your suitcase is easy by placing several pots of plants directly in it. If the height of the containers is much lower than the walls of the suitcase, sea pebbles and pebbles can be poured on the bottom of the planter, and the gap between the containers can be filled with moss or crushed bark.
Do-it-yourself pots options
For the manufacture of original containers that can organically fit into landscape design and act as a spectacular decoration, you can use a wide variety of materials: burlap and ropes, leftovers plastic film and plastic bottles, plaster and polymer clay... Any of these materials in skillful hands masters are able to turn into bright element garden decor.
Decorative plaster vase
To make an original pots that will last more than one year, you need to prepare:
- asbestos or polymer gypsum;
- flexible wire for arranging the frame;
- construction bandages or strips of fabric 10 cm wide;
- water-based paints and colors;
- acrylic varnish for outdoor use.
The cache-pot can have any shape: it all depends on the chosen base for the frame. In our case, a plastic bucket with a volume of 10 liters will act as a temporary basis, which will be removed upon completion of the work.
Place the bucket on a flat surface, turning it upside down. To make the frame, we braid the surface of the bucket with wire, the edges of which we carefully tuck and hide. Remove the resulting frame from the bucket. Now you can start breeding gypsum, the consistency of which in the finished form should resemble thick sour cream. We lower strips of cloth or bandages into a container with plaster solution, soaking them for 2-3 minutes. Our task: to overlay the wire frame along the outer and inner walls. We put the strips of fabric, well soaked in the solution, layer by layer on the frame until the thickness of the walls reaches 1.5-2 cm. We carefully coat the walls of the pots with the remaining solution. Leave the structure to dry completely for 12 hours.

After the base has completely hardened, you can start decorating the pots, decorating it with all kinds of pebbles, colored glass and beads
To do this, first level the surface by sanding it with sandpaper. Then we cover the bottom and walls of the product with white water-based paint, on top of which with a second layer we apply the desired background for the applique or ornament.
Car tire hanging planter
Old car tire- an excellent material for the manufacture of decorative elements. Rubber is resistant to external influence and unfavorable weather conditions, thanks to which it is able to regularly serve for more than one season.

It is hard to believe that such a colorful parrot, importantly swinging under the canopy of a house or between the branches of trees, can be done in just one day with your own hands.
To make a hanging planter you will need:
- tire without steel cord;
- drill and drill with a diameter of 10;
- sharp knife;
- washers М8, bolts and nuts;
- paints for outdoor use.
To make it easier to work when cutting out parts, the knife blade can be periodically moistened in liquid soap or detergent.

Symmetrical cutouts 2/3 are made along the side wheel on both sides of the tire. In the larger side of the incised tire, through the triangular cutouts, separate the side part

As a result, a blank should be obtained, which we subsequently carefully turn inside out, giving the desired shape
The body of the parrot is ready: it remains to shape the head of the bird and give it a recognizable shape. To do this, cut out the beak from the scraps of the tire.

Insert the cut parrot's beak into a longitudinal incision made with a sharp knife along the edge of the smaller side of the body
In order to securely fix the beak, we squeeze both halves with a string, drill through them through hole, through which we then tighten them with a bolt. You can correct the shape of the bird already in place by making several cuts with a knife.

Cut the tail of an exotic bird from the long side of the workpiece along the contour previously marked with chalk
The parrot is ready: it remains to pull off the side parts of the product with a rope or wire, and then paint it in bright colors.
Outdoor flowerpot of twigs
For work, you will need branches 0.7-1.5 cm thick and a thin cord or twine. If possible, it is better to give preference to branches of birch, viburnum and bamboo - they look the most interesting. It is better to choose sticks of the same thickness.
For the manufacture of pots, branches are cut with a knife or secateurs to approximately the same length, which should be 1-2 cm higher than the pot itself. We lay out the blank sticks close to each other on a flat surface and braid with twine so that a mat is obtained, the length of which should be enough to wrap around the pot.

Thin branches of trees left after garden pruning can be used as decorative elements. They can serve as the basis for the manufacture of a beautiful pots, which are perfect for decorating both the site itself and the interior of the house.

To create a larger structure, it is better to use bamboo, or round or square bars, assembled in the form of a cube.
Step-by-step master classes on video
A convenient option is when the branches are glued to the burlap base. We wrap the outer walls of the pot with a woven mat and fix the decoration with colorful satin ribbons or the same twine.