Do-it-yourself spice grinder. Mechanical spice grinder
Without spices and herbs, our food would be bland and tasteless. They make dishes more appetizing, improve our digestion and cheer up. You can already buy in stores crushed spices or special jars with a built-in chopper. In such containers, the contents retain their taste and aroma for a long time, you just need to twist the device over the dish, and the spices will be evenly distributed.
Unfortunately, the manufacturers did not plan to reuse spice grinders. Due to the small volume, the packaging is quickly consumed, and many simply throw it away. Do not rush to get rid of such a useful thing, because it can be easily opened, filled again with any spices and used for a very long time. The British believe that saving is another form of income. It's hard to disagree with this!
Editorial "With taste" prepared a simple life hack for you, how to disassemble the grinder and extend her life. Very convenient, cheap and practical!
How to open a pepper mill

Buying loose spices and arranging them to your liking is much cheaper than spending money on a new mill every time. 80% of a product's value comes from packaging, so why throw away a recyclable item? Find out at.
This toy consists of a pepper mill attached to the end of a gun that looks like a silencer.
The trigger, when pressed, turns on the electric mill, and next to the fuse there is a switch responsible for light, sound and vibration.
Ready to bring pepper justice to this world? Then let's start assembling an electric pepper grinder!
Consumables:
- toy electric gun (mine cost about 200r)
- new SPDT switch
- stranded thin wire
- heat-shrink tubing
- clip
- plastic funnel
- wooden rod (I used a wooden spoon)
- black paper
Tool:
- dremel
- soldering iron
- wire scissors
- pliers
- hot glue gun
- sharp knife
- sandpaper
- square
It is obvious that this mill has a very unusual appearance and it is better not to take it out of the house.
Step 1: Dismantling the Pepper Maker


I bought the windmill from the DX site. The top of the case is easily unscrewed so that you can easily replace the battery. Once you unscrew the top of the windmill, you will have access to the battery compartment and motor. The spice compartment will also become available for unscrewing.
The battery compartment is connected by reins to the chopper motor using two small clips. By pressing on the clips, you can disconnect the motor and the battery compartment. Next, using a soldering iron, you can solder the wires from the motor.
Flipping the battery case over reveals two copper strands that form the original windmill's switch. Since we will use a different type of switch, and it will be located in a different place, these wires can be soldered for later use.
The battery compartment at this stage should be a simple case for 4 AA batteries with two wires and no switch. Now let's put the windmill aside and come back to it after we modify the toy gun.
Step 2: Gun Analysis


I found my gun in a cheap store. When the trigger is pressed, the diodes on the gun light up and it makes a very pleasant “boom bang bang” sound. And it vibrates too. The toy was assembled into 15 small screws, after unscrewing which the gun is disassembled in half, revealing the internal electronics. A simple spring on the trigger acts as a switch, and the battery sits tightly in the handle.
The idea is to use existing gun electronics and incorporate a pepper grinder into it. Below is the completed diagram.
Step 3: Embed the Mode Switch


I wanted the windmill to work both with and without the effects built into the pistol, so I decided to add a switch in the form of a pistol safety to allow you to easily select one of the modes. The pistol was designed in the likeness of the MP5 and, like most pistols, its safety is located near thumb. In this toy, the fuse is static and nothing can be done with it.
I added my own fuse in place of the toy's fuse. I cut the wires from the toy gun battery and soldered a 15cm wire to each end. Each new pin was attached to a SPDT/SPST switch, then I insulated everything with heat shrink tubing.
With a sharp knife and a dremel I made small hole under the safety of the toy gun, placed the switch there and secured it with hot glue.
Step 4: Second Contact


Since I wanted the trigger to operate both the pistol and the mill, I decided to modify the existing trigger by adding an additional spring contact to it on the other side. The original design of the toy was that when the trigger spring is pulled, it makes contact with a contact and completes the circuit. Using the existing trigger as a guide, I bent a new trigger spring out of a paperclip.
Where the end of the spring makes contact when the trigger is pulled, there is a post on which the wire spool rests. My coil was too big so I cut it to half size and made a new connection. A spacer was installed between the two coils, allowing each circuit to be closed simultaneously and separately. The new coil was connected to battery mills.
Step 5: Shelf for Second Trigger


After I got both circuits closed when the trigger was pulled, I enlarged the spring shelf on the trigger so I could fit another spring on the other side.
When the glue stuck, I formed with pliers plastic shelf so that it is a reflection of the existing spring shelf on the other side.
Step 6: Support for the Mill


The mill does not weigh very much, but support is needed to use it in a pistol. The wooden kitchen spoon I found was perfect shape- A thin body that fits snugly against the barrel of a toy gun and a curved end that can be connected to a windmill will provide good stability. I added a black funnel to the design, it will create a smooth transition between the body of the windmill and the barrel of the toy gun, and also hide the wooden spoon.
The funnel should be pulled over the spoon to a level where the wide part of the spoon does not completely rest against it. The handle of the spoon must be measured to the depth of the gun. With a marker, I marked the places where the handle should be split and where the wide part of the spoon meets the edges of the funnel, with a dremel I made two clean cuts.
Then I made a cut in the wide part of the spoon, in which the windmill was firmly fixed in place, I also cut a channel for the wires in the handle of the spoon. Using hot glue, I attached the spoon and the mill motor, and the wires were placed in the cut channel.
Then I put the funnel back on the spoon and advanced it to the junction of the spoon and the mill, made a mark on the inside of the funnel where the mill body meets the spoon, and then cut the funnel with a dremel to right size. To secure the funnel, spoon and mill, I glued everything with a layer of hot glue.
Step 7: Decorating the Silencer


To give the device a finished look, I decided to wrap the muffler in a decorative black cardboard cover. This cardboard will hide the transition between the funnel and the mill and give the muffler a neat look and make the whole device look like a real firearm.
Mills for grinding spices from the Kotanyi brand are extremely convenient and popular kitchen appliances among users. And although they are not intended for repeated use, a single jar can also extend the shelf life. Every housewife will need tips on how to open a Kotanyi pepper mill manually or with the help of improvised items. Due to the simple structure of the device from the Austrian manufacturer, several methods can be used to remove the plastic insert from the structure.
Any hand mill Kotanyi is a glass container with a lid and a built-in spice grinder. The jar contains from 30 to 50 g of spices. Used as a filler different types peppercorns, coriander, dried onions, fenugreek, basil, rosemary, thyme, coarse sea salt.
The crushing mechanism is made of plastic and tightly installed in the neck of the bottle. When the lid is turned, large components are ground into powder. The mill has two modes of operation. The first produces larger particles, the second produces smaller ones. The closed container is airtight, thanks to which the whole spectrum of aromas and taste of spices is preserved.
With these obvious advantages, the device has several disadvantages. First, a real Kotanyi mill is relatively expensive. Secondly, the disposable chopper is not meant to be reused. However, this technical feature with a skillful approach, you can fix it by pouring the pepper into the jar again.
Many manufacturers produce spices in hand mills.
Disassembly methods
There are several working tips for opening a Kotanyi Pepper Mill. Each of them is easily applicable at home. It is possible to open the plastic insert without damage in a few minutes using one of the four proven disassembly methods:
- manually without tools;
- with a knife;
- two boards;
- by heating.
Designs without factory defects and not damaged during operation are suitable for reuse.
Manually
If not at hand the right tool, it is quite possible to disassemble the mill manually. Moreover, this method is considered a male prerogative, since it requires the application of force:
- Remove the protective cap from the device.
- Set the coarse grinding mode.
- In one hand, the jar itself is tightly clamped, in the other - the built-in chopper.
- Turning the mill, lift the base of the lid at a break.
- With the second movement, turn again and lift the lid on one side.
Such manipulations are repeated several times until the container is completely opened.

With a knife
A sharp tool does not allow you to remove the entire mill device, but only the plastic membrane disc. But this is enough to re-fill the pepper in a jar:
- After removing the cap, the tip of the knife is placed between the core and the neck.
- The insert is gently lifted from several sides, leading the knife around the circumference.
- After removing the plate, a funnel is installed in a narrow hole and spices are poured through it.
- To put the part of the mill in place, lightly press on it until it is completely compacted.
You can also make vertical cuts on the plastic body of the lid with a knife. After that, it is removed with a slight upward movement. This easy way there is a drawback: the part cut and then fastened with a bracket or adhesive tape does not look very aesthetically pleasing.


With two boards
To dismantle the Kotanyi mill, two small planks can be used. Their width should be greater than the size of the lid, and the length should be sufficient to be gripped by hand. A semicircle is cut out on each wooden plate, equal to the diameter of the neck. Then they put the jar on the table, tightly support the built-in lid with one plank. On the other hand, a second blank is applied and with its help the edge of the plastic structure is lifted.
Lid heating
When the mixture of peppers in the mill is over, you can use the thermal opening method. It is convenient in that it does not require the use of force or sharp objects. In a small container, water is heated to boiling and the plastic part of the mill is lowered into it. Hold for 4-5 minutes, then remove the structure from boiling water. Grabbing a towel or napkin, turn the lid and lift it. The oversized plastic part can be removed effortlessly. After drying, it is installed in its original place.
Instead of boiling water, you can use a hair dryer: hot air also expands the plastic and makes the lid pliable.
To open a disposable mill, use any of the four methods. Repeated use of the device allows you to independently compose spice compositions based on your gastronomic preferences. A nice bonus is also a significant budget savings, since spice bags are much cheaper than a complete mill.


Video
.
Good time everyone. In this article, we will consider MK, one author for the manufacture of a spice mill.
Materials needed: Preliminarily well-dried cherries, a set for a mill with ceramic millstones.
Tools: Lathe, drill bits different sizes, drill chuck.
First of all, the master made an approximate ratio of millimeters and inches. To do this, he used a unit conversion table + rounding.

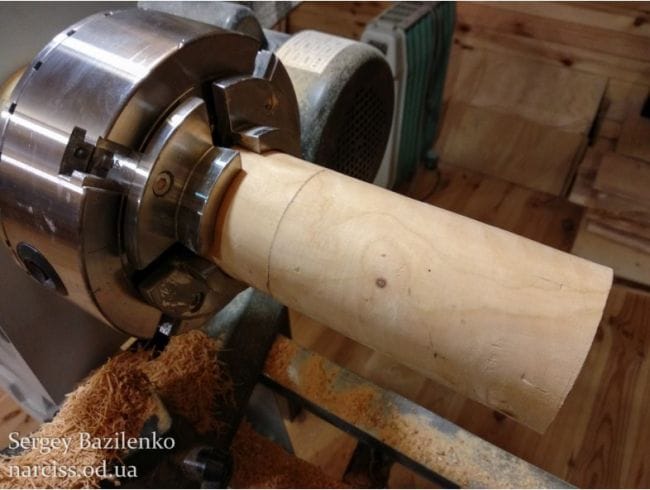
Manufacturing process.
I installed the workpiece in the machine and started processing it.

This set was used by the master.

First, the author processed a workpiece up to 65 mm in diameter and realized that a mill with such a diameter was too big. Then he recalculated the dimensions again and slightly reduced the diameter.

I decided to make the turning part a little longer. I made the markup.

The author also machined the inner diameter.

Trimming off all excess.

Set the drill chuck in tailstock turning.

With a pen drill, slowly makes a hole in the workpiece.


When deepening the drill, it reduces the feed so as not to overheat the workpiece and the drill. Drill size 1-1/8 inches.

On the reverse side of the same part, the hole was made 1-1/2 inches. The author glued masking tape on the drill to control the depth of the hole.


Then the master did through hole by 7 mm, in the upper rotary part of the future mill.

By fitting tightly the size of the inner leg.
In addition, the master made a small recess for the crab, with the help of which the core of the mechanism will rotate.

Having connected both parts, clamped in the centers and machined the middle. After grinding.

Then he installed the crab in its place.

For safe use mills in the kitchen, covered it with wax-oil mastic. Also, this coating gave good view and glitter homemade.

Ceramic millstones have this type.

Assembly of all mechanisms and parts.
Actually, hello.
On the agenda - a review of the spice mill with the original grinding mechanism.
Briefly - the device is suitable. Details by letter.
***
Disclaimer - the review is written under the Sales Review heading, therefore it cannot be objective by definition. All feelings, emotions, epithets and conclusions from the use of the product are the result of a deal concluded by the author with the devil, who lives somewhere in China. Persons who are hypersensitive to this kind of writing should immediately close this page and listen to at least three in order to achieve the lost spiritual harmony. Others may continue reading solely at their own peril and risk.
***
Despite the significantly thinned ranks, let's try to continue.
Even without being a certified specialist in turning raw meat into fried meat, the author understands the importance of adding the right spices to the prepared dish in a timely manner. And grinding spices, of course, is best just before use.
In my kitchen, spice grinders are available in this assortment - several Ikea ones (for cloves, fennel, and Sichuan pepper), ordinary, bought offline (for a mixture of peppers, mostly black). The reviewed one that has now appeared, I believe, will complement the pepper mill as desktop version, but more on that later. 
All mills, except for the one under review, have not only a drawback, but rather a feature - they can be used strictly with two hands, and nothing else. For the surveyed, one is quite enough, which can sometimes come in handy.
The mill arrived in a typical Chinese box, there were no revelations. Although people who are not devoid of aesthetic taste will certainly note that it is quite possible to give it even instead of a diamond ring, and without additional decoration. She (the box) is so beautiful. 
The piece of iron itself, in my humble opinion, also looks quite decent, it’s not a shame to put it on the table if there are Dear Persons in the house as guests. Special admirers of the observed object of high art can put only a pepper pot on the table, so as not to disturb the harmony created by worldly dishes. 
Disassembled it looks like this: 
The device is simple, there is nothing to break. Every detail is beautiful, the inner world of the pepperbox is worthy of external perfection. The material is stainless steel, none of the parts (except for the washer) showed attraction to the magnet. There is no doubt about durability, unless of course you decide to grind titanium balls. 
Next, we will conduct a comparative grinding test. The opponent is the Ikeev mill with a tightly screwed regulator nut (that is, set to fine grinding), sawdust from it in all the photos is on the right, sawdust from the monitored mill is on the left.
Test results
In my, again, humble opinion, there is not much difference. Except for the fact that in conventional mills the coarseness of grinding is regulated, but not in the monitored one (the reason is simple - the existing grinding is perfect and is suitable for all cases in exactly the same way).
In the process of using it, I got the impression that the mill will bring maximum benefit not on the desktop, but on the dining table - its grinding is fine, the amount of spice from one press allows you to accurately dose the grinded product. Yet again - appearance it is quite disposed to put the device on public display, without being embarrassed at all.
Verdict - I personally am satisfied with the free mill. "One-handed" design, simple reliable mechanism, quality materials, nice appearance. The lack of grinding adjustment and low productivity can be written down as disadvantages - but these disadvantages are a continuation of the advantages, because when using the mill as a handy, the lack of grinding adjustment turns into compactness, and low productivity turns into dosing accuracy.
The most important issue is the price, and here, of course, everyone is free to decide for himself. Ikeevskaya mill costs, for example, 230 rubles. Considered - exactly twice as expensive. On this occasion, I will not give any advice, because ... see the disclaimer at the beginning.
Coupon for two bucks
For those who want to decorate their home with a genuine masterpiece of Chinese culinary thought, there is a coupon that reduces the price by 2USD: yzzwww170222 valid until March 10th.
I borrow everything.
Hurrah, comrades!
