DIY backgammon: we make tabletop entertainment for an evening of games with our own hands. DIY backgammon: materials, the process of making DIY backgammon drawings
Board games will never go out of style. So backgammon does not lose its popularity among different age categories. This game has been known for many generations, and few people know that the first mentions of it date back to about 3000 BC. in the East. Today backgammon is given to relatives, friends and colleagues, and it is quite easy to buy them. Another thing is to do it yourself and surprise a person. Someone will think that it is difficult and not given to everyone, but this is not so.
Manufacturing technology at home
The standard set of backgammon includes 2 playing fields, 30 chips and 2 dice. The size of the closed board is 50x26.5 cm. Backgammon opens like chess boards.
For manufacturing you will need:
Now about the process of making backgammon with your own hands:
- The plywood needs to be sanded to remove any irregularities.
- Having chosen a presentable pattern for the inner walls of the backgammon, you need to carefully fix it and put a carbon copy to draw out the contours. For aesthetics, they should be small and visually aligned.
- Now we need to burn out the outlines of the images on the future playing fields.
- You can start registration outside backgammon. Here you can burn a larger and more interesting drawing. Also, if desired, both sides can be painted, or one can be made - "front".
- When the contours are burned out, you can start painting the images with a 2-layer stain.
- It is necessary to make 8 slats approximately 1 cm thick, 2.5 cm wide (4 pieces - 26 cm long and another 4 - 50 cm) and grind.
- Reiki for curly planks - you need 4 pieces. Their length should be 21.5 cm. 6 sockets should be sawn out on each plank with a radius of 15.5 mm. And again all the slats need to be sanded.
- Now glue all the parts in their places, sawing the parts. Then the nest areas are lined.
- Everything is varnished. And then the loops are inserted.
Option 1
Let's make backgammon out of oak boards, about 5 cm thick. First, we will make blanks for the backgammon frame - a plane for playing them. The boards need to be cut into thinner boards that stick together. It turns out a flat field for the game. Please note that in this way adjacent strips compensate for each other's warpage. You can take plywood and divide it into 2 equal parts to create a base for a folding board. Folding fields for playing backgammon are boxes that allow you to add all the chips and dice after the game and keep them for a long time without losing them.
The marking on the inner playing side of the board follows the 6 + 6 principle. Inside the sides, it is necessary to mark the holes for the chips. Sometimes these holes are cut from individual planks and nailed or glued on top, thus, the sides are obtained, indicating the boundaries for placing the chips. Further, a drawing is cut out on the outside, it is made, as a rule, with a special machine. Then the resulting field for the game is toned and the two folding parts are manually assembled. The parts should fold and unfold freely. Pick up two mechanisms that provide free movement of the halves of the backgammon board. And polishing is also important - to avoid splinters and unevenness on the surface. It is necessary to carefully check whether the boards fit together so that no cracks form over time.
The second part of the work consists in making the chips themselves. You can also make them out of wood, or pick up flat chips of the same size from a different material - for example, from an old children's plastic toy.
Sometimes the backgammon board is combined with the chessboard on the other side. After you have made backgammon - do not rush to play. A product made of wood needs to lie down for a while. 10 days will be enough.
Option 2
- To make backgammon with your own hands, you need to take two suitable sheets of well-polished plywood 480 mm on one side, 210 mm on the other, 4 mm thick.
- For drawing on the inner surface, you need to prepare 3 colors: 2 shades of brown, one light or bronze paint in a can.
- Transfer the drawing to the surface through the stencil, then glue the veneer that matches the color onto it. This operation requires carefulness and deliberation.
- You can paint the surface of the board with a stencil superimposed on it with bronze paint.
- If the paint is not spray paint, use plain bronze paint and a sponge.
- Make frame blanks from thin strips. First, glue the slats together, then glue them to the board.
- Cover the finished drawing with several layers of varnish.
- On a lathe, it is necessary to turn chips with a diameter of 25 mm and a height of about 12 mm in an amount of 30 pieces. Leave 15 chips light, and cover the other 15 with stain. Apply the varnish in several layers.
- You can make chips from checkers. To do this, buy 2 checkers sets and select the required number of tokens of two colors.
- If you are good with wood carving, carve an oriental pattern on the outside.
- Cut the plywood overlays to the outside. They should be smaller by about 20 mm. Stick them on.
- Mark the borders of the lining with a curly skirting board, you can buy it.
- Attach the hinges to both halves of the board on one side, the hook on the other.
- You can make not a folding backgammon board, but a stationary table. The surface of the old coffee table is marked, veneered or covered with paint through a stencil. They make bumpers. Cover everything with varnish in several layers.
Option 3
Find strips four centimeters wide and form the dimensions from them. On the side planks, using the chips, draw the halves of the holes and cut them out with a hand-held plywood jigsaw. Then put all this on two pieces of plywood and lightly nail down with nails. Spread the slats with PVA glue (only Korean and by no means Russian, it is called kong and usually goes as an additive to wallpaper glue under numbers 204, 205, etc.). Then or in advance, you can put on the plywood a pre-prepared picture, such as beautiful wallpaper, or simply burn out or paint, although this is more difficult. There is nothing better than wallpaper. The thickness of the slats is from one to one and a half centimeters.
Option 4
True connoisseurs of this game always have a beautiful board, and some even get a special table for playing backgammon - a usual one coffee table, on the surface of which there are markings for the game. The choice of such boards and tables is huge: there are handmade wooden products, there are glass products. They are usually made beautiful by intricate patterns applied (by hand or at the factory). And everything would be fine, but there are such boards and tables oh, how expensive, so not everyone can afford to buy such a luxurious thing.
We used to have a regular wooden folding board for playing backgammon, bought in a store. Although this board was very beautiful (carved and hand-painted), it was very large and unwieldy. It was tedious and troublesome to constantly take it out and put it back in the closet.
My husband has long dreamed of a backgammon table. But we could not find a suitable one - those that we liked were very expensive, and those that suited us for the price did not suit us in appearance.
Then the husband offered to make the table himself. In addition, our usual coffee table was already worn out in order and we wanted to throw it out, so it was quite possible to take a chance and try to remake it.
In the shop furniture fittings we bought decorative plastic corners. In the building materials department, we bought a bronze spray paint in a spray can and a varnish for wood. As a drawing, we have chosen the drawing of our playing board. Having cut the drawing paper to the size of the table, we redrawn the drawing from the board onto it. I had to tinker a little: the dimensions of the table and the board did not coincide a bit, and the drawing itself turned out to be intricate. When the drawing on the Whatman paper was ready and represented the future surface of the table, we carefully, with small scissors, cut out all the arrows and monograms of the drawing. The result is a stencil.
Having degreased the surface of the table, we attached the stencil to it with "double" tape. From a distance of about 30 cm, we applied bronze paint to the table. We applied the paint from above so that it would not spread under the Whatman stencil. Instead of spray paint, you can use the usual one, but you will have to apply it on the table not with a brush, but with a piece of sponge.
After waiting for the first layer to dry, we applied the second. After both layers were completely dry, we carefully peeled off the stencil and varnished the drawing. On the corners of the table, we glued decorative plastic corners, which were also pre-coated with bronze paint. I pasted golden sequins on the sides of the table, which successfully emphasized its oriental style. To prevent the sequins from clinging and peeling off, we also varnished the sides of the table.
Now we no longer have to fiddle with the board to play - in a matter of seconds we can place the chips and play. And I didn't have to throw out the table - you won't find such a beautiful and practical table in any store!
If you are inspired by our idea - go for it! Instead of markings for backgammon, a chess pattern can be applied on the table (for fans of checkers and chess), or you can simply decorate with some intricate pattern. The main thing is to show your imagination!
Option 5
Many factory-made boards combine the ability to play chess, checkers and backgammon, that is, 8x8 squares are drawn on one side of the board, and 6 + 6 markings are applied on the inside. Chip holes are placed along the sides. Thus, chess pieces and checkers (chips), together with dice, are conveniently placed inside the board, which folds in half and closes with a latch.
Many "craftsmen" have modernized their chess boards for backgammon. Indeed, this is the easiest way to do this, and the chips can be carved out of wood or borrowed from plastic ones from an unnecessary children's game. Basically, if you buy two sets for playing checkers (there are twelve pieces of different colors), you can select 30 pieces for backgammon, fifteen of each color. Although all this will not be solid, it is quite possible to get by with such a set for playing backgammon at home. But it is unlikely that you will go to play for money with such backgammon.
Once you've learned how easy it is to cut, connect and glue straight triangles onto this board, you'll definitely want to decorate other projects with geometric patterns. Simple gadgets and simple tricks make making such a board fun.
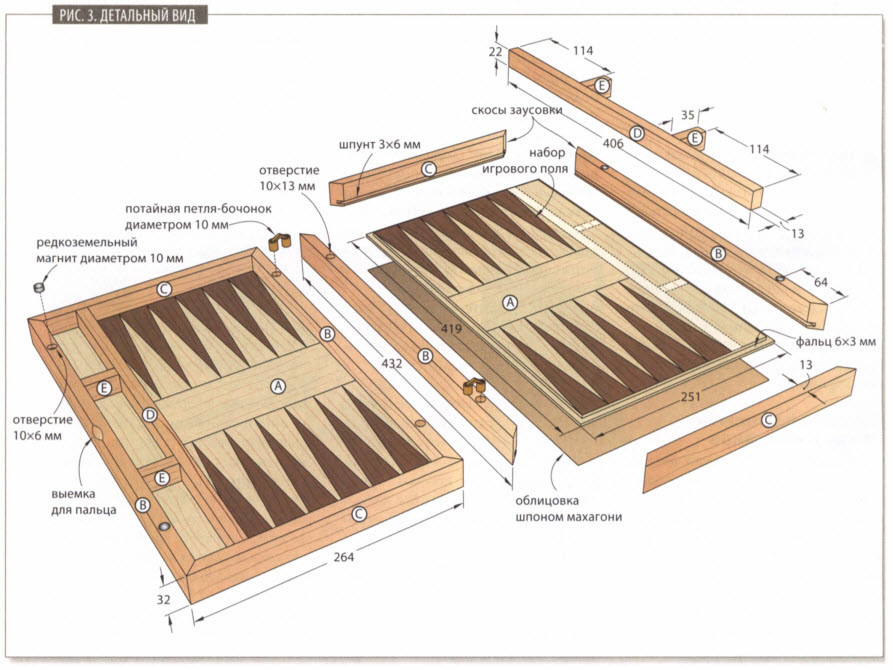
- Overall dimensions: unfolded - 530x432x32 mm; closed - 264x432x64 mm.
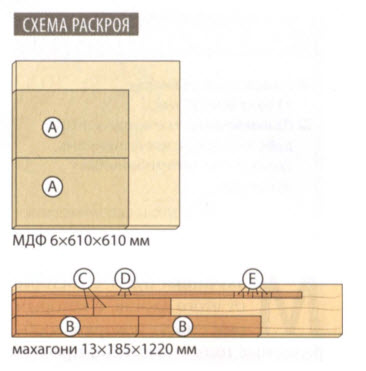
- Materials: veneer of walnut, maple and mahogany; MDF 6 mm thick; mahogany.
Mastering the skill
- Learn how to cut multiple layers of veneer into pieces for geometric designs.
- Learn to neatly join the veneer without visible gaps.
- Make two identical pieces of the game board by sawing open the closed box.
Start by preparing the veneer
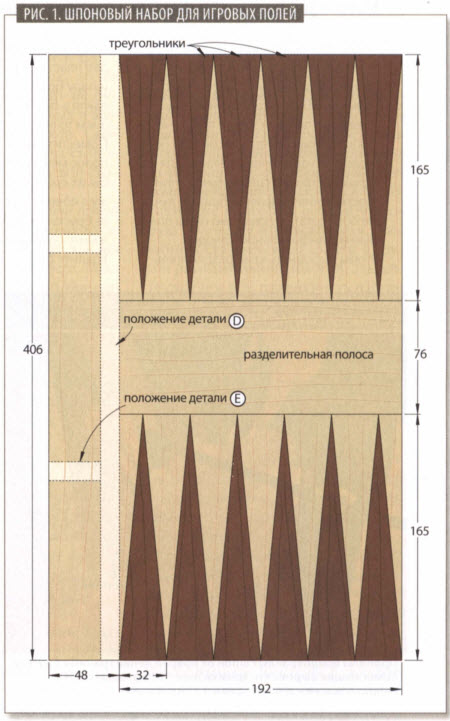
1. To create the board playing field, cut 38 × 191 mm strips of walnut and maple veneer, making 30 pieces of each color. Quick tip! To neatly cut a strip with a sharp knife along a metal ruler, place an even piece of hardboard or plastic underneath.
2. From the 13 mm thick scraps of hardwood, cut four 38 x 254 mm top plates and four bottom dimensions 51 × 254 mm. In the four top plates, make 4mm diameter mounting holes 25mm from the ends.
Divide the cut veneer strips into four stacks of 15 pieces each and, aligning the edges, squeeze them into a bag between the top and bottom plates (photo A)... Secure the top plates with 4.5x25mm brass screws. Place a 60- or 80-tooth blade in the saw and saw off one edge of each bag (photo B). At the end of the plate, draw an arrow pointing to the edge just sawn off. Unfold the bag 180 ° and, pressing the flat edge against the longitudinal stop, saw off the second edge of the bag to a final width of 33 mm. Do the same for the rest of the packages.
CHOOSE A VENEER, FOLD IN A STOP AND CUT INTO DETAILS
Orient the veneer strips with a diagonal pattern so that the cutting line coincides with the direction of the grain (see photo E). Think about how to properly pet a cat or dog.

Adjust the cross (miter) stop to an angle of 5 ° and insert it into the left slot of the saw table. Saw the bags to a length of 203 mm. The arrow at the end of the bag should point forward.
Pressing the wide plate of the package against the longitudinal stop, align the edge of the stack of veneer strips in several passes, gradually removing thin layers of material.
3. Stick strips of adhesive tape on the sides of the veneer bags and slabs. Saw off the marked end by shortening the bag to a length of 203 mm using a cross (corner) stop turned at an angle of 5 ° (photo C)... Fix the end stop (stopper) on the cross stop strip to cut the rest of the packages to the same length.
4. Read the article “Sled for cutting narrowings on small parts” and make the fixture described in it. Then put marks on the end and side of the package of parts, setting aside distances of 32 and 165 mm, respectively. Align these marks with the kerf in the skid. (PhotoD) and circle the bag to secure the stop and plate to the base. Now file each veneer pack as shown in photo E.
Place the package of workpieces on the base of the sled, aligning the marks with the edge of the cut. Trace the bag with a pencil to determine the attachment points for the stop and dies.

Fine-tune the rip fence to align the cut at the base of the carriage with the saw blade and cut the package at an angle. Finish the cut before reaching the rear edge of the slide.
Make a triangle ornament

Gently and tightly connect the triangles to each other using small pieces of masking tape, which will be removed before gluing the set to the base.
1. Take a straight strip of veneer with straight edges to use as a ruler to align the triangles when assembling. To assemble each quadrant (fourth part) of the playing field, first glue one of the light maple triangles with masking tape, pressing its base against a veneer ruler. Now carefully glue the walnut and maple triangles in pairs so that you get parallelograms. Glue them first with masking tape to the edge of the ruler. (PhotoF), before connecting with each other. Continue assembling until each quadrant consists of seven maple and six walnut triangles. The side free from masking tape will subsequently be the front side of the ornament.
Quick tip! Maintain the orientation of the triangles when removing them from the stack, and stack them as they lay: top side up, bottom side down. Any angular deviations when cutting the constrictions will be mutually compensated when you collect the parallelograms. Carefully remove the masking tape connecting the quadrant to the veneer ruler. Collect the other three quadrants in the same way.
2. For dividing lines (fig. 1) take two pieces of maple veneer measuring 80x230mm. Read the "Expert Advice" and follow the directions to align the edges. Line up the maple veneer in the same way at the edges of the board halves.
3. Glue one quadrant to the edge of the dividing strip, center aligned. The side with the adhesive tape (bottom) must face up. Drag the triangle vertex position labels to the other end of the dividing strip (photo G) and glue the second quadrant, aligning it with the marks.

Place the kit sheet on the edge of the workbench and, aligning the square with the tops of the dark triangles, place marks on the other edge of the dividing strip.

Tape the entire surface of the playing field with tape. Avoid overlapping strips to ensure an even pressure when gluing the kit to the substrate.
Quick tip! Check the squareness of the playing field by measuring its diagonals. If they don't match, try flipping one of the quadrants and then transfer the tape to the opposite side.
In the same way, collect the second half of the playing field, connecting the remaining quadrants with another dividing strip. Tape the entire surface of the set with tape (photo N) and remove the pieces of tape from the opposite (bottom) side.

Line up the edge of the steel ruler with the tops of the outer maple triangles and cut the board to the final size with a sharp knife.
4. Trim each half of the board to a final width of 191mm (photo I, fig. 1) and line up the newly formed edges. Cut two strips of maple veneer 48mm wide, line up the edges, and glue them with masking tape to one edge of each set (fig. 1).
Note. Maple stripes form side fields to accommodate compartments in which checkers and other game accessories are stored. In our case, the diameter of the checkers was 32 mm. If your checkers are of different sizes, change the width of the side stripes and the dimensions of the box accordingly.
Glue the playing fields onto the base
1. Prepare two bases A for the playing fields by sawing them out of 6 mm MDF, four 19 mm MDF pressure plates and one piece of mahogany veneer, 255 x 432 mm. Apply white PVA glue to the base evenly and place a veneer sheet on top. Cover the veneer with a sheet of waxed paper and squeeze the bag with clamps between two 19mm MDF boards. When the glue is dry, remove the clamps and attach the veneer to the second playing board base.
Quick tip! Apply a layer of glue to the substrate quickly and evenly with a cheap paint roller from foam rubber.
2. Use a saw to cut both bases to their final dimensions (see the “List of Materials” at the end of the article). Place the router in the table and fix the 6 mm wide rebate cutter in its collet. Mill the folds along the entire perimeter of each base from the side that is not covered with veneer, adjusting the overhang of the cutter so that a 3 mm thick ridge forms along the edge. The overhang of the cutter depends on the thickness of the glued veneer and it will most likely be slightly more than 3 mm (fig. 2).

Apply a thin layer of glue to the base. Use a sufficient number of clamps to distribute the clamping pressure evenly.
3. Now glue the veneer board to the other side of the base (PhotoJ), carefully aligning the edges of the set with folds. Use wax paper, pressure plates and clamps as before. Let the glue dry and stick the playing board onto the second backing.
Box the fields
1. To complete this project, you need to glue the foundations with the playing fields into a completely closed box, and then divide it into two halves. First, cut two pieces of 67 × 460 mm for long B and two pieces of 67 × 300 mm for short C walls from a 13 mm thick mahogany board. On inside Using a standard saw blade, make 3 × 6 mm tongue grooves along both edges with a 3 mm distance from the edge of each workpiece. Then mill the fillets with a radius of 1.5 mm along both edges on the same side. (fig. 2). Now saw off the workpieces to the final length, making bevels at the ends for a mustache (fig. 3).
Backgammon game - blueprints

First, make cuts in the short walls and insert 3 mm spacers, securing them with masking tape. Saw the first long wall, insert the spacer, and then make the final cut to split the box in two halves.
2. Dry (without glue) assemble the box, inserting only one base with the playing field. Pay attention to how the ridges of the base fit into the grooves of the sides of the box. If necessary, deepen the dowels or shorten the length of the walls to get rid of any gaps.
3. Apply glue to the corner bevels and the grooves of the walls, as well as to the folds of both boards with the playing fields. Assemble the box, secure with clamps and let the glue dry. Adjust the rip fence of the saw machine to a width of 32 mm and use a conventional saw blade to divide the box into two halves (photo K).
4. Saw out long partitions D... Add 3mm to the diameter of your game pieces to determine the position of the baffles. Glue the long dividers in place. Then cut out the short partitions E, the length of which depends on the position of the long ones. (In our case, the short baffles were 35 mm long.) Glue the short baffles in place (fig. 3).
5. Using a semicircular file, guiding the floor at an angle, make a notch for a finger on the edge of one of the halves of the box. Using a drilling machine, drill four holes of 10 mm diameter for the blind keg loops (fig. 3), and then the same holes for the magnets. Sand both sides of the box with 220 grit sandpaper.

6. On both sides of the box, apply a small amount of cyanoacrylate (second) glue to the holes for the hinges to secure them. (PhotoL). Then glue the magnets, checking their polarity so that they attract each other. Apply three coats of colorless coating (we used a semi-matt nitro varnish in an aerosol can) and invite a friend to spend the evening with him an exciting game.


Backgammon is a very exciting and quite popular game that is played both for money and for the sake of the process itself. However, buying real quality backgammon can cost a lot. But it will be much more pleasant to make backgammon with your own hands, which will then be doubly pleasant to play. Homemade backgammon, made with a soul from high-quality materials, with beautiful patterns, it will not be a shame to donate at all.
At the moment, in view of the availability huge opportunities that modernity provides us, you can easily find all the necessary information that will fully reveal all the features of how to make backgammon with your own hands. In order to make backgammon, as a rule, hard types of wood are used, such as oak, for example. Boards must be of high quality, which were stored in accordance with all the rules and requirements. Indeed, the quality and service life of the product itself depends on the quality of the material. The thickness of the boards must be at least five centimeters. You should not purchase undried boards, as they can deform, and the product can then lose its appearance. If non-dried boards are nevertheless purchased, then they must undergo proper processing before proceeding with the direct manufacture of the product. That is, the boards must be pre-dried.
So, after the material is purchased, you should start the manufacturing process itself. There are many options for how to make backgammon. You can make backgammon, you can resort to the option of sawing into thin planks, which are then assembled into a flat shield for the playing field. It is customary to decorate the external wooden field with a carved pattern. Wood carving can be done manually or by means of a milling machine, which will make many of the same elements.
When the frame itself, as well as the playing fields, is ready, everything should be covered with protective impregnations, tinted, and then varnished. After that, you need to carefully polish the backgammon surface and again varnish. After backgammon are collected, they should lie down for several days after which the playing field can be covered with the necessary paints. After that, the process of grinding and varnishing is repeated. After applying the final layer of varnish, it is necessary to withstand backgammon for several days to completely absorb the varnish and dry it.
How to make chips for backgammon
As for the question of how to make chips for backgammon, they can also be made of wood. Some people use the version of children's checkers, but it looks completely undignified. Sometimes even beer and soda lids are used.
How to make carved backgammon
Information on how to make carved backgammon can be found on many sites dedicated to backgammon, where it is described  many different options for the manufacture of the game board itself and the original execution of chips and dice. The main common options are using wood or plywood to make a game board. The main thing is that the surface is thoroughly polished. The board, as a rule, is painted with paints, covered with carved or burnt patterns.
An alternative and more laborious option is the manufacture of a gaming table. That is, it is a stationary home option. Someone takes on the manufacture of such a table from scratch, and someone takes on the modernization of an old coffee table. As the simplest and quick option there is a rework of the chessboard, that is, semicircular notches are cut out for the chips and the internal marking of the playing field is applied.
As for such an element as zary, that is, playing dice, it is better to make them from dice, or to purchase ready-made ones. You should not use wood as a material for making dice, as such cubes will wear out very quickly and lose their appearance and functionality.
How to make your own backgammon
Backgammon is an old game that is popular among the people among various segments of the population, despite its considerable age - the history of the game goes back several centuries. Today, high-quality original backgammon is an expensive and valuable gift, and with good woodworking skills, you can easily make carved backgammon with your own hands, in order to end up with an exclusive DIY set.
Instructions
1
To make backgammon, use valuable hard woods - for example, oak. Find a reliable supplier of high-quality and well-preserved oak planks, and purchase planks 5 cm thick. Buying undried planks, you take responsibility for their further preparation for processing.
2
Dry the camera, if you have one; if not, purchase already dried boards from companies that have their own drying equipment.
3
Saw the boards into thin planks, from which you will subsequently assemble a flat board that will become the playing field. Separately cut the thin, narrow planks that will serve as the backgammon frame. 
4
A carved drawing will look beautiful on an external wooden field. If you are skilled at wood carving, you can make your backgammon even more unique by creating a hand carved pattern.
5
If you have access to a special milling machine- make a thread with it. Unlike manual work, the machine helps to create many of the same pattern elements.
6
After the frame and playing fields are ready, cover them with protective impregnations, tinted and varnished. Then go over all the wood surfaces of the backgammon with a sander and varnish again.
7
Collect backgammon and leave them to lie down for a few days so that the boards "get used" to each other. After some time, modify backgammon - cover the playing field the right paints, finish sanding, varnishing and tinting.
8
After the last varnishing, wait a few days for the varnish to be completely absorbed into the wood and dry. Put chips and zaras inside the backgammon box, and the finished game can be gifted or used for its intended purpose.
Backgammon: the manufacturing process
Dear colleagues. Today I would like to talk about backgammon and carving board for  games.
Backgammon is an ancient oriental game. The birthplace of this game is unknown, but it is known that people have been playing this game for more than 5000 years, for which there is historical evidence. The oldest backgammon board was found in Asia Minor (in Shahri-sukhta) and dates back to about 3000 BC. An analogue of this game was found in the tomb of Pharaoh Tutankhamun. One of the legends testifies that once the Indians, wishing to test the intelligence of the Persians, sent them a set of chess, believing that they would not guess how to play this wise game. However, the Persian sage Bozorgmehr not only easily coped with this task, but also offered his own, which the Indians could not solve for 12 years. Buzurkmehr invented and sent his opponents a new game - backgammon (backgammon ottoman - battle on a wooden board). In Western Europe, the spread of the game is associated with the return of the Crusaders from the 12th century Crusades. The game became very popular in medieval Europe and was called Trick-truck. This name, apparently, comes from the sound of bones hitting a wooden board. At that time, the word "backgammon" coexisted to refer to the game of kings. Only representatives of the highest aristocracy had the privilege of playing backgammon.
According to the Eastern tradition, the board for playing backgammon has always been richly decorated: carving, inlay, painting. Backgammon is also very popular in our time. This is confirmed by the number of views of the boards for the game on our site.
Meanwhile, for the most part, this is a classic flat-relief carving, which is quite within the power of novice carvers. For them, the master class, I think, will be of the greatest interest. Half of the success of carving a game board lies in a well-chosen design. The most widespread are floral ornaments - arabesques.
I deliberately leave the joinery part of the board production behind the scenes, this is a job for carpenters. Let's go directly to the carving.
Before us are alder panels veneered with ash on one side. If you are going to veneer the panels yourself, it is worth remembering that if you apply the veneer only on one side, then as the glue dries, the panel will bend towards the veneer. To avoid such a result, on the other hand, ordinary paper (newspaper) is glued, therefore, when the glue dries, deformation does not occur. I would like to draw your attention to the fact that the panels lie on the packaging polyethylene "with pimples": it perfectly protects the product from damage during operation. Should be put smooth side to the workpiece. Otherwise, chips will be trapped between bubbles and may damage the surface. As a result, an "unpleasant surprise" may emerge during toning. There is only one drawback in using this polyethylene ... you can get carried away with popping bubbles and spend the whole day mediocre ...
We transfer the drawing to the workpiece using a carbon copy. In this case, only a quarter of the drawing is drawn (the printer has broken down). It is better to have a ready-made drawing on the whole plane at once. This will eliminate the distortion of the symmetry of the picture, which is very important in this case.
After transferring the drawing with a carbon copy, we correct it by hand.
We proceed to sampling the background for the thread. There are two ways: the first classic - cutting with a knife along the contour of the pattern, followed by sampling the background with flat chisels (it is necessary to clarify that the knife in this case should enter the wood clearly at 90 degrees). If it is not possible to maintain the perpendicularity of the knife to the workpiece, then you can slightly fill it up at an arbitrary angle away from the leaves of the ornament, further, when working out the thread, correcting the drawing distorted because of this. The second way is to select a background using hand router and a "finger" cutter, in this case I did just that. The advantages of this method are the speed, exact 90 degrees along the edge of the ornament, the background selection around all elements is performed clearly on one  level. Hands do not get tired in the laborious process of background selection. Of the minuses: the need for a router, and the impossibility of using it at home due to noise and dust.
So, the "rough" background is chosen to a depth of 5 mm; as you can see, there are places where the cutter did not reach, we remove them with a knife and flat chisels.
Here you should strictly follow the rules given in the first method of background sampling. Nobody canceled the work by hand.
It's time to get familiar with essential kits tool: knife-joint, preferably with the most acute angle to its edge from your entire arsenal. Flat chisels 1, 2, 3, 5, 10 mm. In my case, they are made from sharpened Soviet files. Semicircular chisels 6, 9 mm.
After the background is selected in all hard-to-reach places, we begin the study of the ornament. Let's start with the bottom and top edge of the panel. We cut with a knife the points of intersection of the details of the ornament with each other to a depth of 2-3 mm, revealing the upper and lower points of the ornament, cut it with a flat chisel. Thus, intertwining the ornament.
We draw our vision of future drawing profiles.
Using a knife or flat chisels (whichever is more convenient for anyone), we first form the convex part of the profile.
Then, with the help of semicircular chisels, concave profiles.
We repeat the operations with the central element of the ornament.
We work through the whole drawing again, correcting in more detail all the deficiencies we noticed.
Now you can start mutating the background. We start by "piercing the background" around all the carved elements, achieving a graphical image. For this I use a simple sharpened screw. Not aesthetically pleasing, but cheap and practical. You can also use different punches for this.
Then we continue to "prick" the entire remaining background.
We admire the result obtained. The carving is finished at this stage and you can start finishing work. Water stains were chosen for toning. I usually use one color diluted to three tones: light, medium and dark. In this work, two types of wood were used, and in order to highlight their merits of each of them, two colors of stain were used: Dark oak and Teak. Teak - for ash. Dark oak (thinned three tones) for alder.
First, the carved panel is tinted. We cover all the threads with the lightest dye. Then, until the stain is all dry, apply a medium tone to the milled edges of the panel. Next step: go to the background - the darkest tone. You should be careful and try to apply the dark tone as carefully as possible. So that the dye does not fall on the light areas of the thread, we begin to paint over from the center of the selected background area, approaching the towering thread elements with a minimum amount of dye on the brush. Let the work dry, and open the ash veneer on the other side - with Teak stain. With the same stain we open the joinery elements of the backgammon board.
After the stain has dried, remove the raised pile with a sandpaper (you can use an old rubbed skin). Or, as I used in this case, Indasa RHYNO SPONGE is a special flexible abrasive on foamed polyurethane coated with aluminum oxide, tear-resistant. Ideal for finishing, primers and varnishes and processing in hard-to-reach places (I will post a photo later). The main thing is not to damage the stain on the sharp edges remaining on the thread after working with chisels.
We evaluate the result and cover the work with varnish. For such works I use a two-component matt varnish. We look at the ready-made backgammon.
Backgammon is an ancient oriental game. The exact place of their origin is unknown, but they are already about 5000 years old, which is confirmed by historical manuscripts. The oldest board for the game was discovered in Asia Minor, in the town of Shakhri-Sukhta. Scientists have established that the thing was created around 3000 BC. NS. The same board was found in
One of the legends says that one day they decided to test the resourcefulness of the Persians and presented them with chess. They believed that they would not understand the rules of this unusual game. However, the sage from Persia was able to reveal the secret and in return sent them his game, which the Indians could not solve for 12 years. Bozorgmerh sent them nothing more than a game of backgammon (translated from Persian, "backgammon takhte" means "fight on a board made of wood").
In Western Europe, the game spread thanks to the crusaders in the 12th century. It gained popularity in the Middle Ages in European countries, where it got its name - trick-track. It simulates the impact of bones. The name "backgammon" was used among the kings and the nobility.
The game has gained considerable popularity in our time. Many craftsmen never cease to amaze with their new original performance of inlay. This article will describe how to make your own backgammon.

What does the game develop?
Just like chess, backgammon is designed to train thinking. Only in the first case, logical thinking develops, and in the second, resourcefulness and ingenuity. Scientists claim that after everyday backgammon games, the level of intelligence rises by 10%. This is the conclusion reached by researchers in the UK.
What does the board look like?
The board has a rectangular shape. It has 24 points (12 on each side). The board has two sides. Each point, as a rule, represents a narrow elongated triangle, the base of which is located along the edge, and the height reaches half of the board. Six points on one side are called the player's house. Its location depends on the rules of the game. The board is divided in the middle by a vertical bar called a "bar". Usually knocked down checkers are displayed there. Each player has 15 of them. The move is determined by the pair - zar. There are also two pairs for each player, as well as cups for mixing the bones.

Carpentry work when making a board
Many people are interested in how to make backgammon with their own hands. Such a process is within the power of even a beginner in woodcarving. The first step is to compose. Backgammon in this case will turn out without size errors.
You will need:
- plywood;
- slats;
- loops.
What should be the plywood? Carefully ground, it has no roughness or burrs, which is very important for the manufacturing process.
Board size
Before making backgammon, decide what size board you want to get. They are different:

What is the main thing when carving on a backgammon board?
In most cases, the carved backgammon, the dimensions of which are indicated above, are made in the classical style with its inherent flat reliefs. Such work will be within the power of even beginners. Half of the success lies in the correct drawing. Ornaments with plants or arabesques have become widespread.
For example, consider panels made of alder. On the one hand, they are veneered with ash. If you want to do this part of the work on your own, then it should be noted that the veneer is applied only on one side. After drying, the panel will bend towards the veneer. In order not to get a similar result, glue on the opposite side plain paper, you can even have a newspaper. When the glue dries, there will be no deformation in this case. When working with panels, it is advised to put them on polyethylene from packaging with soft inflatable pimples. This will protect the parts from damage during operation.
The film is laid with the smooth side to the workpiece, otherwise, during operation, the chips will clog in the pimples and may damage the surface. When applying the tone to the material, you can get an undesirable effect.
How to transfer a drawing?
The drawing is transferred to the workpiece by means of a carbon copy. Stock up on a finished image, the scale of which is designed to be applied over the entire plane. This will help to avoid breaking the symmetry, which is an important point in the manufacture of the board. After transferring the drawing by means of carbon copy, it should be corrected by hand.
Sample background for thread
At such a stage as sampling the background for the thread, there are two methods:

Carving tools
To make your own backgammon, you will need the following tools:
- Jamb knife with an acute angle to the edge.
- The flat shape of the chisels is 1, 2, 3, 5, 10 mm in size.
- Chisels with a semicircular shape measuring 6, 9 mm.
Arabesque processing
After sampling the background in all hard-to-reach places, you should start working on the ornament. They start from the bottom and top edge of the panel. The intersections of the parts are cut with a knife. A depth of 2 mm is taken. By cutting with a flat chisel, the lower and upper points of the pattern are revealed. Thus, the ornament will intertwine.
Then the future profiles of the drawing are drawn. By means of a knife or a flat chisel, a convex part of the profile is formed. Then, using semicircular chisels, the concave parts of the profiles are processed. The operation should be repeated with the central part of the ornament. The drawing must be worked out a second time, correcting all the shortcomings.
Matting the background
Matting the background means piercing it around all carved elements. This can achieve the graphic appearance of the arabesques. For this purpose, you can use a simple sharpened screw. Various punches are also used. Then the tattooing of all the remaining parts continues. The carving process at this stage ends, you can proceed to the finishing part.
Giving tone
DIY backgammon involves toning. For this process, you can use water stains. Usually one color is used, which is diluted to three shades: light, medium and dark. In this case, two types of wood were used: ash and alder. To emphasize the beauty of each of them, two colors of stain were used: dark oak and teak. Teak is good for ash and dark oak is good for alder.
First of all, the carved panel is subject to toning. The lightest paint is applied to all threads. Then, without letting the stain dry, a medium shade is applied to the milled edges of the panel.
The next stage involves coloring the background. It is covered in the darkest tone. Do this with caution. The paint is applied with the utmost care so as not to get on the light part. Coloring should start from the center of the selected background area, moving on to the towering carved parts. In this case, the minimum amount of dye is taken with a brush.
The wood surface should be allowed to dry and then stained with teak on the other side. The joinery components of the board are covered with the same tone.
After the stain has dried, the raised pile is removed with a sandpaper. The main thing is not to damage the paint on the sharp edges that remained on the thread after working with chisels.
The entire board is covered with colorless varnish. For this purpose, a two-component matt varnish is used.
The second option for making backgammon
Above, the manufacture of such a product as carved backgammon was described. Another method involves burning the patterns.
To make backgammon with your own hands in the second way, you will need:

Progress
The process of making a backgammon board in this case involves the following stages:
- The work begins with the design of the outside and inside. The prepared drawing is burned on both sides according to the chosen cliche.
- glued into a spike and glued along the perimeter of the board.
- In wide slats, holes for chips are cut out and also glued.
- Next, the loops and clasp are installed.
- Finally, the board is covered with a colorless varnish in three layers.
What chips are used?
Chips are machined from You can use ready-made plastic for playing checkers.
Conclusion
The most beautiful backgammon boards do not look like chess. Their reverse side is always decorated with magnificent designs or designs. Handmade backgammon looks impressive. The price for such a product is quite high.
A complete set of backgammon consists of a playing board, thirty pieces and two dice. In shape, the playing board resembles a closed book 660 * 310mm in size (660 * 620mm when opened) and 35-40mm thick. It unfolds like a chessboard.
If the inner plane of the board is mentally divided by mutually perpendicular lines into four equal parts, you get four rectangles. On some modern boards they are designated by letters of the Latin alphabet: A, B, C, D. Put them in the middle of the smaller sides of the board (Figure 1).
On each quarter of the board there are six semicircular nest-fields, the radius of which is equal to the radius of ordinary checkers - 15mm. Chips move along these sockets (along the perimeter of the board). The slots are numbered from one to six, starting from the outer (side) side of the board.
Above each field, there is a sector with a height equal to five chip diameters (165-180mm). Sectors are drawn on the light plane of the board with black lines.
On standard boards, the quarters of the board are not indicated, the fields are not numbered, the placement of chips when playing long and short parties is not indicated, the direction of movement of the chips is not given, and this is very important, especially for beginners.
DIY backgammon game
There are 15 white and 15 black chips in the game at the same time. Ordinary checkers with a diameter of 30mm are suitable for a backgammon board of this size.
To determine the player who starts the game first (with white checkers), and the length of the moves, two dice are used - black and white... The cubes are called "bones" or "dawn". On the planes of the cube (side size 10-12 mm), dots are applied - from one to six, as in dominoes. The edges and corners need to be slightly rounded so that the cubes roll freely when thrown.
In order to make a backgammon board by yourself, you will need: two pieces of plywood 4mm thick, 260 * 500mm in size;
eight wooden slats 10mm thick, 25mm wide (four - 260mm long and four - 500mm long);
two furniture loops measuring 30 * 30mm;
one or two furniture hooks for locking a closed board;
carnations 10 and 12 m long;
eight screws 8-10mm long for hinges;
slats for curly strips (4 pieces).
The semicircular cutouts for the nests on the strips can be cut with a jigsaw, but it is better, if possible, to drill through holes and then cut in half lengthwise. Then you get two strips at once. The dimensions of the strip with sockets are shown in Figure 2.
Pieces of plywood, slats and planks must be well cleaned with an emery cloth. The slats are connected strictly at right angles, as shown in Figure 3. The curly strips should fit snugly between the long slats. After the frames are knocked together, connect both rectangles with loops. They must be cut in so that they do not protrude above the surface of the rails and that the heads of the screws are "recessed" in the holes of the hinges.
Then you need to put plywood on the outside of the frames and temporarily nail them with two studs. Then open the board and draw a pencil around the inner and outer perimeter of the frames. Place the curly planks inside the board and also circle along the contour of the nests.
Then detach the plywood from the frames, cut and trim them around the perimeter, apply all the markings with a pencil (Figure 1) and, if desired, arrange the outer planes. After that, cover all the parts with one layer of colorless furniture varnish, rubbing it well into the surface of the wood. When the varnish dries, circle the traces of the pencil with black ink. The contour lines should be 0.8mm thick. On the cross-rails of the frames with enamel or oil paint apply letter designations: A, B, C, D. Then coat all parts with varnish one or two more times, dry well and finally nail the covers to the frames. Then install the curly strips and nail them with nails on the outside of the covers.
For playing backgammon, you can adapt the usual chess board... Then it must be drawn from the inside and shaped strips must be made in accordance with the dimensions of the board. The chips will need a smaller diameter, according to the size of the nests obtained.
HomeNewsCase for chess and backgammon: do it yourself
Case for chess and backgammon: do it yourself
Case for chess and backgammon - soundly made, from good tree beautifully decorated - can be as exclusive as a jewelry box. You don't have to buy expensive handmade kits for this. We will tell you how to make a case with your own hands, and what is required for this.

Choosing a tree
First of all, you need to choose a tree from which the box for chess or backgammon will be made. Usually one of four types of wood is used:
1) beech is a kind of material, and it is easy to tint it in any color, for which it is preferred by many;
2) pine is a fairly easy-to-use material, especially if a light-colored box is planned;
3) oak is prized for its hardness, but the element can break off during processing;
4) ash has a beautiful pattern, and is also slightly inferior to oak in hardness.

Making a wooden blank
The workpiece can be made by yourself, ordered in the workshop, indicating all required sizes, and if there is a suitable old, worn case - take it as a base. It is necessary to remove the old fittings from such a product, and then remove the old varnish and paint with a sandpaper.
If you have time, you can make the workpiece yourself. For this, a plane is being prepared on which they will play. It is recommended to saw the boards into thin planks and then glue them together. The result is a flat playing field, but the planks will compensate for each other's warpage. A simpler option would be to take a sheet of plywood and, by dividing it in two, create a base for a folding board. In any case, it is important that the boards fit together, otherwise cracks may form in the future.

Next, you need to add the sides to get the boxes for storing the chips. On the inner playing side of the board, markings are made, according to the 6 + 6 principle (8x8 for chess), and holes for chips are marked inside the sides. They can be cut separately from the planks and attached from above to form border-sides for the placed chips.
We select accessories for chess and backgammon
Backgammon fittings include different elements:
- locks;
- overhead hinges;
- fasteners in the form of nails, screws and self-tapping screws.
It is very important to choose hinges that will harmoniously look in the product, without getting out of style and colors. However, the color can be corrected with the appropriate metal paint.

Mortise decorative hinges and locks for chests and boxes look beautiful. Many professionals recommend purchasing lamber loops that are not visible at all when closed. They are not cut into the end of the box, but into the face, and here it is easiest to get by with a CNC machine. You can also attach leather loops 1.5-2 mm in size with nails. You can choose the skin to match the color of toning or vice versa, a contrasting shade.
Clasps can also be made of metal or leather. A convenient and practical option is closing with magnets or a pin. There are also overhead locks with an eyelet, which, with high quality performance, serve for a long time and well. They usually fit well with the oriental style of the case.
When choosing metal fittings, give preference to the one that weighs more, as this speaks of good quality alloy. It is desirable that there is a good protective covering which is difficult to scratch.

Drawing a picture
A beautiful backgammon box on the outside usually has a pattern that can be applied in different ways:
- burning out
- painting
- thread
- drawing.
The drawing can be applied using a stencil. The printed pattern is placed exactly in the center of the material, covered with tracing paper on top (it can be slightly oiled) and fixed with buttons on one side of the pattern. Then an old, not too black copy paper is placed under the drawing, and everything is fixed in the corners. The drawing is traced on tracing paper with a pencil and so is interrupted on a tree.

Burning is done with a special electric burner, but some use a regular soldering iron. A special knife is used for carving, but you need to clearly mark each element, down to the smallest detail, and work it out. This decoration method takes more time.
Few beginners come up with their own patterns, since it is easiest to use the ideas they like from the Internet, sometimes combining them. You can lay the stencils on the surface and cover the surface with spray paint or from a can using a swab. Before painting, the tree must be primed with acrylic primer. On top of the dried primer with a wide flat brush, you can apply acrylic paint to the sides, covering the bottom with masking tape. If you are drawing acrylic paint, then in case of an error it will be possible to apply a new layer and hide the defect.
Here is a classic way to transfer a pattern to a wooden surface using tracing paper:
And you can use the method of transferring the printed image from paper to wood using glue to decorate the case:
If you are not confident in your drawing skills and do not want to use a template, then a crackellure varnish can be a good solution, which will create a beautiful decorative effect of "antique cracks". After the varnish dries, paint of a different color is applied, and cracks appear in it.
Finishing
After the image is ready, the surface is finished. Thanks to her, the backgammon case will look respectable for many years.
DIY backgammon with bright patterns
This is done with varnish. Universal option can be called a varnish in a spray. It dries quickly, fits evenly, and goes well with craquelure varnishes.
For decorative creativity, water-based acrylic varnishes are suitable, which are divided into glossy and matte. The former give an even, beautiful finish with a glossy sheen, while the latter are invisible. They are usually odorless and dry quickly, but keep in mind that with heavy use, such formulations may not be the best. They are applied quickly with a soft flat synthetic # 16 brush. A thin layer of varnish should be well spread over the surface.

For maximum protection choose yacht varnishes- also matte and glossy. They are slightly yellow, but for a vintage style, this is even an advantage. It has a strong smell and you need to work with it with gloves, using a foam sponge for application. A good alternative would be parquet varnish POLY-R without yellowness. It is applied in the same way as yacht, but does not have a strong odor, dries much faster and gives a beautiful shade.
A complete set of backgammon consists of a playing board, thirty pieces and two dice. In shape, the playing board resembles a closed book 660 * 310mm in size (660 * 620mm when opened) and 35-40mm thick. It unfolds like a chessboard.
If the inner plane of the board is mentally divided by mutually perpendicular lines into four equal parts, you get four rectangles. On some modern boards, they are indicated by the letters of the Latin alphabet: A, B, C, D. They are placed in the middle of the smaller sides of the board (Figure 1).
On each quarter of the board there are six semicircular nest-fields, the radius of which is equal to the radius of ordinary checkers - 15mm. Chips move along these sockets (along the perimeter of the board). The slots are numbered from one to six, starting from the outer (side) side of the board.
Above each field, there is a sector with a height equal to five chip diameters (165-180mm). Sectors are drawn on the light plane of the board with black lines.
On standard boards, the quarters of the board are not indicated, the fields are not numbered, the placement of chips when playing long and short parties is not indicated, the direction of movement of the chips is not given, and this is very important, especially for beginners. Therefore, we advise on a new board - whether you bought it or made it yourself - to apply all the designations shown in Figure 1.
There are 15 white and 15 black chips in the game at the same time. Ordinary checkers with a diameter of 30mm are suitable for a backgammon board of this size.
To determine the player who starts the game first (with white checkers), and the length of the moves, two cubes are used - black and white. The cubes are called "bones" or "dawn". On the planes of the cube (side size 10-12 mm), dots are applied - from one to six, as in dominoes. The edges and corners need to be slightly rounded so that the cubes roll freely when thrown.
In order to make a backgammon board by yourself, you will need: two pieces of plywood 4mm thick, 260 * 500mm in size;
eight wooden slats 10mm thick, 25mm wide (four - 260mm long and four - 500mm long);
two furniture loops measuring 30 * 30mm;
one or two furniture hooks for locking a closed board;
carnations 10 and 12 m long;
eight screws 8-10mm long for hinges;
slats for curly strips (4 pieces).
The semicircular cutouts for the nests on the strips can be cut with a jigsaw, but it is better, if possible, to drill through holes, and then saw in half lengthwise. Then you get two strips at once. The dimensions of the strip with sockets are shown in Figure 2.

Pieces of plywood, slats and planks must be well cleaned with an emery cloth. The slats are connected strictly at right angles, as shown in Figure 3. The curly strips should fit snugly between the long slats. After the frames are knocked together, connect both rectangles with loops. They must be cut in so that they do not protrude above the surface of the rails and that the heads of the screws are "recessed" in the holes of the hinges.
Then you need to put plywood on the outside of the frames and temporarily nail them with two studs. Then open the board and draw a pencil around the inner and outer perimeter of the frames. Place the curly planks inside the board and also circle along the contour of the nests.
Then detach the plywood from the frames, cut and trim them around the perimeter, apply all the markings with a pencil (Figure 1) and, if desired, arrange the outer planes. After that, cover all the parts with one layer of colorless furniture varnish, rubbing it well into the surface of the wood. When the varnish dries, circle the traces of the pencil with black ink. The contour lines should be 0.8mm thick. On the transverse rails of the frames, apply the letter designations with enamel or oil paint: A, B, C, D. Then coat all the parts with varnish one or two more times, dry well and finally nail the covers to the frames. Then install the curly strips and nail them with nails on the outside of the covers.
An ordinary chessboard can be adapted for playing backgammon. Then it must be drawn from the inside and shaped strips must be made in accordance with the dimensions of the board. The chips will need a smaller diameter, according to the size of the nests obtained.
Option 1
Let's make backgammon out of oak boards, about 5 cm thick. First, we will make blanks for the backgammon frame - a plane for playing them. The boards need to be cut into thinner boards that stick together. It turns out a flat field for the game. Please note that in this way adjacent strips compensate for each other's warpage. You can take a solid sheet of plywood and divide it into 2 equal parts to create a base for a folding board. Folding fields for playing backgammon are boxes that allow you to add all the chips and dice after the game and keep them for a long time without losing them.
Consequently, there are practically none. A small lock can provide extra security for your hotel door, especially where security is not trustworthy. By stirring the ear through the loop of the backpack, you can also secure the luggage on the train when we need to squint and we are not going to worry about the luggage.
Very good equipment for keeping money, documents and keys. No sachet for the neck, no pockets where everything is randomly mixed, and a bag on the hips. With a sturdy closure, it will look perfect when walking without a backpack in the city. For repairing shoes, harness, glue, mounting structure. Recommended repair tape and 38mm tape.
The marking on the inner playing side of the board follows the 6 + 6 principle. Inside the sides, it is necessary to mark the holes for the chips. Sometimes these holes are cut from individual planks and nailed or glued on top, thus, the sides are obtained, indicating the boundaries for placing the chips. Further, a drawing is cut out on the outside, it is made, as a rule, with a special machine. Then the resulting field for the game is toned and the two folding parts are manually assembled. The parts should fold and unfold freely. Pick up two mechanisms that provide free movement of the halves of the backgammon board. And polishing is also important - to avoid splinters and unevenness on the surface. It is necessary to carefully check whether the boards fit together so that no cracks form over time.
The second part of the work consists in making the chips themselves. You can also make them out of wood, or pick up flat chips of the same size from a different material - for example, from an old children's plastic toy.
Sometimes the backgammon board is combined with the chessboard on the other side. After you have made backgammon - do not rush to play. A product made of wood needs to lie down for a while. 10 days will be enough.
For viewing and yes, but also for broadcasting alarms in extreme situations... A flat mirror surface can also come in handy when it comes to separating something small. Immortal repair kit. A small set of tailors will buy from 2 zł.
Like a needle and thread, by the way and a safety pin. How often have you missed your trip? To get rid of unnecessary, longitudinal elements that get under the skin. Good as pliers or gripping in various unpredictable situations. Clear corners in electronics. For removing dirt from grooves, grooves and other awkward places in our inventory.
Option 2
- To make backgammon with your own hands, you need to take two suitable sheets of well-polished plywood 480 mm on one side, 210 mm on the other, 4 mm thick.
- For drawing on the inner surface, you need to prepare 3 colors: 2 shades of brown, one light or bronze paint in a can.
- Transfer the drawing to the surface through the stencil, then glue the veneer that matches the color onto it. This operation requires carefulness and deliberation.
- You can paint the surface of the board with a stencil superimposed on it with bronze paint.
- If the paint is not spray paint, use plain bronze paint and a sponge.
- Make frame blanks from thin strips. First, glue the slats together, then glue them to the board.
- Cover the finished drawing with several layers of varnish.
- On a lathe, it is necessary to turn chips with a diameter of 25 mm and a height of about 12 mm in an amount of 30 pieces. Leave 15 chips light, and cover the other 15 with stain. Apply the varnish in several layers.
- You can make chips from checkers. To do this, buy 2 checkers sets and select the required number of tokens of two colors.
- If you are good with wood carving, carve an oriental pattern on the outside.
- Cut the plywood overlays to the outside. They should be smaller by about 20 mm. Stick them on.
- Mark the borders of the lining with a curly skirting board, you can buy it.
- Attach the hinges to both halves of the board on one side, the hook on the other.
- You can make not a folding backgammon board, but a stationary table. The surface of the old coffee table is marked, veneered or covered with paint through a stencil. They make bumpers. Cover everything with varnish in several layers.
Repair damaged equipment. If not for the thigh bag, maybe a leash? Slimmer than a sachet, suitable for carrying a key or case. Be visible, be safe! Something that can at the same time protect our neck, eyes, ears and still serve as a sleeping group.
Luminescent zipper closure
The first item in the gadgets category. Easier to "move" in a sleeping bag when there is no light source. Backpack buckles don't crack very often, but if that kind of adventure happens to find a solution, it can be embarrassing. One spare buckle is only PLN 3.
Option 3
Find strips four centimeters wide and form the dimensions from them. On the side planks, using the chips, draw the halves of the holes and cut them out with a hand-held plywood jigsaw. Then put all this on two pieces of plywood and lightly nail down with nails. Spread the slats with PVA glue (only Korean and by no means Russian, it is called kong and usually goes as an additive to wallpaper glue under numbers 204, 205, etc.). Then or in advance, you can put on the plywood a pre-prepared picture, such as beautiful wallpaper, or simply burn out or paint, although this is more difficult. There is nothing better than wallpaper. The thickness of the slats is from one to one and a half centimeters.
Option 4
Weapon for leeches, medicine for a sore throat. Several copies have not harmed anyone yet. In the event of loss or theft, we can verify your identity. It can get you out of curiosity, and you can and seriously if going on motorized vehicles or bicycles. Local events are usually inevitable, so it is possible that we will find ourselves in a situation where we have to investigate.
Piezoelectric itching alignment
For those who travel with children. When we lose sight of the child, we can easily find them using the system installed on the bracelets. More about the bracelet. This is a small device that will help you fight bites. Stops swelling, reduces itching, is painless, works from electric shock.
True connoisseurs of this game always have a beautiful board, and some even purchase a special table for playing backgammon - an ordinary coffee table, on the surface of which there are drawings-marks for the game. The choice of such boards and tables is huge: there are handmade wooden products, there are glass products. They are usually made beautiful by intricate patterns applied (by hand or at the factory). And everything would be fine, but there are such boards and tables oh, how expensive, so not everyone can afford to buy such a luxurious thing.
How many times have there been such situations that puffed soy, and an open window does not help? In hot climates, the fan will certainly be used more than once. We will clean everything from nails to shoes. We cleanse everything from face to mug. Not the same person living on the road. For long hours spent on vehicles, airport transfers, or other circumstances during which time may be extended, one of the following suggestions could be used. Some also seem to work well with the locals.
We communicate with local radio stations and music that hears romantically in small, cheap rooms somewhere in Southeast Asia. Combined with a mug of endless fun and endless emotions. It's worth knowing the rules before leaving. Why not take the time on the road to learn how to play an instrument? Music, even played by an amateur, is also a pretty good incentive for integration.
We used to have a regular wooden folding board for playing backgammon, bought in a store. Although this board was very beautiful (carved and hand-painted), it was very large and unwieldy. It was tedious and troublesome to constantly take it out and put it back in the closet.
My husband has long dreamed of a backgammon table. But we could not find a suitable one - those that we liked were very expensive, and those that suited us for the price did not suit us in appearance.
Both solutions have their followers. It’s a shame to forget about reading on the go, because during its duration the perfect film feed will surely come to drink the contents from sheets or a small monitor. If there is no circle and cross, then table football, if not table football, these are ships, if not ships, this is a city-state. An excellent opportunity to integrate with the local language and expand your knowledge of the geography of the country you are visiting. Maybe it will finally be possible to understand the mysterious cube?
Well compiled with smoking while traveling, this is something to take in your own hands. Best in releasing wooden blocks. A simple logic puzzle that can swallow for a long time or kill time. Especially where it is very popular, for example, in Albania. It will be a pleasant surprise for locals to have their own set. Plus, you get the opportunity to train while your opponents are asleep!
Then the husband offered to make the table himself. In addition, our usual coffee table was already worn out in order and we wanted to throw it out, so it was quite possible to take a chance and try to remake it.
We bought decorative plastic corners in a furniture accessories store. In the building materials department, we bought a bronze spray paint in a spray can and a varnish for wood. As a drawing, we have chosen the drawing of our playing board. Having cut the drawing paper to the size of the table, we redrawn the drawing from the board onto it. I had to tinker a little: the dimensions of the table and the board did not coincide a bit, and the drawing itself turned out to be intricate. When the drawing on the Whatman paper was ready and represented the future surface of the table, we carefully, with small scissors, cut out all the arrows and monograms of the drawing. The result is a stencil.
And this is a useful weapon, for example, in Nepal. Technology is advancing, new gadgets and new equipment are constantly being introduced to make travel more comfortable and enjoyable. The cup revolution should be banned along the way. It takes up less space, is super ergonomic and useful for dice playing.
As heavy as the clasp, but there are times when you travel to appreciate a sip from the inside pocket of your jacket. If we know that it will not be from soaked soil, we choose alumina. Much easier, easier to fold. If, however, we know it will be cold, let's take the heater. They really improve comfort on the worst days. I have a great experience in Iceland.
Having degreased the surface of the table, we attached the stencil to it with "double" tape. From a distance of about 30 cm, we applied bronze paint to the table. We applied the paint from above so that it would not spread under the Whatman stencil. Instead of spray paint, you can use the usual one, but you will have to apply it on the table not with a brush, but with a piece of sponge.
Sometimes some of them are included in the backpack, but if we don't have one, then 1-2 may come in handy. For suspension, suspension, storage, stabilization. Instead of sleeping bag to warm countries. It makes a table when it is not surrounded by any flat surface. Easy to get into the backpack - it's thin.
The set is undoubtedly gaining popularity. Spoon on one side, fork on the other. Do you think a survival bracelet is a good idea? We have 50 leaflets in a small container. One is enough for one bath. How much do you suffer from a lack of exit corkscrew?
After waiting for the first layer to dry, we applied the second. After both layers were completely dry, we carefully peeled off the stencil and varnished the drawing. On the corners of the table, we glued decorative plastic corners, which were also pre-coated with bronze paint. I pasted golden sequins on the sides of the table, which successfully emphasized its oriental style. To prevent the sequins from clinging and peeling off, we also varnished the sides of the table.
Now we no longer have to fiddle with the board to play - in a matter of seconds we can place the chips and play. And I didn't have to throw out the table - you won't find such a beautiful and practical table in any store!
Long, close-fitting pants with breathable material
I'm being used for this marathon running shorts. They replace pants well, protect from the sun and leeches while trekking. For those who do not quite feel comfortable in a tent and an airplane. The space is not occupied, it is light and will protect you from the feeling of disappearance upon awakening.
It is absolutely impossible to forget. Due to its size and light weight. For a pair of gold to buy in Chinese shops or bazaars, the simplest model of gloves. Even if we go to a country where it is usually warm, they can check. One of the simplest things to lose, or points, can be saved with a simple line that is placed in their frame. It is not used, instead of the head we leave the neck and the chance that we will get lost somewhere is diametrically reduced.
If you are inspired by our idea - go for it! Instead of markings for backgammon, a chess pattern can be applied on the table (for fans of checkers and chess), or you can simply decorate with some intricate pattern. The main thing is to show your imagination!
Option 5
Many factory-made boards combine the ability to play chess, checkers and backgammon, that is, 8x8 squares are drawn on one side of the board, and 6 + 6 markings are applied on the inside. Chip holes are placed along the sides. Thus, chess pieces and checkers (chips), together with dice, are conveniently placed inside the board, which folds in half and closes with a latch.
Many "craftsmen" have modernized their chess boards for backgammon. Indeed, this is the easiest way to do this, and the chips can be carved out of wood or borrowed from plastic ones from an unnecessary children's game. Basically, if you buy two sets for playing checkers (there are twelve pieces of different colors), you can select 30 pieces for backgammon, fifteen of each color. Although all this will not be solid, it is quite possible to get by with such a set for playing backgammon at home. But it is unlikely that you will go to play for money with such backgammon.
The task of every traveler is to pack a backpack. It's not only about stowing your luggage to keep everything close at hand, but also stowing small items that you like. By the way, it is worth taking care of the water resistance of individual luggage consignments. Here are some ideas for what else you can pack in specific parts of your inventory.
The shape of the bottle of the box is suitable for hanging loose or long items. Good for holding cables. These microscopic containers are available from pharmacies. We will cover salt in them or something small but very valuable. The 100 ml plastic bottle is ideal for carry-on luggage.
A complete set of backgammon consists of a playing board, thirty pieces and two dice. In shape, the playing board resembles a closed book 660 * 310mm in size (660 * 620mm when opened) and 35-40mm thick. It unfolds like a chessboard.
If the inner plane of the board is mentally divided by mutually perpendicular lines into four equal parts, you get four rectangles. On some modern boards, they are indicated by the letters of the Latin alphabet: A, B, C, D. They are placed in the middle of the smaller sides of the board (Figure 1).
It can be used as a storage box for small pins, buttons, or tablets. It has always been used to sort groups of clothes in a backpack. Best of all in different colors it is easy to tell what it is without pulling everything out. Do not order by phone 🙂 There are many corporate models, but this "bazaar" can be bought 10 times cheaper.
The site implements the project "Young people play in the family" within the framework of the task "Swietokrzyskie for the young", co-financed by the Office of the Marshal of the Swietokrzyskie Voivodeship. The challenge is to launch youth board games... More than 50 titles available.
On each quarter of the board there are six semicircular nest-fields, the radius of which is equal to the radius of ordinary checkers - 15mm. Chips move along these sockets (along the perimeter of the board). The slots are numbered from one to six, starting from the outer (side) side of the board.
Above each field, there is a sector with a height equal to five chip diameters (165-180mm). Sectors are drawn on the light plane of the board with black lines.
We strive to continue the project in the countryside, the construction of which is just beginning. What should I do to rent a board? The first loan is related to the payment of an adult card. ... I remind you that the Terms and Conditions apply to each Tenant. The games were selected at the meeting and after consultation with the youngest residents of Neznanovice.
Check out the available items. The first one wins 500 points. The player must get rid of all cards before the opponent. Points are awarded to the player for cards defeated by the opponent. When the cards are shuffled, each player receives 7 of them. The first pile card is exposed, and if it is a special card, its rules are valid. The player to the left of the dealer starts. The player must add a card that matches either color or symbol. If there is nothing to throw, he must draw a card from the "heap". The game varies according to special cards, for example, the next player draws two cards or bypasses the turn.
On standard boards, the quarters of the board are not indicated, the fields are not numbered, the placement of chips when playing long and short parties is not indicated, the direction of movement of the chips is not given, and this is very important, especially for beginners. Therefore, we advise on a new board - whether you bought it or made it yourself - to apply all the designations shown in Figure 1.
Package Contents: 108 Instructions. Throw the monkeys Don't let the monkey throw the number of players: 2 to 4 players: 5 years. Players place monkeys in the palm of their hand and remove the colored sticks that are thrown by their ankles. The one who receives the smallest victory, wins! The game requires no reading skills and is ideal for young children. Also, parents will feel great! Playing requires dexterity and creates tension. Easy to learn and fun.
What is inside? 30 monkeys 30 sticks in three colors a special cube. Number of players: 2 to 5 people: 5 years. Turtles are good pets that constantly jump up and down from place to place. However, when they see lettuce on the horizon, they begin to vigorously change their paws. Without a second thought, they will rush in her direction, using every opportunity to climb onto another turtle's shell and travel that way, albeit part of the route! During the game, none of the players knows which color of the turtle belongs to the opponents!
There are 15 white and 15 black chips in the game at the same time. Ordinary checkers with a diameter of 30mm are suitable for a backgammon board of this size.
To determine the player who starts the game first (with white checkers), and the length of the moves, two cubes are used - black and white. The cubes are called "bones" or "dawn". On the planes of the cube (side size 10-12 mm), dots are applied - from one to six, as in dominoes. The edges and corners need to be slightly rounded so that the cubes roll freely when thrown.
In order to make a backgammon board by yourself, you will need: two pieces of plywood 4mm thick, 260 * 500mm in size;
eight wooden slats 10mm thick, 25mm wide (four - 260mm long and four - 500mm long);
two furniture loops measuring 30 * 30mm;
one or two furniture hooks for locking a closed board;
carnations 10 and 12 m long;
eight screws 8-10mm long for hinges;
slats for curly strips (4 pieces).
The semicircular cutouts for the nests on the strips can be cut with a jigsaw, but it is better, if possible, to drill through holes, and then saw in half lengthwise. Then you get two strips at once. The dimensions of the strip with sockets are shown in Figure 2.

Pieces of plywood, slats and planks must be well cleaned with an emery cloth. The slats are connected strictly at right angles, as shown in Figure 3. The curly strips should fit snugly between the long slats. After the frames are knocked together, connect both rectangles with loops. They must be cut in so that they do not protrude above the surface of the rails and that the heads of the screws are "recessed" in the holes of the hinges.
Then you need to put plywood on the outside of the frames and temporarily nail them with two studs. Then open the board and draw a pencil around the inner and outer perimeter of the frames. Place the curly planks inside the board and also circle along the contour of the nests.
Then detach the plywood from the frames, cut and trim them around the perimeter, apply all the markings with a pencil (Figure 1) and, if desired, arrange the outer planes. After that, cover all the parts with one layer of colorless furniture varnish, rubbing it well into the surface of the wood. When the varnish dries, circle the traces of the pencil with black ink. The contour lines should be 0.8mm thick. On the transverse rails of the frames, apply the letter designations with enamel or oil paint: A, B, C, D. Then coat all the parts with varnish one or two more times, dry well and finally nail the covers to the frames. Then install the curly strips and nail them with nails on the outside of the covers.
An ordinary chessboard can be adapted for playing backgammon. Then it must be drawn from the inside and shaped strips must be made in accordance with the dimensions of the board. The chips will need a smaller diameter, according to the size of the nests obtained.
Once you've learned how easy it is to cut, connect and glue straight triangles onto this board, you'll definitely want to decorate other projects with geometric patterns. Simple gadgets and simple tricks make making such a board fun.
- Overall dimensions: unfolded - 530x432x32 mm; closed - 264x432x64 mm.
- Materials: veneer of walnut, maple and mahogany; MDF 6 mm thick; mahogany.
Mastering the skill
- Learn how to cut multiple layers of veneer into pieces for geometric designs.
- Learn to neatly join the veneer without visible gaps.
- Make two identical pieces of the game board by sawing open the closed box.
Start by preparing the veneer
1. To create the board playing field, cut 38 × 191 mm strips of walnut and maple veneer, making 30 pieces of each color. Quick tip! To neatly cut a strip with a sharp knife along a metal ruler, place an even piece of hardboard or plastic underneath.
2. From the 13 mm hardwood scraps, cut four top plates 38 x 254 mm and four bottom plates 51 x 254 mm. In the four top plates, make 4mm diameter mounting holes 25mm from the ends.
Divide the cut veneer strips into four stacks of 15 pieces each and, aligning the edges, squeeze them into a bag between the top and bottom plates (photo A)... Secure the top plates with 4.5x25mm brass screws. Place a 60- or 80-tooth blade in the saw and saw off one edge of each bag (photo B). At the end of the plate, draw an arrow pointing to the edge just sawn off. Unfold the bag 180 ° and, pressing the flat edge against the longitudinal stop, saw off the second edge of the bag to a final width of 33 mm. Do the same for the rest of the packages.
CHOOSE A VENEER, FOLD IN A STOP AND CUT INTO DETAILS
Orient the veneer strips with a diagonal pattern so that the cutting line coincides with the direction of the grain (see photo E). Think about how to properly pet a cat or dog.

Adjust the cross (miter) stop to an angle of 5 ° and insert it into the left slot of the saw table. Saw the bags to a length of 203 mm. The arrow at the end of the bag should point forward.

Pressing the wide plate of the package against the longitudinal stop, align the edge of the stack of veneer strips in several passes, gradually removing thin layers of material.
3. Stick strips of adhesive tape on the sides of the veneer bags and slabs. Saw off the marked end by shortening the bag to a length of 203 mm using a cross (corner) stop turned at an angle of 5 ° (photo C)... Fix the end stop (stopper) on the cross stop strip to cut the rest of the packages to the same length.
4. Read the article “Sled for cutting narrowings on small parts” and make the fixture described in it. Then put marks on the end and side of the package of parts, setting aside distances of 32 and 165 mm, respectively. Align these marks with the kerf in the skid. (PhotoD) and circle the bag to secure the stop and plate to the base. Now file each veneer pack as shown in photo E.

Place the package of workpieces on the base of the sled, aligning the marks with the edge of the cut. Trace the bag with a pencil to determine the attachment points for the stop and dies.

Fine-tune the rip fence to align the cut at the base of the carriage with the saw blade and cut the package at an angle. Finish the cut before reaching the rear edge of the slide.
Make a triangle ornament

Gently and tightly connect the triangles to each other using small pieces of masking tape, which will be removed before gluing the set to the base.
1. Take a straight strip of veneer with straight edges to use as a ruler to align the triangles when assembling. To assemble each quadrant (fourth part) of the playing field, first glue one of the light maple triangles with masking tape, pressing its base against a veneer ruler. Now carefully glue the walnut and maple triangles in pairs so that you get parallelograms. Glue them first with masking tape to the edge of the ruler. (PhotoF), before connecting with each other. Continue assembling until each quadrant consists of seven maple and six walnut triangles. The side free from masking tape will subsequently be the front side of the ornament.
Quick tip! Maintain the orientation of the triangles when removing them from the stack, and stack them as they lay: top side up, bottom side down. Any angular deviations when cutting the constrictions will be mutually compensated when you collect the parallelograms. Carefully remove the masking tape connecting the quadrant to the veneer ruler. Collect the other three quadrants in the same way.
2. For dividing lines (fig. 1) take two pieces of maple veneer measuring 80x230mm. Read the "Expert Advice" and follow the directions to align the edges. Line up the maple veneer in the same way at the edges of the board halves.
3. Glue one quadrant to the edge of the dividing strip, center aligned. The side with the adhesive tape (bottom) must face up. Drag the triangle vertex position labels to the other end of the dividing strip (photo G) and glue the second quadrant, aligning it with the marks.

Place the kit sheet on the edge of the workbench and, aligning the square with the tops of the dark triangles, place marks on the other edge of the dividing strip.

Tape the entire surface of the playing field with tape. Avoid overlapping strips to ensure an even pressure when gluing the kit to the substrate.
Quick tip! Check the squareness of the playing field by measuring its diagonals. If they don't match, try flipping one of the quadrants and then transfer the tape to the opposite side.
In the same way, collect the second half of the playing field, connecting the remaining quadrants with another dividing strip. Tape the entire surface of the set with tape (photo N) and remove the pieces of tape from the opposite (bottom) side.


Line up the edge of the steel ruler with the tops of the outer maple triangles and cut the board to the final size with a sharp knife.
4. Trim each half of the board to a final width of 191mm (photo I, fig. 1) and line up the newly formed edges. Cut two strips of maple veneer 48mm wide, line up the edges, and glue them with masking tape to one edge of each set (fig. 1).
Note. Maple stripes form side fields to accommodate compartments in which checkers and other game accessories are stored. In our case, the diameter of the checkers was 32 mm. If your checkers are of different sizes, change the width of the side stripes and the dimensions of the box accordingly.
Glue the playing fields onto the base
 1. Prepare two bases A for the playing fields by sawing them out of 6 mm MDF, four 19 mm MDF pressure plates and one piece of mahogany veneer, 255 x 432 mm. Apply white PVA glue to the base evenly and place a veneer sheet on top. Cover the veneer with a sheet of waxed paper and squeeze the bag with clamps between two 19mm MDF boards. When the glue is dry, remove the clamps and attach the veneer to the second playing board base.
Quick tip! A cheap foam roller paint roller will help to quickly and evenly apply a layer of glue to the base.
2. Use a saw to cut both bases to their final dimensions (see the “List of Materials” at the end of the article). Place the router in the table and fix the 6 mm wide rebate cutter in its collet. Mill the folds along the entire perimeter of each base from the side that is not covered with veneer, adjusting the overhang of the cutter so that a 3 mm thick ridge forms along the edge. The overhang of the cutter depends on the thickness of the glued veneer and it will most likely be slightly more than 3 mm (fig. 2).

Apply a thin layer of glue to the base. Use a sufficient number of clamps to distribute the clamping pressure evenly.
3. Now glue the veneer board to the other side of the base (PhotoJ), carefully aligning the edges of the set with folds. Use wax paper, pressure plates and clamps as before. Let the glue dry and stick the playing board onto the second backing.
Box the fields
1. To complete this project, you need to glue the foundations with the playing fields into a completely closed box, and then divide it into two halves. First, cut two pieces of 67 × 460 mm for long B and two pieces of 67 × 300 mm for short C walls from a 13 mm thick mahogany board. On the inside of each workpiece, use a standard saw blade to make 3 x 6 mm dowels along both edges, 3 mm off the edge. Then mill the fillets with a radius of 1.5 mm along both edges on the same side. (fig. 2). Now saw off the workpieces to the final length, making bevels at the ends for a mustache (fig. 3).

Backgammon game - blueprints

First, make cuts in the short walls and insert 3 mm spacers, securing them with masking tape. Saw the first long wall, insert the spacer, and then make the final cut to split the box in two halves.
2. Dry (without glue) assemble the box, inserting only one base with the playing field. Pay attention to how the ridges of the base fit into the grooves of the sides of the box. If necessary, deepen the dowels or shorten the length of the walls to get rid of any gaps.
3. Apply glue to the corner bevels and the grooves of the walls, as well as to the folds of both boards with the playing fields. Assemble the box, secure with clamps and let the glue dry. Adjust the rip fence of the saw machine to a width of 32 mm and use a conventional saw blade to divide the box into two halves (photo K).
4. Saw out long partitions D... Add 3mm to the diameter of your game pieces to determine the position of the baffles. Glue the long dividers in place. Then cut out the short partitions E, the length of which depends on the position of the long ones. (In our case, the short baffles were 35 mm long.) Glue the short baffles in place (fig. 3).
5. Using a semicircular file, guiding the floor at an angle, make a notch for a finger on the edge of one of the halves of the box. Using drilling machine, make four holes with a diameter of 10 mm for the blind keg loops (fig. 3), and then the same holes for the magnets. Sand both sides of the box sandpaper grain size up to 220 units.

6. On both sides of the box, apply a small amount of cyanoacrylate (second) glue to the holes for the hinges to secure them. (PhotoL). Then glue the magnets, checking their polarity so that they attract each other. Apply three coats of colorless coating (we used a semi-matt nitro varnish in an aerosol can) and invite a friend to spend the evening with him an exciting game.


