We build a reliable fence from Ershtrokenik with your own hands - step-by-step instructions. Metal Stakenice Fence (Ershthette) DIY Scheme of the fence from EvroShther
During the construction of a private house, the land fence plays a no less role than the construction of the walls and the ceiling device. The fence is the first thing to see visitors to the manor, and it is already possible to give the first quality assessment. construction work. If earlier the fence was an ordinary stakenik from a low-quality board, which remained after the main construction work, then the site is currently used to fence various materials. On how to set the fence from the ereshnika with their own hands, let's tell later in the article.
The following materials are used to produce fences and fences:
- Concrete plates. Such fences have standard concrete sections. They are installed on special pillars that have a groove.
- Fence from sheets of professional flooring. Refers to one of the most popular designs. Mounted easily, it is inexpensive, has excellent appearance.
- Ershtroker. Relatively new Material. It is a strip from a galvanized sheet of a small thickness. This sheet is protected by several layers of polymer coating and paint. In principle, the stakenik reminds the professional flooring, only has a form not sheet, but planks. This new material has perfectly proven itself and deserved popularity among builders.
This material is manufactured at Metallurgical plants ArcelorMittal and Thyssenkruppp in Belgium and Germany, respectively. Like any other material, the Ershtroker has both advantages and disadvantages.
Of the advantages, you can allocate:
- Large service life. Due to several layers of polymer coating and paint, such material will serve for quite a long time. For proper montage and operating 50 years - a short time for it.
- Different sizes. Due to the fact that each staketin's length varies from 0.5 to 3 meters, they can be used to create fences of any height.
- Small weight. Possessing low weight, the Ershroaster is easily transported and installed.
- Beautiful appearance. Due to the fact that in the production of Ershrokels are used various options Coloring, from ordinary to imitation valuable breeds Tree, such a fence will look very beautiful and gently. It is suitable for any design of the house.

The disadvantages of the european practically do not exist, the main among them:
- Weak protection. Naturally, it makes no sense to compare it with a fence from cast concrete or slag blocks. Thin sheet metal It is unlikely that he will stop the one who wants to get into the territory. Therefore, in areas with a bad criminogenic environment, it can only be used as a fence between neighboring sites.
- Clauses between stakes. Due to this, it will not be possible to remain unnoticed for such a fence. If there is no desire so that passersby seen the courtyard, you need to install a solid leaf without gaps. However, for those who grow on panstone Flowers or other cultures, it is only on hand. Such a fence will not give a shadow, and will ensure normal flowing of flower beds.
Types of Ershurst and Montage Methods
Currently exists a large number of The types of eurfacket, thanks to which you can make a great fence:
- Stakenik "Nova". It is a strip of a width of 115 mm, made of durable galvanized steel with a thickness of 0.5 mm. Each plank has 16 rigors that allow it to withstand pretty high mechanical loads. Steel is covered with a layer of polymer with a thickness of 25 mkm, which ensures excellent wear resistance.
- Model "Ekonov". It is a model that is very similar to the previous one. Due to the reduction in the width of the plank by 15 mm and the rigs of stiffness to 12, it was possible to reduce the price of this material without losing performance characteristics. Staketin length is mainly from 1 to 2 meters. Due to the low price, this material can be used in the country or in country house. Usually this stakenatnik is mounted with a gap from 10 to 100 mm, but it is possible to install it and skimproof (double-sided installation).
- Stakenik "Light-M". It has a strip width of only 70 mm, and only 6 rigid ribs. It is installed both with a gap and skidding. Thanks to such dimensions, the material has a low weight, which does not require the construction of a massive design of the fence. Low price It gives the opportunity to use it for the fence of the parisades, childish platforms, etc.
- Stakenik "Barrera". It differs from all those above the method of applying a coating on a steel blank. Powder-polymer spraying makes a protective layer very durable and durable. The Staketin length varies from 1.5 to 2 meters, and the width is from 80 to 120 mm.

In addition to different species Ershrester, there are several ways to mount the Ershtroker, making the section from it. The section can be made up of planks of various lengths, creating a fence of various design forms:
- Wave. Stakenists are installed on the span in such a way that their upper end reminds the wave.
- Convex and concave arc. Stakenists are located so that in the middle there are the highest of the lowest, respectively.
- Christmas tree. With this design, the location of the staketin is selected as in the previous versions, and the upper edge of the slats has the shape of the Christmas tree.
- Lestenka. This species is the alternation of long and short staketing.
Installation of the fence from the erupteel do it yourself
The main stages of the mounting of the Overflower

The process of installing a fence from Ershrokenik is practically no different from the installation of a fence from a professional flooring. The whole process of work can be divided into several stages:
- Development of a fence diagram from erershther. It will help to navigate in construction and pick up the right amount material.
- Foundation device.
- Construction support pillars.
- Welding transverse lag.
Installing the fence from Ershtrokenik do it yourself
Many believe that it should not be erected to build a foundation for the installation of the fence. But this is far from that. The fact is that in the absence of a foundation under the fence it will be easy to make a subpople. Optionally, it may be a person. Meeting on the threshold of your house with a wild animal or a homeless big dog can bring a lot of trouble. Therefore, before making a fence from Ershtroker himself, it is better to pour a concrete foundation under it.

Installation order:
- The construction of the foundation starts from the trench device. Since the weight of the fence is not too big, the depth of the trench 30 cm is quite enough. The height of the foundation above the zero mark is about 30-40 cm. In the field of installation places, the width of the foundation must be increased to be able to lay them decorative brick.
- After the trench is dug, the crushed stone and sand layer is stacked. Next is installed formwork. For its device it is better to use plates chipboard or OSB. Fasten formwork with wooden bar or fittings.
- Inside, the reinforcing belt from the reinforcement is installed, a diameter of 10-12 mm, bound to the wire to a single design.
- Then set the support poles. For them, they use a profile pipe with a cross section of 50x50 mm with a wall thickness of at least 4 mm. Fix them with welding to the reinforcing belt. When installing a pillar, you must make sure that its position is correct. In order for all of them to stand in the line, first and last install the first and last. Between them stretch 3-4 kapron threads that will become a reference point for the installation of the rest.
- If the posts are planned to install lighting lamps, wiring is turned inside the pipe.

- When the installation of the columns is over, you can start the pouring of concrete. A solution of cement mixture, sand and crushed stone of the middle fraction is prepared in proportion 1: 2: 2. Cement is used 400 grades with the addition of slag. It is inexpensive and for this work it will be quite good.
- After the foundation freezes, you can begin to run steel pillars with decorative bricks. The wellwork is applied here. The process itself is not very complex. The only thing you need is to constantly monitor the flattering of masonry. When laying bricks inside, the mortgages are installed to which lags will be welded. They are made independent of the reinforcement and pieces steel sheet 4 mm thick.
- After laying a row, the mortgage is welded to the pipe and laid brick. They must be located on the same level. Usually, 3-4 lags are used for fastening the stake. Accordingly, 3-4 mortgages are installed on each pillar.
- After the pillars are covered with bricks, you can welcome lags to the mortgage. Before you welcome each of them, and the position is checked by level.
- Next you need to paint all metal fence details in the color of the stakenice. To begin with, they are ground, and after drying, the primer is painted in two layers.
How to fix the ereshore on the fence

The next step is mounted by the European passman:
- Each plank is screwed to lagham 2 self-draws. Accordingly, if Lag 3, then the point of fasteners should be 6. The question is the better to fix the Ershtroker, the discussion. Many make it with the help of self-tapping screws, while some prefer a bolted connection.
- Self-tapping screws should not differ in color from the stakenik. If there were failed to find such on sale, you can paint the usual fastener in the desired color. It is better to use selflessness from of stainless steel. They are not subject to corrosion, and will not spoil Staketin. Using usually steel, rust from self-drawing can transmit the bar that will need to be changed.
- Standard gap between stakenis 3 cm, but when installing, it is necessary to calculate its value so that the slats are set uniformly. Before starting the installation on lags, marks are made for which each staketine will be attached.
- Installation process is quite simple. At the top of the point is drilled through hole Drill with a diameter of 3.5 mm, which screws up a self-tapping screw. Then its position is adjusted and the lower self-tapping screw is screwed, after which - all others. After that, you can install Ershtroker on the wicket with your own hands.
Installation of the fence from erership do-it-yourself: video
To date, there has been a special interest in the fences of the European class. They are universally installed both in private possessions and in all sorts of objects. Mean means - fences from Ershrokel.
Similar fences are the territories of public and administrative buildings and objects, warehouse and industrial enterprises, dacha plots and other private ownership. Let's look at the details of this direction.
What is a fencing from erershther
Essence of eurbicker
Ershtroker is profiled metal strips coated with a protective layer of polymer (decorative). This material is endowed with a number of advantages, among which the low price of finished products is distinguished.
In addition, it is worth highlighting:
- high practicality;
- presentation of the appearance;
- simplicity mounting work;
- durability.

In production, steel 0.5 mm is a thickness of very high quality with processing:
- zinc - 275 g per square. m;
- primer;
- polymer coating - 25 MK (one or two-sided).
This ensures the above-mentioned long-term and warranty (at least 10 years) on polymer coating (its uniform fading).
Stakenik produce rolling method:
- sixteen profile bends provide reliable rigidity;
- the top cut with a stamp looks classically.
Metal school is an excellent alternative, surpassing them according to aesthetic and high-quality properties. For proper installation Such a fence for a long time will serve you, pleaseing the eye with the originality of the performance.

Properties of material
- Fences from metal stakenika practically will not require additional care during operation;
- This material is absolutely resistant to aggressive effects. external environment;
- Planks of metallic staketing with the same size with wooden - much easier for the latter;
- By service life: this material designed for 20-30 years of fragile operation;
- In addition, a similar fence at any time (if desired) can be repainted in their understanding, or to add all sorts of decoration elements.
Know!
Eucer's planks possessing high strength - remarkably opposed strong windsAt the same time, having the opportunity to carry out the load of an additional character.
A similar fence is almost impossible to damage or break!

In the photo, the top is the first two options for special occasions, because it is recommended to apply them at a height of at least 180 cm due to the special risk of injuries.
On the fences from this material it is possible to mount:
- lighting systems;
- alarm and video surveillance - at the same time, without not worrying about reducing the carrying characteristics of the structure.
It often happens that the fences of a similar plan are equipped with pointed tips, which significantly increases their protective qualities. Additionally, for insurance, instead of fasteners use anti-vandal head bolts.
Design and material for the fence
By its design, the erupker consists of:
- carrier area (pillars);
- metal stakenik - enclosing area.

The carrier area is the pillars between which the fence itself is held (enclosing the area).
Poles can be made from:
- brick;
- concrete;
- metal.
The last option is the most acceptable, because metal (pipe 60 x 60 or more) is the most durable material. In addition, it is smaller in consideration and cost in comparison with the materials listed above for the supports.
Tip!
Choosing a specific metal brand of metal for the carrier part of the structure, should be proceeding from the characteristics of its enclosing part.
Power support should depend on the weight of the enclosing part: for a unilateral stake, for example, a pipe 60 x 60 is suitable.

- These are elements of direct fill between supports. For fences from a metal bag, it is recommended to use between the supports carrying jumper from the profiled tube 20 x 40.
One staketin has a weight - 700 g - and it is a small weight that will not hurt to apply as profiled pipes of a small cross section. The fence can vary by heights - from 1.5 - to 2.2 meters.
However, thanks modern technologies You can order any size and color. The width of the section is 2, 2.5 and 3 meters.
Montage of the fence from the erupteer do it yourself - it's a simple matter
Installation of the enclosing unit
- In the height of the fencing from the metal stakenik can be from the half-meter to 3 m, but the most common option is to use 1.25 - 2 meter slats;
- Setting a similar fence, staketin can be placed at any reasonable distance from each other;
- Sometimes stakes are installed in a checker order, thus obtaining a "deaf" fencing of increased strength, but when the ventilation functions are saved.
Conclusion
As you understand, it is quite realistic to make a person's own installation of the fence from the Evroatian at home or at the cottage. Clear instruction can be a good help for you! In addition, in the video presented in this article you will find additional information on this topic.
Speaking about the stakeholder for the construction of fences in the country and in a private house, they usually represent a fence, scored from wooden planks with a smooth, pointed or curly top end. Landscape designin which such a stakenik is inscribed, most often corresponds rustic style With elements of retro and provincial coziness. Many modern materials Try to mimic wooden designs And replace them. Not left aside and stakeholdatik for fence. The market presents materials for fencing from PVC and those about which we will talk today - metal, known as the "EurShther".
Practical material - metal stakenik - allows you to make a modern beautiful fence.
The advantages of the fence from the European
Many daches have already managed to feel the inconvenience of solid fencing from sheet metal products:
- there are large sections, constantly closed shadow of the fence;
- circulation air is difficult inside the solid fence. Due to the lack of ventilation and overheating, many plants suffer;
- deaf fence is not the best element of landscape design.
All these drawbacks can be avoided if instead of a solid fence to make a fence from a metal stakenik with their own hands.
Here is its unconditional advantages:
- ershtroker has the same strength and durability, as well as sheet metal and significantly superior wooden structures;
- light weight Staketin makes it possible to make a lightweight frame and save - 1m² weighs about 300 g;
- simplicity and convenience of mounting make it possible to make a palanisade from a stakenice or any other fence yourself;
- material is easy to maintain and care. From such a fence, unlike the wooden, it is not necessary to consider the plated paint annually and tint again;
- plants growing next to the fence receive a sufficient amount of the sun and a favorable microclimate.
Highly good video About the Features of the Ershrester:
What material was called Ershtroker
The profiled metal strips of about 10 cm wide and a length of 1.5 to 3 m, specially intended for fences, are made in the same industries, where there are standard sheet metal products. Material, as a rule, has galvanizing and colorful polymer coating with one or both sides.

Ershtage profile with spangled edges
High-quality varieties of the stakenik must necessarily have spangled edges. The fence from such slats looks beautiful and aesthetic, unlike a cheap variety with sharp cuts. In the first case, each detail is passed through the rolling mill and is molded, and in the second - stakes are cut from the finished sheet of hardware without processing edges.
Manufacturers are constantly offered to the market new types of metal bags, which change the material, the method of applying coatings, profile design and coloring.

Rich color palette allows you to build a fence for every taste
Currently, the most popular form of the routine with a rounded upper edge. The second common form of the vertex is a horizontal cut. In this case, the upper end end of the fence is additionally closed by a horizontal bar. The tops of the blanks can be performed in another form. Sometimes sharp jazbins do on them. This is permissible only for fences more than 2.5 m high. At low fencing, sharp tips can cause injuries without ensuring effective protection.

Horizontal plank closes the top bottom of a metal bag
There are erupters and in the way of connecting to the frame: there are open and closed fasteners. In the second case, hardware is not visible on the surface of the stake.
Manufacturers provide additional service - They can make cuts according to the stated size.
Base and framework
In order to make a fence from the stake in your own hands, you should start with the installation of support pillars. Depending on the climatic conditions and the composition of the soil, they have to boil to a depth of 1.5 m. Poons can be made by gasoline or hand garden brown. For reliability and stability, the pillars are forced with rubble and poured concrete. The tops of the columns are closed from moisture with suitable caps or plugs.
After setting, the solution is embarking on the montage of the frame. As a rule, it is made of profile pipe welding method. Sometimes runs are collected on bolted fasteners.
Before starting the installation of the stake, the poles and the frame must be primed and painted in the color of metal products. If the supports make wooden, underground part Need to miss bituminous mastic And wrap the rubberoid, and the upper end to sharpen to flow water.
Montage of erupkener
Fastening Staketin to framework is produced in accordance with the intended design with the help of screws selected in the tone.

White fence planks require the use of white screws
From the method of placing planks, their heights and magnitude of the lumen between them depends on the total cost of the fence, the cost of its manufacture and design:
- the maximum distance between adjacent placters should not exceed 5 cm;
- each staketine is fixed on 2 screws to the upper crossbar and 2 to the bottom;
- to withstand the same distances between Staketins, you can use the following method. Deciding with the distance between adjacent planks, you need to pick up a suitable wooden bar. Applying it between the straps in the fastening process, control the accuracy of the installation;
- those who do not like the lumens between Staketins can make an opaque fence by placing a stagnant order alternately from two sides of the running lag. It turns out a solid ventilated fence with the original volume design.

Selection of fasteners
To connect the framework of the fence in those places where welding is not used, a bolk fastening is used. For hanging, European slats use self-tapping screws. To protect the polymer coating, hardware is screwed through the substrate plastic or rubber rings. Self-tapping screws must be galvanized and painted in the color of the fence.

Fastening of the European Self-staples to the frame of the profile pipe painted in the tone
A little about shortcomings
Despite the complex design of the profile having many rigidity and fractures, Ershtroker is not the most durable material. A little effort is required to apply mechanical damage to a colorful layer or mock the surface. It is enough to hurt him shovel, unfortunately lean the bike, touch the corner of the garden car or mower. They fear of the plates of the erupteel and pressure of snowy snowdrifts.

Dark Horizontal Plates Metal Stakenice Advanced White Massive Racks
By the way, despite the prefix "Euro-" material is widespread at all in Europe, but in the CIS countries. European design meet beautiful fences Using a metal stakenik, located between the fence racks horizontally.
Market building materials Every year it grows and enriched with new and new products. With the development of technologies, materials are becoming more contemporary, and their advantages compared to competitive are indisputable. Among such products and the European serviceman.
EUROPEATER fence for a private house
What is so good the material where it can be used and how to use? Consider more.
Features of the material
Ershtroker is metal sheets About 10-15 cm wide and half a half to three meters high. The surface of the metal is galvanized and covered with a polymer composition for protection against harmful effects adverse factors External environment (rain, snow, frost, hail, fog).
It seems to be reminded, but has a number of benefits:

The wide possibilities of applying the material contribute to the rapid spread of the novelty among the owners of their own homes and various firms.
An example of the original fence for the cottage
The popularity of the stakeholder is only growing, so new colors and forms appear. If each section is manufactured separately, the material will cost more, but its quality will be significantly higher.
With a mass cutting of parts from one sheet, such defects may appear as burrs, jar and other small deformations.
Also can be different. If a powder method is used, each detail will be scratched uniformly on both sides. Release and one-sided version of the stake, when the paint is processed only front side Staketina, A. inner side It remains matte-white.
Installation process technology
In the process of installing a fence from Ershtrokenik, several main steps can be distinguished:
- Preparation for installation (calculation and purchase of materials, preparation of instruments, search for workers, if not planned independent installation fences);
- Planning territory;
- Mounting frame;
Each stage we describe in detail for a clear understanding of the entire installation process.
Materials
Materials will be needed:


Scheme of the fence section from Evrohstaper
They are in advance the height and width parameters and the width of the material are in advance, and when the calculation conditions are inserted (the length and shape of the perimeter of the area, the presence and amount of wickets and the gate, their width), the computer issues the exact value of the amount required for the installation of the amount of the amount of the number.
However, such calculators have a certain error, and when installing can often be noted that the material is not enough. Experts are recommended to add about 10% over the desired value to the calculated value of the value, so that the stakeholder is just enough. Let it be better to stay a little material in reserve than it is not enough.
After all, the order of the new party of the stakenik may entail many problems: long-term expectation of the completion of the manufacturing process (if necessary material Not available), the differences in the quality of various parties (may be slightly different with a shade); It may happen that the purchased material was excavated without a residue and its further production is not planned at all.

An example of bilateral fencing from EvroShther
And the wines of everything will be improperly calculating using a universal calculator.
Instead of a calculator with the same success, you can use the simple formula for: each meter of the fence accounts for about 6 stakes (if the width of them is up to 15 cm) or 8 staketing (with a width of 10 cm). To calculate the length of the fence, the length of the perimeter should be subtracted the size of the gate length and wickets. So, without calculators and other special programs, you can approximately calculate how many stakes will be needed to install the fence of any length.
Instruments
To install the fence from EvroShtnik, you will need:

After everything is ready, you can proceed directly to construction work.
If needed inexpensive, but beautiful and durable fence, you need to build it from the metal package. Especially since it is not difficult to build, since it is simple. Since this material appeared relatively recently, on the background of neighboring traditional hedges it will look no standard.
Advantages that make EvrisTaste Popular
He got his name due to similarity with a wooden stakenist. In fact, it is cut into the strip. It is made of galvanized metal with a thickness of 0.5 to 2 mm thick and is covered with two layers of a colored polymer coating. The average width of one element is 10 cm, and the length is from 0.5 to 3 m.
Undoubted advantages help to help him:
- Greater strength caused by the design of elements that provides high rigidity. Not deformed with significant wind loads.
- Weight, relatively with other materials small, which greatly simplifies transportation and installation.
- Montage with your own hands is very simple: it is enough to secure the planks with self-draws on the frame. Accordingly, the replacement of elements during damage is also simple.
- Presentable appearance. It is possible to choose any color. If desired, you can rebuild or reproduce the existing color.
- The installation is possible on both sides (in a checkerboard), which expands the design capabilities.
- The fence from the metal bag, like other metal fences, the photos of which are on the site, perfectly transfers any weather adversity.
- Due to high wear resistance, service life is ensured up to 50 years.
- The fence from Errystechnik does not shade landings, like others, therefore is a preferred option for cottages. If you wish to hide any area from prying eyes, it is enough to mount additional stakes on the other hand, covering the gaps.
- Side sizes offered by manufacturers make it possible to build not only protective, but also decorative metal fences.
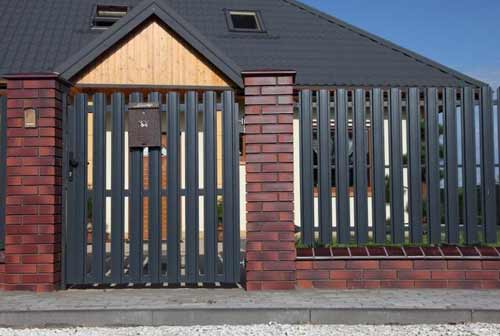
 Fencing from Ershrester with a gate in a private house
  Ershursian fence in the country
  Ershurstian fence on ribbon foundation
 Combined fence with ereshore
  Horizontal layout of the plates with horizontal location
  European fence photo
 Fence from Ershtroker "under the tree"
  Fence from EvroShther "in a checkerboard"
Disadvantages during the operation of this type of fence in different climatic zones No detected.
Tool for work
Build a fence from Ershrester with their own hands without the desired tool arsenal will not work. Therefore, it is necessary to prepare:
- Bayonet and soviet shovels. However, the pits below the racks are better to drill the brown. It turns out faster and careful.
- Apparatus for gas or electric welding. It is used to welding the crossbar to the columns.
- Powerful screwdriver or electric drill. You can, of course, screw the screws with a simple screwdriver, but it takes a lot of time and strength.
- Set of standard locksmith tools.
- Level. Optionally laser type, quite a simple building option.
- Normal 5-meter roulette.
- Several tassel different size For staining welded seams, hats of selflessness, cutting places.
- Set of wooden peasants and cord. Used to mark up and monitor the correctness of the injection mounted.
Necessary materials and calculation of their quantity
So that in the construction process do not be distracted in search of missing materials should be in advance their list, and then calculate required amount. The list needs to include:
- Steel pillars round or square, 6x6 cm, sections. The wall thickness should be at least 2 mm. Optimal distance Between them is considered 2-2.5 m. So the number of columns is determined by dividing the length of the perimeter by the distance between them. If you plan to separate yourself from purchased pipes, you should consider not only the outer height, but also the size of the part is blown into the ground. Depending on the state of the soil, it can be from 0.5 to 1.2 m.
- In most cases, they are made from the profile pipe with a cross section 2x4 cm. For an elevation of up to 2 m, they are installed in two rows, if higher is three. Accordingly, it is necessary to multiply the perimeter to the definition of a common pattern of Lag to 2 or 3.
- Rubbed.
- The number of decorative plugs for columns is equal to their number.
- Primers and paints for work on metal will be required near a liter by 8-12 supports (depending on their size) for coating in one layer.
- Self-tapping screws depending on the number of lags you need two or three on each bar. If the form of staketin provides for mounting from both sides, the screws will be required twice as much. To save time it is better to buy them with already painted heads.
- Ershrester, the size of the material is selected according to personal preferences. To calculate the number of planks on the sites of manufacturers, there are calculators. But, as practice has shown, they give out results with a big error. More often to a smaller side, that is, the material is not enough. Therefore, experienced people are recommended for reliability to increase the result by 10%. With an acceptable accuracy, you can calculate the quantity on the basis of the condition that 1 meter of the perimeter will have to 6 pieces of rails up to 15 cm or 8 pieces with a width of 10 cm. When calculating the width of the gate, and also the wicket is not taken into account.
The stakenik must be chosen with the fought edges, it will look much better.
Procedure for building fencing with their own hands
Marking perimeter
First of all, the construction site should be cleaned from the remnants of the former hedge, garbage, align. Then, referring to the site plan, it is necessary at the corners of the future fence to knock the pegs and pull the cord between them. Along its line, the installation sites of intermediate columns are scheduled. It is advisable to choose the distance between them along the length of the crossbar, but not more than 4 m to prevent their sagging. If the length of the lag is small, then no more frequent accommodation is rebeling.
Installing columns
On normal soils, the pits are made in a depth of 50-60 cm and the same support is clogged with a sledgehammer. After placing it vertically, the free space in the pit is filled with a mixture of sand and rubble with a thorough rambling. On the weak soil The sump depth is increased to 75 cm. The post is installed on a cruise pad with a thickness of 10 cm, the armature is installed around it, the 90 ° vertical is set up with stones or wooden wedges and concrete is poured. At least a couple of days, until the concrete hardens, no action should be performed.
Since the corner supports accounted for an increased load, the pits below them must be deeper. And the pillar itself is preferable to make a larger pipe from the pipe, for example, 8x8 cm. Regardless of which the installation of reinforced supports will also be required. Does not require the use of powerful columns.
Assembly of the carcass
Lags to the columns can be mounted in self-drawing, bolts, welding. The fastest I. reliable way, of course, welding. The top row is attached at a distance of 15 cm from the edge of the columns, the bottom at an altitude of 20-30 cm from the ground. In order not to mark the markup of the place of attachment of each lag, it is necessary to pull the cord between the angular supports on top and lower the cords and navigate them. Together with the frame, the gate and wicket is installed. The finished frame should be covered with primer and paint the color of the stake. The holes at the top of the pipes must be closed with plugs, to prevent ingress of water. The plugs should be inserted with the effort so that they do not break the wind.
Sometimes proceitted are made of wooden bars. However, it is not so resistant to external influencesAs a metal protected by a polymer coating. The bar must necessarily increase by antiseptic and paint. Since the strength of the tree is also not at the height, the distance between the columns should be reduced to 1.5 m to ensure the reliability of the entire structure.
Fastening stakenik elements
 Eringe Colored Fence
  Fastening of the plates of the fence from the European passman
  EUROPEATER FOOD FLOWER FASTERS
  Essential Fence Installation Scheme
  Assembling a fence from erershther with self-tapping screws and brackets
  Fence from Evro sweeper do it yourself
 Self-tapping screws When fastening, staketing to cross should be twisted without fanaticism, without damaging the polymer coating. In order for all the rails to be at the same level, after installing the first to pull the cord at its height and all subsequent align on it. To speed up the installation, the staketin is needed from wooden bar Or a piece of pipes make a template and squeeze the distance between them. To give a fence of a complete type from above on Staketin, it is necessary to fix the eaves with self-taverns of the cornice or the skate bar. If the rivers have the upper ends, it will increase the protective properties of the fence. Therefore, the top in this case is better not to close.
Construction tips. Optimal is the gap between the rails in 2-5 cm. large sizes The fence will look not aesthetic. When fastening staketing in a checker order, the distance between them increases to 8-10 cm.
You can independently build a fence from Ershtrokenika very quickly and efficiently if you purchase ready-made sections. Since it will be difficult to move the sections in a single room, you will have to use one - two helpers. By type, such a fence will not differ from the fence, constructed by professionals, but it will be much cheaper.