Original wood shelves. How to make mounted shelves do it yourself
Shelves are often used not only for supplement and decorating the overall interior room, but also for a clearer and appropriate organization of space. Thanks to their use, the apartment owner gets the opportunity to be conveniently located great amount Small things that are simply lost in the closets.
Today, the market presents the mass of various models that are made of different materials. They differ in the design.

You can choose not only products with classic design, but also ultra-modern designs.

But more and more, people prefer to make such interior details independently. Asking how to make the shelf with your own hands, they reread the lot of literature and browse many directories.

However, this does not mean that the independent manufacture of the shelf is characterized by complexity and it is not able to a person who does not have special skills. No, it is completely wrong.

Familiarization with the literature in this case is necessary in order to create a product with beautiful designwhich will fit into common interior. Consider in more detail what the shelves are.
Varieties of the shelves
Any specialist will tell you that before proceeding to the creation of the product, it is necessary to decide for yourself, which design you want to get and whether it will be combined with the interior. And only after that you can start creating a product.

After all, for the house, decorated in a classically weathered style, is completely unacceptable to use trendy and modern shelves. They will look extremely ridiculous.


The most popular and widely known fond of the shelves is a classic shelf. Due to the fact that it is quite simple to install, but appearanceThanks to simplicity, it seems exquisite and sophisticated.
Used success and open, closed shelves. Closed products are most often used for decorating and installing indoors decorated in more. modern styles. For their design, glass and sometimes plastic are used.

The open designs can be used both in houses designed modern and apartments with classic design. Over the past few years, this kind of shelves have become enormous popularity and therefore gradually displaces classic options.

In small rooms, it is quite often possible to see the angular shelves that have a special way of fastening. They are mounted on the adjacent walls that are adjacent to each other. Most often they are used in bathrooms, kitchens and subsidies.

In addition to the above, shelves, which are attached to the wall, there are suspended and outdoor structures. Suspended shelves are mounted not quite in the usual way.

They are installed using cables and vertical racks, and fasten directly to the ceiling. Such a fastening looks rather unusual and original.

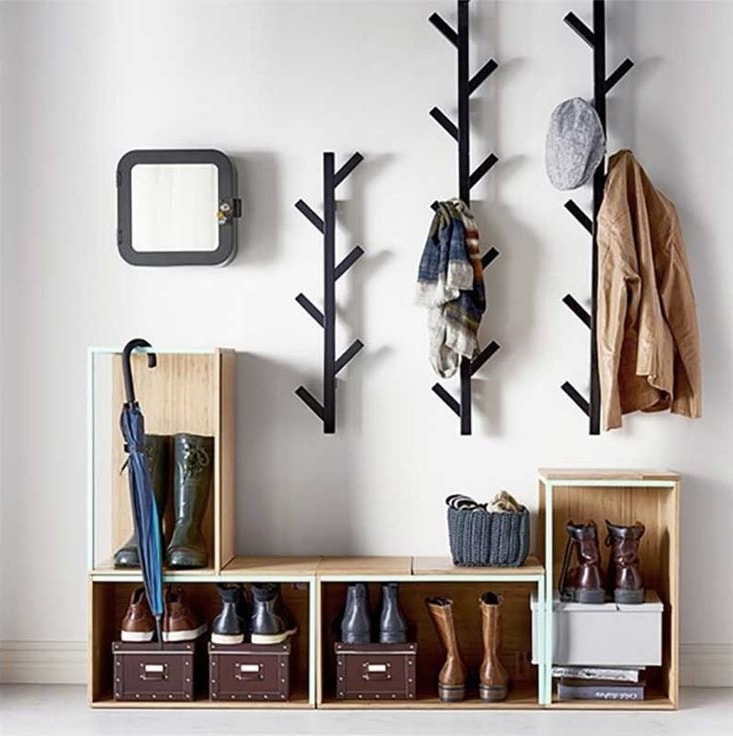
The outdoor designs are most often used in the hallways. After all, it is precisely the floor shelves for shoes made by their own hands, not only look beautiful, but also help you organize the space of a small hallway. At the same time make them quite simple.
How to make a simple shelf?
To create a declared product, you should prepare in advance or prepare some tools and materials. You can use what the connecting elements you can use what is more suitable for you. But the most popular are the usual self-tapping screws, brackets and dowels.
Note!


For example, take the photo shelves with your own hands, which is presented below. It depicts a product with such parameters: width 250 mm, height 300 mm, length 1100 mm. The manufacturing process for convenience will be divided into steps.
Stages of work
At the first stage you need to mark the markup. To do this, you should put the boards on the table or any other smooth surface and move the measurements with the drawings. Side walls should have an altitude of exactly 268 mm.

This markup is optimal because, the side walls will be located between the two parts.

In the second stage it is required to produce board boards. For cuts to get smooth and neat, it is necessary to use an electrolovka. After cutting, you will succeed 2 sufficiently long blanks and 2 shorter.

In the third stage, you can proceed to the processing of the obtained billets. The resulting segments should be covered with a special protective varnish or verses, pre-polishing them.

Note!

In the event that you only plan to paint the shelf, you can do the treatment with the usual antiseptic primer. So you will increase not only the service life, but will achieve a more uniform paint distribution.

At the fourth stage of the manufacture of a wood shelf with their own hands, you start directly assembling it. The bottom board should be laid on a flat surface. From the end of the workpiece, retreat 8 mm and spend two lines parallel to cut.
They should be noted 2 points with a distance of 5 cm from the edge. In the noted points you need to drill holes for the screws. With the second workpiece it is necessary to do the same manipulations.

After that, you should install lateral blanks on the bottom segment of the board and secure them. As soon as you finish with the mounting of the side panels, proceed to install the top panel and securing it.

At the fifth stage, the brackets should be fixed on the ends of the side panels, and in the wall there are several holes for dupels. After that, screw the screws so that they protrude 5 mm. And here is your shelf ready.

In the same way, you can make acoustic shelves and acoustic shelves, but you need to take into account the size of the equipment itself. Measurements should be performed carefully, because if you make a mistake, work will have to start again.
Note!


Photo shelves do it yourself


Place for books, souvenirs, cute heart of baubles - here is the main purpose of the shelves on the wall. Someone has a collections of candles, someone has a tomiki's favorite poet, and someone keeps photo albums on the shelves. It is important that the shelves themselves should be no less aesthetic, rather than the items on them are stored.
Make a shelf of wood - the first thing comes to mind when independent manufacture Shelves. Indeed, this option is the most common.

Wooden shelves are good accessibility and cheap material, ease of processing, and the ability to experiment with the design. And you can start learning to make such creative designs with a simple and universal shelf, which will not be superfluous, and in the living room, and in the children will come in handy, and other options for its placement can be considered.
Materials for the shelves:
- Wooden trimming of different lengths;
- Rope trim;
- 5 furniture shields;
- Fastener fastened;
- 2 cable rings;
- Electrolovik;
- Drill;
- Roulette;
- Pencil.
On the shelves (shields) you need to make holes. Arrow should be drilled at a distance of 6 cm from the edge, and 12 cm in each other.
Wooden trimming must be cut, the length of them can be different, but the height needs to be done common. Inside the sawn cropping, drill holes for ropes (through).
First of all, the bottom nodes of the ropes are tied. They rushes the bottom shield (lower shelf), between the shields along the edges as the interval between the shelves there will be stacks of cropping. All trimming is better divided into parts, and between each floor shelf lay the same amount of equal segments.

The procedure is repeated, over the upper shelf on the wall, the ropes are tied with nodes. Do it need firmly to wall design It was impossible to deform either with their own hands, nor any other force action.
It turns out a pretty shelf on the ropes inside the stacks of trimming, it is possible to place it in any room.
Wooden shelf do it yourself, the simplest way (video)
Shelves from chipboard on the wall
Chipboard is a chipboard, truly universal Material For construction work. Plate sizes, its smooth surface allow you to do various designs Do with your own hands, including wall shelves.
Perhaps only sawing chipboard causes difficulties, since the material is impregnated by resins. The most suitable tool for working with chipboard is an electric jig.


Not superfluous will be the following tips for working with this material.:
- For wall shelves, laminated chipboard are often purchased;
- Often the shelves created by their own hands are sealed with a laminated film or paper that simulates various patterns (including natural);
- To fragilely twist screws and screws in the design of the chipboard, you need to get an electric drill;
- The shelves from this material are made to the kitchen often, as it is convenient to store containers with spices, cereals and pasta, jars with herbs collected by their own hands;
- In the hallway, such shelves serve as a place to store important domestic things;
- Such a shelf on the wall in the nursery can be the purpose of the bookstation.
In small storage rooms, which are included in the planning of many apartments, you can make the original shelves for household needs - do it yourself, quickly and cheap.
Round Shelves on the Wall
Round cardboard shelves for the kitchen or bathroom - a squeak of interior fashion. They are made, as a rule, from cardboard and plastic pipeWhich with their own saws of the saw is cut into circles at 10-15 cm wide. The edges of the circles are sanded emery paperAnd then the future shelves are painted in several layers.

It turns out pretty original round shelves, for the kitchen - very interesting option Registration. They can be stored:
- Kitchen towels;
- Various brushes and sponges;
- Decorative baubles;
- Packages with herbs for making tea do it yourself;
- Other beautiful kitchen devices.
In the bathroom round, unusual and very comfortable shelves There will also be at the wall to the wall: jars with cosmetics, towels, washcloths can also be stored in these pretty shelves.
How to make a round shelf (video)
Square shelves on the wall
Wall-mounted compositions from square shelves on the wall look great. Miscellaneous shelves are chosen in one color, and it is possible to contrast, and are combined into one wall pattern - small with large in one line, vertically or horizontally, diagonally.
Square shelves are usually small, they are difficult to accommodate many items. Most often these are different souvenirs, miniature vases, books.
Often these shelves decorate the objects of antiques, vintage little things.
And to make such interior decoration With your own hands, you can take advantage of standard materials. A tree in most cases is chosen by matte bright paint, covered with varnish. Or self-adhesive film decorates the surface of such shelves.


Little shelves on the wall
The kitchen wall often requires small shelves. They do not occupy space, do not lose the interior, but emphasize the general mood of the kitchen. Wall-mounted shelf You can use for the decor of the room.
If the regiment is on the kitchen, you can place it:
- Bright jars for spices;
- Culinary books and notebooks;
- Canvas bags with spices;
- Beautiful dishes.
You can make such shelves from wood, plastic, glass, and even stacks of painted and glued books.
Designer shelves on the wall
In the kitchen, such designs are rarely attracted, yet these exquisite things are more often decorated with a living room, an office, children's.

Now the shelves on the wall are especially high demand:
- Labyrinth;
- Asymmetry;
- Book shelves-flopper;
- Modules;
- Forged structures in olive style.
Some shelves seem to continue furniture, some - as if the protrusions on the wallpaper, so they are disguised as a wall. There are bizarre shelves that are made to order, often they echo with a drawing of a curtain or parquet pattern.
Bookshelf do it yourself (video)
Conclusion
Shelves in the kitchen, in the living room, or in the nursery - all of them can be made independently, armed with ideas from the Internet and their own fantasy. Of course, such designs will win from shop fellow, thanks to their hand-maid origin. Yes, and B. monetary equivalent They can do cheaper.
Examples of the shelves for home with their own hands (photo)


Sometimes, in order to make your interior design exceptional, it is not necessary to resort to the services of expensive specialists or buy an exclusive and dear furniture. After all, the design of the room interior is not a routine lesson, but the most that neither is the creative process of the transformation of space. Therefore, sometimes, to give a room a certain individual style, there is enough of the most ordinary and inefficient items, which their presence will dilute the monotony of the interior, making it more dynamic and functional. Such elements are racks and wall shelves, when choosing which it is important only to take into account the harmony of their forms and colors with the surrounding interior, without forgetting them about their main functional destination.
Types of shelves
The variety of types of shelves is very large today. If we take the material from which the regiment is made, they can be classified as follows:
- Glass and mirrored;
- Wooden (chipboard, MDF, plywood);
- Polymeric and plastic;
- From other materials combined with each other.
If we take the design, the appearance, structure and method of fastening, then you can allocate types:
Wall mounted
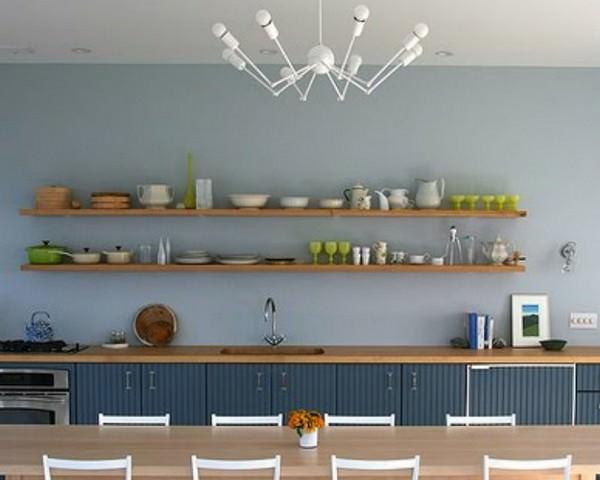
Wall shelves having a support to another stable furniture or floor. A positive feature of such shelves is that their special design allows them to withstand them quite a large load, which makes them an indispensable helpers in the house when the place is necessary for storing something overseas and heavy.
Most often, they are used for all sorts of equipment or storage of shoes in. These shelves occupy a minimum of space, which is also a positive feature, especially for.


Built-in "nois-shelves" in the design of plasterboard will be advantageous to look at any interior

Classic (rectangular)
Classic rectangular wall shelves are attached straight to the wall. Plus such a structure is what can be used both internal and external surface. The rear wall may be absent, leaving the wall open.
You can put various interior items to the top: vases, hours, photos, lamps, books, night lights and figurines. It is such shelves because of their functionality to add comfort to the apartment.


Simplicity and conciseness - the main batch of the interior in the style of minimalism
Multi-tier
Multi-tiered shelves on the wall look very original, and also combine many different functions. This type of shelves can combine the combination of various horizontal, vertical and inclined planes, which turns out to be very convenient in everyday life.
However, they often make simply the same horizontal planes, which, firstly, have no less beautiful appearance, and secondly, very functional. In this case, the will of fantasy should be given to do something at the same time convenient and beautiful, corresponding to both your preferences and the surrounding interior.


Corner
Corner regiments make it possible to use all empty corners in the apartment. Most often they are used in the bathrooms, but this type of shelves can be applied anywhere. They are reliable and stable. They can be made even transparent, which will look very modern.


Applying shelves in the interior
Wall shelves were integrated into our lives so much that it was already difficult to imagine life without them. There is no such place in the house where they would not find their use. People put them on, suspend on, screw the shelves to the wall, they mount them in the cabinets, embedded in the chest, install in the mezzanine and other hardly available places. After all, the shelves are not only an elegant interior decoration, it is also an extra room for storing things that always lack.
In addition beautiful shelves In the interior will help to properly arrange emphasis in the room, emphasizing his overall flavor. Even more attractive they will look if they are equipped with additional backlit in the form lED ribbonemitting soft light.


Special rules where you need and can be places - no. They can be installed anywhere. However, it is still desirable to take into account functional purpose Rooms:
- If it is a working office, then it is desirable to install them above the table, within the accessibility of the outstretched hand so that if necessary, you have not had to constantly get out of the chairs.
- The same method of placement of the shelves will fit for. Only in this case it is better to use open shelvesSince every hostess loves everything stood in love.
- Installing wall shelves in or designers are advised near the bed or above it. Thus, you can dilute the empty space of the wall.
As it was already above, in addition to the functional use, it is necessary that the wall shelves also brought aesthetic pleasure. For this, you can accommodate your favorite books and magazines, place photos of smiling relatives and close people to you who will give you nice memories and warm feelings.


Shelves are a decorative element Household, whose main task is to decorate the interior. This item always attracts attention, so it is very important that things placed on them were correctly and neatly placed.
- If you want everything to look harmoniously and tastefully, things need to be exposed in a certain order. For example, large items should not be located next to small, they are best placed separately and preferably higher, while small items will look great on the lower tiers of the shelves.
- We must not forget about the right. Each element must strictly match the overall stylistics of the room. Bright colors should not spoil the interior, but on the contrary, add it, competently bringing flower palette Rooms to perfection.
- The space of the shelves must be used, both in height and in the depth. Higher items should become behind low, while functional things need to be placed on the fore. However, it is not worth too climbing the space so that it does not create a hard sense of the decor. Ideally, the ratio of a free and busy area should be 50 by 50%.


Also, do not forget about the variant of symmetric placement of objects on the shelf. This method allows to achieve the desired effect of a certain completion of the interior.
Types of domestic shelves.
Wooden shelves and racks
Fashionable and modern wooden shelves have long replaced huge and uncomfortable racks and cabinets. These fashionable and practical elements fit perfectly into the design of any room. They are perfectly combined with any interior style, easy to operate and care, and are also a great place to store things.
Wooden shelves will become not only a beautiful addition to your interior, but also an integral attribute of modern life.
Buy or make it yourself
Today there is no difficulty to buy a ready-made pendant shelf both through the Internet and in any furniture store. The advantages of such a purchase are obvious:
- It is not necessary to spend time on the manufacture of a private wooden shelf;
- You can buy high quality certified products that will last long time;
- You can choose a rack, a wardrobe or a bed in the same color and design, because in stores suspended shelves - this is usually separate element Set of furniture.
- You can immediately choose the required size and floors of the shelf, thereby having received the confidence that it will endure the load you need.
However, not everyone will like the shop regiment, many prefer to make it yourself to get the original and unique thing.
Make a wooden shelf with your own hands is easy, especially since today there are a lot of ideas and master classes on the Internet.

Tree and metal - an excellent addition to the interior of the loft style

Wooden Shelf Master Class
There are such suspended shelves that you can hardly find on the Internet - it is wooden shelves from cutting boards or bars, which serves a piece of rope. They look very stylish and unusual in the interior. Here are the two most popular ways of their manufacture:
First option:
- Tell the board desired size, process it with grinding machine, or paint.
- On the sides on both sides at the same distance drill, we do a single hole with a diameter equal to the diameter of the rope, on which our shelf will hang.
- We do in the openings of the ends of the rope or rope and tie a reliable dense nodes so that the board keeps on them. Fix the shelf in the selected place.
Second version (multi-tier):
- As in the previous case, we prepare the boards, this time there will be for at least two. We will also need small bars different size Both thickness, they will become the side walls in the future model.
- Brucks from above and below, using self-tapping screws and special wood glue, fix the main boards. After that we give our billet for some time to dry out. The first tier design is ready.
- Similarly, using all the same material, we make the remaining cells of the future shelf. Carefully make sure that the internal angles are straight.
- After required amount The elements for the shelf are assembled using a rope or metal chain, connect them between themselves. The final stage is to install fastening for the wall. It is best for this purpose a carbine or anchor bolt with a hook.
As you can see, there is nothing complicated. The shelves can be painted under the color of the furniture, cover the mourn or decorate with decorative elements to their taste.


How to choose a suitable shelf
Agree, the hinged shelves in the interior always look spectacular. If, of course, choose them to choose and locate in the right places where they will look good. Now, fortunately, the choice of shelves is huge and their diversity is simply amazing.
The shelf is not only useful and necessary furniture, but also an excellent design element that can bring beauty to the house.
In order to determine the choice, let's remember which types of shelves exist:
- One of the most popular shelves is wall-mounted, which is attached directly to the wall;
- Also popular corn shelf, which is located between the two walls. This allows you to save place indoors;
- Floor shelves, which are placed on the floor are also very effective. And if they are also on the wheels, they can be moved at the right moment, remove or rearrange;
- The suspension shelves are equally popular, which with a variety of chains, cables, belts are attached to the wall or to the ceiling.
- Folding shelves will also perfectly help to save space, since when necessary, they can be folded.
- Shelf-table, the name speaks for itself, can take two types: actually the table and the shelf. it excellent option For a small room.
- If the area of \u200b\u200byour room allows you to use more placesThe racks are perfectly suitable here.
Yes, as you see a variety of shelves are great, and there are quite a lot of them today. You only stay to decide on the type of design. The main thing is not to clutter the shelves the entire room. They should go well with common view Rooms in which you plan to hang them.


If you need racks for storing important things: books, documents, photos, then try to make them stable and strong. Especially if they are intended for children.
Shelves in this case should not be located too low, as the children are very active and movable. Also do not make a choice in favor of glass shelves. And their corners should not be sharp.


As for the choice of shelves in. Here you can give the will of fantasy. Here the shelves - tetries, shelves of unusual forms, shelves, spirals, shelves will look good.
In the bedroom you can do by conventional classic shelves. Often, they will look over the bed where family photos can be placed.

Wall shelves for books and wood racks - are the last pussy Fashion

White color - is an excellent wall decor background
It will be better if the material from which the shelf is made will coincide with the tabletop material. This will give the kitchen room its specific style and grace.


If in the kitchen as the material for the shelves is used natural wood, its surface should be reliably protected by means of moisture resistant and temperature difference
Video: Beautiful shelves in the interior
As you can see, the types of shelves and their forms are abused, so the main thing is not to overdo it, but to focus on quality and durability.


The main thing is to remember that the shelves on the wall should look very good in the room for which they are intended. But no one forbids you to make something new and unusual in their design. After all, when good choice Wall-mounted shelves and racks, your room can play with new paints.
Standard cabinet furniture has long lost its relevance, it changed a variety of wall shelves made with their own hands.
The design of such interior items is not inferior to furniture in the style of high-tech or loft.

Materials for the manufacture are easy and accessible by price. They can find their application in any room or apartment.

With replacement old furniture Shelves, you can expand your space for something useful.


The most common types of wall shelves
Shelves equipment will provide additional comfort and comfort, they will be indispensable in the children's room, kitchen or hallway.
Make furniture on your own quite time-consuming and complex process, but to assemble the shelves forces to everyone, because for this you do not need some special experience. For this, any materials will be suitable.
The functionality of the shelves will exceed all expectations. In addition, you can easily place the decor objects and a variety of trifles, which will give your room a cherished look.

At present, open wall shelves are currently popular, their purpose depends on the location:
- for scarves and hats in the lobby;
- for souvenirs and dishes in the hall;
- for cosmetics and photos;
- for personal hygiene items in the bathroom;
- for textbooks and office in children;
- for seasonings and containers with bulk products in the kitchen.

Also the shelf can be intended for a specific subject, for example musical instrument, souvenir cold weapons, etc.
The aesthetics of the shelves must be observed in all rooms, whether it is a garage, storage room or a warehouse. Always nice to look at neatly arranged and folded things or tools.

Often it is the shelves that are subject to decor, they are able to attract the attention of the intricateness of lines and the unusual form.
But if you focus on the items that you want to demonstrate, the shelf must be weightless and transparent, for example, made of glass.

Classification of row designs
The correct distribution of the load on the wall and the regiment is one of the most important aspects When assembling them. Very often, the walls are fixed on the wall that are not intended for this, such as shelves for shoes or large flowers.

At the same time, the main thing is to correctly select the material and fastening, which will withstand the weight of the objects placed on the shelves. There are several types of wall shelves, differing in their design:

- open and closed;
- cantilever racks;
- corner and straight;
- with the rear wall or without it;

- multi-level;
- with straight corners or rounded;
- a variety of geometric forms;
- using different materials (Glass, Mirror, Tree, Metal, Plastic).


Types of fasteners
Fasteners perform not only their direct purpose, but they themselves may be subject to decor, for example, sidewalls, made using art forging, Macrame attachments, a variety of ropes, belts and cables.
You can safely lock the shelf on any surface can be dowels, anchors, brackets.

Selecting room for homemade shelves
As mentioned earlier, the shelves can be placed in any room, even in the nursery they are intended to create comfort and decor. With their manufacture, use children's theme.

The living room will help rationalize the space and save you from unnecessary bulky old furniture.

In the kitchen, in the hallway and the bathroom can be an independent piece of decor, as well as perform their direct functions, which ordered your life.

If you decide to equip the wall shelves with your own hands, the order of action is very simple.


First of all, it is necessary to remove the size from the place where it will be placed, make an outline, choose the material and the type of fastening with the workload.


The final stage of the work will be finishing and grinding your shelf to give her the most aesthetic appearance.

It will only be left to place favorite items on it and enjoy the fruits of their works.

Photo shelves do it yourself


In the home setting there are objects from which you can refuse and the interior itself is not injured, neither the appearance of the room. However, there are objects that can not be replaced, otherwise functionality is lost, the style suffers and the situation seems unnatural. We are talking about wall shelves, which can be made with your own hands using a fantasy and a little effort.
What the shelves are
Shelves are not only a major storage location of various household items, collection or underscore. They themselves complement and design, and are reliable and spacious storage of essential items.

One of the outdated definitions tells that the shelf, it is attached to the wall, mounted in it or a closet horizontal board, which is serving for storing items (books, souvenirs or dishes). Not everything is so simple now, as was ever. Shelves are not always horizontal, not necessarily attached or mounted and not completely wooden boards.
By arrangement, the shelves are divided into three main categories:
For basic materials, shelves are divided into:
- mDF shelves, chipboard
- shelves made of gypsumolok
- wooden
- metal
- glass
- plastic
- combined (at least two material)
It is important to understand that this list is not a dogma. With a developed fantasy, it is possible to make a shelf from egg wavy or a cardboard box. With no functionality, nor the relevant designer solution is lost.
According to the design features, the shelves are divided into:
- console
- with rear wall
- with side walls, one wall, without them
- horizontal
- vertical
- multi-tier
- with a shift door
- straight, inclined, radius
Views
For a more detailed understanding of the attachment methods, this material follows in more detail. So it will be easier to decide which type of installation to choose for your solutions.
Consider these three categories.
Wall shelves

Wall shelves
The wall is considered a shelf hanging on the wall. There are two main ways to fastening it. it traditional way With the use of racks and brackets that may have a decorative appearance, the second (secret) method is used to conceal in general all the mounting elements that serve the bracket, axis and suspension.
Corner shelves

Corner shelves
Such shelves are mounted in the corner of the room to two adjacent walls, as in turn, they are divided into the shelves for the inner and shelf for an outer angle over 180 degrees. The fastening of such shelves is carried out in the same way as the usual walls, with the exception of rare cases of the use of the ceiling as a support. A distinctive feature It serves increased labor intensity compared to the first method.
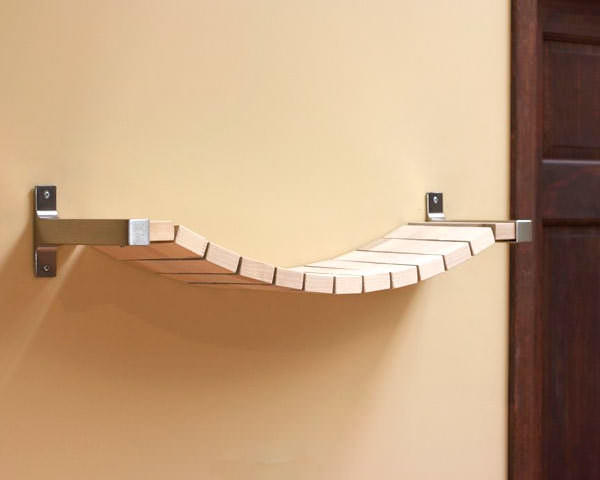
Suspended shelves

Suspended shelves
This type of shelves significantly expands the capabilities of design solutions. As a rule, the mount is carried out directly to the ceiling with cables, chains and ropes. A dowel is mounted in the ceiling, which screws up a steel hook with carvings. When drilling a hole under the dowel, a small deviation is allowed from direct corner. This increases friction on fasteners and the reliability of operation increases.
Feature

To make a "intricate" shelf you need to purchase suppnitious tools
If everything is clear on the material of the shelves and other classifications, then some difficulties may arise with toolrition. Therefore, for the manufacture of something extravagant, you will need a visit to the construction market in order to acquire a tool.
Modern building market is not only construction Materials and tool. This is another extensive sphere of services. Therefore, if the cost of the service is significantly less than the price of the instrument, it is worth thinking about this factor and take the right appropriate solution.
Another aspect of complexity lies in personal skills. Of course, cut wood or plastic shelf Can be ordinary hacksaw without buying an electrolovka. But not every wizard can do a qualitatively radius shelf of the glass independently; Even when the edge sticker on the sheet, the chipboard may occur.
Based on the feasibility and personal experience In the manufacture of products from selected materials, you should knowthat the construction market is ready to perform a number of work for small money. This is: Crucified MDF sheets, chipboard, from wood, plastic, radius and straight cutting glass, drilling holes according to customer drawings, metal cutting along the contour and others.
Understanding what you need to do, from which it is necessary to make, considering the interior of the room, you just need to approach it is advisable to solve this issue and do not litter spaces with extra tools. But further production and addition to the interior can be made independently by purchasing the necessary material.
Collect the necessary tool
Regardless of which material for the manufacture of the shelf will need, you should collect a tool that will be needed in the manufacture and installation finished design. For installation, either a perforator, or a drill or even a screwdriver, depending on the material of the room walls, is required.

It is also necessary to prepare:
- screwdriver or drill
- electropolitanzik
- metal hacksaw (wood)
- brackets (usual or decorated)
- self-tapping screws (nails) or anchors
- paint (varnish) for wood (metal)
- sandpaper
- level (Water or Laser)
- roulette
Depending on the shelves, the tool can be supplemented with the listed assortment depending on the requirements for the final result. If the question becomes controversial, return to the point of appropriateness.
When choosing paints, it is necessary to take into account their composition and drying time. Oil paints perhaps more cheap MaterialBut dried for a long time, which can lead to some inconveniences while waiting for the final result. Also wooden, plates chipboard And MDF costs some time after the purchase to hold in a warm dry room in order to evaporate moisture.
If the manufacture of a wall shelf occurs in the apartment, you need to think about the time of work and days of the week, so as not to cause inconvenience to your neighbors. Especially it concerns final stage Works - installation, in which you have to use the perforator and drill the walls or ceiling of the room.
See also:
- How to make a children's house with your own hands? Give children your fabulous corner for games (80 photos & video) + reviews
- How to make a dog for a dog with your own hands: The dwelling device in the yard and in the apartment. Drawings, sizes and original ideas (55+ photos & video) + reviews
Secure work measures - the key to success in any case
Unfortunately, not everyone exacerbates attention at this point preparatory operationsthat sometimes leads to sad consequences. If such significant efforts are attached to implement creative ideas, then why not slow down the look at that these creative dreams do not turn into a tragic reality? In addition, it is elementary and practically no expensive.

When it comes to the power tools, it is worth the fact that 220 volts are not just an unpleasant shaking, but a possible death. Therefore, work follows in dielectric shoes, previously inspected cords and extension cords for the presence of bare areas. Nobody will be difficult to use the tape and eliminate the danger.
When working with an angular grinding machine, it is reasonable to stock up construction glasses with yellow filters. The cost of their acquisition will be a bit, but this will serve as the key to the chips of the eyes. Do not ignore and protect your hands - gloves not only protect the skin from cuts, but also help to avoid unwanted spots when painting.
When installing the design, if necessary, use the services of an assistant. This is important especially if it is required to fix the product at the height, here it is not necessary to buy a construction helmet.
Security is a process, not the result
Bruce Schneier.
The most difficult question is from what to do the shelf

"Classic genre" as the main material
If everything is more or less clear with the safety technique, then it is often difficult to choose such a variety of materials. For greater understanding and practicality, you should consider some features of each of them.
- Wood (Chipboard, MDF) - leading material on the market in the manufacture of furniture. In plus its low cost. In the work it is easy to process any tool and long service lines at low humidity.
- Metal - production often requires availability welding machine. The material has a lot of weight, but great wins when combining with other materials.
- Plastic - Like the tree is quite cheap material, easy to work. Compared to the tree, it has a significant plus - it does not form mold at high humidity (loggia, balcony, bath, toilet).
- Glass - Very stylish and fashionable material. It can be very profitable to play with space at small areas of the room using mirrors. Requires glass cutting and diamond drill to drill holes if necessary.
- GLC - the cheapest of the above materials. Not resistant to high humidity. It is often used in the manufacture of niches in the wall, which subsequently serve the shelves.
It is natural that the choice of material for manufacture should not be determined only by the value of the material. Important factor Playing and the opportunity, and the skills of the master. This is the case when excessive risk will cost certain unforeseen costs when the blanks are damaged.
Construction and purpose of manufacture
Earlier it was said that shelves are wall mounted, suspended and angular. Each of them differs from another way of installation, which also affects the design. Moreover, when combining the material, the functionality of the finished product increases. You can make a design closed type with opening doors where products can be stored; for open type The shelf wins its openness to install souvenirs or vases with beautiful flowers.

In any case, at the first stage it is necessary to understand for what purpose the design will be the design, which to choose the material and choose the tool. Such a sequence will help to resolve the issue with the design decision and will reduce the time for preparatory work.
Who is not thinking about distant difficulties,
Sit down close trouble
Confucius
Getting started with the selected material
Wood
An ordinary pine or fir serves the working material (fir has a lighter shade). A good help in the work will be an electric grinding machine.
When buying should be carefully inspecting the material. The tree should not be rotten, cracked or have a lot of bitch. For room temperature From such bitch can sometimes be resin, which will lead to additional difficulties; Wood moisture should also be taken into account.

After sawing the material on the necessary dimensions according to the drawing, it should be given a smooth and smooth surface. To this end, we use pre-prepared emery paper or grinding machine. First used rough paper No. 40, then No. 80 and final finishes are given No. 120.
Chamfer on the edges too need to round. If, after squeaking of the material, small cracks manifested themselves, we apply a spacure on the tree. After drying the putty, the restored area also needs to be treated with emery paper.
Next for installation to the installation site, you should drill holes in the required depths. They are needed to prevent cracking of the workpiece in the process of screwing into the material of fastening screws or screws. The diameter of the drill is chosen somewhat less than the diameter of the stem of the self-press or Eurovint.
After drilling a tree, the necessary shade is given or color. To save wood texture, it is covered with a verse or similar materials and then paint with a transparent varnish (or without it).
Manufacturer Design Bookshelf

As an example, the manufacture of a book shelf in the form of a labyrinth. After the operations described in detail, it is necessary to proceed to the construction assembly, pre-enjoyed the sections of different shades.
For reliable contact, the construction glue is used on a tree, additionally compress the surface of at least two Europeans.
It is important to know that ordinary self-tapping screws do not guarantee sufficient strength and reliable operation of the design.
To preserve aesthetic appearance, the glue must be wiped. After drying the glue, both sections of the composition are applied by level right place. Next, the pencil marks the fasteners and holes under the dowel, then the shelves are attached to the wall.
Such a labyrinth is an outstanding example of creativity. If you wish, you can complicate the design with additional sections and secure the real labyrinth puzzle on the wall, performing and entertaining the role for guests.
Making a decorative sample for giving coziness indoors

The shelf itself is manufactured already described above the method of necessary sizes, but the mounting to the wall will be completely different. You can use chains, twine or leather belts.
If you take straps, then their cuts should be even. For fastening the belt to the wall, it is folded in half and drill a hole for 1.5 - 2 centimeters from the edge. The same actions are made with the second strap, the length of which is calculated at discretion individually.
Via building level On the wall make two marks at a distance, less shelves on 10 - 15 centimeters. Then in the noted points drill holes for nylon dowels. In each of the belts, folded twice the screw, which is screwed into a dowel (or driven, if it is a dowel - a nail fast installation).
Already a fully prepared shelf is saturated in the loops of the belts and is set as much as possible in the level. In order to avoid shifting the shelf in the loop of the belt from the reverse end, adjacent to the wall through the belts, screws the screws.
Combination colors of chipboard and edges
Examples described above can be performed not only of wood, but also plywood, chipboard or MDF. The surface of emery paper should be processed only in the places of cut. At home, chipsets are formed on the slabs on the slabs, which are easily painted with special wax shallow suitable color after pasting edge.
The melamine edge is available in a wide color range and glued to the end of the plate using an ordinary iron. The edge color is not necessary to select the same color plate - it is advantageous to combine, using color gamut premises.
Rigid fixation of glass billets in fasteners
For the manufacture of glass blanks, certain skills of work will be required in this specialization, glass cutter and sandpaper or diamond gradually for grinding the sharp edge. The process is quite complex without adequate qualifications, therefore it is easiest to order the workpiece of professionals, and the rest of the work is performed independently. Glass shelf order any form.
To mount a conventional rectangular shape, it is required using the level to mark on the wall 2 points for drilling. Next, it all depends on the selected fastener element. You can use hard fastening of glass to the wall or simply apply the shelf to chrome brackets.
IN drilled holes Dowels are inserted in the wall and special holders or aluminum profile are attached. With rigid fixation, the shelf is inserted into the rubberized grooves of the fasteners, is exhibited smoothly and fixed.
Plastic shelf
For the manufacture of a conventional rectangle or square will need a plastic sheet necessary thickness Depending on the intended load. It should be noted that plastic material is quite flexible. However, it has a great advantage over the tree and derived from it with materials - it is completely not afraid of moisture.
For sawing the workpiece we use the hacksaw with small tooth or electrolovka. When manually sawing the saw must be kept under sharp angle. Plastic is fairly easy to mechanically process.
After cutting, it is necessary to handle the edges of the sandpaper and remove the chamfer. Depending on the selected installation method, it is possible to drill the holes for the brackets, but in order to avoid this you can use the fasteners from the previous example.
Since plastic is not afraid of moisture, it is rational to use in rooms with high humidity: balcony, loggia, bathrooms. In the rooms it is practical to use for flower supports where it is possible to spray water from pot. When installing plastic ceiling Or the window sill is not worth a hurry to throw up trimming - they will help to save on the material.
Fantasy crosses the border

"Advanced" technologies in everyday life
It is worth a details on one of these solutions and take advantage of exclusively by gear materials.
The bathroom has a very easy and quickly to build a beautiful product for towels and washcloths, almost without spending no means. Enough to choose several five-liter bottles from drinking water And search for a trap cord with a length of about 8 meters. You will also need fasteners and adhesive gun.
Depending on the needs, 6-8 eraser bottles are taken (in this case of the square cross section in the diameter). A narrowing segment of each bottle on the planned line with a marker is cut off with a girlfriend tool. For a reliable clutch with each other, a glue gun is used.
In the resulting block on external corners An ordinary knife or scissors are done by holes in which a caproic rope. Calculate the length of the cord can be clearly. Using the level there are two points and after drilling a dowel with hooks, where and tap the edges of the rope.
Such a block is universal and can be applied not only in the bathroom. If you wish, you can increase or decrease the number of compartments, change their shape and location, as well as the required volume of each cell.