How to glue the wallpaper on the outer corners. How to glue non-woven wallpaper in corners
The most in a simple way renovation of the interior of the apartment is pasting the walls with wallpaper. However, when performing work, many face some difficulties. The greatest difficulties are caused by gluing wallpaper in the corners. In the indicated places, during repairs, many make mistakes that spoil general form updated finishes... It is enough to familiarize yourself with the algorithm that prompts the correctness of such actions, and similar problems will no longer occur during subsequent repair work.
Wallpapering in corner areas
 The main difficulties faced by apartment owners when pasting walls finishing material, are uneven outer and inner corners, often having uneven geometry... All this not only complicates the gluing process decorative material, but also significantly increases the repair time, which is hardly included in the plans of any person.
Ultimately, the owners of the premises are forced to additionally process the surface of the walls. Moreover, even the subsequent use quality materials does not guarantee that the corners will be perfectly even. This gives the impression that the work is done unprofessionally and spoils the overall appearance of the room.
Few know how to properly glue wallpaper in the corners of a room. In order to correctly carry out this process, you must follow a certain sequence of actions. Before that, you need to remember the following:

 Once the work has approached the next wall joint, the strip of wallpaper is trimmed so that it is glued to the adjacent wall just a few centimeters. Then the wall processed adhesive solution
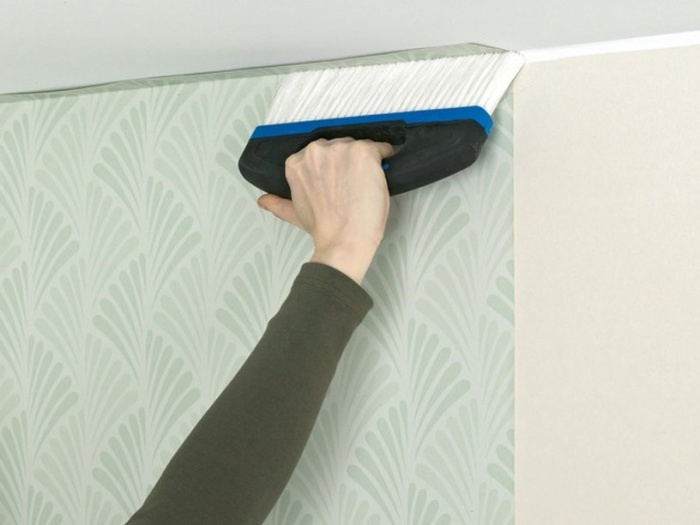
... After the strip is fixed on the wall, you need to iron it rubber spatula or press down with a roller. It is important that no folds remain at the junction of two walls, even if an uneven bevel of the edge of the strip appears on the adjacent wall. If the material is very dense, shallow cuts can be made with inside finishing paper material... In this case, the canvas will better adjoin the surface of the junction of the walls.
Once the work has approached the next wall joint, the strip of wallpaper is trimmed so that it is glued to the adjacent wall just a few centimeters. Then the wall processed adhesive solution
... After the strip is fixed on the wall, you need to iron it rubber spatula or press down with a roller. It is important that no folds remain at the junction of two walls, even if an uneven bevel of the edge of the strip appears on the adjacent wall. If the material is very dense, shallow cuts can be made with inside finishing paper material... In this case, the canvas will better adjoin the surface of the junction of the walls.
 Then on the wall, where there is a smaller part of the wallpaper strip, a straight line is drawn from floor to ceiling using a level or plumb line. In this case, you should step back from the corner by the width of the roll. Next, the glue is applied to the wall, and a piece of strip is applied to the existing line. At the same time, its edge will overlap the uneven edge of the previous section of wallpaper.
When both strips are fixed, it is necessary to determine the place of the smallest overlap. It should be divided in half and from the middle draw a straight line along the entire height of the corner, then cut it with a sharp knife or blade.
 The top piece of material must be carefully removed, folded back and the cut off part of the bottom strip must be removed. Then both edges of the wallpaper are smeared again glue, close and gently smoothen with a roller. The result should be a perfectly even angle, and there will be no sagging or crevices at the junction.
When gluing wallpaper in the corners, you need to wait some time after fixing it to the wall. Otherwise, the material wet from the adhesive will not be able to cut evenly. As you can see, there is nothing complicated in this process, if you follow the algorithm
.
Such angles are much less common in rooms. The work on pasting them with wallpaper occurs in the same way:

 It must be remembered: even in the case of perfectly even corners, there is no need to strive to wrap the whole canvas. This is most often leads to wrinkling and irregularities, and there is a high likelihood that the material will bulge and bulge ugly. As a result, you will have to carry out renovation work repeatedly, which requires financial costs. The whole canvas is wrapped only when wallpapering on window or door slopes.
Cutting off a part of the web will not lead to a large consumption of wallpaper, therefore gluing wallpaper to the corners will not require an increase in spending. In general, the work is simple, but there are small nuances... If you take them into account, everything will be done correctly in accordance with your own requirements. If you are not confident in your abilities, it is better to entrust the work to professionals.
It takes ~ 2 minutes to read

Save
Another plus in favor of choosing wallpaper is the ability to independently perform simple work, getting savings and pleasure from the result. However, the surface of the walls is uneven and many are stopped by the question: how to glue wallpaper in the corners?
The glued canvases repeat the unevenness of the walls, hiding some of them. But at the corners it happens differently. Even non-woven wallpaper, which stretches easily like a fabric, when dried on uneven corners wrinkle, folds, distortions appear. Later, they peel off in these places. To prevent this from happening, you should know how to glue them correctly.
Preparing wall corners

Save
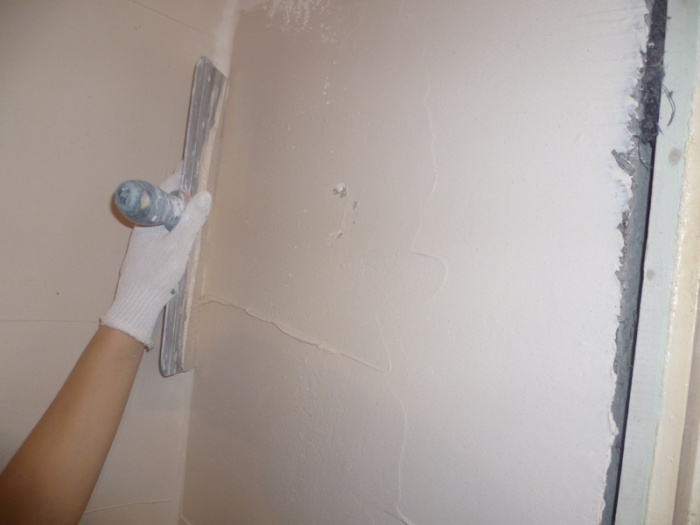
Even if the walls are plastered along the lighthouses and high-quality plastered, this does not mean that everything is in order with the corners. Shallow grooves and grooves are unacceptable, they are putty. Ideally, when puttying and subsequent sanding, the inner corner is given a minimum radius of curvature.
This will completely remove excess glue and air during pasting. When preparing the outer corner, be sure to use perforated corner... This will help create straight lines and properly wallpaper it, protects against plaster collapse in case of light blows that occur, for example, when furniture drifts.
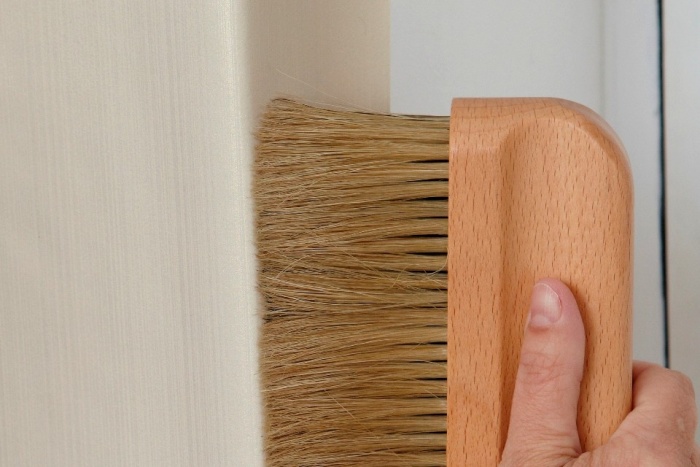
When applying the primer to the walls, a roller is used. Use a brush for thoroughly priming corners. Choose the order of the sheets and decide where to start. It may be more convenient to start at the edge of a window or doorway... Start by choosing a wall with a less noticeable angle, such as where the cabinet will stand.
Pick up a narrow strip of wallpaper cut from a roll to the width. Walk with her along the selected wall, trying the options for the location of the sheets. When choosing the option of how to properly glue the corners with wallpaper, strictly follow the rules:
- sheet joints in the corners are unacceptable;
- no matter how even the corner may seem, do not plan to paste over it with a solid sheet;
- instead of an overlap sticker, use an overlap sticker followed by a double cut.
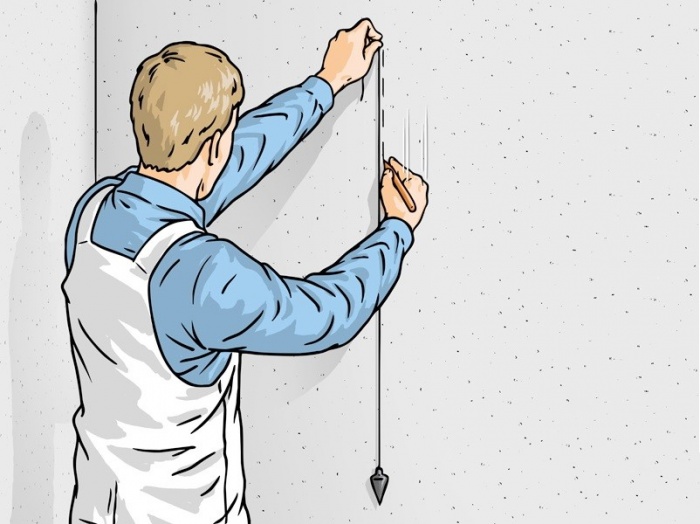
Shifting the starting point, select the location of the first panel on the wall so that corner walls accounted for approximately the middle part of the next panel. Using a plumb line and a sharpened pencil, mark a vertical line on the wall. It is not necessary to draw a solid line, which can later become noticeable.
You can apply barely noticeable marks a centimeter in length every 20-30 cm and draw a line not from the very junction, but, say, one centimeter to the left or to the right, so that later this line will close. Such an inconspicuous line will serve as a reliable reference point and will not show up later at the very junction, as it sometimes happens.
Gluing the first canvases
Recall the sequence of the sticker:
- Open the wallpaper with or without pattern selection (according to the instructions in the roll).
- Apply glue to walls, canvas, or to walls and canvas (according to the instructions).
- If the sheet is glued, fold it over to prevent the glue from drying out prematurely.
- Stick the canvas on the wall from the ceiling downward, guided by the vertical mark or with the extreme edge of the already glued canvas, aligning the pattern.
- Carefully remove the remaining air with a roller or brush, smoothing from the center to the edges.
- Using a wide spatula with a stationery knife, trim the top and bottom of the panel, smooth it again with a roller, if necessary, coat with glue and smooth again.

Save

Save
Save
How to glue the wallpaper: inner corners
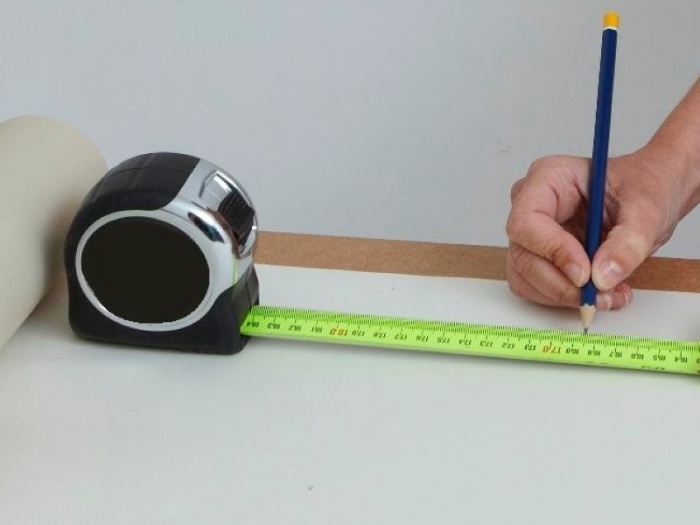
- We cut out a strip from a single piece, 5 centimeters wide than the distance from the last piece to the corner (measure at the ceiling, in the middle and at the floor, take the largest one), the remaining piece will be glued after the first.
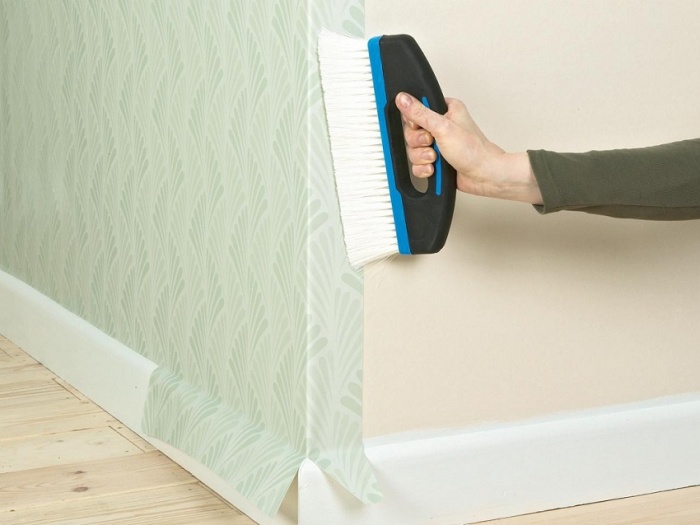
- We coat with glue (according to the instructions for the wallpaper) and glue the prepared canvas, smoothing it with a roller or brush, first on the wall, then in the corner and then a strip on the next wall, removing excess glue and air.
- In places where the wallpaper wrinkles noticeably, we make horizontal cuts 5–10 cm apart.
- Using a plumb line, draw a vertical line for sticking the remaining piece of canvas so that it is glued with an overlap of 2 cm on the previous canvas in its narrowest part.
- We coat and glue the remaining canvas, aligning the smooth edge with the applied vertical line, smoothing out the remaining glue and air.
- We are preparing a knife, for this, before each cut, we break off the tip of the knife according to the marks on the blade.
- Using a knife and a wide spatula, we cut without tearing, in one step, both layers of the canvas so that the cut passes a centimeter from the edge of the second strip.
- We remove the cut off excess, if necessary, bend the edges and finish with glue, roll it in with a roller.
After double trimming, an inconspicuous joint remains. If it doesn't work the first time, remove the glued strips and repeat with great diligence. It will definitely work, and you will know how to properly glue the wallpaper in the corners.

Save
Pasting the outer corners of the room is carried out in the same order and in compliance with the same rules: we carry out the markings so that there are no joints and do not try to paste over with a solid canvas.
After gluing the first corner piece of cloth, the rolled-up part of the wallpaper must be at least 5 cm. The next cloth should be glued along the markings so that the overlap in the narrowest part is at least 2 centimeters. Save
Useful expert advice
- If you find an air bubble and it does not smooth out, pierce it, remove the air, pour a little glue with a syringe and smooth it with a roller.
- Sometimes, when trimming from above, below or at the window and doorway, the wallpaper is chewed. Let them dry a bit and cut again. Perhaps the knife is dull and it's time to change the blade.
- Avoid drafts in the room, this can lead to premature, uneven drying and flaking of the sheets.
- Unplug and frame outlets and switches in the room ahead of time. You can put it back in place immediately after pasting.
- When gluing to problem areas, add 10% PVA glue to water while preparing the glue.
- If old wallpaper is difficult to remove, wet it with a primer using paint roller... Remove immediately before the primer is dry.
Video: how to glue wallpaper in the corners of a room
Glue modern wallpaper- it's not difficult. Even a renovation novice can handle this. But, if it is easy and simple to mount canvases on smooth walls, then you will have to tinker with the corners. It is the corners that become the stumbling block that slows down the whole process and requires a lot of effort. More often than others, non-woven wallpaper or vinyl canvases on a non-woven base are used in the repair.
Material features
Fully non-woven wallpaper is easy to install and durable. They are made of non-woven cellulose with the addition of synthetic components. The cellulose component gives the wallpaper elasticity and breathability, while the synthetics add strength. These wallpapers are much harder to tear than paper based vinyl, for example. In addition, they do not wrinkle at all, no bends remain on the surface.
The same properties are possessed by vinyl wallpaper on a non-woven base. The only difference is that the canvases do not "breathe", since vinyl does not allow air to pass through. Therefore, before gluing them to the walls, it is necessary to treat the surfaces with an antibacterial primer or use glue with fungicidal additives. These measures will prevent mold and mildew from growing.
Non-woven wallpaper has a number of advantages over other coatings:
- Their feature is good adhesion to glue and to any wall material. Such canvases do not need to be treated with an adhesive, it is applied only to the walls. The same goes for non-woven vinyl.
- A useful quality of non-woven fabric is its tensile strength. The material does not shrink after the glue dries, the dimensions of the canvas do not change. Thanks to this, the joints do not diverge, and the seams between the stripes remain invisible. This feature is especially useful for wallpaper intended for painting, since painting makes all wall defects even more noticeable.
- Non-woven fabric cannot be washed, but can be painted. Cellulose-based vinyl can even be cleaned. detergents, it also lends itself well to staining.
- Due to the bulk of the cellulose fibers, such wallpaper evens out the walls, hiding small irregularities. Durable synthetic components resist tearing, which allows non-woven wallpaper to reinforce walls. They prevent cracking by holding the plaster in place.
- Wallpaper on a non-woven base can be easily removed, their two-layer nature allows you to leave the substrate on the surface and use it as a base for new coatings.
Installation of wallpaper on the walls
You can glue the wallpaper in several ways (you can easily familiarize yourself with it from a photo or video). One of them involves the initial pasting of all smooth walls, and then the corners. Other masters advise starting from the most prominent corner in the room. There is no consensus on this issue - everyone can glue at their own discretion.
Preparing the walls is a must for any method. The old coating must be carefully removed, the cracks must be putty. Then the walls are covered with a special primer or wallpaper glue... Only after the primer has completely dried do they proceed to pasting the walls.
At the point of reference, a vertical line is drawn, this must be done with a plumb line or building level... The first strip is cut from the roll, the length of which is equal to the height of the wall plus 5-7 cm. The wall is carefully coated with glue and wallpaper is applied. The canvas is leveled with a plastic spatula or wallpaper roller, focusing on the vertical.
Advice! It is better to use a special glue with a colored indicator - in liquid form, such a composition has a pink tint, and after drying it becomes colorless. This allows the adhesive to be evenly applied to the wall without leaving any gaps.
At the baseboard and under the ceiling, the wallpaper is cut with sharp scissors or a construction knife. Move on to the next lane.

How to glue wallpaper in corners
In order to properly paste over the corners, you first need to deal with their types. Angles are:
- Internal - each room has at least several of these corners (there are four in the standard layout). Highly important factor is the correctness of these sites. If the corner is uneven, has drops, "sinks", the method of wallpapering will differ from the standard one.
- External corners in apartments began to occur more often with the appearance of drywall - these are various niches, arches, columns and others decorative elements... This also includes door and window slopes, if, of course, it is envisaged to start wallpaper on these areas.
The easy way
The easiest way is to paste over an absolutely even corner. Unfortunately, these are quite rare. These are either plasterboard structures, or walls prepared for painting (plastered perfectly smoothly and evenly).
In this case, both in the inner and outer corners, the wallpaper is glued in the same way - it is simply wrapped in a single piece of wallpaper. The main thing is not to stretch the coating, after drying it can return to its original size and shape. If there are small wrinkles on the wallpaper, it is allowed to make several horizontal cuts in the corner. This will help to level the finish, and the cuts will not be noticeable after drying.
Important! No matter how even the angle is, it is better not to use the method of pasting it with a solid sheet, if it joins with outside wall... Condensation occurs more often in the corners near the outer walls - the wallpaper can come off and deform.
Standard method for gluing corners
It is safer to glue the wallpaper in the corners using the "overlap" method. Its essence is as follows:
- After gluing the adjacent wall at three points, measure the distance to the corner.
- For the largest of the three values obtained, the strip is cut off - its width is equal to the largest figure plus 2-3 cm for overlap.
- The wall is well coated with glue, especially paying attention to the corner (it is better to use a brush).
- The prepared piece of wallpaper is applied to the corner, aligning the joint with the previous canvas.
- The overlap formed on the adjacent wall is carefully pressed, tucking the wallpaper into the corner with a plastic spatula.
- For a tighter fit, the edge of the wallpaper can be trimmed - short horizontal cuts are made every 5 cm.
- Trim the bottom and top edges of the wallpaper using a metal trowel and a sharp knife.
- From the narrowest overlap point, they retreat about one centimeter towards the corner, make a mark.
- Focusing on the mark, draw a vertical line in this place using a plumb line or level.
- Prepare the next strip (if necessary, select a picture).
- A strip is applied to the wall greased with glue, aligning its edge with the previously drawn line in the corner.
- Level the strip, expelling air and excess glue. Cut off at the ceiling and at the floor.

Corner processed! Go to pasting flat wall until the next corner - the procedure is repeated. In this way, you can glue the outer corners with a variety of wallpapers.
Advice! Considering the considerable thickness of the non-woven wallpaper, the overlap may be too noticeable.
In this way, you can paste over those corners that the furniture or curtains will hide, and choose a different method to finish the rest. You can also try to cut only upper layer wallpaper.

The slopes do not have to be glued with wallpaper, the video shows how they can be beautifully trimmed at the corners:

Corner trimming method
If the walls are supposed to be painted, there should be no overlaps on them. The paint will make the thickening of the wallpaper too noticeable; another method is needed here. This method is suitable for both internal and external corners.
The work is performed in the following sequence:
- The first seven points from the previous instructions are repeated - the strip is glued with an overlap on the next wall. Only in this case, the overlap is made more - 5-7 cm.
- A distance equal to the width of the roll minus one centimeter recedes from the corner.
- Using a plumb line or level, draw a vertical line at this point.
- Cut a strip from the roll and apply it to the wall greased with glue, aligning the edge with the drawn strip.
- The second edge is applied to the previous strip with an overlap, the wallpaper is pressed and smoothed.
- Carefully push the wallpaper into the corner with a spatula, leveling everything again.
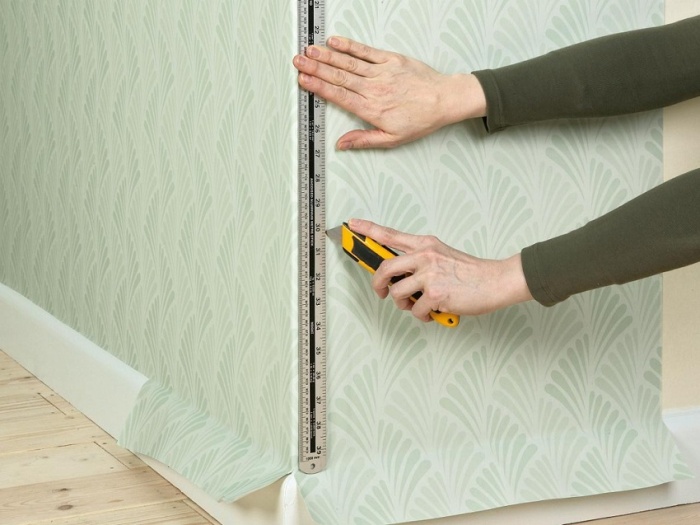
- In the middle of the overlap, a metal ruler is vertically applied, a very sharp knife is taken and a line is drawn along the edge of the ruler without tearing off. It is very important that the line is drawn in one motion.
- Remove the trim of the upper fabric, fold back the edge of the lower one and also remove the excess.
- Both edges are greased with glue and folded end-to-end. You can slightly tighten the canvas in the right side so that there is no gap or overlap.
- Rolled with a roller for joints.
This method helps to make the connection of the canvases invisible. It also works well on outside corners, in niches and on slopes.
Advice! It is better to use a small metal spatula 10-15 cm instead of a ruler.
Due to the unevenness of the corners, the ruler may not fit snugly against the wall, the cut will turn out to be crooked. The spatula must be moved along with the knife, avoiding breaks in the cutting line. How to properly crop the wallpaper in the corners can be seen in the video:
In the article you can find the answer to the question of how to glue wallpaper in the corners. It is worth treating the finishing process with all responsibility, irregularities can be conspicuous, thereby spoiling the impression of a freshly made repair.
Step-by-step instructions for gluing inner corners
When finishing the main problem I can be uneven walls and the resulting folds in the wallpaper. It should also be borne in mind that with curved walls, the joints of the wallpaper can diverge.
How to glue the outer corner (outer)?
The protruding corner must be pasted over by analogy with the inner one, but there are slight differences that must also be taken into account when working.

What if the corners are uneven?
Uneven walls frequent problem old houses. Before starting to glue the topcoat, it is advisable to carry out preparatory work and put the surfaces in order. If the corners are visually even and do not require overhaul, it will be enough to walk with a hard cloth, removing small bumps and dust. If the irregularities are visible to the naked eye, then it is better to do a little work before you start gluing the wallpaper.

Features of gluing meter wallpaper
Wide canvases are convenient in that they allow you to finish with fewer seams on the surface. It is more difficult to glue them, but the result is worth it.


How to join at the corners?
It would seem that such a trifle as gluing corners in a room can completely ruin the whole work if done incorrectly. And if there is also a pattern on the wallpaper that needs to be customized, then you should approach the decoration responsibly.

How do I fit the drawing in the corners?
It is important that the drawing is continuous and even around the entire perimeter of the room. To do this, you need to correctly combine the pattern, and cut off the excess.

- The strips are also glued with an overlap. Leave an allowance for both walls.
- With a plastic spatula, the wallpaper is pressed against the corner.
- After gluing the second sheet, the wallpaper is trimmed according to the pattern. This method refers to wallpaper with a small pattern. A large pattern may require trimming at the edges.
Before gluing, you must first prepare the material for work by spreading the covering on the floor and studying the drawing. Segments are cut off after fitting the pattern in height.

Features of cutting wallpaper in the corners
In order to get a perfectly even seam in the corner, you need to properly trim the excess.

- After the wallpaper is glued to the wall, an even metal ruler is applied, it can also be a spatula or a rule. To make the cutting line even, you can use a level.
- With a sharp clerical knife, cut off the excess along the edge of the ruler, after which the top layer of wallpaper will come off.
- Gently pry on and take out the bottom layer of wallpaper, remove it in the same way.
- The canvases are coated with glue and pressed tightly to the corner. As a result, the coating adheres tightly to each other.
Gluing wallpaper in the corners is not so difficult, but special care and accuracy is required. Today there is a finishing method that allows you to do work without joints at all, namely liquid wallpaper. They are applied in an even layer and do not require such difficulties as fitting the pattern, width, precision in rounded areas and other nuances.
Wallpapering in the corners is the most difficult one. Here, both the material itself and a properly prepared plane are important. We will consider how to glue wallpaper in the corners in this article. Specialists' recommendations will also be given. On the video and photo, you can see and understand everything yourself.
For perfect result, without cutting the wallpaper at the fold, the corners in the room should be even. In such a situation, all the work will be to process the walls and wallpaper. adhesive composition with further pasting.
However, finding a room with perfectly flat, geometrically correct characteristics is very difficult, even one corner will spoil the overall picture.
What will affect the work:
| Smoothness of walls | This is the most important indicator. It is necessary to immediately measure the level of the wall and its deviations. After all, it may look even, but as you move from one wall to another, a skew will become noticeable, which will increase from one strip of wallpaper to another. The drawing will begin to shift towards the corners, and will look crooked in relation to horizontal surfaces. |
| Wallpaper pattern | If you have a lot of corners in the room, then look at the choice of the coating pattern. After all, no coincidence will affect appearance plane. |
| Grip quality | Always prepare your base well. After all, if this is not done, the wallpaper will not fix well and may lag behind. |
Possible problems and subtleties when pasting wallpaper on corners
An important point when performing of this type works is the material from which the selected wallpaper was produced. Various materials behave differently during the sticker process. And doing the work with your own hands you need to know these subtleties.
The instruction in this question will be as follows:
| Without the addition of auxiliary layers, the most demanding. If you are dealing with them, all actions should be as prompt as possible. The paper web is quickly saturated with the liquid from the glue, and if you forget about it for a while during work, it will creep into pieces. |
| On the contrary, it is necessary to allow sufficient time after the application of the adhesive for a better impregnation. But in some species vinyl wallpaper there is a fairly thin sputtering of the pattern, so you can press them against the wall only with a rubber roller. Do not forget to pay special attention to the corners, the adhesion of the wallpaper to the wall in these places should be maximized. |
| do not require adhesive treatment on the back. In this case, only the walls are coated, and the corners are impregnated twice to achieve the highest bond strength. |


Note: The overlap depends on how dense the material is. For example, if glass fiber is used, the strips are glued joint to joint. Even a slight overlap will be noticeable.
How to glue wallpaper to an inner corner
The main purpose of wallpapering is to prevent “wrinkles” from appearing in the corners, and the wallpaper sheets themselves do not disperse.

So:
- To prevent this from happening, the canvas is wound up so that a grip of no more than 2 cm is formed on the adjacent wall. In this case, it is necessary to take into account how uneven the angle is, and the stronger the curvature, the more allowance is left. The edge is pressed against the wall with maximum force. In the case when wrinkles begin to form on the strip, it is necessary to make neat cuts with scissors, cutting the canvas, heading towards the fold.
- The next step will be the implementation of the markup, it will be superimposed on it next strip wallpaper on the next wall. From the allowance of the first strip that entered the second wall, measure the distance of the width of the wallpaper sheet with a decrease of 5 mm.
- Then, using a level, a vertical line is drawn on this section of the wall. Upon completion of the marking, the next sheet is glued. In order for it to be perfectly aligned, a reference point is taken on the drawn line.
How to glue wallpaper to an outer corner
Wallpapering on the outer corners has its own problems, but it is quite possible to avoid them if you act professionally.

Attention: In order for the wallpaper to fit perfectly on the outer corner, the point from which the sheet will go is determined so that its edge goes around the corner by 3 cm.
- The edge of the sheet is pressed against the wall with maximum force. If wrinkles appear, as well as when working with inner corners, small cuts are made.
- Along the edge of the sheet, you can tear off a thin strip of wallpaper so that only a delicate edge remains. This method allows the seam to be trimmed more neatly and will make the overlap less noticeable.
- After that, using a level, a value equal to the canvas and increased by 0.5 cm is marked from the corner. Along the line obtained, the next sheet is glued in such a way that its edge overlaps the torn edge of the previous sheet.
- The joint is pressed through with maximum effort, the upper and lower edges of the wallpaper are trimmed using the trimming method, after which the sheets are rolled with a rubber roller.
How to glue wallpaper with a pattern in the corner
When the wallpaper has a pattern with vertically spaced stripes, the corners will be most visible if it is distorted. And with horizontal lines, the pattern will be disturbed, it will be visible when approaching the floor and ceiling plinths.

Avoiding problems like this is simple:
- Do not forget to leave an overlap on the next wall;
- hide the resulting joint at the top of the corner;
- glue the wallpaper in the corner of the room so that the edge of the canvas lies perfectly flat with the line drawn in advance. In this case, the second edge is cut to the edge of the corner.
It is rarely possible to completely avoid distortion of the picture; minor errors are likely to remain. But only you will know about this drawback. Indeed, to find it, you will have to carefully study all the corners in the room. Subject to all the rules, the wallpaper will be perfectly even, and the pattern will not be disturbed.