Technology of installation of gabions. DIY gabions
A gabion is a large metal cage made from twisted wire. This design is very simple to manufacture and place on the territory of your site. Such a design is not expensive, and at the same time reliable in use. She doesn't need any extra care.
Advantages of gabions
If we compare gabions with other similar structures, it becomes clear that gabions have great advantages. Their advantages include:
- high strength, as it is able to withstand heavy loads;
- each mesh construction can be attached to another, for this you need only galvanized wire, as a result you can get a monolithic structure;
- they blend well with the rest of the landscape, so over time, the effectiveness of such a structure will only grow;
- low costs for use and installation;
- ease of installation due to the low weight of the product.
Gabions have many advantages, due to which they are widely used in various fields and areas.

Varieties of gabions
Depending on the type, the following gabions are distinguished:
- box-shaped;
- cylindrical;
- flat.
It follows from this that the frame shape will look like a cylinder, flat figure or on the shape of the box, it is to be made from a mesh or from a welded structure.
In a welded structure, the bars, which are laid perpendicular to each other, are welded at the intersections. Welded boxes have a rectangular shape; in order to connect the walls, a wire spiral is made.
The mesh structure is created by attaching a steel mesh to a rigid frame. Each cell of such a grid is hexagonal in shape.
How to make gabions with your own hands
Before you start making gabions, you should take care of the following material, which you will definitely need:
- metal grid, the thickness of which should be from 0.2 to 0.8 cm, depending on the parameters of the product. In this case, it is worth considering the features of operation;
- fittings. With the help of it, the frame is strengthened and rigidity is given to it;
- staples for wire and metal spirals. These materials are used to hold structural parts together;
- geofabric. This material is necessary in order to create a reverse filtration, as well as to reduce the consumption of sand or other material for the embankment during the installation work.
Be sure to stock up on stones. If for you appearance this is the main thing, then choose the material, different colors or odd shapes. To do this, you must give free rein to your imagination.
To carry out work on the manufacture and installation of gabions, you need simple tools, many of which you probably already have: pliers or pliers, a stapler for mounting, a mount, a shovel and anchors.

Attention ! If reinforcing bars are used in the manufacturing process, then welding must be used, since tying the parts with wire is a rather difficult process, which, moreover, cannot guarantee the required rigidity of the frame.
We make a frame
Since the weight of even a small structure will be significant, the manufacture and assembly of the gabion frame must be carried out at the place of its installation.
The gabion manufacturing process takes place in several stages. To begin with, we will prepare the base, if possible, then it is better to strengthen it, for example, tamp the soil or remove upper layer soil. Use sand to make a pillow, the thickness of which will be from ten to twenty centimeters. Everything will depend on the weight and parameters of the gabion.

Attention ! If a fence is being erected from gabions, then at a shallow depth it is necessary to equip strip foundation. This is especially necessary in cases where gabions are combined with sections made of traditional materials.
To prevent grass and other weeds from growing on the gabion net, it is necessary to make a shallow ditch around the entire structure. After that, the ditch should be covered with a geotextile or ordinary black film, fixed by bending one edge under the future structure.

Then it is necessary to cut the mesh in accordance with pre-calculated dimensions and proceed to its connection.
First of all, it is necessary to install the bottom of the structure, and lay the sides to it and fasten them together with metal wire. The remaining wire must be tightly twisted and fixed using pliers.

If your gabion needs to be quite large or with one of the sides disproportionately long, you need to consider stiffening diaphragms. One of the sides must be open so that the structure can be filled with stones.

The last stitching should be done after all installation work is completed and the entire volume is completely filled.
After completing all the work on the manufacture of the frame of the structure, it must be finally installed and fixed. To ensure the strength and reliability of the structure, not only due to its own weight, the structure should be fixed with anchors or homemade stakes. You can also use reinforcement, the diameter of which should not exceed 1 cm.
In the manufacture of a structure consisting of more than one tier, it is possible to allow the possibility of saving material, for example, in the construction of fences. In this case, the gabion mesh of the lower tier can become the bottom for the upper tier.
Filling the gabion with stones
After prefabricated structures installed and rigidly fixed to each other, you can proceed to the next step - laying stones. This is not a difficult stage, but requires compliance with certain rules:
- you need to start filling when the gabion is in its place;
- if stones are chosen for internal filling different size, then large ones need to be laid along the edges, and the center should be filled with smaller stones;
- if you use small stones that are of the same size and shape, then you need to lay them in bulk, in several steps with compaction of all parts;
- with a gabion height of more than 1.5 meters, stones should be laid in several layers, the thickness of each of them should be from 15 to 25 cm. In addition, after the structure is 1/3 filled, it will be necessary to make stretch marks, which will opposite sides are fastened in order to prevent deformation;

Advice ! If the structure has a height of more than a meter, then this procedure should be done again after a certain interval, for example, after filling two thirds and three quarters of the volume
- if the gabion will consist of many levels, then the bottom row should be filled with stones, taking into account their shrinkage under the influence of their own weight, as well as under the action external load, so they need to be filled on average 5-7 centimeters above the upper edge of the structure;
- sometimes it is possible to allow the use of stones that have a smaller fraction than the parameters of the cell, but then they must be laid in the middle of the structure or at the bottom of the structure, they must first be wrapped with geofabric, which will not create an obstacle to water, seeping through the gabion, but at the same time will not let it wash the filler from the gabion;
- after the installation and filling of the gabion is completed, you need to perform the last step - cover installed design cover and fix it with a metal spiral of wire.
Advice ! To ensure that the stones do not move and the image does not lose its appearance, follow the steps in several stages. Lay out the stones by hand, be sure to compact each layer in the gabion.
Conclusion
Gabions are a good tool to cheaply and cheerfully create decor in your personal plot or garden. This type landscape design is flexible and mobile. And it gives free rein to your imagination.
Your masterpieces will look respectable and beautiful. And most importantly, the manufacture of a gabion can be done with your own hands and with minimal cost. Show a little imagination and fantasy, be a designer, create and give joy to your loved ones and others. After all, when such beautiful elements of landscape design as gabions delight your eyes, your mood will improve and your soul will be light.
What is a gabion landscape design? Fabrication designer lessons
The material for the creation of which are stones that are not bonded with a solution. This design is called gabions. If desired, it is very simple to build such a fence of stones. Gabions are used in the construction of wind protection, hedges. Using such structures, you can strengthen the shore of lakes and ponds, create original decorative elements in the garden. In order to understand how to lay gabions with your own hands, you need to familiarize yourself with the functions, types of designs, and the material used to make them.
What are the functions of stone structures
Gabion structures are successfully used in construction. Among the main functions it is worth highlighting:
- Protection of the site from the winds.
- Strengthening the coastline of various water bodies.
- Using gabions, you can regulate the riverbed and organize an embankment.
- Creating hedges in areas of any size.
- Convergence protection large masses snow.
- Use for decorative purposes.
Advantages of gabions

A wide range of applications of gabions speaks of the advantages of the design:
- During the installation of the frame, the gabions are bonded with galvanized wire, which makes it possible to speak about the strength of the structure, capable of withstanding heavy loads.
- In the process of absorbing various sediments by gabions, they are not destroyed. During erosional erosion, the base of the structure is slightly deformed, while remaining strong.
- During the installation of the structure, there is no need for construction equipment and creation drainage device. It is enough to buy stones. In addition, they do not require special processing. Therefore, this method of strengthening significantly saves money.

Given the shape of gabions, they are divided into box-shaped and cylindrical. Sometimes you can find flat products rectangular shape, the thickness of which reaches 30 cm. This type of structure is used to strengthen the coastline, in the construction of retaining walls.
Cylindrical structures are used to create underwater foundations from box gabions.
Making gabions

To get the job done, you need step-by-step instruction for the erection of the building. Before proceeding with the construction of gabions, it is necessary to choose a place for construction. The preparation stage includes tamping the soil.
Preparation of materials
It would be useful to make a foundation with a pillow. It uses crushed stone and sand. You will also need a metal mesh. At the same time, it is important to correctly calculate the load level so that in the future the structure does not collapse.
An excellent option would be a mesh with PVC coating or stainless steel.

The color of the stone depends on individual preferences and ideas. The size of the material must match the grid cells. When choosing stones, it is worth considering their density and frost resistance. Especially these parameters need to be paid attention if the structure will be under the influence of water. Most often used:
- granite;
- diorite;
- quartzite;
- basalt.
No less popular is sandstone, which is frost-resistant.

If you need to build a gabion above the water surface, it is important to choose a stone that is 30% larger than the cells. For underwater structures, stones that exceed the cell size by 50% are suitable.
Frame preparation and installation

The mesh is cut to size and stitched, adhering to the intended shape. For this purpose, welding or a strong wire is suitable, the ends of which are inserted into the stone filler. If the gabion is long, you need to take care of the partitions. The design should be filled gradually. Today, gabions on the market can be purchased unassembled, so it will be very easy to transport them.
stone laying

- After the structures are installed on Right place and linked to adjacent sections, they can be filled with stones.
- Brick, flat pebbles and large stones are laid by hand.
- Small stones can be poured out and compacted.
- If the mesh reaches a height of 0.5 m, the stones are laid on its third, then the front and back walls are fastened with strong wire.
- Lay another layer of stones.
- Repeat the procedure for bonding the two walls.
- Stacked last layer stones.
It is worth remembering that flat gabions can be filled immediately. In the case of filling gabions in layers, the lower one must be covered with a stone 5 cm above the container, taking into account shrinkage.
For structural strength, it can be reinforced with rods that are installed inside the frame half a meter apart.
How to build a fence

In the natural landscape, a gabion fence will be an ideal protection that will last long term without much care. A feature of the construction of a structure is that it is necessary for its construction more space than for a conventional fence.
Install stone wall directly on the ground, without a foundation. For its reliable fixation, it is necessary to install steel poles at regular intervals.
- First of all, you need to dig holes for the posts. The depth of the holes depends on the height of the future fence.
- The pillars are placed in pits with pre-poured concrete, which must be carefully compacted. It is important to install the posts evenly. The plane of the fence depends on this.
- It is necessary to give time for the concrete to harden (three days).
- A wire frame is fixed around the fence, in which the stone will be laid. The work is carried out with the help of nuts, clamps and washers. For a low gabion, you can make a frame from a chain-link mesh.

- After installing the mesh, one should not forget about treating the wire with anti-corrosion agents.
- When laying out the stones, it is advisable to link the mesh with extension brackets. Fill the frame evenly. In this case, it is advisable to use multi-colored stones and materials of a rare breed. The main thing is that the appearance of the fence does not stand out from the general style of the site.

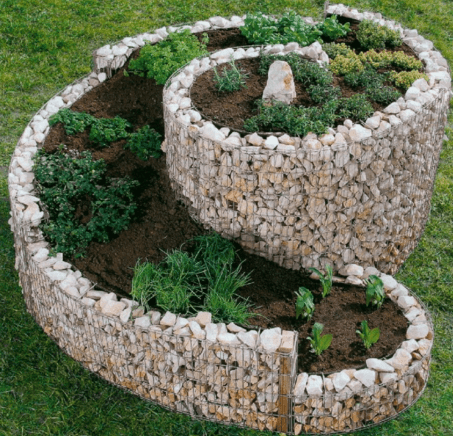
Fences look very original, in which stones alternate with layers of fertile soil, with unpretentious plants planted in it.
As you can see, many people can make a gabion, but in order for it to last as long as possible, it is important to follow the recommendations outlined in the article.
Video
Watch a short animated video that shows the process of creating gabions step by step:
In this video you can see a variety of gabion structures:
A photo


Gabion is an Italian word. The literal meaning is "large cage". They have been known to mankind for a long time, before the invention of small arms, when they began to be used as cover for shooters in trenches. These structures are successfully used now to strengthen coastlines, protect against avalanches or landslides, set up fish farms and other facilities.
What made gabions popular with private developers? Thanks to this design, it is possible not only to create original and beautiful flower beds, stone fountains, gazebos or fences. Gabion can be used to improve house adjoining buildings. It is known that the stone heats up slowly, but retains heat for a long time. This property of it can be used for warming the bath, the outer walls of the house, the greenhouse.
Gabion reminds of unity with nature, of what a person always strives for at a subconscious level. And if you still surround the structures filled with stone with vegetation or, conversely, plant flowers in a stone cage, you get an incredible harmony: eternal stone- and fragile living greens. The arrangement of flower beds and lawns is far from the only possibility of using gabions. Fence, zoning of the site, design of a gazebo or pool - far from complete list areas of application of the gabion.
The gabion is also attracted by the simplicity of its design. To build a large cage and fill it with stones - there is nothing easier. That's why everything more people decide to build gabions with their own hands, because for this it is quite enough to have simple skills in owning tools and basic knowledge of welding. Also, the durability parameters of the gabion are comparable with stone - a natural material that can survive both the house and its owners.

It is impossible not to note the mobility of the structure. If there is a need for redevelopment, the gabion can be easily disassembled and moved to another location. Also, for its arrangement does not require formwork or excavation. This design does not require additional costs for cement mortar for bonding, but does not lose its strength. The only exception is a tall gabion structure, such as a fence. In such cases, a small trench is dug, the surface is leveled and a geotextile layer is preliminarily arranged. Low gabions do not require any surface preparation.
Gabions have another indisputable advantage - the high environmental friendliness of the material, which allows you to expand the scope of its application.

The question of price is one of the main ones in any construction. For comparison, let's take a reinforced concrete fence (in terms of strength it approaches stone) and a gabion: the estimated cost of 1 m 3 for reinforced concrete reaches 20,000 rubles, and for a gabion - 7,000 rubles (depending on the type of stone, the price may be even lower). The flexibility of the metal mesh allows you to build a gabion of any configuration, which will a definite plus for design ideas. And, of course, the device is an excellent solution to the issue of noise absorption.
2 How to fill the gabion?
The stone is the filler and the main part of the gabion. It is he who gives the appearance of the structure. And it's better to use natural material the area where such a fence is arranged. Firstly, the natural look will emphasize the dignity and harmony of the house with environment. Secondly, the very presence of a stone in the area removes the issue of its acquisition. It remains only to deliver it to the site, which can be quite inexpensive.
If there is no stone in the natural landscape, but you want to arrange a gabion? In this case, the material will have to be purchased. It will cost more, but there is one advantage - the choice. And the range of fillers today is so large that it is worth looking into it in more detail.

To fill the mesh, basalt, quartzite, diorite and granite rocks are most often used. It is also possible to use sandstone or other types of stone with high strength. In the case of using a gabion as decorative element design, it is appropriate to use glass, wood, broken tiles and other materials.
It is important to choose the material and shape. If the filling is used for underwater structures, then the shape of the stone does not really matter. For these purposes, even chopped pieces of reinforced concrete are suitable. For elements landscape design choose the shape and size in accordance with the designer's intent.

What about the size? For the construction of underwater or coastal fortifications, the diameter of the stone should be half over size cells in the gabion grid. This is due to the requirement for increased stability in the aquatic environment. Smaller stones will be washed out with water. For a device of this design in dry areas, the size of the filler should be 1/3 larger than the cell size. To close the free space between large stones in the gabion, a slight addition of a smaller material (up to 10%) is allowed. But even small stones should not pass freely through the grid cell. Moreover, such an additive is permissible only for ground structures.
3 Metal box device
A metal mesh is the second mandatory part when installing a gabion. Finished boxes with different sizes cells are now available for purchase. But for those who decide to build gabions with their own hands, we will tell you how to choose the right wire. Considering that the structures will be on outdoors, you need to choose a material with anti-corrosion properties. The best way- galvanized twisted wire with a cross section of 2.2–4.0 mm.
Despite the fact that ready-made boxes and nets are offered in a wide range, making a gabion with your own hands is somewhat more profitable and more convenient, because it gives you flexibility in execution. After all, if there is no right size a finished mesh that matches your idea, creating a metal cage yourself may be the only option to complete the project.
If you decide to act exclusively with your own hands, now let's take a closer look at how to make a gabion. If the mesh is made using welding, then additional fastening is used at the seams by twisting the wire, previously cut into suitable pieces. The size of the cells depends on the stone with which the gabion will be filled. The length and height of the fence are measured on site.

To prevent the structure from sliding under its own weight, each section is reinforced at the corners with metal pins. To increase the strength of the cage, you can arrange additional stiffeners. For such purposes, a rod made of reinforcement, deeply dug into the ground, is suitable. If the height of the cage is more than 0.5 m, then the filling is carried out in three stages. Each time, filling up the stones by 1/3, it is necessary to tie the opposite walls together so that the structure under the load does not deform.
Since it is almost impossible to make a gabion with a height of more than 0.25 m without the threat of further slipping, it is not recommended to stretch the mesh with a solid line, without dividing sections. This can also lead to deformation. From the finished mesh, you can build a gabion of a cylindrical or round shape, fastening it around the edge with twisted wire. Such unusual blotches will give interesting view site design. It is better to use the chain-link as an auxiliary material for the construction of a gabion structure, although it is easier to deform, which is important when making it yourself, but this will be its disadvantage in the future, besides, it is less durable and not sufficiently resistant to corrosion. It is best used for interlayer in high sections.
When the manufacture of a homemade gabion is completed, you need to properly pour material into it. It is not recommended to fill the sections with too large stones, then a lot of free space will form between them, which will need to be occupied by smaller stones. And they will slip through a large cell and get enough sleep around the grid. If you make a gabion fence with your own hands, which should hold or break water flows, for example, in the coastal strip, then filling it with more than 2/3 is dangerous. The force of a wave or a rushing current can easily overturn structures.

Construction waste can be used to load the mesh in the interior. To do this, the cavity inside the gabion, between front sides, pre-covered with geotextiles, and then placed various materials so they don't come out. The outer sides of the cage are laid out with beautiful stones.
If you plan to make a high fence (up to 3 m) from gabions, then you can make it from separate sections. But then you have to work a little. Because for stability on each other, the structures will have to have a rigid frame. Usually, sections are welded from metal corners, to which the mesh is then attached. The cells acquire more weight, but this becomes a guarantee of stability, if you, of course, assemble the fence, withstanding vertical level. Of course, it is better to provide additional fixation cells between themselves, at least the simplest - wire.
Recently, in landscape design, you can find fences, the material for which are stones that are not bonded with mortar. This design is called gabions. If desired, it is very simple to build such a fence of stones. Gabions are used in the construction of wind protection, hedges. Using such structures, you can strengthen the shore of lakes and ponds, create original decorative elements in the garden. In order to understand how to lay gabions with your own hands, you need to familiarize yourself with the functions, types of designs, and the material used to make them.
What are the functions of stone structures

Gabion structures are successfully used in construction. Among the main functions it is worth highlighting:
Protection of the site from the winds.
Strengthening the coastline of various water bodies.
Using gabions, you can regulate the riverbed and organize an embankment.
Creating hedges in areas of any size.
Protection against the convergence of large masses of snow.
Use for decorative purposes.
Advantages of gabions
A wide range of applications of gabions speaks of the advantages of the design:
During the installation of the frame, the gabions are bonded with galvanized wire, which makes it possible to speak about the strength of the structure, capable of withstanding heavy loads.
In the process of absorbing various sediments by gabions, they are not destroyed. During erosional erosion, the base of the structure is slightly deformed, while remaining strong.
During the installation of the structure, there is no need for construction equipment and the creation of a drainage device. It is enough to buy stones. In addition, they do not require special processing. Therefore, this method of strengthening significantly saves money.
Varieties of designs

Given the shape of gabions, they are divided into box-shaped and cylindrical. Sometimes you can find flat rectangular products, the thickness of which reaches 30 cm. This type of structure is used to strengthen the coastline, in the construction of retaining walls.
Cylindrical structures are used to create underwater foundations from box gabions.
Do-it-yourself brick pool - construction features (15 photos)
Making gabions

To complete the work, you will need step-by-step instructions for the construction of the structure. Before proceeding with the construction of gabions, it is necessary to choose a place for construction. The preparation stage includes tamping the soil.
Preparation of materials
It would be useful to make a foundation with a pillow. It uses crushed stone and sand. You will also need a metal mesh. At the same time, it is important to correctly calculate the load level so that in the future the structure does not collapse.
An excellent option would be a mesh with PVC coating or stainless steel.
The color of the stone depends on individual preferences and ideas. The size of the material must match the grid cells. When choosing stones, it is worth considering their density and frost resistance. Especially these parameters need to be paid attention if the structure will be under the influence of water. Most often used:
No less popular is sandstone, which is frost-resistant.
If you need to build a gabion above the water surface, it is important to choose a stone that is 30% larger than the cells. For underwater structures, stones that exceed the cell size by 50% are suitable.
Frame preparation and installation

The mesh is cut to size and stitched, adhering to the intended shape. For this purpose, welding is suitable to buy which you can visit the online store of welding equipment https://svarservice.by. If the gabion is long, you need to take care of the partitions. The design should be filled gradually. Today, gabions on the market can be purchased unassembled, so it will be very easy to transport them.
stone laying

Once the structures are placed in the right place and linked to adjacent sections, they can be filled with stones.
Brick, flat pebbles and large stones are laid by hand.
Small stones can be poured out and compacted.
If the mesh reaches a height of 0.5 m, the stones are laid on its third, then the front and back walls are fastened with strong wire.
Lay another layer of stones.
Repeat the procedure for bonding the two walls.
Lay the last layer of stones.
Finishing the bath inside: creating a cozy relaxation zone - HappyModern.RU (26 photos)
It is worth remembering that flat gabions can be filled immediately. In the case of filling gabions in layers, the lower one must be covered with a stone 5 cm above the container, taking into account shrinkage.
For structural strength, it can be reinforced with rods that are installed inside the frame half a meter apart.
How to build a fence
In the natural landscape, a gabion fence will be an ideal protection that will last a long time without much maintenance. A feature of the construction of the structure is that more space is needed for its construction than for a conventional fence.
Install a stone wall directly on the soil, without a foundation. For its reliable fixation, it is necessary to install steel poles at regular intervals.
First of all, you need to dig holes for the posts. The depth of the holes depends on the height of the future fence.
The pillars are placed in pits with pre-poured concrete, which must be carefully compacted. It is important to install the posts evenly. The plane of the fence depends on this.
It is necessary to give time for the concrete to harden (three days).
A wire frame is fixed around the fence, in which the stone will be laid. The work is carried out with the help of nuts, clamps and washers. For a low gabion, you can make a frame from a chain-link mesh.

After installing the mesh, one should not forget about treating the wire with anti-corrosion agents.
When laying out the stones, it is advisable to link the mesh with extension brackets. Fill the frame evenly. In this case, it is advisable to use multi-colored stones and materials of a rare breed. The main thing is that the appearance of the fence does not stand out from the general style of the site.

Fences look very original, in which stones alternate with layers of fertile soil, with unpretentious plants planted in it.
As you can see, many people can make a gabion, but in order for it to last as long as possible, it is important to follow the recommendations outlined in the article.
Almonds (3 photos)
Video
Watch a short animated video that shows the process of creating gabions step by step:
In this video you can see a variety of gabion structures:
A photo


Walking through someone's dacha, you can hear an admiring exclamation: "look how cute and beautiful gabion»! What is hidden under this concept?
gabions are light and transparent mesh boxes made of rigid wire, which are filled to the top with a filler, usually natural or artificial stone. These practical and elegant containers made of metal and stone have a number of advantages:
- easy to install,
- durable and stable,
- compact,
- are not afraid of soil shrinkage and repeat all the outlines of the soil,
- environmentally friendly,
- with good sound insulation
- waterproof,
- goes well with any country landscape,
- of course, very beautiful.
Thanks to these properties, for the installation of fences, parapets, retaining walls, for the design of reservoirs, installation garden furniture, and also as a diverse picturesque element of decor on.
gabion types
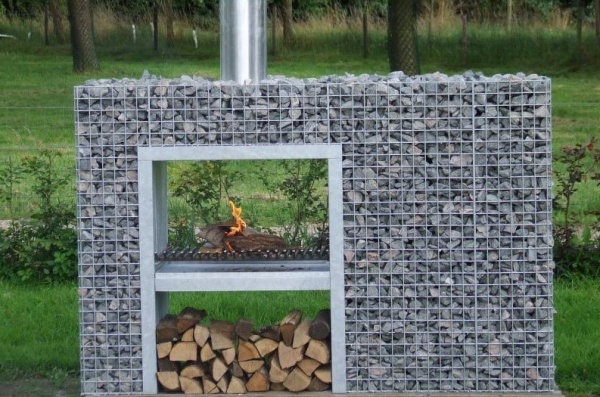
Most often, the gabion has the shape of a spacious box. in the form of a regular rectangle 1.0-6.0 m long, 0.5-2.2 m in height and 0.1-1.0 m wide. For example, gabions are sold 1x0.5x0.5 m; 4x1x1 m; 1.5x1x1; 3x2x0.3m; 6x2x0.5 m; 1.5x1x0.5 m, etc. Such containers are great for fencing a flower bed, lawn or recreation area, as a "leg" of garden furniture, for delimiting a territory or building a fireplace, mini-waterfall, retaining wall, fence, etc.
There are also so-called flat ("mattress") gabions, which are commonly used to reinforce the bottom of a pond, shoreline or slope. Their traditional filler is river pebbles of all shapes and types. Due to the low height - up to 30 cm - such structures easily follow the bends of the soil surface.
Finally, there are cylindrical baskets, which are suitable for strengthening various retaining walls, for laying out the bottom foundation, as well as for decorative purposes ("columns", "legs", "columns", etc.).
General design of gabions
For mesh boxes, a special galvanized or galfan wire is used with a coating strength 4-5 times higher than that of a conventional mesh - chain-link (the latter is not suitable for gabions!). Also, sometimes the wire for gabions is covered with a layer of PVC, especially for underwater structures, to protect them from corrosion. The thickness of the wire, taking into account the coating, is usually 2-6 mm.
Container cells look like a rectangle or hexagon. Additionally, the strength of the basket is achieved by double twisting technology or by welding. In the first version, the double-twisted steel wire is attached to a rigid frame, and in the second, the bars are welded at their intersections at an angle of 90 degrees.
Opposite sides of one gabion are fastened with special strong braces. If there are several containers, they are linked into one monolithic structure with staples or spirals. Large containers can be equipped with intermediate diaphragm compartments that reduce the risk of bloating.

Filler selection
More often as a filler for a gabion in the country different types of rocks are selected both natural and artificial formations. Suitable:
- granite,
- basalt,
- limestone,
- marble,
- diorite,
- pebble,
- travertine, etc.
The main colors of this filler are gray, black and white, but you can also get red boulders or colored glass stones to achieve a beautiful decorative effect.
Optimal stone size- within 7-20 cm. The main thing is that the stones do not fall out of the grid. For "land" containers, it is recommended to choose stones whose size is approximately 30% larger than the size of the gabion cell, and for underwater structures - by 50%.
It is also very important that the filler be durable (stone grade - not lower than 400M, optimally - 1000M), frost-resistant (from 200-300F) and not eroded (not lower than 0.6% by weight), have specific gravity from 17.5 kN/cu.m.
As an alternative for purely decorative purposes to fill gabions, you can use brick, paving stones, wood, glass, broken tiles, concrete, etc. For example, the installation of gabions with imitation for laying logs is very popular.
Let's get into more detail now get acquainted with installation of gabions at home.

Installation of gabions
Tools and materials:
- shovel;
- level;
- wire cutters and pliers;
- bucket;
- a flat board and a pole or crowbar for leveling stones;
- gabions;
- supports, sand, cement (for high gabions);
- long straight rail;
- fittings for corners and braces;
- metal spiral or wire crimps;
- geotextile;
- gabion filler;
- small gravel for backfilling the base.
Step 1. Preparing the base on the site
Clean well in place of the future gabion. The site should be planned, without strong irregularities. About a bayonet of a shovel or a little less, remove the sod by making a small, even trench along the width of the container, trim and compact it.
Step 2. Folding the box
Unpack the package, lay the gabion horizontally on a flat area and check that it is free of defects. Then bend all the walls and assemble the gabion into a container.

First, wire the corners of the box, making sure that all the tops of the sides of the container are in line. After "tie" the ribs with wire. In the corners you need to drive, weld or push the reinforcement.
You can buy more durable structures already in finished form in the form of welded sections.

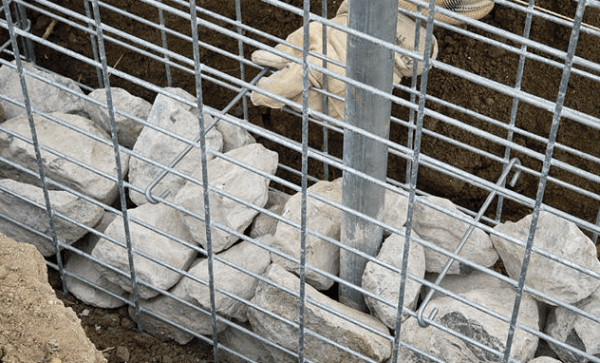
Step 3 Installing the Empty Box
Install the gabions evenly, without distortions, controlling everything according to the level. It is allowed to deepen the box a little by 5-10 cm into the prepared groove - the container will then sink under the weight of the stones and “fix”.
And here for high fences or retaining walls, as a rule, support posts are pre-set and concreted (for example, 60 * 40 mm). Then a gabion mesh is “put on” on top of them, which is fixed to the supports with the help of assembly studs with bolts or by welding. Supports are recommended to be concreted to a depth of approximately 50-70 cm with an interval of 1-1.5 m based on the length of the basket. To lower the gabion, the bottom of the mesh must be cut in advance. After backfilling the stone, the support pipes will not be visible.
For standard gabions you can weld longer reinforcement pins in the corners, which are then dug in or even concreted - so the box will stand more reliably. The empty box is temporarily supported by wooden spacers during the hardening of the concrete.

Step 4. Installation of subsequent blocks (if necessary)
To connect individual blocks, use a metal spiral or crimping brackets, thanks to which all your baskets will become one single structure. After connecting, be sure to check the straightness of adjacent edges and faces.
Temporarily attach to the outside of several empty containers wooden lath, to ensure the evenness of the facade of all gabions at the time of laying the stone. At the end of the work, the slats are removed.
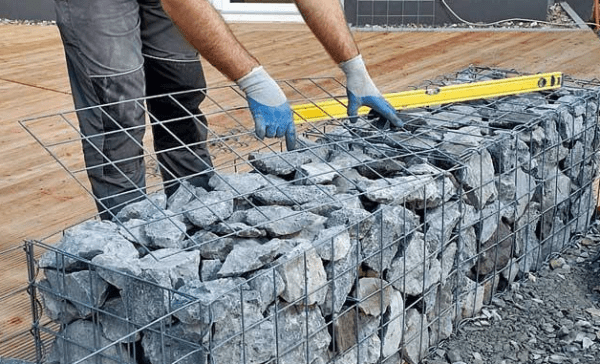
Step 5. Filling the filler and installing the braces
First, lay out the box with stones to half its height. To do this, lower stone after stone one at a time, or even better - with a small board, trimming them with a pole. For smaller fractions, you can pour out the filler from the bucket, leveling it right in the basket with a crowbar and hands. Choose stones according to their shape so that when laying they fill all the voids to the maximum and lie as densely as possible.

After filling the lower half of the box, tighten the opposite walls of the gabion with special bracing cables in the form of stiffeners to prevent further swelling of the container walls under the weight of stones. Place horizontal braces evenly through 4-5 cells across the entire width of the basket in increments of approximately 25-40 cm.
Then proceed to further filling the filler of the remaining half of the grid to the very top of the container.
Higher gabions are recommended to be filled first by a third. That is, in this case for high structures everything is done in three approaches: backfilling with stones by a third, then braces are placed, again the filler goes up to 2/3 of the container, again cables, and, finally, stones to the top.
Invisible places of the gabion, its middle, but not more than 15-20% of the total volume, can be carefully laid out with smaller stones or even construction debris, after covering the slag or battle with geofabric. From this property of the container does not deteriorate, but you can save money and time.
Finally, close the mesh box lid by pulling it up tightly and securing it with wire. First, pre-tie the corners of the cover, checking the evenness of the fit of the sides everywhere, and then fasten the ribs.
After laying, hose down the cobblestones to remove dust.

Step 6. Finishing the top of the gabion
Most often, the top of the container is left "breathable". If desired, the upper part of the structure can be finished with wood or various decorative plates. For example, on the back decorative panel metal staples are placed in advance, and after filling the stone, they are attached to the top of the container with a wire.
To refresh the gabion and give it a natural style, you can plant green leaves in the space between the pebbles. climbing plants- it will be very picturesque.
This work has been completed. As a result, gabions will long years serve as practical and very beautiful decoration landscape of your dacha, bringing to it a bit of aristocracy and elegance!
Installation of a multi-level gabion in photos
