Stove baby. How a baby brick oven is built, from foundation to masonry
The "Baby" oven, shown in fig. 1, - small, compact, economical and convenient for a garden insulated house. If desired, the oven can be made higher by laying similar rows between the 18th and 19th rows. The oven is equipped with a cooking chamber and two drying chambers: lower and upper. The lower drying chamber is closed and is located on the right side of the oven above the slab overlap. Four hooks made of thick wire are laid in the masonry of its overlap (threads with mushrooms or fruits are hung on them for drying).
A thermometer can be installed on the chamber door. This drying chamber maintains a constant temperature for a long time. The camera door is mounted on a frame made of metal corners. Instead of a door, an L-shaped flap can be installed. Hooks, if necessary, are replaced with U-shaped wire or a shelf-type stand for baking trays. The upper drying chamber is open, but a damper can also be installed in it. To do this, a metal plate is pushed into the ceiling, deepening it in front by 1-1.5 cm so that the damper can be set with an inclination. It is undesirable to plaster the walls of the drying chambers, you just need to grind the seams.

Rice. 1a. Oven "Baby" (front view): a - cooking chamber; b - drying chamber; в - holes with a diameter of 7 mm in the door drying chamber; d - thermometer; d - a branch pipe for a samovar
Rice. 1b. Oven "Baby" (back view)
The design of the stove is simple and with little skills it is not difficult to build it, but for an inexperienced craftsman it is considered difficult. The stove can be folded under any solid fuel, but since coal, peat and dung emit a lot of smoke, the stove must be cleaned annually due to clogging of the gas ducts with soot.

Rice. 1c. Oven "Baby", A-A, B-B and V-V sections: a - drying chamber; b - laying of the back wall with a ladder (with protrusions)
The stove is placed on a solid (monolithic) foundation. A blower is laid out from the 3rd row 1
with a window in which the door is installed 2.
The 5th row overlaps a window with a door. A grate is installed on top of the 5th row 3.
Before starting laying the 6th row, you need to think about how to lay the back wall, since the grate can be shorter or longer. The wall can be cut off from the grate or from a brick thickness of 12 cm, as shown in the section along B-B with a dotted line 4
. It is possible to lay the wall using a ladder (see Fig. 1c). To do this, from the top wall, which runs to the edge, to the grate, in four rows, you need to make the same projections. In our case, each ledge is about 4 cm.In the 6th row, a firebox door is installed 5.
Having laid out the firebox in the 6-8th rows, block the firebox door with the 9th row and fix the overlap with the 10th row. Now you need to cover with a slab 6
firebox and, so that gases come out of the firebox, make a hailo 7,
the size of which should be in the range of 7-7.2 cm. For this, it is first more convenient to make the back wall, which is installed on the edge. After that, a stove is placed above the firebox so that it does not reach the back wall and the distance from it to the stove is at least 11.5-12 cm (this is necessary so that there is an opportunity to make a hailo near the back wall 7
and install the partition 8,
separating hailo 7
and the gas duct coming from it from the cooking chamber 9).
The board is placed directly on the mortar without a groove. It should be noted that a standard plate with two holes is large for this oven, so it is shortened to the right size(cut off, leaving a smaller hole) and placed above the firebox, flush with the front wall. On the 10th row, a frame with doors is installed in front of the cooking chamber. The frame is secured with wire or plates. The fixing wire is bent under the side walls of the oven. They do it like this: with one hand they pull the wire, with the other they put a brick of the side walls on it and, so that the door does not weaken, bend the wire up close to laid bricks... The frame in the upper part can be tied not with the side walls, but with the overlapping masonry. If the corners of the frame come into contact with the plate, the part that touches the plate is sawn off. On top of the frame in the 15th row, the overlap of the cooking chamber is made along the iron plates or corners installed on the 14th row (see section along B-B and general form oven). Before performing the overlap, the 14th row is first adjusted in height, that is, it is cut so that the upper 15th row lies flush with the side walls without undercutting. With the 16th row, the two previous rows are fixed and the masonry is fastened to the back wall, and a frame with a door for a drying chamber designed for a small amount of food or herbs and a cleaning door are installed 10.
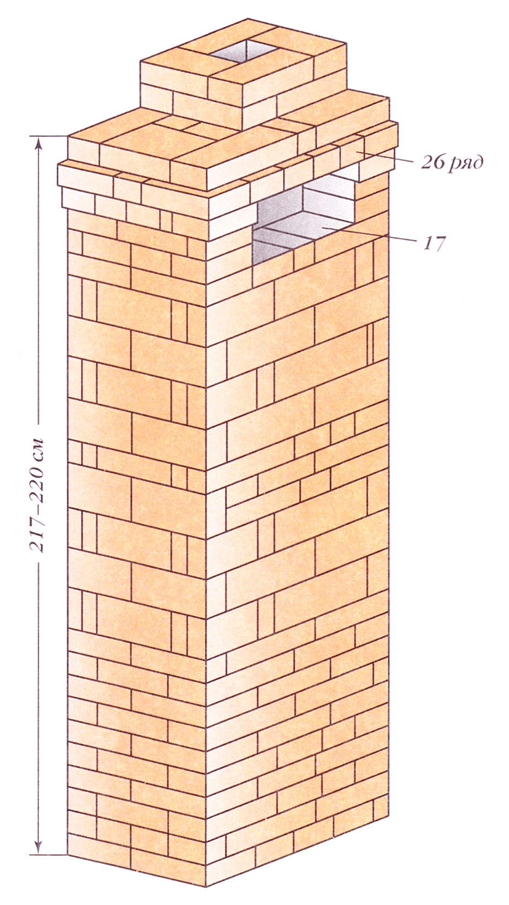
The 17th row along the entire perimeter is placed on the edge. A samovar pipe is inserted into the middle of the 17th and 18th rows. The 18th row is blocking the cleaning door. If necessary, the brick is hewn out over the door. As a result of the masonry of the 17-19th rows, a drying chamber is formed, the size of which is limited by the size of the gas duct, the width of which should be 7-7.2 cm. window 11
for additional passage of gases and faster heating of the left wall and the lower part of the drying chamber. In the 19th row, the gas duct is once again blocked, as a result of which a window is formed 12
and a small flue 13
for heating the front wall and drying chamber. On top of the overlap, the front wall is fastened to the drying chamber using a wire not thicker than 4 mm, bent on both sides. The 20th row is placed along the perimeter on the edge to the drying chamber, and the overlap above the drying chamber is placed on a die, doing this so that the size of the gas ducts at the walls is still 7-7.2 cm. Hooks are placed in the seams of the overlap 14
from thick wire (if it is very thick, then grooves-recesses are cut out for it in the brick). The 21st row is placed on a die end-to-end to the masonry on the edge, which was made in the 20th row. After that, it is leveled with the top of the masonry - hung up. In this row, constriction is made, expanding the flue from 7-7.2 to 13 cm (see section along B-B). On top of the 21st row, two valves are installed 15,
after which they put the 22nd row, which secures the valves. In the 23rd row, they begin to lay out a flue in the middle of the oven 16
and in the left wall one more (open) drying chamber 17.
In the 23rd and 24th rows, lay out the cleaning window and install the cleaning door 18.
In the 24th and 25th rows, extrusion is made to fit the size of the square gas duct 16.
After that, the inside of the flue will not decrease diagonally. The 25th row overlaps the back and middle parts of the gas duct 16,
leaving only an opening for the outlet of gases (the size of the opening must correspond to the size of the gas duct of the pipe). A corner or plate is inserted into the same row to cover the upper part of the drying chamber.

Rice. 1d. Oven "Baby". Ordering (rows 1-17): a - iron plates; b - door frame; в - a branch pipe for a samovar
In a three-quarter 19
covering the cleaning door 18,
make a constriction of the protrusion hanging over the gas duct so that it does not interfere with the movement of gases coming from below (they will hit it, which is undesirable). As a result of masonry, the entire 25th row will have an overlap of the cornice around the stove, with the exception of the three-quarter 19,
which is laid flush with the front wall of the stove, forming a gap in the cornice. In the 26th row, above this three-quarter, there will be a cornice canopy in the size of two laps (the measure is the cornice inlet in the 25th row). The 26th row overlaps a small drying chamber. On the 27th row, the masonry of the stove is fixed - it is laid flush with its walls. From the 28th row, pipe laying begins and a valve is laid on top of this row 20.

Rice. 1d. Oven "Baby". Ordering (rows 18-29): a - fastening wire; b - iron corner
The oven works like this. Fuel is put into the firebox, the valve is opened 20
in the pipe and valve 15
over the samovar pipe. In this position, gases from the firebox rise upward, reaching another valve 15
near the back wall. This valve is closed, and gases leave through the windows to the left wall, make a turn and above the cooking chamber (see orders from 17th to 20th rows) enter the front wall. Since the furnace is small and the gas ducts are without partitions, they serve as guides for the gases, so the gases from the left wall do not seem to reach the top of the furnace. But it is known that warm air lighter than cold, so over time it will rise up and heat the masonry.
If it is necessary to reduce the heat transfer of the furnace, then you can use a summer flue, which is clearly visible in the section along B-B. Although it is slightly, it will still reduce the heat transfer of the stove. To do this, you need to open the latch. 20
in the pipe and valve 15
near the back wall. Then the gases will go from the firebox through the valve 15
into the gas duct 16
and through the valve 20
into the pipe. During operation in this variant, gases will heat only the rear wall of the furnace and one of the walls of the lower and upper drying chambers; the rest of the oven will remain cold.
For the samovar to work, you need to open the latch at any time. 20
in the pipe and valve 15
over the samovar pipe. The gases from the samovar will go straight into the pipe.
For laying the stove, you will need (pcs.): Red brick - 250, cast iron stove 41 × 39 cm - 1, furnace door 21 × 25 cm - 1, blower door 14x 14 cm - 1. cleaning door 14 × 14 cm - 2, latch 13 × 13 cm - 1, latch with holes 12 × 23 cm - 2, frame with a door for the cooking chamber 37 × 43 cm - 1, frame for the drying chamber 17 × 37.5 cm - 1, metal corner 4-5 cm wide and a length of 50 cm - 2, a metal plate 58 cm long - 1, a grate 17 × 25.5 cm - 1, a branch pipe for a samovar - 1.
Bake of this type is a compact structure that can be conveniently accommodated in any type of house, from a country house to a residential one all year round.
The baby is created from ecologically clean materials such as red ceramic brick or refractory fireclay brick... Baby's prototype is a modernized Swedish stove, thanks to its design features easily amenable to modification; bell prototypes are much less common.
This is what a baby oven looks like
From its prototype, the brick oven Baby Malyutka retains exclusively height - depth and width are easily variable values.

Furnace construction tools must be ready before construction begins
To create this furnace manually, you will need the following tools and materials:
- 210 red bricks or 76 refractory chamotte;
- ordinary clay or fireclay;
- sand;
- furnace door, blower, 2 cleaning, 2 view valves;
- roofing material in the amount of 2 sheets;
- metal pre-furnace sheet.
Now you can start a detailed examination of the construction of the Baby's stove and its advantages.
Advantages of this type of oven
The baby, which is, in fact, a mini-fireplace, occupies the minimum area for a heating stove - only 0.4 square meters. meters. She has simple design, which any beginner can collect, and instead of the whole system heating channels, a fuel cap functions in it.

A furnace of this type does not require a powerful additional foundation for itself., but can easily heat a room up to 35 sq. meters. To achieve this effect, in the off-season it can be heated only once a day, and in the cold season - 2 times a day.
The Malyutka stove is economical and can use both firewood and anthracite, coal and other types of filling for its work.
In the event that the future Malyutka brick stove is heated exclusively with wood, red brick can be used in its construction, however, only building and refractory bricks are suitable for the construction of a firebox chamber and a firebox.
Do-it-yourself baby oven
Before starting the direct construction of the furnace, you should consider its location - it is excluded as adjoining two outside walls building, and its location in the center of the room - in view of unreasonable heat loss and ineffective distribution of heated air.

The baby requires a not powerful, but a good additional foundation... If there is a water heater under the floor or electric heating, the entire screed rises - in the absence of these under the floor, using a grinder with diamond disc a rectangle of the floor is cut out along the perimeter of the future furnace.
A pit is dug with a depth of 350 mm, with the most aligned edges. Falls asleep in it sand pillow 70 mm high, which, after filling with water, is left to dry for several days.
Reinforcing lathing is created from twelve rods with a 100 - millimeter pitch, welded in two criss-cross layers. Next, a lattice that is maximally identical to it is created. Both of them are fastened with reinforcing rods at the joints - and welded along them.
In the process of making concrete mortar, only M300 cement can provide a foundation that is optimally strong for Malyutka. The poured foundation must be finished 50 mm above the floor level in order to avoid the formation of a layer of cold air at the bottom of the furnace in the future.
Features of the masonry oven Baby

To build Baby's masonry with his own hand, in addition to brick and roofing material, you will need such materials as: a steel strip, a solution of water-clay-sand, a trowel, a level and foil.
To prevent heat from escaping under the floor of the building, the foundation of the future stove is covered with foil.
- On a set of 1 and 2 rows of bricks, after laying each of them with a level, it is imperative to control the evenness of their location. This is required due to the small area of the stove itself, which means that the correct distribution of pressure on each of its supporting brick elements.
- On the 3rd row with front side a blower is recruited, having dimensions twice as large as the furnace. On the 4th row, a window is inserted into it. Inner surface the ashtray is overlapped by a grate.
- Row 5, representing circular masonry, fixes everything structural elements and metal.
- The 6th row forms the furnace window and the firebox, on which the door is installed on the 7th row.
- The 8th row covers the firebox with a steel strip located on the front side.
- From 9 to 11, the row is typed in circular masonry.
- From 12 to 14 rows, the back wall turns "on its side", the masonry goes to expand two small grooves.
- On the 15th row masonry, an elongated vertical well is formed on the back and side walls; in the center, the main support brick is laid, the base of the future column. The masonry continues and the 16th row, on which the column is laid out with two perpendicular steel strips.
- The 17th row separates all formed wells from each other, getting 4 oblong - along the walls - and 1 central square.
- From 18 to 22 rows are similar masonry.
- On the 23rd row, the wells form an "L" -shaped similarity, in the next row - too.
- On the 25th row, the side wells are closed with bricks. From 26 to 28 - the outer dimensions of the masonry are compared with the size of the pipe.
- On the 29th row, a damper is placed, and from the next row, the chimney is formed and removed.
Thus, it is completely easy to carry out the construction of the baby's oven with your own hands..
We recommend watching a video on laying ovens with your own hands:
V country house or at the dacha, the "baby" stove is an excellent alternative for people who do not have the necessary skills in stove construction, but want to include such a unit in their interior. For the manufacture of a structure, you will need a minimum of materials and relevant knowledge.
The characteristic features of the stove
Advantages of Malyutka ovens
The "crumb" stove has a number of advantages over other types of structures for heating a room. It is not surprising that many users install this type of fireplace in their homes. Pros in favor of building a "baby" oven with your own hands:
- Small area. It is the owners of small country houses most often choose a mini oven.
- Simple construction scheme. Even a person with minimal construction skills can easily disassemble the drawings and lay the foundation and design of the furnace on their own.
- Profitability. The device does not require preparation a large number firewood for the winter, the consumption of materials for heating the stove is relatively small. It is allowed to use, besides wood, other types of fuel, for example, coal.
- There is no need for a strong foundation.
disadvantages
 For such a structure, only a heat-resistant type of brick is needed.
 However, besides the mass positive sides, the "crumb" oven also has disadvantages:
- Insufficient heating. The heating stove is capable of filling a room with heat up to 35 square meters.
- Limited materials. Only suitable for bookmarking a device separate species brick resistant to high temperatures.
Heating hob"Baby" has its prototypes among other types of designs (and Swede).
What materials are used?
The "baby" stove is made of a special type of bricks that are resistant to high temperatures. Characteristics of materials:
- Fireclay brick. An irreplaceable thing for laying the furnace surface of the stove.
- Private. It is not suitable as a facing material, but most of the structure is laid out with this brick, so the consumption for it is maximum.
- Facing. Suitable for finishing the front of the fireplace, there is an opportunity to choose the color yourself.
 For construction, you will need to purchase a furnace door.
 For laying, you need to purchase the appropriate elements of the furnace, without which the structure will not function fully. In addition to bricks, they also include in the work (an approximate list of the main auxiliary materials):
- grate;
- furnace door;
- gate valve;
- blower door;
- burner stove (cast iron);
- clay solution.
How to do it yourself?
Preparatory stage of construction
At the stage of preparation, you must have the following tools available:
- welding machine;
- roulette;
- bayonet shovel;
- grinder;
- waterproofing;
- rod;
- water and sand;
- solution.
 After determining the place for the building, you need to lay the foundation for it.
 The first thing to start with preparatory stage- determination of the location of the future fireplace. It is important to correctly position it in order to eliminate energy loss. The walls of the structure are not placed near the outer walls of the room, but it is also not recommended to place the fireplace in the center of the room. Not in all cases the "baby" brick oven is built at the same time as the building. Sometimes you have to lay the foundation on finished floors. If a "warm floor" system is used in the house, the entire screed must be lifted. After the place for the stove has been prepared, a hole is dug up to a depth of 35 cm, completely covered with waterproofing. Next, fittings are laid, and the solution is poured.
Step-by-step instructions for carrying out work
Brick is the priority material for laying stoves. A small or large "crumb" oven, although it has simple construction drawings, but detailed diagram the order of work will come in handy in any case. Step-by-step instruction:
 Before the start of ordering, the foundation is waterproofed with roofing material.
 - A layer of waterproofing is applied to the foundation. It is recommended to use roofing material.
- The ordering starts from the corners, three rows each.
- The vertical and horizontal lines of the plumb line are measured.
- The first row (solid layer) should be perfectly accurate.
- A thin layer of clay is applied to a row of bricks and three rows are placed around the perimeter. At the same time, the door is installed. Everything is done quickly and accurately.
- A steel wire is brought into the attachment area, the ends of which are twisted and wound up in order.
- Visible defects are eliminated using a grinder.
- The grates are being installed.
- The next row includes the use of fireclay refractory bricks and installing a firebox door wrapped in an asbestos cord.
- All subsequent rows are laid flat. The ordering is completed with the expectation that there is room for a slight backward shift.
- Is already charged installed door and the stove is placed. It is recommended to buy the cast-iron version for cooking.
- The last stage is finishing the outer walls of the oven. Whitewashing is used most often in such cases. Before starting work, it is recommended to protect all walls in the house from dirt, since it is problematic to remove whitewash stains.
In order for the device to ultimately turn out exactly as the user envisions it, you need to take time to study the instructions.
Recently, the oven in garden house- this is no longer "news". Amateur gardeners more and more often build them in their estates, summer cottages. At the same time, the main requirement for such is compactness, from which the baby oven has become the most demanded. Well, besides this, the baby oven heats up, and "cooks" to eat, and bakes, and even builds easily! You can build it yourself:
Baby oven design

The baby cooking and heating stove has a height of 1.9 meters, a width of 0.75 meters, and a depth of 0.63 meters. Its heat transfer is 1700 kcal / hour! Occupies only 0.47 sq. The volume of the furnace is 0.90 cubic meters. Has a hob with one burner, oven-cabinet and extractor fan. Also, it is equipped with a kindling passage used for kindling the stove after a long downtime + for cooking food in summer time(when heating the house is not needed). Through this passage, the heat goes straight into the pipe, without warming up the stove.
This oven also has an oven. It has 2 modes: 1 - when hot gases "come up" to it, having previously passed through the revolutions (strokes) in the furnace body itself, 2 - when the gases pass to it, passing through the ignition passage, the temperature of the gases is higher here.
Materials for building a furnace

Furnace foundation
This baby oven is built with a foundation! It should go 50-70cm deep, and its upper part should be equal to the level of the finished floor. More simple, and inexpensive foundation is considered buto-concrete. It is done like this:
first, a pit 80x65cm is prepared, formwork from boards is inserted into it. The inner side of the formwork is covered with roofing material or plywood to concrete mortar did not ooze through the cracks. Next, a battle of bricks is laid in layers, a rubble stone, and all this is poured cement mortar... The solution is prepared in proportions 1k3, 1k4. Several layers of roofing material are laid between the stove and the foundation - for waterproofing.
Masonry oven baby
The baby cottage stove for this project is laid using clay-sand mortar. It is prepared in proportion: two parts of sand to one part of clay. Before preparing the solution, the clay is necessarily soaked, and the sand is sieved. Lay the mortar between the bricks in a certain layer - 5-6mm thick. We carry out the masonry with a bandaging of ½ brick, it is possible also in ¼. We check all corners with plumb lines that depart from the nails driven into the ceiling.
Every six rows of masonry inner side the oven is rubbed with a wet rag!
After the pipe, an opening is made in the ceiling with the expectation of fire-fighting cutting. Between the pipe and wooden floors there must be a distance of at least 250mm. Also, do not forget about protecting the wall behind the stove, if it is wooden. It can be covered with burlap, a 2 cm layer soaked in a clay solution, and a sheet of iron on top. We nail a sheet of iron to the floor in front of the oven to protect it from fire.


1-28 row - laying.
Furnace niche rack (3 × 3 tube and 2 plates).
Oven steam hood visor (made of steel 110x930x1).
Furnace niche frame. We connect the parts by welding, using screws or rivets. We fix the frame to the wall of the stove with wire, which is laid between the rows of masonry bricks.
Oven / oven. We make the floor slab from a two-burner oven plate, cut in half. The opening of the burner, which is used for the hood, is closed with a latch. We rivet it to smooth side the plate itself.
As practice has shown, for a room with a volume of 30 cubic meters. with double floors, insulated walls and double window frames warmed up to temperatures of + 20 ° C (at an external temperature of -20 ° C), you need to burn the baby up to 12 kg of dry firewood in the oven. And already in the next days, with a 2-time firebox, it is necessary to burn about 5 kg of firewood.
A comfortable, beautiful and functional stove is the dream of every summer resident. For all lovers of beds or rest in the country, the Malyutka stove was invented. Advantages of the baby hearth:
- compact size;
- Personal heat transfer ( 1700 kcal / hour);
- low fuel consumption, can be used chips and wood of poor quality, which is ideal for giving;
- Cooking;
- quick DIY erection: the first kindling can be done a couple of hours after laying (but not for long, with paper or chips);
- a light weight, the hearth does not require a foundation, but if you bake more minimum sizes, then it is better to make it a foundation.
The ordering of the oven is quite simple and you can easily do it yourself. Optimal dimensions for giving - height 1.9 m, width 0.75 m, depth 0.63 m.
To expand the possibilities, the Baby can be improved. Add cast iron stove, range hood, oven. She will become an indispensable assistant in the country, especially since the Baby oven is very profitable financially.
Operation tricks:
- If the hearth is idle for a long time during the cooking process, it is not necessary to preheat the oven. Begin cooking food it is better immediately when kindling, the heat will warm the stove and go through the pipe. The oven should not heat up.
- To prevent steam from the dishes from entering the room, when ordering, think over the hood.
- When using the oven, you can provide two modes - hot air goes through the channels to the oven, or the air enters through the ignition passage. In the second case, the temperature is higher, and it is possible to remove the samovar door.
Heating equipment formation
 First of all, it is necessary to decide on the place where the Malyutka stove will be installed, as well as to prepare an accurate diagram with dimensions and order. General principles stoves are also suitable for the baby hearth. Installation is carried out at a safe distance from the walls ( about 25 cm.), the stove should not stand in a draft, and the chimney should not touch ceiling beams... The safety principles must be fully respected - walls, ceiling and floor are insulated with fire-resistant materials.
For the construction we need:
- (corpulent);
- fireclay brick (for the firebox);
- or cement M300;
- reinforcing rod;
- blower door;
- grate;
- furnace door (if you choose a glass door, then the baby can function as a fireplace);
- cast iron hob;
- gate valve.
Read also: Making a stove for a cauldron
Of the tools you need:
- trowel (leveling mortar, cutting seams);
- hammer and pickaxe (for bricks);
- level;
- Master OK;
- plumb line (weight with a cord) for checking angles;
- a rule (a wooden ruler with a cross section of 1.5 x 6 cm and a length of 1-1.5 m, having parallel planes) for the evenness of the masonry;
- roulette.
Foundation
 For a solid multifunctional furnace, a foundation will be required, but a concrete one will be more economical. The pit must be at least 80x65 cm., formwork from boards is installed into it, covered with plywood or roofing material and poured with concrete. Next, a brick fight and a rubble stone are laid out, everything is poured with cement (ratio 1 to 3). The last step is to cover with insulation in several layers of roofing material.
For the strength of the foundation, it is better to install a reinforcing grid. Lay out six rods 50 cm long and six wide. The step should be approximately 10 cm, the joints are welded with electric arc welding. You will need two such lattices.