Home-made and hand-made machines and devices for sharpening knives. How to make a sharpener with your own hands? Devices for sharpening knives, device and manufacture Home-made devices for an electric sharpener
To perform their function, knives must always be sharp. Any housewife, using a knife to cut food, knows how quickly it becomes dull.
Can make a sharpening from wooden blocks... You will need 4 blocks of the same size: 2 - wooden, and 2 - abrasive. The wood is sanded, removing all burrs with sandpaper... Markings are applied to them depending on the desired angle, they are applied grindstone and fix its width. On the markings, cuts are made with a depth of 1.5 cm. Abrasive bars are inserted into the grooves and fixed with bolts.
Consider the action of the clamping device. The knife is fixed and remains stationary, while the stone makes forward movements. It forms a straight cutting edge on the knife edge at the desired angle. To make the blade perfectly sharp, you need to change the sharpening stones successively. It must be remembered that the stones must move strictly perpendicular to the area that is being sharpened.
Chisels and planer knives can be sharpened at home. It is necessary to make an elementary device where the sharpening angle will be fixed. Sharpening is carried out strictly on sanding paper.
Simple knife grinder
 To make it, you need two pairs of slats and a bar. The slats are interconnected by means of adjustable screws, a bar is installed between them. The structure must be stable, it is undesirable to move it on the working table. To better fix the block, you need to provide support strips that can be positioned between the wooden components.
It's easy to do it yourself. You need to prepare the right tool.
Such a machine has disadvantages:
- it is not always possible to control the sharpening angle, especially if you work for a long time;
- the design is unstable, one more fixation unit is needed;
- you need to regularly tighten the screws so that the position of the bar does not change.
Sharpening planer knives
This is a complex process that requires certain knowledge and skills. It is difficult to find a planer knife sharpener on the market. Many people do this with ordinary sharpeners. It is recommended for this case to purchase a modern low-speed sharpener, which is equipped with water cooling.
To make a planer knife sharp, you need to find a smooth and unrefined stone that is applied in this area. A water stone is perfect.
You can sharpen such a knife in any car workshop that has a knife sharpening tool. For an additional fee, any blade will be sharpened using a special machine.
 There are two types of knife sharpening: one-sided and two-sided. The working methods will differ from each other. This must be taken into account.
When choosing a quality block, you need to take a stone with a medium grain.
Knives that have special coatings for the cutting edges do not need to be sharpened. They are made of extra hard alloys that protect the blade from wear.
A sharpener with a special cutting edge in the form of teeth is not worth trying to sharpen in the usual way... For such a blade, you need to apply laser control, which is not available in an ordinary apartment.
Wash blades often hot water it is impossible, since this makes their blades dull faster.
To sharpen the blade quickly if you don't have a special device at hand, use a regular ceramic mug. Its bottom usually has a rough rim not covered with glaze - it can be used instead of stone. The method is suitable for auxiliary sharpening.
Some villages still practice method of sharpening blades on the foundation... For its manufacture was used cement-sand mortar, therefore, the surface of the foundation has a grainy surface. Of course, this is a way for residents apartment buildings not acceptable, but it's a pretty good option.
Conclusion
Every house must have a knife sharpening device. A simple model of a knife sharpening device can be made by hand.
Let it be the most simple model but if you do it yourself, your blades will never dull.
Sharpening knives is a process that even delicate female hands can handle. Indeed, in our time there are many devices that facilitate this task. Ceramic knives, for example, do not require sharpening, which is very convenient, and steel knives require periodic sharpening, since the material is dull. To sharpen the knives, you can use coated abrasive bars or a knife sharpener.
- Grinding bar.
- Special cut files.
- Sharpening accessories.
- Knife sharpening machines.
Note.
The old-fashioned knife sharpening is, of course, good and efficient way but a finely tuned machine for household use gives more quality result with the desired angle of formation of the edge of the blade.
Knife sharpening rules
 Experts recommend following a number of rules in order to get high-quality sharpening of knives at home, which in turn will reduce the number of sharpening of the blade.
If you are a proponent of using an abrasive bar, start with the sharpest part of the blade, and end with the duller one, namely the one that is little involved in the process of cutting food. Often, the process starts in the middle, moving towards the edge of the blade with a slight twist. The shape of the knife and its thickness affects the angle of the blade. The sharpening machine for kitchen knives performs turning at an angle of 25 °, the blade is tilted over the bar by 12 - 13 °.
The type of sharpening machine for planer knives and the material from which it is made also affect the quality of the work.
On various Internet resources, you can find special videos that clearly show the process of sharpening a knife blade.
Note.
Knives are manufactured mainly from alloy and carbon steel. Hardened steel needs to be sharpened with a bar with an abrasive, stainless steel - with a triangular file. This is due to the fact that relatively soft metals, during the sharpening process, forget the surface of the bar with the abrasive. The forged blade is quite flexible, so it is advisable to fix it and sharpen it with a bar in casual movements. Frequent use of abrasive stones contributes to the formation of a greasy film on the surface, which must be rubbed off.
Previously, table sharpening machines for knives were made from wedge-shaped bars and oak. The bars were placed on both sides of the wooden blade, so that the cutting edge was free. The structure was pulled with a rope and, using a grindstone, the blades were sharpened to the utmost sharpness, while obtaining an excellent sharpening angle.
Sharpening knives used in planers is done as follows: on glass of large thickness, impose an emery cloth with a fine fraction, the beveled part of the cutting edge on an abrasive and sharpen in a circular motion.
Sharpening knives at home
For this purpose, you need to take a block of hard wood, the surface of which is formed by sharpening at a certain angle necessary to form the edge of the blade. This makes it possible to keep the corner of the cut edge. For the convenience of sharpening the blade, fix the blade in the plane of the bar using self-tapping screws.
Sharpening machine for jointer knives, make a tool with your own hands, this will make it possible to make the process easier, and the quality of work is much higher. The main thing is to follow the rules and nuances in the work, and there will be no problems.
The do-it-yourself knife sharpening machine is designed to make it easier to work with metal products. Home tool you can sharpen with your own hands with the help of improvised means, and in production you cannot do without a machine. There are more volumes and more serious tools.
Professional knife sharpeners
The sharpest tool is considered to be a rock cutter or a carving knife.
This is used by butchers for cutting animal carcasses, and cutting off the skins. With such intense work, the tool blade dulls extremely quickly. If the volume of work is not too large, sharpening can be done on conventional machine which is equipped with a control over the angle of the blade edge. Knife sharpeners in the meat processing industry are mainly used by KNECHT USK 160. Such machines are universal, so absolutely any knives can be sharpened on them.
At enterprises engaged in woodworking and in carpentry shops, equipment is installed that can cope with large volumes of work. It uses a tool with long-blade jointers and planers. Sharpening of metal takes place on equipment with a mechanical drive, which feeds the tool for sharpening.
When trying to sharpen a tool yourself with a sharpening bowl
… Without the use of fixation and guides, zones with different angles will be formed on the blade. When processing wood with a poorly sharpened tool, you will get an uneven cut and a wavy surface. The sharpening machine for flat knives has a simple vertical design, the discs are sharpened on machines with a separator and a rotating table.
Universal knife sharpener
This type of equipment the best way suitable for enterprises that perform large volumes of work per day. No one will tinker with metal by hand, since it is hard work. Bench machine VZ-319 is equipped with a rigid frame and a precisely fitted mechanical drive. Therefore, it copes with sharpening any type of tool - planers, cutters, knives, etc.
For domestic use, the Tormek T7 model is suitable. The equipment of this unit is large, there are many nozzles and additional elements for sharpening kitchen knives, scissors and other tools.
Making a knife sharpener with your own hands
It is quite simple to make a knife sharpener for household use, for this you need a cut, or, wooden lath, sandpaper, lamb bolts. The first step is to make a knife holder, for this purpose cut off a piece of material. In order to avoid clinging of the bar to the holder, you need to clean the edge at a certain angle using emery. On a vertical stand, mark up and cut off the top, this will serve as the basis for. The angle is set to half that required for sharpening the blade.
For household knives, the angle is 10 - 15 °. To facilitate the construction of a knife sharpening machine, make a drawing, so it will be much easier for you. Take into account the fact that the height is influenced by the transverse base. Finally, all elements need to be trimmed and sanded. Then, you need to make holes for the bolts in the plate, which will fix the blade. When marking, determine the distance of the holes from the edge of the base. This will allow you to sharpen blades of different thicknesses.
In the next step, the plate needs to be secured using bolts. The uprights are fixed with screws. It is important to remember that the pressure on the bottom is small, so thermal glue can be used to fix the elements. The horizontal bar is attached in the same way.
To make a bar, you need to cut a rail of a certain length. At one edge, sandpaper is attached with a sufficient fraction of abrasive particles. In order to achieve a better result in work, you can make more bars with different abrasives. A good grit range is P600 - P2000.
Note.
To protect your hands from injury when sharpening the tool, screw the handle onto the top of the rail. Thus, you get a machine for home use with good functional properties.
In the process of sharpening knives, the device receives support on the table, which in turn makes it easier to work with it.
Currently, there are several types: a machine for sharpening knives, for a hairdressing machine and others. This article talks about how to make a machine for sharpening knives at home: detailed drawings with dimensions, photos and videos (2-3 videos) are presented.
Often, when sharpening knives at home, households use abrasive sticks. However, in order to use them in practice, you need the necessary skills and experience with them. After all, if the knife is sharpened at the wrong angle, then the blade remains dull.
Diagram of the location of the block to the blade.
Before the direct manufacture of the machine, you need to heed the advice from locksmiths-sharpeners.
When sharpening a knife, the master performs the following actions:
Determines the angle between the active area of the blade and the block. Moreover, for each model, the angles are different;
The knife is positioned at an angle of 90 degrees to the direction of the bar. The grooves that form when the razor blade of the knife rub against the block should be at 90 degrees to the knife line. The angle in a similar situation is half the sharpening;
Typically, the angle is 25 degrees;
The locksmith starts processing from the beginning of the foot blade;
When adjusting the sharpening angle, the master paints over part of the foot blade with any marker. As a result, the locksmith controls the work area directly.
As a rule, after sharpening, the working blade has non-uniform deformations. Therefore, when self-processing, the "reference point" should not be the sharp part of the knife.
Choice of sticks for sharpening a knife

The main indicator of a block is graininess.
The bar is the main component that makes the blade thin and sharp. As a result, before choosing a design, it is necessary to select the necessary blocks.
When self-sharpening knives, the household uses these types of blocks
which have a high grain size. By using such bars, the shape of the foot blade is corrected.
having an average grain size. With the help of such bars, the locksmith removes the grooves that are formed during the initial processing of the knife.
touchstone, which is covered with GOM paste. In a situation like this, the locksmith polishes the blade.
When processing knives in the kitchen, you can use two types - with medium and high grit. And also in this case it is necessary to use a touchstone.
Base
When making a sharpener at home, you can use various parts. In particular, you can use laminated box plywood 12 mm thick, which was previously used in the creation of radio enclosures.
When building a machine at home, a household member performs the following actions:
Selects the basis for such an installation, which must weigh at least 5 kg. IN otherwise it will not be possible to sharpen chopping devices and tools on the machine. Therefore, in the manufacture of such equipment, the tenant uses various steel corners with a size of 20x20 mm;
Further, from plywood, he cuts out 2 parts with a jigsaw, which have a trapezoidal shape, the base is 170 by 60 mm, and the height is 230 mm. When cutting, the locksmith makes an allowance of 0.7 mm for sharpening the ends: they eventually turn out to be straight and fit according to the markings;

Installs between the inclined walls on the sides 3 part - an inclined surface made of plywood of such dimensions 230 x 150 mm.
In such a situation, the trapezoidal sides are on the side on a rectangular surface.
The result is a base - a wedge. In such a situation, a 40 mm inclined surface protrusion is formed in the front part;
Then, along the side wall ends, the locksmith marks 2 features with a thickness gauge. At the same time, it retreats by half the thickness of the plywood;
Drills the ends of an inclined surface and connects the base parts for a while;

At the back of the structure, the locksmith connects the side walls using a 60x60 mm block, which is attached to the end with two screws from 2 sides; - makes a 10 mm gap in the block.
In such a situation, it retreats 50 mm from the center - 25 mm from the edge. To maintain a vertical position, it is first drilled with a non-thick drill from 2 edges, and then expanded;

Then, at the top and bottom, two threaded fittings are screwed into the slot, and in the fittings - a 10 mm stud, the length of which is 250 mm.
If the threads do not coincide with the studs, the lower case is adjusted.
Assistant device
In the manufacture of a helper device, the following actions are performed:
Removes the flat inclined part from the base, modifies it and installs the fixation device on it, as well as the clamp of the device used;
Measures 40 mm from the edge in front and at this mark, using a garden hacksaw, cuts out a groove, the depth of which is 2 mm;
Using a boot knife, 2 upper veneered layers are chipped off from the end of the board. As a result, a sample is obtained into which the locksmith inserts a 2 mm steel plate at the same level with the total surface;

The handyman contains 2 steel slats with dimensions 170x60 mm and 150x40 mm. The machine operator connects them along the big end, which has equal marginal indents, and makes 3 through slots by 6 mm.
With the help of bolts, it pulls the strips along the cracks made. In such a situation, the machine operator leaves the bolt heads on the side of the large upper plate;
Then he removes metal defects of the welded seam in the form of sagging and grinds the plate to give it a smooth surface;

Attaches a small striker to the edge cut, transfers the crevices with a drill and bolts the handrail.
Fixation device

Second important detail the handler is considered to be the clamping bar. It can be made from 2 parts.
L-shaped bar measuring 150x180 mm, the width of the shelves of which is 50 mm (top);
Mounting plate in the form of a rectangle measuring 50x100 mm (bottom).
In the manufacture of the clamping bar, the machine operator performs the following actions:
Sets the bottom plank to the far edge of the top;
Makes 2 holes in the center and retreats 25 mm from the edges of the part, through the holes connects the parts with two 8 mm bolts;
Screws in 8mm bolts on 2 sides. In a similar situation, the close bolt's hat is located near the top bar;
Welds the heads of the bolts to the plates and grinds them in advance until roundness is formed;
Yes, the inclined board retreats 40 mm from the edge and draws a line with a thickness gauge;
Makes one 8 mm gap in 25 mm at the edges at the bottom and top;
With the help of markings, he connects the edges of the slots and makes a cut with an allowance with an electric jigsaw. Expands the groove with a file to a width of 8.5 mm;

Fastens the planks with a groove, which is in the board, tightens the upper bolt with a nut and, thus, firmly fixes the plank.
Then he tightens the connection with a nut;
When pressing the lower bar (in the base niche), the wing nut is screwed onto the second bolt.
Sharpening angle control
When adjusting the sharpening angle, the locksmith performs the following actions:
On the pin, which is in the block of the machine base, he throws a large washer and tightens the nut.

The rod does not turn in the case; it makes a block for adjusting the sharpening angle from a small carbolite bar, the dimensions of which are 20x40x80 mm.
At 15 mm from the shoe edge, drills 20 mm on the end on 2 sides, expands the gap to 9 mm, then makes a thread inside;
He retreats 50 mm from the axis of the new slot and drills another one in the flat part of the workpiece - 90 degrees to the previous one. Such a slot has a diameter of 14 mm. In such a situation, the locksmith greatly expands the hole using a round rasp;
Screws the block onto the spire - sets the desired eye height without the use of fixing screws;
Fastens the block from 2 sides with M10 hex nuts.
Using interchangeable blocks and making a carriage
When making a sharpening carriage, the machine operator performs the following actions:
Welds 30 cm M10 threaded rods with a smooth rod, the thickness of which is 10 mm;
Uses 2 hard bars 50x80 mm and the thickness is 20 mm. In all the blocks in the center and on top, 20 mm retreats from the edge, and then makes a gap 10 mm wide;
Screws a wing nut onto the bar, then a large washer and 2 bars, then a nut and washer;

Clamps rectangular sharpening stones between the bars or makes several replaceable sharpening stones.
As a block base, the machine operator uses a rectangular tube from a profile or a piece of cornice, the width of which is 50 mm;

Sands the flat machine part and cleans it of grease, glue the strips of sandpaper with a grain size of up to 1200 grit with Super Moment glue.
The sandpaper should have a fabric base, and a strip of suede should be glued onto 1 of the blocks to apply polishing to the blades.
Simple homemade machine
The most common version of the machine structure is considered to be 2 pairs of wooden slats, which are fastened together with screws. The machine operator installs a block between such parts.
The main reason for the popularity of usemanual homemade machine for sharpening various knives - this is its stability. During operation, the machine structure does not move in any way along the workbench.

When fixing the block, the locksmith uses the support strips, which are located between the wooden elements.
However, such a homemade machine has the following disadvantages:
The craftsman sets the blade to the stone by hand. With prolonged work, it is difficult to keep track of the sharpening corner;
When making such an installation, it is necessary to use a fixing unit. The machine structure must be stable, so it must be firmly attached to the workbench;
In the process of work, the screeds loosen and the location of the block changes.
Another advantage of such a scheme is the ease of manufacture. Such a machine structure is often used when sharpening knives for a jointer and for the kitchen.
Wooden slats can be of various thicknesses. When self-made a simple sharpening machine, you can use various components at hand.
At the initial study of all the nuances of manufacturing, you need to watch thematic videos, which describe in detail how to make a machine at home.
It is quite difficult to sharpen a knife correctly by hand. It will take some time to develop the habit of keeping a constant sharpening angle, which is not easy at all. A knife sharpening device can make the task easier. There are factory options. But for good copies you have to pay off a couple of hundred dollars, and this is clearly a lot. Good news the fact that these devices are easy to make with your own hands. Moreover, many homemade knife sharpeners are not worse in terms of functionality than from well-known manufacturers, but they cost many times cheaper.
Knife sharpening basics
Knives have different uses, and even in an ordinary kitchen there are several of them. There is for cutting bread and other soft foods, there is for cutting meat, chopping bones, and other hard objects. And these are only household ones. But there are still those who take on hunting and fishing. If you look closely, you will see that they all have different angle sharpening (this is if they were no longer sharpened at home). It is the sharpening angle that is the most important characteristic, which is determined by the purpose of this blade.
The knife sharpening device will greatly facilitate the work
At what angle
The sharpening angle is determined based on the main field of application of a particular blade:
it general recommendations introduced based on many years of experience... There are, however, options: some blades have several zones with different sharpening. This wishes them to be more versatile, but the complexity of sharpening increases many times over.
From the above it follows that the device for sharpening knives should be able to set the required sharpening angle. And this is the main difficulty in its design and manufacture.
How to sharpen
Sharpening stones of various grain sizes are used to sharpen knives. They are conventionally divided into coarse, medium and small. Why conditionally? Because in different countries its designation of grain size is adopted. The most convenient classification is by the number of grains per unit area. It is expressed in numbers: 300, 600, 1000, etc. Some firms duplicate more English terms... Here is an approximate division:
In addition to the grain size, whetstones are distinguished by their origin: they are of natural origin (shale, corundum, etc.), there are ceramic and diamond. Which is better? It's difficult to say - a matter of taste, but natural ones grind off faster and are rarely fine-grained.
Natural ones are soaked in water before use or simply moistened with it. They absorb water and, during sharpening, an abrasive paste is formed on the surface from the water and separated abrasive particles, which increases the sharpening efficiency. For the same purposes, you can use a special little (honing oil) or a mixture of water and soap (whichever you prefer). In general, with each of the sharpening stones, you need to try all these options and choose the best one.
The shape of the sharpening stone for sharpening knives is a bar, and it is desirable that its length be much longer than the length of the blade - it is easier to sharpen. Convenient bars with double grain - on the one hand, larger, on the other - finer. For sharpening knives for ordinary use, it is enough to have two bars with medium grain (different) and two small ones (one can be very small).
Manual sharpening procedure
The device for sharpening knives only facilitates the process of guiding the edge, therefore, knowledge of manual sharpening techniques is required. It is impossible to sharpen the knife correctly without them.
The order of sharpening knives is as follows:
On this we can assume that the sharpening of the knife is finished. Some are still finishing the edge on the old belt. A piece of belt can be fastened to wooden block(glue, do not nail), rub with goyi paste. Then carry out several times alternately with one or the other side, but with the cutting edge turned back. So the last grooves left by the abrasive are polished and the belt is not "cut" at the same time.
How to make a homemade knife sharpener
All homemade knife sharpeners solve the main problem - they allow you to accurately maintain a given angle of inclination of the bar to the blade, which is very important for obtaining a good cutting edge. There are very simple fixtures, there is a little more difficult, but allowing you to work with greater comfort. Choose according to your taste.
Some of the options are from improvised means
Simple device for sharpening knives
Basically it is a sharpening stone holder. Everything is elementary: two triangles made of wood, which are connected with pins with "lambs". A bar is clamped between the corners at the required angle. You can set the angle using a protractor, a special program on a smartphone, or using the rules of trigonometry (right-angled triangle).
Knife sharpener - abrasive holder
When sharpening on such a device, the knife must be kept strictly vertical at all times. This is much easier than holding it at a certain angle.
The same idea has a different embodiment: on solid foundation make movable holders into which the bars are inserted and fixed in the desired position. The corporate prototype is in the photo below.
Bar holder for sharpening a knife
This homemade knife sharpener is made of wooden blocks. It turns out that it is light, so that it does not move from its place, it must be fixed with something. To avoid holding it with your hand, you can use clamps.
Swivel holders allow you to set a predetermined angle, and then fix it with the help of "lambs"
Such a device for sharpening knives, of course, makes the work easier, but it is still quite difficult to maintain an angle: you have to control the verticality of the blade all the time. This habit develops over time, but it's difficult to get started.
The device on wheels
An interesting version of a manual knife sharpener with a fixed bar and a trolley on wheels, on which the knife is fixed. It is made on the basis of knife sharpeners, chisels and planers. Such a device also works well with a knife, but it is necessary to adapt to sharpening a rounded edge.
Homemade tool for sharpening knives on wheels
In this version, as in manual sharpening, the bar is stationary, and the blade of the knife, fixed on the movable trolley, moves. The angle is set by the height of the bar relative to the platform on which the blade is mounted. The peculiarity of this device is that the table needs to be flat. It could be a table top made of natural stone, you can on regular table put glass.
In the above version, the angle changes slightly, which is usually enough for sharpening the same type of knives, for example, kitchen ones. If necessary, the design can be improved by adding holders (pictured below).
Improved model
All this is implemented very simply, as it resembles an ordinary constructor: strips, holes in them, everything is assembled on bolts and screws.
To ensure the immobility of the bar, there is also a device.
For fixing the bar
The plus of this whole design is that it is easy to unfold the knife while maintaining perpendicularity in the rounded area, and also very easy to process from the other side: you need to turn the cart over. For this, four pairs of wheels are made.
Homemade manual knife sharpening machine
Slightly more complex and much more convenient homemade devices, which are made on the basis of well-known brand devices. They have an adjustable platform on which the knife is fixed. The platform is exposed at a given angle. The block is mounted on a movable bar attached to the rack.
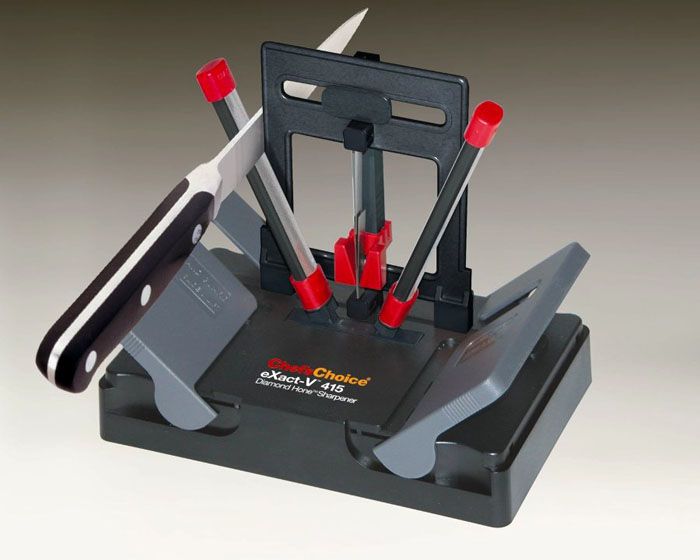
One of the branded knife sharpeners
Hand-made devices are somewhat similar to the design presented above, but there are some differences. There are many options. Here are some.
Option one: a fixed platform on which the blade is fixed
This fixture is made from remnants of laminate (chipboard can be used), two steel rods with a diameter of 8 mm and a movable fixture.
General view of the device for sharpening knives
This design has a fixed base, which on regular hinges a platform with a knife holder is attached. The near edge of the platform can be raised at some angle that is convenient for work. But otherwise she is motionless.
On the vertically mounted steel bar, there is a movably mounted retainer, in which a loop is attached to the side. A rod is inserted into it, on which the bar is fixed. This loop is a simple, but not the best solution: there is no rigid fixation, which means that the corner will "walk".
The loop into which the second rod is inserted
Particular attention should be paid to the block retainer. An emphasis is made on the rod at some distance from the edge (about 30-35 cm). This will be a fixed retainer. The second is made movable, it is fixed after installing the bar with a screw and a thread cut in the body of the holder. The second option is to cut a thread on the rod and tighten the installed bar with a nut.
Knife holder - one or two steel plates fixed on a movable platform. They are fixed movably - with screws and "thumbs". Having loosened the fasteners, insert the knife blade, clamp it. It is very difficult to move it. Then, having installed a pin with a fixed bar in the loop, adjust its height so that the required angle is set.
Angle setting
You can, as in the photo, make templates with the desired angles and achieve the coincidence of the planes. After the transverse bar is fixed, you can work - hold the bar in the desired direction.
This device for sharpening knives works well, but you can only move the abrasive along the blade when sharpening a kitchen knife. Classic sharpening - movement perpendicular to the cutting edge. This can be achieved on the straight edge of the blade. If the blade is short, it will be almost perpendicular, but this will not be done on the rounded part on the fixed holder. And all such devices "suffer" from this drawback. Once again: they are - great option for sharpening kitchen knives (below is another good option from the same series).
Option two: with a movable platform and a magnetic holder
In this version of a homemade knife sharpening device, the problem of previous sharpening is solved. Here the frame remains motionless, which sets the angle of movement of the bar. The bar holder moves freely along a guide set at the desired angle. The knife is mounted on a movable table. You can, as in the presented version, make a magnetic holder, you can - the usual one from a metal plate and "lambs". Move the table so that the movement of the abrasive is perpendicular. Actually, everything is in the video.
One clarification: in this case, it is very important that the surface on which the table with the fixed knife moves is horizontal and even. You can put glass or use a polymer countertop (marble will work too).
Similar materials


We will send the material to you by e-mail
Regardless of what kind of guarantee the manufacturer of knives gives that during use they will not require sharpening, sooner or later this question arises before the user. It doesn't matter if it concerns kitchen utensils or camping utensils. a sharp knife is the key to success in fishing and hunting, while traveling and when preparing food. Accessories for sharpening knives - types and rules of use, as well as how to make it yourself - this is the topic of today's review of the editorial site.
The simplest device for sharpening cutting tool is a bar, and the device for its use is a fixer for the angle of the location of the sharpened surface
Knives can be classified according to the following indicators:
Whetstones and whetstones
A whetstone (whetstone) is an abrasive tool used to sharpen cutting edges household appliances and kitchen utensils, carpentry and metalwork tools.
The industry produces four types of stones for sharpening knives:
- natural- novaculite and Japanese water stone are distinguished by their high price and complexity of use;
- diamond- the most popular type of product, it is distinguished by a variety of both geometric dimensions and grain size. They are distinguished by wear resistance and efficiency of use, as well as low cost;
- ceramic- a modern type of sharpening tool, distinguished by its combination in itself positive qualities natural and diamond analogues;
- artificial- to all known species electrocorundum or carbide, they are of low cost, but in the process of use they crumble and are not suitable for finishing the cutting edges.

Hand tools
- Musat for sharpening knives.
Almost everyone knows what musat is, but that this is the name of this product, many do not even suspect. The reason for this is that musat, as a rule, comes with sets of knives offered for sale through trade organizations.
Musat is a rod made of various materials, equipped with a handle and characterized by a rough drawing of the working surface.

The roughness of the drawing is the size of the notch applied to the rod, and it is this that determines the degree of roughness of the cutting surface of the knife after it has been processed. Musat is equipped with a rod with a certain degree of magnetization, which ensures that metal particles formed during use get into food and kitchen utensils. Musats are classified by:
- rod shape- round and oval, flat and tetrahedral;
- materials used- ceramics and metal, diamond and mixed designs.
Each species has certain advantages and disadvantages that determine the possibilities of using the device and its purpose.

- Manual machines.
Household manual knife sharpening machines differ in their design, but in any of them, a bar or a whetstone acts as the main element. The action of the abrasive tool on the cutting surface is carried out using the forces applied by the user. The main task performed by a manual machine is to create and maintain the optimal angle of sharpening of the cutting edges for the entire period of work, which is achieved by rigidly fixing the knife in a given plane. The industry produces various models of such equipment, differing in the size and methods of attaching abrasives and processed knives, as well as the materials used and cost.

Household electric sharpeners do not take up much space and are very functional, because in their design, as a rule, various fixed sharpening angles are provided for different types knives and other cutting tools (scissors, screwdrivers, etc.). The ability to quickly and efficiently sharpen the cutting edges of knives is very important for catering establishments, where the speed and quality of cooking depends on sharpening. Professional machines for sharpening knives are functional devices equipped with high-quality abrasive tools that allow you to perform not only rough sharpening, but also fine-tuning the cutting edges of knives for various purposes.

Professional models, in addition, as a rule, have several modes of operation, allowing you to sharpen with different efficiency required for knives made from various metals or ceramics.
How to properly sharpen a knife at home
Everyone knows that a knife must be sharp, and for this it needs to be sharpened, but how to do it correctly is often not known to every user. It should be noted right away that for correct execution work is necessary:
- Know the sharpening angles for each type of knives and other cutting tools.
- Be able to work for various equipment or using available tools.
Sharpening angle of knives for various purposes
For knives used for different purposes, the angles of sharpening of the cutting edges are different, which is due to their purpose and nature of use.

This value is for:
- table knives - 55–60˚, because ready-made dishes are soft enough and cut easily, moreover, with a lower sharpening angle, there is a possibility of damage to the dishes during a meal;
- hunting and folding models - 40−45˚, which is explained by their versatility;
- kitchen knives - 30−35˚;
- used for professional cutting of vegetables - 35˚;
- used for professional cutting and deboning of meat - 25-30˚;
- used for professional cutting of fish - 25˚.
Some types of knives are sharpened with different sharpening angles, such as, for example, intended for slicing bread (the angle is 15˚), but this is a narrowly targeted use, in which sharpening must be performed quite often, because with a decrease in this indicator, the durability of the cutting edges decreases.

How to sharpen a knife at home with a bar
In order to properly sharpen a knife using a bar, you must follow several rules for performing work:
- it is necessary to choose the optimal sharpening angle corresponding to the purpose of the knife;
- the blade should be located in relation to the plane of the bar strictly in the specified parameters of the sharpening angle for the entire period of work;
- sharp and abrupt movements should not be allowed, they must be smooth and sliding;
- when performing work, the bar should be moistened abundantly with water diluted with soap or detergent.
How to sharpen with musat
The process of sharpening a knife using musat is shown in the following figure.

The work is done as follows:
- musat is installed on a flat surface strictly in a vertical plane;
- the upper part of the device is aligned with the sharpened edge of the knife near its handle, after which the knife moves along the musat rod in an arched motion directed from top to bottom;
- the movements are repeated several times on both edges of the knife.
I would like to note that experienced users can perform this operation on weight, without rigid fixation of the rod of the device used.
How to sharpen a knife correctly on an electric grinder
When using models equipped with electric drive, the basic requirements for the performance of work, allowing you to perform the correct sharpening, are the same as in the case of using a bar or a sharpening stone.

But, besides this, there are additional requirements, which can be formulated as follows:
- it is not the abrasive that should be moistened with water, but the surface of the knife being processed, which is explained by the fact that water is not stored on a rapidly rotating wheel;
- overheating of the blade must not be allowed, which can lead to its damage, which occurs when the machined edges are strongly pressed against the abrasive surface;
- for rigid fixation of the sharpening angle, additional devices can be used that are installed rigidly to the body grinding machine or in the hands of the user;
- when working on sharpening machines for industrial purposes, it is necessary to use personal protective equipment, such as gloves and goggles.
In the case of using small devices intended for home use, the main requirement for sharpening is the operation time, all the rest (fixing the sharpening angle, protection, etc.) the machine performs itself, according to its design.

Typical mistakes when doing work with your own hands
When self-sharpening knives, many users allow typical mistakes, which can be formulated as follows:
- Creating the wrong sharpening angle prevents the knife from being used for its intended purpose or limits its functionality.
- Excessive pressure when working on electrical models or the wrong direction and nature of the movements when using a bar or grindstone contribute to damage to the surface of the knife, destruction of its edge.
- Sharpening the cutting surface without pre-cleaning from dirt and foreign substances leads to blurring of the abrasive and its damage.
- Using only one musat when sharpening cutting edges. This device is intended only for finishing or dressing the knife blades; it is not intended for performing the main sharpening.
- Failure to complete the sharpening operation again leads to a rapid blunting of the cutting edges.
- Use of an abrasive (stone or whetstone) of only one grain size.

Making a machine for sharpening knives with your own hands
Although it is now possible to easily buy necessary fixtures and equipment designed for sharpening knives and other cutting tools, however, handicraftsmen continue to make knife-cutters with their own hands in their free time. When making a knife sharpener with your own hands, you need to decide on its type (manual or electric) and the type of abrasive materials used (bar, wheel, sanding belt), as well as the materials available that will go to make the body of the assembled device, its frame. Consider the option of a manual sharpener using an abrasive bar and plywood as the frame of the structure. Appearance the assembled device is shown in the following figure.
