Simple wiring diagram for an egg turning system in an incubator. Do-it-yourself automatic egg incubator: diagrams and drawings, step-by-step video instructions Do-it-yourself automatic turning of chicken
You need to know any type of poultry and take into account many nuances. For example, many novice poultry farmers are interested in how to turn eggs in an incubator. There is no unambiguous answer to this question, since each educational literature provides different information. However, it should be borne in mind that when incubating eggs, it is important to create conditions that are as close to natural as possible. For example, a laying hen, when incubating, turns the eggs several dozen times a day.
The rollover problem is solved by using a modern automatic device, but you still need to know how often to turn eggs in an incubator.
Experienced poultry farmers recommend turning eggs up to 96 times a day for maximum incubation results and up to 24 times a day for optimal results. If the eggs are turned more often, the hatching result may be impaired.
It is impossible to turn over manually so many times. So what to do for those who are hatching in conventional incubators without automatic inversion.
The success of the entire incubation process depends on how many times the eggs are turned in the incubator. Eggs are usually turned by hand every 4 hours during the day. The coup is not carried out at night.
How to turn eggs in an incubator
There are several ways to flip. For example, if the tray has a vertical rotation, then its axis when turned over is tilted 45 degrees to one side and the other. This method has a significant drawback - after turning, the upper part of the eggs will heat up to 40 degrees, and overheating, as you know, during incubation is unacceptable. In this case, in the lower part, the temperature will be 36 degrees, and in the middle - 38. Still, the method is used, but only those who have a fan in the incubator.
If the tray is in a horizontal position, then it rotates about 180 degrees around the axis. With such an overturn, uneven heating is also possible. Therefore, additional heating elements are installed in the lower part of the incubator.
How to manually turn eggs in an incubator video
Correct turning of eggs leads to an improvement in metabolic processes, more better development the circulatory system and, as a result, the successful hatching of healthy and active young animals.
All experienced poultry farmers are well aware that one of the main conditions for the successful incubation of eggs, in addition to the correct temperature and humidity, is their periodic turning.
Moreover, this must be done according to a strictly defined technology. All existing incubators are divided into three groups - automatic, mechanical and manual, with the last two varieties suggesting that the process of turning eggs will be carried out not by a machine, but by a person.
A timer will help to simplify this task, which, having a certain amount of time and experience, can be made with your own hands. Several methods of making such a device are described below.
What is it needed for
The egg turnover timer in an incubator is a device that opens and closes an electrical circuit after the same period of time, that is, in simple terms, a primitive relay. Our task is to turn off and then turn on again the main units of the incubator, thus automating the system as much as possible and minimizing possible mistakes caused by human factors.
The timer, in addition to the implementation of the overturn of eggs, also provides the implementation of the following functions:
- adjustment temperature regime;
- provision of forced air exchange;
- start and stop lighting.
The microcircuit on the basis of which such a device is made must meet two main conditions: low current switching with a high resistance of the key element itself.
The best option in this case, the technology of constructing electronic circuits CMOS, which has both n- and p-channel field-effect transistors, which provides a higher switching speed and, moreover, is energy-saving.
The easiest way is to use the K176IE5 or KR512PS10 timing microcircuits sold in any electronics store at home. On their basis, the timer will work for a long time and, what is especially important, without interruption.  The principle of operation of the device, based on the K176IE5 microcircuit, involves the sequential execution of six actions:
- The system starts up (short circuit).
- Pause.
- An impulse voltage is applied to the LED (thirty-two cycles).
- The resistor turns off.
- The node is charged.
- The system is turned off (open circuit).
Important! If necessary, the response time can be extended to 48–72 hours, but this would require upgrading the circuit with higher power transistors.
Timer,
made on the KR512PS10 microcircuit, in general, is also quite simple, but there are additional functionality due to the initial presence in the circuit of inputs with a variable division ratio. Thus, to ensure the operation of the timer (the exact time of the response delay), you need to choose the right R1, C1 and set the required number of jumpers.  Three options are possible here:
- 0.1 seconds – 1 minute;
- 1 minute – 1 hour;
- 1 hour – 24 hours.
If the K176IE5 microcircuit assumes the only possible cycle of actions, then on the KR512PS10 the timer operates in two different modes: variable or constant.
In the first case, the system is turned on and off automatically, at regular intervals (the mode is set using the S1 jumper), in the second, the system is turned on with a programmed delay once and after that it works until it is forced off.
To implement a creative task, in addition to the timing microcircuits themselves, we need the following materials:
- resistors of various powers;
- several additional LEDs (3-4 pieces);
- tin and rosin.
The set of tools is quite standard:
- a sharp knife with a narrow blade (to short-circuit the resistors);
- good soldering iron for microcircuits (with a thin tip);
- stopwatch or watch with a second hand;
- pliers;
- tester screwdriver with voltage indicator.

Homemade incubator timer with your own hands on the K176IE5 microcircuit
Majority electronic devices, such as the considered incubator timer, have been known since Soviet times. An example of the implementation of a two-interval timer for incubating eggs with detailed instructions was published in the magazine "Radio", popular among radio amateurs (No. 1, 1988). But, as you know, everything new is well forgotten old.
 If you are lucky enough to find a ready-made radio designer based on the K176IE5 microcircuit with an already etched printed circuit board, then assembling and setting up the finished device will turn out to be a simple formality (the ability to hold a soldering iron in your hands, of course, is highly desirable).

Let's consider the stage of setting time intervals in more detail. The two-interval timer in question provides an alternation of the “work” mode (the control relay is on, the mechanism for turning the incubator tray is working) with the “pause” mode (the control relay is off, the mechanism for turning the incubator tray is stopped).
The "work" mode is short-term and lasts within 30-60 seconds (the time required to rotate the tray at a certain angle depends on the type of specific incubator).
Important! At the stage of assembling the device, you should strictly follow the instructions, do not overheat in the soldering points of electronic semiconductor components (mainly the main microcircuit and transistors).
The "pause" mode is long and can last up to 5, 6 hours (depends on the size of the eggs and the heating capacity of the incubator.)
For ease of adjustment, the circuit has an LED that will flash at a certain frequency during the time intervals setting. The power of the LED is matched to the circuit using a resistor R6.
The duration of these modes is adjusted by timing resistors R3 and R4. It should be noted that the duration of the "pause" mode depends on the value of both resistors, while the duration of the operating mode is set exclusively by the resistance R3.  For fine tuning, it is recommended to use 3–5 kΩ variable resistors for R3 and 500–1500 kΩ for R4 as R3 and R4, respectively.
Important! The lower the resistance of the timing resistors, the faster the LED will flash and the shorter the cycle time will be.
Adjustment of the "work" mode:- short-circuit the resistor R4 (reduce the resistance of R4 to zero);
- turn on the device;
- resistor R3 to adjust the LED blinking frequency. The duration of the "work" mode will correspond to thirty-two flashes.
Pause mode adjustment:
- use the resistor R4 (increase the resistance R4 to the nominal);
- turn on the device;
- measure the time between adjacent flashes of the LED using a stopwatch.
The duration of the pause mode will be equal to the received time multiplied by 32.

Instructions: how to make an incubator timer on a KR512PS10 microcircuit with your own hands
The KR512PS10 microcircuit made on the basis of the CMOS technical process is used in a wide variety of electronic timer devices with a variable division factor of the time cycle.
These devices can provide both a single turn-on (turning on the operating mode after a certain pause and holding it until it is forced to turn off), and cyclic turning on - turning off according to a given program.
Did you know? The chick in the egg breathes atmospheric air, which penetrates the shell through the smallest pores in it. By letting in oxygen, the shell simultaneously removes carbon dioxide exhaled by the chick from the egg, as well as excess moisture.
Creating a timer for an incubator based on one of these devices will not be difficult. Moreover, you don't even have to pick up a soldering iron, since the range of commercially produced boards based on KR512PS10 is extremely wide, their functionality is diverse, and the ability to adjust time intervals covers the range from tenths of a second to 24 hours.  Ready-made boards are equipped with the necessary automation, which provides quick and accurate adjustment of the "work" and "pause" modes. Thus, the manufacture of a timer for an incubator on a KR512PS10 microcircuit is reduced to the right choice boards for the specific characteristics of a particular incubator.
If you still need to change the operating time, then you can do this by short-circuiting the resistor R1.
For those who love and know how to solder, and also want to assemble such a device with their own hands, we will give one of possible schemes with a list of electronic components and tracing of the printed circuit board.  The described timers are applicable to control the inversion of the tray in operation with household incubators with periodic switching on of heating elements. In fact, they make it possible to synchronize the movement of the tray with turning on and off the heater with a cyclic repetition of the entire process.
Other options
In addition to the considered options for basic microcircuits, there are many electronic components on which you can build a reliable and durable device - a timer.
Among them are:
- MC14536BCP;
- CD4536B (with modifications CD43 ***, CD41 ***);
- NE555, etc.
Some of these microcircuits have now been discontinued and replaced by modern counterparts (the industry for the production of electronic components does not stand still).
All of them differ in secondary parameters, an extended range of supply voltages, thermal characteristics, etc., but at the same time they perform all the same tasks: turning on / off a controlled electrical circuit according to a given program. 
The principle of setting the working intervals of the assembled board is the same:
- find and short-circuit the "pause" mode resistor;
- set the desired flashing frequency of the diode with the resistor of the "work" mode;
- unlock the pause resistor and measure exact time work;
- set divider parameters;
- place the board in a protective case.
When making a tray flip timer, you need to understand that this is primarily a timer - a universal device, the scope of which is not limited solely to the task of flipping the tray in an incubator.
Subsequently, having gained some experience, you will be able to equip heating elements, lighting and ventilation systems with similar devices, and in the future, after some modernization, use it as a basis for automatic feeding and water supply to chickens.
Did you know? Many people believe that the yolk in the egg is the embryo of the future chick, and the protein is the nutrient medium necessary for its development. However, in reality this is not the case. The chick begins to develop from the embryonic disc, which looks like a small speck in the fertilized egg. light color in the yolk. The chick feeds mainly on the yolk, while the protein is a source of water for the embryo and useful minerals necessary for normal development.
Thank you for your opinion!
Write in the comments which questions you have not received an answer to, we will definitely respond!
11
once already
helped
Collapse
Following the instructions in this article, you can make your own incubator. It will have the same functionality as shop appliance, but it will cost you significantly less. In order to assemble an incubator with your own hands at home, you do not need to have special skills and knowledge, follow our advice and everything will work out.
Where to start, what tools do you need?
Before you start assembling, decide on the main material of which the product will consist. if you have old refrigerator, then you can take it as a basis. Large pieces of styrofoam, no less than 40 x 25 centimeters, or a simple cardboard box will also work. The determining factor when choosing a material is its thermal insulation capacity.
For heating, you will need to equip the device with a lamp or heating device, take care of temperature control. In incubators, you can configure auto-rotation by adding additional mechanisms.
Automatic turning of eggs in the incubator is needed to save time. Usually it is installed on large devices designed for 200 or more eggs.
Everything you need to build:
- Refrigerator (if you are thinking of building an incubator from an old refrigerator), a box, or styrofoam.
- Standard incandescent lamps with a power of 25 to 40 watts. The number of lamps depends on the size of the incubator, a small unit for 100 eggs can be heated with four lamps.
- As an alternative to lamps, you can use electric heating elements.
- Incubator tray made of metal mesh or analogs. The net should hold the eggs tightly. The refrigerator can be fitted with wooden trays.
- Thermometer, fan.
- Thermostat (if you are designing an automatic incubator). To do this, you can use bimetallic plates, electrical contactors or barometric sensors.
- Gearmotor (what the overturn mechanism consists of). If necessary, bearings - 4 pieces, clamps for tightening them.
- Sealant for sealing gaps for insulation purposes, screws, various fastening materials, metal corners.
- A hygrometer is used to monitor the humidity level.
Attention! Heating lamps should be installed more than 25 centimeters from the eggs.
Decide on the size of the incubator, decide from what you will collect it. Then select all the necessary components from the list above, and you can start assembling.
How to determine the size?
The size of the incubator must be planned in advance. This parameter depends on the volume of your production, the number of chickens. The deciding factor in this matter will be the number of eggs that you plan to lay in the device. Also, the size of the incubator is influenced by the type of heating system, the location of the lamps and the material from which the device is made.
For a more accurate work, you will need dimensional drawings that look something like this:
Fig. 1. Drawing example
Here is a drawing of a small incubator (45 eggs) 25 cm wide and 40 cm long.
Model sizes for 100 eggs
When forming the size of the incubator, keep in mind that the temperature 2 cm from the egg should be in the range of 37.3-38.6 degrees Celsius. Typically, a medium-sized device is made for 100 eggs. The cells are made about 45 millimeters in diameter and 60-80 millimeters deep. It is recommended to make a replaceable grille so that you can adjust the dimensions for different types eggs.
Collecting home incubator do it yourself for 100 eggs, you will get a device measuring 60 by 60 centimeters. The device weighs about 3 kilograms. It can be converted and used to house duck, goose, turkey or quail eggs.
If you are building an incubator at home from an old refrigerator, it will take up more space and hold more eggs than a piece of foam or cardboard.
How to calculate the size?
Dimensions for a do-it-yourself incubator can be determined using the table below. The table shows the dependence of the length, width and height on the number of eggs stored.
When making an incubator for chicken eggs with your own hands, you should take into account that with the same capacity, the foam structure will be more voluminous than cardboard.
Larger models are usually made in several floors, using other technologies. Therefore, the calculations there are made differently.
How to make an incubator from a refrigerator with automatic egg turning?
The incubator design has many similarities to the refrigerator design. Therefore, you can easily make an egg incubator from the refrigerator. The body of this device retains heat well. It can accommodate more eggs, each incubator tray will lie on a separate rack.
The shelves of the refrigerator will act as shelves. Inside, there will be optimal humidity thanks to the liquid exchange system located at the bottom of the household appliance. In this chapter, you will learn how to make your own incubator from the refrigerator by adding a thermostat, a heater and swivel mechanism.
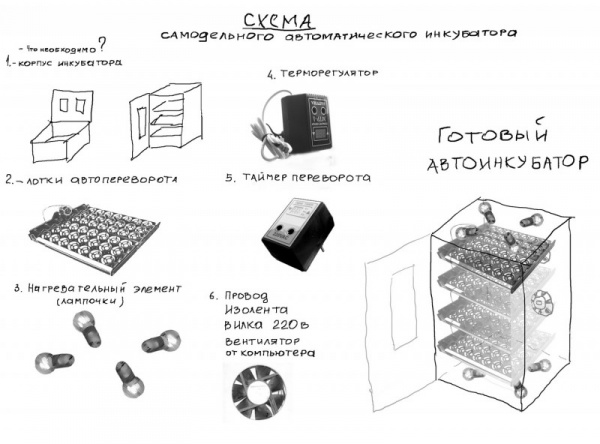
Fig 2. Scheme of a homemade incubator from the refrigerator
Consumables and their prices
Knowing how to make a homemade incubator will save you 70% of the device's retail price. The simplest incubator from the refrigerator can be assembled without investment. But if you want to make it convenient and effective, then you have to buy a few additional items.
- An old refrigerator is usually purchased free of charge; you can buy an ad for no more than 1,000 rubles.
- Bulbs for 220 volts - from 25 rubles apiece.
- Thermostat - from 300 rubles.
- Fan - from 200 rubles.
- Sprocket chain or metal stem.
- Egg turning drive - from 500 to 5000 rubles. You can get it for free. any geared motor will do, for example, from a car windshield wiper.
Basic requirements for the camera
A homemade incubator from a refrigerator must meet the minimum requirements that will make hatching possible. It takes about twenty days to hatch the cubs. During this period, the incubators maintain a humidity of 40-60 percent. As soon as the chicks begin to show up, the humidity is increased to 80 percent. In the final stage, before the chicks are taken, the humidity is returned to its original level.
Eggs require temperature control. Therefore, your device must be manufactured with this fact in mind. Temperature requirements vary depending on which eggs you place in the incubator tray. Select the mode according to the table below.
Temperature table
Ventilation system
Making an incubator from a refrigerator involves installing ventilation system... Ventilation affects the temperature and humidity inside the device. Prevents the formation of an unfavorable climate for eggs. The average ventilation speed should be about 5 m / s.
A do-it-yourself home incubator from the refrigerator should be equipped with two ventilation holes, which are drilled into the body. One of them is located at the bottom, and the other at the top. Plastic or metal tubes are inserted into the holes so that the air masses do not interact with the glass wool located under the casing of the cooling device. The ventilation is regulated by partially or completely blocking the openings.

Fig 3. Ventilation system
Reference: embryos begin to consume oxygen from the outside as early as on the 6th day of incubation. In the third week, the egg consumes 2 liters of air per day. In the last days before hatching, each chick consumes 8 liters of oxygen.
There are two types of ventilation:
- Constant is a system that assumes the creation of a continuous movement of air, with a constant exchange and smooth distribution of heat.
- Periodic - a device that is triggered once every 24 hours to actively change the air in the chamber.
Please note that even the most high quality ventilation does not allow completely abandoning egg flipping. Therefore, a mechanism for turning eggs in an incubator is needed in any case. Auto-flip prevents the embryo from sticking to the shell.
Constant
Constant ventilation for the refrigerator has the following principle of operation:
- A fan installed inside the chamber drives the air flow into the holes. Due to this, the air is released to the outside. When making a home incubator with your own hands, you should pay maximum attention to this point.
- When leaving, the air flow is mixed with fresh air passes through the heaters.
- Then the air goes down, where it is humidified by a container with water.
- The incubator device helps to heat the air, which subsequently gives off heat to the eggs.
- After heat dissipation, the air returns to the fan.
The design of an incubator with constant ventilation is more complicated than with periodic system... But this allows you to simultaneously solve three problems: air humidification, ventilation and heating of eggs.
Periodic
Periodic table. If you are making an egg incubator with your own hands, then most likely it will be a manual mechanism. You will need an electronic controller to set the automatic start-up. The use of a controller is not always justified, especially if you are making the simplest homemade incubator with automatic egg turning. Ventilation in such a system is as follows:
- Heating is turned off.
- A fan is started, which replaces the air and cools the eggs.
- After 30 minutes, the fan is turned off and the heating system is started.
The fan characteristics are determined depending on how many eggs the chamber is designed for. If you are making an average do-it-yourself incubator with an automatic flip with a capacity of 100-200 eggs, then you need a fan:
- working from a 220 volt network;
- diameter from 10 to 45 centimeters;
- with a productivity from 35 to 200 m 3 / hour.
In addition, the design of the incubator must include a filter for the fan. The filter prevents dust, dirt and lint from entering the blades of the device.
Incubator body from the refrigerator
This is an important aspect of the topic "how to make an incubator from a refrigerator with your own hands", since from correct preparation device case will depend on how efficiently it works.
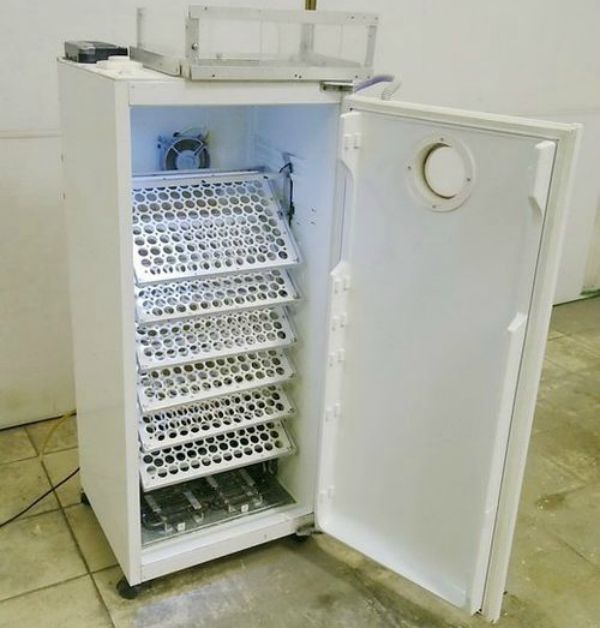
Fig 4. Case from the refrigerator
First you will need to remove freezer and other built-in equipment. Then make ventilation holes as described above in the installation text for this system. Install as many shelves and trays as you see fit.
Heating system installation
Making an incubator with your own hands with an automatic flip, you will have to organize the heating system yourself. To do this, use 4 incandescent lamps of 25 watts or two bulbs of 40 watts. Lamps are equally distributed between the bottom and top of the refrigerator. The lower lamps should not interfere with the installation of the humidification water container.
Before making an incubator at home, you need to make the necessary calculations and prepare the tools. Take your time in the process of work, as this can lead to disastrous results.
The choice of the thermostat
Many are interested in the question of how to make a home incubator with an optimal temperature regime. To do this, you need a high-quality thermostat. There are three types that poultry farmers use:
- An electrical contactor is mercury thermometer with an electrode responsible for turning off the heating when a certain temperature is reached.
- Bimetallic plate - closes the circuit when reaching desired parameter heating.
- Barometric sensor - closes the circuit in case of excessive pressure.

Fig 5. Finished thermostat
If you are thinking about how to make an incubator with convenient control, then install an automatic thermostat. This will greatly improve convenience and save time.
Coup mechanism
According to generally accepted technology, the egg turning mechanism in the incubator should be triggered 2 times a day. Some experts recommend turning eggs twice as often.
There are two types of egg flipping in an incubator:
- frame;
- inclined.
The frame rotary device for the incubator functions by pushing the egg with a special frame that rotates it about the axis.
The incubator tilt swivel device involves periodically tilting the egg tray at a specific angle. This changes the position of the embryos inside the eggs and their position in relation to the lamps.

Fig 6. Swing mechanism
The main principle of the automatic rotation device is that the motor drives the rod, which acts on the egg tray.
How to make a simple swivel mechanism for the refrigerator:
- Install the reducer inside the refrigerator at the bottom.
- Set inside the refrigerator wooden frame that will hold the trays. The trays must be fixed in such a way that they can tilt 60 degrees towards the door and also in the opposite direction.
- The gearbox must be firmly fixed.
- A stem is attached to the engine, connected to the tray on the other side.
- The motor drives the stem, which in turn tilts the chute.
Video
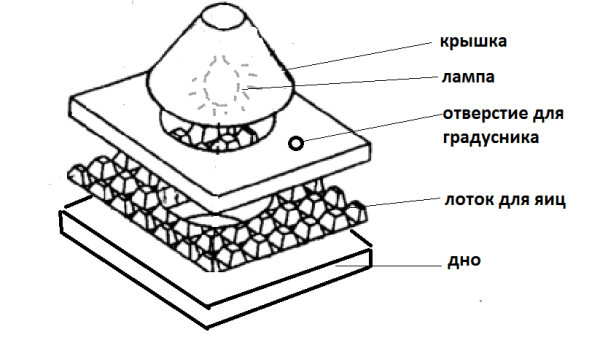
Making a device out of the box
Consider the question of how to make an incubator out of the box. This option will be the cheapest of the proposed ones; production will take several hours. Cardboard is a fragile material, but at the same time, it retains heat well and is easy to work with.
In our difficult times, when the prices of goods are growing at an inexorable pace, you will always find an area in which you can profitably apply your practical skills and theoretical knowledge. By looking at the cost of an incubator manufactured in an industrial setting, you can easily calculate the benefits of self-made similar device. Moreover, making a home incubator with your own hands is not so difficult.
Here is what a forum user says about his homemade incubator with mechanical egg flipping genius.
genius
In short: an incubator for 60-70 chicken eggs, mechanical overturn using a special grate, I don’t do automatic in principle. Heating with bulbs, two chains. Temperature control with an electrocontact thermometer. I don’t trust electronics. The temperature run-up in the corners is 0.5 degrees. Cheap and cheerful. In the presence of components, the incubator can be made in 3 - 4 hours.
The most important thing in manufacturing is to ensure the ability to maintain optimal humidity and temperature indicators inside the device, as well as create conditions for the timely turning of the eggs in order to evenly warm them.
Incubator body
In most cases, the body is the basis of everything. And the incubator is no exception in this case.
When making a case Special attention should be given to providing good thermal insulation for the future device. This will allow in the future to avoid the troubles associated with the observance of a strict temperature regime in the incubation chamber.
For the manufacture of the case, porous polymeric materials, penoplex (expanded polystyrene) with a thickness of 20 mm, etc. are quite suitable. You can also use fiberboard sheets or chipboard, but double walls should be created with foam, felt or foam filler.

The size of the incubator will directly depend on the number of eggs that are planned to be simultaneously placed in the chamber. In terms of the height of the inner chamber, 50 cm will be enough. The area of the inner base will be equal to the area of the egg tray. But to it it is necessary to add about 50 mm on each side. This is the gap that must be between the tray and the body of the incubator to ensure air circulation. In the lower base of the incubator, it is imperative to drill several holes with a diameter of 10 mm, through which air exchange will take place between the inner space of the chamber and the external environment (the incubator must be constantly enriched with oxygen). For an incubator for 50 eggs, 6 holes are sufficient.
Attention! The bottom holes should be positioned so that they do not overlap the baking sheet (plate) with water, which will be installed in the chamber to maintain sufficient level humidity.
To ensure unimpeded air movement between the bottom of the device and the surface on which it will be installed, a gap of 30 ... 50 mm must remain. A viewing window of 100x100 mm, covered with glass, should be made in its top cover. If there is no forced ventilation in the incubator, then the glass should be slightly opened during operation, leaving a gap of 10 ... 15 mm.

And one more nuance: one of the side surfaces of the incubator must have a door for changing water and other actions related to the maintenance of the chamber.
Incubator tray
In order for the eggs to be neatly placed in the inner space of the incubator, we need to make a special tray. In our case, it can be made based on wooden frame, which is covered with a fine mesh from below. As a mesh, both an ordinary mosquito used in the construction of modern window glass units and a metal (maybe different) mesh with a cell size comparable to 5x5 mm (but no more) are suitable. In order to eliminate the sagging of the mesh, a couple of small slats can be nailed from the bottom of the tray, which will comprehensively strengthen the structure of the tray.
To make it easier to turn the eggs during incubation, the tray should be equipped with a plug-in wooden grate. For convenience, you can make several gratings at once, having different sizes internal cells. So, for quail eggs, a lattice with a cell size of 45x35 mm is suitable, for a chicken egg, cells with a size of 67x75 mm are needed. If you want to lay goose eggs in the incubator, then the cells must be of the appropriate size - 90x60 mm. The width of the grate should be 5 mm less than the tray itself. In length, it should be shorter by 50 ... 60 mm - for quail, by 80 ... 90 mm - for chicken eggs and by 100 ... 110 mm - for goose eggs. Thus, by moving the wire rack along the tray, you can turn the eggs 180 degrees. In order to evenly warm the eggs over time, a similar procedure should be performed approximately once every 2 to 3 hours.
 Egg Turning Tray
The height of the sides of the tray itself should be 70–80 mm. The tray should be installed on 100 mm high feet.
This is the most simple construction tray that allows you to turn all eggs at the same time. But in order to make the design of the incubator more modern, the process of turning the eggs can be automated. This will require some technical improvements.
How to make a flip in an incubator
In order to automate the process of turning eggs in an incubator, an electromechanical drive must be introduced into its design, which is triggered after a certain period of time (as we have already said, it takes 2-3 hours). The accuracy of the time interval will be ensured by a special time relay. The relay can be purchased ready-made. Those who like to "dig deeper" in microcircuits can make it on their own, taking as a basis an electronic or even mechanical watch, which is easy to buy in Moscow and in any village.

Here is what the FORUMHOUSE user writes about this.

mednagolov
Now on sale it is easy to buy Chinese electromechanical relays with a cycle of 24 hours. In fact, this is an elementary watch with a plug that is plugged into an outlet, and on the case of this watch there is a socket into which the consumer is plugged in, inside the watch a tiny electric motor is spinning. There is no need to wind them up, around the dial, lined up for 24 hours, there are "push buttons" with which you set the time intervals.
The electric motor must necessarily transmit torque through the gearbox. This will help smooth the movement of the grate and keep the eggs intact.

The grid of the tray should slide along the guides. The walls of the tray can play the role of guides. But in order to avoid accidental jamming, this mechanism can be improved. For this, a metal axis protruding from both ends should be attached along the central axis of the lattice. She will play the role of a reliable guide. The axis will be inserted into special grooves made on the sides of the tray. Such a design is reliable, it can be easily assembled and, if necessary, quickly disassembled.
In order to drive the grate with eggs, we need a reciprocating mechanism, consisting of an electric motor, a gearbox, a crank mechanism and a rod connecting the drive to the tray grate.
 A device for turning eggs in an incubator.
As an electric motor, you can use special "motors" for microwaves, which are available on the market. Also, some craftsmen create an electromechanical drive based on a mechanism that is part of car wipers. Or, what a way out of the situation was invented by the forum member mednagolov: the drive of the egg-turning mechanism from e-mail. engine ball valve remote control d = 3/4 220v (has an extremely powerful and durable gearbox, as well as microswitches for end positions).

He used the power supply from an old computer, and the time relay was a mechanism from a Chinese clock, which was written about a little higher.
The mechanism functions as follows: the relay closes the electrical circuit after a specified period of time. The mechanism is set in motion and moves the grid of the tray, turning the eggs over. Then the end position switches (limit switches) are triggered and the grille is locked in the opposite end position. After a specified time, the cycle is repeated, and the grate returns to its original position. The whole process in a homemade product takes place without human participation.
Incubator heating
The correct placement of the heating elements in the incubator chamber is the key to success in hatching healthy and robust chicks. It is customary to use ordinary incandescent bulbs as heating elements. Ideally, they are best placed over the egg tray, evenly spaced around the perimeter of the incubator. The tray and the heating element should be separated by a distance of at least 25 cm.In a homemade incubator, use light bulbs low power, at 25 watts, etc. The total power of the heating elements used in such an incubator should be 80 watts - for a device designed for the simultaneous hatching of 50 chicks.
The lower the power of the heating elements, the more evenly the heat is distributed in the incubation chamber.
When placing lamps on the walls of the chamber, you should also ensure that they are evenly spaced around the entire perimeter. Know that using consistent electrical connection heating elements, you can significantly extend their service life. But the power of each consumer in this case will be halved. This should be taken into account when calculating the number of heating elements, because with the appropriate connection method, the number of consumers will have to double.

Control over temperature indicators
As we already know, the temperature in the incubator chamber must exactly match the specified parameters. Otherwise, such a device is worthless. Optimal for hatching chicks in artificial conditions the temperature is from 37.5 to 38.3 ° C. But it should be observed strictly. A conventional thermostat will help maintain the specified range, which can be purchased without any problems in the store. It is necessary that this device ensured the accuracy of temperature values corresponding to 0.2 ° C. An error greater than the presented value can be fatal for developing embryos.
Connect the thermostat to heating elements a person who has decided to make an incubator with his own hands, we think, will not have any difficulty. The main thing is to ensure that the temperature sensors are near the egg tray. The sensors can even be mounted on the tray for more accurate readings. A conventional thermometer should be used as an additional control. Better if it is electronic, capable of showing tenths of a degree. But in extreme cases, an ordinary alcohol thermometer is also suitable. It should be fixed in the chamber in such a way that it is located directly above the tray. In this case, its readings can be taken by looking through the viewing glass.
Heat accumulator

JG_ member of FORUMHOUSE
In order for the temperature to drop more slowly, a heat accumulator must be used. I used water as a TA. It gives humidification and still gains temperature, and when it is turned off, it gives it away for a long time, preventing the temperature from dropping quickly. Only the container with water should be large. You can just put a metal pancake or put a dumbbell inside - why not TA?
It remains to add that without a humidifier in an incubator, all your efforts are doomed to failure. Therefore, a baking sheet or an open plate filled with water can be considered one of the essential elements involved in the incubation process. As for the heat accumulator, a heating pad or plastic bottle with water will never be superfluous in the interior of your incubator.

Humidity control can be done with a psychrometer, which can be purchased at a hardware store. The optimum humidity in the incubator should be between 50-55% (just before hatching, it can be increased to 65-70%).
Incubator ventilation
Many owners homemade incubators consider that the fan is an integral part of such a device. But practice shows that a small incubator, the number of eggs in which does not exceed 50 pieces, can do without forced ventilation... Air convection in it occurs naturally and this is enough to maintain the vital functions of the embryos.
If your incubator chamber is designed for large quantity eggs, or if you want to create an ideal microclimate inside the device by all means, then for these purposes you can use special fans with a diameter of 80 to 200 mm (depending on the volume of the chamber).

The fan can be installed in the top cover of the incubator in such a way that it draws air from interior space cameras. Part of the air flow will go out, and its main volume will be reflected from the cover and pass over the lower intake holes, mixing warm air with cold and enriching it with oxygen.

That, perhaps, is all. To know different opinions our users regarding the design, as well as familiarize yourself with their practical experience, you can in this topic. We also have information for those interested in productivity. If you want to create at home more, in the design of which there are powerful components and complex ventilation schemes, then you should visit this section.
Electrical diagram of the egg turning system in the incubator.
The constituent elements of the proposed wiring diagram are assembled from the simplest parts and mechanisms.
System automatic coup eggs consists of a mechanical part, connected by hinged connections with a trolley, on which trays with eggs are located, or directly with the trays themselves, and an electrical part, which includes limit switches (fixed position sensors) and an executive unit.
Mode switch for the electric circuit of turning eggs in the incubator.
 We used a small Chinese-made quartz alarm clock. The technological equipment of industrial incubators used a system mechanical watch with limit switches triggered by pressing the adjusting bolts installed on the timeline of the disc rotating instead of the arrows.
 A similar system was taken as a basis.
On the dial of a quartz watch, every 90 ° (15, 30, 45, 60 minutes) contacts are fixed through which voltage is applied to the windings of the control relay. And the contacts are closed - the minute hand, on which a small springy electrical contact is fixed on the underside.
The dial can be processed in any way: glue slip rings, melt the wire with a hot soldering iron, place a foil-coated getinax with contact markings, use photocells, reed switches - everything is at the discretion of the designer and everything - depending on the materials available.
 The spring contact on the minute hand is made of tinned copper wire, which is softer than steel.
The arrow is plastic and it is easy to melt on it with a hot soldering iron or glue the ready contact.
The electrical circuit of the incubator rotary system is assembled to a minimum and easy to assemble.
The principle of operation of the electrical system for turning eggs in an incubator.
The control contacts (SAC1) close every 15 minutes. The clock works as usual.

The unit for the electric drive of the egg turning system in the incubator.
Any drive mechanism can be used: children's electric toys, an electric drill unit, an old mechanical alarm clock, an electric car wiper mechanism, a rotary mechanism from a household heater or fan, an electromagnetic traction relay with a vacuum regulator, use ready-made from automatic control washing machine or make your own screw with minimal details (by the way, very simple and convenient). Depends on the design and size of the incubator itself.
 If you use a gearbox with a crank mechanism, then the main shaft must have a diameter greater than the stroke length of the rotary frame (with the horizontal position of the frame on the tray). With a screw mechanism, the length of the working threaded part corresponds to the stroke distance of the egg turning system.
Electric drive of the egg turning system in the incubator the screw mechanism is controlled by an electric motor with a reversible connection, that is, the engine is switched on alternately in the left and right directions of rotation.
Description of the work of the electrical circuit of the rotary system of the incubator.
The battery powered quartz alarm clock works as usual. At regular intervals, namely: every fifteen minutes of the current time, the minute hand, passing over the contacts fixed on the dial, brings a spring contact to them and through them closes an electrical circuit. Thus, a control signal is generated for the control relay (K2 or K3).
On the reverse side of the relay (K2 or K3) electrical signal enters the limit switch (SQ1 or SQ2).
There is a rod on the movable mechanism of the rotary system, which, moving together with the moving part of the system, presses on the limit switch button, being in one of the extreme positions, and thereby breaks the circuit: mode switch-control relay-limit switch.
Simply put, it turns out like this: from the mode switch (modified alarm clock) with its contacts closed, the voltage goes to the control relay and then to the limit switch. If the limit switch is in the closed state, the control relay will turn on and close with its contacts the control circuit of the drive relay, which will supply power to the electric drive of the swing system.
The system will start and move the mechanism to one of two positions carried out when the eggs are turned over in the incubator. The end position will be fixed by turning off the limit switch by pressing the stem moved with the frame on the switch button.
 The circuit with reversible motor connection is slightly different by the addition of a second drive relay with two controlled (switched) contacts.
Electronic lovers can use a digital timer with self-starting after a cycle or a time relay, once used by amateur photographers. There are many options. You can buy a ready-made electronic unit. Everything is from possibilities.
List of some details.
- SAC1 - mode switch.
- K3 and K4 - control relays of type RES-9 (10,15) or similar.
- K1 and K2 are the relay of the drive with the switching current, respectively, for the load current.
- HV - indicator lights.
- SQ1 and SQ2 are limit switches. Microswitches (MK) from old cassette recorders can be used.