How best to make a warm floor in a private house. Warm floors water: mounting schemes, laying methods, installation rules
Sometimes is the only solution to ensuring comfortable and cozy accommodation in a private house, especially in the conditions of the northern regions. In autumn-spring and winterthe base under the legs may quickly cool enough, and it is necessary to walk in warm socks, otherwise the legs are marked very much. Also, the plus can be considered in some way additional heating of the structure itself from the inside. In the objects of individual residential construction often make warm floors. Mounting schemes in a private house can be the most different, but the essence is one - such a heating system was and remains most commonly equipped in the house. Let's see what the features of water floors, as they can be made independently.
Warm floors - no innovation for a long time. For several decades, they are used to create comfort and comfort in the house and are especially popular in private houses, where there are no neighbors from below, but only a basement or foundation. And, of course, in the cold seasons of the year, the floor under his feet will be cool, if not ice (there is a lot of things, how high-quality the floors themselves were insulated).

Warm water based floor based is often recommended for use for heating floors in any private house, although there is also electrical and. The latter are often equipped in apartments, as they do not bear the dangers of flooding of premises, as well as more simple in laying - in particular, do not need a cement screed building. But water floors are perhaps perfect option For a private house, especially if it has a heating boiler.

On a note! Water system Heating should not be regarded as the only heating system in the house. It can only act as an additional together with heating radiators and other heaters. But make life in the house comfortable - this is just its task.

It is easy to understand that, in contrast to the electrical system, water is carried out in the water role of the heater, which enters the pipes laid and filled with a tie. The coolant is served through a special collector, which is connected to the heating system (central, heating boiler, etc.). The heat comes from the heated, circulating pipes, water to the concrete screed, heats it, and it, in turn, gives heat into the room and warms the flooring. Therefore, it will be nice to walk by this floor.

Attention! Water systems are used, as a rule, it is in private dwellings. The apartment rarely has the ability to connect a system to central heating, and there is also a chance to flood the neighbors living below in the event of a system breakdown.
Dignity
Water-based heating system has a lot of advantages. These include:
- achievement of the desired level of comfort, since the floors will always be warm, and the air indoors will be swollen evenly;

- safetyBut only in a private house. Such floors will not hit the current, and the worst thing that can happen is leakage. But in a private house, it is not as critical as in an apartment. Moreover, even if the leakage occurs, the maximum property of the owner will suffer, but it's not he himself, since the risk is burning hot water simply no;
- economy - Also one of the advantages. Water floors will save a lot of natural and cash resources, as the water will be used as the coolant one and the same. You can also quickly warm the room using water floors if the ceilings height is very high;
- compatible with all floor coverings - also plus. Indeed, only in rare cases cannot be stacked on top of the heating system some specific coatings. And that if you do everything competently, then any coatings can be laid on top of the water system;

- the cost of the water system is smallthat will save some amount of money when installing.
But such a system has disadvantages. For example, when installing cannot do without, and this is a rather hard work that requires certain skills. Plus, the screed before operating will have to dry, and this is plus 28 days to the duration of repair. And throughout this period, nothing can be done in the repaired premises. Another drawback is the complexity of the repair of the system itself if necessary. So it is important to do everything qualitatively initially to avoid trouble for a long time.

Types of water floors and device features
The main element of the system of such heating of floors is the pipes by which coolant water circulates. They can be both metallic and made of polymeric materials. The first is distinguished by the high price and complexity of the compounds, the second to lay it much easier, and they are cheaper. In addition to pipes, you will need other elements of this system. This is the base in the form of a concrete slab or polystyrene, waterproofing layer, a layer of thermal insulation, a concrete screed. From above, this cake is placed directly. In general, the thickness of the whole design will be about 7-15 cm.

Depending on how the arrangement of the warm floors is carried out, there are several main types of design.
Table. Types of water floors.
| A type | Description |
|---|---|
| Heavy | This is the most common option distinguished by high reliability. It is important to carefully prepare a rough surface (draft floor or overlapping), then lay heat and waterproofing layers, and then a layer of the reinforcing mesh, to which the heating contour itself from the pipes will be attached to the clamps. After that, it remains to fill with the screed, dry it, and the warm floor is ready to operate. Heavy water floors are also called concrete or wet. The latter is due to the fact that it is required to carry out work on the pouring of the screed. It is important to understand that a layer of screed over the pipes should not be less than 3 cm. |
| Lungs | In this case, a special is used as the basis for pipes polystyrene foam plate. It is sold at the finished version. When installing it needs to be put on the draft floor and pave it in accordance with the heat-mall pipe diagram. They will not need additional fixationSince on the slab itself there are special protrusions, allowing reliably to fix the pipes. Then from above placed special heat distributing plates, on top of which the installation of the piston coating is carried out. This is a good option to arrange water floor in the conditions of impossibility of installing it standard scheme Due to the high gravity of the standard screed. |

There is also another option to arrange a warm floor system - wooden reikas. That is, a tree will be used as the basis for such a floor to which the pipes are attached, and the tops are closed with drying and finishing coating. This option is extremely rare and it is not reliable.
Mounting schemes
It has already been mentioned that the laying of warm floor laying may be different. Depending on the scheme and compliance with the rules of installation, the propagation of thermal energy indoors will occur. The main layout schemes there are three, but they are all united by the fact that it is mandatory for the installation of pipes from the walls towards the central part.
Table. Water floor mounting schemes.
| Type of schema | Characteristic |
|---|---|
| In this case, the pipes are stacked on the spiral from the wall to the center, and then returned to the starting point. Moreover, the design is gradually narrowed towards the center of the room. When calculating the scheme and its laying, you must not forget to leave the free space between the pipes so that you can "lead" them back to the power source. It is noted that such a scheme will allow the most uniform heating of floors, and hydraulic resistance due to it can be reduced. The number of pipes is also used smaller than in other cases. The main drawback is not an easy installation. |
| In this case, the pipes are stacked along the walls loops in one direction, and then in the opposite. When looking at such a scheme, you can mark the waviness of the outcome pattern. So put the pipes simply, but due to the frequent step of laying pipes to achieve uniform heating of the floors without temperature jumps, it is unlikely to succeed. |
| In this case, both pipe laying schemes are combined. The option is used if the walls indoors are cold enough. Pipes are stacked so that they lie in the form of loops, and in some places at right angles. |


FEATURES OF MONTAGE
Before it comes directly about the water floor installation process, it is worth talking about some features of this process. So it is important to take into account that in many respects heat load Any room will be directly dependent on which materials are made from the walls, how everything is insulated how large the window openings, as well as from a number of other factors. We will have to try to calculate the heat transfer. If it is more than 100 W / m 2, the water floors cannot be applied as the main heating system, and only as heating of the floors directly.

The length of the pipes can also be any. It will depend on the size of the room and laying scheme. Perhaps in one great room We will have to lay two, or even more contours. This refers to rooms with an area of \u200b\u200bmore than 30 m 2 in the first place. And each contour will be heated independently of the other, although all contours can be connected to one collector. However, the diameter of the pipes, the laying step between them and the length should be the same if the highways are connected to one system. And from the diameter of the pipes, in turn, the length and step of the contour depend on. What he is more, the longer the contour can be.

Tip! If there is a built-in furniture in the room, then the floor area under it does not need to be considered when calculating. There's still no sense from the warm floor, and the pipes can not be laid there.
From each wall you need to make a small indent (about 10-15 cm from the outer and up to 30 cm for the inner walls). The step between the pipes can vary within 20-30 cm if they are used as an additional option of the premises heating.

Water floor is an ideal option for heating for large rooms, the area of \u200b\u200bwhich is more than 20 m 2. But in a small room it is better to choose some other option, as it will be very uncomfortable to lay water highways. It is also worth staying on a heavy version of a warm floor as possible, that is, mount it using a concrete tie. This is the most reliable, albeit the longest option, but it is ideal for a private house. By the way, by itself, the screed is very well protecting the contour pipes from the risk of damage and itself is capable of holding heat for a long time, and therefore will help save money.

Warm floors are considered in our understanding more modern system Heating than radiator heating. However, this is not the case - they appeared much earlier. Stubborn historical facts suggest that the warm floors have been successfully applied in times Ancient Rome, in the territory of Korea, and in Russia too. True, only furnace heating was used, since the transportation systems of hydrocarbons in the pipes did not yet exist. IN modern world The most economically successful countries are widely used by heating with warm floors, and this is done not only for considerations of obvious comfort, but also the fact that such heating allows energy resources, the demand for which grows every year is taken into account.
This type of heating is the cheapest pleasure. Accessories and work are very expensive. That is why any maternity owner may have the idea to make a water warm floor with their own hands. Why not? Especially since the experience of both successful and unsuccessful implementations is already enough to give specific recommendations. The goal of our article is to give specific advice to those owners who are going to make warm water floors, but at the same time they save their money and eventually got what they wanted - comfortable and economical heating.
Why is it a water warm floor?
Of course, it is easier to be implemented, they are easier to manage, but the cost of energy makes their own adjustments - in operation this type of heating is much more expensive than water warm floor. It will take place only 4-5 years and the warm water field will pay off with interest, but only with the condition that it will be made competently and correctly. It is about this that the authors of the article and want to say to our readers. Matching colorful catalogs with expensive equipment, and based only on the experience of people who were able to realize warm water floors in their home.
Most heating systems are currently used as a source of heat natural gas - and it is completely logical, since this type of fuel costs cheaper than others. And this trend will be maintained for several more decades at least. Therefore, the warm floors are best realized precisely water, the coolant in which heats the combustion energy natural Gas. But for this you need to comply with a number of conditions.
Water warm floor
Warm water floor is a complex multicomponent system, each part of which performs its function. Consider its device in the following figure.
 Typical design of "Cake" of warm water floor
 This type of floor heating is called "wet" because the "wet" building processes are used in its arrangement, namely the fill of the cement-sand tie. There are still so-called dry warm floors, but they are mainly done. As part of this article, we will consider the "wet" warm water floors, as they are much better, at least their installation and more difficult.
Warm water floor is mounted on a stable and durable basewhich can be a concrete plate or soil. On the base, vapor barrier from a polyethylene film with a thickness of at least 0.1 mm is stacked. The next layer of "cake" is the insulation as it is best to use extruded, which has a very low thermal conductivity coefficient, high mechanical strength and reasonable value. A cement-sand screed is equipped over the insulation, in which the plasticizer is necessarily added - for the mobility of the mixture, ease of laying and reducing the water-cement ratio. The screed is preferably reinforced with a metal wire mesh with a cell pitch 50 * 50 mm or 100 * 100 mm. In the same place inside the screed tubes of a warm floor with circulating coolant circulating in them. The height of the tie over the pipes is recommended to do at least 3 cm, however, the practice suggests that it is better than 5 cm and the strength will be higher and the heat distribution on the floor will be more uniform.
In the place of the walls of the walls to the screed, as well as the damper tape, which compensates for the thermal expansion of the screed when it is heated, is laid at the boundaries of the walls of warm water heating. The finishing floor covering should be intended for working with warm floors. The best way out is ceramic or porcelain stoneware, but some other types of coating are laminate, carpet or also can be used with warm floors, but there should be a special icon in their marking.

Such covers, however, require clear observance thermal regime Floor, which is achieved by the use of automation - special mixing nodes.
Requirements for the premises, where heating with warm water floors will be implemented
The most intelligent stroke in construction is when the heated floor pipeline is laid at the layout stage. It is very successfully used in Germany, Sweden, Norway, Canada, and, and in other economically successful countries, where energy carriers are very expensive and therefore, it is precisely an outdoor heating that is 30-40% more economical radiator. It is quite possible in the finished room, but it must meet certain requirements. We list them.
 The most proper pipeline of the warm floor is the one that is laid at the construction stage of the house
 - Given the significant thickness of the warm water floor - from 8 to 20 cm, the height of the ceilings in the room should allow you to mount such a heating system. It is also necessary to take into account the magnitude of the doorways, which should be at least 210 cm.
- Floor base should be strong enough to withstand a heavy cement-sand tie.
- The base for the warm floor should be clean and smooth. The irregularities should not exceed 5 mm, since the differences strongly affect the current of the coolant in the pipes, they can lead to importing contours and an increase in hydraulic resistance.
- In the room where warm water floor is planned, all plaster works must be completed, windows are inserted.
- The heat loss in the premises should not be more than 100 W / m 2. If they are more, then it is worth thinking about insulation, and not to give the environment.
How to choose a good pipe for a warm floor
About the pipes of warm water floor is written in detail in on our portal. Obviously, for a warm floor, it is better to choose pipes from stitched polyethylene - pex or pert. Among Pex pipes should be preferred by PE-XA pipes, as they have a maximum stitching density - about 85% and therefore have the best "effect of memory", that is, the pipes after it stretching, always seek to return to their original position. This allows you to apply axial fittings with a supervision ring that can be meditated in building structures without fear. In addition, at the dawn of the pipe, it is possible to restore her form heating problem construction phenomenon.

Pert pipes do not have the effect of memory, so only collet fittings are applied with them, which cannot be meditated. But if all the circuits of the warm floor are made by solid pieces of pipes, then all connections will only be on the collector and it is quite possible to use PERT pipes.
In addition, manufacturers produce composite pipe pipes, when a aluminum foil is placed between two layers of cross-linked polyethylene, which is a reliable oxygen barrier. But the heterogeneity of the material, the difference in the coefficients of the temperature expansion of aluminum and polyethylene can provoke the bundle of the pipe. Therefore, it is better to choose the PE-XA or PERT pipes with a polyvinylethylene barrier (EVOH), which significantly reduces the diffusion of oxygen into the coolant through the pipe wall. This barrier can be located in the outer layer of the pipe and inside, surrounded by layers from PE-XA or PERT. Of course, it is better that the pipe that layer Evoh. Located inside.

For heat-mall circuits there are three main pipe sizes: 16 * 2 mm, 17 * 2 mm and 20 * 2 mm. Most often use 16 * 2 and 20 * 2 mm. How to choose exactly the "right" pipe.
- First, the brand in this matter matters and it is necessary to pay attention to it. The most famous manufacturers: REHAU, TECE, KAN, UPONOR, VALTEC.
- Secondly, a lot can "tell" the labeling of pipes, it should be carefully studied and should not be ashamed to ask more questions to the seller-consultant.
- Thirdly, the qualification of the seller-consultant helps a lot when choosing a pipe. Do not forget to demand certificates of compliance, ask about the presence and prices of fittings, mixing nodes, collectors and other equipment. It is necessary to know about what bays sell the pipe, by how many meters so that later in the calculations it takes.
- And finally, if the PE-XA tube is selected, then you can spend a small test. To do this, a small segment of the pipe must be stirred, and then warm up this place with a construction hairdryer. High-quality PE-XA, and PE-XB pipes should also recover the original form. If this did not happen, so that it would be written in the label - it's just not a PEX pipe.

Warm Paul Design Principles
One of the most important stages In the arrangement of warm water floors is their competent calculation. Of course, it is best to entrust it to experts, but already enough experienced experience says that it can be done independently. On the Internet you can find a lot of free programs and online calculators. Most famous manufacturers provide their software for free.
water warm floor

To begin with, it is necessary to determine what temperature should be at the warm floor.
- In residential premises, where most of the time, people spend standing the floor temperature should be in the range from 21 to 27 ° C. This temperature is most comfortable for the legs.
- For work premises - offices, as well as residential rooms, the temperature should be maintained in the 29 ° C area.
- In the hallways, lobby and corridors optimal temperature - 30 ° C.
- For bathrooms and pools Temperature floor should be more - about 31-33 ° C.
Heating with warm water floors is low-temperature, therefore the coolant must be supplied at lower temperatures than in radiators. If water can be supplied in the radiators at a temperature of 80-90 ° C, then no more than 60 ° C in the warm floor. In the heat engineering there is such an important concept as fall of temperature in heating circuit . It is nothing but the difference in temperatures between the feed pipe and the reverse. In systems of warm water floors optimal modes 55/45 ° C, 50/40 ° C, 45/35 ° C and 40/30 ° C are considered.
Very important indicator is (loops) of warm water floor. Ideally, they must be all the same length, then problems with balancing will not arise, but in practice it is unlikely to succeed, so it is customary:
- For pipe with a diameter of 16 mm Maximum length 70-90 m.
- For pipe with a diameter of 17 mm - 90-100 m.
- For pipe with a diameter of 20 mm - 120 m.
Moreover, it is advisable to navigate not to the upper border, but on the bottom. Better smash the room on large quantity Loops than try to achieve circulation by a more powerful pump. Naturally, all hinges should be performed by pipes of one diameter.
Pitch layout (laying) Pipes of a warm floor - another the most important indicatorwhich is done from 100 mm to 600 mm depending on the heat load on the warm floor, the purpose of the room, the length of the contour and other indicators. Step less than 100 mm Make Pex pipes is almost impossible, the probability is just to break the pipe. If the warm floor is equipped only for comfort or additional heating, then you can make a minimum step to make 150 mm. So, what is the layout step to apply?

- Indoors where there are external walls, in the outdoor heating make so-called regional zones where pipes are stacked with 100-150 mm increments. In this case, the number of rows of pipes in these zones should be 5-6.
- In the centers of premises, as well as in such where there are no external walls, the laying step is made by 200-300 mm.
- Bathrooms, baths, paths near the pools stacked with a pipe with a step of 150 mm across the area.
Methods of laying the circuits of a warm floor
The contours of water heat can fit differently. And in each way there are advantages and disadvantages. Consider them.
- Laying the tube of the warm floor "Snake" It is more simple in the installation, but its essential disadvantage is that on the floor will be at the beginning of the circuit and at the end a tangible temperature difference - up to 5-10 ° C. The coolant, passing from the feed collector to the inverse of the warm floor design, cools. Therefore, such a temperature gradient arises, well tangible legs. Such a laying method is justified to apply in boundary zones, where the floor temperature should decrease on external Wall To the center of the room.

- Laying the pipe of the warm floor "snail" More complicated in the implementation, but with this method, the temperature of the entire floor will be approximately equal, since the feed and reverse is undergoing in each other, and the difference is leveled by a massive tie tie when performing the calculated installation requirements of the laying. In 90% of cases, this method is used.

- Combined Warm Paul Pipe Play Methods Also applied very often. For example, the boundary zones are laid by snake, and the main area of \u200b\u200bsnail. It can help correctly split the room on the contours to distribute with a minimum of remnants of the pipe bay and provide the desired mode.
In each of the ways can be applied variable laying step When in the edge zones it is 100-150 mm, and in the indoor of 200-300 mm. Then it is possible in one room to provide requirements for more intense heating of edge zones, without applying other methods of laying. Experienced installers most often do this.
 Laying of the heating circuit "Snail" with a constant step (left) and with variable naked (right)
 To calculate the contours, it is best to take advantage of a special and very easy-to-use software. For example, the famous Valtec manufacturer, which distributes its program for free. There are also simpler programs to calculate the layout of the contours that count the loop length, which is very convenient. For example, the program "Snail", which also extends free of charge. Those who are not very friendly with the computer can make the calculation of the contours on their own, taking advantage of millimeter paper on which on the scale to draw the plan of the room and already on this sheet a pencil "decompose" the contour and calculate their length.

When dividing premises on the contours of the warm floor, the following requirements should be followed:
- The contours should not move from the room to the room - all the premises should be adjusted separately. Exception can be bathrooms if they are located nearby. For example, a bathroom next to the toilet.
- One heating circuit should not heat the room with an area of \u200b\u200bmore than 40 m 2. If necessary, the room is divided into several contours. The maximum length of any side of the contour should not exceed 8 meters.
- On the perimeter of the room, between the premises, as well as between the individual circuits, a special damper tape should be laid, which, after filling, the screed will compensate for its thermal expansion.

Selection of the type of heaters for a warm floor and its thickness
The insulation for warm water is obligatory, because I would not want to spend my money on heating the Earth, the atmosphere or unnecessary building structures, but the floor is exactly the necessary, which should take the lion's share of heat from the heating circuit. For this, the insulation is used. What kind of types need to be applied? Among all their diversity, the authors of the article recommend that only two of them should be paid attention to.
- Extruded expanded polystyrene (EPPS). This material has low thermal conductivity, high mechanical strength. Epps is not afraid of moisture, it practically does not absorb it. Its price is quite accessible. This insulation is produced in the form of plates of standard sizes 500 * 1000 mm or 600 * 1250 mm and a thickness of 20, 30, 50. 80 or 100 mm. For good docking plates on side surfaces there are special grooves.

- Profile heat-insulating high-density polystyrene foam. There are special round or rectangular bolsters on their surfaces, between which it is very convenient to lay a pipe without additional fixation. The fastening step is usually 50 mm. It is very convenient when installing, but at the price they are much higher than plates from EPPS, especially in eminent brands. They are produced with a thickness of 1 to 3 cm and sizes 500 * 1000 mm or 60 * 1200 mm - it depends on the manufacturer.

Epps plates may have an additional foil layer having additional marking. Plate marking The case, of course, useful, but the presence of foil only increases the cost of the insulation, and there will be no sense from it for two reasons.
- Manufacturers declared reflectivity will not work in an opaque environment, which is a screed.
- Cement mortar is a strong alkaline environment that is perfectly "eating" insignificant (in several dozen micron) aluminum layer before its froze. It is necessary to realize that foil plates are marketing stroke and no more.
The authors of the article recommend applying for insulation of plates from EPPS. Saving compared to profile mats will be obvious. There is enough difference in the cost and fasteners, and a lot of money will remain. Recall the folk wisdom that saved money is akin to earned.
What thickness should the insulation in the construction of a warm water floor cake? There are special and complex calculations, but you can do without them. If you learn a few simple rules.
- If the warm floors will be made on the ground, then the thickness of the insulation must be at least 100 mm. It is best to make two layers of 50 mm and put them in mutually perpendicular directions.
- If the warm floors are planned in the premises above social Floor, then the thickness of the insulation is at least 50 mm.
- If the warm floors are planned over the rooms heated below, then the thickness of the insulation is at least 30 mm.
Additionally, it is necessary to foresee the fastening of EPPS plates to the material of the base, since when pouring the screed, they will strive to emerge. For this purpose, the plate dowels are ideal. They need to fix all the plates in the fields of joints and in the center.

For fastening the pipe to EPPS, special harpoon brackets are used, which reliably fix the pipe. They are fastened with an interval of 30-50 cm, and in places turning the pipe from PEX, the step must be 10 cm. Usually it is calculated that 500 pieces of harpoon-bracket are required on the bay of 200 meters. When purchasing them, it is not necessary to chase over the brand, as it will cost several times more expensive. There are very high-quality and inexpensive brackets of Russian manufacturers.

Choice of the collector-mixing node of the warm floor
Water floor collector - the most important elementwhich takes the coolant from the highway, distributes it in contours, adjusts the flow and temperature, balances the loops of the contours, contributes to the air removal. Without it, no warm water floor will cost.

Collector's choice, and if we talk more correctly - collector mixing node It is better to trust the specialists who will select the necessary components. In principle, it can be collected independently, but this is the topic of a separate article. Just listed which elements should be in order not to be mistaken in the choice.
- First, it is directly the collectors themselves that can be equipped with various reinforcement. They must be equipped with tuning (balancing) valves with flow meters or without them, which are placed on the feed collector, and there may be thermostatic valves on the opposite or simply overlapping valves.

- Secondly, any collector to remove air from the system should be equipped with an automatic air vent.
- Thirdly, and on the feeder, and on the reverse collector should be drainage cranes for draining the coolant from the collector and air removal when the system is filling.
- In the fourth, for connecting the pipe to the collector, fittings should be used, which are selected individually in each case.

- Fifth, for fastening collectors and providing the desired center distance, special brackets are applied.

- Sixth, if a separate riser for warm floors is not equipped in the boiler room, then a mixing unit must be answered for the preparation of the coolant, including a pump, a thermostatic valve, bypass. The design of this node has many implementations, so this issue will be reviewed in a separate article.

- And finally, the entire collector-mixing unit should be located in the collector cabinet, which is installed or in a niche, or open.

The collector-mixing knot is placed in such a place so that all the lengths of the highways from it, to the hinges of the warm floor, were approximately equal and the main pipes were in close proximity. The collector wardrobe is often hiding in a niche, then it can be placed not only in cabinets and boiler rooms, but in dressing rooms, corridors, and even living rooms.
Video: What calculations are needed in front of a warm floor device
Installation of water warm floor with his own hands
After calculations and purchases of all necessary components, it is possible to gradually implement a warm water floor. Initially, it is necessary to outline the places where collective cabinets will be placed, crushed, if necessary, a niche is also made through building structures. All rolling and drilling work must be completed before the next step.
Installation of insulation
Before this stage, it is necessary to prepare the premises for this - to endure all unnecessary, remove the entire construction trash, replace and spend the floors. The room must be absolutely clean. When mounting the plates, it is necessary to be in shoes with a flat sole, as heels can damage the surface. We list the sequence of actions when installing the insulation.
- First of all, the clean floor level is littered on the walls using laser or water. All irregularities are measured using a long rule and level.
- If irregularities exceed 10 mm, they can be completely aligned with pure and dry sand, which should be dissolved later.

- If the warm floor is made on the ground or above the ground floor, the waterproofing film is spread with the adhesive adjacent strips of at least 10 cm and coming to the wall. The joints of the joints are glued with scotch. As waterproofing it is quite suitable polyethylene film 150-200 microns.
- Starting from the far corner of the room, the process of laying plates of EPPS begins. They fit close to the walls of a marked surface up.
- The plates of EPPS must fit tightly with each other with the grooves that are available on their side surfaces. When laying each plate, it should be tight to the base and be in the horizontal plane, which is checked by the construction level. If necessary, under the stove sweeps sand.

- If obstacles are obstacles in the form of protrusions, columns and other elements, then after preliminary markup, the stove is cut by a construction knife along a metal line. At the same time, the EPPS must be put on some non-solid foundation so that the knife does not fill, for example, a piece of plywood or OSP.
- When laying the next row, it should be borne in mind that the stakes of the plates should not coincide, but to go aims, like brickwork. In order, if the Epps remained from the last latter, a part of at least 1/3 of its length remained, then the installation of the next row should be started with it.
- If laying of the second EPPS layer is planned, it should be carried out in a mutually perpendicular direction with the first layer.
- After laying thermal insulation, it follows using a perforator with a long brown and a hammer to fasten the plate dowels on each junction - on each joint and in the center of each EPPS stove. The joints between EPPS are stuck with a building tape.

- If after mounting the insulation, cavities or cracks remained, then they can be scored by the trimming of Epps and blew mounting foamBut you can do it later, after installing pipes.
After that, it can be said that the insulation installation measures are completed. Although EPPS plates are sufficiently density to withstand the weight of an adult, it is still necessary to observe precautions when moving. It is best to use wide boards or pieces of plywood or osp.
Installation of warm water floors
It has come the most responsible and difficult moment - installation of pipes of a warm floor. At this stage, it is necessary to be particularly attentive and neat and here without an assistant can not do. It is also desirable to have a special device for unwinding the pipe, since it is strictly forbidden from the bay pipe with rings, since it will be very strong voltages, which will complicate or make it impossible. The main rule - the bay must be twist, rather than removing the pipe from the stationary bay. In principle, this can be done manually, but it is much easier to the device.

If there is a markup on the upper side of the plates, it is simply wonderful, then laying pipes will be very simplified. And if not, it is not necessary to "be conducted" to purchase a foil thin insulation made of foamed polyethylene with applied markup. There will be no sense from him. You can apply markup on your own. To do this, marker on the upper side of the plates are made marks at the distance of the required step of the contour, and then the paint thread is fighting the lines - you can make markup in a short time. After that, you can read the tracks of the circuits of a warm floor.
heavy-floor screed

The collector cabinet is attached in the intended place and the collector is mounted in it, while without a pumping mixing group, it will be needed later. When entering the collector, when leaving it, as well as at the entrance to, each pipe must be protected by a special corrugation. However, the corrugation from eminent producers is a breathtaking money, so it is quite acceptable to replace it with the thermal insulation of the corresponding diameter. Also, the pipes should be protected when transitions from the room in the room and from the contour to the contour.
The installation of a warm floor pipe should be started from the zones that are most remote from collectors, and thermal insulation from foamed polyethylene must be dressed on all transit pipes, which will ensure maximum energy preservation to the destination point, and does not "confuse" heat along the road. Further, the pipe "emerges" from the plates of Epps, already "naked" bypasses all its warming circuit and "overtures" back and already in the heat insulation follows to the collector. The transit pipes themselves are placed inside the plates of EPPS, for this, the passages of the passage are preliminarily cut into them.

If the thermal insulation consists of two layers of EPPS plates, the first layer is first fit, then all communications are laid, including the transit pipes of the warm floor, and then the second layer is adjusted and trimmed on the spot.
In addition, in the area of \u200b\u200bthe location of the warm floor, pipes can go to radiators, as well as highways of hot and cold water supply. If there are several pipes, they can be fixed in a beam or plate dowels or a perforated metal strip and dowels. In any case, they should not be behind the top surface of the EPPS plates so that from above can be unhindered to lay the circuit of the warm floor. All cavities are placed by the mounting foam, which, after frozen, is cut off flush from the surface of the insulation plates.
On the perimeter of the room where the warm floors will be, a damper tape is pasted on the walls, which is designed to compensate for the thermal expansion of the screed. The tape is like a glue layer, and without it. When purchasing it, it is not necessary to chase the brand and overpay several times more. Now the damping tape decent in all senses russian production. If there are no tapes at all, then this is also not a trouble - it can replace the foam of 1 or 2 cm thick, glued to the wall on liquid nails or the mounting foam.

The damper tape should also be installed between the rooms and different contours. For this, a special tape with T-shaped profile is produced. And in this case, it can replace a thin foam glued with mounting foam or glue.

Installation of pipes is made as follows:
- With the bay, 10-15 m tubes are wrapped off, the thermal insulation and the corresponding fitting for connecting to the collector are dressed.
- The pipe is connected to the appropriate collector output.
- According to the previously marked tracks, the pipe is stacked and harpong-brackets is attached in direct areas after 30-40 cm, and on the turns after 10-15 cm. The pipe should be bending carefully, without chances.

- When laying, do not try to attach the pipe at once, and it should first decompose on approximately 5-10 m highways, and then fix brackets. The pipe should lie on the insulation without tension, there should be no effort that tries to pull out the EPPS braces.
- If the bracket for some reason flew out of its place, then it is mounted in the other, at a distance of at least 5 cm.
- After bypassing the entire circuit of the warm floor, the reverse tube returns to its feed and with it next to the collector. If necessary, heat insulation is put on it.
- By arrival to the collector, the pipe connects to it corresponding to the fitting.

- Near the corresponding loop of the warm floor on the wall, as well as also on paper, the length of the contour is necessarily recorded. This data is necessary for further balancing.
Similarly, all contours are laid. At first it will be difficult, but then, after one laid "snail" everything will be clear and work will go without problems. When moving on already padded circuits, it is necessary to bed under your feet or knees of boards, faeer or osp.
 Walking in shoes on pipes is not recommended. It is better to organize such "paths"
 Video: Laying of a warm floor pipe
Installation of reinforcing grid
Disputes about the feasibility of the reinforcing grid are constantly. Someone says she needs, others claim the opposite. There are a lot of examples successful incarnation Warm floor without reinforcing grid and, at the same time, there are examples of the unsuccessful sale of a warm floor with reinforcement. The authors of the article claim - reinforcement will never be superfluous, but only correctly performed.
The Internet is replete with examples when a metal mesh is placed on the insulation and fixes, and then a warm floor pipe is fastened to it with the help of plastic screys. It seems that it is convenient, but this is not reinforcing, but simply putting an absolutely useless mesh under the screed, to which money was spent. Reinforcement is when the grid is inside the screed, and not under it. That is why the authors recommend putting the grid on top of the pipe.

For reinforcing screed, a metal mesh made of wire with a diameter of 3 mm cell size 100 * 100 mm is quite enough. The grids from the reinforcement are not recommended due to the fact that the reinforcement has a corrugated surface and when installing can damage the smooth surface of the pipe. Yes, and it is not worth spending extra money on excessive strength of the screed, because it is assumed that the warm floor is mounted on a sufficiently strong base. The grid is stacked with an overlap per cell and binds to either knitting wire or plastic clamps. The sharp protruding ends must be bought off so that they do not damage the pipe. Additionally, the grid is attached to the pipe in several places by plastic clamps.
Instead of a metal mesh, plastic can be used, which will perfectly rein the screed and save it from cracking. Stop the plastic mesh is more convenient, as it goes in rolls. The use of a plastic mesh practically eliminates pipe damage, and its cost is significantly lower.

After laying the grid, the question arises again about the protection of the pipes, because, moving into the shoes on a metal grid, you can easily damage it, and the pipe is therefore recommended again to move only on boards, plywood or OSP. But there is still a very competent solution that will avoid damage to the pipes when pouring the screed.
The cement mortar is prepared - the same as it will be when laying a screed (1 part of the cement M400 and 3 parts of sand) and in the laying process, "blooms" are made from the solution that are slightly performed for the surface of the grid - 2 cm is sufficient. These "flames" are made with such frequency (30-50 cm), which will allow in the future to put on them boards or phanels and completely safely move. Another plus of this approach is fixing the grid, because when walking it, it seeks to bend, and this can damage the welds.
 "Lyapki" from the solution will fix the grid and will help to safely move
 Filling out contours. Hydraulic tests
This operation must be carried out even before filling the screed, as it is easier to fix it with a hidden malfunction immediately than after the floors are flooded. To do this, the hose is connected to the drain nozzle on the collector and is displayed in the sewer, as there will be a lot of water through the contours of heating. It is best if the hose is transparent - it will be easy to track the output of air bubbles.
To the input of the feed collector, which must be equipped with a shut-off ball valve, connects water water through a hose or pipe. If the quality of tap water is low, then it is worth filling the system through a mechanical filter. To any other output associated with the circuits of the warm floor, the crimping pump is connected. It can be a free output manifold output, the output of the returns from the collector and other places - it all depends on the specific implementation of the collector node. In the end, the tee can be screwed into the ball cut-on faucet, and the system is filling through it, and crimping. After testing, the tee can be removed and connect the collector to the feeding line.
The system filling is made as follows:
- The collector overlaps all the contours of the warm floor, except one. Automatic air vents should be open.
- Water is supplied and its purity and air output is controlled along the plum hose. On the internal surface Pipes in production can remain technological lubricant and chips, which must be washed with flowing water.
- After all the air came out, and the water flows absolutely clean, the drain crane overlaps, and then the washed and filled circuit overlaps.
- All these operations are done with all contours.
- After washing, removal of air and filling out all contours, the water supply faucet overlaps.
If leaks are found at the filling stage, they are eliminated immediately after pressure reset. As a result, it should be filled with a clean heat carrier and a monitoring system of warm water floors.
To test the system, a special tool will be required - a crimping pump that can be rented or invited an experienced master who has such a device. We describe the sequence of actions during crimping.

- Fully open all the contours of the warm floor connected to the collector.
- Clean water is poured into the capacitance of therapy pump, the pump feed faucet opens.
- The pump hits the pressure in the system two times more than the working - 6 atmospheres, it is controlled by the pump pressure gauge and on the collector (if there is a pressure gauge).
- After lifting the pressure, a visual inspection of all pipes and connections, which, in principle, should be only on the collector. The pressure gauge pressure is also controlled.
- After 30 minutes, the pressure again raise up to 6 bar and again inspect all the pipes and connections. Then after 30 minutes these actions repeat. If leaks are detected, they are immediately eliminated after pressure reset.
- If the leaks are not detected, the pressure again raise up to 6 bar and leave the system for a day.
- If, after a day, the pressure in the system fell no more than 1.5 bar and no leakage was detected, then the heat-mall system can be considered properly mounted and hermetic.
When lifting pressure in the system, the pipe in all the laws of physics will try to straighten up, so "shooting" of some brackets is possible in those places where "familized" with them. Therefore, "leaps" from the solution will help to keep the pipe in place. In the future, when the screed is filled, the pipe will be securely fixed, but when pressure tests, poorly fixed pipe can be given unpleasant surprises.
Video: Filling system with heat carrier
Video: Covering system of warm floors
Installation of Mayakov
The fill of the tie of the warm floor should be carried out on pipes under operating pressure. Considering that in most closed heating systems, the working pressure must be in the range of 1-3 bar, you can take the average value and leave pressure 2 bar in contours.
As a lighthouses, it is best to use the guide plasterboard profiles of Mon 28 * 27 / UD 28 * 27. They have sufficient stiffness and a smooth upper surface, which is very useful when moving the screed.

Lighthouses must be installed at the level of pure floor minus the thickness of the finish flooring. To secure them very often use simply mortar pillows, for which the guide profile is placed, and then it is removed by level. But this approach has a disadvantage in the fact that if the lighthouse rose below the required level, it is necessary to get it, put fresh solution and exhibit.
It is best if the lighthouses from the guide profile will be under it to have a tough support and can serve as a dowel for concrete and the screw of the corresponding length. It is preferable to use special screws along concrete - braided, which do not require the installation of a dowel, and, it means, the drilling diameter will be less. If a dowel is required to drill a hole with a diameter of 10-12 mm, then 6 mm is sufficient for heat. The top surface of the screws screw should be at the level of the surface of the future screed.
 Screws on concrete - braided
 Lighthouses should be located at a distance of no more than 30 cm from the walls. There should be no long distance between the beacons, since the solution suggests to settle and the pit may form on the ready-made screed. Optimally 1.5 m, then a construction rule of 2 m is used to align the screed. When installing beacons, the following is made:
- From the walls located on the left and right of the entrance, two lines are watched at a distance of 30 cm - it will be the position of extreme lighthouses.
- The distance between these two lines is divided into equal parts so that it does not exceed 150 cm. It is desirable that one of the bands occur directly to the entrance to the room. If necessary, the band, which comes to the input may be smaller.
- On the floor, the lines of the position of future lighthouses are stuck. They make the location of napillates with a step of 40-50cm.
- The perforator with the corresponding heating of the brown is drilled by the holes to the specified depth.
To exhibit copper caps in the same plane, it is best to use the laser level. If there is no herself in the arsenal of his home master, it does not matter, now this very useful tool can be rented, especially since it will be required for only one day.
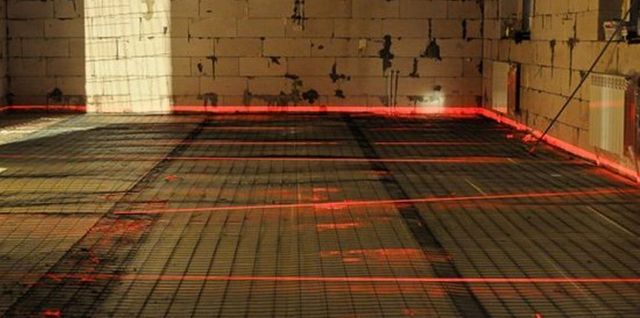 Laser level - an indispensable assistant when marking and installing beacons
 On the wall made a marker of lighthouses. To do this, the thickness of the finishing flooring is taken from the thickness of the finishing floor surface pre-battered on the wall. The laser level is set at this mark, and then screwing or unscrewing brazen, their caps are set at one level. If you enjoy with this operation a regular construction level, it will take much more time, and the error will be higher.
Further, the guide profiles are stacked on the caps of the copiers, the construction level is checked correctly. To secure beacons, a cement solution is used in its places as the same formulation as for a floor screed (1 part of cement + 3 parts of sand).
Lighthouses are removed from copper caps, and then slides are made from the cooked solution slightly higher than the height of the screed. It is enough to do them after 1 meter, as the beacon and it will already be securely fastened on the hats. Further, the profile is stacked and pressed into the solution, and its excess is immediately removed by the spatula. Finally, the level of installation of all beacons is checked.
At the same time, you can check the correctness of the installation of all damping tapes, separating the premises and contours and, if necessary, strengthen them with a solution.
water warm floor
Video: Installation of beacons for a heap screed
Warm Filling
Increased requirements are imposed on the tie of warm water floors, because in addition to the mechanical loads that portened by it, it also experiences temperature deformations. And usually the cement-sandy solution does not go here, the concrete mix must be modified by plasticizer and fiber.
The plasticizer is designed to reduce the water-cement ratio, increasing the mobility of the mixture and increase its strength when drying. Mobility When laying a heating floor screed is extremely important, as the solution should be tightly "clay" pipes and easy to release air bubbles outward. Without the use of plasticizer, the only way to increase the mobility of the mixture is to add water to it. But then only part of the water will enter the reaction with the cement, and the rest will evaporate for a long time, which will increase the time of setting and pouring and reduce the strength of the screed. The water-cement attitude should be exactly the way that will allow the screed to grab. Usually, 1 kg of cement requires 0.45-0.55 kg of water.

The plasticizer is produced in liquid and dry. It is necessary to apply it exactly as the manufacturer recommends, and nothing else. All sorts of "substitutes" in the form of liquid soap, washing powderPVA glue is not allowed.
Fiber is designed for dispersed reinforcement of a concrete mix, which makes it possible to significantly reduce or virtually eliminate the formation of cracks, increase the strength and resistance of abrasion, increase the strength to bending and compression. This is achieved by the fact that the microfiber fibers are distributed and fasten the screed throughout the volume of the concrete mix.

Fiber is metallic, polypropylene and basalt. Polypropylene or basalt fiber is recommended for tie. It is added according to the manufacturer's recommendations, but it is recommended to use at least 500 grams of polypropylene fibra by 1 m 3 of the finished solution. To get a mixture with best properties, 800 or more grams per 1 m 3 are added.
You can find ready-made mixtures for pouring the tie of the warm floor from well-known and not very manufacturers. The composition of these mixtures already includes a plasticizer, fiber, and other components. With undoubted convenience of their use and high quality, the cost of the finished screed will be significantly higher than the solution cooked independently.
Before the fill of the screed, it is necessary to remove all the extra items from the floor, if necessary, the surface is needed. It is also necessary to prepare the entire tool and dishes to knead and transport the solution. All the work on the pouring of the tie of the warm floor in the room should be made at a time, so it is desirable to have two assistants: one is preparing a solution, the second is wearing, and the chief executor lays and smash the screed. All windows must be closed in the room, the screed must be limited to the effects of drafts and direct sunlight.
An independent preparation of a heap screed solution should only be carried out by a mechanized manner - the quality of the solution must be high. A concrete mixer or construction mixer can be used as auxiliary mechanisms. No shocks on a drill or puncher here are suitable here, no matter how many "truthful" sources say.

The basis of the solution is the portland cement of the brand not lower than the M400, which should be dry and with storage time not more than 6 months after the release date. Sand should also be dry, washed and sifted. River sand will not fit - it is too correct. For a screed, the ratio of cement to the sand should be 1: 3 by weight, but in practice few people weighed sand and cement, and the universal measurement method is taken - bucket. Considering that the density of the construction sand is in the range of 1.3-1.8 t / m 3, and cement during transportation of 1.5-1.6 t / m 3, then you can not be afraid to measure cement and sand buckets, since quality The mixture will be quite valid.
Water in the composition of the solution should be about a third of the mass of cement, that is, an approximately 15 liters of water is needed on 1 bag of 50 kg of cement. However, the use of a plasticizer reduces the water-cement ratio, so when preparing a solution with water, you need to be very careful - it is better to not be discolored and then adding than to pour.
The technology of preparing a solution with a mixer and concrete mixer is slightly different. The mixer must be stirred on the low turns of dry cement, sand and flocculation polypropylene or basalt fiber and then gradually add water with a plasticizer dissolved in it. In the concrete mixtures of the gravitational type, which the absolute majority, stir dry cement and sand is difficult (dry cement is sticking to wet blades and drum), so it is first pouring a part of the water with a plasticizer, and then the cement is added first, then the sand, then also portion of cement And the remaining water. Fiber is added gradually. One piece along with water, the other with sand. At the same time, Fiber can not be thrown into the drum of concrete mixer lump, and it is necessary to divide on the portion and flush before the bookmark.

The cooking time in the concrete mixer is usually 3-4 minutes, and a mixer is a little more - 5-7 minutes. The readiness of the solution is determined by homogeneous color and consistency. If you take a lump of a solution in hand and squeeze, the water should not be released from it, but at the same time the solution should be plastic. If you put a solution with a slide on the floor, then it should not be very spread, but only a little to settle under its own weight. If there is no cuts in it, they should not be broken, but should keep shape.
Laying the screed begins with distant corners of the room and is conducted by the lighthouses. Only after the completion of one band, the next one is put up and the next one, the process will end with the entrance to the room. In the level of alignment, do not try to perfectly align the surface of the screed on the lighthouses. The main thing is that there are no failures in the screed, and small influx and traces from the rule are easily corrected later.

After 1-2 days (it all depends on external conditions) When on the screed can already be walking, it is necessary to clean it with the surface. Initially, a damping tape protruding from the screed is removed and the construction rule is removed, and then the construction rule is taken and the sharp end is pressed against the beacon plane. In the direction from ourselves, short, but energetic movements are cleaned until lighthouses are completely broken. Then the trash is cleaned, the screed is moistened from the sprayer and is covered with a polyethylene film.

The next day, the beacons can be carefully removed, it is possible to unscrewed, and the formated grooves are wiping with a solution or tiled glue. The screed is moisturized and covered, it is recommended to do daily for the first 10 days after the fill.
Balancing of heavy floor contours. Commissioning
After full ripening Screeds, and this is at least 28 days, you can start balancing the circuits of a warm floor. And in this process, flowmeters on the collector will help. That is why it is necessary to acquire a collector with balancing valves and flow meters.
The fact is that the loops of the warm floor have different length, respectively, they have a different hydraulic resistance. Obviously, the "lion's share" of the coolant will always go along the path of the least resistance - that is, along the shortest contour, and the other will get much less. At the same time, in the longest circuit, the circulation will be so sluggish that there is no speech about any heat unit. In a competently composed project of warm floors, consumption is always indicated in each circuit and the position of adjusting valves, but if the warm floor is made on their own, then a simplified, but active technique is suitable.

- If the pumping node is not yet connected, then it is installed. A warm floor collector is connected to the feed and return highway.
- Full all the contours of the warm floor are opened, the balls of feed and returns are open at the input. Automatic air vent valves must be open.
- Included circulating. The maximum temperature is put on the head of the mixing unit, but the boiler does not turn on, the coolant should circulate room temperature.
- Pressure in the entire heating system is communicated to the working (1-3 bar).
- All the contours of the warm floor are closed, except for the longest. The position of the flow meter on this circuit is noted and recorded.
- Fully opens the second in length of the contour. If the flow in it is greater, the balancing valve is spinning until the consumption is lined with the longest.

- Further, all the contours are sequentially open in the order of their length, the balance of the valve is adjusted.
- As a result, consumption in all circuits should be the same. If this is not the case, you can correct the adjustment on the contours, not the touch of the longest loop.
All of the above operations are completed correctly and flow meters show that circulation in contours occurs, it is possible to begin testing a warm floor with a heated coolant. It is necessary to start at low temperatures - from 25 ° C, and then every day gradually increase the temperature by 5 ° C, until the coolant is supplied to the contours with its operating temperature. What a sequence of actions at this stage.
- A temperature of 25 ° C is displayed on the thermostatic adjusting valve of the mixing unit, the circulation pump is turned on at the first speed and in this mode they give the system of day. This monitors and corrected circulation of flow meters.
- After a day, the temperature rises to 30 ° C, and the system of warm floors is left for a day. Controlling flow and flow rate and returns.
- On the next day, the temperature rises another 5 ° C, to 35 ° C. It is already much closer to the operating mode of the warm floor, so it is already worth adjusting the temperature difference between the feed and reverse collectors. If it is in the range of 5-10 ° C, then this is normal, and if more, then you should increase the speed of the circulation pump for one level.
- The maximum temperature to which the temperature can be lifted in the feed floor collector is 50 ° C, but it is better not to do it, but to check on operating modes - 45 ° C or 40 ° C. Similarly, the temperature difference is checked for feeding and reverse. The pump should work at the lowest possible speed so that the temperature difference is up to 10 ° C.
The correct adjustment of the heated floor is impossible to evaluate immediately, since such a heating system is very inertial. Must go through a few hours to feel the change in temperature mode. Therefore, everyone who has made independently a warm floor should be armed with patience and gradually bring the system to such a mode that would provide the desired floor temperature taking into account the coating. To do this, you will need to "play" with the settings of balancing valves, the thermal heads (if they are equipped with a collector) and the speed of the circulation pump. The main thing is that the water warm floor system made by its own hands works.
Find out how, having studied the instructions with the photo, in a special article on our portal.
Conclusion
Stubborn statistics suggests that the system of warm water floors beyond obvious comfort gives more substantial energy savings. The same statistics suggests that the number of successful independent realizations of such heating is growing every year. All technologies are already worked out, the market is flooded by any components, for every taste, color and wallet. The information you need is always in open sourcesThe specialists can always ask the Council. The team of authors hopes that this article dispelled the original fear and made it possible to understand the readers that it is possible to make a water warm floor with their own hands possible.
Video: How to calculate and make a water warm floor with your own hands
According to efficiency, the new, central heating services are constantly becoming more expensive. Therefore, consumers are looking for an alternative how to make a warm floor in a private house with autonomous economical heating.
This technology is more economical from the point of view of the cost of fuel, it allows you to remove bulky radiators, freeing the space for other useful elements of the interior. Pipes under floor covering do not spoil appearance The settings and do not interfere with the cleaning of premises.
From the ecological side, the warm floor provides the perfect heat distribution for a comfortable condition of a person. The space at the level of 1-1.5 m above the floor is well warmed, above - cooler air. Therefore, many learning the techniques how to make warm floors in a private house. Simplicity of exhaust technology allows you to make a warm floor with your own hands.
Types of warm floors
The long-term practice of using the "Warm floor" technology showed its efficiency: a uniform distribution of heat throughout the area of \u200b\u200bthe room and. There are some limitations: heating out the floor covering more than 30-40 ̊С is not recommended, it will create a certain discomfort when walking, you can burn bare feet.
With a large number of rooms, high ceilings, especially in the regions where low temperatures are held for a long time, relying completely to the outdoor heating circuit should not be. You can make a warm floor in the house with your own hands and use it as an additional source in the system of overall heating.
Make a competent calculation heating system Taking into account the heat loss independently difficult. This is done highly qualified heat engineers, while many parameters are taken into account:
- the size of the room;
- thickness and type of building materials of walls and flooring;
- climatic zone;
- the average annual temperature, wind roses and much more.
There are no such calculations, it is easier in a private house with your own hands install a warm floor, using the already accumulated statistics. Practice shows that in the north of Russia in brick buildings With thick carriers 60 cm The warm floor is used as an additional heated. IN middle lane And the southern regions can be used these technologies as the main heating system.
There are two main designs of warm floors:
- water warm floor, where pipes with a liquid coolant circulating on them are laid;
- under flooring, heating electrical cables or films are stacked.
The accurate calculation and layout of the circuit or heating cables are made taking into account what type of warm floors is installed, and in which object.
Water warm floor from the heating of the central system is not recommended, it is illegal. This question must be coordinated with utilities, which is very difficult, and it is not a fact that everything will later continue to function. Warm floors in the house better do from the autonomous boiler on their fuel.
The heat-mall device and the calculation of the amount of heat required for the floor in a private house in a certain room are made on the basis of practical experience. Laying cable or pipes 3-5 meters long by 1 m 2 in increments of no more than 30 cm makes it possible to highlight heat 60-80 kW / m 2. This is enough for heating a residential area. The rooms provide a temperature of up to 25 ° C in the middle lane and in the south of Russia with well insulated walls and windows.
Watery warm floors
Technology of water heat floors are effective during operation from an economic point of view. Payment costs compared with the classic radiator system are 20-30% less. But the installation of the system is laborious, the design contains a large number of expensive elements and connection nodes.
Main elements:
- Heating boiler: Models can be electric, gas on liquid and solid fuel, hybrid options. The choice is made on the basis of the cost and availability of energy resources in a specific region.
Gas models are especially in demand in the house, this is explained by the autonomy of this type of boilers. Gas in many regions of Russia is the most affordable and inexpensive fuel. The heating system of data of boilers does not depend on central heating and water supply. It allows you to independently adjust the power consumption and fuel consumption depending on the needs.
- Pipes. 3-5 m per 1 m 2 heated surface are consumed, these standards are determined by many years of practical experience. Popular patterns of cross-linked polyethylene pipes, strong heat-resistant products with a material density of 60-80%. To achieve these qualities is used different methods Processing.

When irradiated with the electron flux in the magnetic field, a density of 60% is achieved, peroxide treatment creates a crosslinking density of 75%, gas selenium -65%. In any case, this density is enough to lay warm floors.
Good Option - Metal plastic pipes, durable and heat-resistant, have three bearing layers and two adhesives.

The inner and outer layer is crosslinked polyethylene, the middle layer is the aluminum foil 0.2-2.5 mm, hermetically welded over the entire length.
- Collector. It distributes the coolant in contours, this is the main node of the heat supply, all separate contours are connected in it. A collector is installed with so much thermoclap as in the contour system. The length of the contours is different, so the amount of heat carrier in them is not the same, the coolest time in the contours does not coincide. To maintain a given temperature in each circuit, temperature sensors are installed, they control servos in a timely manner, distributing hot and cooled streams in the specified directions.
- Thermoventil. A three-way mechanical valve that distributes the intensity of hot and cooled streams is often used. Electrical drives are installed for automatic control to the valve.

- Circulation pump. It is recommended to put a pump with a wet rotor, its impeller rotates and is lubricated with the coolant, the work is very quiet.

- Heat carrier. It may be water, antifreeze or toosol.
The costs of waterproofing, thermal insulation, cement screed and flooring are required.
Sequence of laying
In the floor basement Preliminary screed is made on the ground, the surface is falling asleep by sand by 5-7 cm, then rubble 3-5 mm on a thickness of 8-10 cm. For vapor barrier, everything is covered with a polyethylene film, superimposed layer 8-10 cm of river sand with an explosion of a fraction from 0, 05 to 0.1 cm.
A layer of waterproofing is placed on the preliminary screed. It can be bitumen-rubber mastic, it is applied with a tassel. It is easier to use adhesive rolls, based on the bitumen with polymer ingredients. The structure of sheets is reinforced with fiberglass or polyester. The insulation layer is stacked on top - extrusion expanded polystyrene (foam). The thickness of the insulating layer in the basements of 10 cm and more, on the upper floors is enough 5-10 cm.
Very effectively use thin elastic insulation with reflective surface. The structure of rolls is a polymer filled with air bubbles, or mineral wool, a layer thickness from 2 to 50 mm.
The reflective layer, 14-20 microns, there can be several options for the structure:
- double-sided - foil from two sides of the roll;
- one-sided;
- self-adhesive, on the one hand, the adhesive surface, with the other-folled.
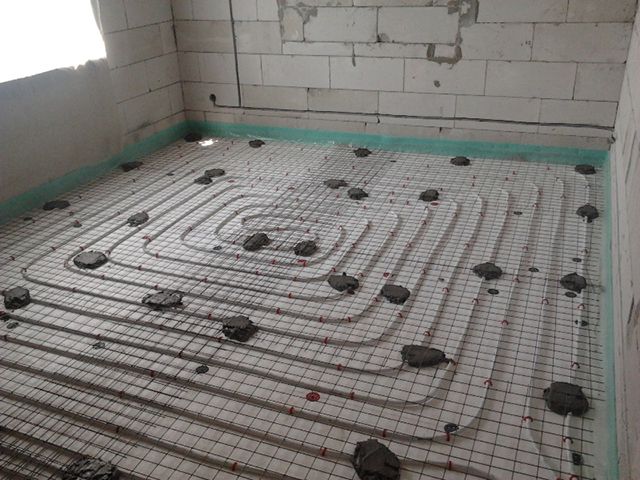
Heat-resistant metal-plastic pipes in the shape of a snake or snail are stacked on the reflecting insulation. Pipes are attached to special metal or plastic strips, often for reinforcing the screed and uniform distribution of the load on the pipes apply a metal grid.
Pipes are fixed to the grid with plastic harness, wire on the grid Ø 3-4 mm, the size of the cells 5-10 cm. The concrete screed is applied with a thickness of 7-8 centimeters, it is thoroughly aligned, after drying, the floor covering is stacked.
For a warm floor, it is recommended to use a ceramic coating, it will mostly accumulate and transmits heat. When installing pipes on concrete slabs, the elements of the preliminary screed are not made. The process begins with cleaning, leveling of the surface and waterproofing, the remaining operations are the same.
It is impossible to make a concrete screed on wooden overlapsThey may not withstand weight and collapse. In wooden houses, hydro, and thermal insulation are mounted on the floor, lags are nourished, between which the pipes are packed. Boards, Faneru, Chipboard are put on the lags, after which the facing coating, parquet, laminate or other materials are applied.
Electric warm floor
Equipment for the installation of this design is required less, the installation is carried out easier. The absence of a liquid coolant greatly simplifies the entire heating system. For heating, heating cable or infrared film is used, they are connected to the electrical circuits through thermostators.
Laying of heating cable and plates
In the absence of a liquid coolant, waterproofing on the plates can be excluded, since the probabilities of the leakage will not be. When laying on the ground, the preliminary screed and waterproofing is recommended to leave. Such a warm waterproofing floor in a private house will exclude the penetration of moisture from the soil into the room. The rest of the materials for the screed and the sequence remain the same.
The cable is stacked in a similar way, snake or snail. To warm up well insulated premises to + 18-25 ° C, it takes 150-200 W / 1M 2, if you take a 3-5 m cable to 1m 2, then the laying step will be 10-30 cm. The temperature threshold for the premises is calculated based on their functional purposes. , in the bathroom warmer - up to +25 ̊c, in the hall - +20 ̊c. Manufacturers make different cables, when buying, you need to be interested, how much power consumes 1 time meter.
Infrared plates produce rolls with a width of 800 mm, 500 mm and 1 meter, length 0.7-15 m. They are fixed to the heat-insulating coating of the thermoskotch, are stacked by 20 cm from the walls and not closer than 6 mm from each other, connected in parallel to 220V network.

The power consumption of plates is 45-65 W / m 2 * h, this is the amount of electricity consumed by 1M 2 films per hour, the melting point of the insulating film on the plates 130 ° C. There are ready mattes, insulation with a reflective layer are fixed on infrared plates, the width of such products - 83 cm, length - 1-12 m.
Be sure to take into account the installation places of furniture and large-sized household appliances (washing machine, refrigerator, cabinets) indoors. Under them to lay cables and plates are not recommended.

Stacking heating cables and plates should be planned on the free surface of the floor covering. This will reduce the load on the sources of heat, the space in the room will be heated more efficiently.
Connecting electrical heating elements
There are different types of cables:
- Uniform - not divided into parts, a certain power is made and length. After laying are included in the network through the thermostat, opposite ends;

- Two-wire - cables, closed at one end, which is hermetically sealed by a plastic cap. Another end with two wires is connected to the network through the thermostat, the cable on the part does not cut.

- Two-wire self-regulating cable - cuts into parts in certain places. The thermostat works a film matrix, located along the entire length between copper conductors. Resistance varies depending on the ambient temperature. The current begins to proceed between wires in those places where the temperature is below +5 ̊c. The lower the temperature around the cable, the greater the current and heating of the cable. Such models are expensive.
Temperature regulators
Manufacturers offer many different types:
- Mechanical (analog) regulators are the simplest and reliable.

- Digital - with liquid crystal displays, on which several parameters are displayed: The temperature of the floor covering, air in the room, sometimes the current time.

- Digital programmable thermostators - allow you to set a certain temperature at different times of the day (day - night) or weeks of the week. In the absence of people, the temperature decreases, it increases before arrival, it makes the mode of operation more economical.

- Temperature regulators S. remote control Can be controlled by a remote control in the infrared range, both on TVs, by radio channel. More expensive models work on the GSM network, on the Internet online, managed from iPhone, tablet or PC, from any place where there is a cellular communication or cable Internet.
Thermostators differ in control agencies: in mechanical models, wire resistance changes by moving contact on the plastic disk in the instrument housing.
In digital regulators, the resistance changes the microcircuit, which includes electronic switching relays. The control can be carried out by mechanical buttons or touch segments on the display, as on mobile iPhones or tablets.
Regardless of the model of the thermostat, the control blocks are connected along a typical scheme to the same elements in the same functional purpose:
- to the network 220V;
- to heating cable;
- to one or several temperature sensors;
- through grounding.
For security reasons, all electrical heating systems in private home ownership connects to the Rush to the network through a short circuit protection machine and the Uzo (contact protection device).
Outcome
The technologies of the device of warm floors provide a lot different options Installation. To determine the appropriate method and best Materials, it is necessary to proceed from financial opportunities, take into account the climatic conditions of the location of the object and functional purpose premises.
Private house owners provide installation of water warm floor. It will be in one room or immediately throughout the cottage, depends on the family budget and the desire of the owners. But his dignity is difficult to overestimate - during operation, you can forget about warm socks and walled diseases In children and adults. If all the money is spent on construction, but the dreams of the warm field leave the owners, you need to drown the sleeves and start working. For laying, it will take some time, minimum skills in construction and useful information.
What is a warm floor in a private house?
Make a warm floor water with your own hands - It is to create an artificial heating system that provides air heating from below. In this case, the floor serves heating deviceSupporting the specified temperature mode. It provides thermal comfort and meets all the requirements of the technological process.

When heating the floor heating in a private house, the following heating options are mainly considered:
- Electric floor;
- Electro-water floor;
- Classic water field and using pipes and boilers.

The last type of heating of residential premises is used in construction most often. Its main advantage - profitability when designing, in the process of use and with possible troubleshooting. Consider the main advantages of water floor:
- Safety. Hot pipes are isolated from a person with several layers of building materials - the likelihood of skin burn is excluded.
- Saving. Electricity consumption is reduced by 25-30%. The costs of arrangement of warm water floors pay off during the year.
- Convenience and comfort. Using the regulator, the owners can set the optimal temperature mode: at 20-30 cm from the floor - 20-22 ° C, at the level of 1.5 m - 18-28 ° C.
- Durability. Right installed system Heating is capable of functioning without repair and maintenance of 25-40 years.

The main disadvantage of water floor applies the possibility of waterproofing disorders With an independent installation. What other disadvantages have a heating system:
- Inaccessibility. If still there was a breakthrough of the pipes, then to eliminate the violation, you have to open the entire floor.
- Installation of additional equipment. It will takes the acquisition of radiators when the warm floor arrange is only one room.
Three ways to install warm water floors
Before proceeding to self-installing a warm floor, you need to choose a method that will optimally match the design of the house and the construction skills of its owner. There are three systems options: polystyrene, wooden, concrete.

When building a wooden system, you can save substantially and use materials that remained after the construction of the house: boards, MDF plates, plywood pieces.

Design steps:
- On the wooden base The floor is laid wooden bars 15 cm long, leaving the distance corresponding to the diameter of pipes between them;
- The next layer will be the thermal plates, which are fixed with screws. The grooves of the plates must fit tightly into the space between wooden bars;
- A tight film of polyethylene is placed on top of the construction;
- The final stage is the fastening of plasterboard sheets.
Choosing in the construction store the thermal distribution plates, it is worth paying attention to the presence of a latch. When it is used, the adjacent surfaces of all elements of the design will be the most closeV, and this will directly affect the volume of heat transfer.
The polystyrene system of more than any other suitable for independent installation Warm water floor. Polystyrene thermal insulation plates are equipped with special latches for reliable clutch. Setting the folded plates on the wooden basis, it is obtained by a one-piece design with a smooth surface.

In the grooves, plates are placed pipes. Applications of fasteners will not need - the pipe is fixed with a slight press until a complete entry in the groove. It remains to be put on top of the plate from the metal and everything is ready for the installation of the flooring.
The concrete system is used most often due to its relative cheapness, availability of materials and reliability.

Prior to laying layers:
- Screed from sand and cement;
- Waterproofing material;
- Thermal insulation material;
- Pipes of the heating system;
- Reinforcing mesh and (or) fastening of plastic;
- Mixture of concrete with plasticizers;
- Flooring.
This method is suitable for owners of houses that previously worked with concrete and have the necessary equipment for its manufacture.
List of essential materials
Before making a water warm floor with your own hands, you need to responsibly approach the choice of components. First, purchasing materials, ask the seller to show certificates for products. Secondly, before visiting the store, make a list of the necessary building materials, then you do not buy extra pipes or clamps. This is what will take when installing the heating system:
- Dampfer tape. This is foamed polyethylene to compensate for temperature expansion. Located between the edges of the screed and the wall. It has thermal insulating and noise insulation properties.
- Heat insulation materials. Now there is a huge selection of materials for thermal insulation in any price categories. When installing water floor, you can use sheet expanded polystyrene foam. Together with the damper ribbon, the polystyrene will provide the optimal return of heat pipes of the heating system.
- Waterproofing materials . A dense polyethylene film prevents unwanted leakage. Try to use a whole piece of material when laying. If the area is large, then the edges of the film must be made in scotch.
- Grid reinforcing finelye. The size of the mesh cells should be 150 square meters. mm, cross-section of a rod 4 mm. The material is used to give strength to the screed and fastening of pipes.
- Pipe. If the quality certificate guarantees integrity for 20 years or more, you can safely buy a purchase regardless of the material from which the products are made. For good heat transfer, pipes with a diameter of 2 cm are suitable.
- Fastening. The selection of fixtures will not be difficult - there are plastic or metal, any forms and sizes in construction stores.
Materials for water heat should be selected depending on the installation method.
Before visiting a construction store, check whether all tools are in stock. When carrying out installation work, it is not without a drill and a screwdriver.
Design and calculation of the parameters of a warm floor
If you are not sure that you can independently design the design of the warm water floor or calculate the number of pipes in meters, you can resort to the help of specialists or make calculations using computer programs. But there should be no difficulties, here are some hints:
- It is impossible to do one contour of the floor more than 100 m, the excessive length will negatively affect its integrity.
- The length of the circuit components should not be varied by more than 10-12 meters. And it is better to use the circuit when installing the contour.
- The warmer in the winter in your place of residence, the more there should be a distance between the pipes. If in the coldest period of the thermometer does not fall below - 20 ° C, then optimal distance Between the pipes is 15 cm. Under conditions of harsh winter, the pipes should be positioned after 10 cm.
When carrying out the correct calculations, you must have the following parameters: with a distance between pipes in 15 cm, 6.5 m of pipes will be spent on one square meter, and at a step of 10 cm - 9.9 m.
Installation of water floor
How to make a warm floor of water: all materials and tools are at hand - you can start to install. Builders call the combination of layers of water floor design "Pie", here we need to collect it.

Preparation and insulation of the surface under water warm floor
How to install a warm floor of water: first of all, you need clean the surface from the construction trash and make a concrete screed using a reinforcing wall. The quality of the screed is checked with a level - if the surface turned out with flaws, it is aligned with a trowel. We form a cake Next:
- Thermal insulation layer;
- Waterproofing layer;
- Another layer of reinforcing grid.
All materials used regardless of the selected laying method must be tightly fitted along the edges to each other. If the slots were formed at the joints, it is possible to remove them with the help of the tape (when using the film) or the mounting foam.
Select and install collector
When selecting a collector, focus on the size of the room where the warm floor will be located, and the power of the unit. The collector must perform the following functions:
- Maintain the required pressure;
- Control air flow;
- Ensure water flow control;
- Provide the whole system reliability;
- Control heating - warm floors should not cool.
It is best to purchase a collector from brass or stainless steelEquipped with a shut-off valve and temperature sensor. When installing, first connect the water supply pipe to the unit, and only then the pipes with its outflow. You can use special fittings or clamping ring with sleeve and nut.
Selection of heating boiler
When choosing a boiler, you need to focus on the following models:
- Electric boilers. The most convenient option when arranging a warm floor: Even if there is no electricity, the boiler will not stop working.
- Gas boilers. The cheapest model at cost and price of fuel. Failure - floors will be cold, if gas will end in the highway.
- Salt boilers. Do not suit the owners of houses that care about the state of the environment. In addition, it will be necessary to constantly clean the filters.
Make a warm floor by water with your own hands in a private house, using boilers that work on firewood and coal. If there is a lot of such fuel in your area, it is inexpensive, you can purchase such an aggregate.
Installation of pipes
With the help of clamps (or aluminum wire) secure the pipes on the reinforcing grid. When mounting the water floor mounting, it is impossible to delay - under the pressure of hot water pipes are slightly expanding and can vibrate. Start mounting a water warm floor system water supply pipes. The contour segments are then attached between them, and the collector is connected to the latter.

Before making installation, you must calculate the number of outputs from the collector. It is so much that there should be contours on the surface of the screed.
Pouring tie.
How to put a water warm floor under the tie - before pouring a screed, check the system. To do this, it will be necessary to turn on the heating and submit water under pressure of 2.7 bar. If within a few hours the waterproofing is not broken, everything is done correctly.
Left make a cement-sand tie. Fill the emptiness concrete and align the surface using the construction level. Laying water floor is over.
- Please note that only the owners of private houses are eligible to equip such a heating system. In many regions of our country, there is a ban on re-equipment in the apartments of water supply systems. Wrong water intake can lead to leakage: Neighbors apartment house Will remain in winter without heating. At best, you can get rid of the fine, at worst - pay overhaul damaged rooms.
- When installing the water system, it is required to provide a final version of the floor covering: marble, granite, basalt have excellent thermal conductivity - in the house will always be comfortable. But wooden floors and carpets are poorly distributed heat from the heating element. In addition, the tree will dismiss, and synthetic carpets are able to allocate harmful substances in the surrounding space.
- The quality of the installation of the warm floor will be higher if you align it the base. The total number of irregularities on the surface should vary within 5 mm.
Before each owner of the private house there is a question of choosing the optimal type of heating, which will not only adopt their functions, but also to harmonize with modern design. Bulky radiators of heating morally outdated, worsen the interior of the room and dried air. An alternative is a water warm floor, for a private house is the most efficient option.
What is water-free floor
We bring to your attention not only a list of component materials, but also the principle of their choice.
Pipes.For floor heating flooring, plastic or metal-plastic pipes are used. Recently, the recognition of plumbers received pipes made of stitched polypropylene, which differ from other pipes highly resistant to deformation, excellent thermal conductivity and a high degree of tightness.

An important condition when choosing pipes is suitability for use in heating systems. Unfortunately, some unscrupulous sellers, using the client's incompetence, sell pipes intended for water supply. The result is an inefficient heating system. To avoid this, you need to watch the labeling that is available on each pipe:
- linear expansion of not more than 0.025 mm / m;
- heat consumption from 0.43 W / m 0 C.
The required amount of pipe depends on such indicators as the installation step and the diameter of the material. Look more in the table.
Boiler.You can purchase gas, electrical or solid fuel. The choice will be due to the residence region. For example, if there are interruptions with power supply, it is better to buy a gas boiler. If we talk about power, it depends on many indicators. For a standard house with insulated walls, plastic windows and a ceiling height of at least 3 meters, the following calculation is made: the specific power per square meter must be 100 W or 1 kW at 10 m 2. Knowing the total area of \u200b\u200bthe house, you can calculate the power of the boiler. It is better to turn on the supply of power, about 20%.
Collector.Provides the performance of the entire water floor and supports the temperature set by the thermostat. It is best not to save, but buy a collector consisting of a duct sensor, a drain crane and crane of Maevsky (whipsing the air flowing). Additionally, you will need to choose a shield.

Circulation pump.It is purchased if it is no longer built into the boiler. This device provides water circulation in the system and can be equipped with a thermostat that will control the water flow rate and, thereby adjust the temperature in the system. The perfect solution is a three-speed pump with a thermostat (installation of a temperature controller will require knowledge in the field of electrical engineering and not everyone forces). To learn how to choose a pump for performance, can be from the table:
As for the company, then preference is better to give european manufacturers. German company Grundfos has perfectly proven itself.
Accessories.Meaning couplings, threads, fittings, ball valves, etc. The amount required by their quantity is calculated individually, based on the characteristics of each water heating floor system. Heating of the floor in each specific house has to be calculated and planning individually.
Read also about, which will help seriously reduce the cost of heating.
Installation of water floor
First of all, you need to inspect the old floor. Linoleum, parquet, boards are subject to dismantling. On the tile, if it is strong enough, you can retain plastic pipes without pouring a rough screed.
A black screed, otherwise it is called "primary", serves for the maximum dense laying of thermal insulation. Therefore, at this stage, you can hardly not worry about the level of the floor and the presence of small irregularities. There will be enough concrete layer with a thickness of several centimeters. For these purposes, the M-300 grade cement is suitable, mixed with sand in the ratio of 1: 4.

The next step will be the laying of thermal insulation. There is nothing difficult here, it is worth only to pay attention to the joints between the material. They need to fix the assembly scotch to avoid unnecessary heat loss.
Material for insulation may be different:
- Styrofoam. Although it is considered a morally obsolete insutiator, perfectly copes with the task assigned to him. The only drawback is short-life.
- Penropopy insulation with foil reflective layer.
- Heater polystyrene foam for a warm floor. This material is best suited for insulation. Having a high density, polystyrene foam (otherwise Painoplex), perfectly isolates the water floor from a cold concrete base. Polyurex 35 can be used, which is resistant to ignition.
The last step will be the installation of a reinforced grid with a 5 mm reinforcement cross section and with cell sizes of 10-15 cm. It will be possible to secure the pipes for it using plastic ties. Moreover, reinforced grid Serves as a binder design for concrete floor. Or you can select special mats for water floors.
Secrets of Masters when installing Pipe for heating floor
The work itself does not have any particular difficulties, but there are a number of nuances, the knowledge of which will help to carry out the installation correctly.
Selection of laying scheme.Two ways of laying are known: snake and snail (spiral). Last option preferable. The fact is that when laying the pipe "Snake", the water temperature decreases by the end of the hinge, which entails the uneven heating of the floor. The location of the pipe helix will help this avoid: the floor warms up uniformly. At the same time, the material requires significantly less.

What length should there be a pipe?Regardless of the power of the selected boiler, the water will cool, as it removes it from the point of receipt. Therefore, the recommended pipe length is 100 m. In case you need more importantUse several contours, each of which is connected to the collector separately.
How to calculate laying step?To accurately calculate the step can only experienced designer: to get correct value Many factors are taken into account, from the thickness of the walls and size of windows, to the diameter of the pipe. However, there are averaged data that we will operate. The optimal laying step for the system, which is the main source of heat in the house, is 10-20 cm. This value is not constant. Near the outdoor walls, the first 5-6 rows are stacked in 5-6 cm increments, closer to the inner walls and the middle of the room the step increases to the above data.
Today, construction stores have special mats for warm water floors, which greatly simplify and speed up the process of laying pipes. Look at the photo as it works.
 Application of mats for warm water floors
 How to solder pipes?This issue also has several subtleties that need to be illuminated within the framework of the article:
- connect pipes with each other, better through special adapters (otherwise barrels);
- if soldering metal plastic pipes is done, then the metal shell must be removed at a distance of about 3 cm from the edge of the pipe.
To achieve high quality connections, you must be guided by the following table.
Assembly, installation, collector connection
It should be noted that the process of assembly collector will differ depending on the model, the number of heating circuits selected components. In order for the system to function without complaints, the assembly must be carried out according to the instructions attached to devices.

Where to position the collector?When choosing a place to mount a collector box, you need to take into account the equivalent removal from all circuits. It is necessary to ensure uniform water pressure in all circuits. If the wall on which the collector cabinet is installed, not carrier - can be made in it niche.
How to assemble a collector?
Consider the assembly process on the example of the ICMA UPS model. In this case, we will take into account that the circulation pump and the collector itself is used together, it will provide simplicity of heating control.
- We set the circulation pump on the cape nuts, gaskets are needed between the nut and pump.
- We connect the collector with the pumping group, winding adapters with a cape nut and not forgetting about gaskets.
- The mixture unit must be connected to the thermostat and the valve responsible for the flow of cold water (mixing).
- Connect the mixing group to the collector.

Now the collector can be installed in the mounting cabinet, connect the feed and reverse to the distributor, then connect the elements of the heating circuit using adapters.
Installation of the boiler: Features, sequence
When connecting the boiler to a warm floor system, a problem often occurs. The fact is that the boiler gives the water temperature in 75-80 0 C, and for normal operation of water underfloor floor, a temperature is required not more than 45 0 C. For this reason, the connection must be performed in such a way that water with a reduced temperature is supplied to the pipes. Make it in closed system Heating can be only one way: dilute hot water The cooled coming from the "Furning". This function is performed by the underground shelter node.
Heating of the floor when installing must be assembled according to the following scheme, ranging from the boiler:
- At the beginning of the circuit, the control valve is installed, then the circulation pump and the collector.
- Between the valve and the pump, the submersion assembly is mounted in such a way that the cooled water from the "inverter" entered into the flow and then, through the circulation pump to the heating system.
- Final stage - Summing up the reverse tube to the boiler.
It should be remembered that the principle of installing the boiler itself will differ from different models and types of equipment.
Read more: Paul with mounting schemes.
Pressing and trial launch
After the end of the installation work, you need to test the system. For this conduct crimping.
Check the tightness of the system in two ways: water under pressure or compressed air. Preferably the first option: after checking on tightness, you can immediately turn on the heating. Air inspection is used in the case when heated floors work from central heating, and there is no confidence in its timely inclusion. In any case, the pressure must be no higher than 6 bar. The system is considered to be operational if for 24 hours the pressure indicator has decreased no more than 1.5 bar.

After testing for tightness, you can hold a complete launch. The water temperature must be about 80 0 s, for this, the submersion node must be disabled. At such a temperature, the stress in the pipes is reduced, which ensures the durability of the structure.
Conclusion
You need to pour a concrete screed after the water in the pipes finally cools. For a screed, it is possible to apply both traditional concrete and a warm-alone solution with a higher ability to carry out heat. The thickness of the layer should not exceed 7 cm.
After the final drying, the screed can be drilled outdoor coating.