How to make a beautiful ceiling kitchen. Ceiling repair in the kitchen: Requirements for coating, painting, pasting wallpaper, ceiling plates, drywall, rush and stretch designs
Getting Started by repair, many wonder: what ceiling is better for the kitchen? In the interior of any room, everything should be harmonized - ceiling, floor, walls. This problem is not raised by chance, because the kitchen is a room in which the hype of humidity is not rarely formed soot, water drops and fat. To avoid such problems you need to highlight the time, choose qualitative materialwhich is resistant to moisture, temperature drop and easily cleaning.
Selection of material
Contemporary building materials suitable for finishing the ceiling in the kitchen are provided in a large assortment: panel, stretch, also rubber structures. You can perform the painting of the ceiling or enclose it with wallpaper.
The classic option is the perfectly plastered ceiling and subsequently painted. What is his advantages? As a result, it turns out a smooth and white surface, a refreshing room and always practical regardless of taste and preferences. Stucco - it is environmentally friendly pure Material. White color Spearly expands the space that is beneficial for a small room.
By cons of plasters, the complexity of the process can be attributed. To make a smooth and smooth surface, you must resort to careful alignment and stripping the ceiling, which takes not enough time.

Other options
To perform a non-easy task for choosing material, options are needed that will not affect the functionality and aesthetics of the room. Some of them:
- hinged plasterboard ceiling;
- plastic panels;
- stretch ceiling;
- painted surface;
- fucking wallpaper.

When choosing one of the options, it is necessary to consider positive and negative characteristics. Do not forget about the peculiarities of the room itself.
Ceiling of plasterboard sheets
There are various ideas of using this surface. Plasterboard is a material, thanks to which you can safely hide all irregularities, as well as hide engineering communications under it. Many designers such ideas fall to taste, solutions there is a huge amount. Between the ceiling and sheets of drywall place the original built-in lamps, visually increasing the vertical walls adorning the room.

There are many options for mounted, multilevel structures. But, when this material is selected, it is worth paying attention to its properties. Moisture-resistant material is required. It is better clean, does not change the color when moisture gets into it. A solution consisting of several levels is suitable for rooms with high ceilings.

Plastic panels
If you need to decide what is better to make the ceiling in the kitchen with bad ventilation, then better option can not found. Material does not require much time to care, perfectly tolerates wet cleaning. Installation of PVC panels is not fully accomplished even for beginner. If the question is solved for beginner masters, which material to apply in the kitchen, plastic panels are an excellent option.

Completed material in different color gamma. The room can be equipped in any style. It is possible to make a design of several levels if the height of the room allows. For one tier, there will be enough gap of 7-10 centimeters.
If it is decided to separate the shelf surface PVC panels, then you need to know that it is better to acquire a material resistant to elevated temperature. Raw materials must be accompanied necessary documentsconfirming that heating is envisaged, and toxic gases are not distinguished.

Ceiling under painting
For the ceiling it is better to acquire paint detergent. Algorithm for painting preparation:
- alignment of the surface, cleaning from defects;
- all irregularities and cracks need to be eliminated by putty;
- small agriculture emery paper grind the treated surface;
- apply several layers of primer with painting roller;
- paint the ceiling acquired paint.

To appearance In the kitchen did not spoil the protruding yellow stains, before painting, their alkyd matte paint should be treated.
Ceiling tile
What material is the easiest way to install? Ceiling tiles. Laying of polystyrene tiles does not require special tools, large skills. To separate the ceiling, you need to have:
- tiles set;
- measuring roulette;
- sharp stationery knife;
- special glue.

Under the tile, you can greatly hide minor defects, but if the base has large drops, Make plaster. It is better if the surface of the tile is laminated. With severe pollution separate fragments You can replace if it is not possible to wash or paint. This material is fuel, absorbs moisture. It is better to use it in small kitchenswhich are equipped with a good exhaust system.
When using such a material, incandescent lamps should be positioned at a distance of about 20 centimeters from the base.

Fucking wallpaper
This method of finishing the ceiling has certain advantages over others:
- material is low-cost;
- if there are minor cracks on the surface, then under the wallpaper they are invisible;
- moisture-resistant material is easily humid cleaning;
- special wallpapers are withstanding up to 10 gloves, which makes it possible to embody various design ideas;
- color, texture, drawing - all this has a huge range;
- work is performed quickly.

It is not difficult to make the room with a cozy with the help of wallpaper, but to realize ideas into life will help in advance the design of the ceiling in the kitchen.
Important! When buying glue, you must pay attention to the type of wallpaper, pick up the most suitable. It will have a positive effect on the picture.
Stretch ceiling
This type of finish is very popular. Conducting an assessment exactly which ceilings are best used for the kitchen, many choose this particular option. This design has a property to solve several problems at once:

- perfectly masks irregularities, surface defects;
- no need to prepare the basis for installation ideally;
- the film will hide various communications;
- material is not demanding of care;
- resistance to moisture;
- long operational period;
- presentable appearance;
- the ability to embody a variety of design ideas;
- material withstands a large number of water.

There are several installation options. stretch ceiling. One does not require availability special equipment And you can do it yourself.
How to choose a ceiling in the kitchen? (2 video)
Ceiling options in the kitchen (40 photos)


Each apartment needs periodic repairs, especially if various finishing materials come to unsuitability: panels, wallpapers or whitening on the ceiling. The ceiling in the kitchen is one of the most vulnerable places in the entire apartment: Daily cooking can quickly pollute it, and then the owners will have to think over its repair.
Requirements for ceiling covers in the kitchen
The kitchen is a room where the differences of moisture and temperatures often occur. Here we usually wash the dishes regularly and prepare food. Therefore, all materials for finishing must necessarily have the following properties:
- Hygienicity. In the kitchen should be as clean as possible, because it is a guarantee of household health. So, thinking about the repair of the ceiling, you should give preference only to those materials that you can wash and wipe.
- Moisture resistance. The ceiling finish should not lose the outer attractiveness and absorb moisture when exposed to steam.
- Practicality. Now few people want to spend a lot of time to maintain purity. For this reason, by planning the repair of the ceiling in the kitchen with their own hands, it is recommended to give preference to those materials that will not create difficulties during harvesting.
- Durability. Materials that can serve for a long time are always in preference. After all, their application moves the prospect of the need to perform a new repair.
- Aesthetics. The ceiling in the kitchen should be harmoniously combined with the rest of furniture and decoration, as well as please the eye.
Repair ceiling in the kitchen with your own hands
The ceiling, just like the whole kitchen, belongs to the room of increased risk. Sauce, GAR and steam will definitely experience the surface for strength even when modern system Ventilation. And below you will learn how you can repair the ceiling in the kitchen, and the photo and video will clearly demonstrate to you this difficult process.
Contact a construction and repair company or repair the ceiling in the kitchen on your own - this is the question that needs to be solved by the owners of apartments.
By performing repair with your own hands, you can significantly save your money, having spent them to decorate more expensive materials. And below you will learn how to make the repair of the ceiling itself.
Where to begin?
First of all, you need to assess the degree of damage and the scale of the upcoming work. The formed soot on the finishy whitewash requires much less effort to update the ceiling coating than the fastened plaster.
Depending on the level of damage to the ceiling and budget, which you select, you can perform the following repairs:
- Painting or whitewash.
- Stowing finishing panels or wallpaper.
- Installation of the suspended ceiling.
- Installing the stretch ceiling.
- Preparation for repair work.
Whatever the options you choose, will pre-prepare a working surface. To do this, you will need: a rigid brush, a spatula, finish spacure And the mixture for primer.
Pre-from the kitchen need to bring furniture (and the one that remains, just cover polyethylene film). You also need to be sealing the film and the floor, and if it is not, then use newspapers. This will significantly save time and strength on cleaning upon completion of the repair of the ceiling in the kitchen.
The old coating must be considered the maximum using a rigid brush or spatula. Any irregularities and cracks on the surface of the stream is important to be pricked. After the primer dries, the finish putty is applied. It will prepare the surface to further actions, and also lines the surface of the ceiling. In the event that, for one application, it was not possible to achieve a flat surface (checked by the level), after drying it is necessary to apply another layer. Finishing materials are applied to the aligned surface.Repair ceiling in the kitchen with your own hands: photo and similar instruction
Teaches or painting
Because of its briefness, these both ways go into the past, but on the other hand, these are the cheapest finishing materials.
If the repair of the ceiling in the kitchen must be done by whitewash, it is important to take into account the following subtleties:
- Before applying whiten, you need to thoroughly wash old bliss from the surface of the ceiling to the very concrete base.
- Preparing a mixture for blissing, it is necessary to add a certain amount of joinery glue, as a result of which finishing material Get extra strength.
- Apply paint needed smooth smears perpendicular to each other. Thus, you can eliminate the formation of longitudinal "influx" paints.
Choosing the painting of the ceiling in the kitchen, it is worth preferred by waterproof high-quality paint. Her expenses depend on its characteristics.
Brushes apply for staining foam rollers or kraskopult. We advise you to apply at least 2-3 layers of paint.
Tip! Note that last layer Paints must be applied towards the light source, because so you will avoid traces of the brush on the surface of the ceiling.
Ceiling pastry cuisine polystyrene plates
The main advantage of this material is low cost and simplicity of work. Before proceeding with the ceiling salary, you need to place the plates so that the central is strictly in the center of the room. In addition to the attractiveness of such a cladding, you can accurately determine the number of incomplete tiles, to fit them to the necessary sizes.
Casting technology is very simple - a layer of glue with a thickness of no less than 1.5 cm is applied with a spatula on the tile, after which the tile is applied to the cell reserved to it and gently pressed to the ceiling.
PVC panels or shook wallpaper
It is a bit more complicated, but it is more convenient to apply the ceiling in the kitchen of the PVC panel. They are presented in a wide variety of colors and sizes.
PVC panels should be attached to special glue. They have protruding grooves and details for better docking with each other. And for them it is convenient to care for: periodically wipe with a cleaning agent.
Choosing a wallpaper for the ceiling to the kitchen, you should give preference washing optionswhich are designed for sticking in such a room. Specialists advise to give preference to wallpaper shades to visually increase the flow height, thereby expanding the kitchen space.
As for the wallpaper with the print, it is important to select them so that the drawing completely coincides throughout the perimeter of sticking. In this case, the sticker must be carried out in parallel with the wall, where the window is located, namely from the window to the door.
The process of pasting the ceiling by wallpaper implies compliance with such rules:
- Wallpaper strip length should be 15-20 centimeters more to overlap the ceiling connection with the wall.
- You need to stick the wallpaper in the direction from the window (in parallel to it).
- Slices of wallpapers are cut in advance for the exact fit of the pattern, after which they are nicking and stuck alternately.
- From pasting to drying wallpaper windows and doors in the kitchen should be closed to exclude drafts and, as a result, dug wallpaper.
Installation of suspended ceiling
Much more and more convenient to operate in the kitchen, suspended ceilings were shown in the kitchen. And there is nothing surprising in this, because they are not exposed to deformation, easily wash and completely replaceable.
By installing the suspended ceiling, it is necessary to first organize the framework. But note that the instruction on its arrangement differs depending on which you decide to install the ceiling in the kitchen. Although the following general points can be distinguished:
- P-shaped metal profile fasteners.
- Preparation and fastening of suspensions to secure profiles, where the subsequent final fastening of the panels will be performed.
The panels you choose must be fastened with self-tapping screws on a predetermined frame (they are attached along the edges). Footprints from self-samples are hidden by special corners, which does not spoil the aesthetic appearance of the ceiling.
Plasterboard - material, even more hygroscopic than polystyrene tiles, so it is better for the kitchen to give preference to its moisture-resistant version, especially since it is not much more expensive.
But be that as it may, many owners choose this option for the kitchen, as it allows you to create the most original, multi-level structures.
Moreover, suspended ceiling Allows you to hide communications and install built-in lamps.
The disadvantages should include:
- Sufficient labor complexity.
- Reducing the height of the ceiling, which can be critical in a model planning houses, where the ceilings are so low.
- The need for various additional work. After mounting the plasterboard design, you will have to perform putty and surface coloring. Plasterboard allows you to spend the wallpaper sticker.
Rush ceilings in the kitchen
Such an option to finish the ceiling has a huge amount positive qualities, among which include:
- Stability K. unfavorable conditions operation.
- Ceilings, like other types of suspended structures, do not need carefully preparation of the surface and allow you to put the communications secretly.
- Diversity decorative decoration. You can resort to options with open and closed type Rosek, use different combinations colors inserts and rails.
- Rush ceilings are easy to leave, easily clean.
- If necessary, you will dissemble the design without any difficulties (for example, if you need replacing the lamp).
- The ceilings meet the requirements of fire safety.
Among the shortcomings it is worth allocating only a decrease in the height of the ceilings.
Installation of stretch ceiling
The installation process of the stretch ceiling is quite complicated, so it is better to charge it to those skilled in the art. It justifies a high price, without requiring serious effort when careing.
This option is quite expensive, but it is one of the most practical. Its main advantages:
- Long-term operating deadlines for ceilings. The coating will serve several decades without the need for repair.
- By installing stretch ceilings in the kitchen, you may not worry about flooding, which can arrange neighbors on top. The panels are capable of withstanding a huge amount of liquid, your ceiling and the kitchen interior itself will not suffer.
- Using different options Design, installation of a panel of different structures and colors, the construction of multi-level structures, etc.
- If necessary, the ceiling is easily clean.
- Stretch ceilings do not burn out in the sun and perfectly carry the temperature differences.
Conclusions about repairing the ceiling in the kitchen with your own hands
So, the repair of the ceiling you can perform almost any technology. Choosing a finish material, the owner must take into account its durability, quality, cost, and, of course, the ability to serve in difficult conditions. Comparing all factors, you can choose the most suitable option.
In order to make a decision that the ceiling is better to do in the kitchen, you should carefully understand the properties of each of the materials, find out all the advantages and cons of its use. At the moment there are many materials suitable for the finishing of the kitchen ceiling. It is a tree, and so popular PVC, and plasterboard and even metal. It is especially worth paying attention to the flammability of the materials used and their resistance to humidity, as well as to temperature drops - in kitchen rooms These are the most common conditions. A significant role is played by the service life - it depends on it, as long as it will serve this or that covering.
One of the cheapest and proven options for finishing the ceilings in the kitchen is the plaster. The design of the ceiling in the kitchen with the help of plaster makes it possible to eliminate damage to the coating due to the drops of moisture. Among the additional advantages of this finish should be allocated:
- Plaster is not afraid of temperature differences - very coldy, As well as the suffocating heat, do not affect the coating.
- The plastered ceiling in the kitchen can be washed countless times - this will not bring the surface of the same harm.
- Cheapness this coating Also is a rather significant advantage.
 Plaster - The most affordable and widespread option of the ceiling surface
 However, plaster, with a fairly large number of advantages, has a lot of deficiencies, in particular:
- The plaster is very dirty, also has a feature to absorb fat, so such ceilings will be washed in the kitchen quite often.
- Does not protect against flooding from above, from which even a small flood will be wrapped in divorce on the kitchen ceiling, or worse - suspiced plaster.
- Another, a sufficiently weighty minus - such a finish is greatly absorbed odors.
Stucco is a good budget option for ceiling design in the kitchen. Cheap, reliable, without special efforts - This option looks quite decent. However, if you plan to make ceilings in the kitchen more aesthetic and practical, it is better to give preference not to usual, but decorative plaster.

Plasterboard
The drywall finish is an excellent solution to the question of whether to separate the ceiling in the kitchen, subject to the exhaust to it. One of the main advantages is the ability to create multi-level structures, thanks to which you can emphasize the overall design of the room. Also, due to the features of the design of the ceilings in the kitchen of plasterboard, the surface does not need alignment, which allows you to significantly reduce costs.
 Multi-level ceilings from drywall - available and beautiful
 Such kitchen ceiling It also has disadvantages - it cannot be washed, and in the absence of drawing in the room, he will quickly lose his appearance. This option is very popular, thanks to aesthetics, comparative budget, as well as the ability to significantly diversify the design.
Finishing from PVC panels is a fairly popular option due to a variety of texture, as well as ease of installation. This ceiling decoration in the kitchen has many advantages, in particular:
- low cost;
- water resistance;
- durability;
- easy to care.
 Plastic panels – a budget option For finishing kitchen ceilings
 Moreover, a similar type of finishing during damage can be easily replaced. Moreover, a damaged area is replaced, and not all coverage, which significantly reduces the cost of repair.
The ceiling in the kitchen of plastic has its drawbacks. One of them is a high sensitivity to damage. Anyone, even a light blow can lead to a breakdown of the coating. In addition, plastic is easy to fire, and in the process of burning, toxic gas is distinguished, which is especially important for such a fire-hazardous room as a kitchen.
Solving what finish to apply, you can not forget about metal ceilings in the kitchen. They are quite popular due to their high strength, as well as low cost. At the same time exist various options Performances, in particular from aluminum or other metal. Among the additional advantages of such a ceiling is to highlight:
- long service life;
- the coating is not afraid of moisture and temperature drops;
- such a kitchen ceiling is easy to wash;
- the material is not susceptible to burning;
- not afraid of floodings.
It is worth noting that the last item is applicable exclusively for finishing - it will not affect her water. But it will fall into the room, so protect the interior from the effects of flooding a metal ceiling will not be able.
 Metal panels - practical option For trimming ceiling in the kitchen
Such a choice of ceiling into the kitchen is really reliable and practical. Metallic or aluminum coatings are perfectly coping with their duties, easily clean, and also absolutely stolen the effects of time. However, it is quite difficult to call this type of ceiling cover.
When choosing a ceiling into the kitchen, stretch structures use in great demand - and not in vain. Their appearance can be safely called impeccable, and the cost has long passed into the category available. The design consists of a decorative profile to which the fabric or film is attached. Which of the materials choose, solve you. We will dwell on each of the species.
Fabric ceilings in the kitchen are initially considered more durable than film. Among the characteristics of the fabric options should be allocated:
- High resistance to mechanical damage.
- Partial flow of water during flooding.
- The need to complete the replacement of the canvas during the forced dismantling of the ceilings in the kitchen.

The film variant is distinguished by the following characteristics:
- It is subject to mechanical effects, it is easy to contact with a sharp object.
- Holds water, thanks to which you can not be afraid of leaks when flooding from above.
- It can be removed and stretched many times without replacing the material (for example, for draining water and drying).
In addition, both film and fabric stretch options May be matte or glossy, satin or transparent. This ceiling trim in the kitchen has many advantages:
- resistance to moisture drops;
- ease of installation;
- the ability to install point lighting;
- the possibility of combining with other structures;
- uncomplicated care.

Stretch ceilings have their drawbacks:
- the design cannot be installed independently;
- material is exposed to sharp objects;
- heating contributes to the deformation of the ceilings, including sagging, which is especially relevant for the kitchen room, where the temperature changes are common;
- if the design is strongly deformed, it must be completely replaced, it is easy to impose a latch.
Painting Ceilkov
Many types of ceilings in the kitchen, including plastered or plasterboard, need painting. That is why the question is how to paint the ceiling in the kitchen, is also quite relevant when finishing this room. You can answer it, based on the requirements that are extended. If you do not threaten flooding - the usual water-emulsion paint is suitable. That ceiling coating It is easy to wash and, in case of need, it is enough to refresh, imposing a layer of paint. But experts advise the use of more stable front coloring compounds for kitchen premises, which easily withstand constant temperature differences and even a small flood.
 Paint for kitchen ceilings should withstand temperature differences and wet cleaning
 Other finish options
The options for finishing the ceiling at the moment there is quite a lot. In addition to the exotic designs, there are also exotic designs - including from laminate. However, such a ceiling in the kitchen is affected by moisture, fungus and mold and is created rather to hit, rather than from practical considerations. At the same time, such options are quite expensive and cost is often not justified.
It is also worth noting also blissing, as an option for finishing, and foam. But such materials are unlikely to boast of special aesthetic properties. The reliability and duration of operation of this design is also small, which makes them not too popular, but, nevertheless, very available option. Their use can be quite justified if you need a temporary finish before conducting larger repair work.
The choice of ceiling into the kitchen should be done based on the features of the room put forward to the requirements for it, and, of course, the budget. To date, there are quite a few options for design of kitchen ceilings, which correspond to both aesthetic and practical requirements, do not require high costs. However, it is worth remembering that for the best quality of the decoration installed, its installation is better to entrust professionals, which will also prompt how to separate the ceiling in the kitchen in your case most optimal.
Repair ceiling in the kitchen with their own hands should be done especially carefully because ready ceiling Couples will continue to work, soot, elevated temperatures and other negative factors.
Almost any repair of the ceiling in the kitchen begins with the removal of the old finish. This process is not as simple as it may seem like inexperienced homemade masters. First of all, you need to prepare a lot of fixtures and tools, without which to get rid of its coating is very difficult. We need:
- gloves, safety glasses, in some cases respirator;
- ladder;
- metal brush and spatula for removing old paint or blissing;
- purchase film and scotch;
- hammer and chisel for removing plaster;
- bucket, sponge, garden or ordinary pulverizer;
- roller (it is desirable that his veils are as long as possible);
- pila Bulgarian;
- perforator.
Removing the old coating from the ceiling
If your kitchen ceiling was closed with chalk, wash the old coating will simply be simply with the help of water and roller or rags. With lime coatings, as a rule, everything is more complicated. It will be necessary to wet small sites Surfaces with water and wait 20 minutes while she does not apply the ceiling.
After that, we are equipped with a spatula and begin to thoroughly roll up the old coating. Some places may have to handle the perforator. It is usually required to remove hardened finishing compounds in the joints of the ceiling slabs.
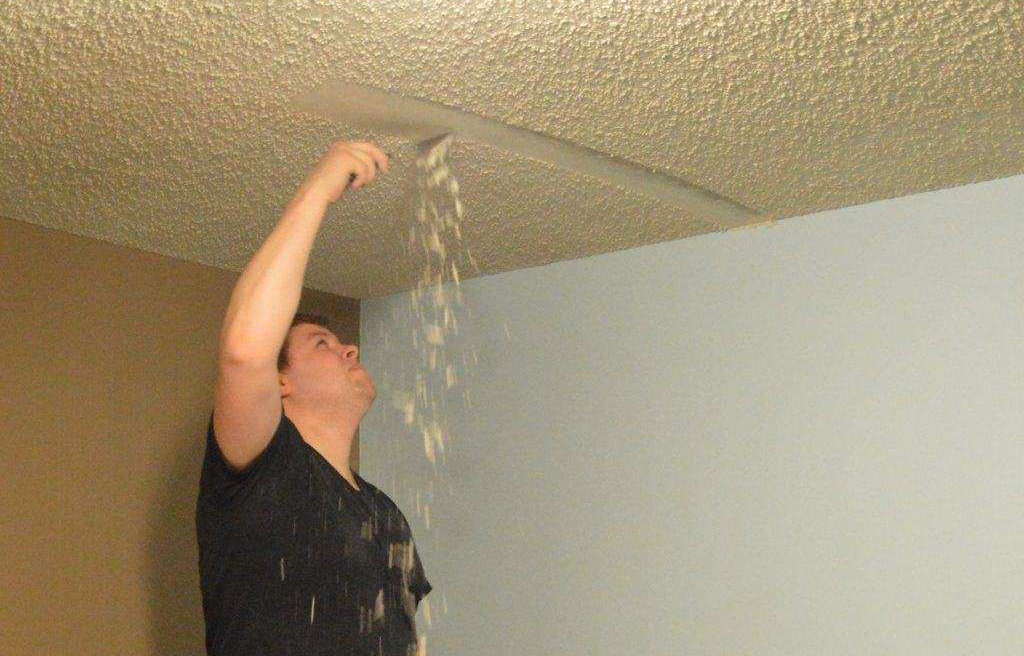
The plaster is removed using a hammer and chisel mechanically. This operation is laborious. First you need to beat off the old coating, and then clean it with a spatula or metal brush. Approximately the same way remove the old paint.
Before you begin cleaning the ceiling, be sure to cover all items and techniques in the kitchen film, well fix it with painting scotch. Do not forget about your safety - put on protective glasses, respirator, gloves. You have very dirty and dusty work.
If under the old finish you saw the mold, it must be processed. To do this, use whiteness or a similar means containing chlorine. It is well protected from mold and special anti-grapple primer compounds. Treat the entire surface, and not just plots with mold. And then the fungus will never appear on the ceiling.
If you plan to beat the ceiling again or paint it, you need to take care that it is truly even. Surfaces with drops of heights up to 1-1.5 cm is allowed not to align. In other cases, plastering the ceiling should be performed. At home, this operation is carried out using fiberglass mesh and lighthouses. The work scheme is relatively simple. It is necessary like this:
- Find (using a water or laser level) the lower point of the ceiling (rough).
- Install lighthouses (they are metal profiles).
- Put the plaster composition between profiles, distribute it to the spatula. The mixture should be slightly played. When the entire ceiling is processed, take the rule and zigzag movements remove all the excess plaster.

The process of leveling the ceiling
Important refinement! The plastering makeup is forbidden to apply a thickness of more than 2 cm.
If the unevenness of the ceiling does not hide such a layer, one more shuttering should be performed.
You will need to wait to dry out the first layer, and then press it a special reinforcing grid. After that, again apply plaster.
When the ceiling surface drops are 2.5-3 cm and there are large cracks on it, alignment can be performed by the following technology:
- Expand cracked with a spatula. Thoroughly clean them.
- Put prepared hollows.
- After drying the primer composition, they bloom the gap by mounting foam.
- We are waiting for a day, remove the extra foam (cut off with a knife), re-hand the surface of the primer.
- Apply the plaster (with the help of a spatula) on the gap (the composition is needed very tight), and supervisor the sickle (reinforcing tape).
- Place the tape.
Align the ceilings with drops of more than 3 cm in the usual homemade Master Not under power. In this case, it is better to invite a specialist who has skill work with special dowels, reinforcing heavy metal nets, special sand-cement compositions of the type of Rotband.
Even easier - refuse traditional options Finishing ceilings (whitewashing, painting) and make in your kitchen suspended construction. Then complex and time-consuming surface equalization can be made at all.
Before applying paint (as well as a chicken solution), the aligned ceiling surface should be covered. This is done by gypsum finishings. They are applied by a spatula (it is desirable to use a wide tool) in one layer, and if necessary, in two. The thickness of applying putty is small, about 1 mm.

Ceiling painting in the kitchen
After 6-7 hours, the ceiling is watched and grind grinding machine (in its absence - manually), treated with penetrating primer. After all these preliminary work, you can safely begin staining (whitening) of the surface. As dyes most often apply claimer, lime, acrylic or.
The irmentation forms a fairly attractive and very thin layer of coating on the ceiling. But the limestone or chalk solution requires minimal financial costs. In addition, such compositions are considered environmentally safe. If the whitewashes and the water-emulsion do not attract you, you can use acrylic paints. They are expensive, but characterized by excellent decorativeness and true aesthetics.
By the way, the ceilings painted with acrylic mixtures are allowed to be purified during their operation. soap solutions and warm water. This distinguishes them from surfaces treated with water-based paint, which cannot be washed. Such ceilings can only be wiped a slightly moistened in water with a cloth (and better dry rags) without friction.
Council of specialists. Kitchen ceilings are desirable to be painted not glossy, and matte compositions. The latter excellently hide small surface irregularities. But glossy paints, on the contrary, protrude the flaws of self-alignment of the ceilings.
Inexpensive, repair the kitchen ceilings can be repaired by assessed by wallpaper - relief, washing, intended under painting. Professionals recommend using embossed or washable materials. The first are able to hide under them some irregularities of the ceiling surface. And the washable products themselves are ideal for the premises where food is preparing. Note - the wallpaper sticker is made on a well-aligned surface.
Separate a kitchen ceiling without extra cost Polystyrene foam plates allow. Installation of these products is very simple. All installation work without difficulty will perform a common person With minimal experience in repair activities. True, such plates are characterized by a number of shortcomings. They are:
- poorly laundered from dirt and nagwed fat (and what kitchen without them?);
- hygroscopic;
- fire beads safe due to its increased flammability.
The tiles of polystyrene foam are good for kitchens with a powerful hood and in cases where it is planned inexpensive and fast repairs.

Ceiling pasting wallpaper
Even more hygroscopic is drywall (GLC). But it is nevertheless, it is often used to repair the ceilings in the kitchens. This is due to the fact that plasterboard sheets make it possible to form elegant in terms of design ceiling structures in several levels. And the problem of high hygroscopicity of the material will not be disturbed if you acquire a special moisture-proof GLC.
Important moment. When installing plasterboard sheets It is necessary to lower the height of the ceilings, which is critical for apartments in typical houses. Also prepare for extensions when using GCL. You will definitely need to put a plasterboard ceiling, and then hold it with wallpaper or painting.
Practical and beautiful but expensive options repair of kitchen ceiling surfaces can be considered tensioning and rack structures. Stretch ceilings look great, they are performed in different design variations, they are easily clean, do not fade under the sun and have resistance to temperature differences. Similar positive characteristics also describe wheels.
As you can see, repair the ceiling surfaces in the kitchen is now running different technologies. You only need to choose the suitable way to you.
There is no eternal ceilings, and first of all it refers to the kitchen, where the human factor is largely affected by the service life.
Extreme cooking methods in saucepans without water or with a dropping pancakes, insect hunting using any submitted items, an unsuccessful attempt to keep a champagne stopper in hand - all these factors can cause damage requiring the repair of the ceiling.
Unfavorable environment in the kitchen room with high humidity, high temperatures and fat discharge significantly reduces the service life of any ceiling, and the flooding, which experienced almost every resident apartment housesmay not only spoil the ceiling, but also lead to its replacement.
Optimally - it is necessary to update the ceiling coating, at least once every few years.
Often, the errors in the installation are pleased to deteriorate: poor preparation of the surface of the ceiling slabs for the ceiling device, errors when installing the installation profile, use in lamps of too powerful lamps, etc.
Solving how to repair the ceiling in the kitchen, you must proceed from its view. Depending on the type of ceiling, its repair can be made with their own hands or need help of specialists.
Surface preparation
In addition to removing the old coating before repairing the ceilings, it is necessary to prepare the basis for which ceiling materials will be applied. Preparation may include the following work:
- Remove contamination. Defects from rust spots, soot and fat, leakage divorces are removed using alkaline or acidic products, you can use and meansAfter removing the layer of polluted surface.
Often the ceilings in the kitchen after many years of operation have established yellowwhich is quite difficult to paint. In this case, you can use inexpensive means "whiteness", which has an active chlorine in its composition. It is divorced in water and applied roller on the ceiling several times.
- Alignment of recesses. For high-quality sealing cracks, it is necessary to expand it by 5 - 10 mm., Removing fragile or detached areas, after which it is projected. Filling in deep slots can be performed using alabaster, cement-lime or plaster plaster solutions, Rotband. After the surface, the surface is sweeping and inspired by sandpaper.
- Primer. Used in preparation for the repair of all types of ceilings with coating on the main one. Liquid primer applies to improve adhesion deep penetration (Ceresit CT 17), they are applied to the surface with a roller in two - three layers.
In the name of the primer there is a word "colorless", but in fact it is not entirely true. The primers have a yellow and white opaque color, for the ceilings it should be chosen only white, similar to milk.
- Putty. For alignment of the kitchen ceiling, seeding shells, very small cracks are used by spatlement. In this method, the special putty mixture is applied to the primed surface and after drying it is aligned with sandpaper.
In the construction sector to strengthen the ceilings, small plastic grabs are used for finishing work with a glued thin porous layer of rubber. Sandpaper or special grid is fixed on it working surface With special bolts with clamping plates on the opposite side of the grater.
Bled ceiling
There are two ways to repair a brown ceiling: with the removal of an old coating or redecorating With the application of a new layer on the whitewash. If the ceiling has not been repaired for a long time and the coating is yellowed from time to time, having intimidated with kitchen fat and so much, then it is better to remove it.

The cracked ceiling is not only an inesthetical appearance, but also the chance that over time, the whits will fall
Shaving the ceiling follows the same material that was used in the previous coating.
There are several ways to apply whitening: with the help of a brush, roller, or a pulverizer nozzle, each of them has its own characteristics:
- A brush could be used until the invention of the roller - the method of time-consuming, ineffective with low coating quality (leaves on the surface of the strip, bristles).
- The use of roller is suitable for most homeowners and gives an average quality with proper application.
- Sprayer - Method of Professional Application coloring materials. Gives best qualityBut the coloring of the ceiling requires professional skills. Also, the method has significant drawbacks - a large amount of suspended dust is formed during operation, which leads to increased consumption of materials, pollution of all surfaces, requires the use of protective agents.
Cretaceous coating
Repair of the kitchen with their own hands with the removal of the old ceiling coating it is easier to spend, pre-impregnating whining with water with a roller and then removes it with a steel spatula. The remaining small layers of the chalk are washed away with the help of a sponge. After drying, the ceiling surface is cleaned with sandpaper, after which it is ready for whitewash.

The ceiling peeled from the chalk is not ground, if it remains areas that need to be aligned with the spat, they need to be cleaned as much as possible from the chalk to the concrete base and process to otherwise Spaklyka will not hold on.
It is fairly easy to distinguish chalk from lime: it is not evaporated when handing over the ceiling in the case of the use of lime, when using the chalk coating, its traces will remain on the hand.
For the preparation of a colorful solution for coloring 10 m.KV. 3 kg. The chalk is diluted with water depending on the application method in a certain relation (usually per 1 kg. The chalk accounts for 2 l. water), add 30 to 100 ml. PVA glue, 50 g economic Soap, 10 - 20 g. Sinky.
Before use, the chalk solution must be strained through the Capron, otherwise large solid particles contained in the chalk powder will remain on the ceiling.
Lime coating
It is rarely used in the kitchen premises, mainly used in the bathrooms.
When removing the old layer, it is necessary to use a metal spatula, pre-dumping the removable section with a hammer. The use of water in the case of a lime coating is ineffective, it is poorly dissolved, comes and smeared over the surface.
Lime is pretty hard to clean
After alignment and stripping of the limestone ceiling (it is not blocked on the lime), you can proceed to its painting with a roller or spray gun.
The solution for limeplains is 10 meters square. prepared by dissolving in 4 liters. Water 2 kg. Lime with the addition of 100 g. Salt and 45 sinks.
Repair of painted ceiling
The repair of the ceiling in the kitchen with their own hands in most cases will require repainting, even if the surface will be painted the same paint. This is due to the conditions of operation of the ceilings in the kitchen premises, at which their surface quickly loses its original snow-white look.
In the case of peeling paint, strong deep penetrating contaminants or mechanical damage to the ceiling, it is necessary to thoroughly clean from old paint or putty, to predict, and then align a new putty.
When scrolling the sandpaper, it is possible to align not only putty, but also remove the old paint in the problem places of the ceiling.
For painting kitchen ceilings use modern materials: Water-emulsion, acrylic, latex paints that are not washed off with water.
When conducting painting work With your own hands, it makes no sense to use a pulverizer: it will lead to a large consumption of paint without getting high, if not a specialist works.

Roller will not only save paint, but also will evenly distribute it on the ceiling
It is easier to use a roller with a synthetic nozzle - a fur coat, for the convenience of working it can be applied to the telescopic extension (fishing rod), which allows you to paint the walls and a floor ceiling. Another one an important element It is the use of a special bath where paint is poured. When working, the roller is lowered into the paint and rolled on a flat surface of the bath, which contributes to the uniform distribution of paint along the coat.
Before the main coloring corner of the room must be painted with a brush or small roller.
The surface of the surface is made at least two layers: the first is applied perpendicular to lighting, the second after drying the paint along the direction of light.
Ceilings in the kitchen are usually painted matte paints - It does not require high quality prepared surface and makes unnoticed small irregularities.
Repair of wallpaper or polystyrene foam tile
When damaged wallpaper or polystyrene foam plates As a result of flooding, negative impact Contaminated air in the kitchen or their spontaneous dugout can be attempted to re-glue the retired sheets, first cleaning and thoring the desired section of the overlap panel.
In most cases, wallpaper or tile during operation lose their appearance and is subject to replacement.
An excellent exit from the position is the coloring of the wallpaper. You can paint any types of wallpapers (even paper, if you do not strongly wasting their surface), it is suitable for water emulsion, acrylic, latex paints. The method is also convenient because after some time the wallpaper can be repeated, while getting a durable budget ceiling.
Repair of plasterboard ceilings
In case of damage to the plasterboard coating, small areas can be covered and cleaned with sandpaper, with severe flooding, the sheets will have to change and put all the joints and their surface. After carrying out preparatory work The whole ceiling will have to repaint.
PVC panels ceiling and wheels

After mounting the ceiling of PVC will not need to be repaired, if only you yourself damage it
It is difficult to submit a situation in which rack ceiling with 50. summer time Services will need to be repaired - except after the fire. PVC panels are more affected by external environmentOver time, they can change their color and deform. Main repair of robust and plastic ceiling It consists in replacing the panels, and everything will be changed in the plastic.
Repair of stretch ceilings
When subtoping or small damage to the tension ceiling, some options for its repair can be used:
- Using a special patch that is glued with inner The ceiling and sticks the hole, preventing its further distribution. Cosmetic repair can be made by setting the damage to the damage an additional lamp, an exhaust grille or by gluing the applique.
- If the hole is at a distance of no more than 10 - 15 cm. From the wall, the ceiling can be tightened, warming it with a hairdryer.
- If flooding occurred cold waterIt is enough to drain it through the holes in the lamps or simply dry the ceiling by dismantling the lamps and ensuring ventilation of its inner surface.