How to dry the basement of the private house after the flood. How to dry the cellar: get rid of dampness with proven ways
Most of the happy garages owners in the autumn-spring time are faced with such an unpleasant problem as the flooding of the cellar. But the dampness in the basement appears as a result of errors committed even during the construction of the garage, because it is very difficult to calculate and provide for all possible options The occurrence of it in the basement. After all, the groundwater or neighbors can suddenly be discovered or neighbors to equip any water drains. Consider some of the main options like drying the cellar in the garage, and the arrangement of the effective waterproofing of the room.
Best for the construction of the basement use the filler concrete or concrete plateswhich are good for both floors and walls, and do not use porous foam block materials, a block of clay or bricks. They strongly absorb moisture, which will lead in the future to unnecessary problems. Therefore, how to prevent the emergence of dampness in the garage and in the basement, in particular, should be thought already at the project stage.
When choosing, what kind of design is better, the team or monolithic, you need to repel from your capabilities. The monolithic basement more laborious, but its service life is much more, working with concrete blocks Moves much faster and this is also a good option. To prevent groundwater in the pit construction works It is best to spend in the summer season
Methods of drying basement
Unfortunately, it is not always possible to provide everything to the smallest detail during the construction of the basement. It seems that the place is carefully selected, and the waterproofing paid great attention, the presence of groundwater is taken into account, and the basement is still wet. Let's consider in detail all the main ways to dry the cellar in the garage.
But first it is necessary to prepare the place itself: to free the basement from all items located in it, including banks, shelves, racks, boxes, and so on. We carefully slow down the whole garbage and leave for a natural drying by air for a couple of days, so it is advisable to do this in dry hot weather.
Seeing brazier. For this simplest method, we will need an old unnecessary metal bucket. Bucket is steadily fixed in the center wet premises. The fire, divorced in this bucket and supported for a long time required to dry out the basement, heats the air, which forms the forced additional circulation of hot air, and the raw at that time comes out of the basement. The positive effect is also created by the properties of smoke to destroy not only mold and fungus on the walls and the floor, but also helps get rid of various harmful insects and rodents.
Surifying the candle. This method of drying basement is also very simple, but no less effective. But for him it is necessary to build the ventilation pipe almost to the floor, it is steadily consolidated in any metal container and arrange under it. Then right in the pipe it is necessary to light the paper so that the initial thrust appears. Next, this thrust will be kept due to burning candles under ventilation. To continue this process for at least three days, and in fact, until complete drying of the room, it is only necessary to follow the burning of the candle, while replacing the burnt to the new one. It is also possible to replace the candle on the dry fuel tablet, which will not be less effective.
Waterproofing Waterproofing Methods
To strengthen protective abilities building material From moisture at the construction stage, it is necessary to use waterproofing additives that enhance the moisture protection properties of the building material. But what can be done if the moisture appeared already in the finished garage?
Exterior drainage. The most efficient and economical way to prevent moisture in the basement is to remove groundwater outside the garage or, even more reliable, immediately into the sewer. But it is possible to be done only in the case of a separate building. In the basement of the big house, in cooperative garages this way is unprofiled. Of course, provide for an external drainage and perform it is still on initial stage Construction, but if you missed this moment, you can take water in this way and later.
External drainage technology:
- Place and dig by external perimeter basement trench, about 40-to 50 cm wide, and below the burial floor level by half a meter;
- Every two meters, drainage plastic tubes are inserted into specially prepared wells drilled to the first layer of sand. These pipes, in order to avoid squeezing sand, are covered with a metal grid with a shallow cell. When drilling wells, do not deepen them in the sand too deep to completely exclude entering the system of sewage water;
- All bottom prepared trenches, in order to avoid casing, is covered with such material as geotextile. It is necessary to cover not only the bottom, but also the walls of the trench;
- Trench we fall asleep rubble, you can use gravel, to the height of forty centimeters, so that the gravel layer is slightly higher than the bottom base of the basement wall;
- Completely falling asleep with a trench, carefully closed it with geotextiles, tightly wrapping rubble and turning this design into a drainage tube located throughout the perimeter of the garage and preventing intake and accumulation of groundwater;
- We fall asleep this pipe by the remaining soil, well tamping all the bulk layers.
Inner drainage
 To solve the problem of rapid drying of a large basement, you need to arrange a system of internal drainage of your basement. How to do it?
Locate throughout the perimeter of the dried room of the pipe, which are interrelated among themselves to collect the whole water flowing into the cellar. In modern specialized stores, the assortment of such drainage pipes is very wide: different diameters, different perforations and rigidity. The in the greatest demand is the pipes with a diameter of 110mm.
 Over the entire length of the drainage pipe at the same distance, special holes are located apart. If the inner drainage you did not spend before installing the floor, then later when the inner drainage is wiring, the floor will have to break, replacing it with a new one.
Internal drainage technology:
- There is a trench around the perimeter of the wet room to a depth of 40-50 centimeters;
- It is too thoroughly the bottom of this trench and is spread throughout the perimeter a special geosptic Warranty material;
- A trench is falling asleep by 15-20 centimeters with rubble or gravel;
- On the flowing layer on top, the drains are stacked, be sure to observe the three-millionth bias on each meter of length of the drainage pipe;
- Fully drainage pipes fall asleep. Gravel is best to take a medium size, not more than 15 millimeters, in order to avoid clogging of holes with small stones, is thoroughly covered with geotextiles over it;
- The trench falls asleep with soil or sand, it is thoroughly tamped every bulk layer;
- In the basement, the lowest point is chosen and there is a well-based well to collect water, which can be made with her hands from a girlfriend or, which is much easier, but more expensive to buy a ready-made industrial PVC-Well. These wells have such properties as ease and strength, have a height of up to three meters, are easily installed and easy to use. But many because of saving funds prefer to build such a well independently from concrete than several times increase their scope of work;
- A special drainage pump must be installed in the well, which automatically turns on when the float floating in the well reaches a specified level. When pumping water, the float is lowered into a certain position, and as soon as it reaches it, the pump again automatically turns off. Water pumped into the pump should be output through the hose connected to it to the local sewer or beyond your site. Some craftsmen, instead of a well, use a barrel for 200-300 liters. But in this case, you must not forget regularly and constantly ventilated the room.
Protection of injections
The most expensive, but the most efficient method of waterproofing using injections. This is the newest innovative modern methodbut, unfortunately, it requires special equipment and is performed only by professionals, due to which the cost of these works is increasing several times. Such waterproofing is very effective even when the brick and foam block are used in the premises.
Injection method technology:
- All over the perimeter of the room, it is necessary to drill small holes with a diameter of about 1.5-4mm, observing the distance between them from 20 to 80 centimeters. This distance depends on the thickness carriers, composition and density of soil and other frequently emerging factors;
- Install B. drilled holes Scroll packers in which high pressure With the help of a special necessary pump introduce insulation substances or polymers.
Of course, such waterproofing is possible at any time of the year and day, without breaking the previously constructed elements of the room: floors, finished cladding and so on.
Modern waterproofers from polymers are the most environmentally friendly and durable materials among the current building materials that have the ability to fill all cracks in the supporting structures for a long time.
Penetrating waterproofing
It is also one of the effective modern methods Waterproofs basement. The principle of operation of such waterproofing is the creation of new structural connections of the compound, as a result of which pores and capillaries are blocked.
This material is very fast, and most importantly, the entire surface of the room is qualitatively covered. Avoiding energy consumption padded inland wallsAll work is instantly conducted indoors, with the help of processing and concrete, and brick walls.
Such a mixture is divorced by water and applied to the prepared surfaces that must be moistened in advance. When reacting with water on the wall surface, this mixture turns into crystals that fill the capillaries of porous surfaces tightly.
After complete processing and drying of the basement, it is possible to apply it to its necessary objects, which must be treated with a special antiseptic acrylic solution or simply solution copper Kaperwhich is also very effective in the fight against mold and dampness.
Choose that way of getting rid of dampness in the cellar that is most convenient for you.
Excessive humidity in the cellar occurs due to various factors. The root cause is usually initially improperly designed and built-in storage room for vegetables, fruits and conservation. If the problem is already there, there are established, tested by time budget waysHow to dry the cellar. Also appeared methods are more comfortable, but enough energy-intensive and costly monetary equivalent. But with any variant, after drying the cellar, its disinfection is recommended.
Preventing moisture accumulation in the cellar
So that in the future do not face the problem how to dry the cellar in the garage or private house from dampness, at the initial stages of construction it is necessary to take care of compliance with all the rules and rules for ventilation and waterproofing (vapor barrier) of the premises.
- The walls and the floor are best pouring concrete based on high-quality cement (for savings it is allowed to add a low-quality substance to a solution to improve moisture repellent).
- With intimacy of groundwater, external waterproofing will be required. It can be both in liquid form and rolled. Protection from water by criterion of reliability and financial capabilities is selected.
- If the cellar is designed on the slope, then drainage pipes will be a mandatory addition to the fight against moisture penetration inside the repository.
- It is necessary to make a special challenge around the entrance to the cellar, to prevent sediment from entering it.
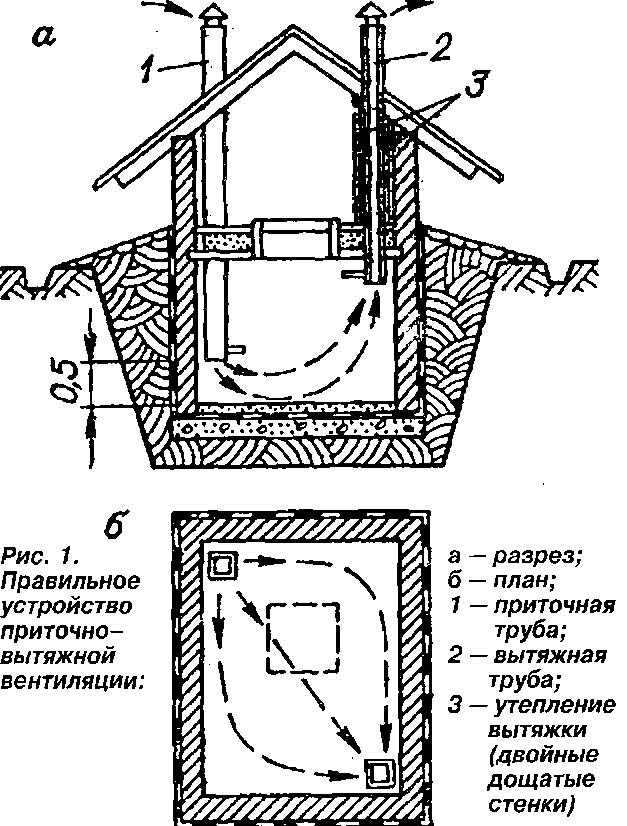
- In the basement, install supply and exhaust ventilation in different angles Storage (diagonally). Diameter 12.5 cm - it optimal size for ventilation boxes or pipes. The first pipe is installed, not bringing to the floor 10-15 cm - it will be responsible for the air intake outside. The second, for exhaust, is fixed below the ceiling level within 10-2 cm. All ventilation is protected from direct sediment and garbage, but with a good gap. On the exhaust box, it makes sense to secure the device to stabilize the thrust and circulation. Ventilation pipes are installed vertically, you should not tilt the pipe more than 30 °. The length of the channel with a slope cannot exceed one meter.
- The storage room of fruits and vegetables in the garage or house is isolated by vapor insulation to reduce the possible penetration of moisture in the lower (basement, subfield, cellar) and upper room levels (rooms at home, garage, economy block).
Floor design in storage
The main reason for the mooring of the cellar is closely located groundwater. Initial competent device Paul will prevent the problem excess moisture in the basement. There are several ways of waterproofing flooring.
- Most often, the floor remains earthen. Water from the lower layers in capillaries penetrates the surface of the floor. To prevent the need to dry the cellar from damp, earth floor align, tamper and covered with dense film or rubberoid. To protect the coating from breaks or breaking wooden shields (possible reasons Coverage disorders: foot pressure, installation of boxes with sharp angles, careless displacement of heavy items).
- Earthy floor can be enhanced with clay stuffing, that is, to cover the entire floor with a sealing mixture of clay and sand. This operation, which allows to dry the basement, building a natural barrier to exit moisture, is carried out in four receptions:
- At the previously aligned earth floor of the cellar pour one layer of rubble or broken bricks, and fill the space between the stones of a thick clay mixture with the addition of sand (clay takes with a good percentage of fatty, and the floor level should be pulled by 15 cm after the fill).
- Clay will be seated very tight.
- Scatter sand on the compacted floor and rub it. Surplus is cleaned with a broom and scoop.
- Created clay floor must be well dried for two to four weeks.
- The most favorable way to improve the floorproofing of the floor and avoid regular drying of the cellar is to make it concrete and with a good drainage system. True, this is the most costly method requiring special knowledge and skills.
If after all manipulations with the floor, the level of humidity in the basement or garage will significantly decrease significantly, it means you will no longer need to worry every year how to dry the cellar from dampness (especially during the spring raising of groundwater).
Improving waterproofing of walls
Weak moisture insulation of walls of structures is another reason for the convergence of the basement of the garage or separately equipped cellar. The walls of brick have many pores, according to which moisture penetrates inside and falls condensate. The problem is solved in several ways:
- Create outdoor isolation from moisture. If possible, remove the soil from the walls and apply two-layer mastic from bitumen or resin.
- Make an internal waterproofing layer (apply special impregnations From the depth of penetration to 0.5 m, blocking pores of the cellar walls).
Good supply-exhaust ventilation And sufficient waterproofing of the floor and walls will become the key to the dry basement. But how to dry the cellar when the water has already penetrated inside and began his negative impact? The choice of method of combating dampness depends on the presence of ventilation in the cellar.
Drain of ventilated basement
In the basement of any type will have to spend whole line Works, but it is first necessary to remove from the placement of the cellar stored there stocks, dismantled structures (shelves, racks, flooring), storage tanks (box, boxes, barrels). All structures made of wood need to dry in the sun and treat 5-10% solution of copper sulfate, regardless of whether they were damaged by the pathogenic microflora.
The second stage should be blued with a double layer of lime.
- The lime is divorced so that the solution does not flush with a painting brush (you can add 5-8% copper sulfate solution).
- Make a lime tank into two equal parts.
- The first part with the help of a painting brush is launched in the corners of the cellar and thrust with an effort on the walls (it is possible to the ceiling), without trying to get a flat surface, but not forgetting about safety technician.
- After a day, the second part of the solution is also buried on the walls.
Ultimately on the third day interior surfaces The cellar becomes porous and bug. The moisture in the form of condensate is not held on them, as the lime takes the water inside itself. As soon as he dried upper layer Lime, it is worth starting to dry the basement.
Burner drying diagram with ventilation
1. Check whether the ventilation is arranged correctly (if you do not correct the shortcomings, dry the cellar will have to re-on, almost a couple of days after the drying procedure).
2. Control the purity of the ventilation boxes or pipes (remove all the dirt, mold or moss.).
3. Strengthen air ventilation process:
- Installing the fan on the exhaust pipe. For open doors And the hatches of the cellar will dry out (depending on the number of accumulated moisture and weather conditions) in the interval from 3 to 10 days.
- Organization of ventilation enhancing with a small heating device (candle, dry alcohol tablet, alcohol burner). For this, the ventilation pipe is increasing over the ceiling so that it can be substituted under it heating element on a non-combustible stand. Warm air will strengthen circulation and accelerate the drying of the basement.

4. Heat the cellar, if forced ventilation did not cope with the drying of the basement. The drying process with heating is carried out in stages:
- Take a metal bucket (preferably not new).
- We produce a lot of holes in it, both in the walls and at the bottom.
- Fresh charcoal To almost the upper edge of the container.
- Ignite the contents of the bucket and wait for sustainable burning.
- I lower the bucket with the coal in the cellar (the bucket should hang in the immediate vicinity of the repository bottom and under it it is necessary to put a refractory substrate).
- We close a tight lid of the cellar (as usual, so that the smoke goes into ventilation).
- We open a periodically hatch cover to enter the oxygen into the dried room or enhance the ventilation using a vacuum cleaner through the supply pipe.
- Remove the bucket with running coals.
- Seal tightly cover for three to four days.
- We carry out the sucked and disinfected cellar.
Do not forget that the decision, how to dry the cellar must be safe for those who warm up and for the room itself. The burning is always fire, smoke, carbon monoxide.

The bucket at the same time the method of drying the basement can be replaced by other heating devices. A small stove is quite suitable - burzhuyka, a heat gun with good power (more than 3 kW), good Kerogaz, gas-burner (carefully - open fire).
Drying cellar without ventilation
The cellar, not equipped with ventilation, naturally accumulates dampness. The question arises here: how to dry the cellar without ventilation and at the same time do not harm the health of smoke or carbon monoxide? The answer is obvious - it is impossible to do this. We will have to install at least the simplest ventilation.
Prior to the start of the installation of Ventkanalov, to collect moisture in the basement can be several uncomplicated ways. This will require materials with high levels hygroscopicity:
- Sawdust - regularly change the wet on dry.
- Calcium chloride is to place around the perimeter and in the center of the cellar (you can calculate, not forgetting that it is caustic, and use it many times).
- Related lime - decompose along the walls and on the shelves.
- The usual dense cardboard from the packaging of furniture or boxes is to lay dry and change during wetting.
In addition, there are high-tech ways to dry the cellar from dampness. For example, air dryers that use most often for the premises where there are open water (pool, jacuzzi, decorative pond). True, the cost of the desiccant fluctuates from 20 thousand rubles and higher. But they regularly fulfill their function when draining the raw basement, it is only necessary to merge the water collected by them on time.
Ways to deal with pathogenic microorganisms
Excess moisture, in time not dried in the cellar leads to the massive development of harmful microorganisms. All kinds of mold and fungi reproduce strongly and cause harm, as all wooden designsand stored in open video Products. A very detrimental disputes of harmful microflora on a person who is in the infected basement.
There are the following available tools To combat pathogenic microorganisms:
- Negained lime (install a barrel with lime in the ratio of 3 kilograms of dry lime per 1 cubic meter volume, pour water, leave the room, sew the basement, after two days to ventilate).
- Sulfur checker (pre-render metal subjects From the cellar or to cover their lubricant layer. Install a checker on a non-splashing stand, set fire to the wick, trying not to inhale smoke, quickly leave the processed room, close the hatch and ventilation tightly, to ventilate every other day).
How to cope with humidity after flooding cellar
The flooding of the cellar may occur due to raising groundwater, the penetration of precipitation or random flooding. The reason is not important when it is necessary to decide how to dry the cellar from groundwater or how to dry the basement in the garage from excessive moisture. Scheme is simple:
- Pour the water from the floor of the repository pump or drainage pump.
- Freeze a basement.
- See a couple of days with open hatch and ventilation.
- Collect garbage.
- Bicycle lime.
- Dry the cellar one of the above methods.
There are settlements where the flooding of basements of private houses and cellars occur regularly. In this case, it is necessary to strengthen the floor drainage.
The dampness in the cellar is a familiar phenomenon with which all residents of the private sector are fighting from the season. Excessive moisture can appear in the form of condensate on the walls and the ceiling due to insufficient measures for waterproofing of the room, water can be formed on the floor of the basement from the proximity of groundwater or because of spring floods. The products themselves can become a source of unwanted humidity, if they are assembled not in time or not sufficiently sucked. By itself, the water is not dangerous, but it leads to the destruction of the construction and all its details, in addition, contributes to the appearance of aggressive mold, fungus and various insects.
To dry the cellar, and this article will be devoted, because it is simply necessary to fight with an excess moisture in the basement, otherwise it will not work out.
Preliminary Drying Rules
Seeing the cellar and basements need in summer when it is warm and dry weather. It is recommended to start this procedure as early as possible, better immediately after the rainy season. Events on the drying of the cellar can last from the week to one and a half months - depending on how much all the walls and the floor are wounded.
We need to start drying a cellar with natural measures, and if they are insufficient, you will have to go to the second stage - forced drying.

Here, how can you dry the basement in a natural way:


Attention! If earthen floors are used in the cellar, it is recommended to change their upper layer annually. For this, the soil, infected with mold and fungus, cut off and put out on the street. Instead of this layer, the basement is covered with a layer of dry coarse sand.
How to dry the cellar without ventilation
It happens that in the cellars there is no exhaust ventilation Either it is, but the faulty or natural thrust is not enough to venture the entire basement. It happens that the weather in the summer stands rainy and cloudy, which weakly contributes to a high-quality drying of the cellar.

In such cases, the cellar is needed, which is carried out by artificial methods. There are several such methods and each of them deserves separate attention.
Drying cellar with a roas
As the most primitive brazier can be the usual metal bucket. You can take an old bucket with a leakage bottom or at all without the bottom. Galvanized pelvis or some kind of metal is suitable.
Burning container must have legs, about 10-15 cm high, you can also put a bucket in the basement on bricks or stones. In any case, it is necessary to provide air flow from below, which will stimulate the spread of the heat in the cellar.

Important! If the basement floors are made of wood, and there is no possibility to remove them, the drying method is categorically forbidden - it is fireless! All wooden and other combustible structures and equipment are necessarily taken before drying from the cellar. If the entrance to the cellar is made in the form of a hatch, it is necessary to provide a way to lower the warmer inside. It can be the usual rope with a crochet at the end.
The bucket is filled with coal or firewood and burn the bonfire on the surface of the earth, and only after that they lower the roasting in the cellar, using the rope and hook. The same applies to the dropping of firewood or coal: first, the bucket is extracted from the basement to the street and only after that add fuel.

Man remains only to monitor the state of the fire and maintain the flame. To dry high quality, the brazier should burn the clock 10-12. Thanks to the bottom line, the heat will spread through the cellar, filling with smoke and hot air all the corners of the room.
As a result of such a drying, the cellar will not only get rid of moisture, but also disinfected - caustic smoke will destroy mold, fungi and insects. Brazier need to have strictly in the center of the cellar so that the heat and smoke spread evenly.
Tip! It is recommended to use firewood from linden or birch as a fuel. This wood has disinfectant properties.
In no case can not be included in the basement, while brazier works there - a person simply suffocates in such a room or choose carbon monoxide!
Drying cellar with a candle
This method is very ancient, it was used by hundreds of years ago. So that the drying is possible with this method, the basement must be equipped with an exhaust pipe, which is usually located under the ceiling of the room.
The candle is placed in a tin jar and installed directly near the ventilation of the cellar. Be sure to extend the main pipe by installing metal corrugations or tin pipe on it.
A small candle warms the air located at the entrance of the pipe, because of this, it begins to circulate in the basement faster, the thrust increases. As a result, the air temperature in the cellar does not rise, but increases natural ventilation - Walls and floor drain much faster.
Doors or luke of the cellar when using this method must be open!
Important! Instead of a conventional candle, you can use dry fuel tablets. This substance during combustion distinguishes disinfectant gases, which will not be superfluous in the fight against mold and microbes in the basement. For drying, the cellar will need to burn 10-15 tablets.
Drying cellar electrical appliances
This method is quite expensive, because during drying a cellar is spent a lot of electricity. You can use two types of heaters in the basement:
- Closed heaters, such as oil, infrared, convector. The electrical appliance is located in the center of the cellar and the air indoors evenly warm up. For a complete drying of the basement, no less than ten o'clock will be required, sometimes heaters in the basement must work for several days.
- The electric tub is designed to dry out the rooms after flooding, so it is perfect for the seasonal drying of basements. This device is very powerful, the heat gun is capable of drying the cellar in just a few hours, so the whole process will cost cheaper than in the case of a household heater.

Attention! If there are earthen floors in the basement, you need to put a rigid base on them for the electrical heater.
Dried cellar fan
Usually the cellast is dried, opening the doors in warm and dry summer days. You can speed up the natural process by installing the fan in the middle of the staircase. The prerequisite for this method is the presence of an exhaust pipe in the basement, because the fan just disperses air, accelerating circulation.
Depending on the sizes of the cellar, the fan may be required on three to five days.

Tip! Very effective fan blades inserted directly into the pipe ventilation system basement.
Using bourgearies in the basement
The stove of the type of burzhuyka is very effective in drying cellars. However, such a furnace is far from every private economy. Those who have bourgeois have, can dry their cellar very cheaply and quickly.
The burzhuyk is placed inside the basement so that its pipe fit to the exhaust hole of the ventilation system. Heat oven wood or coal - it does not matter, the main thing is that heat in the basement is sufficient.

Hot smoke leaving the bourgear tube accelerates air circulation in ventilation canal basement. Additionally hot walls of the furnace warm the room, dried mold and fungus, eliminating condensate and excess moisture From the basement.
The way with the stove is considered fire hazard, so inside the basement at the time of drying should not be wooden objects or other flammable materials. You can not use the bourgeito in those cellars, where the ventilation is made of plastic - the pipe is simply melted from the heat of the oven.
What to do with the cellar after drying
Upon completion of the ventilation, the installation of the dried shelves perform, the basement includes boxes and a crust, set inside the cellarboxes and boxes for vegetables or fruits.
In general, an extra moisture in the basement should alert the owner: if condensate appears, the walls or the floor will appear, it means that something is not done at the stage of building a cellar.

Improve the waterproofing of the underground storage can be several methods:


In a dry basement, the mold does not apply, there are no fungus, there are no bacteria and harmful insects, so the products are perfectly stored, until the next season, remaining the same delicious and useful.
There are several drying methods of the basement, each owner can choose the one that is more convenient for it and is appropriate.
The drying of the basement premises a complex of one-time or preventive eventsaimed at normalizing the humidity of structures and air. The specific method is selected based on the volume and functional purpose: With an area within 2 m2, it suffices to improve the air exchange with the help of a candle, if necessary, dry storages are used, and air dryers are involved. These works are combined with antifungal surface treatment.
In which cases requires drying?
The need for moisture normalization occurs:
1. With a one-time flooding of the cellar in spring or when raising an agriety due to excess precipitation. After the decline of water without taking action inside the underground, dampness is preserved for a long time, a system sufficient under normal conditions does not cope.
2. If you need to accelerate the withdrawal of building moisture. Private house cellars, pits under garages and utility rooms lay and isolate in summer time or early autumnBut there are exceptions. The decoration is not recommended to be delayed, the drying of the walls and the floor helps to avoid violations of the technology.
3. When violating the operation of the channels or insulating layers cellar. Bringing holes, lack of thrust in roast or rainy time, seepage of soil moisture or other deviations of the temperature and humid regime lead to excessive dampness and condensate appearance, which is unacceptable.
4. When conducting annual preventive measures. Most of the disinfecting solutions used dries naturally, but if necessary, the intensity of the air exchange is strengthened before loading or unfavorable weather conditions.
Overview of popular methods
To save the cellar of a private house or pit under the garage of dampness, uses one of the following methods:
- Absorption of excessive humidity by absorbing materials.
- Strengthening air exchange with a lit candle or dry alcohol.
- Drying a roasting or portable stove.
- The use of electrical dryers: heat guns or specialized units operating on the principle of air cooling.
- Installation of forced fans.

After eliminating the causes of the appearance of excess moisture, after eliminating the causes of excess moisture or for the purpose of prevention, all removable items and the products themselves are made to simplify the works and removal of dampness on hard-to-reach areas. In the presence of free time, the basement is at first trying to try naturally, namely, reinforced ventilation for 3-5 days. In the absence of results, one of the above forced methods is selected.
The preparatory stage is mandatory in any case: the surfaces are inspected for the object of fungus and disinfected by the compositions deep penetrationRemove loose decoration MaterialsThe upper layer of the ground floor is updated (if any), the walls and system of racks are processed by anti-grab solutions or re-white. In the basements after flooding, the systematic nature, the protection of the floor and walls increases, the drainage pipes are laid around the perimeter of such buildings. The latter is checked in the air exchange system (by bringing matches to the holes), if necessary, additional supply tubes are installed or existing channels are cleaned.

1. Features of drying with hygroscopic materials.
With a minor, but constant manifestation of damp in the cellar and the inability to enter additional ventilation pipes to normalize the working mode inside, absorbent substances are used. Dish raw basement Allowed by sex and periodically changing sawdust, descended wood coal boxes, lime powder, declined in the corners of calcium chloride and pieces of cardboard. The advantages of the method include the simplicity and ability to update sorbents (some types of materials will quickly dry under the sun and lower again), the disadvantages - inexpediency, if necessary, processing large areas. Cardboard and charcoal is used without restrictions, lime lime or calcium chloride are not placed near the products.
2. Strengthening thrust with a candle or dry fuel.
Most. simple way Changes in thermostatic equilibrium is the lifting paper to the outlet nozzle. In rooms with standard two pipes, forced drying is organized by installing candles under them protected from the ignition of the container. In addition to the current opening, the volume of the incoming air increase the opening of the inlet hatch or door. The burning candle is put on the floor, and the exhaust pipe itself is lengthened by a temporary nozzle.

This method refers to the proven and safe, it allows you to relatively quickly dry the cellar (the combustion is supported before reaching the results, usually 2-3 days) of any volume: from pits in garages to individual storage facilities. Burners or dry alcohol tablets can be used (10-15 pcs on the basement of the standard volume, in addition to high-quality drying, his couple kill the spores of fungi). Related restrictions include the need to support combustion and risk of increasing condensate inside when sucking wet hot air in summer, followed by cooling on the walls, control over the process is required.
3. Pros and cons of the use of heat guns and electrical dryers.
This method is valued for security: in the center of the cellar or in any right place A heater or a heat generator is placed, allowing you to quickly remove excess moisture from the designs. Indoors C. concrete screed They are installed directly to the floor, with ground floors - on a specially prepared base. The power of the device is selected on the basis of volumes and humidity: for drying enough oil, infrared or converter heater, to distinguish moisture from flooded private houses used heat guns for 3-5 kW. In especially complex cases Forced fans are introduced into the scheme.

A separate group includes dehumidifiers working on the principle of cooling based on freon. Running through yourself a wet environment, they bring condensate to special receiving containers and containers, to start the devices, it is enough to connect to the network and periodic water pouring. Such air dryers for the basement are recommended to buy under the maintenance of the underground with a large area, including agricultural vegetable stores and industrial facilities. In addition to collecting condensate, they filter the circulating air and control its temperature, the most advanced models are functioning and for cooling, and for heating. Their scope of application is not limited to the cellar, if necessary, they are transferred to any premises.
Thermal guns work quickly and provide high-quality and deep drying of structures. They require installation on a stable and dry base, but to organize such conditions is easy. The consumers include the need for electricity, in addition to a significant flow, this option is not suitable for remote storage facilities that are not connected to the network.
4. Heating of the roar.
The essence lies in the location on the floor of the roaster, bourgear stoves, kerosene burner or a conventional tin bucket with hot sawdust or charcoal. The resulting heat enhances the circulation processes and drives out moisture from the surfaces, the achieved effect is maintained for a long time. Before starting, the room is ventilated naturally for 3-4 days, a brazier and its analogues are placed for another a few hours, in particularly difficult cases fire supports 1-2 days. This method allows to dry and lay down the smoke design, thereby reinforcing the protectedness to mold.

Brazier or stove require caution when lowering down, they weigh a lot, the insurance with rope is mandatory. Dry sawdust are used for extracts, to support long burning - Coke or charcoal, but in general there are no restrictions on the loading of ordinary firewood. You should be prepared for the formation of a large amount of smoke, this method is better suited for individual storage facilities, and not underground private houses. Independent roasor or burzhuyki is prohibited, an insuring helper remains upstairs.
5. Forced fans.
When carrying out the annual prevention of drying the cellar is easier by increasing the volume of circulating air. No restrictions are missing, the desired effect provides both portable fans installed on the floor of the basement and compact deflectors embedded in the exhaust pipes, the latter may be temporary or permanent. The advantages include simplicity, to minuses - dependence on electricity. Efficiency depends on the elimination of the causes of the penetration of moisture, with a violation of the waterproofing layer or constant hovering underground needs more serious protective measures, the air exchange optimization is not enough.
The reasons for the appearance of water a lot, and the result is one - water in the cellar. There are many in different ways Drying cellars, but many of them are time-consuming and costly. Dry and venting the cellar in summer and autumn. It is desirable when the temperature inside and outside the cellar is approximately the same, somewhere closer to the autumn. Before drying, we liberate the cellar from racks, shelves, trays and boxes (wearing them on the street). Then we carry out within 2 - 3 days. Now you can proceed to drying.
Methods of drying cellar
1. Bucket with smoldering coal. In the old bucket, along the walls and the bottom, we make an ax on the hole and wept the fire (you can use wood and stone coal). When the fire turns well, with the help of a rope or cable, we lower the bucket at the bottom of the cellar. We close the cellar cover, every 25 to 30 minutes it is necessary to open it to access oxygen. How the fire will be fritted, pull the bucket and close the lid. Immediately in the cellar it is impossible to descend, in order to avoid poisoning carnant gases. We do so to complete drying. This method is used in the presence of ventilation, if there is no ventilation, then all this needs to be done with an open lid. Smoke still disinfects the room from mold and different bacteria and pests.
2. With a candle (incandescent lamp 60 volts, alcohol burner). It is necessary to increase the ventilation pipe almost to the floor (distance 15 - 20 cm. To create an initial thrust, set fire to paper in the pipe. Then under the pipe we put a lit candle in a tin can. For three days, change the candles, and wet, cold air is pulled out.
3. Dry sawdust. I smell dry sawdust to the bottom of the cellar when wet - change on dry.
4. Cardboard boxes. On the bottom of the cellar lay down dry carton boxes, as we make a replacement.
5. Haired lime. We fall asleep to the lime along the walls and on the shelves, you can simply put the box with lime in the corner corner.
6. White moss. We place a container with a white moss powder in the cellar. Salt. In a metal container, we pump out the salt, and omit in the cellar. Periodically salt must be calculated or drying.

6. Calcium chloride. We lay out in the cellar, the next day we collect, calcinate, and can be used again.
7. Ceramic bricks. Heat 2 - 3 ceramic bricks, and omit in the cellar. Cooled, bricks pull the moisture from the cellar. When they are cooled, we get them and warm up again. After the tenth times, bricks need to be changed, they cease to absorb moisture. So we do, while the cellar does not dry.
8. Granules from sawdust (feline filler). Outdoor bag S. feline filler Leave in the cellar. Granules will well pull moisture.
9. Silica gel (for feline Toilet). Silica gel can be twisted or decompose on the cellar in the canvas bags.
10. Wormwood. Wipe or decompose the wormwood in the cellar.
- It is interesting -