Balcony insulation options from the inside. How to insulate a balcony with your own hands: step by step photos, instructions, choice of materials
To create a comfortable functional room in the loggia, it is necessary to carry out work on its high-quality insulation. On the market today are the most different materials, therefore, it is possible to insulate the loggia with mineral wool, polystyrene foam, polystyrene foam and other types of insulation. The choice of insulation depends on many factors. It is very good if there is an opportunity to consult with experts on this matter.
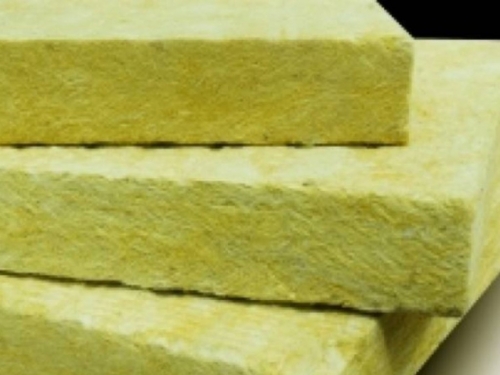
Mineral wool
Mineral wool insulation is the traditional and most common option.
This material can provide sufficient high level thermal insulation and sound insulation.
At the same time, it is recommended to use mineral wool for insulation only if there is no load on the insulation. Besides, insulation material it is necessary to protect it as best as possible from moisture and condensation formation on it.
Mineral wool insulation works are carried out in the following sequence:
- First, all surfaces insulated from the inside are waterproofed. This stage is preliminary. To create a high-quality waterproofing layer before insulation with mineral wool from the inside, it is best to use special insulating impregnations. They can be bitumen and polyurethane mastic, special paints and varnishes... In addition, rolled polyethylene materials (sold in any hardware store) are often used as an insulator. What kind of insulator will be used does not really matter.
- Then you need to complete the lathing device. The installation step of wooden blocks should be about 1 cm less than the width of the mineral wool sheets. In addition, you need to select the bars in such a way that their thickness is slightly greater than the thickness of the insulating material slab. The fastening of the elements of the lathing can be done to the rough surfaces with dowels and self-tapping screws.
- To install the plates mineral wool you need to select and dilute a suitable adhesive composition (which one is not important). It is applied to the surface of the slab from the inside, after which it is placed in the cell formed by the crate. The slabs need to be adjusted so that they are slightly larger than the mesh size. This will avoid unnecessary voids.
- As soon as the adhesive composition dries, it is recommended to additionally secure the thermal insulation material with your own hands using dowels-fungi.
- Surface cladding can be done with any suitable material. Any type of finish is suitable for this, which will not create a large load - plastic panels, plywood sheets, lining ...
- In conclusion, fine finishing surfaces and decorative work... Work in this case can be performed with any finish.
Good results and reviews are given by the material ISOVER.
Expanded polystyrene
Insulation of your loggia inside with expanded polystyrene gives enough nice results... This material is produced by mixing polystyrene and special foaming components. The mixture is heated, subjected to high pressure followed by foaming and adding carbon dioxide.
For insulation of the loggia with expanded polystyrene, plates with a thickness of 45-50 mm are perfect.
- Their fastening is carried out on dowels, Double-sided tape and glue (which type of fastening to choose depends on the material of the walls). When insulating the loggia with expanded polystyrene from the inside, it is best to arrange the plates of the material in a checkerboard pattern so that they do not move under their own weight during operation.
- In order to prevent the occurrence of cold bridges, seams, gaps and docking zones need to be filled with your own hands construction foam(when insulating with expanded polystyrene and polystyrene, the problem of cold bridges is especially relevant).
- As soon as the polyurethane foam dries, you need to cut off its excess with your own hands.
- To provide additional insulation, which is required for insulation with expanded polystyrene and polystyrene, it is imperative to lay a layer of special polyethylene foam with a thickness of 5-8 mm. In this case, a layer with foil should be located inside the loggia. This approach will allow you to form a high-quality vapor barrier layer with your own hands and ensure heat reflection. The seams must be glued with construction tape with their own hands.
- On thermal insulation layer you can fasten the wooden lathing (for this it is better to use small-sized bars that have been pre-treated with antiseptic compounds). In addition, instead of lathing, often from the inside, the loggia is trimmed with plasterboard sheets.
- On a wooden crate or drywall sheets, with your own hands any finishing materials can be applied.
You can do without the lathing and use a mesh for reinforcement, for finishing.
Penoplex and penofol
Very often penoplex and penofol for insulation are used in one insulation system.
One of the best materials.
These are high quality insulating materials, which have a lot of positive operating and technical characteristics. Many experts recommend using them specifically for insulating loggias from the inside. The use of such a heater for a loggia will allow you to create a comfortable environment inside the room and maintain an optimal microclimate on the coldest days.

Penofol for the loggia.
Insulation works using these materials are carried out in the following sequence:
- First, do-it-yourself preparation of all insulated surfaces: floor, ceiling, walls, parapet. The old one is completely removed finishing material, all traces and debris are removed. After that, you need to carefully check the integrity of the structures from the inside so that they do not have cracks, holes and other defects through which cold air can penetrate into the room. It is important that the loggia is completely sealed from all sides.
- Then, vertical logs are installed. It is necessary to fasten the material with a certain step, the size of which will depend on the thickness of the insulation used.
- Next, penofol is attached directly to the lags. For this, you can use any suitable adhesives which are suitable for indoor residential use. During the installation of the initial foam layer, it is required to direct the foil outward.
- After that, the installation of the penoplex is carried out ( the best option for a loggia - material 20 - 25 mm thick). Laying the slabs from the inside of the loggia can be done independently - there is nothing complicated in this process.
- Finally, you need to glue another layer of penofol. In this case, the material must be positioned in such a way that the foil layer is directed inward. As a result, we will get a kind of cake, in which the main heat-insulating material (penoplex) will be protected with penofol on both sides.
- All joints that arose during the installation works from the inside of the loggia, it is necessary to glue it with construction adhesive tape.
What kind of insulation material to choose for insulating a loggia?
You need to understand that do-it-yourself work on insulating the loggia can be done from the inside and outside. Of course, it is much easier to make insulation inside the loggia. For this, a wide variety of thermal insulation materials... Their choice will depend on the design features, operating conditions, the nuances of the installation work, therefore, in each case, special attention should be paid to the choice of insulation.
The purchase of the most expensive insulation on the market will not always be justified.
For example, if the loggia has high-quality glazing, high-quality construction, and no defects are observed, then you can use the most simple materials... In addition, the choice of insulation for the loggia will depend on whether heating is planned.
Many tenants apartment buildings face the problem of shortage square meters... An excellent solution this issue can be self-insulation loggias. This is a painstaking business, requiring certain construction skills and time from the contractor. However, the finished result is worth it. Warm balcony expands the possibilities of using space, "ennobles" the living space and can become the pride of a home craftsman.
The need to insulate the loggia
Each apartment owner decides for himself how to use the additional square meters of the loggia. Some equip a pantry or workshop on the balcony, others operate the premises more rationally - they create a "winter garden" or a separate room. The insulated loggia can be converted into a cozy place for rest, work, a compact gym or an area for children's creativity.

In addition, an insulated balcony solves a number of problems:
- the heat loss of the premises and the cost of heating the apartment are reduced;
- reduces the risk of mold on the walls of the balcony.
External or internal insulation can be done. The obvious advantages of the outdoor method:
- not "eaten" effective area;
- simplification interior decoration walls.
Significant advantage internal insulation- the ability to do the work yourself, without hiring workers.
The choice of thermal insulation material
Various heat-insulating materials are used as insulation, ranging from traditional, inexpensive, and ending with modern high-tech ones. To insulate the loggia from the inside, it is better to use thin, lightweight materials. Thanks to their small width, it will be possible to save useful space.
Consider the characteristics of the main thermal insulation materials for warming a loggia / balcony.
Foil-clad polyethylene foam - a layer of foil is applied to one side of the polyethylene, which reflects the IF radiation and "rejects" heat flows back. Insulation characteristics:
- roll width - 1 m, thickness - 2-5 cm;
- ease of installation - the polyethylene foam sheet is easily cut with a knife;
- laying method - end-to-end or overlapping;
- the effectiveness of thermal insulation is almost doubled;
- the material is used to insulate the ceiling and walls.
Warming the loggia: step by step instructions. Penofol use
Mineral wool has good thermal insulation properties and an affordable cost. However, experts do not recommend using this material for insulating a loggia for a number of reasons:
- poor moisture resistance - mineral wool absorbs liquid, so you will have to additionally strengthen the waterproofing;
- when using mineral wool, an arrangement is required natural ventilation- a gap must be left over the insulation, which slightly "hides" the area of the balcony;
- for facing the loggia, you will need wall reinforcement and additional measures.
Styrofoam - foamed plastic different density... The bulk of the material is gas. Polyfoam has the following characteristics:
- slab size - 1 * 1 m;
- insulation thickness 2-10 cm;
- foam density - 15 or 25 kg / sq. cm;
- durability.
Extruded polystyrene foam (penoplex) - modern heat insulator styrofoam-like but with stronger structure and functionality. Properties of expanded polystyrene:
- slabs rectangular 1200 * 600mm;
- thickness - 2-10 cm;
- foam density - 35-45 kg / sq. cm;
- vapor permeability;
- frost resistance;
- slabs are chamfered for tighter laying;
- light weight and ease of installation;
- flammability class - G-1;
- material is not used in open places where UV rays penetrate.
Do-it-yourself loggia insulation: step-by-step instructions. Penoplex installation photo

Insulation fastening methods
The choice of the method of insulation, first of all, depends on the used heat-insulating material and the further decoration of the walls.
Insulation for putty and plaster is suitable when using foam or polystyrene foam. Thermal insulation panels are glued to the base tile adhesive... Plates are additionally fixed with dowel mushrooms. You can start plastering / filling walls or ceilings one day after installing the insulation.
Foil-clad polyethylene foam is laid under the base of the frame. In this case, it does not matter how the profiles are fastened - to the wall or by means of U-shaped fasteners. Penofol sheets are applied to the ceiling / wall of the loggia and fixed with slats. In this case, an overlap joint is permissible, and the connecting strip can be glued with tape.

Insulation under the base of the frame is possible only when using a thin insulation with a thickness of up to 20 mm. Pressing a thicker heat insulator will affect the stiffness of the battens and fixings.
If you plan to clad the balcony with plasterboard or PVC panels, MDF, then it is advisable to lay the heat-insulating material in the cells of the frame. As a heater, 15 density foam or mineral wool is used. The disadvantage of this technology is an increase in the thickness of the heat-insulating "pie".
Options for arranging a "warm" floor
The technology of floor insulation on the loggia is somewhat different from the insulation of the hay and the ceiling. Excessive requirements are imposed on this element of the balcony.
There are several basic options for arranging a "warm floor":

Do-it-yourself loggia insulation: step-by-step instructions
Below is a step-by-step instruction for insulating a loggia with penoplex.
Tools and materials
For work you will need:
- foam plates;
- building level, stationery knife, marker;
- PVC pipes for cable laying;
- container for kneading glue;
- construction mixer;
- trowel;
- polyurethane foam;
- assembly gun;
- a grater for grinding heat-insulating sheets;
- plastic smooth trowel for grouting the floor;
- metal grid;
- sand concrete M300 coarse fraction;
- polyurethane glue.
Warming the loggia: step by step instructions. Photo - a diagram of the insulating "pie".

Preparatory work
First of all, on the loggia it is necessary to install energy-saving plastic windows... It is not worth saving on glazing - it is better to choose double-glazed windows and fittings from firms that have proven themselves in the "window" market.
If high-quality windows have already been installed on the balcony, then you can proceed to the insulation of the balcony.
Preparatory activities:

Ceiling insulation

Installation of heat insulator on walls and parapet

Warming the floor of the loggia with penoplex: step by step instructions
Consider the stages of creating a "warm floor" using foam and cement-sand screed:

- If necessary, installation supporting frame it is better to use a galvanized metal profile. Unlike wood, it does not rot and is not heavy.
- Thermal insulation work should be carried out in dry weather. Many adhesive mixtures and primer compositions have features of application in high humidity conditions.
- The slots on the loggia are treated with foam that is resistant to low temperatures.
- The wood used must be dried, and then treated with anti-fire and decay agents.
Warming the loggia with your own hands: step by step instructions. Video.
In urban apartments, the presence of a balcony means the ability to expand the usable area of the entire home. But without proper repairs, which includes insulating the entire balcony, such an area can only be useful as a terrace or a cold storage room. The balcony insulation technology includes a complex of repair measures aimed at creating a special structure that will provide comfort and warmth in the room being repaired.
Features of loggia insulation
On the one hand, do-it-yourself insulation should not present any difficulties. It is enough to purchase material with the required parameters and install it on your balcony. The tricky part is that the appearance of ease of repair leads to further frustration. This is when, in a cold season, an unpleasant draft, mold, water accumulates and the walls freeze on a loggia insulated and renovated with love. Condensation is to blame. On contact warm air with a cold surface, steam reaches such a saturated state, under the scientific name "dew point", when it easily turns into water. This leads to an uncomfortable state inside the balcony, destruction of the thermal insulation system and other unpleasant sanitary and hygienic consequences.
Most reliable way insulation - multilayer enclosing structure outside. This option contributes to the free movement of heat outside interior walls OK. This leads to the fact that the joint different temperatures, or rather, the contact of cold and warm air occurs outside the walls indoor space, which means that such unpleasant phenomena as condensation, steam, mold and dampness are not threatened. The outer de layer will not allow the penetration of cold from the street.
The result is an almost ideal atmosphere inside the balcony. The whole difficulty is that it is not always possible to make external insulation of the walls and roof with your own hands. The only way out is a well-built construction of internal insulation.


The installation of a window block has a double meaning: firstly, protection against atmospheric precipitation, and secondly, keeping the heat on the loggia. But doing glazing with your own hands is not always a justified risk; it is better to invite professionals for this. When installing windows, check how carefully the slots are sealed, whether the parapet (base) is reliable, from which the frame is made, whether the height of the expanders corresponds to the thickness of the intended insulation. It is better to clarify all these questions before window work.


Before starting work, decide on the choice of material for interior decoration. For this purpose, foam plastic, mineral wool, penoplex, penofol, etc. are used. In order to prevent condensation subsequently, for internal works choose vapor barrier materials.


You will need:
- polystyrene or its analogue, layer thickness 3-6 cm;
- foil-clad penofol or ordinary foil, polyethylene film for parainsulation;
- screed materials (dry mix for the floor or antiseptic boards);
- bars for lathing;
- moisture resistant panels for decoration;
- glue, double-sided tape;
- polyurethane foam;
- screws, dowels.

Thermal insulation of a loggia implies thermal insulation of walls, ceilings and floors. Any material, especially for walls and ceilings, should be securely fastened. For this, two methods are used: glue or dowels. The peculiarity of the adhesive method is the application technology and the accuracy of the choice of the composition. An important point is that the glue must match the insulation material. A notched trowel is used to apply the adhesive. The first step with its help is applied along the perimeter of the heat-insulating material adhesive solution... In order to avoid leakage of glue to the joints, it is laid, stepping back a couple of centimeters from the edge. The rest of the usable area is evenly dug in with glue in the form of dots.

Another method for DIY repair involves fastening with the help of "fungi" - special dowels. They are issued different sizes, and when buying insulation, you need to immediately look for fasteners that are suitable in size and property. For comparison, when attaching insulation with a thickness of 4 cm, you will need about 7 dowels with a diameter of 1 cm and a length of 9 cm.

To protect yourself from unforeseen embarrassment in case of unsuccessful fastening with your own hands, it is permissible to use two methods at the same time: first, glue is applied, and the insulation is installed in place, and then the structure lends itself to the dowelling process.


If everything is fine with the floor, then you may not need to repair it. But if you observe special scrupulousness and do everything according to the rules, then floor insulation will not take much time, in the end it will help to avoid unpleasant surprises. A well-mounted do-it-yourself shelter will help make a cozy room out of the balcony for living at any time of the year. The first step is to achieve a perfectly-even coverage. Before installing the thermal insulator with your own hands, flatten the floor surface. Mineral wool, polystyrene foam or a “warm floor” structure is used as insulation for the floor.


The first layer of insulation is staggered. As the first step, as in the case of the floor, the entire surface of the walls is leveled, holes and cracks are closed. The next step is to cover up the joints formed between the insulation and the wall using polyurethane foam.
Warming methods
Loggia insulation technology involves two possible paths to create a comfortable, warm environment with your own hands.
1. This method is designed for the property of polyethylene or foil to retain moisture and not let it pass into the inner layers of the insulation. In this technology, it is quite possible to use mineral wool, because in other cases it is not recommended to use it as a heat-insulating material.

In this case, the structure will look like:
- balcony railing;
- insulation, for example, mineral wool;
- vapor barrier (foil or polyethylene);
- MDF or PVC panels;
- wooden beams or plastic panels.

All technology is carried out "dry", which facilitates construction works... The only drawback is the lack of air permeability. This problem is solved by functional ventilation.
2. In this version, a protective barrier is not used, and thermal insulation is carried out using materials with low vapor permeability.

In this case, the do-it-yourself design will be as follows:
- fencing;
- glue;
- insulation;
- glue;
- reinforcing fiberglass mesh;
- glue;
- finishing layer;
- fixing with a dowel.
With this method, you can use a putty as a finish, followed by wallpapering. The design takes up some part of the usable area, more laborious than the first, but has good air permeability with adequate heat retention.
Standard work procedure for insulation
1st step- laying and fixing insulation on the floor, front and side walls and ceiling. In this case, all cracks and joints are sealed with polyurethane foam.
2nd step- vapor barrier. For this purpose, foil or polyethylene is placed over the surface of the insulation and secured with tape or glue. The fastening is completed by mounting the vapor barrier in the joint with metal tape.


3rd step- floor screed. Do-it-yourself flooring can be done in different ways.


Bondage and thickness. Its height reaches 4 cm.Before pouring the screed along the perimeter of the floor near the wall, a gap of 1 cm of foam foam is laid out.After the screed hardens, it is laid ceramic tile using the appropriate glue.
Electric heated screed. Here is a job for specialists or skilled craftsmen in DIY repair.
Wood flooring... Throughout the area of the loggia, wooden rods are laid, which are fixed using polyurethane foam. Grooved boards are mounted on them, forming a flooring.

4th step- lathing. On the ceiling and walls, horizontal and vertical lathing of wooden beams... To mount in concrete wall use screws and dowels.
5th step- final finishing. The decoration of the loggia largely depends on financial capabilities and preferences in external design.


The last final step is finishing with plastic panels, drywall or wooden clapboard... The main thing is to observe the technology renovation works in the apartment.
Some subtleties in this matter will help avoid further disappointment. The vapor barrier is laid on the dark side of the insulation, the foil should be turned inside the warm room. The use of mineral wool as a heater is not always justified. If water seeps into it, then the entire insulation system will have to be changed. When using mineral wool, you need to take care of waterproofing measures. Wooden rods cannot be mounted through the thickness of the insulation, since then places of accumulation of cold and water, the so-called "cold bridge", are formed. In order to fully improve the repair of the loggia, consider an additional ventilation system, which will significantly enhance the climate control of the entire living space.
Each owner of an apartment with a balcony can be considered to a certain extent happy man... Due to this part of the apartment, you can expand the area of your home. The balcony can be used not only as a place to store old things. With some effort, you can arrange a study there.
However, to create a room on the balcony with comfortable conditions, in which one could be without outerwear in winter time, you need to take care of its additional insulation. There are quite a few options for thermal insulation of this structure. Which one to choose, each owner decides for himself. Consider the most common ways to insulate a balcony to turn it into a multifunctional room.
Basic concepts when working on balcony insulation
 First, it is necessary to divide between two closely related concepts "balcony" and "loggia". Many people confuse them, believing that there is no difference between them. However, there is a difference.
If we talk about the balcony, then it is a remote-type structure that completely extends outside the building. The floor on the balcony is concrete slab which is built into the wall. It has a metal lattice fence along its perimeter. In the process of insulating the balcony, this the lattice can be sheathed with any material, namely:
- plastic;
- plywood;
- steel sheets.
But the loggia is a room in which only one side is open. It can be fenced with a parapet made of:
- metal;
- bricks;
- concrete;
- plastic.
How to insulate a balcony yourself: insulation scheme and work plan
 If you set out to insulate the balcony with your own hands, then you need to start work by creating a glazing structure. For the reason that the balcony is on the street and when created, it is not isolated in any way, therefore, when glazing it, it is best to use frames with double-glazed windows... For those people who live in regions with a harsh climate, the best choice there will be triple-glazed windows.
Through the use of insulation on the balcony, the effect of a "thermos" should be created. For this need to create high-quality insulation for the future room. Usage modern materials will allow you to keep warm on the loggia.
Work order
If we talk about the technology of insulation of balconies in general, then we note the following stages, which it includes.
When the glazing structure is installed, work is done to seal all the cracks. To do this, use polyurethane foam or resort to the help of sealants. If the slots are too wide, then they are covered with pieces of plywood or foam is used.
Further it is necessary to waterproof all surfaces balcony from the inside. The market offers big choice materials to effectively solve this problem. For example, you can use roofing felt, which is overlapped and glued to the base. Used for gluing joints gas-burner... In addition to roofing material, liquid penetrating substances can also be used. One of the most popular is the penetron. It is applied to the surface using a brush or roller. After that, it is necessary to fix the insulation.
When this is done, proceed to the vapor barrier device. To create it, you can use polyethylene foam with a foil layer. Fastening of this material is performed end-to-end. When it is laid, it is glued with aluminum tape.
Then they move on to finishing the ceiling and walls of the future room. What materials to use in these works, the owner decides. After that, arrange the floor. He might be:
- bulk;
- concrete;
- wooden.
Note that the given insulation scheme for your new room is universal. It can be used for a balcony or loggia. The main thing is to adhere to all stages and perform them in correct sequence... Should not be used when thermal insulation works something inexpensive. In this case, the insulation will be of poor quality and will not last long.
How to insulate a balcony from the inside: the easiest ways
When the task is to perform high-quality insulation of the balcony, then you can use one of several methods. The choice in favor of a certain one will depend on the further use of the insulated balcony.

On technical properties materials, you need to navigate when choosing a heater for thermal insulation of a balcony. There are quite a lot of materials on the market, and they all differ in their characteristics. The most important of these are:
- coefficient of thermal conductivity;
- composition;
- structure.
Insulation of the balcony with penoplex
 Penoplex is a material belonging to the group of extruded polystyrene foam. It has high thermal conductivity and excellent moisture protection. In addition, his positive quality is the flexural and compressive strength. Manufacturers offer it in the form of slabs, in which the thickness can vary from 20 to 100 mm. Slabs of this material are smooth and with a surface on which there are protrusions according to the thorn-groove pattern. The use of the latter provides a simple fastening of the material.
If severe winters are frequent in the area of your residence, then in this case, when choosing a penoplex, preference should be given to plates with a large thickness. If you live in a region with a mild climate, then when insulating a balcony, a foam board up to 40 mm thick should be used.
The methods of attaching the penoplex largely depends on what kind of finishing material the owner will use for insulation.
If your plans include plastering your future room with plasterboard or using plastic panels, then in this case you can fix the insulation plates using plastic dowels that look like a mushroom.
Experts recommend using dowels with a length of 8 to 10 cm when fixing such a heater. If the owner plans to finish the attached room with plaster, then in addition to fixing it to glue, it is necessary to additionally fix the penoplex on the dowels.
The process of installing insulation penoplex
Work on fixing the insulation on the balcony begins with fixing the slabs to the surface with a preliminary installation of a waterproofing layer.
The assembly of the slabs is carried out end-to-end or they resort to the thorn-groove scheme.
Let's note such a moment: for fixing on a wooden crate, foam-plastic slabs are not intended. The device of such a system does not provide heat retention in room. Therefore, if you plan to use drywall for covering the balcony, then in this case the insulation is mounted according to the above method. Then the vapor barrier is laid. Next comes the crate, on top of which the finishing material is fixed.
V currently many experts call penoplex the most suitable material for thermal insulation of the balcony. The main reason is its high strength. If this material parameter is not so important for you, then you can save money on insulation if you choose more affordable option- Styrofoam.
 How warm will it be in your new room with arranged thermal insulation, largely depends on the floor. Therefore, the task of warming it should be approached with all seriousness. If the work is done incorrectly, then all finishing activities carried out in this part of the apartment will be nullified.
First of all, you need to decide what material to use for insulation floor surface... Expanded clay is not recommended for this, because it has low thermal insulation values and to create good insulation a device of a layer of considerable thickness will be required. But even in this case, it will not be enough. Not the best option there is also mineral wool. The use of this material requires a good vapor barrier. Therefore, the most the right choice is a polystyrene sheet.
Usually the installation of the balcony floor is done with a slight slope. This is done in order to ensure the drainage of water. But since the balcony will be completely isolated from external environment, when creating it, you can make the floor strictly horizontal.
Stages of work
 The first thing to start with is laying penofol on the stove. It should be located metal side up. Thanks to it, heat will be reflected on the balcony. After that, the fastening of wooden bars 40x40 cm is carried out.When placing them, you should maintain a step of 50 cm.
Further between the bars it is necessary to firmly insert the foam sheets, and the gaps that have arisen should be closed using polyurethane foam. Then the second layer of beams is laid perpendicular to the first. This will create an air cushion.
Next, proceed to the installation of moisture-resistant plywood, which is located on top layer timber. When it is laid, it remains only to install flooring... It can be a laminate or linoleum.
The same scheme can be used to insulate walls and ceilings.
Heating on the balcony
 To on your balcony where you arrange living room, it was always warm, it is necessary to install an additional heating source. Previously, on the balcony, this function was performed by heating batteries, which were connected to centralized system heating. This is currently prohibited. However, there are other options for heating the balcony, which will create a comfortable temperature on it.
If the balcony will not be used permanently as a room, then a suitable heat source can be electric heater... To install such a device, you only need an additional socket in the apartment and powerful electrical wiring, which must be able to withstand the additional load.
If there is not enough space in the apartment for arranging a study or winter garden, then you can add a few square meters if you insulate the balcony. In this part of the apartment, after thermal insulation, you can arrange a study or increase the area of an existing room. It is not so difficult to carry out thermal insulation work. The main thing is to know the technology of creating a construction of insulation and use quality materials... In this case you can get an extra room, which will be warm regardless of the weather outside.
Loggia, from a constructive point of view, is perfect to become a full-fledged room or an extension of an apartment. To make this possible, it is necessary to carry out a number of construction and installation work on insulation, glazing, decoration. The result will be cozy room for relaxation, spacious living room, additional work space.
The result of insulation may differ from the desired one, if several factors are not taken into account when choosing materials and technology of insulation works.
The first factor is the further purpose of the premises:
- if it is supposed to have a utility room, then any insulation is used in one layer; mainly, only the part directly in contact with the street is insulated - the parapet;
- the desire to have a separate full-fledged room will require application different kinds thermal insulation materials, which are laid in two layers over the entire surface of the loggia;
- the option of combining a loggia and a room will also require two-layer insulation, but in this case, the main attention is paid to the parapet, and the walls are covered in one layer.
The second factor is the size of the loggia itself, since if it is small, then such insulation is selected, which, with a small thickness, has enough high rate thermal protection. In this case, the usable area will be reduced slightly.
The third factor is taking into account the fact that any material from which the walls of the interior are made passes the moisture accumulated inside. This water vapor, colliding with the colder air of the street, settles on outside walls. If this wall is insulated, it means that the insulation is covered with moisture, which leads to its rotting and a decrease in its thermal insulation properties. It is necessary that the water vapor does not reach the insulation.
Insulation materials
On construction market there is whole line, with the properties of which you need to get acquainted before properly insulating the loggia inside. What is attached to the consumer?
Mineral wool and all materials based on its production or basalt fiber are a very popular material with good indicators of thermal insulation, sound insulation and fire resistance. During service it retains its shape and structure, does not succumb to aggressive media and microorganisms, but is highly hygroscopic. Such high permeability requires careful waterproofing works... The disadvantages include the thickness of the material and the need to equip the lathing and hydro-barrier, which takes up the usable area.

Polyfoam is produced from polystyrene. It is chosen for its durability, low thermal conductivity, resistance to the influence of microorganisms, and low hydrophobicity. Self-extinguishing foam is suitable for insulating the walls of the loggia inside, since the usual one is very flammable.
Penoplex, Tepleks, Primaplex, Styroform, Ursaform, URSA, XPS - materials based on extruded polystyrene foam. They have the lowest heat conductivity rates, which means the highest thermal insulation properties... These materials are durable, easy to install, provide good waterproofing and sound insulation.

Materials made of extruded polyethylene and covered with foil on one or both sides are suitable as insulation for the loggia: Penofol, Izokom, Tepofol, Izolon. Among all the listed heat insulators, its thermal conductivity is the highest. Therefore, it is used as an independent material for "cold" insulation or as a reflective material for interior walls. But its small thickness and high vapor permeability allows it to be used as a second layer of insulation.

Separately, it should be said about the material that is not produced in plates or rolls. which is sprayed like foam and creates a single heat-insulating surface. In all technical indicators, it surpasses other materials. The main disadvantage is high flammability with the release of toxic substances. Self-assembly practically impossible, since a special installation for spraying is required.

Stages of thermal insulation work
Before insulating the loggia, a whole series of preparatory work:
- glazing and sealing of all gaps between the frames and the wall, parapet;
- surface preparation;
- waterproofing.
Double-glazed windows with frames made of any material are chosen as glazing. They must be functional, have a ventilation mode and be light enough so as not to create additional load on the floor slab.
Walls, ceiling, floor are pre-cleaned of debris and other contamination, and the integrity of the surface is checked. If cracks and inter-tile gaps are found, they are filled with a sealant. Align if necessary.

An important approach to correctly and better insulating the loggia is to create a layer of waterproofing. To do this, use one or more materials, since it is necessary to waterproof the parapet and that's it. external walls, floor, ceiling, frames.
TO waterproofing materials include:
- roofing material;
- various types of coating, painting substances;
- penetrating waterproofing;
- folgoizolone.
Rolled waterproofing is glued with an overlap to the base, and the seams are sealed with a sealant, sealed with special tape or soldered, as is the case with roofing felt. When coated with foil-insulating material, an additional layer of thermal insulation is obtained. The use of coating, paint, penetrating insulation is justified in hard-to-reach areas and in the case when the dimensions of the room are very small.
After determining which insulation is best for the loggia and holding preliminary works, proceed directly to the insulation itself. There are two ways:
- a continuous layer of heat-insulating material is created and any options for steam penetration to the insulation are minimized;
- lining of insulation and covering it with a vapor barrier.
Warming methods
First.
In this case, materials with low vapor permeability are used: polystyrene, expanded polystyrene. Their thickness must be such as to create the required resistance to the passage of steam and, at the same time, be sufficient for the required thermal insulation. In the case of using tile insulation, the sequence of work is as follows:
- tile glue is divorced;
- glue is applied to the corners of the slab and in the center;
- the plate is applied to the surface and holes up to 6 cm deep are drilled through it with a puncher for dowels;
- across drilled holes with the help of mushroom dowels, the final fastening is carried out, at least 5 dowels are used;
- the next slab is also laid after checking the surface with the rule;
- the seams between the slabs are closed assembly adhesive or glued with tape;
- it is possible to lay a second layer of insulation, for example, penofol;
- after laying all the sheets, fiberglass mesh is reinforced;
- putty for leveling mesh texture.
Reinforcement is carried out in four stages:
- the plates are treated with coarse grain sandpaper;
- cover the slabs with glue up to 3 mm thick;
- a fiberglass mesh with cells of 5x5 mm is pressed into the glue;
- apply a second layer of glue over the mesh.
You can also use rolled thermal insulation materials, the installation technology will not change. In this case, pieces of insulation of the required size are cut off.
After such insulation, surfaces are obtained that are completely ready for painting, or any other decorative material.

Second.
For this method, there are no restrictions on the choice of insulation, since the technology provides for the creation of a vapor barrier between it and decorative trim... Such insulation is carried out with the help of arrangement wooden lathing or without it, but then the crate for PVC plates is made on top of the vapor barrier.

The lathing is made from wooden beams or metal fasteners and a profile. In the case of metal parts, heaters must be laid under them.
The height and width of the crate depends on the type of insulation:
- for mineral wool, the beams are selected with a smaller width than its mats, so that the laying is carried out with a roll;
- it is advisable to lay several layers of cotton wool so as to cover the beams, then they will not become conductors of cold;
- for polystyrene, all parameters of sheets and beams must match.
After laying the insulation in the crate, an overlap is attached to it vapor barrier material... It can be ordinary polyethylene, a membrane. All joints of the vapor barrier are glued with tape. If the lining with insulation was carried out without lathing, then profiles for mounting the finish are attached on top of the vapor barrier.