Prefabricated plywood tables. DIY plywood table - simple and beautiful
A coffee table is a piece of furniture that is quite common, like armchairs, comfortable sofas, chairs, beds. The purpose of the tables is more decorative than functional; small objects, books, newspapers or magazines are stored on them. On rare occasions coffee table can be used as coasters for snacks, cups of tea.
In order to make a plywood coffee table, you need to choose the right material, if it is too thin, then it is better to glue the sheets in two layers.
Most often, the tables are factory-made items, but you can also make stylish and attractive things from inexpensive materials with your own hands. A coffee table can be made from plywood. It is a versatile material that is often used to make furniture today. But manufactured items are no different big fantasy, and sometimes you want to decorate your home with stylish and comfortable pieces of furniture.
A plywood table can be made with carvings, comfortable shelves. Products made of glued layers of plywood will look decorative. For this, small parts of it or whole sheets are used, which are glued together with a special waterproof glue designed for working with wood. After manufacturing, the surface of the table can be coated with varnish, oil, stain.
Shellac varnish will give the product a more noble surface, which is inherent in the old beautiful things from natural wood.
Assembling a table from plywood scraps

During the repair, many people have plywood scraps, which are often simply thrown away as unnecessary. But it is from these pieces that an unusual and beautiful Art Nouveau coffee table can be assembled. It will have two legs, and the tabletop will be in close contact with the walls. For a table, you can take a whole sheet of plywood, but it will have to be cut into separate pieces, so it is better to use waste. If they are not there, then you can always inquire about their availability in the construction markets and in stores, where they will gladly get rid of unnecessary materials.
How to make a table of such an unusual shape so that it is comfortable, compact and decorative? First, you will have to prepare the materials and tools that will be needed for the job:
- a small piece of whole plywood or thick cardboard, which will be needed for the template;
- pieces of plywood with the same thickness, preferably 18 mm. The number of such pieces should be large, since the main structure will stick together from them;
- moisture resistant glue for working with wooden surfaces;
- jigsaw;
- pencil;
- a circular saw;
- vice;
- Sander;
- oil or varnish for processing the table after assembly;
- fasteners for fixing the table to the wall surface.

How to make a plywood table quickly? First, you need to draw a template on a sheet of paper, according to which the legs of the product will be cut. Since the table is made in the Art Nouveau style, the legs are best done curved or even openwork. The process of building a table begins with drawing up a sketch. Draw the legs on a large sheet of paper in full size. After that, the drawing is transferred to thick cardboard so that the legs are symmetrical. You can paint only one side, as a result, you get even and beautiful models.
If the template is ready, then you can start gluing the pieces of plywood. It is necessary to make the structure in such a way that their shape repeats the shape of the future table legs. After each gluing of 2 parts, it is necessary to remove all excess mortar with a clean cloth, to squeeze the pieces of plywood tightly together so that the gluing is of better quality. When the blanks are already ready for the legs, you need to lay them on a flat surface, attach a template on top and circle with a simple pencil. Now you can cut the resulting structure with a jigsaw.
Back to the table of contents
Countertop preparation and wood processing
With the countertop, things are a little more complicated. You need to get a beautiful drawing, so it's best to glue the pieces of plywood at an angle so that they converge in the center. The angle of inclination of the parts that will be located from the edges to the center should be one, then the drawing will turn out to be very beautiful. After gluing and drying the glue, the worktop should also be cut according to the template. When you make such a table, you should get 3 separate parts - these are two legs and a table top. They need to be given an attractive appearance, to remove all sharp corners.

With a sander, it is necessary to carefully and very carefully process the entire surface of each workpiece so that it becomes smooth and beautiful. There should be no burrs, sharp edges or corners left. After the surfaces are processed, it is necessary to assemble the table; you can use ordinary self-tapping screws for fastening. The structure can be attached to the wall with special metal corners, which must be placed so that they are not visible from the outside. Now the main thing remains - it is necessary to make the surface of the coffee table beautiful and stylish.
For decoration, it is recommended to use shellac varnish, which will give the product a noble matte surface. natural wood... Since the pieces of plywood were glued together at an angle, the whole structure takes on a very interesting, original pattern, which does not in any way remind that the product is made of ordinary plywood and waste. It is not recommended to use paint for decoration, since the beautiful drawing will no longer be visible, the table will acquire a normal appearance.
Back to the table of contents
Manufactured from birch plywood
Birch plywood is excellent for building a coffee table, which has an attractive appearance, durability, it is very easy to work with it. The structure will consist of plywood blanks glued together. The shape of the table can be any, but you must first draw up a drawing. This will allow you to immediately calculate the amount of material, determine what tools and installation steps will be needed.
To build a small but very attractive coffee table, you will need the following materials and tools:

- birch plywood;
- moisture resistant glue specially designed for working with wood surfaces;
- wooden hairpin;
- oil or varnish for impregnating the future surface of the table;
- sandpaper;
- jigsaw;
- a circular saw;
- drill.
The manufacturing process consists of the following simple steps:
- drawing up a drawing of the future table. In this case, it will be a small structure with a length of 800 mm and a height of 400 mm. Based on these parameters, birch plywood will be cut;
- It is recommended to draw the drawing in full size, after which it will need to be given to the printing house so that the templates on the self-adhesive film can be printed on the plotter. Such templates will need to be glued to the surface of the plywood, and then carefully cut them along the edges;
- all blanks are cut out with a jigsaw, their edges are completely cleaned with emery paper from burrs. Markings for fasteners are applied to the surface of the workpieces. Holes are drilled with a drill, then you can start connecting the parts;
- it is recommended to first conduct preparatory work, and then start processing the wood. The material for the table itself is purchased in the amount of 3 sheets, the dimensions of each are 1200 × 2400 mm, the sheet thickness should be 18 mm;
- you will need 27 blanks to work. Each should have a size of 400 × 800 mm, which fully corresponds to the dimensions of the future structure;
- holes for fasteners are made in each workpiece using a milling nozzle. At first, you can only prepare 23 pieces, leave 4 for further work... The holes must be cut in full accordance with the template so that the table looks attractive and neat.
Such a table can be very useful if there is a shortage of storage space and if you do not work with wood every day, but on occasion.


Step 1: Dimensions and part identification


Many parts only have one dimension. This is because the second is either unimportant, stated elsewhere, or, depending on the thickness of the plywood. I found out this method was: 18mm, 23/32, 3/4 can be close, but small errors add up.
You will need:
4x8 plywood sheet. I used BC. NS. and it was designated 18mm.
4 pipes about 32 ″ long. This is a flexible part. I used 1.25 inch aluminum tubes from onlinemetals.com. They are a little expensive to ship, but were necessary as I drilled holes that were too big for my 1 "electric pipe. I plan to experiment with what you have in stock and what drills you have access to. A snug fit will give the best results.
8pcs x 2 3/8 ″ bolt
Wing nut 3/8 8pcs
Washer 3/8 16pcs
glue & double stick carpet tape
biscuits and or drywall screws
3/4 oak dowel 36 ″ long
Notes:
Blue pieces and one short yellow piece of trumpet support. They are shown here but installed under the table to keep the pipes parallel to the top.
Not all photographs are 100% accurate. The first table had a glitch and some adjustments were made to the final drawings.
The bolts are overkill, but the larger ones are easier to use.
Step 2: cut the strings


The idea here is to have similar parts without moving the saw. A table circular saw can be used, but this was done with a circular saw and parallel emphasis that came with him.
First cut: Rip 24 ″ off short end of 4x8 plywood. This is for the top of the table and will be the basis for many other aspects. It is important to use some of the cut. Track saw, straight edge, etc.
Second cut: From the other end, use your 24 "piece and subtract 4 plywood thicknesses. This should be around 21. The reason this is important is because the legs fit on the inside of the top of the table and outside the shelf.
Cutting them off to either side gives great precision.
Set these two aside and continue cutting.
The pieces have color coding and if they have a color or a colored point they have one common dimension. Remember to save on right side your line.
Foot note: The feet should be 3 ″ x3 ″ when finished. This leaf cut has a short side measuring long for a rabbit. If you want glue and wood screws or glue and cookies the short side would be 2-1 / 4, or 3 ″ minus the thickness of the plywood!
Once all the strips are cut, go back to the first 24 "wide piece made and cut that 37" long. We cut it neatly, with a guide or straight edge of some kind. Save the cut for later as the short skirt ends will come out of it.
The next section of the top shelf is the length. This was done with the second line. Use the top one you just made as a template and subtract four plywood thicknesses. Should be about 34 ″. The ends cut off like a short skirt will be made of this.
Step 3: drilling holes, long planks


1. Take two long 3-3 / 4s. To get the length, spread them out on top and subtract two thicknesses of the plywood. Draw a line. Clamp them together and cut at the same time if you can with a circular saw or miter saw. Set aside.
2. Cut off two short 4-1 / 2 and the remaining 3-3 / 4. This aspect should be 32-3 / 8 ″ +/- so that they will fit into the shelf when everything is assembled. Clamp and cut all three at once.
3. Next, drill holes of the required diameter depending on which pipes you have chosen. Pay attention to the location of the link from the bottom. Mark all "bottoms" for later editing. Drill holes as straight as possible. For this I used double tape and a drilling machine. All pieces were stacked on a flat surface with the referenced side down. In short, they were in the center and all fit.
If you don't have a drill press, drill three 3-3 / 4 wide as one group, remember shorter in the center and make your marks last longer. They must be ordered long, short, long. Then, using the shorter ones as a template, drill two 4-1 / 2 wide. I would recommend using double-sided tape.
Also notice. If your plywood has a good side / and a bad side that matters to you, flip the boards appropriately. If the holes are not perfect the pipes may not allow you to do this later.
Step 4: drilling holes, short boards


1. Board supports. Cut off the remaining 4-1 / 2 boards approximately 24 ″. I did this by cutting 4-1 / 2 x 48 in half. Then add the remaining 4-1 / 2 and cut all three at once on a miter saw to the maximum length possible.
2. Pipe supports. Cut long 3-3 / 4 in 2 pieces 22-3 / 8 +/-. They will fit under the table so that their actual size is 24 ″ minus the plywood thickness * 2.
Similar to long boards, these should be stacked and stuck together. Ideally 4-1 / 2, 4-1 / 2, 3-3 / 4, 3-3 / 4, 4-1 / 2 with 3-3 / 4 centered. Remember the bottom markings. If you need to break what I would like to do 3-3 / 4 and 4-1 / 2 and mark them as A. do the rest and mark them as B. You don't want to bend the pipe to get things to fit.
Pay attention to the holes:
My first holes were for a 1 ″ emt conductor. This stuff was cheap, but my hole was too sloppy. Thus, expensive aluminum. However 1.25 aluminum through the 1-1 / 4 hole drilled with the fostner bit was too tight. Ended up using a feather drill and some sanding.
Step 5: optional rigor mortis


In my table I have mortised legroom. I don't think this is absolutely necessary, but it does add to stability. That's a fair amount of work. Take it or leave it, worse thing is to add a few more bolts!
If you choose this should be done to the bottom of the top of the table. Ideally, before making the holes and ostentatiously before the skirt is added.
Step 6: assemble the top


This should go pretty fast. I used a sponge jointer. If you do, be sure to mark the boards and links at the correct angles. Glue and clamp or glue and nails / screws work as well.
All your pieces were branded on the bottom. Make sure it is visible when you assemble these pieces.
Step 7: drill at the top


There are two ways to do this.
1. Draw a 2-1 / 2 line around the top. From this line of centers of holes 4-3 / 4 apart in the short direction and 5-5 / 16 in the far directions. Drill away. The numbers are a little off, 1/8 is possible. With some fancy geometries, you could slice through the lines if you really want to. 3/4 ″ fostner bit for best results
2. I built a jig. 9-3 / 4 x 37 pieces of plywood. Draw line 2-1 / 2 all the way around. Mark your centers 5-5 / 16. Set the 2-1 / 2 link on the drilling machine. Drill one hole line and only opposite two corners.
Place the template on your top with a line of holes along the bottom edge, the clamp securely. Drill. Then flip it over and line up the two corner holes with the two detailed ones. Insert a 3/4 inch wall plug into each of the two corner holes. Again the clamp and drills are in line. Next, I reeled up the fishing rods, slide the template of one line, placing it in the corners.
This worked pretty well. The holes looked good, but not 90 degrees. It probably needs another jig!
Step 8: legs


A couple of ways to make legs.
Cut off all legs to 32 ″. This is not critical. If you have other machines you can use in combination with this table I think that changes that. Cut as much as you can safely at once for greater precision. Make sure you don't use more than 3 ″ wide boards... Those on the shelf.
We have 3 ″ stripes and either 2-1 / 4 ″ or 2-1 / 2 ″. According to these plans 2-1 / 2 because there was a rabbit and a dado. If you want to use other methods, use 2-1 / 4 ″. Or technically 3 ″ minus the thickness of the plywood. In my case, 18mm.
Step 9: assemble the shelves
We cut before. It should be about 34 "(37" minus 4 plywood thickness).
Take the remaining 3 long "wide planks." Spread them out on a shelf on top and put two pieces of plywood at the end to cut the overall length. Scribe and overhang. Cut them both out at the same time. Should be around 32-1 / 2 ″.
Assembling the shelf is simple as you did the top one. No need for extra holes or spikes.
Additionally:
Tape the long boards together and drill two more holes for the pipes. I am centered on the shaft 3 ″ of the board and about 4 ″ from the end. I did it much however it would be more useful if several wells are drilled in the legs to raise and lower the shelf. I only have one shelf high.
Step 10: Leg Hole Cutting Guide and Leg Hole


This guide drills holes in the top and in the shelf exactly. This is not necessary, but if you have all the holes turned off, then the legs will be determined specifically. This helps make the legs interchangeable.
Directory
Scrap about 3x10. Cut 3 ″ for the top. Cut the remaining piece in half a short way with a 45 degree cut.
Two lines up 45 degrees end and tape them together as shown. Cut off the 90 degree end so they are the same. Drill a 3/8 ″ hole 1-7 / 8 from the 45 degree end and 2-1 / 4 down from the top (measured before pasting the actual jig onto the top).
Use a square to make sure it's 90 degrees. Glue and Brad or clamp together.
Use a jig to drill 2 holes in each of the four corners of the top and shelf.
DRILL FOOT HOLES
With the table upside down, set the legs using a temporary clamp. If you decide to numb you do not need hose clamps. I counted legs and angles to be safe.
Outside, use the holes drilled at the top to drill through the legs. Run bolt and washers up to washers and nuts in each corner.
The height mark on the shelf measures from the top along the leg. Mark each leg. Remember that you are working upside down and if you turn over the shelf to use it as a tray, it will effectively lift things. The plywood surface is about 12 "off the ground on my finished table. Install the shelves inside the legs. This should stay with friction, but clamp to make sure the corners stay in line. Through the holes drilled before you drill from the inner shelf through the legs. Add bolts as above. If you would like the adjustable shelf height to move and mark the shelf, drill, repeat.
There are additional holes. If you want to bolt them you will need another set of bolts and adjust the hole placement. Wing nuts may contradict each other.
Step 11: gates

This article will help readers who want to try their hand at furniture design. We propose to start experimenting with the manufacture of furniture from plywood. The article provides examples of popular works of famous designers, shows the basics of plywood processing, as well as making a rocking chair with your own hands.
Imagine the interior of your dreams that reflects your personality, character traits and status. Modern tendencies in interior design, they mostly lean towards non-mass design items, but rather, author's production. However, there is an opinion that designer furniture has a very high cost and is often simply unavailable.
Factory-made furniture often does not meet individual preferences - it is simple, ordinary and typical, not always of high quality and often quickly loses its initial appearance... A rather trivial design should also be attributed to the "advantages" of factory-made furniture. As a result, every apartment with factory furniture is often an example of unattractive urban design. And you want something special and original.
 Gothic leather furniture in the best traditions of post-art nouveau, designer Michel Haillard, France
There is a stereotype regarding designer furniture, it is associated with furniture from expensive solid wood with luxurious leather trim. That is so, but is it necessary to limit creative thought to such a rigid framework, because the work of authorship presupposes, first of all, an idea that can be realized using various materials.
It is worth noting that heavy classic furniture has practically left the fashionable furniture Olympus, with the exception of the work of several fashion designers, including the luxurious "animal" furniture of Michael Hallard. In turn, minimalism, which has topped the furniture TOP, requires a completely different design approach, involving other materials for manufacturing.
Recently, in the search for inexpensive materials for the manufacture of furniture, designers have paid attention to such unpretentious and familiar plywood. Although plywood has long been used in the manufacture of furniture, various structural models are made on its basis, it is appreciated for its "ability" to absolutely fantastic transformations with relatively easy technological processing... At the same time, designer plywood furniture has a more democratic cost than solid wood furniture.
 Signature coffee table, designer Justin Couch, France
In the world of furniture design, the names of designers are known who have made a name for themselves in the manufacture of furniture from plywood. Their works became the prototype of industrial designs that are deservedly popular among lovers of modernism; there are also designs that are made only by hand.
Designer fantasies in fashionable furniture interpretations
Almost everyone is attracted by the completely informal furniture solutions of fashionable Western designers. World author's design is developing in a completely different creative plane than the industrial one. In this creative space, the idea becomes part of the philosophical vision of the world, and the boldness of the designer's thought is elevated to a cult. There are no rules, let alone prohibitions. Even functionality fades into the background. The main task of designer furniture is to delight consumers with its informal forms.
 Left: Plywood restaurant decoration, New York. Right: bent plywood armchair
Many people wonder what creativity is? In this case, the creative approach only partially conveys the meaning of this quality of artists. Creativity is the ability to rethink reality, to create something that is often only understandable to him. creative idea and embody it, at first glance, in a trivial household item. Only a few works of authorship have become the basis for industrial designs that successfully combine the main characteristics of factory furniture: ergonomics, functionality and technological simplicity of manufacture. The rest of the models have become a real example of contemporary art.
 Left: Floral furniture motifs by Shige Hasegawa, Japan.
Right: sunny plywood ottomans upholstered in dyed fur from Kyle Bunting Furniture & Art
Modern technologies for the production of furniture in many ways have not undergone significant changes. Furniture is made in almost the same “old-fashioned” way as it was several centuries ago, and plywood is considered one of the most used furniture materials.
 Copies of Dressler Brothers Furniture, Canada
Ease of manufacture, sophistication, minimalism and a kind of delicacy of plywood furniture samples due to the use of many carved parts fastened together - lamellas, allow a completely different look at a seemingly trivial furniture material.
The Dresler brothers (Jason and Lars Dressler) are the modern pioneers of plywood in a new incarnation. For the manufacture of their elegant minimalist furniture models, they use high-quality birch plywood, which is cut out on a special woodworking machine, processing, namely: grinding the elements, subsequent polishing, painting and final assembly, is done manually.
The simplicity of making plywood lamellas and the possibility of making highly decorative furniture models have prompted various design experiments. An example is the author's work of the American designer Justin Couch, who uses contrasting appliqués from cut plywood covered with acrylic putty.
 Left: Designer bench made of plywood slats. Right: Justin Couch's coffee table.
Justin Couch uses two types of plywood - birch for light parts, walnut for blackened parts, this approach makes painting easier. His furniture is informal, elegant and extraordinary. The portfolio of Justin Couch includes both exclusive designer models and products designed for mass production.
To some extent, the path of Justin Couch was repeated by the American designer Hilary Wiezbenski, who founded a small company and manufactures designer furniture from plywood. She started by selling leaf tables. Over time, Hillary began experimenting with bent plywood. Inner admiration is caused by the original shelf with a "flowing" clock, made entirely by hand from steamed plywood.
 Left: Leaf table, designer Hilary Weisbensky, USA. Right: shelf with a "flowing" clock
Plywood is versatile, it can be used for making furniture, in interior decoration and allows you to achieve stunning effects and textures.
 Left: An industrial model of Justin Couch's rocking chair.
Right: plywood bedside table by famed American modernist George Nelson
Author's models of plywood furniture
Most foreign design studios do not supply their products to Russia. While shipping is possible, it often comes with a lot of complications. What to do if you want to arrange your home outside the box and have a little free time and desire? The answer is simple, you can try to make furniture with your own hands. It is possible and it turns out not that difficult. The plywood processing technology is quite simple, but we will talk about this later, and now we will pay attention to the author's furniture models, which you can try to make yourself.
Designer sun lounger for garden and terrace
The original sun lounger was created by the design company DesignKoalition. The sun lounger will provide you with maximum relaxation and rest on fresh air... The base for the chair is made of plywood 18-21 mm thick, the rails are rigidly connected to each other with wooden beams or a metal pipe.

University chaise lounge SOFT Rock
The University of Massachusetts has developed an original chaise longue, which has become a real decoration of the university grounds. Chaise longue made of flexible plywood, installed inside LED lights which is powered by solar panels. The interior of the chaise longue, designed for relaxation, reading and practice, has excellent ergonomics.

Jeffrey Matthias coffee table
An interesting and simple side table designed by the American industrial designer Jeffrey Matthias from Denver. On his website, you can see his portfolio, which includes drawings of products for self-made furniture. The main quality of industrial plywood products is the most economical cutting of plywood sheets, this is how this table is designed. Jeffrey enthusiastically communicates with everyone who wants to reproduce his furniture models and asks him to write on any questions that arise.


Children's plywood wood table
If you want to decorate your nursery in a green design style, we recommend you reproduce this model. writing desk-tree. The table is made of plywood, the edges are finished with a special acrylic filler, which allows you to achieve the plastic effect. The result is an extraordinary kids' desk and chair with vibrant finishes. The table is made of 24 mm plywood.
 Model of a children's desk in the form of a tree (90x140x75)
Justin Couch's coffee table
An interesting element in the living room will be Justin Couch's wonderful coffee table in the modern baroque style. To achieve a similar "varnish" effect, special acrylic fillers are used, which make the surface look like plastic.
Dresler Brothers Armchairs
Of course, the Dresler brothers' chaise lounges are an exceptional example of modern plywood furniture. Such products are easy to manufacture, the only difficulty will be in the manufacture of lamellas. Nevertheless, the result in the form of ready-made armchairs will add a special touch of fashion to your interior.
 Armchair by the Dresler brothers. It is assembled from lamellas that are pulled together
Rocking chair Toby Howes
Toby Hoves is a renowned British furniture designer whose models are distinguished by refined elegance. They are an excellent example of contemporary furniture modernism. His portfolio includes a rocking chair made of bent plywood. Many craftsmen find it difficult to repeat such a chair. Obviously, the plywood in this case is processed by hand.

Plywood table by Erwin Zwiers
The table top is distinguished by originality in this model. It is made using twisted sheets of thin flexible tropical wood plywood. Agree - the table is non-trivial and easy to manufacture.

The success of the chair bench is primarily due to its sophisticated ergonomic shape. These chairs are becoming an element of children's rooms, public spaces and ultra-modern living rooms. For manufacturing, lamellas are cut out, which are rigidly fastened to each other. The result is a stable and lightweight construction.
 Armchair-bench DieFabric. Drawing of the lamellae for the chair
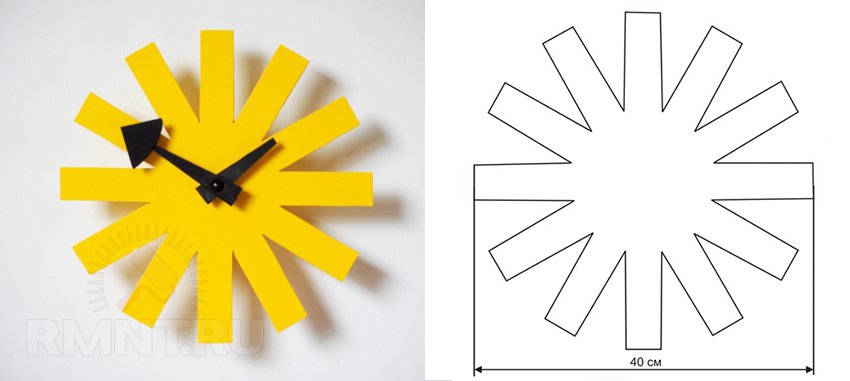
George Nelson's legendary Asterisks watch
It is impossible to ignore the masterpieces of the famous American modernist George Nelson. Asterisks watches are especially popular among his models. Like everything ingenious, they are easy to make and can become part of your interior if you make them yourself from thick plywood, cover with acrylic putty and, for example, yellow paint.
Plywood furniture manufacturing technology
Plywood is widely used in the furniture industry, it is used for the manufacture of structural and decorative parts. Plywood boards are characterized by high strength and elasticity, which allows them to be used in various furniture structures, which, as a result, still have a small weight.
Plywood grades and safety of use
Several types of plywood can be found on sale, birch plywood is considered the most common in our region, other varieties can be imported from other countries. In general, plywood is divided into 5 grades, and polished and non-sanded plywood are also distinguished:
- FOF - moisture-resistant film faced plywood, covered with a special layer of PVC film to give additional moisture resistance.
- FSF - moisture resistant non-laminated plywood, usually birch, is distinguished by exceptional water resistance. This is plywood wide range applications, it is also used as a furniture material, phenol-formaldehyde glue is used for its production.
- FC - birch plywood produced using carbamide-formaldehyde resin.
- FBS - Bakelite plywood, also called "marine" or "Finnish" plywood. Such plywood is covered with bakelite varnish, which gives it special physical and chemical properties. Bakelite plywood does not change its performance under the influence of hot climate, moisture and sea water.

There has been a long debate regarding the safety of using plywood in furniture production. For example, FSF plywood is made using resins with phenolic compounds, while FC uses urea (ammonia). According to GOST, only the formaldehyde content is regulated. The question arises, what is the emission of formaldehyde and what level is it safe? V plywood FSF the emission is less, which means it is safer.
All Russian plywood factories have an E1 safety certificate, plywood corresponding to an E0 certificate is presented on the market, and some factories are also certified according to the “safer” CARB 1 and CARB 2 standards.

From the point of view of furniture safety, it is better to avoid Chinese plywood, and opt for Finnish manufacturers who strictly adhere to the requirements of standards, and Finnish resins contain a minimum of formaldehyde. When choosing plywood for nursery, you should also avoid laminated products that contain a high level of formaldehyde. Experience shows that the issue of the ecological quality of plywood from various manufacturers is quite controversial.
The cost of plywood can fluctuate depending on the type, manufacturer, and also the types of wood used for its production.
Mahogany marine plywood. Marine plywood made from gabun tree veneer (Acuomea kleinea) native to Congo can be sourced from factories in Holland, Italy, Greece, France, Israel and the USA. A variety of this type of plywood is plywood made from Shorea wood veneer, which grows in the Philippines, such plywood is more common under the names "meranti" and "luan", commercial varieties are also available "yellow luan", "white luan", "red luan" and "red meranti". Usually such plywood is supplied with a thickness of at least 6.2 mm, the "okume" grade can be found in thinner sheets. The size of the sheet often does not exceed 1.22x2.44 m.
Plywood from birch, cedar, beech, pine. As a rule, it is plywood of a wide range of applications, made from available wood in the country of manufacture. It is such plywood that is more often used for the manufacture of furniture, plywood with a beautiful decorative coating. Good material for the manufacture of furniture, Russian plywood is used, in many cases it is not inferior to foreign counterparts.

Birch plywood
Flexible tropical wood plywood. This is an excellent option for making bent parts. Highly valued flexible ceiba plywood, also keruing, wig. During the production of flexible plywood, special qualities are given to it, any parts will have structural strength and will be self-supporting. This plywood was created specifically for design purposes. Also, an ultralight plywood made of ceiba and sumum wood has been developed, which is almost 2 times lighter than its counterparts. Tropical plywood is highly decorative; when covered with stain, its texture can be compared with "Wenge" veneer, which is the most popular in furniture design.

Laminated plywood. This is a type of plywood that has a laminate surface layer. For furniture production laminated plywood with various colors of finishing is used.

Plywood processing
Making furniture out of plywood does not require significant training. Some pieces of furniture can be made with a jigsaw, router and drill, more complex parts can be carved out on a CNC woodworking machine. Curved parts will be difficult to manufacture.


There are several ways to make bent parts. The first method consists in steaming the plywood blank. This applies to traditional types of plywood that do not bend. In the simplest case, the plywood blank is placed in a hot bath, where it is kept for about 30 minutes; in the hot state, the blank must be fixed on the mold and left for 5-7 days. This method requires gentle flexion.
 Method of making a curved workpiece
Can be made bent blank from several thin sheets of plywood and give it the desired shape... In this case, flexible tropical wood plywood is used. To fix the shape, epoxy glue is used, which is applied on both sides of the workpiece. The glue is absorbed into the top layer of plywood, polymerizes and then retains the given shape of the furniture part. Plywood is glued using ordinary carpenter's adhesives - bone and flesh, casein glue is not used, as it leaves streaks. You can use synthetic resin glue.

Plywood furniture decoration ideas
The shape of the furniture is not always self-sufficient; the design also implies a color scheme. In some cases, shape and color are dominant, such as in the Dresler brothers' armchairs. British designer Erwin Zweers emphasizes the natural beauty of wood, while Justin Couch completely covers the texture of wood with paint.
When making designer furniture, you can give Special attention, first of all, painting furniture using decoupage technique. Here are several options for decorating furniture using this technique.
A wonderful pale pink plywood wardrobe will add a kind of flair to a young girl's room. At first glance, exaggeratedly simplified cabinet shapes are complemented by a bright color scheme, which distinguishes this model among the trivial industrial solutions.

Looking at this wardrobe, you unquestioningly agree that the author's design creates a special world around its owner. Used for painting latex paints and varnish.
The plywood bureau, decorated in a botanical style using decoupage technique, is very original. A whole series of furniture designed by design studio Martha Stewart Living. Floral motifs look very harmonious, and decorating furniture in this style is quite simple - the base is covered with primer, then a blank with a pattern is glued, and then varnished.
 Martha Stewart Living Design Furniture Series
Luxurious mahogany cabinet cabinet can be made of meranti plywood. Light areas are decorated using decoupage technique.
 FLORA wardrobe by Josef Frank Design
Instructions for making your own rocking chair
You can make furniture yourself, it's even easier to find a use for it. Even a not entirely successful first copy will decorate the interior of a summer cottage or a terrace, in addition, some flaws can be hidden due to painting or the use of textile decor. The first experiments can start with making a rocking chair, it turns out it's quite simple.

To make such a chair you will need desire, a little skill, an affordable woodworking tool and plywood measuring 1520x800 mm and 4, 10 and 15 mm thick.
At the first stage, the patterns of the chair parts are drawn. The pattern can be made by transferring the drawing onto cardboard with a cell size on a scale grid of 100x100 mm.

The drawing of the part is transferred to the plywood and cut out with a router. It is necessary to lay out the parts in such a way as to perform the most economical cutting. For manufacturing, you will need 3 sheets of plywood 15 mm thick. Holes for screws are made at the attachment points.
All cut out parts are carefully carefully sanded and sanded with sandpaper with different grain sizes, only then the product is assembled. Typically priming and painting are done disassembled. If it is necessary to check for functionality, the chair is pre-assembled.

The back of the chair and seat are assembled from plywood strips, which are glued onto thin plywood 4 mm thick (parts 10-11). This creates a flexible backrest design. Parts 4-7, 8 and 9 are made from three plywood sheets. Technologically, we recommend gluing three sheets of plywood and only then cutting out the part.
Table. List of parts and materials
| Part number | Name | Qty | Dimensions (edit) | Materials (edit) |
| 1 | Sidewall | 2 | see fig. | plywood 15 mm |
| 2 | Rack | 2 | — | — |
| 3 | Seat support | 2 | — | — |
| 4 | Plank | 1 | 470x45 | — |
| 5 | Plank | 1 | 540x45 | — |
| 6 | Plank | 1 | 485x45 | — |
| 7 | Plank | 1 | 470x45 | — |
| 8 | Seat strip | 16 | 540x30 | plywood 10 mm |
| 9 | Backrest plank | 18 | 500x30 | — |
| 10 | Backrest base | 1 | 540x500 | plywood 4 mm |
| 11 | Seat base | 1 | 540x480 | — |
| 12 | Step | 1 | length 535 mm, diameter 28 mm | Beech, birch |
A little effort and you can show off a chair self-made perhaps this will be just the beginning, and you will have a new hobby that will also allow you to save money family budget... The simplicity of making furniture from plywood is really surprising, it can be within the power of women who are always able to create something special from simple and uncomplicated things.
The variety of furniture options that can be made from plywood is a matter of slight admiration for anyone who does not even plan to study. self-production furniture. Indeed, plywood is excellent design material that not only cabinetmakers can work with. Making furniture with your own hands is available to almost every person who wants to try their hand at furniture design. Moreover, you can use the "tips" of fashionable furniture designers working with plywood, or create something of your own.
Homemade furniture is in great fashion now. She has a lot of advantages over the factory - House master knows exactly what he made his cabinets and armchairs from, and usually tries to ensure that his creations not only decorate the interior, but also serve for a long time. If you decide to do this and you have some materials left after the repair, you can first try to make a table out of plywood with your own hands. Some models will be discussed in our article.
What would you like?
Plywood is an excellent material from which, in principle, any furniture can be made, and for a table it is even more suitable than the now popular chipboard. But before you make a plywood table, think about what your product should be:
- compact;
- convenient;
- beautiful.
Otherwise, it just makes no sense to get down to business. In stores, you will find a lot of different tables from the most unexpected materials. Among them there are certainly plywood tables. There are many options that you can do yourself:
- magazine;
- children;
- writing;
- kitchen;
- workbench table;
- any other model, up to secretaire tables and models combined with wardrobes.
Much depends on what exactly made you get down to business. Do you want to seriously start making furniture, completely furnish your apartment, or do you just have pieces of plywood left that need to be used somewhere? But in any case, it is better to start with something small.
Important! The first plywood table can be a coffee table - it will take the remnants of what you used for repairs. By the way, not necessarily plywood - maybe laminate or chipboard.
Coffee table
To make a small plywood table with your own hands, drawings are not required, but a template is very useful. The table, which is described below, is attached to the wall.
Important! Your future product may be different heights, in this case, it is not at all necessary to comply with sanitary standards prescribing how to sit at the table and how the legs should stand. There is a magazine on it, some statuette and a table lamp.
Dig in the bins and see if you have:
- a piece of plywood for the countertop;
- a small but whole sheet of plywood or thick cardboard - you need it for a template;
- carpentry or other moisture resistant glue;
- jigsaw;
- a circular saw;
- pencil;
- vice;
- sander (you can do just sandpaper, but this will take more time);
- fasteners;
- the remains of wallpaper, a sheet of Whatman paper or graph paper;
- long ruler;
- varnish, wax or oil.

We collect the legs and prepare the details
We start making a table with a sketch:
- Come up with the shape of the countertop - it can be rectangular, square, round, oval, with a notch or even a fancy shape.
- Think about the shape of the legs - you can make them straight or curved.
- Draw it all on a piece of paper.
- Estimate the dimensions. The table is small, so the main parameter that you should be guided by is the size of the plywood sheet, unless, of course, you plan to make a type-setting table top from pieces.
- Draw full-size legs on a large sheet of paper.
- Transfer the drawing to heavy cardboard.
- Cut the legs according to the template - if the shape is complex, you can use not an electric, but an ordinary hand jigsaw.
- If the plywood is not thick enough, make the legs in two layers.
- Glue the layers.
- Remove excess glue and let the blanks dry.
- Place the legs on a flat surface.
- Align them with the pattern.
Important! The model, which is attached to the wall, has only two legs.
Table top
If the tabletop is simple and made from a single piece, there is no problem. They just cut it out. It's a different matter if you only have pieces of plywood or if you want to make a typeset drawing from different types wood. In this case, the fragments are cut at an angle so that you can make up a flat surface from them and the seams are not noticeable. First you need to glue the pieces into a single whole, and only then cut the tabletop according to the template. After the blanks appear, we do the following:
- We grind the surfaces of the legs and countertops - we get rid of splinters, sharp corners, etc.
- On the underside of the tabletop, we outline the places for the screws.
- We fasten the legs using furniture corners.
- We outline on the wall straight line for fasteners.
- We fix the table on corners or on a metal profile.
Important! The corners must be fastened from below under the table top so that they are not visible from the outside.
Which plywood to choose?
Do-it-yourself plywood table does not have to be fixed to the wall. You can make the most ordinary table, on one or four legs. And his size can be much larger. But in such cases you will not get off with the remnants of materials, plywood must be chosen on purpose, and the question arises, which one.
Important! Plywood is a glued veneer, and the number of layers is always odd, and most often it is divided by 3.
This material has enough advantages, and the main ones are strength and abrasion resistance. They are due to the location of the fibers. For the manufacture of plywood are used:
- Birch;
- conifers of trees.
Important! There are also types when the veneer is made of birch, and the inner layers are made of conifers... These are fairly cheap varieties. There is also a material made entirely from deciduous trees, but it is more expensive.
On the price tags in the store, you may find some not entirely clear designations:
- brand;
- grade;
- grinding.
Brand
The brand designates such qualities of plywood as:
- moisture resistance;
- application area.
You can find such designations:
Here's what to remember here:
- FK means that urea resin glue was used, this brand is used for furniture and internal works in the premises.
- For outdoor work, FSF is used - it is a moisture-resistant material, but it contains formaldehydes; this option is not suitable for furniture.
- Melamine resins are used for FKM plywood, which makes it possible to use the material for all works.
- FBA means that plywood is not resistant to moisture, it can be used for living room furniture, but it is not suitable for kitchen and bathroom.
- An excellent option is FOF. Plywood covered protective film... It is expensive, but of high quality; moreover, the film can be colored.

Variety
This indicator is determined by the appearance of the surface. It is designated by the letter E - this is the highest quality. This is followed by decreasing coefficients, they are denoted by Roman numerals from I to IV or ordinary Arabic. In this case, the same sheet can be of two varieties - separately for the face and the wrong side.
Grinding
Unpolished material is designated as NSh. There may be other options:
- Ш1 - one side is sanded;
- Ш2 - the sheet is sanded on both sides.
Important! On some sheets, you can also see the letter F with different indices - this is how the amount of formaldehyde is indicated.
Some basic principles of working with plywood
Before making a plywood table with your own hands, as well as any other furniture, try to master the basic principles of working with this material. This applies to tools. Better to use a jigsaw, and for some especially fine work- manual jigsaw. Any of them allows you to make high-quality cuts, and not necessarily straight. Sawing with a jigsaw is a separate genre, a manual jigsaw allows you to cut bizarre lines that require high precision, and an electric one speeds up the process where extreme precision is not needed.
Important! Pay attention to the files. The smaller their teeth, the more accurate the cut will be.
Fasteners
DIY plywood table, as well as a cabinet, stool or hanging shelves, you need to fasten only with special self-tapping screws. They are designed for fastening wooden parts and adhere perfectly even to chipboard, not to mention plywood and solid wood.
To work with self-tapping screws, you will need a drill - hand or electric, and a set of drills.
Important! A hole is made for the screws in advance, and it should be slightly less than the diameter of the fasteners - by about 2 mm.
Diy plywood dining table
Now you know how to choose plywood, how to work with it, and even tried making a small table. You can move on to further achievements. For example, make a plywood dining table with your own hands. It will not be much more difficult than a magazine one, if you choose the right materials, and you are already familiar with the process:
- As with making a do-it-yourself coffee table, sketch and draw patterns for the legs and countertops.
- The templates can be handed over to the printing house to be printed on a special self-adhesive film - then they can be glued directly onto the plywood and cut according to them.
- Prepare the plywood - if it is too thin, glue 2-3 sheets together, the table should not bend.
- Grind cuts and surfaces if necessary.
- On the underside of the tabletop, mark the places for the holes for the legs.
- Drill them out, but not through them.
- Manual milling machine grind the tops of the legs so that they fit into the prepared grooves.
- Glue the legs.
- Place the table the way it will stand.
- Align the legs.
![]()
Plywood round table
How to make a plywood table with your own hands if you prefer a round or oval shape? Yes, just like any other. You just need a template for the table top. If you need a small coffee table, you can use a round cover. Only it must be washed very well.
Important! There are options when the cover becomes part of the table - the tabletop is attached directly to it, so that not only a table is obtained, but also a cavity for various little things. But you can also make a tabletop with legs.
So, circle the tire over the plywood:
- Cut off the countertop.
- Sand it.
- Flip upside down.
- Mark the place for the leg.
- Drill it out.
Leg
The leg of such a small table is a wooden round stick on a cross - this is the simplest option. You can make a table on four legs, but you need to position them correctly:
- Lay the worktop blank face side way down.
- Find the center (this must be done very accurately).
- Draw 2 diameters at 90 ° to each other.
- Drill holes for the legs on these diameters, stepping back 5-10 cm from the edge.
- Glue the legs or secure with corners.
DIY plywood children's table
If you have already tried to make a dining table or coffee table out of plywood, children's furniture will not be a problem for you. The main thing here is to make the table in size, and so that the product is durable and safe. Therefore, we make it on the frame.
You will need:
- a piece of thick plywood for the countertop (can be glued from several sheets);
- strips of plywood for the frame and legs;
- carpentry tools;
- fasteners.
The order of work will be as follows:
- Cut out the blanks for the legs - according to the templates, if necessary, glue the legs from several layers.
- Prepare the countertop (glue from several layers, sand).
- Cut out strips for the frame - their width is 10-15 cm, the length is 10 cm shorter than the sides of the tabletop.
Start the assembly with the frame that is placed under the countertop:
- Check how straight the corners are.
- Secure the sides of the frame with furniture corners.
- Screw the legs in the corners so that their upper parts are inside the frame.
- The worktop can be glued or fixed with self-tapping screws.
- Be sure to bevel the corners.
- Cover the countertop with edging tape.
- The legs can be connected with crossbars at the bottom for greater stability of the entire structure.
How to finish the table?
It depends on what it is intended for, what technology you used to assemble it and what kind of furniture you already have. The only thing you shouldn't do is paint. But there are many other options:
- varnish;
In a word, making a table from plywood is a process that is accessible even to a novice master. The most important thing in this story is to find suitable materials and buy good tools... Try it, and maybe you will get a real masterpiece worthy of a palace, because even the most famous masters started somewhere.
Furniture defines the character of the room and sets the mood. A plywood table can become an interesting accent in the living room, study, dining area. The Dekorin design team has prepared a special selection of photographs for you. See how unusual and original tables are. Hopefully this article will help you look at plywood furniture from a new angle.
Why can a plywood table compete with other materials?
Plywood is thin sheets of wood that are glued together under pressure. In terms of strength, this material is not inferior to solid wood, chipboard and MDF. At the same time, plywood tables are environmentally friendly and safe for health. But evaluate the aesthetic component yourself from the photo. How do you like that option? Agree, they look stylish.


A plywood table can be of the most bizarre shape. Like this, for example, as in this photo.


Models with straight, clear lines will perfectly fit into interiors with minimalist design. Intricate curves will suit country and modern styles.


But to fully reveal its essence, a single piece of furniture can only in a specific room. That is why, when choosing a creative plywood table, you need to take into account the design of the room, its functional load, and the color scheme.


Plywood table in interior design: interesting ideas
The industrial design dining area is complemented by a matching style kitchen table from plywood. Simplicity and conciseness of forms, as well as ease of use are the main advantages of this choice. If you want, you can add a little expression. If the surface of the table is tinted with special oil, then the tabletop will only benefit from this.


Folding tables are very convenient. Such models allow an economical approach to the organization of a limited living space. If necessary, it can be folded into a coffee table or console table. This will free up additional square footage.


The heart of any study is its desk. Take a look at the models made from laminated plywood. You can even make it yourself if you want. You will need a sheet of plywood, a few bolts, and some interesting metal legs. A little patience and voila! Of particular charm such a product will give a striped open side cut of the tabletop.


And this is how you can arrange a work corner. This table will not only decorate a small office, but will also allow you to keep everything you need close at hand.

For spacious loft-style rooms, you can pick up tables with a "rebellious" character: intricate rough legs, massive table top, contrasting colors. How do you like this design table plywood?

The table looks interesting, the legs of which create a graphic pattern on the laminated surface of the table top. It can be used both as a dining room and as a computer desk.


How about a plywood deer table? This model easily replaces the shelves. And it will also give the living room or study the ease and comfort of home.

A beautiful plywood coffee table is a nice addition to a stylish design
A coffee table is a detail that can surprisingly combine disparate interior elements into a single composition. Plywood pieces of furniture show themselves from a completely unexpected side. For example, how do you like such a table. Both simple and effective.
Besides decorative functions, the coffee table also provides comfort. You can put a cup of tea on it, leave your keys in a conspicuous place. It is also convenient to re-read the latest press. If you like, the table can only be used for aesthetic purposes. For example, center a vase of flowers.


What height to choose a coffee table - decide for yourself. It all depends on the style of the room: low or medium height, round or rectangular, and maybe an irregular geometric shape.
Bent plywood tables are the best choice for futuristic interiors. Intricate, whimsical design lines that seem to contradict the laws of physics can change the way you perceive space.


Plywood desktop: what is design or functionality?
When registering working area pay attention to these table models. Plywood perfectly combines practicality with aesthetics. Choosing a similar piece of furniture - you will not regret it.
It is important for a desk that it is comfortable in height. This way you will not get tired quickly during work. When choosing a color, it is better to stay on restrained colors. Too bright shades, although they look stylish, can create additional stress on the eyes.
For rooms with limited area you can consider options for folding computer tables from plywood.


Cute plywood table for the nursery
Children grow up quickly and try to imitate adults in everything. To develop perseverance and acquire the first drawing and sculpting skills, the baby will need a small table. The plywood models are not only safe for installation in the children's room, but also have an attractive design.
In terms of shape, it is better to choose a model with a round table top or with rounded corners. This will help prevent injury. The color of the table can be very diverse. The main thing is that he attracts the attention of a fidget.


