DIY wooden ladder step by step instructions. How to make a wooden staircase with your own hands
Making interfloor stairs for cottages is not an easy task. To do this, you need to know many nuances of construction, have experience in this area, therefore, if possible, it is recommended to contact a company specializing in this issue... If you want to make an interfloor staircase yourself, then first you need to study the current information, get acquainted with beautiful examples already finished projects, plan your own structure and create it.


Types and elements of structures
As you know, a staircase is used to move from one tier of a building to another. There are stairs that allow you to get from the street to the house, and there are those that are designed to go from the first floor to the second or from the second to the third. As a rule, interfloor stairs inside private houses are found only if the house is a cottage or a mansion, but this is not necessary. For example, a staircase can lead to the attic. In this case, it will also be considered interfloor.
The staircase consists of many elements. Depending on which of the types of stairs is chosen, their set also differs. For example, for a traditional wooden staircase, you can additionally use a radius riser, both convex and concave, a spacer sleeve or a ball that serves as an ornament for the railing, and for a minimalistic one, where the steps seem to float in the air, you can do with only running steps. However, there is a certain set of elements, which is tacitly considered the main one, available in almost every staircase construction.


Bowstring
The bowstring is the main structural detail of the staircase. It is on its basis that everything else is built. The bowstring is called bearing element, it bears all the load that the ladder takes on. The bowstring has recesses for the steps. As a rule, a ladder has two bowstrings, however, this is not always the case. The exceptions are often options when the staircase is adjacent to the wall on one side.


The bowstring can be made from various materials: wood, metal, plastic. And also there are composite and bent-glued elements. V last years professionals came to the conclusion that it is still not worth using bowstrings, since the design has many drawbacks, the main one of which is that it does not withstand heavy loads.
And also even experienced master it is difficult to design a staircase on large bowstrings, since all their proportions must be as accurate as possible.


Kosour
A stringer is called one of the varieties of a bowstring. In this case, only one is made, and it accounts for the entire bearing load. Kosour can be located not only on the side of the stairs, but also in the middle, which is more preferable. It serves as a support for steps and risers, as well as other important parts of the staircase. When designing a kosour, it is important to preserve its shape: there must be protrusions under the steps, while the parallel edge can either repeat the stepped protrusions, or be continuous.
The choice of this or that material depends on the material or the preferred stylistic solution.
Remarkably, the kosour has two attachment systems: with filly and "comb". The "comb" is the notorious stepped design, while the filly stringer is usually attached in the middle and has support platforms on each ledge. These wide platforms allow the steps to be better fixed.


Steps
The steps are what the foot rests on when entering the stairs. They can consist of a tread and a riser.
- Tread Is a horizontal surface on which the leg rests directly.
- Riser supports the tread, strengthening the structure, at the same time closing the space that is under it. And also the riser does not allow the foot to "slip" between the steps, if a careless step was made.


The design of the staircase can be performed without a riser, but in this case it should be borne in mind that the tread will take on all the load. So, the ladder will not be as reliable. Similar architectural solutions are designed for situations where it is not planned to move extra heavy loads up the stairs. In some cases, according to the architect's idea, the staircase is made only of steps, as in this figure.
In this case, the role of the kosour is played by the wall, or the kosour is simply mounted into the wall, further strengthening the structure.


Railings
Railings are by no means an indispensable attribute of stairs, however, their presence is highly desirable, especially if elderly people or children live in the house. The handrails have a protective function, preventing them from falling sideways from the stairs, as well as for support during the ascent or descent. The railing consists of handrails and balusters. Handrails are horizontal elements that can be directly supported. Balusters are vertical tables to which handrails are attached.
In some cases, the railings are made in the form of a solid piece, handrails alone or with balusters, which are attached not to the stairs, but to the ceiling. All these innovations are made at the request of the customer or interior designer. If the railing is made on a staircase with several flights, then the balusters in some cases can also be supporting pillars. Thus, they support not only the handrails, but also the bowstring and steps, as a result of which the load on them increases many times over.


Choice of design
Despite the many different options for interfloor stairs, there are not many constructive types. There are only two of them: screw and sustainer. The first ones are chosen when there is very little space for the stairs and you need to use it rationally. In the second case, the staircase can be impressive, straight, located in the middle of a large hall. However, there is a second option - to arrange marching staircase along the wall, while the wall will play the role of one of the bowstrings.
Obviously, the choice of this or that design depends on the space allocated for the stairs, but there is another important component - this is the general architectural idea. For example, in a minimalist loft style, a modest spiral metal staircase, rather than a pompous marching staircase, will look much better, while in a classic interior such a large-sized structure is simply necessary.
Thus, you need to rely not only on the possibilities, but also on the compatibility of the chosen option with the environment.


Screw
Small spiral staircases are familiar to everyone. They represent a single support post, to which the steps are attached in a spiral manner. The most important quality of such options is the small area consumption. So, for a spiral staircase you need only 1 sq. m. At the same time, they look quite interesting and are able to become bright accent the entire interior.
On the other hand, these ladders are extremely inconvenient, especially if the vestibular apparatus is not very well developed. The tread width remains very small, which greatly increases the risk of injury if you stumble when descending or ascending. It will be extremely difficult for elderly people to climb such a ladder, therefore, if the option is chosen only for the sake of style, it is better to refuse it.
It is good to arrange spiral staircases in specially designated bay window niches, providing them with railings along the entire length. Then the risk of injury will be minimized, and the convenience will increase many times over. And also it is necessary to do the illumination of the steps so as not to stumble.


Marching
Marching stairs are an example of pomp, an indicator of wealth. They require a lot of space, while remaining the most convenient today. Depending on the material, such options can be both pretentious and modest, homely, traditional. And also a lot depends on the existing elements: if all of them are available, then such a staircase is more classical. The exclusion of some details indicates a modernized model.
Marching stairs are available in several versions: straight, swivel and curved. Each of them is beautiful and complex in its own way. The shape depends not only on the direction of the bowstrings or kosour, but also on the shape of the degrees themselves. It is safe to say that various variations of flight stairs allow you to choose the right shape for any style direction of the interior. In some cases, it becomes possible to save significant space by eliminating some of the elements.
It is worth paying special attention to ensuring that this measure is truly justified, since in the case of refusal of one part, the load on all the others increases significantly.


Direct
Straight flight stairs do not imply bends or kinks along their entire length. The classic large staircases in the halls of two-story pompous buildings can serve as a clear illustration. Straight ladders take up the most space and are the most comfortable of all. Marching or flights of stairs, except for the base and the top, are not provided. To make a straight flight staircase look appropriate, you need to take care of the environment.


Placing such a staircase in the middle of the hall, it must be remembered that the style should be traditional. The back-to-wall arrangement will fit into almost any style, however, it looks most interesting in the modern avant-garde, if you add color accents at the same time.
Simplified structures with a minimum of visible support elements look interesting.


Swivel
The production of rotary flight stairs allows you to save space allocated for the construction of a staircase. This implies the presence of at least one intermediate march - at the place of the break. It is customary to place the so-called turns at the corner of the wall when it comes to wall-to-wall placement, or at the required height when placed between two walls. An example can be seen in the entrances of multi-apartment storey buildings. Swivel flight ladders are more difficult to manufacture, but much more convenient to operate. They do not take up so much space, while it becomes possible to rationally use the space near the wall, which often remains unused.


Due to these qualities, it is the rotary marching structures that are the most common option. When registering interfloor stairs for a cottage, the main task is to "domesticate" such a capricious object. An involuntary association with high-rise buildings can kill all the comfort in the house. For this to work, pay special attention to the selection of materials suitable for these purposes.
You should try to abandon concrete, as well as too sharp corners. An example of a "government" building can be seen in the image below.


Curvilinear
Curved flight stairs can also be called radial due to their curved shape. If in the case of the rotary variants it was a question of ninety-degree corners, then here the bends should be smooth, soft, unobtrusive. However, exceptions are possible when the bending is strong, but the screw structure is not yet discussed. Since rounded bends of walls can be found quite rarely, it cannot be concluded that radius stairs are made only in these cases. Much more often you can find cases when the staircase is rounded due to the fact that it expands downward.


Curved designs are not as compact as screw designs, although they can also save a lot of space. They look interesting in modern styles, but with a touch of classics, such as fusion. Sometimes rotary stairs are made in order to emphasize the unusual shape of the niche, which was reserved for the structure. Then it is advisable to make a radial staircase of almost the same scope as the niche itself.


Materials (edit)
Interfloor cottage stairs are not built from this a large number materials, as it might seem at first glance. Previously, the spread of raw materials was much greater, and even now, with a proper budget, the choice is practically unlimited. However, zealous owners have long abandoned the abundance of materials that can be easily replaced with cheaper counterparts. For example, marble staircases are now almost never found in private houses, but there is a cheaper equivalent, which is easy to give a marble look - this is concrete.
Undoubtedly, natural raw materials are still held in high esteem. Many are not stopped even by the rather high cost and difficulty in work. Materials from which you can build a staircase yourself deserve special attention, especially if you do not want to spend a lot of effort, money and time. For special details, you can contact the blacksmith shop or professionals, while the work on processing the rest of the elements falls entirely on the shoulders of the owner.


Wood
The tree has not given up its positions for many centuries. The best analogs in terms of durability, ease of use, durability have not yet been invented. Wood allows you to create a special atmosphere in the house, while even the most primitive staircase structure will look dignified. In this regard, many home-grown and professional craftsmen choose it. It is worth noting that the cost of wood can fluctuate.
Of course, it is best to choose the most expensive solid wood for the stairs, which is properly processed. However, some claim that a good, durable ladder can also be built from pressed sawdust if you choose MDF plate sufficient thickness. In any case, you cannot leave a wooden staircase unprocessed.


Painting, etching or varnishing will be required, which will lead to additional financial and labor costs. This fact should certainly be taken into account.
Concrete
Concrete stairs are mostly associated with the interfloor space in the entrances, but in vain. Current technologies make it possible to make practically any structures out of concrete, both in complexity and in appearance... The material can be given any look, while it will not differ at all from the original in the eyes of an inexperienced viewer. Until a certain time, a big problem when working with concrete was its impressive weight, however, in recent years, the substance has been significantly "lightened", and now a concrete staircase can weigh no more than a metal one. At the same time, the strength qualities did not suffer at all.
Some types of concrete can withstand constant contact with water, and the water will not cause any damage to them. The challenge is to give the concrete elements the required shape. As experience shows, it is still best to contact a specialized agency for a concrete staircase, abandoning attempts to make such a construct on your own. It is not a fact that the resulting product will be of proper quality, but a lot of money and time will be lost.


Metal
Metal stairs themselves are not so common. More often, bearing and supporting elements or railings are made of metal. Metal structures may be appropriate only in some stylistic concepts, in many cases they will look too pretentious and futuristic, which is not always a plus. It is quite possible to work with metal, especially if you know the basics of welding and forging. These works must be performed without fail, especially when it comes to intricate openwork designs.
Metal is a relatively malleable material, but not all types of metal are suitable for building stairs. For example, it is better to refuse aluminum, while steel and cast iron are ideal. For many, weight is a big question. finished structure... Indeed, if the staircase is made only of metal, it will have an impressive mass, therefore, it is necessary to strengthen the foundation and floors in advance in those places where it is planned to be installed.


Design and calculation
Before proceeding with the construction of any structure, you must first carefully plan everything, starting from the location and ending with the amount of materials. It is necessary to approach this step as responsibly as possible, since the success of the entire enterprise largely depends on preparation. The optimum values will be given as an example, however, taking your own measurements is an important step. First, you need to draw up a drawing, which will clearly reflect all the basic information. To do this, you need to make simple calculations using the step-by-step instructions below.


Based on these parameters, you can later calculate the amount of materials required and approximately calculate how long it will take for construction, whether it is possible to cope with it alone, or you will have to resort to the help of a partner.
Number and height of steps
First of all, the height and number of steps are calculated. However, before proceeding directly to these calculations, you need to know the height of the stairs itself... This is done very simply: you just need to determine by measurements the height from the floor of the first floor to the floor of the second floor. You can make it easier: take the height of the walls on the ground floor and add to this value the thickness of the overlap between the floors. For example, the height of the walls is 3.1 m, the thickness of the floor is 40 cm.Then the height of the stairs will be 3.1 + 0.4 = 3.5 m.
Riser height is standard and can fluctuate within 15.2-19.7 cm. It is not recommended to make steps higher or lower, as they are uncomfortable when lifting. You should choose any value within the specified limits, for example, take 18 cm. To calculate the number of steps, you need to divide the height of the stairs by the height of the riser: 350/18 = 19.44 cm. It is better to round up: the number of steps will be equal to 20. For simple recalculations, it turns out that the height of the riser will be 17.5 cm: 350 (the height of the stairs) / 20 (the number of steps).

Step width
The width of the step should be between 22-40 cm. To calculate the width that is suitable for a particular case, there is a formula: the double height of the riser in total with the width of the step gives 64 cm. According to the second formula, the height of the riser, summed up with the width of the step, gives 47 cm. It is worth taking a look at how formulas work.
- 64 - 17.5 (riser width) = 46.5 cm. In this case, the width turned out to be too large.
- 47 - 17.5 = 32.5 cm. The step width is within optimal limits, so you can take this value as a reference. Should be rounded to 33 cm.

As practice shows, a suitable value will be obtained only according to one of the formulas, so you should not be lazy to calculate using both the first and second formulas.
March width
The minimum staircase width is 80 cm, however, it is not rigidly recorded anywhere. More emphasis is placed not on the fact that it is necessary to make marches of a certain size, but on their number. It depends on the location of the ladder and is determined locally. It is worth taking note of the definition used by professionals. They choose a march with a width that can be divided without a remainder by the width of the step. In our case, the following values are suitable: 66 cm (33x2), 99 cm (33x3), 132 cm (33x4) and so on.

Ladder length
The length of the ladder is easy to determine. To do this, you need two previously derived values: the number of steps and the step width. It is necessary to multiply them: 33x20 = 660 cm. The staircase turns out to be very long, so you need to consider options for a rotary or curved staircase. Few houses can accommodate a staircase almost 6.5 m long. The length of the spiral staircase will need to be calculated using special programs.


Clearance height
This refers to the distance from the ceiling to the steps. This parameter determines the exact size of the hole in the floor of the second floor, to which the staircase adjoins. It should be remembered that the gap between the ceiling and the staircase should be at least 180 cm, ideally 200 cm. The place under the opening should be marked where this distance between the ceiling and the step becomes smaller.


Stringer length
To calculate the length of the stringer, you will need to use the Pythagorean theorem: add the length of the staircase in the square to the height of the staircase in the square and display Square root... In our example, we get 660² + 350² = 435600 + 122500 = 558100; √558200 = 747.06 cm. Let's take it with a margin, rounded up to 750 cm. As you can see, the calculation scheme is quite simple. You can do without all sorts of professional values such as the angle of inclination, simply calculating all the necessary indicators, using school knowledge of mathematics. At the same time, the slope of the stairs will turn out to be comfortable, so there will be no need to bend over or be afraid to fall due to the fact that the stairs are too steep.
Without observing the rules and without making safety calculations, the staircase with your own hands will be built, at least unsuccessfully, and will require global alterations and expensive modifications. To exclude unsuccessful attempts, it is better to do everything initially, focusing on building codes.
The simplest solution will be modular - they only need to be assembled from complete parts, strictly following the manufacturer's instructions. Ready-made kits are supplied for the assembly of cruise and screw versions, equipped with a full set of fasteners and structural components.
Screw modular staircase assembled according to the principle of a children's designer of their fully prepared components for installation
Material selection arguments
For the construction of a welded staircase made of metal, the skills of a welder and an inverter apparatus are required. You can learn the basics of welding on your own, but for the construction of a presentable structure, the initial course is not enough. Fill concrete structure often predetermine the operating conditions. Concrete steps are used to equip two, three-story mansions made of bricks, foam blocks, gas silicate panels. In addition, a cold concrete system will still have to be sheathed with wood or veneered with another material. As a result, it turns out that you have to do double work.

Construction concrete stairs with wood cladding in terms of financial and labor costs is equivalent to the manufacture of two separate structures
Attention. In two-three-storey cottages according to the requirements fire safety it is necessary to install concrete or metal staircases to guarantee evacuation from the upper floors in case of fire.
Those who need a staircase to the attic should prefer wood. The material is lightweight, easy to process, will not push through the overlap.
Advice. For the arrangement of new low-rise wooden buildings, stepped systems made of wood are recommended due to shrinkage. It is difficult to predict how much the ceiling height will decrease, and what the difference will be between concrete or metal ladder and overlap.
Probable manufacturing errors wooden structure, it will be easier to fix.
The most simple design
For those who want to make a staircase on their own, no one will advise starting with a complex screw type. If the limited dimensions of the room do not allow you to choose a simple, gently sloping option, it is better to purchase ready-made kit modules or contact the builders.
A gentle "means of interfloor communication" will take up a lot of space, but the ascent and especially the descent along it will be the most comfortable. It is optimal that the angle of inclination does not exceed 37º. An inclination of 45º automatically converts the structure to the category of attachments. You will need to go down it with your back forward. The 40º steepness is also not very comfortable for descending.

A sloping staircase with an angle of inclination of no more than 37 degrees is the most comfortable
If there is a question about building on an area limited in size, preference should be given to a two-marching structure with staircase or with winders.
Attention. Between the straight flights directed towards each other, the distance should be at least 100 mm.

Between the marches going "towards" each other, it is necessary to leave a distance
The steps can be based on the supporting beams-stringers, can be attached to the wall with bolts-bolts, attached to two side bowstrings. Consider an example of construction with stringers.
We construct a ladder with our own hands
Regardless of the presence or absence of experience, any master should start with calculations and design. The project focuses on safety and creation better conditions for moving.
Design and project requirements
- The structure must support a load exceeding the average weight of a person.
- It must be equipped with fences, the location of which must be taken into account at the stage of project creation.
- Fences are equipped with handrails and balusters, the distance between the balusters standing next to it should be less than the size of the child's head.
Note. To protect the stairs in order to prevent situations that threaten users, it is possible not with balusters, but with a continuous "canvas" of plexiglass or mesh, if there are small children in the house.
- The height of the structure is calculated according to the finished floors of both floors or according to their estimated elevations.

- According to standards, the sum of the tread width and the corresponding riser height must exceed 50 cm (slight deviations are possible). Recommended height in the range of 14-17 cm, tread width 25-32 cm for full support of the foot.
- The height of the passage is 1.9-2.0 m. The size depends on the height of the users, it is calculated taking into account the height of the tallest family member + 5 cm.
- Comfortable width internal staircase consider the distance between the wall and the handrail or between two handrails 0.90 - 1.00 m.

The principle of calculating the steps is based on a simple formula
Design is the most critical stage. Mistakes made in the process will turn construction into a waste of time, effort and money. Projects are carried out by analogy, regardless of the selected material, and the rules and calculations are identical.
We will prepare the necessary material
We finally decided that we were building a ladder from lumber. For the manufacture of stringers, a pine board with a width of 40 mm is suitable. Risers, which you can refuse to install, can also be made from conifers... It is optimal if the treads are made of hard wood.
Advice. It is better to buy ready-made steps from glued wood, created like glued laminated timber from bars with different directions fibers. They will not deform, dry out, crack.
Let's make the kosoura correctly
According to the projected dimensions of the step, we will draw a pattern. Then we will apply the markings on the boards and use a jigsaw to cut peculiar teeth on it. Those who wanted to know how to build a staircase with their own hands without mistakes and alterations, probably guessed that all elements must be symmetrical. This means that the first sawn beam with teeth will serve as a template for making the second, and if the width of the stairs is 1.20 or 1.50 m, then the third.

You need to start with the manufacture of stringers, for the production of which you need a template with exact dimensions steps, after which teeth are cut out in the beam for setting the steps
Installation of step elements
We fasten the steps and risers to the stringers with nails and self-tapping screws. A craftsman who decides not to use ready-made factory components will also need to cut out these elements according to patterns made especially for them.

The tread can be composed of two planks
A structure is considered more reliable, on the supporting beams of which simple triangular or more complex fillets are first installed. For their installation and fastening, dowels and pre-made grooves will be required.

Diagram: how to make a ladder with more reliable curly wooden filly
Install balusters and railings
To install each baluster, we will use an anchor or hairpin. First, according to the markings, we "stick" a hairpin on the glue with its end, which will then penetrate into the kosour through the tread, then we will twist it and screw the baluster onto the free end. In the same way, fence posts are installed, between which balusters are placed. At the end, the posts and balusters are equipped with handrails.

Installation of fencing elements
Video information: common mistakes
Before starting work, you should watch videos with a list and description of common mistakes.
The process of building stairs with your own hands cannot be classified as the simplest, but it is also not a super-difficult task. The main snag in competent design. And then pedantry and accuracy should lead the performer, and everything will certainly work out.
Hello everybody!
How to get to an object that is at a height unattainable for you? How to collect fruits from the very top of a tree or paint at home? Such questions, most likely, have visited you more than once, it was for these purposes that a special device was invented, which is called the Stepladder.
Stepladders are, perhaps, the most popular and necessary ladders; they are used in everyday life and in other areas of activity.
This article will describe a method for making a ladder, with detailed photo report.
To make a staircase, we need:
Materials:
Two beams 60 * 40 mm;
- timber 50 * 35 mm;
- self-tapping screws;
- dye.
Tool:
A hacksaw for wood, or another available cutting tool;
- Sander;
- drill;
- hammer;
- axe;
- mount.

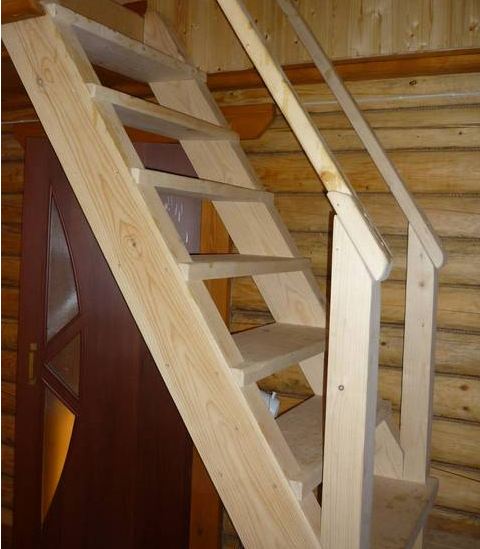
Let's start with the fact that we take two vertical bowstrings with a bar section of 60 * 40 mm, we take its length at our discretion, in this case the length was 3.6 m.

In order to make the staircase strong and the upper edge of the steps was horizontal when tilted, we make special notches, we apply markings in those places where we plan to install the steps, the distance between the rungs is 30 cm. we make markings, we apply it on both sides of the bowstring. Next, mark the depth of the notch - 15-20 mm. We connect the resulting marks with an oblique line, as shown in the photo.

Then, using a sharp ax and a hammer, we remove part of the wood at an angle, but before that with a hacksaw, you need to make a depression along the marked line, this so that the bar does not split in an unnecessary place for us.

We use the ax as a plane, leveling the angle of the notch.

In a similar way, we make notches on both bowstrings.

Next, using a grinder, we process the surface of the bar.

We need to carefully align the notches we made.

Now we paint with paint inner part notches. We put them aside until they dry completely.

Next, we take a bar with a cross section of 50 * 35 mm for steps, it needs to be slightly modified. We take a plane and with it we remove a chamfer. We do the same operation on each bar.

Then you need to make one of the sides of the bars the base one, for this we take an angular ruler and use a pencil to mark up.

When everything is ready, with the help cutting tool saw off all uneven edges, after that we process the surface grinder, smooth the ends.

Now you can proceed to the manufacture of the upper and lower rungs of the stairs. In order to distinguish the top and bottom of the stairs, it must be done with a slight taper. The top should be shorter than the bottom. We take the width of the stairs 65 cm from the bottom and 55 - from the top. You can take other sizes at your discretion. Use a tape measure to mark the length.

Using a square, we apply the markings in the place where the future step will be cut.

We start cutting.

When the steps are ready, we process the ends with a grinder.

Further, at the edges of the bar we find the center, for this you need to step back from each of the edges by half the thickness of the bowstring (20 mm).

Then on the marked centers we make holes for self-tapping screws. The self-tapping screw must pass freely through this hole.

We make a countersink using a drill larger diameter.

Now set up the top and bottom rails by placing and aligning them in the notch. We make the ends of the steps flush with the side parts of the bowstrings. After that, through the existing holes in the steps, we make a mark of the place where it will be necessary to drill a hole. They are needed so that the self-tapping screws do not split the wood when twisting. The holes were made with a drill 0.2-0.3 less than the thickness of the screws.


Now you can fix the step in its place, but before that the pressure side of the crossbar should be painted.


When the stairs are given the required dimensions, we add the missing steps, for this we lay out the prepared bars in the notches, setting the base ends flush with the side parts of the bowstrings.
In any building with a height more than a floor, a staircase is installed. Such a design requires a detailed calculation of all its components, the ability to work with locksmith and carpentry tools, and some design skills. After studying this manual, you will learn how to design and manufacture a wooden staircase with your own hands.
A wooden staircase for a private house most often consists of one or more flights (flights), which are located between floors or intermediate platforms.
Design flight of stairs is a combination of various components with different functional purposes:
- Kosour. It is a load-bearing timber beam with a sawn comb. Risers with steps are fixed to it, so the part must be strong.
- Bowstring. In some cases, it becomes an alternative to kosour, performing load-bearing functions (especially if one side of the structure is adjacent to the wall). Before installing the bowstring, you need to mark it out in detail so that the steps are at a horizontal level.

- Step. The main element of any ladder that is attached to one of the load-bearing beams... In addition to the usual ones, there are run-in and radius steps. Winders have a non-standard shape and are mounted at the starting point of the march. Radius steps are characterized by a curved front edge; they can be semicircular, wavy or with rounded corners.
- Riser. The part is optional, but it provides the ladder with high strength by keeping the tread centered. A spacer sleeve is used to fix the riser. Under semicircular steps the radius type is installed, and the curved version is mounted under the corresponding steps or under the platform between the flights of stairs.
- Support posts. They are placed at the starting and ending points of the stairs, as well as at the edges of intermarch sites. Elements increase the strength of the fence and serve as a support for the handrails.
- Balusters. These are supporting posts for handrails, from which the side rails are formed, can have different configurations.
- Handrails. They are an obligatory part. They rest on balusters and support posts. The main requirement for the element is a smooth surface.
- Spacer sleeve. Such a stand is required for any design with several flights (even when using stringers).
When choosing a staircase structure, the main factor is the size of the area required for its construction. In second place is the convenience and comfort of ascent and descent. Here you need to take into account the frequency of use, the presence of children and the elderly in the house.

Aesthetics is also an important criterion. The staircase should match the interior of the room. In addition, you need to take into account the material possibilities: the manufacture of wooden stairs with a complex configuration requires a lot of time and money than options that are simpler in form and execution.
Marching
They are the most popular. They got their name thanks to the marches (flights) - a group of combined steps. The stairs can have one or more flights.
Allocate straight structures (one-march and two-march, with a recreation area). They can be free-standing or placed against a wall. But straight models require a lot of space, so in order to save usable space, two-march options are provided with a turn at an angle of 90 to 180 degrees.
The march has a curved shape with an optimal ascent angle, then rotary steps are used, which are also available in structures with two and three flights without platforms.
The most popular types of wooden stairs for a country house are:
- Ordinary one-march. They have a simple design with a span in the center of the room or near the wall - the most durable with reliable support.

- Curvilinear one-march. Installed in large rooms to emphasize spaciousness. They are distinguished by a smooth turn and steps extended from the outside.

- Marching with lower turning steps. Sometimes this option is provided by the layout of the room, it can support the chosen architectural style.

- Simple 2-march system. A staircase with two flights and with an interfloor turning platform can be mounted above the door and save space.

- 2 marching L-shaped structure. It is located in a rectangular opening along the perpendicular walls and saves space.

- 2-marching U-shaped staircase with an upper platform and turning steps. The structure is being installed in luxurious mansions with a large hall.

- 3-march system with two platforms. This type of staircase saves space, but requires a significant ceiling height.

To select a specific configuration, you should correctly calculate and measure the free area for installation, draw up a drawing. Detailed guide how to do this will be below.
Screw
Screw-type structures are used less often, as a rule, with a limited area or for aesthetic reasons of the owner of a private house. They are not as convenient as marching ones; it is difficult to transport furniture along them. To install a ladder, you will need to perform complex calculations, since with a small error, it may lose its functional capabilities.

Spiral staircases sometimes perform just a decorative function, especially with a fencing made of artistic forging. The device of such options is possible in almost any room, because they borrow less space than rotated designs. The following types are distinguished:
- with cantilever pinching of steps on the inner post;
- with the support of steps on the inner pillar and perimeter walls;
- with cantilever support of the steps to the casing;
- supported by a fence and bent bowstrings.
 Spiral staircases save space
 Types of structures
Before making a wooden staircase, you should select the best option constructions for your premises.
The following popular design types exist:

The simplest is a straight-shaped staircase, which provides straight-line movement along the march.
Making a wooden staircase with your own hands with visual step-by-step instructions will be considered in more detail. The process includes two main stages: design and installation.
Calculations of the dimensions of the staircase
Before you start designing, you need to do accurate calculations, draw a diagram and plot all the data on it. If you are not sure of the correctness of the calculations, then it is better to entrust the work to professionals who will make a competent drawing, which will allow you to complete the installation step by step without errors.
Ladder overall height
You can determine the height by measuring the distance from the floor of the first to the second floor, taking into account the thickness of the ceiling. For example, if on the 1st floor, the ceiling height is 2700 mm, and the thickness floor slabs- 300 mm. As a result, the total height will be 3000 mm.

If there is no finished floor, then its dimensions should be laid approximately.
Number of steps
If you know the height of the stair and riser, you can determine the number of steps in the structure. To do this, you need to divide one indicator by the second. For example, with a total staircase height of 3000 mm, and a riser height of 175 mm, the calculation will be as follows: 3000: 175 = 171 mm.
After that, you need to round off the value, the result is 170 mm. The table shows an example of calculation:
 Dependence of the height of the steps on their number at a given floor height
 Riser height
On the recommendation of specialists optimal height the riser should be 150-180 mm, in fact, this is the size of a human step. This height can be 150-200 mm. Usually the average value according to the standard is 160-170 mm.
 The optimal slope range of the stairs is highlighted in green
 Step width
To avoid injuries as a result of the incorrectly selected step width, you need to calculate it correctly. Based on many years of practice, the width of the part should be in the range of 220 - 400 mm.

To determine a more accurate value, you can use a specific formula. You need to take the average width of a human step (600 - 640 mm) and subtract from it the height of the riser multiplied by 2, i.e. 640 - 2x175 = 290 mm. This indicator will be optimal for moving.
March width
According to safety rules, for the convenient movement of people, the span should be at least 80 cm wide, but it is better to take at least 90 cm.For convenient transportation of furniture, this indicator for a private residential building should be 100 - 120 cm.
Stair plan length
To calculate this parameter, you need to multiply the number of steps and the width of the tread. In our example, it will turn out to be 29x17 = 493 cm.That is, the staircase comes out quite long and when arranging one march, a room of at least 6 meters will be required. In a small log house or a village house, you will need to make 2 marches with a 90 or 180 degree turn.
Between the marches, a platform is mounted or rotary steps are placed. If you cannot perform the calculation yourself, you can use a special program presented below, which will clearly reflect the localization of the staircase parts.
Ceiling opening size
When building stairs from solid wood you need to remember about calculating the ceiling opening so that when you go up you do not have to bend over. Such an indicator will depend on the slope, which affects the convenience when moving and is selected individually.
The slope of 23-36 degrees is considered optimal, but often it is not possible to maintain the required angle due to the small area of the room (the steeper the slope, the less area it will take).
The size of the opening in the ceiling area will depend on the angle of the flight of stairs. So, for a folding structure, a small opening will be required, and for a larger slope, a more significant one (up to 2 m) will be required.
 The size of the opening in the ceiling is determined based on the minimum allowable value for a person's passage
 Stringer length
To determine the length of the stringer, the Pythagorean formula is used: (length of the stairs in the plan) ² + (height of the stairs) ² = (length of the stringer) ².

That is, with a length of 493 cm and a height of 300 cm, we get the following: L = √ (4932 + 3002) = 577 cm (the indicator is taken with a margin of 580 cm).
Online calculator for calculation
For your convenience, you can use the convenient and visual.
Material selection
After all the calculations have been completed, you need to purchase materials. This will require boards different lengths and density: for steps, the thickness is 3-4 cm; for risers - 2-2.5 cm; for a bowstring or kosour, the thickness is 5 cm, and the height is 150-250 mm. It is better to buy handrails and balusters ready-made, since for their production you will need a lathe and a beam of 10x10, 15x15 cm in size.To fix the components, you will need screws and nails, as well as metal corners for reinforcement.
Manufacturing of parts and installation of stairs
Installation technology includes the manufacture and installation of all elements of the staircase in accordance with the drawing.
Assembling bowstrings or stringers
On the prepared boards, you need to mark the length and cut off the excess. On the bar, using a square, mark the height of the sub-step and the width of the tread with a decrease of 2-4 cm.
 Marking a solid stringer
 Assembling a bowstring with stiffeners
 The recesses for the steps are cut out with a jigsaw or a saw. Next, the workpiece is placed at the installation site so that the lower edge rests against the floor, and the upper edge against the overlap. The cuts under the steps should be horizontal, without "blockages". After that, it is recommended to grind the surface of the bar, perform milling, rounding off the outer edges.
For optimal rigidity, sometimes 2, 3 or 4 stringers may be required, the number of which is selected depending on the width of the ladder. Sometimes it's easier to order a ready-made supporting frame, which will include all elements with cutouts, indicated by numbers for docking in accordance with the diagram.
Installation of steps and risers
The risers are mounted in the prepared kosour cuts, leveled and sanded. Fastening is performed using self-tapping screws, which can then be putty or closed finishing material.

 Options for attaching steps to a bowstring
 After fixing the risers, pre-milled steps are installed, the length of which should exceed the distance between the pair of extreme stringers by 1-2 cm. The width of the elements should be 2-3 cm larger than the comb ledge. The fastening of the steps to the risers and kosoura is carried out on self-tapping screws, the caps of which must be sunk into the tree.
 Fastening the stringer to the upper floor. Methods for connecting the elements of the stairs.
  Fastening the stringer to the floor
 Installation of fences
You can give the structure a complete look using auxiliary parts. For this, carved, straight, curly wooden and metal fences.

The installation of poles with balusters is considered a difficult task, where accurate marking with a fit is required. In the step, the hole for the dowel is marked at a distance from the edge equal to ½ the width of the base of the baluster. Then holes are made on the steps and dowels are glued into them (they should protrude 1-1.5 cm from the surface).

After that, holes must be made in the base of the posts and balusters along the diameter of the dowel, grease them with glue. All elements are pushed onto dowels with vertical level adjustment. Next, the handrails are prepared by cutting the edges at the desired angle and milling them from the bottom side. To dock with the supports, holes are drilled on the element cut. The handrail is installed on a dowel glued into the support post.

After the glue has dried, the stairs must be covered with an antiseptic primer, then the surface is treated with transparent or paint. You can put decorative plinth... In a spiral staircase, you can design with an axial support in the form of a log or a beam, install a bent bowstring to support the steps. The price of such a design will be high, since a viscous flexible wood but the final effect is worth it.
Detailed and simple diagram for a standard staircase to the second floor.
Are you planning to build a private house with two floors or more? We recommend that you immediately plan what the staircase will be. And we will help with this - in this material details about the types for cottages, summer cottages and private houses, design requirements. Also, with the help of diagrams and drawings, we will use an example to tell you how a staircase is calculated and built. The design is quite simple - it cannot be compared with the roof, so the owner, who has only minimal construction skills, can also make it. We will tell you how to make sure that instead of a wooden ladder, you don't get a step-ladder. Having studied the drawings and diagrams, you can make a high-quality design.
Views
Two types have been used in private homes for centuries, which we will briefly discuss:
- Marching... This option is the simplest in execution, while the design is reliable. If a beginner gets down to business, then a marching wooden staircase will be an excellent solution. Also, the design can be divided into one-march and two-march. Despite the differences between these types, they have the same manufacturing complexity.
- Screw... This work is for professionals, as it requires careful measurements and calculations. One miscalculation can ruin the entire structure, so only a master can do it with his own hands. The main advantage of this design is its compactness, because the design takes up the minimum amount of space in the house. Often, a spiral wooden staircase is the center of the composition of the interior. The only negative is a rather steep climb, which negatively affects safety.
Of course, we will disassemble the marching staircase, although we recommend that you familiarize yourself with the screw options. It is easier to carry out the marching version with your own hands, for which there are drawings.  Another disadvantage of a spiral staircase is that it will be inconvenient to transfer large items from one floor to another.
Preparation of materials and features of work
Before thinking about building with your own hands, you need to draw up or take ready-made drawings, as well as prepare tools and materials for the stairs connecting the second floor with the first.
Let's start with the materials for the construction of the structure on the second floor:
- screws;
- thick boards, which later turn into steps;
- bars - the section must be at least 40 millimeters.
It is impossible to do the work without a drawing; the image below shows in detail what needs to be measured, so that in the end it is possible to calculate the dimensions of the future structure.
It is also worth considering the following dimensions when planning a structure for the second floor from the first:
- angle of inclination of the stairs;
- width;
- the height of the entire structure;
- number of steps.
If you have skills in working with a 3D editor, then you can do detailed diagram... For example, the project will demonstrate whether a ladder will come out of a ladder. It is also recommended to study the drawings.
Blueprints
 The simplest drawing of a marching staircase to the second floor, which the owner can make with his own hands. The drawing shows a fairly large structure, but sometimes such a staircase leads to the second floor.
 Knowing the distance between floors, you can calculate the number of steps. For example, the height from floor to floor is 290 centimeters, the steps are selected at 20 cm. After simple calculations, 14.5 steps are obtained. It is necessary to round up to 14 or 15. In the first case, the height of each step should be 20.71 cm, and in the second - 19.33 cm.
In the example, integers are used - the height of the stairs to the second floor is 260 cm, each step goes by 20 cm, resulting in 13. As for the dimensions of the flight of stairs, its width should not be less than 70 centimeters. The upward slope can be anything. In the example discussed in this article, the flight of stairs is 1 meter wide.
It is also worth considering the platforms that will be below and above. The dimensions must correspond to the dimensions of the flight of stairs. The ideal shape would be a rectangle or square.  These are the most simple schemes for the manufacture of wooden stairs to the second floor. The main thing is to choose a convenient angle of inclination, so that in the end there is no stepladder.
The most reliable option is a straight staircase. The U-shaped version is suitable for private houses with a large area. A beginner is unlikely to master the L-shaped design.
Choosing an installation method
The design of the future staircase may include:
- Bowstrings... This word refers to beams that support structures on both sides.
- Kosoura... The second option is the beams that hold the steps of the stairs from below.
Mounting
When the steps, platforms and beams are ready, you can proceed to the installation of the stairs with your own hands. In the example, a variant with kosoura is considered. It is necessary to make notes in advance for the place of their installation. On the floor of the first floor, stringers are installed on a support bar. At the point where the staircase goes to the second floor, the supporting elements are placed in the gaps in the floor beam. In some cases, metal supports are used that serve the same purpose. Fastening of stringers is carried out using anchor bolts.
During the installation process, there should always be a building level at hand, you can also determine the position by the body kit so that at the end you do not get a step-ladder. The elements of the wooden structure must be perfectly level. The step panels must be fixed on top of the stringers, it is most convenient to do this with self-tapping screws. 
Are the steps ready? So you can start installing the balusters on the floor. Support posts are mounted at the top and bottom of the structure, limiting the handrails. They are also decorative and supporting elements. 
Now the installation:
- Finished balusters must be covered with handrails (railings), which are mounted on support posts. If the structure is large, then additional support in the middle of the stairs will not interfere.
- Sometimes 3-4 racks are required. In this case, you should not waste energy on balusters, since flat boards will be a more rational solution.
- After the build is complete wooden surface must be carefully sanded. You can do this with your own hands or with a power tool.
- Next comes the preparation before painting: all debris and dust are removed, it must dry completely. If necessary, putty is applied after sanding. Of course, for this job you need wood coatings.
- When preparatory work completed, you can paint wood elements. A primer is applied, and then 1-2 layers of paint. After drying, it is necessary to varnish the structure. Alternatively, you can use wood stain.
The result is a comfortable staircase, with which you can comfortably and safely climb to the second floor. If the angle is calculated correctly, there will be no stepladder.