Do-it-yourself crib for the baby. DIY children's bunk bed: drawings, diagrams, photos
From the first days I want to surround the child with the best, safe, reliable, and most importantly, such that will serve, faithfully, for many years until the baby grows up.For this, as a rule, they choose natural materials, unable to lay a "mine" of future oncological diseases, thereby protecting the child from the first days.
Parents always want their children to grow up in a healthy environment.
The crib is the first fortress of the baby. It is there that he sleeps, enjoys life, begins to learn about the world, studying everything that surrounds him.But how can you be sure that the covering and materials of the baby bed are safe? Only by making it with your own hands.

It is very important to protect the fragile body from the harmful effects of the external environment.
Smart dads who have their hands in place know perfectly well- you can be sure of something only when it has been tried and done by yourself. This is the main advantage of the product. Why is that? Let's make a little comparison.
| Factory | Homemade | ||
| Advantages | disadvantages | Advantages | disadvantages |
| Don't waste time - went, bought or ordered | Not always quality material | Do you know what is made of | Manufacturing is labor-intensive, time-consuming |
| No guarantee of structural reliability | Reliable construction - checked by myself | ||
| Coverage, not always, high quality | High-quality coating - I selected it myself | ||
| Often the surface of the product is not finished | The surface is thoroughly cleaned - after all, the child will "crawl" on it | ||

If you have certain skills, you can make a bed with your own hands.
Design and construction of a baby cot
The cosiness of the room depends on the appearance of the child's bed, how the child will like it, its convenience and rational distribution of living space.

Thus, design and construction are interrelated.
We all want something original and unusual, unusual for everyday life. But let's be realistic. Why make life difficult with the fanciful design of a child's bed in the form of a car, airplane, elephant or steamer, if they are difficult to make? In addition, if there is no specialized tool such as a thickness gauge, milling machine with CNC, band saw and another? By choosing this design, you can ruin all the wood without achieving what you want.

Let's dwell on a classic crib without frills and tricks, which, although difficult, but quite realistic to make from solid wood, do it yourself.
The best material for a baby bed is solid wood
Wood is the most preferred material, it has no contraindications, it is absolutely inert. While chipboard, fiberboard, OSB, MDF and plywood contain fillers that have a detrimental effect on the body, and also poorly tolerate mechanical stress.

Wooden furniture is always a noble, natural and cozy accent in the interior.
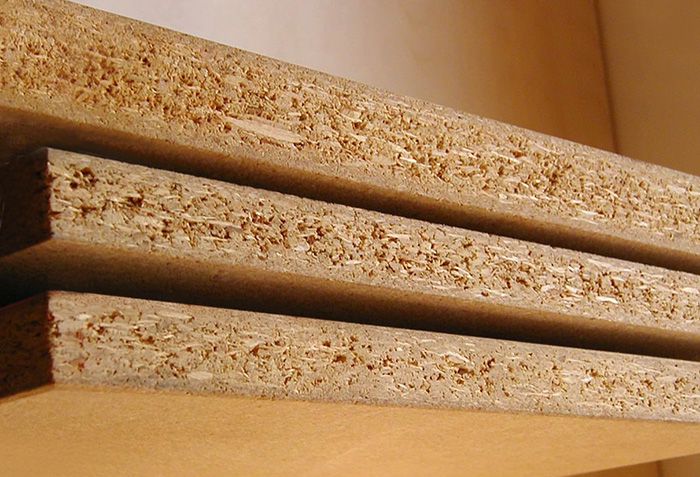
The main feature of all the listed materials that negatively affect the use is the presence of formaldehyde in the composition, chemical compound used in medicine for disinfection.As you can see, it is not for nothing that we advise you to choose a solid wood. A prerequisite is well dried. Do not use raw boards, they will look around, do not have time: the structure will come apart, the material will crack and twist out. It is optimal if the wood has dried on racks for three to four years, in a shaded place, sheltered from moisture.

But if there is none, then a tree will do machine drying.
In addition to the boards you will need:
- Self-tapping screws, bolts (for fastening parts);
- Metal corners (add additional rigidity to corner joints);
- Beam, slats (for a mattress stand);
- Lamellas - flexible planks 15-20 mm thick, made of hard wood (oak, acacia).

Before starting a project for making a crib, you need to purchase materials.
Tools are a reliable assistant to the master
The complexity of the work depends not only on the design of the product and materials, but also on the availability of tools. Having in your arsenal a real carpentry workshop, you can easily make any product. But what if there is nothing but a garage and a workbench? Can I get to work?
No problem! Any man has everything that is necessary. And we will need:
- Drill, with a set of drills for wood;
- Plane for stripping wooden blanks;
- Hacksaw for cutting;
- A set of groove files.

A necessary set of tools, without which the entire project of work will be impossible.
The presence of a manual milling machine will greatly facilitate the work of assembling a crib, but if it is not there, we will manage with the listed ones.

Application hand router makes work easier.
Some features of joinery
To make the furniture reliable, special joinery connections are used in its manufacture. Unlike the usual nail or self-tapping fasteners, such fasteners are more resistant to loosening, do not "fall apart", and resist mechanical damage well.

The main task of choosing a connection method is decorativeness, the desire to make it beautiful and invisible.
Such a connection consists of a blind or through groove and a shank that freely fits into the groove. Fasten them with wood glue. The size of each groove and shank is selected individually, based on the thickness of the wooden blank (slats, beams, boards).

When such a connection is made taking into account the location of the wood fibers, its texture, it seems that the product is made from a single piece of wood.
First, mark with a pencil the boundaries of the groove or shank. Then, with a hacksaw, an incision is made of the required depth for the shank, the groove is drilled with a drill. Excess wood is removed with the help of a chisel. The edges of the product are aligned with files.If you have a router, set the depth of cut and mill the necessary parts. In addition, using the copying ring supplied with the machine, you can easily make the grooves of the desired size.
Making a crib with your own hands
- We determine the size of the product. It is necessary to start from the dimensions of the mattress on which the child will sleep. We take standard size- 1200x600 mm.

The frame of the crib consists of the backs and the base itself, on which the mattress will be placed in the future.
- The bottom of the crib is defined so as not to interfere with the child's climb onto the bed. For children from 4 to 6 years old, this is 35 cm.

The scheme of the footboard of the bed.
- Surface treatment. It is necessary to make the details of the product, bringing them to the same size. The support frame will be a bar, cut into 6 identical blanks with attached 25 mm grooves for fixing the lamellas.

The base of the bed will be 4 boards 35 mm thick and 7 mm wide.
- We calculate the calculation of the back. To do this, add the thickness of the board to the width of the bed. If there is a railing, we make a tolerance of 25 mm, taking into account their volume.

Children's bed headboard diagram.
- The rods for the back are made from a 20x20 mm rail. For fastening at the ends, we make a studded connection.

Decorative headboard with legs for a baby bed.
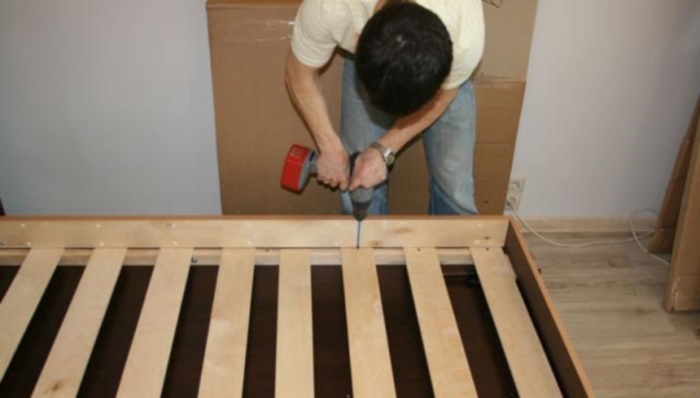
- Putting the frame together. Boards, bed bases are connected to each other using shanks and grooves. For reliability, we strengthen the corners with metal corners, fastening them with bolts or self-tapping screws.

The holes should be the same depth, which is half the length of that piece of wood.
- The base of the mattress is fastened with studded joints to the bed frame.

Before assembling the bed, you need to check the parts for chips and various defects.
- We insert the slats into the prepared grooves on the base of the mattress.
It is not worth saving, if there are few of them, in the future they will quickly break down.
- We attach the sides and back to the frame.

After assembly, we clean the surface and varnish at least three times.
Note! All studded joints are secured with wood glue. Under its influence, the tree is not only held together, but also swells, reliably fixing itself inside the groove.
Crib house - a cozy fairy tale
We all remember the unique feeling and mystery of huts made of bedspreads. So why not pamper your baby and improve his crib by "building" his own house for him, in which it is so comfortable to sleep?

To do this, during the manufacture of the back of the crib, we will make some adjustments.
Namely - by making the railing a little larger, first using a hacksaw or a miter saw, cutting off their tops at an angle of 75 0.We attach the base of the "roof" of our house to them. It is better to fasten the connection with spikes, but given the complexity of such a product, self-tapping screws are also suitable, the main thing- do not forget to glue.

The last step will be to attach the ridge beam, which will tie the base of the frame of our "house".
Thus, the baby will receive a personal "fairy tale" made by the caring hands of the father, and the blanket thrown by the mother will serve as a reliable roof.

Put maximum effort, care and love into your product, and such a bed will give your child good dreams, and you - joy and satisfaction from the work done.
Of course, what we have described does not reflect all the subtleties of the process of making a baby bed with our own hands. While working, you will encounter many obstacles, you will have to think out the nuances more than once. However, we hope that the instructions for making simple furniture that can raise the father's authority to a new level will be useful to both the young dad and the head of the family with many children.
VIDEO: Do-it-yourself house bed.
Parents strive to provide the very best for their children. In shops and markets, prices go up all the time. This applies to any goods, including furniture. Adults are forced to save a lot. They often have to arrange housing on their own... A do-it-yourself children's bed will cost less than one bought in furniture showroom... Making a cozy bed is easy for a baby. This is done in a couple of days. Here you need to be willing to work.
Children grow up quickly and furniture is quite expensive.
To make a bed with your own hands, you need boards and beams made of wood that is poorly saturated with moisture, for example, pine or oak. First, two pairs of legs are made. For the headboard, the supports should be longer, since the back is higher here. This is necessary in order to be able to raise the pillow higher and to be reclining in bed, for example, while reading. Usually a do-it-yourself children's bed is made using the following materials:
- bars;
- plywood;
- boards;
- PVA glue;
- stains;
- varnish.

In an ordinary crib, a child can sleep for three, maximum four years.
Natural wood does not emit harmful substances, therefore, babies do not have allergic reactions. Such furniture is reliable, durable and looks good. A properly made crib is the key to a comfortable sleep. If the room is small, the product is made in such a way that it serves as a playpen during the day. The size is taken based on the length and width of the mattress.

The bed should be as comfortable and functional as possible.
Usually they do not make it with their own hands, but buy it in a store. Children's mattresses are usually developed in conjunction with orthopedists. Special attention is paid here correct formation the spine, and also takes into account the needs of the child's body in getting a healthy and full sleep.

In fact, a do-it-yourself bed for a child is made "at once", you will succeed.
Children from 4 years old buy a mattress on a spring block, where individual elements united by a metal frame. On it, the weight of the sleeping child is evenly distributed over the entire area of the product. For infants, it is better to use mattresses without springs, consisting of foam rubber. In the baby's bedroom, it is advisable to install the bed away from the window opening. This will ensure that the child will not be blown through by a draft.

To make a crib with your own hands, you do not need any professional skills, and the process will take a maximum of 3-4 days.
A chandelier should not hang over the child's bed. Light bulbs often burn out. Sometimes it happens that when a lamp fails, its glasses fly apart in different directions. A glass shard can easily injure a child. If there is a bookshelf hanging over your baby, you should make sure that it is nailed to the wall firmly enough.

The main thing is to use only quality materials and carefully think over the whole process from start to finish.
Basic parts of wooden beds
Though wooden crafts for toddlers are expensive, but individual parts can be bought at a reasonable cost. It is advisable to carefully grind the purchased blanks with your own hands so that the child does not get hurt on any protruding chip. The product consists of the following parts:
- frame;
- slats;
- sidewalls;
- backs;
- legs.

As a result, both the child and the baby will be happy.
The frame is made of planed and well-sanded boards. The slats that support the mattress from below are made up of slats. They are inserted into the grooves cut out in the frame and form a grid for ventilation of the mattress. The distance between them is about 5 centimeters. The sides serve as a fence, thanks to which the child does not fall down. The supporting backrests are filled with plywood sheets.

But if the baby has a large physique, the parameters of the blanks can be changed upwards.
To support the mattress, special grooves are cut in the frame. Joiner's glue is applied to the rack ends. The slats are inserted into the holes. To make the fixation more reliable, self-tapping screws are screwed in from the outside. The backs are done with vertical bars connected by crossbars. Then plywood or wooden rods are installed.

V furniture stores there are a huge variety of crib models for different ages.
The back and front sides are filled with strips and fixed with glue. The near side is made one third lower than the far side. This makes it more convenient to take care of the baby. The holes of the cross bars are filled with PVA glue. Then wooden fence rods are inserted there. The parts should fit into each other tightly, without any backlashes. With a square, you need to check the correctness of the angles. All angles must be 90 degrees. The assembled sidewalls are placed on a flat surface until the glue is completely dry.

But the first factor in choosing a crib for a child should be the material from which the piece of furniture is made.
Required tool
If you've poured a lot of adhesive into the grooves, some of it will of course come out. There is nothing to worry about, because in a dried state, the glue is easily cut off with a knife. Further, the remaining panels are attached, which will serve as a headboard and footboard. They are screwed to the sides with countersunk screws. Each screw must be completely sunk so that their heads cannot be felt. Later, these recesses are covered with putty and sanded. During work, the following tool is used:
- saw on wood;
- manual frezer;
- Sander;
- corner;
- screwdriver.

If necessary, we clean the shields over the entire surface.
After the bed is assembled, it must be decorated. For this, all the gaps between the connected parts are covered with putty. When the putty is completely dry, the treated areas are sanded with fine sandpaper... Further, the assembled structure is treated with stain. This will protect the tree from negative impact moisture. After the stain has dried, a layer of varnish is applied. Since the furniture is intended for a baby, all impregnations must be natural, not containing toxic and aggressive substances.

Only drawback wooden furniture, sold in most stores - this is a "sky-high" cost.
During assembly work, the fastening screws should be screwed in as deep as possible so that they are completely recessed. The resulting grooves are later closed with plugs or covered with putty. The assembled structure must be reinforced with special corners. Then the finished product is coated with varnish or wood wax. If you decide to add wheels to the crib, then do not forget to make clips for them.

A children's bed with their own hands will cost parents a maximum of 17 thousand.
Advantages of DIY children's furniture
If the baby's room is small, the crib can be made with drawers. They are convenient for storing toys, bedding and baby clothes. Such functional furniture saves space, eliminates the need to clutter up the room with additional wardrobes or dressers. The advantages of a handmade baby bed are:
- the ability to design a model that fits perfectly into the interior of the room;
- confidence in the quality and reliability of the product;
- the ability to use only materials that are safe for health;
- relatively low cost.

Self-design and manufacture of the crib has advantages over buying finished product in a furniture store
When all the details and working tools are prepared, it is necessary to carefully consider the process of making the bed itself. This work is best done outside the home, as there will be a lot of sawdust and dust. If it is not possible to work outside, the room furniture should be covered plastic wrap, and remove the carpet from the floor. For a small room, you can make a bed, sleeping place which is located on the second tier. Below, instead of a bed, a soft carpet is laid on the floor. This option will be convenient when you have only one child.

The best option is two large drawers so that you can put large toys and bedding in them.
On the first floor, the kid will spend time playing games, and on the second tier he will climb a ladder to relax. Usually the process of climbing to the second floor is a great pleasure for children. If the child loves to draw, a small table and a chair can be placed on the ground floor. For two children, the usual bunk bed... Structurally, such products are designed in different ways. The lower floor can be located exactly under the upper tier, or be located perpendicularly.

For beauty, the crib can be opened with a primer and varnish.
Sometimes the steps are also used as covers for the boxes underneath. Each such box can be used to put children's toys, linen, clothes. Before you start making a bunk bed, you need to decide on the place where it will stand. You also need to decide on which side it is better to mount the stairs to the second floor. If the room has low ceiling, the upper tier should not be very high.

After you decide on the size and appearance beds for a child, view photos of popular models on the Internet and find the necessary drawings, you can start making a royal bed for a baby
The closer the child is to the ceiling, the more stuffy air he will have to breathe. On the other hand, it is advisable to take into account that an adult should not rest his head on the second tier when sitting down to the baby. The height of the first tier is associated with the convenience of sitting on the bed, as well as the fact that a drawer for bed linen can be built below. Based on this information, we can conclude what dimensions the furniture under construction should have. The most popular crib options are as follows:
- transformer;
- sliding;
- one-story;
- bunk;
- rocking chair.

In order for the size of the mattress and the crib to match, it is better to first buy a mattress, and only then proceed with the drawings of the crib.
In the daytime, the transformer is usually folded, thereby freeing up space in the room. For such a model, a special frame is attached to the wall, where the folded product is removed. In order for the visible front of the bed to fit into the overall style of the room, it should be decorated. Pull-out bed made of two parts. As the child grows, it can be lengthened. For this, special wheels are located at the bottom. The two-tier model is most often made for two children.

From tools you will need a drill, jigsaw and grinder.
Conditions for the manufacture of bed parts
If you purchased wood material directly from the sawmill, then before proceeding with the manufacture of parts, the bars and boards need to be kept for about a week in the room in which the manufactured furniture will be located. This is necessary so that the humidity of the room is equal to the humidity of the materials. Otherwise, in the future, some parts of the bed may crack or warp. When will the material acquire desired parameters, boards and bars must be roughened and carefully sanded.

All materials can be easily purchased at a hardware store.
The vertical beams of the bed should be of such a height that the sides and backs can be built over the upper lounger. The front edge of the lower tier is most often removable. A crib guard is an important safety feature. Special attention should be paid to its reliability. The fence boards are screwed to the support beams with self-tapping screws inside... The hats must be completely screwed into the wood. During the manufacture of the fence, you need to leave an opening for the steps.

For small room a similar version of a crib with a second floor is perfect, but there will be no first.
Ladders are usually made strictly vertical or inclined. First, two beams are attached, which will play the role of guides. Then the steps are screwed on with screws. The top step and the ladder itself are attached to the bed with long bolts. After the fence and steps are installed, plywood sheets are laid on which the mattresses will be located. Since all parts of this product are attached with screws and bolts, it can be easily disassembled and moved to another place later.

This process usually gives children a lot of pleasure, and sleeping on the second floor is much more interesting.
Such a bunk bed is very durable and reliably serves for more than one year. If you paint it beautifully, and then cover it with matte nitro lacquer, it will not shine with sun glare and will preserve the naturalness of the drawings for a long time. The inner part of the sides can be trimmed soft cloth, which will protect the baby from drafts and bruises.

If the child goes to school, or just likes to draw a lot, the place under the bed can be equipped with a desk.

Thus, even in a small children's room there will be more space for games and other entertainment.
VIDEO: DIY crib.
22.07.2019
Despite the fact that today it is not a problem to find a crib for a child for every taste and budget, some people prefer to create this piece of furniture on their own.
The advantages of such a solution are that it takes into account the preferences of the parents, the footage and design of the nursery, the convenience of the baby, as well as the possibility of implementing the most original fantasies and design ideas.
Master class №1. Newborn crib
There is an economic advantage in creating a crib with your own hands, because this piece of furniture is needed only in the first few years after the birth of a child, and then you will have to buy another crib.
In this case, you can significantly save on the finished bed and spend only on materials and decor.
You can make a crib for a newborn according to the instructions from the user clandz666 from the site yaplakal.com.
Preparation for work consists in the development of drawings and the purchase of natural, environmentally friendly materials.
When working with drawings, it is important to take into account the peculiarities of the child's age. In the cradle for a newborn, it is important to avoid right angles, large gaps between the rods, low sides and improperly processed wood. All of these factors affect the safety of the baby.
You can also make not a simple crib, but a rocking chair, in which case the child can be rocked, which is a more convenient option for parents. But this design is not suitable for a child over two years old.
Materials that are suitable for making a cradle for a newborn must be completely safe for health. The easiest way is to work with chipboard and fiberboard. Wood - the best way for a child, but more expensive.
In addition, making a crib for a baby made of wood is economically impractical also because the child will grow up quickly, and therefore it is not necessary to pursue special durability. In turn, a bed for a schoolchild is best made of wood in order to be sure of the reliability, strength and durability of the structure.
Before starting work, it is necessary to ensure the right conditions... They relate to the premises, because sawdust and other waste material should not interfere with the rest of the inhabitants of the apartment or house. Therefore, tinkering is better in the garage or any utility room.
- self-tapping screws different diameters for assembly;
- workpieces made of chipboard, fiberboard and wood of a suitable size;
- curved blanks for the rocking chair;
- castors for a mobile crib;
- a large sheet of plywood or a metal grill for the base;
- sandpaper;
- safe varnish;
- jigsaw, grinder and drill for basic work.
pay attention to important point: When drawing, use the actual size of the mattress in the crib, otherwise it will be difficult later to choose the correct one from the options offered in stores.
1. On a piece of plywood the basis for the construction is marked with a pencil.

2. For a model with boxes, the necessary parts are cut out according to the drawing and attached to the base with self-tapping screws.


It is necessary to make a pendulum mechanism:


3. The main parts of the sides, legs and rods of the bed, as well as the strips into which the bars of the lattice will be inserted, are cut out.


4. A base is created to which the rods will be attached. For the rods in the base, you need to make special grooves, which are filled with glue, and a lattice is inserted into them. If you plan to make a removable grill, then the bottom bar should be easily removed from the base.

5. All parts of the assembly must be coated with a water-based varnish.

6. Final assembly cots.

7. The result is such a construction.

The back can be made in any shape - for example, curly with different decor... Step by step, it is done like this:
1. First cut desired shape backrests:

2. A decoration stencil is made:

3. The desired pattern is cut out according to the stencil:


4. Additional decorations are cut out of plywood:


5. Painted with acrylic:


6. Glued to the back:


You can install:


In order to get a rocking bed, instead of wide sides, you can make four legs, and attach a rocking base to them. In this case, you will have to abandon the storage boxes.
To do side cot, you need to use special mounts for one lattice, which will make it easy to remove it to move it to the parent's bed or sofa. In this case, the height of the bed must correspond to the parent's.
Now you can throw any light fabric on it, creating an impromptu canopy that will protect the child from sun rays... Hanging toys can also be hung on this rod.
Master class number 2. Cot for a child over 3 years old
A child over 3 years old needs his own sleeping place, in which he will sleep at least until school age... If you are going to tinker with a crib for a child who is already in preschool age, then the bed will serve him for several years - until the beginning of his adolescence.
In creating a sleeping place for a preschooler, the material requirements remain the same as for newborns, but the shape of the bed can vary significantly.
Any bed consists of basic elements: frame, slats or slats, backrest, legs and side boards. The parts are fastened to each other with self-tapping screws.
When developing a drawing for a crib in which an older child will sleep, you do not have to worry that he may fall out of it, because the sides can be quite low. You can completely abandon the sides in the design of a low bed for a schoolchild.
You can also take the child's desire as a basis, let him tell you what kind of bed he wants.

1. The first step is to develop a drawing. Pay attention to the size of the base: it must be "for growth" in order to serve the child for at least 5 years.

2. You need to start work from the foundation. For the bottom of the bed, plywood is taken, to which slats and metal corners are attached.


5. It turns out almost finished, but still crude design.

6. The frame is covered with acrylic varnish.


8. After assembly, the steps will look like this:

9. The steps also need to be varnished. They can also be upholstered with carpet, but this is optional.


A stencil is applied:

10. As a result, we get the following piece:

One of the advantages of a homemade bed is that you can tinker with your child. If the son or daughter is quite old, then they will like to participate in the work with dad or mom.
Pros of a homemade bed:
- You design this piece of furniture yourself, so you can add additional details to your taste: for example, drawers, shelves, ladders, etc.
- You can be sure that the bed will be strong and reliable, made of quality and proven materials that are safe for health.
- Saving.
- Exclusivity.
Alternatively, you can think of a bed model that fits perfectly into your child's room. If there are two children, then you can build a bunk bed.
And if you change your mind, then here is our
Read from this article:
Post navigation
A crib is the first piece of furniture for young parents. As a rule, a sleeping place is purchased before the baby is born. But children grow up quickly and after a few years, a more spacious bed must be acquired to replace the cozy cradle. Quality furniture it is not easy to find, and prices for it are not affordable for everyone family budget... If you have certain skills, you can go the other way and make a bed with your own hands.
Baby crib scheme 
Crib  Baby bed
Ideal children's furniture should have the following qualities:
- be made from natural, safe materials;
- have a "breathable" design;
- have enhanced strength;
- not have sharp corners, protrusions and other dangerous elements;
- have a smooth, sanded surface to eliminate the risk of splinters and scratches;
- match the height and weight of the child;
- protect the baby from falling;
- have high functionality (in addition to the berth, there are also sections for storing things).
 Baby crib scheme
  Crib
Crib Benefits of making a baby bed yourself.
- You are confident in the quality of the materials from which the crib is made, as you choose them yourself and work with them yourself. In store products, this parameter is not always obvious.
- You develop the design of the bed, taking into account the individual needs and characteristics of the child (if any), the dimensions and stylistic orientation of the room.
- You can independently test the strength of the bed structure during the manufacturing process and, as a result, be sure that jumping on the mattress will not end in furniture breakage.
- You save a lot if you compare the cost of your own bed with the prices of stores;
- You get real pleasure creating furniture for your son or daughter with your own hands.
 Baby crib design
  Children's bed made of wood
 Deciding on the design of the bed
The easiest way to make a classic crib is a frame, four legs, a headboard and a mattress. However, such a model carries a minimum functional load - it simply provides the child with a sleeping place. Suitable for a spacious bedroom of one child, where there is already a spacious wardrobe, and there is no need for additional storage space.
If the children's room does not differ in impressive dimensions, it will be more practical to supplement the bed structure with drawers or even a chest of drawers. This will allow you to more effectively organize the space in the room.
 Baby cot with chest of drawers
  Bunk bed made of wood
 The loft bed is even more functional. It allows you to raise the child's bed to the second tier, and at the bottom to organize a wardrobe, a table, bookshelves or sports section- depending on the needs of the child. However, such a design will require serious skills in the process of creating the bed. If you are just starting your journey in the manufacture of furniture, it is better to stop at the first two options.
Finally, bunk beds are especially popular. This is a great way to comfortably accommodate two children in a small children's room. However, as with the loft bed, bunk bed not just do it yourself, and before starting work, it is better to carefully weigh your strengths and capabilities.
We will consider further instructions using the example of creating a bed with drawers. This is a fairly simple option and is suitable even for a person with minimal skills in creating furniture. At the same time, such a crib is notable for its practicality and functionality.

 Children's bed made of wood
  Wooden baby bed
 Required materials and tools
It is better to make a bed from solid wood. It is the most environmentally friendly and safe material to create truly durable furniture. MDF made of light wood is well suited. Heavy solid wood is not suitable for cots as this furniture often has to be moved and rearranged.
 Crib
Crib  Children's bed made of wood
 In addition to blanks from MDF, you will also need wooden bar for lamellas. For this part of the bed, choose an elastic material (for example, plywood will work in this case, but chipboard will not).
In addition to wood and plywood, you will need:
- special corners made of metal;
- self-tapping screws and other fasteners of various diameters;
- guiding elements for drawers;
- drill;
- electric jigsaw;
- Grinder;
- sandpaper;
- paper tape.
 Children's bed made of solid wood
  Children's bed design
 In addition, at the final stage of making the bed, you will also need a mattress. When choosing, do not save money, give preference to a high-quality orthopedic model. An important nuance- although the mattress is installed last, it is better to purchase it in advance and make a drawing of the bed under its actual dimensions.
 Children's bed scheme
  Children's bed design
  Children's bed with a chest of drawers
 We start manufacturing
Before starting work, decide on a drawing of a suitable bed model for you. Then get to work.

 Children's bed made of wood
  Baby bed
 Decor variations
A simple bed with drawers usually does not offer any special design solutions... As a decor, you can choose original handles for drawers or make a carved headboard. You can also paint the bed in your chosen color, highlighting the design of the rest of the child's room. The option with the painting of the headboard or legs, the use of special decorative stickers and other decorative elements is allowed.
Emphasize classic design a children's bedroom can be done using carved legs or sides.
If you have certain skills, the sides of such a bed with boxes can be made in the form of the walls of a car, as a result of which, as a result, the bed-typewriter, which is popular today. For girls, you can make a sleeping place in the form of a carriage. However, many young women also like options with cars, except that it is better to make the colors more "feminine" colors.
 Children's bed made of solid wood
  Children's bed with wall mountings
 Carved handrails and slats can be used to decorate a bunk bed. More difficult option- arrange a bunk bed or loft bed in the form of a castle or fortress, a tree house. To do this, it is enough to cut out the facade of the corresponding type and paint it in accordance with the sketch.
Whatever bed you decide to create with your own hands, remember: you are creating furniture for a child. Approach the task responsibly. There are no trifles in the creation of furniture - the safety of those who will use this furniture depends on the grinding of each corner and the strength of each joint. Put your maximum effort, care and love into your product - and such a bed will give your child good dreams, and you - joy and satisfaction from the work done.
Video: Wooden cot
50 photos of crib ideas:

19.09.2017
The furniture made at the enterprise, although beautiful, is devoid of warmth. And so you want your own baby to have a cozy bed made with love and care. That is why many fathers create children's beds with their own hands. The child will remember the furniture made by the father for the rest of his life.
Material options
The material plays a special role in the manufacture of the crib. Today, store shelves are overflowing with children's furniture from ...
- natural wood;
- Chipboard and MDF;
- metal;
- plastic and synthetic materials.
Natural wood furniture is considered the safest from an environmental point of view - this fact has long been scientifically proven. Wood does not have that specific smell that artificial materials have. She is able to create an auspicious, warm and cozy atmosphere for the baby, which has a positive effect on his health. It is worth noting that natural wood will always look expensive and soundly. Products from this material will perfectly fit into any interior.

MDF - a plate made of pressed under high pressure finely dispersed wood shavings. In terms of environmental performance, it is close to that of natural wood. Furniture made from MDF is considered safe for children's health.


V chipboard production formaldehyde resins are used, therefore, during operation, they can emit substances harmful to health. But for many, the price is the deciding factor. Chipboard models have the lowest cost.
Plastic and synthetic products can be bright, very beautiful and stylish. But are they good for the child? Young parents often do not think that toxic substances are used in the production of these materials. Therefore, it is important to remember that during operation, harmful components will be released and harm the baby's health.
Structural elements
The main elements of a baby bed are:
- bottom;
- sidewalls;
- backs;
- frame strips (frame);
- legs.
Baby cots are also available on casters. In models of this design, it is convenient to rock the baby, such cribs are easy to move around the room, if necessary. Some have rocker skids. There are also combined legs: the wheels can be changed to runners, or you can unscrew them completely. There are also cribs, in which the swing is provided by a hinge.
Children's beds can be made in the usual way classic style... However, increasingly popular today are gaining wooden models based on stories from fairy tales and cartoons. Undoubtedly, both the one and the other model will look good in the nursery.
However, themed beds often take up too much space.


This is their main drawback, because not everyone can boast of a large living space. Often the crib has to be pushed into completely limited space... Therefore, sometimes in order to save free space make homemade beds required dimensions:
- bunk;
- transformers;
- attics or houses;
- with drawers and shelves.

This piece of children's furniture can be anything you want. The main thing is to comply with the basic requirements: the bed must be:
- safe;
- comfortable;
- beautiful.
Sketches and drawings
If you decide to make a bed with your own hands, then it is advisable to draw a sketch yourself, complete a drawing or diagram showing the future "nest" for your child. In such a drawing, all dimensions should be accurately maintained, down to every millimeter. The strength and reliability of the structure will depend on this. 

A drawing or sketch of the future structure will greatly facilitate the entire process of manufacturing parts and subsequent assembly. The exceptions are. This is enough complex projects for self-made... It is better to take a sketch made by a professional designer as a work plan: 

Manufacturing and assembling the elements of a crib is a complex process. He demands special attention and great responsibility. Even a slight error in work can lead to sad consequences: the bed can break and injure the child.
Required accessories
Before starting work, you need to stock up on material. Purchase:
- Edged boards.
- Bars, the cross-sectional size of which must be at least 50x50 mm (needed to complete the main frames of the structure).
- Slats with a cross-sectional size of 20x20 mm (will be used for filling, for example, for making logs).
- Self-tapping screws and bolts.
It is worth going to large stores that have building materials in their assortment. Here it immediately becomes clear that the offered wood is of different quality. You need to choose straight boards with the least number of knots. This will greatly simplify and speed up the grinding process of all elements.


Important! Whatever bed is made (the most ordinary, classic or made for a specific theme), you need to remember the rule - bars and slats must be made of extra strong wood... The quality and further life of the product depends on this.
Tool
Despite the fact that the baby bed has a simple structure and can be assembled by anyone, it is still necessary to prepare. Before starting work, prepare:
- roulette;
- drill;
- circular saw;
- Kreg Jig set (special tool for drilling holes at an angle);
- adjustable measuring angle;
- glue for wood;
- self-tapping screws 30, 50, 60 mm;
- water-based varnish;
- stain;
- brush;
- sandpaper;
- putty for wood.
Step-by-step photo report
Let's take the following model as an example:

First you need to choose the right mattress. All the elements of the future design will be made. Then purchase the required building material - edged boards, a bar, slats, water-based varnish, stain, sandpaper and a brush:

Prepare the necessary tools: tape measure, drill, drills, circular saw, Kreg Jig set, measuring angle, bolts and screws of various lengths. These things should always be at hand.
The work begins with the assembly of the side racks:

Make sure all corners are assembled structure straight lines. Mark the places where the sides will be fixed:

After the parts have been sanded and all holes drilled, a little wood glue can be applied to the joints. Without waiting for the glue to dry, the excess must be removed with a napkin.
Fasteners of boards with racks:

If necessary, you need to fasten the boards from the inside at an angle. Use the indispensable Kreg Jig to drill pilot holes. It is a handy and easy-to-use tool.
Fasten the sides of the future bed to the racks:

The crib frame is almost ready:

Now fasten the sides of the second tier:

Then prepare the places where the joists will be attached under the mattress:

First fill irregularities and knots in the frame, then sand. Next, you need to make a ladder to the second tier.

Cover with the first coat of water-based varnish. In this case, Oak Lacra is selected. One of its advantages is that it hardly smells. This is important as there are small children in the house. However, it also has a very unpleasant drawback - it is almost impossible to sand it, and even after drying, a sticky layer remains:

Staircase view:

The ladder in this form is not entirely convenient - it "cuts" the legs, so it will need to be slightly modernized. But more on that later.
The top floor is already ready:

It can be seen that it is necessary to build up the sides. You don't need to add anything from the side of the wall. The bed will stand close to the wall, so there is nowhere to fall. On the other hand, this will have to be done.

Now about the stairs. To go down it was not awkward and painful, slightly process the edges of the crossbars with a hand plow or grinder... This procedure will give them a neat look:

The result of the labors:

The end result is a robust and stable design. Now we can say with confidence that to make such a bed yourself, with the abundance of materials and necessary tools, with which the shelves of hardware stores are filled, is not at all difficult.
You will find more ideas and tips for making a two-tier structure.
Decorating
Canopy

Bedding
To sew a pillowcase, sheet and duvet cover, it is best to use natural, breathable and beautiful fabrics. Perfect here: flannel, calico, satin, poplin.

Mattress topper
To protect the mattress from moisture, a waterproof mattress topper is usually used. Moreover, it is easy to do it yourself. For this, a structure is made, consisting of oilcloth ( interior) and knitted, flannel or calico fabric (outer part). To prevent the mattress topper from slipping, an elastic band is sewn around the perimeter of the product.