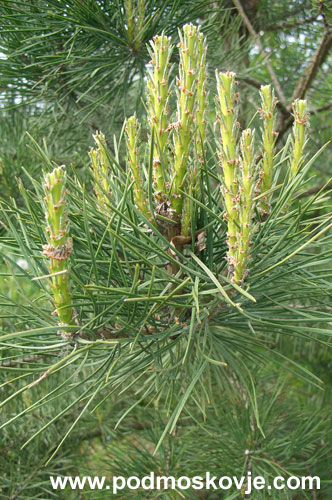
Garden bonsai - technique and work procedure. Scots pine bonsai photo
Bonsai pine is a classic of Japanese gardening art. Today, more than a hundred varieties of pine are known, which are more or less suitable for the formation of bonsai, but four of them are especially popular. Today we will tell you how to properly grow a classic bonsai from pine or fir.
To grow bonsai from pine with your own hands, you have to be patient. The main task is to do everything possible for the slow growth of the plant, which is achieved by frequent pruning of branches and roots, using special soil, and special care methods.
In general, a home bonsai should meet the following characteristics:
- have a powerful and strong trunk, which has a pronounced base, and the roots protrude slightly above the surface of the soil;
- have a small number of branches, while each should be clearly visible and in harmony with the general style of the tree;
- match one of 15 classic shapes;
- be like a tree growing in ordinary conditions.
As already mentioned, there are 4 main types of pine used for planting bonsai in the garden.
Video "How to form pine bonsai"
In this video, you will learn how to shape a pine bonsai with your own hands.
Japanese black
This variety is used most often, as it has an attractive bark texture, is hardy and does not require nutritious soil. In Japan, the cultivation of bonsai from black pine is considered a tribute to tradition. At the same time, in the process of growing, you may encounter a number of difficulties:
- the tree forms unnecessarily long needles (this is due to improper watering, violation of the feeding regime, or if the location of the pot is incorrectly chosen);
- the biological feature of this plant is its extremely slow growth.
Japanese black pine tolerates the most unfavourable conditions content, surviving even on poor rocky soils.
Japanese white
Such a bonsai will have an unusual appearance: living up to its name, the white Japanese pine is covered with needles white... It is a conical tree with a dense, spreading crown.
Mountain
Home care for mountain pine bonsai also does not require a special approach: the culture is unpretentious, tolerates significant temperature changes well, without even changing the color of its needles. Provided that such bonsai are provided the right conditions content, over time it will form lush crown with thick butchery.
In addition, this variety blooms in a delicate purple color. The crown of the plant lends itself to formation in different styles depending on the preferences of the gardener.
Ordinary
Bonsai grown from Scots pine is the most affordable and simple option in our latitudes. In cases where other species require special conditions of detention, the common pine will obediently "fulfill" all the requirements of the gardener, taking the desired shape. The variety has paired needles of a yellow-green hue and a red-brown scaly bark.
Planting and growing conditions
As for how to grow a classic pine bonsai, the secret is to limit the growth of the tree's root system as much as possible (such trees grow in small bowls). Thanks to this approach, the ground part of the tree is inhibited and the desired dwarfism of the plant is achieved.
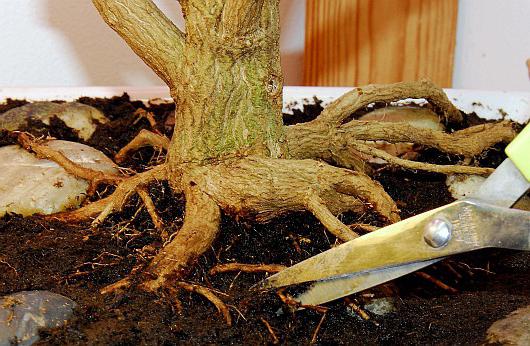
Before planting a seedling, it is recommended to prune the root system, with an emphasis on the main root shoot. Do not forget that a large stone should be laid at the bottom of the container, which is covered with earth. After that, the plant itself is already planted.
Care rules
Whether you are growing a bonsai from fir or any of the listed pines, the plant needs an abundance. sunlight... If you place a container with a tree in a shaded area, you will get too long needles, which is not welcome in the art of bonsai. In addition, due to a lack of lighting, the branches of the tree may begin to die off.
Another danger is drafts. Try to protect your plant from them as much as possible.
Watering and feeding
The plant needs moderate but regular watering. It is important that the grow pot contains a sufficient layer of drainage material. Try to keep the soil constantly moist. Bonsai are fed with a small amount of complex fertilizers, and no more than once a month.
Reproduction
There are two ways to grow a young bonsai from an adult plant: from seeds sown in the spring, or from cuttings, which should be rooted during the summer.
Transfer
It is advisable to transplant a pine in early spring - before the buds swell. This is done once every 2-3 years, and during the initial planting of a seedling no earlier than after 4-5 years. When carrying out the procedure, do not try to thoroughly clean the roots of the plant from the remnants of the old soil - on the contrary, it will be better if it remains, since this soil contains a lot of compounds useful for the tree.
Trimming and shaping
It is difficult to form bonsai from pine due to the fact that the principle of pruning is not similar to other crops. The fact is that the period of active growth in a plant occurs exclusively in the second half of the spring season, unlike other trees.
Another feature is separate growth zones that differ in activity. So, the top is the fastest growing zone, the upper lateral shoots are characterized by medium growth vigor, and the lower ones are weak.
Formation should start from a young age of the seedling, since mature tree it is almost impossible to bend, making it grow in the direction you want. As a rule, formative pruning is carried out in the fall in order to minimize the loss of juices, carefully processing the cuts.
What to do with the kidneys
Pine buds grow in small groups. To give your bonsai the appearance you want, you can do the following with the buds: remove them on the upper branches (which grow the fastest) and leave them on the lower ones, the process of formation and growth of which is slower.
Actions with candles
With the arrival of spring, the buds you saved will begin to stretch into candles, the size of which may vary. They can also be pruned depending on the desired crown shape, guided by the same rule for the activity of tree growth zones. You should not cut off all the candles at one time - it is better to extend the procedure for 2-3 weeks.
Plucking needles
This is one of mandatory procedures, without which air and sunlight will not be able to penetrate to the inner shoots through the outer needles. In addition, by plucking, you can also control the width and height of the tree crown.
The manipulation is carried out from the second half of July until the onset of autumn. Both old and young needles are subject to removal. We are guided by simple rule: the more needles there are on a certain branch, the more activity of growth it differs. By removing some of the needles, we can redistribute the vitality of the plant to other zones.
Needle trimming
Sometimes it is necessary to shorten the needles to make the tree look harmonious. To do this, proceed as follows: allow the tree to freely grow needles during the spring and all summer, and at the end of August, cut off all the needles that have grown during this season.
Of course, the tree will try to actively grow the lost needles, and it will succeed. But the needles will be much shorter, which is what we wanted.
Remember: this method is only good for a fully formed tree, a young seedling can be significantly affected by the procedure.
Now you know how to make pine bonsai with your own hands.
The formation of pine bonsai from seedlings is a long business, not easy, but exciting. In the process of work, you will learn to understand and anticipate all the whims and desires of your pet. You will know him like the back of your hand. Yet he is your child. Well, to know where to start, what to do and in what sequence, read this treatise.Year one:
Autumn - the best time for transplants. At this time, the root system of pines develops. Seedlings collected in the forest, bought in a nursery or grown independently are transplanted into 12-15 cm pots for the next growing season.
Pine seedlings are very different. Some can be short, while others are long with needles growing only at the top. But all of them can be used. As the seedlings develop, you can divide them into large, small and medium trees. How large quantity seedlings you take for work, the more you can choose from a wider assortment of material suitable for bonsai.
Something about pines in general:
Growing pine trees as bonsai is somewhat more difficult than bonsai from deciduous trees. They differ from other trees in two stages of growth per year. Late spring buds, which were laid in the past year, begin to grow and turn into so-called candles. This process ends by July. The second wave of growth begins at the end of August. During this period, the process of branch thickening prevails over the process of elongation. At the end of this growth period (around the end of September), the shoots begin to lignify, preparing for winter. Nutrients in the form of starch are stored in the roots. Old needles turn yellow and fall off. New buds are developing in preparation for next spring. If you prune the roots in winter, the stored nutrients will become inaccessible to the tree and it will weaken.
Bonsai pines can be pruned all year round. Practice shows that coarse pruning is best done at the end of summer, before the second growth wave. The advantage of pruning during winter dormancy is that it takes advantage of the reduction in thickening in the rest of the tree. Black pine badly awakens dormant buds on old wood inside the crown. You can prune strong branches with healthy needles. This will cause new buds to form at the base of the needles. Pruning late summer or early spring leads to the development of dormant buds, which is suppressed by hormones coming from the buds at the ends of the branches.Have a sense of proportion when removing branches. A healthy pine tree can take some mistakes with your intervention, but over-pruning can kill it. Let the tree catch its breath for a season after the cardinal shearing, and then continue with the intended execution.
Pine does not tolerate transplanting well. It takes a long time for the roots to recover and start performing their functions. To recover after transplanting, depending on the age and the degree of root pruning, the pine tree needs one to two years. Pines take much longer to develop a good root system by pruning and correcting imperfections than deciduous trees. You can never bring the roots of an old pine tree to the surface. But this trouble can be avoided by working with a seedling.
General requirement for all pines - sun and good drainage. Full sun is needed to stimulate kidney development. Lack of direct sunlight results in inhibition of kidney development. Good results gives the arrangement of pines in the sun in winter.
Pines are prone to root rot, so good drainage is essential. The soil used for them should be somewhat coarser than for deciduous ones. To ensure good drainage, you can lay on the bottom of a plastic pot with large holes metal mesh... It is worth avoiding the use of clay soils, because they do not dry out for a long time.
Winter care for pine seedlings is pretty simple. No pruning in the first year. The pots are set on the ground in a location protected from the wind, but sufficiently lit, and mulched with sawdust or leaves. The wind does much more damage than the cold.
Year two:
At the end of March, seedlings are cut to 7-12 cm. This activates the growth of lateral shoots, which will play on the thickening of the trunk. Ensure healthy needles remain on the seedling before pruning. Pruning is done at a 45 degree angle with sharp scissors. Try not to damage the needles when pruning. If there are many long needles left on the trunk, then they can be thinned out a little for more even illumination of the remaining ones. Strongly elongated seedlings and those that do not have low-lying buds, it is better to set aside for now. Their formation will take place in a different way. Most likely from them it will be possible to form something in a literary style.
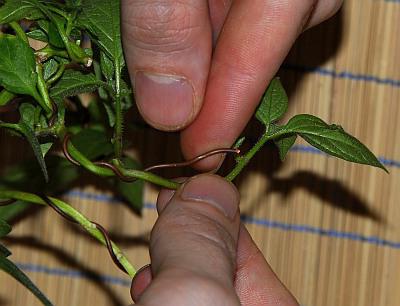
The next step is to apply the wire frame. The goal is to give the trunk some shape. The wire should be on it until it starts to cut into the growing barrel. Watch the growing trunk carefully so that the wire does not go too deep into the bark, so that the bark does not "run over" to the ligature. If this happens, the ligature must be removed. Wire marks will fade over time, leaving the trunk rough and gnarled, giving the bonsai the charm of an old tree. Just do not allow this wire to cut into the bark of deciduous trees! The remaining trail will be noticeable for ten years.
For wrapping seedlings, you can use 3mm aluminum wire from electrical cables... Its use has its advantages. First, it is cheaper than copper. And secondly, it is more noticeable on the trunk and it is easier to control the degree of penetration into the bark.
The best way to apply a ligature is by sticking the end of the wire into the ground at the base of the trunk and turning the pot. Be careful not to break the kidneys or pinch the needles. Some of the plants can be wrapped clockwise, and some counterclockwise. You can then twist or bend the seedlings in the direction of the winding. The part can be left upright, and the part can be bent. When giving plants one form or another, be guided by the bonsai you have seen in pictures, exhibitions, or bizarre tree shapes found in the forest. After a few years, the embedded wire is removed. The remaining scars will heal within two years.
Place the pots in a sunny location, about 30 centimeters above the ground. Feed and water well. In summer, 15 cm pots dry out very quickly. No more pruning is done this year. By the end of the year, the trees should look like small, dense mountain pines. Winter care is the same as last year.
Year three:
In April, plants need to be transplanted into larger pots (25 centimeters in diameter and 12 centimeters deep). Deeper containers can be used, but it is impractical to reduce the diameter. Otherwise, the graceful nebari may not come out.
The soil mixture is prepared from coarse sand, perlite and humus in a ratio of 2: 2: 1. The mixture must be very permeable, that is, when watering, all the water passes through it without lingering on the surface.
Straighten the roots during transplanting. Special attention give to the crooked and entwined along the bottom of the pot. It is not worth shaking off the whole earth from the roots. Minimize pruning. Better to do without it altogether. Sprinkle roots with "Kornevin" or another root stimulator. Place the tree in a container at the same level as in the previous pot (according to the depth of the root collar) and using a sharp wooden stick to eliminate air pockets, carefully cover with earth. Water well by immersing each pot in water for a few minutes, and then place them in the designated spot.
Feed and water well again. Let the trees recover and grow freely. Just before leaving for the winter, cut off the top at the level of the nearest branch extending from the trunk. Remember to mulch the pots for the winter.
Year four:
In the spring, simply raise the trees higher to provide light from below, water and feed until June. A branch left after the top of the head was trimmed last winter will now develop into a new top. From this point, new branches should also begin to develop. Let the top grow loose. Leave all the side branches free to grow. Trimming the top will give the trunk a silhouette. Start looking for interesting trunk lines. In some trees, they are visible immediately, with others, you will have to wait several years.
In August, you will have to make a decision. Despite the same age, the trees will look different. You will need to decide which trees to make a large small or medium bonsai. When choosing a solution, rely on the trunk line, the size of the branches and roots used.
As for the style of formation, you will have to decide which part of the tree is the most successful and start shaping the future bonsai around it. Decide which wood defects are the easiest and start by fixing them. Usually, the trees with which they start working have only one advantage and a lot of shortcomings. The coming years will be spent on emphasizing the former and eliminating the latter. Your work on choosing the final appearance bonsai is greatly simplified if you first make several different sketches on paper. Then, look at pictures of old pine trees, finished bonsai trees, or trees in the process of being developed. In the photo, you may notice some elements that are present in your tree, or, perhaps, you will determine the direction in which you will move. If you do not understand what you want from a tree, then you will never grow a good bonsai.
First, examine the barrel. This is the element that requires the most development and improvement. Pine is a powerful tree. If you settled on a literary style, then the trunk should "carry the load" of the tree. Most likely, you will have to plant the tree in open ground for several years to build up the power of the trunk. If so, remember to grow inner shoots, which will later become outer branches, and keep the tree from growing in height while benefiting from the thickening.
Before planting a tree in a bowl, you must definitely finish work on the trunk. As you work on the trunk, keep the branches small so that they are in proportion to the size and shape of the trunk. It is understood that you must use secondary, internal branching as the final branches, or you will have to graft the shoot to form the right size branches in the right place... It will also take years to form branches. But the process of their development after transplanting the tree into a pot will go faster than the development of the trunk.
Other important feature- superficial root structure (nebari). With every change, year after year, take care of keeping your nebari in order. A strong, ramified root system cannot be formed in one season more than ramification of the crown. Growing roots is a long-term process, as a result of which the tree will firmly hold on to the ground, like a hawk perched on a branch. Use root correction wire and tensioners with every transplant. Nebari is a very important element of bonsai and deserves close attention.
A small bonsai is the easiest to pick. They look like normal little trees, ready to move into a bowl. Determine the front of the tree and stick a carnation into the ground on that side. Cut all the thick branches into front side... Before sending the pine for the winter, cut all long branches to the first (from the trunk) secondary branches. Shorten secondary branches as much as possible. This will energize and strengthen the remaining branches required for the final bonsai. The tree remains in the same pot for next year... Remove some needles that are 2 years old or older. ()
Medium-sized bonsai (about 20-40 cm) should be transplanted into 20-liter containers (about 32 cm in diameter and 25 cm in depth). Deeper containers can be used, it is not advisable. Although, the excess volume can be filled with drainage.
The land is used the same as for the last transfer. Do not disturb the roots at all. Plant the tree while maintaining the level of the root collar. Water well. Sprinkle some soil if it settles, and use a nail to mark the intended face of the bonsai. Mulch containers for the winter. ()
The large bonsai does not yet show its forms in any way at this time. So far, its root system has just been formed. These trees should be planted outdoors. For planting, choose the most sunny place. In early summer, prepare the soil for them in order to transplant in late August - early September. As mentioned earlier, the soil must be well drained. V clay soil add sand and humus. Place the trees at a distance of a meter and a half from each other. Do not disturb the root ball or prune the roots. ()
From this point, the story of the development of trees separately for each of the three sizes of bonsai begins. After all, for them in different times different sets of works are carried out throughout the year. You will need to plan ahead for the order in which all work will be performed.
Big pine - Year five:
Due to the fact that the earthy clod around the roots has not been disturbed, the recovery and adaptation time will be minimal. Fertilize well this year. Big candles will grow by mid-June. 3-5 new shoots will grow on the tree. In August, select 2-3 shoots, and remove the rest. Around the end of November (at the beginning of winter), shorten the shoots of this year's growth to 5-7 cm. Cut off all branches that are more than 2.5 cm thick. With the help of young growths at the top, change the direction of the trunk line. This procedure will continue for the next 4 years. Every year the growth will be more intense. Continue shaping the interesting lines of the trunk in accordance with the intended final design. Pay close attention to the thickening of the branches along the entire trunk to avoid reverse tapering in any of its parts. Use a wire to tilt the barrel to the desired angle. Use a ligature or tensioning device to bend the branches down.
In the third year of the tree's life open ground it is necessary to prune the roots. This can be done in two ways. In the spring, trim the roots on the left and right. In early autumn, trim the front and back. Pruning is done with a shovel at a 45 degree angle to the tree. There is no need to trim each spine separately. It is enough to trim most of them, especially the thick ones. The rest will be trimmed next year when the tree is being dug up.
Digging up the tree can be done in the spring or early autumn, during inactive root growth. Otherwise, the tree will hurt or even die. Having dug up a tree, pruning and root correction should be done quickly, minimizing the time the roots are in the air. Try not to disturb the root system too much. Do not perform this procedure on a windy or hot day. Keep roots moist (not damp).
Over the next four years, continue pinching, pruning, and wire-laying until your tree is ready to move into the pot. Thin, if necessary, the crown. Grow a tip based on one of the side branches. When the tree reaches the desired size, pinch the candles in July so that the secondary growth is not so strong. Work on the pine as you would any other bonsai. Pluck old needles to stimulate new kidney development. Prune branches to get a more branched structure.
It is better to transplant a tree into a bowl of a suitable size (if I can say so about the "container" of a large bonsai) in the spring. Last year, while digging up a tree, you saw its root system and you should have had some ideas for its final appearance. Now is the time to implement these ideas. Make a final root correction and remove all heavy soil from under the tree. The tree will remain in this container for the next four years. Use a coarse pine mixture for soil. After a while, fertilize the soil well. Until May, it is better to keep the plant in a shelter (for example, in a cold greenhouse), protecting it from the wind.
In the first year, the growth will be very small. It is recommended to wait until the first winter with ligation and circumcision. During this time, the tree must be well fed. At the end of June, you can pinch the candles. After the first year, the tree will get used to it and caring for it becomes like an ordinary bonsai in the stage of formation - ligature, pruning, pinching.
 Medium pine - Year five:
The maintenance of medium-sized trees is the same as for trees outdoors. Continue to develop the trunk. In June, pinch the candles on the shoots that will be used in the final version. Select 2-3 new shoots and shorten them in August to 2.5-5 cm. Cut all branches thicker than 2 cm. Also, remove all branches from the front. As with the large tree, remove the top.
Continue annual pruning in June and pruning in August until your tree is the size you want. Cut off all upper branches if they are more than 1–2 cm thick. One of the shoots near the top may be left behind. It will work to thicken the barrel. Taking care not to damage the buds, ligate the lower branches while they are relatively flexible.
By three years of living in a twenty-liter container, the tree should have acquired the height you need. Pinch the candles in early July. Cut off the growth in August, leaving 2-3 shoots. Remove the top thick branches. Use sharp scissors to trim last year's and older needles. Try not to damage your kidneys. As usual, mulch the pots for the winter and protect the trees from the wind.
The tree can be transplanted into a pot in late April - early May. It will live in it for the next 3-5 years. Use coarse soil for pine trees. These trees will recover much faster than those growing outdoors. With strong growth, get big candles by the end of June. The wire is not being applied now. If the growth is not so active, then let the tree just grow without any interference. Be careful with fertilizers - don't burn the roots. It is advisable to use liquid fertilizers, making them in a concentration 2 times less than the recommended one. In this case, you can fertilize weekly.
In winter, remove this year's gain. Remove old needles. If, as a result of the secondary growth wave, a strong shoot is formed, then it can be shortened so that a bunch of 5-9 pairs of needles remains on it. Cover trees for the winter like all other bonsai. In the spring, you can resume normal pine work.
Little pine tree -Year five:
By this time, the small trees are still in pots and look like regular "pre-bonsai" with strongly curved branches. They are not replanted now. Work can start in winter.
Take the time to study your trees. Examine them carefully and start trimming. Remove thick branches. Don't be afraid to shorten the outer branches too much. You can always grow them. And, here, it is very difficult to grow a branch inside the crown. Sometimes it's completely impossible. Ligature and place trees in a protected location.
In the spring, the tree will grow freely. In early July, pinch the candles on the branches, which will remain in the final version. In August, remove the shoots of the second growth wave, leaving 2 on the branch and 3 at the top. At the beginning of winter, remove the old needles, and leave bunches of 5 needles from the new needles. Cut out any thick branches. Mulch for the winter. In the spring the tree will be ready to be ligated and relocated to the pot. The roots can be very strong and can be treated like the roots of any pine bonsai.
Some notes:
Roots often grow out of the pot. These roots help the tree grow vigorously throughout the year. Better to free them carefully and not cut them off. They contain nutrients... You can prune them in late spring. Like any root pruning, it stimulates root formation closer to the trunk.
The basic principle when working with pine is to get as many buds as possible on the initial seedling and grow low-lying branches that thicken the trunk. Then your pine bonsai will resemble a miniature tree as much as possible.
Based on materials from Internet publications
Every year in May, I pick up the pruner and shorten the resinous "candles" of the forest pines that grow on my site. As a result of regular pruning, even the most unpromising pines turn into compact fluffy trees or acquire another impressive appearance.
Do you need ship pines near the house?
The pine tree is well formed. Any. Scotch pine, or forest ( Pinus sylvestris) - not an exception. There are such types, for example, black pine ( Pinus nigra), which initially look impressive. It is better not to "spoil" them, although you can work with them. I like ordinary forest pines with a wide cone-shaped crown. Unfortunately, they are only smartly dressed at a young age. Then these trees are stretched, and their trunks are exposed. I know of many cases when adult 20 - 40-meter ship pines became a serious problem and even a threat to people and buildings. Especially during strong gale winds. Slow down fast growth and you can give the crown an interesting shape different ways... I chose the simplest, time-consuming, but very effective option.

Shortening "candles"
By shortening the young growth candles, you can not only make the pine fluffier, but also give its crown different shapes... In May, the rapid growth of the kidneys begins, which were laid in the previous year. Young shoots or "candles" appear from them. Partial pruning of these shoots allows for the production of garden bonsai. To do this, shears or garden shears I shorten young shoots by a third or more. The work must be completed before the "candles" begin to open.

To create a certain image, some shoots can be completely removed or experiment with the height of the parts left after shortening. There are many options.
By the way, there are cases when forest pines, formed in this way, are sold by unscrupulous sellers as mountain or other valuable species. Such dexterity was very popular at the dawn of perestroika.
With a strong shortening of the "candles", the tree grows in height noticeably more slowly, and spiky "balls" soon appear in place of the stumps.

"Candles" three weeks after shortening


The density and shape of the "balls" depend primarily on the degree of trimming. The safest option is to shorten each candle by the same amount. For example, when only half or a third of the height of the shoots remains. If it is more interesting to have a pine tree not with “balls”, but with “bowls” or “cubes”, then when trimming it is important to pay attention to the height and bending of the upper and side lines, which are obtained as a result of shortening the bundle of “candles”. When cutting, do not injure the needles. Needles are not shortened!
More complex shapes
Pines look spectacular, in which some "balls" are planted on others. For this, at spring pruning one (or several) "candles" from the bunch of shoots are left intact. Next year it will be possible to plant a new "ball" or "bowl" on it. It is possible to create unusual trees and break symmetry by cutting out individual branches. But it is better to start bold pruning only after the mechanism of the transformation of pines becomes clear. To do this, it is advisable to practice using a simple technique - shortening all the "candles" to the same height.
Near Kaliningrad, I saw, near a luxurious mansion, a low pine tree with sparse branches that held green "bowls". The asymmetry gave this tree a special chic.
Waste-free production
Cut off parts of "candles" (fresh and dry) are useful and tasty to add to tea when brewing it. Coniferous decoctions or infusions are poured into a bath filled with water. They can be used to rinse your hair and body after a shower. In addition, it is a valuable medicinal raw material. V folk medicine"Candles" are used with a slow heart rate and general weakness, when a person "can hardly move his legs." Vodka tincture of chopped fresh "candles" helps. It should be drunk three times a day before meals (15 - 20 drops per 0.5 glass of cool water). Vodka tincture can be replaced with decoctions. It is better not to increase the dosage. Dry "candles" stuff a pillowcase and put it on the bed. Pouches with dry pine shoots are left in the closet where the linen is kept.
© Site, 2012-2019. Copying texts and photos from the site pоdmoskоvje.cоm is prohibited. All rights reserved.
(function (w, d, n, s, t) (w [n] = w [n] ||; w [n] .push (function () (Ya.Context.AdvManager.render ((blockId: "RA -143469-1 ", renderTo:" yandex_rtb_R-A-143469-1 ", async: true));)); t = d.getElementsByTagName (" script "); s = d.createElement (" script "); s .type = "text / javascript"; s.src = "//an.yandex.ru/system/context.js"; s.async = true; t.parentNode.insertBefore (s, t);)) (this , this.document, "yandexContextAsyncCallbacks");
Bonsai is small tree with a trunk and crown of a bizarre shape. Its history stretches back to ancient times, to China, but it was in Japan that bonsai evolved from just unusual plants into real art. Today, both the trees themselves and the method of their cultivation are designated by the word "bonsai". How to grow such a miracle at home? How long does it take for an ordinary houseplant or tree seedling to turn into a self-sufficient decorative element? How to grow bonsai from pine or dwarf hardwoods? We will talk about everything that may interest you in this Japanese art in the article below.
Why do many choose bonsai among hundreds of plant varieties?
Indoor flowers can decorate any interior, add brightness and freshness to it. In addition, living plants purify the air and saturate it with oxygen. Anyone who loves flowers, but does not have enough space to accommodate large bushy specimens, usually choose bonsai. How to grow it yourself, true lovers are most often interested indoor crops because it takes a lot of time and effort. Although this breed is dwarf, it is still a tree, which means that it is formed over several years, and not months, like ordinary flowers in the garden on the windowsill. Very few people ask the question of how to grow bonsai from seeds, because this occupation is even more painstaking and requires a lot of patience. At the same time, caring for a dwarf tree, creating a crown of a bizarre shape, decor of the ground - all this gives an extraordinary scope for your imagination, therefore, in originality and fascination, it is much superior to the cultivation of ordinary indoor plants... So are you ready? Then we begin to get acquainted with the art of bonsai in all details!
How to choose a plant to create a bonsai?
As a bonsai if you don't know absolutely nothing about it? Of course, you should start with the choice of planting material. Most often, this process takes place in a nursery or greenhouse. Maple and pine are among the deciduous and coniferous trees growing in our region. Making bonsai from them will not work out quickly, but in the end you will get a real "dwarf" in the best Japanese traditions. You can try to grow a miniature tree from other breeds, including:
- lilacs of various varieties;
- spirea;
- irga;
- Cherry;
- Apple tree;
- juniper;
- larch;
- viburnum;
- cotoneaster;
- hawthorn;
- Birch;
- barberry.
In fact, it is possible to create bonsai from almost any plant. The main thing is that it feels comfortable in the local climate and tolerates frequent pruning.
It is much easier to grow bonsai from indoor flower crops. Experts recommend giving preference to well-branching varieties with small leaves. Surely you have already imagined the role of Benjamin, a coffee tree, a lemon or a fig. Hibiscus, evergreen boxwood or laurel will look no worse.
And to conclude this part of the conversation about bonsai, one more tip: choose the plant that you like. It will take a long time to work on it, and the result is unlikely to be brilliant if the tree annoys you with its appearance, smell or flowering.
How to choose a pot and soil for a bonsai?

So, you have selected and purchased the seedling from which you want to create a bonsai. How to grow him strong and healthy? It all starts with choosing a pot and planting.
The ideal pot for a Japanese dwarf tree is a ceramic container, not too deep, large diameter, similar to a bowl. There should be enough space in it so that the roots of the bonsai are securely covered.
At the same time, it is undesirable to use soil for ordinary indoor flowers, because it retains a lot of moisture, and the root system of the seedling can rot. In nature, bonsai grow in harsh conditions, on rocky slopes, clinging to almost bare rock. Of course, this does not mean that at home the tree should be grown on stones, but the quality of the soil should be as close to natural as possible. In the case of bonsai, the main function of the pot and soil is to balance the aboveground part of the seedling.
How to plant a bonsai?
There must be drain holes in the container. It is also recommended to lay a net on the bottom to prevent soil leaching. Before planting, the roots of the bonsai are pruned so that the plant fits into the pot. Place some soil over the mesh, then position the tree and tie the largest underground parts with wire, securing it to the container through the drainage holes. Finish filling the pot with soil and watering the bonsai.
Please note that trees of species that grow in temperate climates are planted only in spring. If you plan on converting a tropical native to a bonsai, you can do so any time of the year.
How to properly care for bonsai?
How to grow bonsai at home? To do this, it is necessary to maintain a certain light and temperature regime, create a sufficient level of humidity and organize regular watering. It should be noted that bonsai is a culture that cannot be kept indoors all the time. It should, if possible, be sent for a walk from time to time: to the balcony, veranda, or even to the garden.
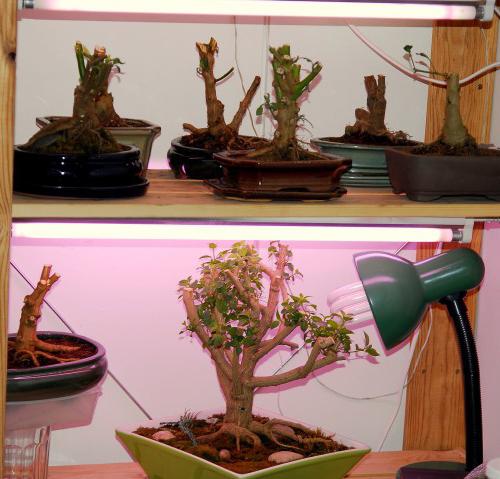
The trees need a lot of light, especially in cloudy weather and in winter, when the day is short. The use of fluorescent lamps will help to correct the situation.
The moisture around the bonsai is kept at the proper level by placing a small vessel of water next to the pot. You can arrange for daily direct spraying of the bonsai with a spray bottle. Do this in the morning so that the foliage has time to dry before evening.
The temperature regime is selected individually, based on the specific requirements of the wood species. So, people from the subtropics (pomegranate, olive, myrtle, etc.) feel comfortable at a temperature of 7-15 ° C. Tropical bonsai need more heat - from 16 to 25 ° C.
The trees are watered often, but in small portions. The soil in the pot should be constantly damp, but not too wet. The water is preliminarily defended. Perfect option is melt water. Make sure that the entire soil layer in the pot is moistened when watering. In summer, bonsai should be "watered" more often, as they grow more intensively at this time.
How to prepare seed material for a miniature tree?
If you are interested in how to grow a bonsai from seeds, immediately prepare for the fact that it will take a lot of time, sometimes even more than 5 years. Planting material can be bought at the nursery, ordered online, or even collected on your own in a nearby park.
Tropical trees are grown from the seeds of boxwood, myrtle, wisteria, ficus, broad-leaved - beech, hornbeam, maple, elm, birch, conifers - cedar, pine, fir, cypress.
The planting material for breeds such as hawthorn, juniper, quince requires resting for 6-12 months. The seeds are placed in a container with wet sand and left in a cool place. Future pines, spruces, oaks and firs, on the contrary, are best sown immediately after harvest.
So how to grow bonsai from oak or other species with seeds? Immediately before planting, they are germinated in water, moss or vermiculite. Break their hard shell to increase germination. It is also recommended to treat the seeds with a fungicide and sterilize the soil to minimize the possibility of germ disease.

Where and how to plant sprouted bonsai seeds?
Bye planting material swells, prepare the pots. Fit peat cups or the most common plastic, filled with a peat-sand mixture (1: 1). The soil is compacted, seeds are laid out on it, and coarse sand is poured on top. Cover the containers with plastic or glass to create a greenhouse effect. Do not forget to monitor the humidity in the resulting mini-greenhouses.
When the first shoots hatch from the sand, they organize regular ventilation, and after the leaves appear, the seedlings can be completely opened. When the plant reaches a height of 10 cm, the plastic cup is replaced with a full-fledged pot. From this time on, you can gradually begin to form the future bonsai.
How to grow bonsai from cuttings?
For those who want to learn how to properly grow bonsai and at the same time save time, we will tell you about the method of forming dwarf trees from cuttings. Comparing it with the seed method, we note that the process will accelerate by about a year. Cuttings are cut from healthy woody shoots and rooted in fertile soil or wet sand. If you have chosen a coniferous species, it is better to do it in April or early September. June is recommended for preparing cuttings for deciduous bonsai.
Important: it will not work to grow a tree from a cut sprig of cedar or pine. On the contrary, if you are interested in how to grow maple bonsai by grafting, know: the shoots of this breed, like elms, barberries, hornbeams, as well as shrubs that are used in hedges, take root very well. Conifers take a long time to take root, sometimes within a year. The first time after rooting, the cuttings must be carefully looked after: hardened, watered regularly. Top dressing is not necessary, since a sufficient amount of nutrients is in the fresh soil.
How to form a bonsai crown?

There are several styles of bonsai. How to grow such a tree on your own so that it looks like a real "Japanese"? To begin with, the bonsai crown should have a conical shape. The trees look very original, the branches of which form pronounced horizontal tiers with the most thickened foliage in each of them. Note that this is not only beautiful, but also very beneficial for the health of bonsai.
The first pruning is carried out immediately after planting. young plant... Do not spare the branches: you need to leave only those that fit into the silhouette of the future bonsai that you have invented. By tying shoots to the roots, wrapping with wire or pulling weights, you can set the desired direction for the growth of the tree. At the same time, you will redistribute energy between stronger and weaker branches.
The most thorough pruning is carried out after wintering. During the season, the bonsai crown is corrected with more gentle haircuts. The technique depends not only on your personal wishes for the shape of the tree, but also on the species of the plant.
Artificial aging of bonsai
How is a bonsai at home so that after 1-2 years it looks like it is more than a dozen years old? There is a special aging technique. Sometimes, using a knife or nippers, sections of the bark are removed from the bonsai trunk. With patience and some theoretical knowledge, you can even split a tree or make a hollow in it. If you plan to leave the twig alive, you cannot leave it completely without bark. Save at least a thin strip that will carry food from the trunk to the top of the shoot. Dead branches can be aged more aggressively using a special wood chisel. The bare trunk is sometimes even tinted or, conversely, bleached.
Juniper, pine and spruce lend themselves best to this treatment, since their wood contains special substances that prevent the development of fungus and decay.
A few terms for true fans of bonsai: plants with a stripped bark are called "shalimiki", and with a split trunk - "sabamiki".
Air layering
Air layering is necessary to correct the shape of the bonsai, for example, if its trunk is too long.

To obtain layering, a circular incision is made on the trunk of a deciduous plant at the desired level and a strip of bark is removed. How to grow pine bonsai using this technique? WITH conifers they work a little differently: the shoot is tied with wire so that a wound appears on it, and then moistened.The resulting damage is wrapped in wet sphagnum in both cases and protected with a mosquito net casing filled with fertile soil. It is better to carry out this procedure in the spring.
Open the casing in the fall (for coniferous bonsai - after a year). Young roots should appear at the cut site. After that, you just have to wait until the roots get stronger. During this time, they should still remain under the casing.
Once you see the roots are ready to bring nutrients to the bonsai from the soil, remove the cover, trim the plant just below the cuttings and plant in a new container.
Of course, this story about Japanese dwarf trees and the art of growing them is far from complete. There is a lot more to learn if you decide to create your own original bonsai. However, no matter what kind of wood and style you choose, remember: the main thing in this business is patience, attention, care and ... your imagination!
Bonsai- such a fascinating art that, alas, requires a lot of patience, perseverance and valuable knowledge. It's one thing to buy a small bonsai tree and then grow it at home. A more difficult but interesting way is to get the coveted, quirky-shaped village out of a small one! And for this you need to be patient: “adult” bonsai from seeds will become only after 25-30 years. Nice present to give to your grandchildren or great-grandchildren, isn't it?
Video: How to grow a Bonsai tree with your own hands? / bonsai
I would say that bonsai from seed- this is a special, subtle, deep philosophy that allows you to know your inner "I" through the language of plants. Yes, you will have to wait, but such a sacrifice pays off doubly, because in the end you yourself create the tree of the desired shape. Dreams Come True!
Now I will not describe how to care for a bonsai at home, how to properly shape the crown, cut the roots, which plants are suitable for bonsai, and so on. This is information for my future articles that you will be able to watch shortly. Today I want to focus on exactly what how to grow bonsai pine from seeds. I think this topic will be interesting to many.
Preliminary preparation
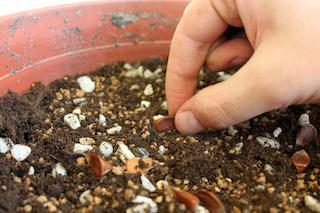
First, we need to select seeds that have been stratified from 2 to 3 months (that is, they were contained in a damp cloth on the bottom shelf of the refrigerator). If you have a choice between pine varieties, then it is better to use black pine seeds. This kind considered less picky and more shade-tolerant. Before sowing, we select a deep vessel (at least 15 centimeters, otherwise the core roots of pines will not be able to develop normally), be sure to lay a drainage layer of expanded clay. Everything free place fill with coarse, steamed or oven-calcined sand. If the soil is not properly treated, bacteria and rot will quickly start in it, which will destroy immature pines at one point.
Video: Growing bonsai at home (Linden). Part 2
Next, you need to make grooves 2 centimeters deep with a distance of 3 centimeters between them. In them, we put the seeds that have spiked (at a distance of 3 centimeters from each other) bonsai and sprinkle them with fine, but also calcined sand.
Now our future home bonsai needs to be watered. This should be done carefully: either spray from a spray bottle, or immerse the bowl in water. To speed up the effect, you can cover the seedlings with transparent film or glass, but do not forget to air them, otherwise instead of pine trees we will collect mushrooms and mold. Oh yes: you need to buy any fungicide in advance (Fundazol will do, although the potassium permanganate solution is no worse) and blot the places where mold forms. Until the trunks of the pine trees begin to coarse, the risk of being affected by the fungus is great.
Seedling care at home
And now, after 10-14 days, the first shoots begin to appear. Glass or cellophane can be removed, the dish can be rearranged closer to the light. Although they will grow in the same position, they will begin to quickly stretch out. And for bonsai art, it is extremely important that the location of the first branches is as low as possible. This is the first stage, at which the seedlings grow up to 5-7 centimeters, after which the root is completely trimmed. Water sparingly, making sure that the earth does not dry out completely. About a month after sowing, pine trunks will begin to change color to reddish brown. So the time comes for the primary molding of the root system.
We carry out the primary pruning of the root system
From this moment, in fact, the cultivation of pine bonsai begins. What we need:
- sharp knife
- small jar for dipping cuttings-
- any remedy stimulating the formation of roots -
- loose, breathable, nutritious soil
- capacity is about 7-8 centimeters in diameter.
Now we start pruning: we extract the pine from the sand, we see a long, rod-shaped root. It is clear that bonsai does not imply the cultivation of such roots, therefore, with a clean, sharp knife, we cut off the root completely to the green part of the tree trunk. In fact, we get a pine stalk. After that, we put it in a bowl with a corn stimulant diluted according to the instructions, and leave it there for 12-16 hours (the terms are indicated by the manufacturer). Which of these funds to choose is up to you: rootin, heteroauxin, succinic acid- it all fits.
After aging in the solution, we plant the cuttings in the prepared soil, water and place them on a light, but not sunny window.
The soil in the dishes should not completely dry out, otherwise the pines will die!
Pine bonsai: further care
The root system grows slowly, but after about 1.5-2 months it will already begin to form. Be prepared for the fact that many of the cuttings will die - this is inevitable damage. Visually, you can determine whether the pine tree has begun: if the trunk shrivels, becomes coarse, begins to deform, then the plant has died. If the bonsai pine looks "stable", and young needles have begun to grow on the needles - vivat, things are moving forward! Now the rooted pines are not afraid of direct sunlight (only on condition of full watering). They can be transplanted again. The purpose of the transplant: to spread the roots neatly horizontally and correctly. Gradually, side shoots will begin to bloom on the tree: not only on the upper levels, but also on the lower tiers. You can work with them and form a spectacular bonsai tree unlike other specimens.
In fact, we have got a full-fledged bonsai at home: over time, the roots will begin to coarse and you can "play" with them, placing a pine tree between stones or on some kind of cliff eminence, effectively exposing the roots. Here, as your heart pleases: flight for fantasy has no boundaries!