How and from what to make a apron for a kitchen with your own hands. Kitchen Apron - budget with your own hands how to make a kitchen apron yourself
Finishing in the kitchen should not only please the eyes, but also be practical. Choosing material for apron, you need to pay attention to its size, quality, aesthetic beauty and cost. Distance Nad working surface, That is, the tabletop and hanging cabinets headset must be optimal to protect the wall from hot steam, oily splashes, fat and other contaminants. As a rule, the finish is made throughout the wall, but quite often limited to individual inserts, for example, in the sink zone, plates.

Features
Choosing a picture of the apron, take into account its size. The height of this element on average ranges from 45 to 60 cm. Selecting certain sizes, it is necessary to repel from our own growth and the stove type. The fact is that the owners of gas plates must observe the distance between the hood and the hob of 75-80 cm.

When you install an apron into the kitchen, leave a couple of centimeters under the top and bottom set, worktop. The visible joint is worth hiding with the help of a plinth or process the zone with silicone, sealant. This is done so that the water does not register for the outdoor cabinet, and its wooden walls did not swell, did not deform, they did not provoke the formation of mold, fungus.

Each material has its own characteristics, specifications. Thus, experts do not recommend using a unhappy ceramic tile, because it has a porous structure. If you do not want to face the accumulation of fat, moisture that is difficult to eliminate from the surface, pay attention to the chipboard, glass, Italian tile, MDF and plastic, artificial stone. All other materials will become an excellent barrier from bacteria and their reproduction. With proper care kitchen apron will last a long time.

To facilitate regular care, try to choose a flat and smooth design without seams, junctions.

photos
Varieties and color solutions
Often the kitchen apron acts as an excellent designer accent in the interior. You can not spend fabulous money for boring facades kitchen headset, Summer wallpaper, dear floor with insulation. It is enough to arrange apron with high-quality materials in an interesting color decision. It will certainly attract the views of curious guests, it's great to decorate the overall atmosphere of the kitchen. There is a colossal number of materials on the market, from which you can create a truly artistic masterpiece.

If you do not have enough funds to buy elite European materials, you can use cheaper analogues. Similar finish from MDF, chipboard, plastic perfectly imitates wood breeds, Natural stone, creates amazing stained glass windows, the effect of broken stained glass, etc. When designing apron, it is important to understand what role he will play in the kitchen interior. Sometimes it is a wonderful background for a kitchen headset or vice versa. In this zone, you can place the volumetric 3D photopris, visually expanding the workspace by giving the story to the kitchen interior.

It can be a seahore, fascinating horizon line, flower still lifes, fantasy plots, animalism or any national pattern (Scandinavian, oriental, Provencal, Azulju, etc.). Universal color for apron is still considered white. Plastic panels, glass will be perfectly looked with a headcard of any color. So that they do not have a "sick" boring look, designers advise to dilute the snow-white tonality with a color insert from mosaic, ceramic decor, photo printing. The neutral range also includes the shade of ivory, beige, ivory, milk, cream.

If you stop on the color apron, be sure to "support" his palette with other details of the interior. Best if it will go tone or pattern in the pattern with textile kitchen elements: curtains, decorative pillowsas well as wallpaper. Incredibly stylish in the kitchen will look at Marsala, Burgundy, Lime, Emerald, Ultramarine.

If the keyroom is key color palette It will become a purple, then in the kitchen - saturated purple. Strive to be used as much natural colors. By the way, all shades of brown, yellow, gray in contrast with black, white, cream, sandy, pastel, etc.

Popular materials finish
One of the most sought-after materials is a ceramic tile or porcelain stoneware format. They are available in price and quality, however more expensive than an option from chipboard, MDF. An order of magnificent aprons from stable glass, artificial stone. The latter are mainly used in country cottages, apartments to maintain the prestige of their real estate.

Tile
Try to choose a tile with a glossy surface for ease of care. Its brilliant surface will reflect the light that visually expand the area of \u200b\u200bthe kitchen. If you do not complain small square metersYou can use volumetric decors, select relief tile samples, for example, with 3D effect. For any interior, a win-win option will be a beige-brown color, despite the fact that the style of you surrounds (classics, kitsch, vintage or ar-nouvo).

The tile feature is that it easily imitates other materials: stone, wood, glass. A popular decoration will be a watercolor drawing or divorce patterns. Small pollution, spots are practically not visible with them. When laying tiles, pay attention to problem areas, seams. Light grout over time will lose its original color. It is important at the beginning of the beginning finishing work use only qualitative materials With dirt-repellent, moisture-resistant components, for example, like epoxy grout.

You can also choose a rectified tile, in which the distance between the seams does not exceed 2 mm. In such a case, the darkened areas during operation will not be noticeable. Experts advise you to choose a tile with a special coating, which perfectly opposes the aggressive environment. With such material, it will not be scary to use any chemical means even with abrasive particles in the composition.

Exists great amount laying options italian tile. You can choose a chess cage, traditional or displaced. It is possible to arrange it diagonally on the Soviet motive or a kaleidoscope (in a color discern). If you select a 10 x 10 cm ceramic tile, then when laying can do without additional trimming. It looks great in the kitchens of a small size.

Reduced the finishing time with ceramic tiles will turn out if you purchase medium samples from 30 x 30 cm and above. They can imitate small tiles, have slots, deepening, but will be laid several times faster.

Photo Plot
An apron is unusually fashionable, made with the participation of photo filter. It will become a unique decoration for the kitchen, will bring individuality, luxury to any interior. You can portray over the cooking surface absolutely any print, pattern or drawing, even your family photo. Such a finish will certainly inspire prepare delicious, appetizing dishes for their favorite households.

Glass
If you are a fighter for quality, strength and longevity, look at the models from kalen glass. It can be decorated with a pattern at any time, for example, from acrylic. The advantage of such a finish will be resistant to pollution, practicality in use, long term operation.

The product perfectly "gets around" with a cooking surface, transfers any temperature differences, does not miss moisture. It is possible to decorate the glass with drawings of large colors, images of birds, animals, vintage objects, fruits or vegetables, sweets.

Glitter glass will give the kitchen tidy at any lighting. It is believed that the glass, as well as the model from the laminate, is the most noble form of finish, it always looks concisely, expensive, prestigious. When mounting, it is better to use fasteners. You do not scratch the headset, facades, so repair and finishing works can be carried out at any stage of construction. The mirror apron will be the same popular, correcting all the shortcomings of the geometry of your kitchen.

Mosaic
Exquisite design of kitchen apron with a mosaic is trend, consists of contrasting shades, nontrivial colors. Mosaic will give a special charm kitchen, tenderness and elegance. When installing such a design, glue, grout, which takes most of the time to "eliminate" seams. It is also necessary to observe the order when laying a mosaic.

Plastic
For the absence of sufficient funds, it is possible to resort instead of apron of natural stone, Italian frescoes, to hypoallergenic plastic economy class. There are several options for such a kitchen finish:
from plastic based on MDF, chipboard or fiberboard;
the use of decorative plastic hot pressing;
creating a stunning visualization "under the tree", stone and other materials;
the use of plastic made of polycarbonate.

All models are easy to assemble, care for them, extending the service life every year. You can also think about a budget option from chipboard and plastic. This design is easy to make it yourself, replace if necessary. Quite often, the material is colorless, transparent. Under it will turn out to shove stylish wallpapers, create a photo printing.

This model exhibits excellent moisture resistance, high temperatures. Want to get apron at an affordable price without seams and joints - take into account the system from the chipboard!

Stone artificial
One of the most aesthetically attractive ideas will be the use of artificial stone. In this case, it is better that the countertop is framed from the same material. Despite its high cost, decoration is very popular among the secured owners of cottages, penthouses, townhouses.

When installing, high-quality work is required. experienced mastersthat will create an ideal picture of the interior. A neat handling of such a surface guarantees a long service life. The product perfectly transfers frequent cleaning, including wet.

Styles of decoration
For design in Loft style, the cable tile is suitable or model under the brick. She has rectangular shape And the bevelous chamfer at the edges, which is reminiscent of the brick. Such a finish will be perfectly looked in the classic and modern interior. There is an opportunity to choose how standard option In the amount of 10 x 20 cm and a large format to 15 x 45 cm.

As a rule, Cabanchik is produced in monophonic color, with a smooth glossy surface. Coloring is predominantly neutral, calm. The collections of the kitchen apron are customary to dilute with interesting photo printing, drawings with fruits, berries, sweets and other ideas on culinary topics.

photos
For kitych styles, the eclectics will suit the mosaic products. They give B. wooden house The atmosphere of well-being, comfort, joy. For the luxurious styles of Baroque, Avangard, Romanesque, Mediterranean will fit wall panels, which are important to provide space and symmetry. For Victorian Styles, pastoral still lifes are suitable, landscape of famous cities (ancient Greece, Venice, Florence, etc.). The tile imitating the lining can be supplemented with textured patterns, spectacular coating, stylized antique ornament.
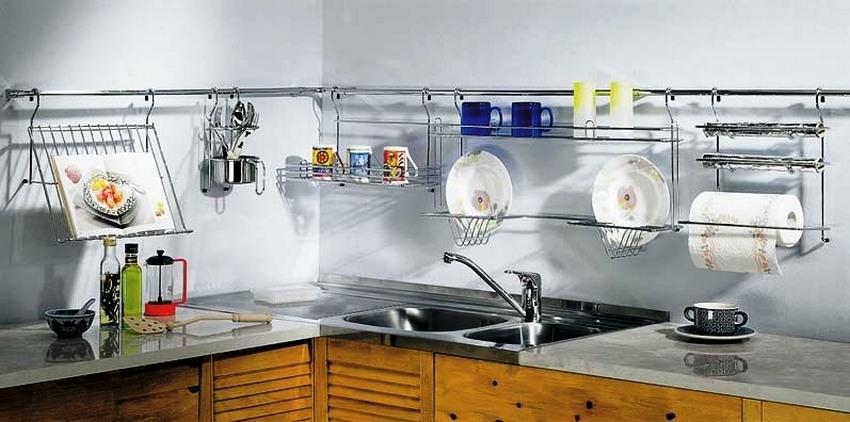
Facing kitchen walls The cafeter forms the so-called kitchen apron, framing the kitchen in a single style. Kitchen walls are best separated by a tile, as it can be easily cleaning it, wash off splashes and flux. On the miniature kitchen it is difficult to place many items so that they are fitted and have always been in convenient access. Realies are the horizontal nickel-plated beautiful steel tubes to which hooks and objects of dishes and utensils are suspended.
An apron of tiles is placed on the wall for 1-2 days, and all the work can be made with their own hands, even without an assistant.

Carefully consider the wall on the subject of cracks, since too weak layer of plaster may not withstand the severity of the tiles of the apron and even collapse.
By pressing, make sure that the wall does not give in pressure in any place.
The apron of a large area is placed on a specially plastered wall, and not on plasterboard platebecause It can crack and split under such a load.
Preparing for work: Tools and materials
Use the level and measuring roulette to create a tile laying scheme. It is necessary to make the markup of horizontal levels for which you will lay the tile.
Instead of drawing a line, you can simply tighten the special rope taken on the ends of the nails or use the folding thread.

Sample the tile on the wall in the order and place in which they will be then glued. It will become clear, in what place to cut the tile, which will not enter the whole. Of course, you need to try less to use the mill, but if you have to cut the tiles on the part, these fragments are desirable to put in the angle in which they will be less noticeable.
Tile can be laid in two ways:
- Square tile can be launched, in this case, it is advisable to purchase tiles in the form of a panel or tiles of two colors and glue them in a checker order;
- An oblong tile is quite possible to lay a waist, and there will be an illusion of brickwork.

Apron from tiles in the kitchen: where to start
Specialists advise to pre-lay a tile on the floor to see how it will look on the wall, and then make the same attack on the wall.

At the same time, the lower edges of the tiles will rest in it. After the glue is grabbed, you can remove the rail, while the remnants of the tile at the place where the rail was.
Before laying, check all the few times. It was here as nowhere is the principle "Seven times death - a rejection once."
Now you need to make glue. Divide it in the bucket according to the instructions. No need to stir too much solution, because it will begin to capture, and the surplus will have to throw away. The rule here is simple - just gradually add water, stirring dry glue to a semi-liquid consistency.
After stirring, leave the solution at rest for 10-15 minutes, and then mix it again. Now he is ready to use.
Working on a stretch of approximate value of 5 × 8 cm, apply glue with a spatula and smear it along the wall. The toothed spatula must be kept under some angle to the wall so that the glue fall into rectangular grooves on the sphate. Apply it with long, wide movements. The direction of the grooves does not matter, but all lines must be approximately parallel.

Stick one tile to check the thickness of the solution, and then tear off. If you see clear lines on the wall, then the solution is too dry. If something like tubercles arise on the wall of the kitchen, then the solution is too wet.
Start laying the tile with your own hands, moving from the middle of the wall to the edges. Between the tiles, it is necessary to lay special cruciform struts, so that the tiles are not shifted, and between them there were gaps, which will be filled with grout.
If the solution performs between the tiles after you put them, the spatula size is too large, you need to take a smaller spatula. Control tile laying horizontal.
Select and mix the grout. It needs to be divorced to the consistency of the toothpaste, and only in an amount sufficient to work for 20 minutes, the rest will simply be spoiled. Special cement mortar Used to fill the gaps of more than 3 mm.

After drying the grouts, treat the seams with silicone sealant to prevent the development of mold. Sealing the seams need every six months.
A few more advice:
- Working in a wet environment, it is better to use a silicone roller around the boundaries of the tile installation.
- If the drying film began to form on the surface of the liquid adhesive, then you need to remove it and throw it away.
- It is advisable to install ceramic apron not on plasterboard walls, and on a special cement shirt.
Apron in the kitchen with your own hands: instructions from A to Z (video)
Railings on the apron of kitchen: Convenient and functional
Railings are brilliant horizontal tubes that various kitchen utensils are suspended by sliding hooks. It is very convenient, as it saves the place in the lockers and drawers, the items are located in the field of view, and the brilliant clean items are cheerful and cheer, create a favorable impression.
Railings are suspended, as a rule, under hinged cabinets. They are located hooks and shelves:
- Flower pots for reviving entourage or incarnation of feng shui principles.
- Shelves with jars of spices, which should always be in front of the eyes.
- Knives and plow spoons, whites.
- Small wooden and plastic cutting boards.
- Gauntlets-tacks.
- Paper towel rolls.
Railing systems in the kitchen interior (video)
Railings are attached directly to special crossbars, navigable to the wall or to the bottom board of the mounted cabinet.
You do not need to do too long rails, as they can progress under the severity and collapse. Also should not hang on them heavy cast iron frying pan.

The railings themselves must be periodically wiped with a special solution, since the splashed nickel plated rails lose their gloss and beauty, the kitchen becomes sloppy.
Railings do it yourself: installation order (video)
The tiled apron in the kitchen consists of 4-5 rows of tiles, laid jack or brace, with their own hands between the worktop and the lower edges of the suspended cabinets. Such apron is done to maintain the purity and tidy of your kitchen, it can be done yourself. Often right on a tiled or ceramic apron install special beautiful steel rails, which hooks suspend large details The service of the type of whiskers, plowing and stirrers, as well as shelves for jars with spices or pans. In this case, the kitchen acquires a pleasant view of the workshop, in which all the details are decomposed in samples and are ready to use.
Design apron for kitchen with your own hands (photo ideas)


Aprons for the kitchen are made of various materials. The easiest, "classic", option since the times of the Soviet Union, is to dye part of the wall between the upper and lower cabinets headset with ordinary oil paint. It looked not too impressive, but it was easy to rub the wall from the soot and oily splashes. Sometimes the hostesses managed to get the film, which was glued onto the wall. Pictures on such a film were varied: from plant motifs to imitation tile tile. In the apartments of many people a kitchen apron facing tiles.
Ceramic Tile Aprons
Tile has a high indicator mechanical strength. She is not terrible water, humidity and even hot couples. If it is laid correctly, high-quality glue mixtures and grouts are used, the kitchen apron will look new even several years after repair. Otherwise, some tiles or their fragments crack or fall due to uneven heating of different segments. The advantages of ceramic tiles can be attributed:
- no interaction with compounds that are formed when cooking;
- environmental friendliness;
- simplicity in cleaning;
- long service life;
- a variety of colors, shapes, textures, sizes.
This wonderful material has its drawbacks. First, before placing the tiles, the entire surface of the wall must be aligned and specially prepared. Secondly, the facing of even the fragment of the wall, drying, grout require a considerable amount of time. Thirdly, in many respects the result of the work depends on the qualification of the tiler. Fourth, high-quality ceramic tile for the kitchen is quite expensive.
Aprons from Ceramographic
Porcelain tiles are more expensive than ceramic tile, but it is more durable, stronger, perfectly tolerates temperature differences, resistant to mechanical effects. It is especially important that porcelain stoneware is painted for the whole depth, and not only in top layer, Therefore, little is subject to abrasion. Most porcelain tiles are made enough large sizesTherefore, for the kitchen apron they will need a little. So, there will be fewer joints and seams, it is easier to care. For porcelain stoneware, conventional glue mixtures on a cement basis, therefore, will have to acquire special compositionsDesigned for this material.
Natural Stone Aprons
Surfaces decorated with natural stone, look rich and very exquisite. Usually they ask the style of the whole kitchen interior, because a cheap plastic headset will look at this room just ridiculous. As a rule, granite uses for the manufacture of stone aprons. It is durable and dense material, practically not absorbing water. The walls of the walls often produce a serpentine, sandstone, quartzite, onyx, marble, basalt, quartz, shale. From their surfaces, it is somewhat more difficult to remove pollution, especially so-old. Stone aprons are not as common as ceramic, since beauty often interferes with functionality and is very expensive.
Artificial Stone Aprons
Such aprons are not everyone can distinguish from those that are made of natural stone, but the imitation is much cheaper. Artificial stone is made from acrylic resin with the addition of mineral fillers and painting pigments.
Advantages of artificial stone:
- no pore, therefore, it does not absorb particles of fat, couples and other pollution;
- low weight;
- ease of docking elements;
- the ability to make a practically monolithic surface;
- variety of designs;
- durability;
- acceptable price.
Mosaic Tile Aprons
Mosaic always looks in the interior very effectively, but make a high-quality web from hundreds of small pieces - a rather laborious occupation. The most popular the following methods of mosaic styling:
- Monocolor - layout of the mosaic of the same color. For creating decorative effect can be used different types And grout colors.
- Mix - using a mosaic of one color, but different shades. Such work is more expensive than one-color layout, because the wizard can perform a smooth transition from light to the dark (gradient), lay out the drawing horizontally or vertical, make a geometric ornament, etc. It all depends on the plan of the owners or the designer solution.
- Panno - Making a kitchen apron from a mosaic with a well-defined pattern.
- Combined laying. When creating a combined apron on a par with a mosaic, natural stone, ceramic tiles, decorative elements are used.
In essence, the mosaic is the same ceramic tile, but much smaller sizes. It can be a glossy or matte, textured or smooth, with sparkles, splashes, sand, glitter. Smalta is also popular - a mixture of glass and metal oxides. It looks original, because each element is different from the neighboring barely caught colors. Competent cuisine lighting will create the effect that the apron is as if shines from the inside. Glass mosaic with minerals (Iridium and Aventurine) will force the owners to fork out, but the apron from such a material with its flickering surface will enrich any interior.
Porcelain booking mosaic is the magnificent imitation of a natural stone that does not absorb chemical compounds and moisture. Metal mosaic is often used in the interiors in hi-Tech style. Of course, in most cases the basis is not metal, but other materials (for example, plastic, ceramics, glass), for which foil is pasted. Alas, pollution on pseudometal are visible, in most cases, perfectly. Such a coating is prone to abrasion.
The main disadvantage of the mosaic is the complexity of its calculation and grout due to the large number of elements and seams.
The kitchen apron can be done far from each material. A high degree of professionalism and great work experience requires working with mDF panels Or with a glass mosaic, however, in some cases, when installing can be done on their own.
Preparation of the room
If you make an apron for a kitchen from MDF, plastic panels or glass, then you can start working when the kitchen set is already installed. Sometimes it is still necessary to move the furniture from the wall. Working with ceramics and porcelain suggests "wet" processes, so there should be no lockers, plates and refrigerators near the wall. It is important to know in advance how highly the lockers will hang, which will be the height of the table top and how the extract is attached to accurately calculate the amount of materials.
The kitchen should be inserted windows, electrical wiring and conversion are mounted. Walls should be placed, if necessary to align. When finishing the walls should not be applied gypsum spacure, and polymer cement mixtures. The floor should already be ready for the floor: aligned and not. The temperature in the room is recommended to maintain not lower than +5 and not higher than +30 degrees Celsius, humidity - no more than 55%.
On the wall on which the apron will be marked. The contours of future cabinets and countertops, exhaust and embedded equipment are indicated. To apply the markup of the apron itself, a level (laser or hydraulic) is required. From one of the edges make the height of the countertop, with the help of the level the same mark make on the other edge of the wall. With the help of a painting tape or cord, a horizontal line indicates the position of the countertop. In the same way, denote the line of the lower edge hinged cabinets. The tile area is calculated by special calculators, which is easy to find online versions on the Internet.
Preparing the segments of the apron to laying
The kitchen apron from the ceramic tile was almost out of fashion, a ceramic and glass mosaic came to replace it, the laying of which has many nuances.
Mosaic tile is square segments (chips) with a finger from 1 to 5 cm. The most "running" - squares in size 2x2 cm. There are also chips of triangular, rectangular, hexagonal and other forms. The more fancy form, the more difficult to lay out it. To facilitate the work of the chips, you can combine in the matrix of convenient size. Mosaic facial side It is possible to stick to the greasy tape. After each segment is entrenched in the place allotted on the wall, and the adhesive base will completely dry, the greasy tape is simply separated. Another convenient method is a polymer mesh, which is located on the back of the matrix. Sometimes a mosaic is already sold with such a grid.
Between chips necessarily the same gaps are left to apply grout. In the chips of 2x2, the matrix 15x15 segments is formed, making a gap of 1 or 1.5 mm.
Selection of adhesive composition
The most expensive adhesive for apron of mosaic - not the best way. First, it is not a fact that it will be the highest quality. Secondly, apron is still not an industrial workshop, not the wall of the pool and the facade of the house, and therefore the environment in the kitchen can not be called too aggressive. Adhesives for mosaic are:
- cement mixtures with modifying additives (cheap, sold in any construction store, usually good quality);
- special adhesive compositions for mosaic, ceramics, porcelain stoneware, glass (have good adhesion, easy to use, price average);
- single and two-component polyurethane adhesive mixtures;
- two-component epoxy glue (the most expensive, but the highest quality formulations).
Choosing Zatirki
Interputer seams always require grout. It protects the surface from the penetration of water, organic and inorganic pollution, mold and fungi. With the right choice of grout "enriched" appearance Kitchen apron. The most expensive, but the most popular is epoxy grout. Cheaper cement-based compounds, even if Latex added in them, still absorb moisture, epoxy - never. Over time, the seams with epoxy grout will not flashate, lose color, they are well tolerated the temperature differences. The disadvantages of this material include relatively complex application technology. The first component of such a grout is the composition of epoxy resin With quartz sand or other mineral filler, the second is a hardener. Sometimes epoxy grout has a third component - the coloring pigment, which is added to the desired concentration wizard.
The process of laying a mosaic apron
Prepare the tool and room. Book low-quality tile segments. Place the work area for garbage collection, water bucket, ensure that there is enough light in the room. Note the start of work on the wall, calculate the number of segments on the horizontal and vertical line, mark the places where the chips may be needed. Next, several processes are performed.
- Rule Check the wall plane on the place of the future apron. If there are influx from putty, they are removed.
- The surface of the wall is eliminated from dust, apply a primer with a deep penetration rate.
- The layout of the mosaic begins. Recommended at a time not to upload more than 7-9 matrices. First, the matrices are folded on the floor or on the table, align in one line, observing the uniformity of the gaps, measure the total length and width. On the wall applies marks of sizes, check construction level Accuracy of horizontal and vertical tags.
- Prepare adhesive mix By the recipe specified on the package with the composition. It is better to cook a mixture with small portions, since over time they lose their properties. First, the mixture is stirred slowly, then accelerated, getting a consistency as a thick sour cream. After 5 minutes, the glue is mixed again.
- The mid-size spatula of the glue composition is applied to the heater, and then apply the apron to the zone, evenly smearing it, as if smearing the oil on bread.
- Shallow spatula made shallow uniform furrows over the entire surface of the composition. Excess glue must be removed.
- The mosaic leaf is taken over the corners and apply, according to previously applied marks. If necessary, check the construction level.
- With the help of rubber ironing or rubber wallpaper roller, the mosaic slightly pressed against the wall. Also come with the rest of the mosaic matrices.
- If necessary, individual chips are partially or completely cut, if they interfere with the submersion and other stationary elements on the wall. Within 20-25 minutes after gluing, the position of the tile can be adjusted. If the glue composition was divorced correctly, it will not be required.
- When all matrices are pasted, they are cleaned, wash away from glue residues. All seams are cleaned rubber spatula and wooden (or plastic) wand.
- They produce stamps of seams.
Laying the classic apron from ceramic tiles is made in the same way, but the process is much easier. Instead of matrices from chips, separate tiles are taken. For ceramic tiles, other adhesive compositions and grouts are often required, as a rule, inexpensive.
In order for the readers, there were no multi-cams about the word apron, the authors consider to tell their duty to the respected visitors of our portal that the article will go on the surface of the wall between the desktop and mounted cabinets, and not about the subject of clothing. Although without one, and no other does not do any modern kitchen and no modern mistress.
When repairing in the apartment or construction of the house, the greatest experiences are not experiencing the fact that it is necessary to part with significant amounts, but from incredible chime flour. The number of suggestions of materials, color and design solutions, various services are so huge that their choice occupies much more time than, actually, repair itself. This applies to the kitchen apron. But the authors can immediately answer main question Readers, - What apron is the best? The answer is unambiguous: the best apron is hand Made Apron, regardless of what material. On how to make a apron in the kitchen with your own hands, and there will be our article. And, of course, attention will be paid to "insignificant little things" in the form of a review of materials and technologies for their installation.
Requirements for kitchen aprons in matters of combination of functionality and beauty
If we consider the etymology of the word apron (in translations from Polish and German, it means an apron or a hemp), then it will become clear that it was originally conceived as a workwear, which was necessary to protect against pollution, which inevitably accompany food cooking. Polish and German linguists are still arguing who else by right belongs to this word although this comfortable thing We used not only they, but most of the peoples in the world. Therefore, etymological battles let them pass by the world of reasonable people, that is us with you. The main thing is to understand the fact that the first and most importantly purpose of the apron is a defense.
However, who said that defense should be rude and ugly? She can be beautiful, can please their owners, not forgetting about the main function. And the current variety of materials and technologies allows harmoniously getting ready and functionality, and beauty. But if you suddenly get a choice than to sacrifice, the unequivocal answer is as possible - you can sacrifice a little beauty in favor of functionality, but you can not do on the contrary.
What do you need a kitchen apron
Kitchen Aprons of glass
Most people have a subconscious fear to the glass. It is associated with something extremely fragile, brittle and sharp. However, the glass is a glass. Now there are countertops, chairs and even steps of stairs. It did not go around this wonderful material and kitchen aprons.
The glass for the aprons is not used, and tempered, 6-8 mm thick, which is more stronger and withstands the heating to 300 ° C. Also used glass type "Triplex", where two layers are glued with a special film or laminating fluid. Glass can be both glossy and matte, both painted in any color and colorless, as with a pattern, and without it.
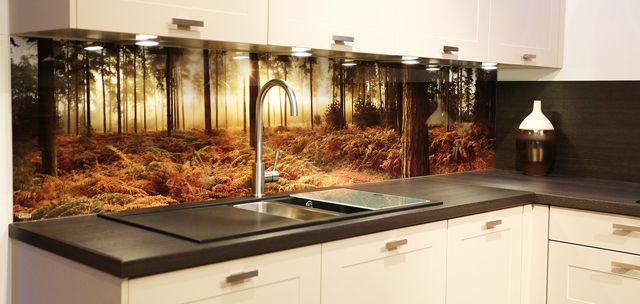
Best of all, of course, use all the possibilities of the kitchen apron of glass and order it with a pattern. Such aprons are also called skinali. But should consider that it can different ways:
- First, transparent glass can be used, which is fixed on the wall marked with photo wallpapers. This is the most fiscal option, but it should be noted that moisture can penetrate the gap between wallpaper and glass, which will spoil the wallpaper or pollut the glass than the whole look will spoil.
- Secondly, the image can be printed on a vinyl film that is glued with back side. This solution is better, but the film over time can also be peeling.
- Thirdly, the image can be printed on the glass itself with the back of the apron using UV technologies (ultraviolet) printing.
- Fourth, the image can be printed by UV ink inside the glass - triplex. This is the best, but also the most expensive option.
- And finally modern technologies Allow the volumetric 3D images and on kitchen aprons including. Watching such aprons is very unusual, it is very expensive.

Glass aprons can be "revived" competently applying backlight from LEDs mounted both outside and inside the glass. The backlight can be both monochrome and color. You can organize various light scenarios for a different mood. The modern market for repair and design of premises offers as many options that can be embodied both a beautiful and competent solution and any designer madness. If only money was enough.
The advantages of glass aprons are obvious, this is moisture resistance, chemical inertness, strength, ease of cleaning, beautiful and original appearance. Of the disadvantages, it is worth noting a high price and the fact that it is still a glass that can be collapsed with an impact load. The aprons from tempered glass or triplex during breaking do not form sharp traumatic fragments. But it will still not return spent a lot of money.
Glass kitchen aprons can also be attached to both through fasteners and with special elements. When removing the size and planning of the workspace of the kitchen, it is always worth considering all that will be installed on the apron. It can be a few sockets, switches, holes for attaching rails - a mounted system for accommodating any kitchen utensils. Just like with the panels from the MDF, the whole range of services for measurements, manufacturing and installation is better to trust the one who did it many times, that is, professionals.
Metal kitchen aprons
For those who intend to create a truly, metal aprons are specially offered. They look very unusual and in some cases even beautiful. Fans of the style of "techno" or "loft" it is possible to use metal in the kitchen, but for this you need to really possess a subtle artistic taste or invite a designer with such qualities that is rare. The line between harmony, beauty and madness at metal aprons is very thin, about the same as the mirrored aprons.

Metal aprons can be performed as large stainless steel sheets and tiles and even a mosaic. The functional quality of the metal is doubtful. With good hygienicness, the metal has excellent adhesiveness with all kinds of kitchen pollution and very capricious in choosing tools for cleaning. He does not tolerate abrasive.
Previously, it was noted that the installation of apron from the MDF or glass panels is better to fully endure those who, in fact, will make them. Therefore, consider other options that you can make the owner with your own hands. But before installation, you need to decide on what stage you need to make apron, and what requirements should be the room.
Requirements for the room and to surfaces
Installation of aprons from MDF, glass or plastic panels can already be done when the kitchen set is installed. Not only can I need, as it is necessary, since it takes a very high accuracy of measurements, which will allow you to perfectly enter apron into the workspace. The only thing that when installing will need to simply move away the furniture from the wall, and with the end-to-end installation it will not even have to do.
If the apron will be made from ceramic tiles, porcelain stoneware, mosaic, natural or artificial stone, then here without wet processes not enough. Therefore, furniture should not be next to those walls where the apron will be, but the exact dimensions of the furniture should be known and how it will be installed (the height of the table top, the height of the cabinets, the distance between the working surface and the lower plane of the cabinets).
What requirements are presented to the kitchen for the installation of apron.
- The kitchen should be inserted windows.
- Must be mounted, all the submersers are installed.
- Walls should be plastered and leveled. On the wall where the apron will be mounted, it is unacceptable to use gypsum-based putty, only polymer cement mixtures can be used.
- The floor must be aligned with an already determined finish coating. Naturally, it should be smooth and horizontal.
- The kitchen should have a temperature not lower than + 5 ° C and no more than + 30 ° C, humidity no more than 60%.
In other words, the room must be fully prepared for finish finish - Wallpaper sticking, applying finishing decorative plaster or painting. The surface on which the apron will be mounted should be dry and perfectly smooth. If a glass, mosaic of glass or smalt will be used for apron, the surface must be covered with polymer cement-based polymer cement mixtures.
Marking of kitchen apron
On the wall completely ready for facing the wall, it is necessary to mark the position of the position of the future apron. But for this there should be a clear idea of \u200b\u200bthe placement of the kitchen headset. Best of all, if it is already purchased and the scheme of its placement will be compiled. What you need to take into account when marking a kitchen apron.
- First of all, the apron should be located in the space between the tabletop and the lower plane of the hinged cabinets, and it is desirable that the apron can go beyond the table top and cabinets at least 2 cm. Most often the distance between the tabletop make 60 cm, but it is permissible to do in the range of 45 -70 cm, it all depends on the growth of people who will enjoy the kitchen.
- The height of the kitchen headset also depends on the growth of people, but, in one family there may be people of different growth, and in the headset often embed household appliances: washing and dishwashers, freezing chambers. Therefore, in most cases, 88-90 cm make height, and people with "outstanding growth" (more than 200 cm and less than 150 cm) do not have to bend or bounce, it will simply be a little inconvenience, to which they get used very quickly.
 Most of the well-made kitchen heads are made for the convenience of medium-sized people.
 - If the standard extract is used dome type, The apron should continue to height over its entire width and reach it to its lower edge, and better if it goes under the stretch at least 5 cm or, which is even better to reach the ceiling. At the same time, for the side surfaces of the cabinets, it is recommended to start the apron as much as a distance of 5 cm.
- The height of the lower edge of the hood domes over the table top should be at least 65 cm for electric stoves, and 75 cm - for gas plates.
- The standard width of gas or electrical kitchen plates or cooking surfaces can be 30 cm, 45 cm, 50 cm or 60 cm. There are dimensions and more, but it already refers to professional-use plates. The most frequently used stoves are 60 cm wide. The size of the hood domes should not be less than the width of the plate, and better if they are greater than one step. For example, for a plate or a cooking surface, 60 cm wide should be selected with an exhaust of at least 80 cm. The distance between the hollow cabinets should allow free to fit the hood.
- An apron in the kitchen does not have to be located only between the tabletop and the upper mounted cabinets. Sometimes it needs to be done with the side of the side walls, especially this is relevant in the area of \u200b\u200bthe washing or plates, if they are located at the edges. Also, the influence on it can be provided nearby window or doorway.

To mark the position of the apron on the wall, you will need a laser, or hydraulic level. Laser, of course, it is more convenient to work, but the hydraulic also gives very high accuracy. It is desirable that the kitchen set is already purchased, but not yet installed on the spot. In the extreme case, you can measure the future cuisine in the store, where it will be purchased or have documentation indicating all sizes. For markup it is necessary:
- On the wall where the kitchen set will be installed, from one of the edges there is a mark of the position of the upper plane of the table top.
- The level of the mark is transferred to another edge of the wall.
- Using the painting cord, the horizontal line of the tabletop position is fed.
- If necessary, if the kitchen is an angular or apron will go to other walls, then a similar markup is made on other walls.
- The position of the lower edge of the hinged cabinets is made based on the size of a particular kitchen headset, which will be subsequently installed in the kitchen.
- The positions of the position of the lower edge of the hinged cabinets are transferred to all the walls where the kitchen apron will be installed.
- On the placed parallel lines there is a location kitchen Plate or hob.
- The position of the lower edge of the hood domes is noted (at least 65 cm for electric stoves, 75 cm - for gas stoves from the tabletop).
- It is noted the position of the side surfaces of mounted cabinets at the location of the exhaust dome, it should freely enter the space between the cabinets, better if there is a gap of 1-3 cm with each of the sides.
- It is noted the top edge of the apron located in the area of \u200b\u200bthe hood. The apron must go minimally 5 cm under the hood, and it is better to do it to the ceiling.
After these actions on the wall, the lines of the future kitchen headset will be marked. But, as noted earlier, the apron is advisable to make it, so that its surface has come to the table top or headset. For the tabletop and the lower edge of the hinged closets, the apron is desirable to shut up at a distance of at least 20 mm, and in the area of \u200b\u200bthe arrangement of the exhaust and on the right, the apron must be opened under the cabinets at a distance of at least 50 mm. Therefore, in parallel with horizontal and vertical position lines kitchen furniture Fight lines of the position of the apron
When planning and markup, the apron should also take into account the size of the tile or mosaic, which will be used. For example, if the tile is 20 cm in height, it is completely logical that it is advantageous to make three rows of tiles of 20 cm, and the lumen between the tabletop and the lower edge of the mounted cabinets make 56 cm, given the fact that 2 cm on top and bottom will go under furniture. If the tile of other sizes is applied, then it is also necessary to take into account. If decorative elements are applied - friezes and borders, then it is necessary to achieve that they are visible. What is the point of using expensive elements that will be hidden from a look under furniture. Each case is individual and requires its differentiated approach.
After applying all the lines of marking indicating the position of kitchen furniture and apron, you need to calculate the area of \u200b\u200bthe apron. The authors of the article are recommended to use the calculator, in which it is necessary to specify only the lumen between the tabletop and the lower edge of the hinged cabinets, as well as the distance between vertical surfaces Cabinets and height of apron over the lower surface of the cabinets in the area of \u200b\u200bthe hood. All attachments of the apron under the furniture (2 cm on the horizontal portion of the apron and 5 cm in the area of \u200b\u200bthe hood) calculator already automatically takes into account.
And the gas stove should be closed by a practical screen resistant to moisture and high temperatures. The appearance of this site is also not in the last place, it is the wall above the working area that is often used to accommodate the accents of the kitchen interior. If the installation of the apron is planned to produce independently, the complexity and duration of installation plays a big role. To do right choiceYou need to select an option with the optimal ratio of all these qualities.
The surface of the wall above the table top is the most loaded area of \u200b\u200bthe kitchen. Here are household appliances, work area and gas stove. Not every type of finish is able to adequately withstand all kinds of influences related to the operation of the kitchen on its direct purpose. Therefore, a number of requirements are presented to the kitchen apron:
- Resistance to high temperatures. Since the heating of the screen surface occurs unevenly, the material should not expand significantly. Flammable and low melting point is also not top Qualities For apron;
- Moisture resistance. The effects of liquids on the surface can manifest itself different types: direct contact, splashes, couples. Therefore, apron needs to be selected from materials that do not absorb water;
- Ease of cleaning. The surface of the screen in the kitchen is subjected to different types of contaminants: dust, fat, food particles. It is important that the material does not change its appearance, even after a long contact with mud;
- Mechanical strength. Since to clean the surface of the apron will have often, and sometimes intensively, the coating should be resistant to abrasive substances and rigid brushes. Micro-sacrapines and sections of an erased paint - definitely will not decorate the kitchen;
- Safety. Environmental purity and lack of harmful evaporations are one of the most important qualities of the kitchen apron, because it can be in contact with food.
A lot of materials are represented on the market, which fully or partially comply with these requirements. Nevertheless, it is a difficult choice that requires accounting for all features of the installation, advantages and disadvantages of different types of aprons.
Types of materials for apron
Decide on the choice of material for the protective screen in the kitchen is better before installing the headset, as some types of finishes are mounted on a free wall.
Aprons from whole or large fragments can be fixed and after placing furniture if they do not require "wet" types of work.
Before mounting any apron, it is necessary to prepare the surface of the wall, check its integrity and reliability. It will not be superfluous to process with soil compositions with an antiseptic to protect against moisture and its inevitable satellites - fungus and mold. It is important to produce wiring in advance and make outlets for outlets.
When the wall plane is prepared, it is possible to measure the area for apron and proceed to the choice of the most suitable materials. To do this, you can compare their advantages and disadvantages, and also assess possible difficulties when installing.
Tile
Classic Facing Facing Apron - Tile of different shapessize and design. It is practical and accessible. Combinations of different colors and decorations of the tile allow you to create unique and beautiful protective screens for the kitchen. 
Features of the material
Tile - a win-win option for the design of apron. It will always be in fashion and will provide a comfortable and safe operation Kitchen. The popularity of tiles is due to a number of advantages that distinguish it from other types of materials:
- Resistant to mechanical stress. Minor strikes will not bring harm to it, and the glaze, which is covered facial surface Stable tolerate intensive cleaning;
- Does not absorb moisture. No wonder it is used for laying in the most wet places Houses in the bathroom and toilet. In the kitchen, it will perform a wall protection function from splashes and a pair flawlessly;
- Easily tolerates uneven heating. Extension is compensated by the presence of a short distance between individual elements Finishes. But it is important to choose a good adhesive base and grout;
- Durable. Lifetime of the apron from tile under the condition high-quality stacking and glue - at least 15 - 20 years;
- Safe. The material is environmentally friendly and non-combustible.
Among the shortcomings of the tiles are the most significant - seams that are difficult to clean from contamination, and the long-term effect on them can provoke the appearance of mold and fungus. But if you do not suck and choose a high-quality grout, these inconvenience can be avoided.
Installation Apron from tile
So that the tile holds well on the wall surface, it is necessary to ensure all the conditions for high-quality adhesion. Check the plaster for emptiness and weak points. Progress and make notches if the base is covered with a layer of paint that cannot be removed.
To lay the tile with their own hands, special tools and materials will be required:
- Glue;
- Spatula with jar;
- Crosses for seams;
- Grout;
- Platekorez.
Installation can be performed in different ways. The easiest - horizontal or vertical, it is best to choose for self-layingIf there are no professional skills. More complex species will require the hands of a specialist: a Christmas tree, with a displacement, diagonally. 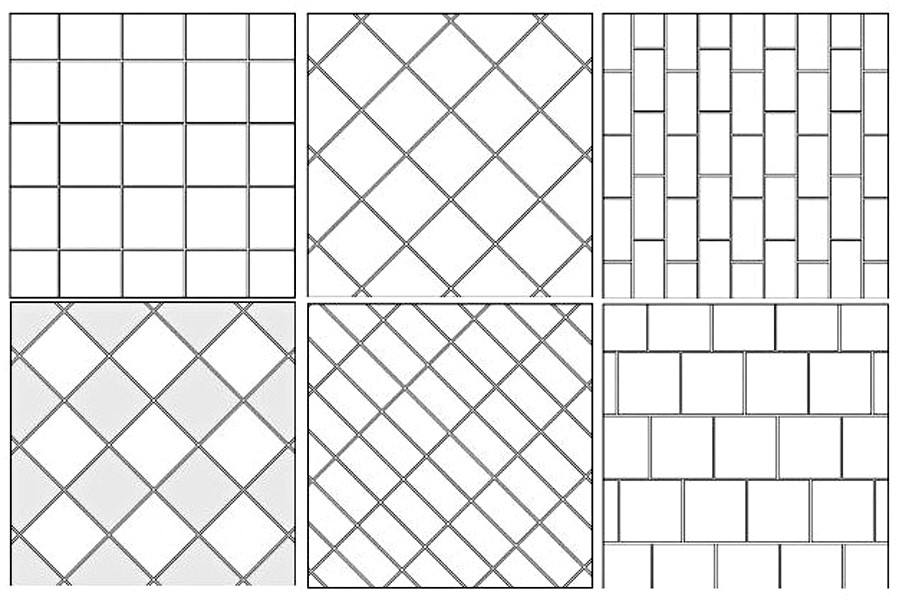
Stacking must be made before mounting the kitchen headset. And since the first row of tiles will begin not from the floor, but from the middle of the wall, it is necessary to temporarily install the rail guide.
The perfect option, if the size of the tile is selected exactly by the size of the apron, then it does not have to cut it. But if there are outlets on the wall plane, you will need to work with the plottle. Guide to the use of this tool is presented on video.
Changing thick adhesive composition You can adjust small irregularities wall, but not more than 10 mm. The layer exceeding this value is unacceptable for lining walls. The tile can "swim" or fall off due to uneven drying of the glue.
In the space between separate fragments Be sure to insert crosses, and not to remove them while the composition does not grab. Swipping seams are produced only after complete drying.
Mosaic
An apron from Mosaic will be a bright accent of the whole kitchen. The diversity of laying options and materials of elements is able to provide harmony with design and individuality. But work with this type of finish requires patience, skills and selection high quality glue and composition for grouting seams. 
Features of the material
Mosaic has all the advantages of the tile, it is not afraid of moisture and contamination, resistant to temperatures and mechanical damage, while has a number of features:
- It is easier to put it around protrusions and sockets;
- To work with a mosaic, white glue is required;
- It has a wider selection of materials for the production of elements: ceramics, glass, stone, metal, mirror.
The lack of mosaic, the same as in the tile - seams, which in this case is much larger. Only epoxy grout will be suitable for their seal.
Installation of mosaic
Stop items in different ways. Designers use the game with color and shades, creating real works of art that will definitely be unique.
Types of laying mosaic:

For mounting, the same set of tools will be required as for tiles. The glue is applied to the wall and on the panel of mosaic. The fragment is installed on apron and press a little. If there is a protective paper layer on the tile, it must be moistened after a few minutes after fixing the fragments on the wall and gently remove it.
48 hours after installing all elements, you can proceed to grout. The raster is applied by a rubber spatula and evenly distributed over the surface. After 20 minutes you can remove excess grouts with a soft cloth.
Glass
The aprons for the kitchen produce from tempered glass. It is stronger than usual and able to withstand high temperatures. On this screen, you can place any image, drawing or imitating texture. 
Features of the material
Glass apron is a practical and safe option. From its surface, contamination is easily removed. Tempered glass or triplex (two glued glass films) are resistant to mechanical effects. If the screen is broken, then in the first case it falls into small fragments with non-footing edges, in the second - fragments are held on the film.
For mounting, the apron make a glass panel by accurate sizes Plot, so it remains only to fix. Seams are most often missing.
The image can be applied in different ways, they differ in price, complexity and practicality.
- Watching photographic windows of transparent glass - inexpensive and fast, but if the moisture falls under the glass, the image will be spoiled;
- Printing on a vinyl film - a more reliable option, the film is not afraid of moisture, but over time it can be detached from the glass;
- Ultraviolet printing on glass - durable and high-quality image, resistant to any kind of external influences;
- UV seal inside Triplex is the most reliable and expensive option, the image is protected on both sides.
There are practically no flaws from this species of the apron. This is a beautiful and functional solution. In the production of glass can do the necessary holes for kitchen utensils and sockets. Stop in the selection of this material can only its high cost. The service life depends on the quality of the printed image. Clean frosted glass or seal inside Triplex can serve an unlimited time.
Installation of glass apron
Installation of glass apron is made after mounting the kitchen headset. Therefore, when measuring the length and width of the site, great accuracy is necessary. Fixation can be made in different ways:
- Through holes (the most reliable version of the attachment, it is used by professionals, but when fixing bolts it is important to be extremely neat, so as not to break the panel; for masking fasteners you can buy decorative caps);
- Sheds (do not require drilling the surface of the glass, suitable for small aprons);
- Liquid nails (the easiest way to install with your own hands, but the surface of the wall should be perfectly smooth).
The junction of the apron with the wall is better to close the sealant so that moisture does not fall into it. All holes in the panel must be produced at the production stage. You can not drill the screen.
MDF (Middle Density Trement Plates)
A compromise design version of the kitchen apron - MDF. Plates are available at a price and attractive outwardly. But their use is limited, so before you choose your choice on this material it is worth relating to its dignity and disadvantages. 
Features of the material
MDF is widely used in the finish of the house and the furniture assembly. It is also suitable for the kitchen. It does not require the perfect alignment of the wall surface.
The facilities of the material are unlimited: it can have any shade and texture, imitate other types of finishes, such as stone and tile, photo printing technique to the surface can be applied any image.
Installation is made simply and quickly. The service life of the material is only a few years, but considering low cost, such a apron can often be changed, which will not only allow you to get rid of the damaged screen, but also updates the cuisine.
The aprons from MDF are not suitable for the kitchen, which is intensively exploited. This option is appropriate for busy people who rarely prepare and contain a room in perfect cleanliness..
The material has some drawbacks:
- Do not stand high temperatures;
- Frequent direct contact with water leads to deformation and peeling the protective coating;
- Abrasive substances and solvents are unsuitable for cleaning MDF;
- The screen surface is less durable than glass and tiles.
Despite the presence of all these minuses, the material is often used for kitchen aprons. It looks beautiful and expensive, while the cost of MDF is much lower than other types of finishes.
Installation of MDF.
Perhaps there is nothing easier than installing an apron from MDF. Its sizes can be adjusted on the spot, but the locations of the sections will need to be blocked. Easy to cut the jigsaw holes for the socket and drill the hook plate.
The installation consists in fixing the panel with self-draws or liquid nails to the wall plane. If the main surface is uneven, you can pre-place the rails on it and create an ideal plane.
PVC panels
The most budget version of the design of the kitchen apron is the covering of PVC panels. They are offered in the market in large quantities, have wide selection Color design and design. 
Features of the material
The benefits of the panels are not much. If you compare them with the material from the same price category - MDF, then plastic is distinguished by excellent moisture resistance, but also as a chipboard does not tolerate high temperatures and cleaning abrasives.
In addition to the deformation during heating, plastic is easily flammified, toxic substances, so gas stove He is not a place. It is good for the working area, where they are often prepared, since contact with water and pollution does not affect its appearance. The service life is also a short to a maximum of 5 to 7 years with proper care.
Installation of panels
For installation, you will need: guide elements (case), self-tapping screw, screwdriver, stationery knife. The panels are bonded among themselves through the spike-groove system, while forming absolutely hermetic compounds.
Installation of panels can be produced on any wall with irregularities and defects, the main thing is to have to screw the screws for the guides.
The lamp is exhibited by level. From above and below - guide elements, then vertical crossbars with a step of no more than 60 cm.
The panels are fixed with self-drawing to the crate, each subsequent closes the place of fixation of the previous and fasteners. Therefore, an externally apron looks pretty presentable. Cut plastic can be a stationery knife or hacksaw with small tooth. All holes need to be prepared before mounting. The edges of the finished apron in height and width, if they are visible, it is necessary to arrange decorative elements, they are sold in the same department where the panels themselves.
A rock
Natural and artificial stone - one of best Materials For kitchen apron in terms of practicality. It has all the necessary qualities. Durable and looks expensive and prestigious. 
Features of the material
Such apron requires relevant kitchen design. Dear countertop and exquisite facades will make a worthy company. For the production of screens use different types of stone. Most often - granite, less often - marble, basalt, slate, quartz. It is best if the surface is polished, it is easier to remove pollution from it.
Artificial stone is much cheaper than natural, while possesses the same properties. But deprived, so it does not absorb moisture and is better cleaned by contamination. It is easier and can be done more subtle. The durability of these materials does not compare with any other.
Montage Stone Apron
Stone products most often produced to order individually. Installation must be made after the installation of furniture.
If the stone has a type of tile, then it can be put on his own hands, according to the same scheme as ceramic. Mounting a solid panel is better to entrust professionals, since the material is expensive, and when independent installationwithout having work skills, you can damage the product.
Installation Apron from solid panels - stone, MDF, PVC and glass is made after installing the kitchen headset, so there will be no problems with the removal of measurements and the place of placement of the screen. It is more difficult to determine the location of the apron, which is installed before installing the headset, it is important to consider the height of the lower cabinets, and flooring and furniture placement scheme. How to do it right, presented on video.
When choosing an apron for the kitchen, it is more important yet not its appearance, but a price category and practicality. And the aesthetics problem has long been solved by manufacturers - all types of materials are presented in various color solutions and design versions.