We make a picnic table with our own hands: step by step instructions. How to make a round or rectangular table out of wood
The word dacha is associated with everyone small garden, a vegetable garden and a comfortable seating area. After all, after working in the garden, you really want to relax in nature, have a barbecue and just relax with your family.
To equip a recreation area, you need to build a gazebo or make a canopy and set up with a bench or chairs.
Such a piece of furniture does not have to be bought ready-made in the store. You can do it yourself if you stock up free time, drawings, tools.
Feature of tables for use on outdoors is them:

The table at the dacha can be made from different materials:
- wood;
- vines;
- metal;
- natural or artificial stone.
Each individual option has its own advantages. But the most are in great demand wooden models ... Since it is pleasant and convenient to work with wood, and you can make a product of any complexity on your own, without much effort.
What kind of wood to make?
Before starting construction country table carefully select the wood. Since from her technical characteristics the service life of the product, its durability and appearance will depend. Most often, outdoor furniture is made from:

Concerning advantages wooden outdoor furniture from any wood species, then these include:

TO disadvantages wooden products relate:
- the likelihood of ignition;
- insect damage;
- the likelihood of rotting.
Advice: in order to increase the resistance of the tree to all negative factors, it must be treated with special means.
Also, most people attribute them to the disadvantages of country tables made of wood. heavy weight... But such products are installed on the street once a year. At the request of the owners, for the winter they can be removed in summer kitchen or any household. construction.
Attention: placing wooden table under open air, it is necessary to think over the space for the drainage of water.
Dimensional drawing

To make a table with your own hands, you will need to draw up a drawing. This will prevent mistakes during the workflow and make furniture much faster. This drawing should have the following designations:
- length of the product;
- width;
- depth;
- height.
Also in the drawing should be noted the materials of their manufacture. For furniture for 8-10 people, optimal size countertops will be 80 by 120 cm.
Important: the dimensions of the table for the summer cottage are calculated based on the needs of users and the availability free space on summer cottage.
If there is a lot of free space, you can assemble a spacious suburban table with benches... The advantages of this design include:
- spaciousness;
- stability;
- ease of use.

Some people prefer tables with ice box... Such designs are convenient. V summer heat they can be used to chill drinks. This model is practically no different from a product with benches. Only in the middle of the table top is an ice box made. Instead of an ice box, you can build a table with flowers. In the middle of the countertop you will have a beautiful flower bed.
If there is free space on personal plot a little, it is worth stopping the choice on folding model furniture. It is different:
- compact size and ergonomics;
- light weight;
- different transformation options.
Important: for the manufacture of countertops, it is worth choosing a board with a thickness of 3-5 cm.
Tools and supplies
Of the tools for making a wooden table, you need to prepare:

From the materials we need:
- lumber;
- furniture glue.
Manufacturing and assembly
The main components tables are:
- supporting frame;
- countertop;
- support bars.
The table assembly process is carried out in the following sequence:

It will look very attractive at the summer cottage round table... For him you need to prepare:
- base;
- racks;
- countertop;
- base for the countertop.
The build phase will consist of the following sequence:

How to paint garden furniture
 Since the garden table will be located in the open air, it will be affected by increased moisture and sharp drops temperature. Also, the tree will succumb to the attack of pests.
You can extend the life of the country table using different impregnation, paint, varnish.
For this it is worth using a special exterior paint.
Photo
Real craftsmen can make works of art out of simple outdoor furniture:


Useful video
All steps are shown in detail in the following video:
Conclusion
In conclusion, it is worth noting that you can make a country table with your own hands in a fairly short time... For this, a drawing of the future product is created, expendable materials and tools. With a competent approach to assembling a table for a summer residence, you will build an attractive and practical product for which your friendly family will gather every weekend for a summer and pleasant vacation.
In contact with
Do garden table do it yourself from improvised materials, which will seem to many to be absolutely useless. We offer you unusual ideas for giving, which relate to the creation of various garden furniture and tables as well. Look at the photo of the garden tables and choose the best option for yourself. When implementing any idea for a summer residence, you can show imagination and make the changes you need.
How to make a wooden garden table with your own hands: photo
A wooden garden table is the aesthetics of the natural landscape of the country house and ease of manufacture. Photos and photos will help you make a garden table with your own hands. detailed instructions... Before you start making a garden table with your own hands, prepare everything necessary materials and tools. Be sure to look at the photo of how to make a garden table with your own hands: they show the production process.
It is very stylish and original table, which can be used both in the garden and in the country interior. Costs are minimal, because it is based on a pallet made of bricks.
You will need:
- pallet from under bricks;
- swivel wheels with a diameter of about 10-12 cm;
- antiseptic stain for wood of the color you need;
- sandpaper;
- screwdriver;
- ordinary screws;
- screws for metal tiles;
- brushes.
The procedure for making furniture and detailed instructions on how to make a garden table with your own hands.


Sand the pallet well: first with a coarse-grained sandpaper, then with a fine-grained sandpaper. You can also use a grinder with a grinding wheel.
Attach the swivel wheels to the underside of the pallet. To do this, use regular screws, onto which put on the washers removed from the metal roofing screws (since there are large holes on the wheel bases). You can directly attach the wheels with metal tile screws, but then you need special nozzle on a screwdriver.
Cover the table with wood stain antiseptic, which is best containing wax. In this case, the table can be tinted under walnut, rosewood, oak, pine, larch, or use a transparent antiseptic to only highlight the structure of the tree without changing its color.
Please Note: Not all pallets are the same! They are different sizes and with different gaps between the slats. Choose the pallet that suits you best.
Round garden tables made of wood and their photos
If you have an old round garden table, take your time to throw it away! Of course, it has absolutely no look and is broken, but for your garden this is a real find. In a new guise, he will decorate not only a relaxation corner in the garden, but also a country house.

Wood garden tables will go well with many styles as their decor is versatile.
Look at the photo of garden tables with similar design options:


You will need:
- old wooden table;
- putty for wood;
- old tiles of different colors or broken tiles;
- white facade paint;
- tile adhesive;
- white grout;
- priming;
- copper and gold outlines for glass;
- putty knife;
- sponge.
Manufacturing procedure


Putty cracks and gouges and fine-grained sandpaper, then prime everything except the countertop. Paint the table white (excluding the table top).
Wrap up tile in a piece of drape or other dense soft tissue and smash it with a hammer. On top of the countertop, apply an even layer of tile glue and on it lay the surface of the countertop with shards of tile. Trim the edges with a trowel. When your mosaic is a little dry, wipe the surface with a sponge soaked in water to remove any traces of glue from the surface.
After the glue is completely dry, grout the joints between the tiles with white grout.
Paint the sides of the tabletop with white paint, and then decorate them, as well as the legs of the table, with an ornament using gold and copper outline on the glass.
Plastic garden table
 Usually garden furniture is made of plastic, wood, rattan, presented in soft natural colors.
However, if a bright multicolored "character" appears in the garden, especially from colored glass, then all attention is immediately riveted to him.
And it is made of an old broken flower stand, a cover from metal barrel and regular round glass.
However, all these elements can be replaced by scraps of colored plastic.
So, let's take a closer look at how to make a plastic dining table do it yourself.
You will need:
- metal piece from a flower stand;
- cover from a metal garden barrel;
- round glass with a diameter of 50-60 cm;
- slice sealing rubber for windows;
- paper;
- pencil;
- copper loop for glass;
- copper acrylic paint;
- white paint on rust;
- acrylic primer;
- a means for obtaining a patina;
- paints for painting glass.
Manufacturing procedure


On a piece of paper, draw a circular pattern in moroccan style... Then use a photocopier to enlarge the pattern to the desired size. Place the pattern under the glass and circle it with a copper outline. Allow the circuit to dry properly for the time recommended by the manufacturer (usually 8 to 24 hours).
Paint the inner parts of the ornament with bright stained glass paints. It is important that the paints you use are evenly distributed within the outlined area, so before painting the countertop, practice on a small piece of glass, defining the right amount paint for fragments. Dry the finished painting well.
If desired, add additional decorative elements copper contour.
Paint the barrel lid white over rust. Now let's move on to the main part of the countertop.
Prime the stand part and paint it with copper acrylic paint then apply patina cleaner in some areas.
When the "foot" of the table is dry, glue the parts that will be in contact with the table top, small pieces of window seal. This will allow her to hold on well.
Assemble the table: put the painted glass on the barrel lid, and put this “table top” on the foot.
DIY ideas for a garden and a summer residence from scrap materials: photo and description

Further on this page you can see ideas for giving from scrap materials and a photo of the process of their implementation in practice. We without fail accompany all ideas for a garden and giving with our own hands photos from various angles so that you can clearly see the whole process of creativity.
Folding garden table
 Try to make a universal folding garden table for your utility block. It looks nice and saves space. And most importantly, it is very convenient and will help you keep a small utility block in perfect order: everything is in sight, and nothing is lost.
You will need:
- a piece of edged pine board measuring approximately 60 X 20 cm;
- two ready wooden fasteners for the shelf;
- light yellow facade paint;
- red acrylic paint;
- small glass jars with screw lids;
- screws;
- screwdriver or screwdriver.
Manufacturing procedure


Sand the board and paint it light yellow.
Decorate the ends of the board with a simple ornament using red paint.
Paint the lids of the cans with red paint.
Attach the jar lids to the board at regular intervals using small screws.
Hang the finished shelf on the wall of the utility block or workshop using the ready-made fasteners (with the covers on the underside of the shelf).
Fill the jars with screws, nails, small fasteners, staples, nuts and other small things necessary for the household and screw the jars to the lids.
You can decorate the jars with simple painting, applique, and in any other way.
Interesting ideas for a summer residence, home, garden and garden with your own hands with a photo
 And now we offer interesting ideas for a summer residence and a garden with their own hands in relation to other interior items necessary for the household.
It will be a comfortable seat where you can relax after gardening. All our interesting ideas for a summer cottage and garden house are accompanied by a photo and can be implemented using various materials at hand.
Make a garden ottoman with old car tires. There are practically no costs, and the effect will surpass all expectations. This ottoman is not simple, but a chest ottoman. In it you can store garden stuff. Nobody will have this!
You will need:
- two old car tires one diameter;
- thick plywood;
- beautiful textiles of your choice;
- facade paint that matches your fabric in color;
- white spray facade paint;
- "Liquid nails" or silicone sealant;
- construction stapler;
- jigsaw.
Manufacturing procedure


Cover both tires with white spray paint and dry. Then paint both tires with a thicker layer of light green paint and dry.
Lay the tires one on top of the other, fastening them with "liquid" nails or silicone sealant... To do this, apply "dotted" small portions of any of the products in a circle on the surface of the lower tire.
Saw a circle out of plywood that is slightly smaller in diameter than the diameter of the tire. Cover it with a cloth and secure the cloth with a stapler.
Put upholstered circle on the basis of tires. Now you're done! The seat is removable, therefore interior The ottoman can be used as a place to store small items.
The color of the tire paint and the seat color can be any, depending on the style of your garden and the color of other garden furniture. In any case, the ottoman will look spectacular.
Garden furniture: tables and benches
 Garden tables and benches are indispensable attributes of a cozy and comfortable country life, in which it is possible to exercise solitude in a shady corner of the garden.
How is it done garden furniture tables, you could already fully recognize their examples published above. And now we propose to make an exclusive design of a garden bench with your own hands.
A garden bench is not just a necessary thing, but a very necessary thing.
It is so convenient to care for plantings and weed, not kneeling, but sitting on a bench, especially as beautiful as this one. Even if she just stands there, she is already garden decoration, no worse than any figurine.
Add green paint to the pictures: finish painting the branches and leaves.
Add accents with gold paint: make picturesque strokes in the drawings, emphasizing lines and details.

When the bench is dry, cover it all, along with the pasted pictures, with a clear or slightly tinted wood preservative.
If desired, the bench can be slightly tinted with blue-gray acrylic paint, creating the effect of an old tree.
One of better ways to make the house area really cozy - to make a table for a summer residence with your own hands. There are several types of country tables, but the most popular are designs from natural wood... They are distinguished by their aesthetics, environmental friendliness and reliability. Products made from combined materials (wood and metal) are also in demand. Collect outdoor table you can do it yourself. This will require boards, carpentry tools and blueprints.
The choice of materials for the outdoor table
To make a garden table with your own hands, you need to choose suitable materials. Special attention should be given to wood:
- Conifers(spruce, pine) are characterized by pliability and ease of processing, but they are characterized by increased flammability.
- Hardwoods (aspen, birch, oak, larch, ash) are more difficult to process, but strong enough, durable and attractive.
For a country table, it is recommended to take a board with a thickness of at least 3 cm, since it can withstand serious loads. The optimal table length is 150-200 cm, this must be taken into account when choosing boards or furniture board for the table top. For the manufacture of legs from a bar, you must choose boards with a cross section of at least 5x5 cm. Optimal height table is 75 cm.
Convenient picnic table
You can make a table for a summer residence with your own hands using the simplest drawings. However, such a product will be bulky and difficult to move. But the folding structure can not only be easily rearranged from place to place, but also taken with you to a picnic. At the same time, even a novice master can make an outdoor table of this type according to ready-made drawings.
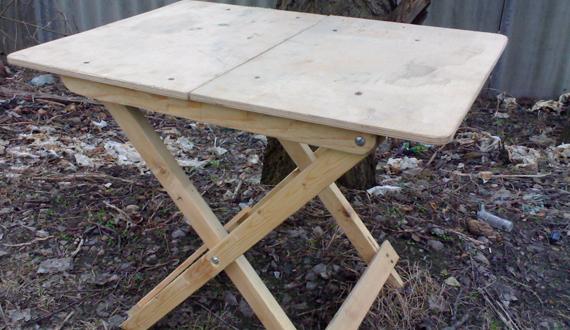
Such a table is distinguished not only by its compactness and attractiveness. appearance, but also strength (the product can withstand a weight of up to 100 kg). At the first stage of work, you need to cut out the structural elements in accordance with the drawing. The dimensions of the folding product can be changed, the main thing is to maintain the proportions.

The edges of the legs and footrests need to be rounded. If you are just learning the craft of a furniture maker, then it is better to cut the corners of the elements at right angles, and then smooth them with a sander. It's easier than rounding off the edges with a jigsaw.
To connect the structural parts in accordance with the drawings, you need to use bolts of any diameter (preferably 6 mm), 35 mm long and with a screwdriver thread. If the bolts are longer than 35 mm, then they will create obstacles in the operation of the future mechanism. When all the elements are prepared, you can pre-assemble the folding table. The legs should be connected together in the central part, and then screwed to the supports as shown in the drawing: the left leg - to the front support, the right - to the rear.

If everything is done correctly, then you can attach the supports to the tabletop using self-tapping screws 50 mm long. But first you need to make a markup on the tabletop and drill holes for self-tapping screws. Then you should check the performance of the structure, it should fold and unfold without difficulty. Folded foldable country table looks like that:
If you are convinced that everything was done without errors, then the structure can be disassembled by signing each detail so as not to get confused during reassembly. After that, all elements must be carefully sanded, covered twice with an antiseptic, and then varnished. This is necessary in order to protect the folding table from impact. environment when used outdoors. When everything is done, the structure must be assembled. She is now ready to use!
Porridge from an ax ... or rather, a table from a stump
Another one great idea for a garden - this is a table made of a stump; you don't even need a drawing to make it. But you will need to find a stump suitable size... You can look for a stump in your own personal plot, at neighbors or in the nearest forest. For the manufacture of countertops, you can take boards or furniture board thickness from 20 mm.

The stump for the future table should be dry, with intact, not rotten and not damp wood. You can dry a fresh tree stump outdoors or in a warm, dry room. Drying period - at least 2 months. Determining if the stump is dry is quite simple: if the bark easily separates from the wood, then the stump is ready to go.
For assembly you will also need building level, tape measure, wood varnish, sandpaper, Grinder, chisel, hammer, nails, screwdriver, self-tapping screws.
Stages of work on assembling a table from a stump
First, the dried workpiece must be cleaned of bark using a chisel or chisel. This must be done carefully so as not to damage the wood and not provoke the appearance of cracks. All soft and rotten areas are removed. Depressions and cracks in the barrel are cleaned of dirt with a chisel, and then processed from the inside with sandpaper folded in half (grained layers outward).

Then the stump needs to be leveled from the bottom so that its bottom becomes even. The protruding parts are removed using a planer. This is necessary so that the table can be installed on a horizontal surface. Other imperfections of the hemp, in particular, large rhizomes, are removed by means of a planer.
After that, all sections are carefully sanded. Process grinder the rest of the workpiece surface is also needed. Hard-to-reach areas are sanded with coarse sandpaper. When the treatment is finished, the stump is covered with an antiseptic, and then varnish. To make the table easy to move from place to place, metal or wooden legs, wheels or rubberized stands can be attached to the bottom of the stump.
Then you need to make the countertop. For this, the boards are fastened to each other with glue, self-tapping screws or strips nailed from the bottom side. If you want to make the tabletop round or oval, then the corresponding drawing should be applied to the bonded boards, and then the product should be cut out.

To attach the countertop to the stump, you need to make a frame. To do this, two parallel strips are stuffed onto the sidewalls of the hemp, and two more rows of holders are placed on top. As a result, 6 planks are obtained, connected to each other with nails. The table top is attached to them with screws or nails.
Then finished structure once again processed with a grinder and covered with two layers of varnish. To prevent the varnish from peeling off, it is recommended to process intermediate layers after complete drying with fine-grained emery paper. The table is ready!
In this instruction, we will look at how to make such an important thing as a work table from pallets. The choice fell on pallets because it is often free material. If you have access to pallets, then this is a great source for making a variety of furniture and more.
On such a table, you can carry out conservation, work on the processing of domestic animals, and so on, because this material is not particularly a pity, but it is pleasant to work in nature.
DIY materials and tools:
- pallets;
- self-tapping screws and screwdriver;
- hammers;
- mount;
- metal sink;
- dye;
- hand sander (if available, good);
- tools for cutting wood (at least a petrol or electric saw);
- nails and other little things may be needed.
Table assembly process:
Step one. Countertop manufacturing
First of all, the author starts making the most important part - the countertop. You can choose the sizes at your discretion. As you can see in the photo, everything is done simply. We disassemble the pallets in order to get boards for the tabletop, cut it to the required length, and then knock it down, or better, twist it with self-tapping screws, so the table will last longer.


Step two. Installing the sink
To make a table, you need a metal sink. We attach it to the tabletop and circle it around with a felt-tip pen. As a result, an area is formed that will need to be cut out.
Before cutting, we will need to reinforce the bottom of the tabletop with boards, since if you don't do this and just cut a hole, the boards will start to dangle. We arm ourselves with a screwdriver, self-tapping screws and fasten the boards from the reverse side around the shell, thereby strengthening the future hole.


Now everything is ready in order to cut the hole for the sink. For work, you can use a jigsaw. If this is not the case, then with experience, the window can be easily cut with an electric or chainsaw. But be careful not to hit the screw or nail.
When the window has been cut out, we install the sink there. There is no need to secure it with anything, it should sit well in its place anyway.
Step three. Making a frame for the table
To make a frame, you will need to get a bar from all the same pallets. As you might guess, you will need two long and two short bars, unless your table is, of course, square. The author decided to collect the frame at the top of his countertop, so as not to be smart with the calculations of dimensions and so on. We select necessary materials and twist them with self-tapping screws. It is not necessary to screw the corners here, since the frame will be strengthened with legs.


Step four. We fix the legs
To make the legs, you will need all the same bars. We select the bars in height, and then fasten the legs with self-tapping screws. You need to screw each leg with at least two self-tapping screws on each side of the frame. As a result, we additionally strengthen the frame, and it will not walk.


Along the top of the legs, the author also fixes beams with grooves, they will serve as a support for the table top. In addition, they, like the lower ones, fix the legs.


In the end, you only need to fix the tabletop to the frame made. Here you can use screws and corners. Then fix the necessary shelves on the table, compartments and the assembly of the technical part can be considered complete.
Step five. Table finishing
The table is made of pallets so that the boards will have a large number of irregularities and sharp edges, which during operation will lead to the formation of splinters and other injuries. To smooth the table, especially the countertop, you need a sander. We remove all unnecessary and make the surface smooth. This can be done by hand using sandpaper.


Half the work is done, now we need to protect the tree from moisture and dirt, since even in the rain, apart from work, it will quickly rot. It is advisable to impregnate the wood with something to protect it from decay. You can also paint the table.
A table is a piece of furniture that you cannot do without in the city or in the country. The table can be placed on the veranda, in the gazebo, or just in a shady place. You can dine with it, arrange a feast or play board games on fresh air... Inexpensively, you can buy only a small plastic table, it is cheaper to make a large wooden table for a summer residence with your own hands. The article will present three options for tables and drawings for their manufacture.
Table dimensions and construction features
The optimal size of the table top for a summer cottage is 80x120 cm. A smaller table will be significantly inferior in functionality, a table large sizes will be too cumbersome and difficult to clean for the winter. The size of the table 80x120 cm will allow you to hold ceremonial feasts with the number of participants from 8 to 10 people.
A table for a summer residence is easiest to make from boards. In addition, it is the most affordable and inexpensive material... The advantage of making a table from wood is that the boards can be sawn on right size at any construction base, and bring it to the country without any problems, thereby saving on transportation. It should be noted that with a table size of 75x80x120 cm, the longest board will be a 120 cm long tabletop board. A board of this length will fit into almost any car.
There are a lot of varieties of table designs, but by and large the difference is only in the form of legs on which the tabletop rests. Therefore, the legs at the table are the most complex element of the entire structure.
Table top
The table top at the table in the country is made of boards. The thickness of the boards can be from 30 to 50 mm. but the best option is a board with a thickness of 40 mm.
An important point is cutting the boards. With a tabletop length of 120 cm, you need 5.3 boards 150 mm wide, 6.6 boards 120 mm wide and 8 boards 100 mm wide. Considering that the boards are sold with a length of just over 6 m, it is advisable to choose a board with a width of 100 mm for the tabletop.
By choosing a board with a width of 100 mm, you will not have to adjust or change the dimensions of the table top, which will greatly simplify the work on the table arrangement. In addition, there will be 2 more boards with a length of 120 mm, which can be used for other parts.
If you buy the right board it does not work, you can make the tabletop not solid, but at intervals. Such a tabletop will look no less interesting. In this case, water that can accumulate on a table with a solid table top will drain through the gaps between the boards.
Straight Legged Table
A table with straight legs is the most simple construction tables for giving. It's steady comfortable table that will serve well both indoors and outdoors.

Fig. 1.
Table legs consist of 4 elements, 2 vertical posts and 2 horizontal ones. The upper horizontal post is attached to the table top, the lower one is the support.

Fig. 2.
The design of the legs can be different. For example, instead of resting on the bottom board, you can make the support on the vertical posts, and the bottom board can be made for additional strength.
Pay attention in this design, the connection of the boards is carried out without additional grooves. This greatly simplifies the assembly of the table. In order for all the elements to be well fixed, it is necessary to glue all the joints with wood glue. In this case, the boards can be connected with self-tapping screws.

Fig. 3.
- Collect the legs. To do this, you need to saw the boards according to the drawing. Treat the joints with glue and tighten with self-tapping screws or a confirmation.
- On a flat surface, lay out the boards for the table top, mark the position of the legs and fasten the boards of the table top through the upper strip of the legs.
- Install horizontal screed between the legs.
- Wait 2 - 3 hours for the glue to dry and remove any burrs and sharp edges from the table.
- Then the table can be varnished. Or just treat it with an antiseptic.
Table with X-shaped legs
A table with X-shaped legs is essentially not much different from a table with straight legs, it just has a different shape of the legs. However, it is impossible to make without creating additional grooves on the legs. This complicates the work somewhat.

Fig. 4.
Table legs consist of 3 elements. Two criss-cross legs and a vertical top bar. The top bar, as in the previous case, is necessary for fixing the table top.

Fig. 5.
To connect the legs in the inclined supports, you need to make a slot in the floor of the board.

Fig. 6.
The table assembly order is as follows:
- The boards are cut to the required length.
- A groove is made in the legs to the floor of the board. The groove can be made with a jigsaw or a router.
- Collect the legs. The connections are glued. The parts are fastened with self-tapping screws.
- The boards of the table top are laid out and the assembled legs are attached to them.
- Install the bottom screed board.
- They process the table from burrs and varnish.
Table with benches
A table with benches is often installed on verandas or outdoors. Unlike the structures described above, it does not require additional benches or chairs, benches are included in the design of the table.

Fig. 7.
The disadvantage of this version of the table at the dacha is that the structure is quite cumbersome, and it becomes very problematic to remove it for the winter.

Fig. 8.
A feature of the table design is that the benches are fixed directly on the table legs. The crossbeams on which the benches are attached are at the same time the tie for the legs, and the benches play the role of a longitudinal tie.

Fig. 9.
The order of assembling a table with benches is as follows:
- Cut the boards to the desired length.
- Assemble the legs and support for the bench flooring. The joints are glued and tightened with self-tapping screws.
- Mark the boards for the table top and mount them to the legs.
- Secure the benches.
- Treat with impregnation or antiseptic.
Examples of tables for a summer residence

Fig. 10.

Fig. 11.

Fig. 12.

Fig. 13.

Fig. 14.

Fig. 15.

Fig. 16.

Fig. 17.