Homemade plastic pvc pipes with your own hands. DIY greenhouse made of PVC pipes: installation tips
Greetings, brain engineers! PVC pipes are analogous to Lego for adults, so having a small supply of such pipes at home is not at all bad brainwave!

In this brain leadership we do it yourself create from plastic pipes three things - a foam cutter, a hacksaw and a selfie stick. For this we need an industrial hair dryer and a spring for bending pipes.
And also to create a cutter:
- PVC pipes a and two stubs for it
- nichrome wire (I took 26 gauge)
- universal power supply (similar to the one I used)
- heat shrink tubing, wires and washer terminals.
For a hacksaw:
- PVC pipe
- hacksaw blade
- steel wire
- Grover washers.
And for a selfie stick:
- PVC pipes of two diameters (one pipe should fit quite tightly into the other)
- steel wire
- PVC plug
- bolt of the correct size for your camera.
If the presented video with the process of this brain leadership is not played on your smartphone, then go to by alternative link.
Step 1: foam cutter - pipe bending


Always wear a RESPIRATOR before heating plastic tubing!
We take a spring for bending and place it in a PVC pipe. We heat the place of the future fold and bend it carefully. We repeat brain procedure until the pipe accepts the desired shape.
Step 2: Foam Cutter - Wire Holes


Cut off the excess and drill holes for the power wires.
Step 3: Foam Cutter - Blanking Holes


In PVC plugs we drill holes for eye bolts, insert ourselves brainbolts, we attach the terminals to the wires and fix them on the eye bolts. And then we put plugs on the ends of the prepared pipe.
Step 4: foam cutter - power supply


We take the power supply (I used a universal power supply) and solder the wires to its output homemade, polarity does not matter in this case, but to isolate the connection, and for a neat look, we use heat-shrinkable tubes. Glue the prepared power wires at the inlet to the tube with black hot glue.
Step 5: foam cutter - reworking the handle

For greater tube reliability cerebrum glue together.
Step 6: foam cutter - nichrome string

Pull between the eye bolts nichrome wire... Due to the fact that the tube brainwashing an elastic, stretched wire will always be in a taut position - both hot and cold.
Step 7: foam cutter - setup


By adjusting the power supply, we adjust the desired level of string heating. And now this homemade you can cut the foam like butter.
Step 8: PVC hacksaw - shaping


Insert the spring into the tube and heat up the bend. Next, we bend the PVC pipe until the desired shape is obtained in the form of the letter "C".
Step 9: PVC hacksaw - string for turns


Into the pipe of the future brainworm insert a spring of a smaller diameter, wrap the bend with steel wire, the ends of which we fix, so I attached them to the table.
Step 10: PVC hacksaw - threads


So that the ends of the hacksaw blank do not diverge when the pipe is heated, we fasten them with electrical tape. Next, we heat the section wrapped with wire and create tension on the wire so that the turns are formed. After the pipe cooled down, I displaced the wound wire and repeated the procedure.
We repeat the same actions from the other end. brain stock.
Step 11: PVC hacksaw - blade cutouts


We cut the ends to the desired length, and then make cutouts in them for the subsequent installation of the hacksaw blade.
Step 12: PVC hacksaw - cloth


We insert the hacksaw blade, and that's it, the hacksaw- homemade ready.
As with the cutter, the blade will be taut.
Step 13: selfie stick - turns


Form curls at one end of the selfie stick blank tube.
Step 14: selfie stick - slots

At the other end of the workpiece, we make 4 slots.
Step 15: Selfie Stick - Small Tube


In a tube of smaller diameter we drill a through brainhole... Then we heat this end and "flatten" it.
Step 16: Selfie Stick - Locking Screw


In a vise, we clamp the selected bolt and put on a PVC ring, which we then heat with a hairdryer and squeeze it from two opposite sides with two pliers, thereby creating a screw fixing the camera in the shape of the letter "T".
Step 17: selfie stick - screw mounting


Insert a screw into the hole in the flattened end, it will fix the camera on brainwashing... I also decided to bend this end so that the camera is at right angles.
Step 18: Selfie Stick - Connecting Tubes


We paint the “lamb” clamp in the color of the tubes and put it on the end of a large tube, then insert a tube of a smaller diameter into this end with slots. This design allows you to adjust the length of the selfie crafts.
Step 19: selfie stick - stub


AND finishing touch- glue a white cap on the free end of the large tube of the selfie stick.
That's all, good luck creating your brainwashing!
A greenhouse is not just a decoration suburban area but also a guarantee good harvest, especially in temperate latitudes. Greenhouse prices industrial production are quite high, and the typical design is not suitable for all summer residents.

In this case, it is easier and cheaper to assemble a greenhouse with your own hands from improvised materials, for example, from plastic pipes.

The classification of greenhouses is quite complex: they can differ in shape, seasonality, presence and type of heating, used frame and shelter material.

The simplest and most reliable designs are suitable for the manufacture of PVC pipes, including:
- wall greenhouse;
- gable, in the form of a house;
- polygonal, with complex shape stingrays;
- arched, with a frame in the form of a semicircle.

Wall mounted greenhouses they are usually attached to the southern or southwestern wall of a house or other room. At the same time, the wall plays the role of thermomass: heating up during the day, it gives off heat at night, which reduces the average daily temperature fluctuations, and also protects from cold northern winds.

In wall greenhouses, a microclimate favorable for plants is created, and the cost price is lower than that of free-standing models. The main disadvantage of this design is the constant exposure to moisture on the wall and the lack of good ventilation, which can lead to the destruction of the wall material.
Gable structure- one of the most convenient and popular. This is explained by the strength of the frame and its resistance to snow and wind loads. The reflection coefficient of gable greenhouses is low, most of the sun's rays penetrate inside, which increases the lighting efficiency. By increasing the angle of inclination of the slopes, you can achieve snow melting in winter time, and the greenhouse does not have to be raked away.

Gable greenhouses are equipped with one or two doors, as well as vents for ventilation. The side walls of gable greenhouses can be either strictly vertical or inclined. In the second case, the illumination in the greenhouse in the morning and evening hours will be higher, which is important for temperate latitudes.
Polygonal design the greenhouse practically repeats the shape of the arch due to several planes that form the slopes and walls. This increases inner space and at the same time, the main disadvantage of arched greenhouses is compensated for - the high reflectivity of the sun's rays.

It is difficult to assemble a polygonal greenhouse from pipes with your own hands due to a large number connecting nodes, therefore, it is usually made from metal pipes by welding or from a profile for drywall, assembling the frame with self-tapping screws.
- perhaps one of the most common designs, and this is easily explained: it is distinguished by its strength and stability, the minimum number of connecting nodes and a large internal space. It can be made from almost any type of pipe, choosing any size and height.

The disadvantages of arched greenhouses include an increased accumulation of snow on the roof in winter period and high reflectivity from the inclined plane of the film or polycarbonate.
Partial reflection compensate correct installation greenhouses - from north to south. With this arrangement, the side walls are illuminated by the morning and evening sun, and the rays hit the greenhouse walls at almost right angles. During the day, when the sun is high, it illuminates the southern pediment and roof, where the refraction of the rays is not so strong.
Snow accumulation is fought in three ways:
- regular cleaning;
- dismantling the film or the entire greenhouse for the winter;
- a change in shape to a pointed arch.

Greenhouses in the form of a pointed arch have a more stable structure, and their increased height has a beneficial effect on the microclimate: hot overheated air accumulates at the top and does not oppress the plants. At the same time, material consumption and planting area do not differ from those of conventional arched greenhouses.
PVC pipes and methods of their connection
PVC pipes are designed for the installation of cold water supply systems and can be operated at temperatures up to +65 degrees. Thanks to their flexibility and a wide variety of connecting elements, it is easy to assemble a greenhouse of any configuration from them.
For greenhouses, PVC pipes with a diameter of 20 to 32 mm are used, they provide the necessary rigidity of the frame. Standard pipe lengths can be 1, 2, 3 or 6 meters.

There are several ways to connect PVC pipes for a greenhouse:
- using clamps, ties;
- on furniture bolts through pre-drilled holes;
- on the glue.
When connecting pipes with clamps or bolts, the greenhouse can be completely disassembled and transferred to another place, ensuring crop rotation. In this way, film greenhouses and hotbeds are often mounted. The film is usually removed for the winter in order to avoid damage by snow and wind, at the same time the frame is disassembled.

The adhesive connection is non-separable, but more durable. It is recommended to use it for greenhouses installed on foundations and left for the winter. Such greenhouses are usually covered - it serves for at least 5-7 years and does not require annual replacement.
Connecting elements for PVC pipes used in the installation of the greenhouse:
- corners, allow the fastening of mutually perpendicular elements;
- tees- connect three pipes in one plane or at an angle (single-plane tees can have an angle of 45, 66 and 90 degrees);
- crosspieces, for connecting four pipe elements.
The number and type of fittings used depends on the design of the greenhouse and the type of connection selected.
Prices for PVC pipes
pvc pipes
The procedure for connecting pipes and fittings with glue
The connection is made on Tangit PVC-U glue from Henkel or its analogue. This glue provides strong fastening of parts and hardens quickly, so installation does not take much time.

Prices for Tangit PVC Kleber
Sequencing.
- Cut the pipe to the required length using a cutter, hacksaw or construction scissors. Check the compatibility of the pipe and the fitting: the pipe must go into it 2/3 of the socket length.
- To clean the edges from burrs, with a knife to remove the chamfer from the end.
- Degrease the surfaces to be connected with any solvent. Apply glue to both bonding surfaces: pipe and inner surface fitting.
- Insert the pipe into the fitting strictly along its axis by 2/3 of the depth until it stops, then turn it 90 degrees inside the fitting so that the glue is evenly distributed.
- Fix them in this position for 15-30 seconds, then wait another 1-2 minutes until they are completely glued.

The procedure for connecting pipes to bolts
Furniture bolts with a diameter of M6 or M8, depending on the diameter of the pipes, are chosen as fasteners. The length must be sufficient to connect two pipes.

Sequencing.
- In the pipes, before the start of installation, mark the places for drilling holes.
- Drilled out through holes drill 2 mm larger diameter bolts.
- Connect the pipes by aligning the holes. Insert and tighten the bolts.

Holes can also be drilled locally, with the pipe temporarily attached to a wire tie or otherwise fixed.
Calculation of the required materials
First you need to decide on the shape and size of the greenhouse (length, width and height). As a rule, there are two beds in a greenhouse, separated by a passage. The width of the beds usually varies between 0.8-1.1 meters - this allows you to plant two rows of plants at the required interval and provide easy access to them.
The width of the passage should be such that you can walk freely with buckets and other garden tool including a wheelbarrow. Usually the path is made 0.6-0.8 m wide.As a result, the width of the greenhouse will be 2.2-3 m.
The length of the greenhouse depends on your needs and the placement rate vegetable crops that you plan to grow in it. Planting rates per 1 m2 of greenhouse area are given in table 1.
Table 1. Rates of planting vegetable crops in the greenhouse.
| The culture | Number of roots per 1 m2 |
|---|---|
| 2-4 |
| 1-2 |
| 4-6 |
| 2-4 |
| 4-6 |
| 2-4 |


Based on these standards, the length of the greenhouse is determined. Usually the length is 3-6 meters - it is impractical to set up a greenhouse of a smaller size, and for structures of greater length it is better to use more durable materials and capital construction technologies.
Note! If you plan to use polycarbonate as a greenhouse cover, choose a length that is a multiple of the width of the sheets (2 meters). This will avoid unnecessary clippings.
The height of the greenhouse should allow free movement in it, in addition, at least 50 cm of free space should remain above the plants - hot air accumulates there and air exchange occurs during ventilation. For low-growing crops - pepper, eggplant, low-growing tomatoes - a height of 1.8-2.0 meters is sufficient. For tall crops, the height of the greenhouse should be at least 2.2-2.4 meters.

Another important parameter for arched greenhouse from pipes - the length of the arc, which is found by the formula:

Here L is the length of the pipe for the arc, m; h is the height of the greenhouse, m; B - greenhouse width, m. Table 2 shows L dimensions for the most commonly used greenhouse sizes.
Table 2. Arc length for standard greenhouses.
| Width | h = 1.8 m | h = 2.0 m | h = 2.2 m | h = 2.4 m |
|---|---|---|---|---|
| B = 2.2 m | 3,1 | 3,5 | 3,8 | 4,1 |
| B = 2.4 m | 3,4 | 3,8 | 4,1 | 4,5 |
| B = 2.6 m | 3,7 | 4,1 | 4,5 | 4,9 |
| B = 2.8 m | 4,0 | 4,4 | 4,8 | 5,3 |
| B = 3.0 m | 4,2 | 4,7 | 5,2 | 5,7 |
To calculate materials, it is also necessary to determine the step between the arches. If you plan to remove the cover from the greenhouse for the winter, it is enough to arrange the arches with a step of 0.8-1 meter. For a non-separable structure, the step should be reduced to 0.5-0.7 meters - this will save the greenhouse from deformation under the influence of snow.
It is necessary to take into account the material for the manufacture of longitudinal screeds, end walls, doors and vents. The total length of the longitudinal screeds can be calculated by multiplying the greenhouse length by the number of screeds. Usually there are at least five of them: two lower, two lateral and ridge. Additional side ties can be used to reinforce the structure.
The end walls will need pipes with a total length of 15-20 m. For each door you need about 5 meters of pipe, for a window - 2-2.5 meters. For convenience, you can draw up a detailed sketch, which shows all the dimensions, as well as the number of connecting elements.

Step-by-step instructions for assembling an arched greenhouse
Below is the step-by-step instruction greenhouse assemblies from PVC pipes with the following dimensions:
- width - 2.4 m;
- height - 2.0 m.
- length - 4 m.
According to table 2, the length of the arc is determined - it is 3.8 m. For the frame, pipes from PVC standard length 6 m with a diameter of 25 mm. Such pipes will provide the structure with reliability and rigidity. To connect the pipes, standard fittings of 25 mm and a glue connection are used.
For a greenhouse of the indicated dimensions with two doors and vents and with a pitch of 67 cm arches, you will need:
- PVC pipe L = 6 m, Ø25 mm - 16 pieces;
- one-plane crosspiece Ø25 - 5 pieces;
- one-plane tee 90 degree angle Ø25 - 28 pieces;
- one-plane tee, 45 degree angle Ø25 - 4 pieces;
- two-plane tee Ø25 - 4 pieces;
- corner 90 degrees Ø25 - 16 pieces;
- self-tapping screws or furniture bolts for attaching side ties - 36 pieces;
- two-legged clamps - 18 pieces, for them self-tapping screws 55 mm - 36 pieces.
- door hinges - 8 pieces, for them self-tapping screws 24 mm - 48 pieces;
- polycarbonate - 3 sheets of 2x6 meters;
- self-tapping screws for fixing polycarbonate with a thermal washer - 100 pieces;
- connecting profile for polycarbonate or construction tape.
You can also use a film as a cover for the greenhouse; it will take about 8 running meters with a width of 6 m.
Ground leveling and foundation installation
To avoid skewing of the structure during installation and operation, the area for the greenhouse must first be leveled. To do this, mark the location of the future greenhouse on the ground with the help of pegs and twine and check the site by level. With a slope of more than 1 degree, the site must be leveled. It is recommended to perform under the foundation sand pillow 5-10 cm thick.

A wooden beam with a section of 10x10 cm is traditionally used as a foundation for greenhouses. It provides load distribution and serves for at least 10-15 years, while it is inexpensive, and its installation does not take much time.

Step 1. The timber is sawn to the size of the greenhouse, impregnated with an antiseptic for lower rims log house or used oil and dried. Antiseptic treatment is more convenient to carry out using a spray.

Step 2. They assemble the foundation on the site for the greenhouse, laying out the timber on a sand cushion or auxiliary posts made of bricks, while using a level. They check the dimensions, as well as the diagonals - with correct styling they must be equal.

Step 3. The bars are connected using metal corners and self-tapping screws. If the length of the beams is insufficient, they are fastened with staples. For better grip, metal pins are used - lugs. All fasteners must have protective covering, it is best to take galvanized elements. After installing the foundation, they can be additionally painted or varnished.

Step 4. Sand is poured along the perimeter of the foundation, finally fixing it. In this case, you can immediately make paths in the greenhouse and fence of the ridges.

Assembling the greenhouse frame
The assembly of the frame begins with the preparation of the necessary pipe sections. After cutting to size, it is better to sign them with a marker so as not to get confused.
For the described design, you will need:
- pipe sections 400 cm long - 2 or 4 pieces;
- pipe sections 190 cm long - 10 pieces;
- pipe sections 180 cm long - 4 pieces;
- pipe sections 140 cm long - 4 pieces;
- pipe pieces with a length of 76 cm - 8 pieces;
- pipe sections 65 cm long - 18 pieces;
- pipe sections 46 cm long - 4 pieces;
- pipe sections 10 cm long - 4 pieces.
The rest of the elements, including the frame of the doors, vents and end braces, are cut in place during the installation process.

Step 1. Pipes for five intermediate arches 190 cm long are glued in pairs using crosses. In the illustration, the connections are highlighted in blue.

Step 2. End arches are connected according to a scheme of four pipe sections and three tees. Two pipe sections of 140 cm each form side arcs, which are attached to the tees with an angle of 45 degrees so that when the arch is bent into an arc, the free sockets of the tees are directed downwards - the pillars of the doorway will be attached to them. Pipe lengths of 46 cm are connected to a 90 degree tee, then the parts are combined into general design, while the side flare of the 90 degree tee must be directed perpendicular to the axis of the 45 degree tees.

Step 3. Collect two lower side ties from six pieces of pipe 65 cm long and five single-plane tees for each tie. The leads of the tees are directed strictly in one direction - arcs will be attached to them.

Step 4. Collect two end ties from three pieces of 76 cm pipe and two single-plane tees for each tie.

Step 5. Collect doorways according to the scheme. Sections of pipes with a length of 1.8 m are fixed in the lower tees, then they are connected with tees and a jumper with a length of 76 cm. Sections of pipes with a length of about 10 cm are glued to the tees - the continuation of the racks. They are later cut to size when connected to the arch.

Step 6. Collect the end walls. End braces and end arches are connected using tees and racks, as well as two-plane tees at the bottom. The pipes at the top of the racks are cut to size.


Step 7. The greenhouse frame is assembled on the foundation. One end arch is installed and connected to the lower couplers. The first intermediate arch is installed in the tees on the lower screeds and connected to the end arch with a 65 cm long jumper. All intermediate arches are sequentially fixed. A second end wall is installed by connecting it to the upper and lower side braces. Temporary wire ties can be used for assembly stability.

Step 8. Check the diagonals of the frame, align it if necessary. The frame is fixed to the timber using metal double-footed clamps and self-tapping screws.

Step 9. Install side ties. They are attached to furniture bolts at a height of approximately 1.4-1.6 meters from both sides from the inside of the greenhouse. For greater rigidity, additional longitudinal ties can be attached. The bolt attachment point is marked with red crosses.

Step 10. Doors and vents are assembled in accordance with the scheme from pipe scraps, tees and corners. Fix the vents to the door frames on the hinges using self-tapping screws. Attach the hinges to the door frame.

Step 11. Fasten the doors with hinges in doorways. Install end screeds from pipes according to the scheme, fixing them to furniture bolts. The attachment point is marked with red crosses.

 Alternative option- design without kinks
Fastening polycarbonate
Polycarbonate - comparatively new material, which has received wide recognition among summer residents.

It has many advantages:
- good light transmittance;
- two-layer honeycomb structure that retains heat well;
- sufficient mechanical strength;
- resistance to UV rays;
- simple and quick installation;
- service life not less than 5 years.
Disadvantages of polycarbonate:
- reflects Sun rays stronger than glass and film;
- not resistant to scratches and pinpoint impacts, requires careful handling;
- if installed incorrectly, moisture and dirt accumulate inside, from which the material fades.
To extend the service life, polycarbonate must be installed strictly according to the manufacturer's recommendations.

Three important factor which must be observed:
- fix the polycarbonate so that moisture can drain along the inner longitudinal stripes;
- one of the sides of the polycarbonate has a protective UV coating; during installation, the sheets must be placed with this side up;
- fastening is carried out on special self-tapping screws with a thermal washer on pre-drilled holes, in otherwise when heated, the sheets will lead.

Sequencing.
Step 1. Remove the protective film from the polycarbonate and mark the top side with a marker (the protective film on it is usually colored or has the manufacturer's logo). Better to make a few marks on each sheet.

Step 2. Cut out polycarbonate for the end walls. For this, a standard sheet is cut into three pieces measuring 2x2 meters. Apply one piece to the end of the greenhouse so that the cavities are directed vertically. Align the left side of the sheet with the left edge and with a marker outline the contours of the arc to the left rack and down along it. Apply the right edge of the sheet to the right side of the end and proceed in the same way. As a result, the contours of two semi-arcs are obtained on the sheet. Cut them out with a mounting knife or jigsaw with a small allowance of 3-5 cm. Do the same with the second end.

Step 3. Fasten the cut parts to self-tapping screws with thermal washers using a screwdriver. The step of fastening is 30-50 cm. At the same time, they try not to pinch the polycarbonate. Trim the excess polycarbonate with a knife.

Step 4. The third piece of sheet is used for trimming doors and vents. The sheet is applied to the doors, observing the verticality. They circle the doors with a margin, cut out blanks and attach them to the doors and vents. An arch above the door is cut out of the remains of polycarbonate, and it is closed. It is better to connect polycarbonate at the joints using special profiles.
We will send the material to you by e-mail
NS arnik, or, simply put, a greenhouse is an integral part of any suburban area or vegetable garden. This structure protects plants from adverse effects. environment... Although the greenhouse is not heated, it is always warm inside it. This factor is provided by the materials from which the greenhouse is made. So, now polyvinyl chloride (PVC) pipes are widely used as a frame. Let's find out how to make a greenhouse with your own hands from PVC pipes.
PVC pipe greenhouse
- Strength. Such pipes will not break under enormous weight. Studies have shown that one PVC element of an average size can withstand a weight of up to 500 kilograms;
- Elasticity. As you know, for the construction of a greenhouse, you need to create arches from pipes. Of metal and wood materials it is quite difficult to do this, while PVC pipes are easily bent into the desired shape. Do-it-yourself arcs for a greenhouse are easily made only if you use PVC as a source material;
- Durability. All PVC products do not break down for decades. Therefore, the greenhouse will be a reliable home for your plants for many years.

If you decide to make a greenhouse from plastic pipes with your own hands, then polyvinyl chloride is the best material available today.
Video: greenhouse options for giving
What do you need to build a greenhouse yourself?
The construction of a greenhouse is a rather fascinating and not complicated process, the main stages of which are presented in the photo below.

The greenhouse consists of three main elements: foundation, frame, cover. These elements are made from the following materials:
- PVC pipes. It is desirable that their cross-section is 13 mm, since this size is the most optimal for creating a greenhouse;

- Boards. Prefer processed, durable wood, with a thickness ranging from 20 to 40 millimeters. It is advisable to cover them with transparent varnish before laying - this maneuver will give strength to the structure;

- Steel wire. Required to connect pipes together. Prepare sections from 80 cm to 1 meter. Their number should be twice as many as pipes;
- Coating. For this purpose, you can use a special greenhouse film or polycarbonate sheets. They are strong enough to protect plants from negative environmental factors. In addition, they are breathable, so crops will not wither;
- You will also need a hammer, pliers, screws, nails and other trifles.

To make greenhouses with your own hands from PVC pipes, stock up on all of the above materials in the right amount. The larger the size of the greenhouse is planned, the more materials will be needed.
Related article:
Step-by-step instructions for the construction of a greenhouse
Greenhouse creation consists of 4 stages:
- Construction of a foundation made of wood;
- Installation of fasteners for PVC pipes;
- Installation of arches;
- Covering the greenhouse.
Let's take a closer look at each process.
Construction of a foundation made of wood
To begin with, it is worth leveling the area that is reserved for the greenhouse. Use a tape measure and steel rods to mark the corners of the greenhouse. Using a level, you can check how flat the ground is.

Next, in the corners of the greenhouse, dig trenches (there should be 4 of them) with a depth of at least 10-15 centimeters. 4 boards are installed there, which serve as the foundation for the greenhouse. These boards should be reinforced with nails and screws. This will achieve better fixation and durability of the greenhouse.

Installation of fasteners for PVC pipes
Next, we drive the steel rods into the ground. They must be installed evenly. To make the length between the rods the same, count their number, divide by two (one batch on each side) and measure the length of each side with a tape measure. Then count optimal distance between the rods. It is important that they are located opposite each other, and that the distance between them is the same. Steel rods are driven into the ground with a hammer. They should stand close to the foundation, that is, to the boards that were previously installed.

Also, to fix the arches, you can use special glasses that are attached directly to the wooden base.

Installation of arches
In order to create arches from plastic pipes, you will need a pipe bender or a construction hair dryer to warm up the pipe and give it an arc shape. After the arch is ready, it is put on a steel bar on both sides and fixed to the base with a clamp.

After installing all the arches at the top point, a pipe is attached to the entire length of the greenhouse with a wire. This additional stiffener will give the structure strength and stability.

PVC industry offers big choice fittings for pipes, therefore there are special crosses to give the design a presentable appearance and ease of installation.

Made of PVC pipes. I would like to note that the homemade products are presented by a foreign author. Their PVC pipe is not soldered, like ours, but glued to a special glue. Therefore, if you decide to reproduce homemade products, keep in mind that our pipes and connectors are of the same diameter and you cannot connect them without processing. I will talk about what materials and tools will be needed when considering each homemade product. All joints, with the exception of some, are fixed with adhesive for PVC pipes. So, let's begin.
Step 1: floating stick
The author made such a stick for fun in the pool. To make it you will need: 20-30 cm 15 mm pipes, two plugs, sand, glue.
Seals one end of the pipe with a plug. Pours two-thirds of the sand into the tube. Closes the second end of the pipe with a plug. During installation, the plugs are fixed with glue. Now, when the tube is placed in the pool, it will always remain on the bottom. You can arrange a game to take out the pipe. You do not need to pour sand, then the tube will float on the surface.


Step 2: shower
For a shower you will need: a fifteenth pipe, 3 plugs, a crosspiece, 2 angles at 90 degrees, 1 angle at 45 degrees, a hose connector, glue.
In the crosspiece from two opposite sides, it installs two pipe segments of 50 cm each. Opposite ends of the pipes are closed with plugs. At one end of the cross, a piece of pipe with a connector for connecting a hose is installed. In the remaining connector of the cross, installs, through a short piece of pipe, an angle of 90 degrees, with an upward angle. Then a 1.8 m pipe is installed in the corner. Installs another 90 degree angle into the pipe. Then a small segment and an angle of 45 degrees. Installs a plug at the end of the corner. Drills several holes in the plug with a 1.5 mm drill. Connects the shower to the hose, turns it on.


Step 3: Rosehip Walker
This homemade product is useful for those who go hiking and its route can run through thorny thickets.
For such a device you will need: 90 cm of an inch PVC pipe, 2-2.5 meters of rope, a drill.
The author drilled holes in the ends of the pipe. I tied the ends of the rope to the holes. The homemade product is ready. Now how does it work. Places the pipe on the ground and steps in the middle with his foot. He picks up the rope. Holding the rope taut raises the leg and moves it forward. Then he lowers his leg, crushing the bush. Thus, according to the author, you can go thorny bush.


Step 4: key stash
To make a cache you will need: 2 plugs, a small piece of 20 mm pipe. The pipe size depends on the key.
Cuts off a small piece of pipe. Covers one side with a plug. Places a key in the pipe, and closes it with a second plug. Now you can place the cache, for example, in the pool. The sealed construction will keep water out, and the air cushion will prevent the cache from drowning.

Step 5: water volleyball
Volleyball is an exciting game. Playing volleyball with a water net instead of a rope net is not only interesting, but also fun. For water volleyball you will need: 15 mm pipe, 3 T-shaped connectors, 2 angles at 90 degrees, 4 plugs, glue, a drill.
From the pipe, he cuts off two pieces of pipe, 1 m each. Drills holes in them with a 1.5 mm drill, along the entire length of the pipe. Connects them together with a tee. Pipes are inserted into opposite ends of the tee, the remaining end looks in the opposite direction from the holes. at the ends of the pipes installs, with an angle down, two 90 degree angles. Cuts seven pieces of pipe of 61 cm. Sets two pipes at the edges and one in the middle. A plug is installed at the end of the middle pipe-leg. A T-shaped connector is installed on the outer ones. Installs four pipe sections at the ends of the tees. Installs plugs on three of them, on the last hose connector. By connecting the hose and turning on the water, you can enjoy playing water volleyball.


Step 6: folding chair
The author considers the following homemade product as a child's one, but I think that such a chair can be useful, for example, for fishermen. So, to make a chair, you need: 20 mm pipe, 8 right angles, 2 long bolts with nuts, old jeans, a drill, sewing accessories.
Cuts off eight 30 cm pipe pieces. Connects pipes using corners, making two squares. Make holes in the two sides of each square in the middle, opposite each other. Slips one square into another, bolts. Opening the legs measures the right amount fabrics, cuts out. Sheathes the seat. The folding chair is ready.


Step 7: planting cage
In order to plant plants at the same distance, the following homemade product was made.
To make it you need: 24 pieces of 15 mm pipe, 4 right angles, 4 crosses, 8 T-shaped connectors.
First, the author collects the middle. Installs pipes in the crosspieces, collecting a square from them. Then T-shaped bends are attached to the ends of the tubes, in them again tubes and corners. Thus, a lattice is obtained. By installing the trellis on the ground in squares, you can plant plants at the same distance.


Step 8: flashlight holder
The following homemade product is simple and functional. To make it, you only need a piece of pipe, two screws and a drill. Cuts off a piece of pipe. From the edges to the middle, cuts the pipe at an angle, leaving about a third in the middle. Drills around the edges of the hole. screws the holder to the wall. Now you can install the flashlight into the holder.


Step 9: puppet theater
The next homemade product should interest parents. For its manufacture, the author used a pipe and various connectors, as well as a sheet and pins.
Having your own greenhouse in the garden is always beneficial and convenient. It's still cold outside, and you have organic vegetables in your fridge that cannot be compared with the products bought at the supermarket. Today, you can build a greenhouse from any material, but if you need to build a structure quickly and easily, then you should use the PVC pipe option.
Which pipes are suitable
Before moving on to the description Supplies, it is necessary to highlight some of the advantages of a greenhouse made of PVC pipes:
- ease of installation, dismantling or transfer to another place;
- cheapness of materials for the construction of a structure;
- creation of conditions necessary for growing numerous crops;
- high strength, lightness and environmental safety.
With all the advantages available, it should be noted that a greenhouse made of PVC pipes is being built temporarily. It will be possible to grow vegetables there only for one season. After this time, you will have to at least replace the top coat. At choosing PVC pipes it is necessary to calculate the required number of them.
To build a small greenhouse, you need to buy PVC pipes of the following length:
- 190 cm (4 pieces);
- 68 cm (10 pieces);
- creation of hinges 10 cm (10 pcs.);
- 350 cm (2 pcs.);
- 558 cm (4 pcs.);
- 170 cm (2 pcs.);
- 360 cm (2 pcs.);
- 90 cm (4 pcs.).
On the video - a greenhouse made of pvc pipes with your own hands:
When choosing a material for sheathing the frame, you can pay attention to polyethylene, polycarbonate or reinforced film. The most durable of all remains polycarbonate. But not everyone can afford it because of the high cost.
But how it looks can be seen in the photo in the article.
What material for a greenhouse is the best and most suitable is described in great detail in this
What a spunbond greenhouse looks like, and how to make it yourself, will help you understand the information from the article:
And here budget option polyethylene or reinforced film remains. If you change the top cover of the greenhouse every 2 years, then it is worth using polyethylene. It is inexpensive and can withstand light wind loads.
Manufacturers and prices of pipes
Today there is a wide range of PVC pipes used for greenhouse installations. The following manufacturers remain the most popular:

Installation of greenhouses
Wooden box base
An arched structure made of PVC pipes can be mounted not only on the ground, but also on a pre-made wooden box. Thus, it is possible to create more favorable conditions for growing crops, accurately monitor their condition, soil composition and temperature regime.
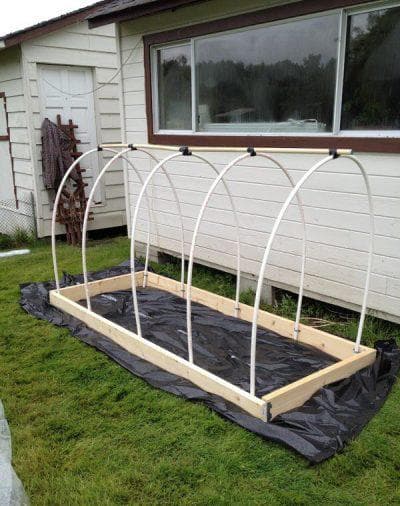
From a wooden box
Everything assembly work are carried out according to the following plan:
- To complete the foundation, it is necessary to prepare the site for installation, carry out the marking.
- Drive metal rods along the edges of the future box. They will be the basis for PVC mounting lathing.
- A distance of 70 cm must be maintained between the pins. Drive in the pegs so that their length above ground level is at least 10 mm.
- Check all diagonals, all corners must be right. Otherwise, the greenhouse will not be sustainable.
- Using the prepared boards, you can start creating the box. Its height can reach from 30 cm.
- Next, proceed to the assembly of the PVC pipe sheathing. To make the ends, you can use wooden beams... Just do not forget to leave room for doors and vents. Sheathed the assembled frame with foil. Tuck its edges under the box and fix with staples. The last step is to install doors and vents for air circulation. But how the greenhouses of the new generation look like, you can see in the photo.
A box for such structures can only have soil at the base, which is poured to a certain level. But there is also the option of installing the box on a cushion made of expanded clay and sand. This will improve the microclimate inside the greenhouse. Such a structure will be warmer, and it will be much easier to assess the condition of the soil.
Polycarbonate coated
You can get a more durable construction from PVC pipes provided that the frame is sheathed with polycarbonate. Such a structure is durable, reliable, and it is also much easier to maintain the conditions necessary for the full growth of plants in it. It is absolutely not required to erect a powerful frame for polycarbonate sheets. So procure metal pipes don't have to. PVC structures perfectly withstand all loads, if the assembly conditions have not been violated.

Installation work is reduced to compliance with the following plan:
- The first step is to prepare a site for installing a greenhouse.... Thoroughly level the soil there.
- The assembly of the greenhouse takes place in the end parts. First, cut out 3 sheets with dimensions of 2x2.1 m.For these purposes, you must use a sharp knife. But the material should lie on a firm and level surface.
- Assemble a frame on the ground from PVC pipes. In this case, it is necessary to take into account the fact that there should be a window and doors that will open upwards. This greenhouse looks like
- Dismantle the protective film from the polycarbonate sheets, place it on the prepared horizontally installed frame with the outside side up.
- Polycarbonate align... The first sheet should be laid so that the doorway and the window leaf are covered. When the sheet is installed evenly, you can fix it to the PVC pipe crate using self-tapping screws. After fixing, cut the unnecessary parts of the polycarbonate in an arc using a construction knife.
- Now you can start fixing the second sheet.... He must or butt to the first. Also, make sure that there are no gaps between the materials. Perform the second end of the building in the same way.
- You can start creating doors and vents... Using a knife and a ruler in polycarbonate sheets, draw and cut through the center of the door frame so that an overlap forms when closing. Cut out the vents in the same way. To make them close well, it is necessary to make protrusions for the hinges. As it is not surprising, any doors about windows can be made from scrap materials, but, it is described in great detail in this article.
- Now you can proceed to the assembly of the frame... Along the perimeter, make a wooden box from the boards. Now mark all the longest sides of it and drive in metal rods around them. They are necessary for the racks of the crate.
- Install PVC arcs on these guides, fix them with the ends with a longitudinal tie.
- Using building level, check the position of the battens. Now you can fix the greenhouse. To do this, drive in special pegs at the corners of the crate to the base. Thus, the structure will not change its position during use or strong winds.
- Fastening the polycarbonate sheets completes the installation... It is necessary to measure the arc and cut the material with a margin of 10 cm. The outside should be directed upwards. Above the ends, it is worth leaving a margin of 5 cm. All unnecessary parts of the material must be removed after fastening.
- Fixation of polycarbonate sheets is carried out using press washers... Take off protective film from the material is possible only after the installation work is over.
- All joints formed between the sheets must be sealed... For these purposes, neutral silicone sealant... Install handles on doors and vents. You may also be interested in learning more about what, and in which part of the garden, it should be planted.
The video shows the installation of a greenhouse made of pvc pipes: