Making the ceiling in the kitchen with your own hands. What is the best ceiling in the kitchen
Each apartment needs periodic repairs, especially if various finishing materials become unusable: panels, wallpaper or whitewash on the ceiling. The ceiling in the kitchen is one of the most vulnerable places in the entire apartment: daily cooking can quickly contaminate it, and then the owners will have to think about repairing it.
Requirements for ceiling coverings in the kitchen
A kitchen is a room where fluctuations in humidity and temperature often occur. They usually wash dishes and prepare food on a regular basis here. Therefore, all materials for finishing must necessarily have the following properties:
- Hygiene. The kitchen should be as clean as possible, because this is a guarantee of the health of the household. So, thinking about repairing the ceiling, you should give preference only to those materials that can be washed and wiped.
- Moisture resistance. Ceiling decoration should not lose its visual appeal and absorb moisture when exposed to steam.
- Practicality. Nowadays, few people want to spend a lot of time maintaining cleanliness. For this reason, having planned the repair of the ceiling in the kitchen with your own hands, it is recommended to give preference to precisely those materials that will not create difficulties during cleaning.
- Durability. Long-lasting materials are always preferred. After all, their use postpones the prospect of the need to perform a new repair.
- Aesthetics. The ceiling in the kitchen should be in harmony with the rest of the furniture and decoration, and also please the eye.
DIY ceiling repair in the kitchen
The ceiling, just like the entire kitchen, belongs to a high-risk room. Soot, fumes and steam will surely test the surface for strength, even with a modern ventilation system. And below you will find out how you can repair the ceiling in the kitchen, and photos and videos will clearly demonstrate this difficult process to you.
Contacting a construction and repair company or repairing the ceiling in the kitchen on your own is a question that needs to be resolved by apartment owners.
Performing repairs with your own hands, you can significantly save your money by spending them on finishing with more expensive materials. And below you will learn how to repair the ceiling yourself.
Where to begin?
First of all, you need to assess the degree of damage and the scale of the upcoming work. The resulting soot on the finish whitewash requires much less effort to renew the ceiling covering than cracked plaster.
Depending on the level of damage to the ceiling and your budget, the following repairs can be performed:
- Painting or whitewashing.
- Sticking finishing panels or wallpaper.
- False ceiling installation.
- Installation of a stretch ceiling.
- Preparation for repair work.
Whichever of the options you choose, you will first have to prepare work surface... To do this, you will need: a stiff brush, a spatula, finishing putty and primer mix.
Previously, it is necessary to take out the furniture from the kitchen (and the one that remains, just cover plastic wrap). You also need to cover the floor with film, and if it is not there, then use newspapers. This will significantly save time and effort in cleaning after completing the repair of the ceiling in the kitchen.
The old coating should be brushed off as much as possible with a stiff brush or trowel. It is important to prime any irregularities and cracks on the flow surface. After the primer is dry, a finishing putty is applied. She will prepare the surface for further actions, and also level the surface of the ceiling. In the event that in one application it was not possible to achieve an even surface (checked by level), after drying, you will have to apply another layer. Finishing materials are applied to the leveled surface.Do-it-yourself kitchen ceiling repair: photo and similar instructions
Whitewashing or painting
Due to their fragility, both of these methods are a thing of the past, but on the other hand, these are the cheapest finishing materials.
If the repair of the ceiling in the kitchen must be done by whitewashing, it is important to consider the following subtleties:
- Before applying the whitewash, you need to thoroughly wash off the old whitewash from the ceiling surface to the very concrete base.
- When preparing the mixture for whitewashing, it is necessary to add a certain amount of wood glue, as a result of which the finishing material will receive additional strength.
- You need to apply paint with even strokes, perpendicular to each other. Thus, you will be able to exclude the formation of longitudinal "slugs" of paint.
Choosing to paint the ceiling in the kitchen, you should give preference to waterproof high quality paint. Its costs depend on its characteristics.
For staining, use brushes, foam rollers or spray gun. We recommend applying at least 2-3 coats of paint.
Advice! Please note that the last coat of paint must be applied towards the light source, because this way you will avoid brush marks on the ceiling surface.
Pasting the kitchen ceiling with expanded polystyrene plates
The main advantage of this material is low cost and ease of operation. Before you start gluing the ceiling, you need to place the plates so that the central one is located strictly in the center of the room. In addition to the attractiveness of such cladding, you can accurately determine the number of incomplete tiles by adjusting them to the required size.
The gluing technology is very simple - a layer of glue with a thickness of at least 1.5 cm is applied with a spatula to the tile, after which the tile is applied to the cell assigned to it and gently pressed against the ceiling.
PVC panels or wallpapering
It is a little more complicated, but it is more convenient to use PVC panels for finishing the ceiling in the kitchen. They are available in a wide variety of colors and sizes.
PVC panels must be fixed with special glue. They have protruding grooves and parts for better docking with each other. Moreover, it is convenient to take care of them: periodically wipe them with a cleaning agent.
When choosing wallpaper for the ceiling in the kitchen, you should give preference to the washing options that are intended for gluing in such a room. Experts advise to give preference to wallpaper in light shades in order to visually increase the height of the flow, thereby expanding the kitchen space.
As for the wallpaper with a print, it is important to select them so that the pattern completely matches the entire perimeter of the gluing. In this case, the sticker should be carried out parallel to the wall where the window is located, namely from window to door.
The process of wallpapering the ceiling implies compliance with the following rules:
- The length of the wallpaper strip should be 15-20 centimeters longer to cover the connection between the ceiling and the wall.
- You need to glue the wallpaper in the direction away from the window (parallel to it).
- Pieces of wallpaper are cut in advance for precise fit of the pattern, after which they are numbered and pasted one by one.
- From pasting to drying the wallpaper, the windows and doors in the kitchen should be closed to prevent drafts and, as a result, the wallpaper peeling off.
False ceiling installation
False ceilings have proved to be much more practical and easier to use in the kitchen. And this is not surprising, because they do not undergo deformation, are easy to clean and completely replaceable.
When installing a suspended ceiling, you must first organize the frame. But keep in mind that the instructions for arranging it differ depending on what kind of ceiling you decide to install in the kitchen. Although the following general points can be highlighted:
- Fasteners for a U-shaped metal profile.
- Preparation and fastening of hangers for fastening the profiles, where the subsequent final fastening of the panels will be carried out.
The panels you have selected must be fixed with self-tapping screws on a pre-installed frame (they are attached at the edges). Traces from self-tapping screws are hidden by special corners, which does not spoil the aesthetic appearance of the ceiling.
Drywall is a material that is even more hygroscopic than expanded polystyrene tiles, so for the kitchen it is better to give preference to its moisture-resistant version, especially since it is not much more expensive.
But be that as it may, many owners choose this option for finishing the kitchen, since it allows you to create the most original, multi-level designs.
Moreover, suspended ceiling allows you to hide communications and install built-in lamps.
The disadvantages include:
- Sufficient labor intensity of installation.
- Reducing the height of the ceiling, which can become critical in houses with a typical layout, where the ceilings are already low.
- The need to perform various additional work. After installation drywall construction you will have to putty and paint the surface. Plasterboard allows for wallpapering.
Slatted ceilings in the kitchen
This option for finishing the ceiling has a huge number positive qualities, which include:
- Resistance to unfavorable conditions exploitation.
- Rack ceilings, like other types suspended structures, do not need careful preparation of the surface and allow you to lay communications secretly.
- A variety of decorative designs. You can go for the open and closed type racks, use different combinations colors of inserts and strips.
- Rack ceilings are easy to maintain and easy to clean.
- If necessary, you will disassemble the structure without any difficulties (for example, if you need to replace a lamp).
- The ceilings meet fire safety requirements.
Among the shortcomings, it is worth highlighting only a decrease in the height of the ceilings.
Stretch ceiling installation
The process of installing a stretch ceiling is quite complicated, so it is better to entrust it to specialists. It justifies the high price tag without requiring serious maintenance efforts.
This option is quite expensive, but it is one of the most practical. Its main advantages:
- Long service life of ceiling panels. The coating will last for several decades without the need for repairs.
- Having installed stretch ceilings in the kitchen, you do not have to worry about flooding that the neighbors from above can arrange. The linens are able to withstand a huge volume of liquid, your ceiling and the interior of the kitchen itself will not be affected.
- Usage different options design, installation of panels of different structures and colors, construction multilevel structures etc.
- The ceiling is easy to clean if necessary.
- Stretch ceilings do not fade in the sun and perfectly tolerate temperature changes.
Conclusions about repairing the ceiling in the kitchen with your own hands
So, you can repair the ceiling using almost any technology. When choosing a finishing material, the owner needs to take into account its durability, quality, cost and, of course, the ability to serve in difficult conditions. By comparing all the factors, you can choose the most suitable option.
Repair of the ceiling in the kitchen, alas, is an inevitable process, since the service life of any coating is limited. If short-lived options are used - for example, whitewashing, you have to face repairs at least once a year. A more durable finish, for example, excludes the process for 10 years, but sooner or later the floor will have to be repaired.
Ceiling preparation for repair
Do-it-yourself kitchen ceiling repair always starts with removing the old coating. Depending on its nature, this process can be very laborious, time-consuming and in any case includes dirty, mostly wet work.
The next step is the actual preparation of the ceiling for the installation of a new coating. There are more options here, but you still have to stock up on time and patience.
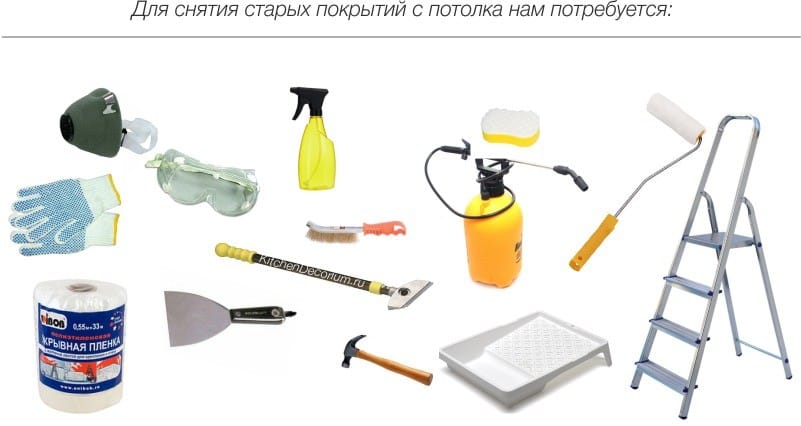
Tools and equipment
To repair the kitchen as quickly and efficiently as possible, you need to have the following tools on hand:
- a ladder or trestle of sufficient height and stability to reach the ceiling surface without risk;
- covering film - any kind;
- masking tape or at least ordinary tape - will be needed for fastening;
- respirator, gloves and goggles are a must. Dry cleaning of the ceiling results in huge amount fine dust, which is highly irritating to mucous membranes and respiratory organs. Wet ones are fraught with the formation of a large amount of dirt, so precautions are necessary;
- spray gun - ordinary, garden, for wetting the kitchen ceiling. You can replace it with a sponge and a container of water or a wide roller with a long handle, but the spray gun is still more convenient;
- staple - preferably wide to remove layers of coating as quickly as possible;
- iron brush, chisel with a hammer - required to remove a more durable old coating;
- perforator and grinder - they are needed if you want to remove the base overlap layer, when infected with fungi, for example. Also, old durable plaster can be removed with a grinder.
Removing the coating
Surface cleaning methods are determined by the nature of the coating. Most often in the kitchen, the ceilings are whitewashed, painted, plastered or pasted over with wallpaper. Often there is also a suspended structure with plastic panels or clapboard. But in this case, you first need to disassemble the system, and only then, if necessary, prepare the ceiling surface.
First of all, furniture is taken out of the room, if possible. Large objects and equipment are covered with foil and secured with tape. The floor, if it is not being repaired, is also covered with a film.
- Whitewashing - removed in two ways:
- wet method- moisten with a sponge or spray bottle small area ceiling and wait about 10 minutes until the covering absorbs moisture. After that, a layer of chalk or lime is removed with a spatula. In difficult areas - joints, as a rule, you can use a puncher. Lime adheres better to the material, so it takes at least 20 minutes to “soak” it;
- dry involves the use of a metal brush or grinder with a disc, which quickly cleans the surface from whitewash. This produces a mass of dust. After removing the whitewash, the ceiling should still be washed.
 2. Paint is removed in the same way as whitewash. A water-based composition is used for the kitchen, since it is safe for humans. This coating also absorbs moisture and swells. The process takes a little longer. The paint can be removed both dry and wet.
3. Wallpaper is the easiest solution to repair. Even washable ones are easily soaked, as the glue that holds them together absorbs moisture. It is enough to moisten the area well with water, and then, picking up the edge of the strip, carefully remove it. Sometimes the use of a spatula is required.
4. Plaster usually has a higher degree of adhesion and is difficult to remove.
The options are as follows:
- the mechanical method involves the use of a hammer and chisel. If the plaster is old and peels off easily, a spatula is enough;
- electric - a punch or grinder with a disc is used. This method is much faster and more efficient.
If, after removing the plaster, mold is found on the base substrate, the infected areas should be removed rather than decontaminated.
In this case, the concrete is broken with a perforator until they reach the uninfected material. Then the entire ceiling is treated with any chlorine-based antiseptics or special antifungal compounds. For reliability, you can re-treat the area with copper sulfate.
 5. Any suspended structures are removed according to a single scheme: first, the finishing material is removed - sheets of drywall, lining, plastic panels, and then disassembles the frame. The finish cannot always be preserved: when fixing with nails, for example, the material is damaged, but the frame elements are quite suitable for reuse.
How to make one of the important stages of repairing the ceiling in the kitchen, in particular, removing whitewash, can be found in the following video.
Initial repair
The need for it does not always arise. The ceiling in the kitchen with your own hands, you can build a rack, plasterboard, even install a tension. In this case, the state of the base coat does not play a special role. If finishing coatings are intended or false ceiling, plastering is required.
The procedure depends on the condition of the ceiling in the kitchen.
Pre-plastering
If there are deep rusts and cracks on the surface - more than 2 cm in depth and width, their embedding is carried out separately.

- Cracks are expanded with a spatula and cleaned of dust and dirt. It is best to use a vacuum cleaner.
- The grooves are treated with a primer for better adhesion to the material.
- After drying, the cracks are sealed with polyurethane foam.
- A day later, cut off excess foam and prime again.
- With a spatula, plaster is applied into the recess, very tightly and a reinforcing tape is applied on top - serpyanka.
- Then a thin layer of plaster is applied over the tape to finally level the surface.
 If the difference in height or the depth of cracks is more than 4 cm, special metal mesh and a special kind of sand-cement compositions. It is better to entrust such repairs to specialists.
Basic plastering
How to repair a ceiling without plastering? Only if you install a suspended structure. And even in this case, it is recommended to cover the surface with plaster, albeit without leveling and smoothing, at least in order to avoid the accumulation of dust and dirt.
Plastering is not the easiest process. It will require the appropriate composition, beacons, as a rule, a fiberglass stack and, of course, a spatula. Cannot be used for kitchen gypsum plaster as it is hygroscopic and absorbs dyes.
 The sequence of actions is as follows.
- treated with an antiseptic.
- The base is primed. Preferred compositions for smooth ceilings, as they provide good adhesion. The primer should dry completely - this is about 12 hours.
- The lowest angle of the ceiling is determined by a laser level or conventional level. With the help of a paint cord, markings are made from this point.
- Beacons are fixed along the ceiling - self-tapping screws located at the required height, that is, taking into account the irregularities of the base ceiling surface. Lighthouses are installed in parallel rows with a distance between them 15–20 cm less than the length of the rule.
- On the self-tapping screws, the beacon profile is fixed to the plaster blotches. The correct placement is checked with a laser level.
- Plaster is applied between the profiles - with a spatula, literally thrown onto the surface. Then the rule is moved between the rows in zigzag movements: the excess mixture is removed and the surface is leveled.
- The plaster layer reaches 2 cm - no more. If the irregularities on the ceiling are too large, then re-plastering is allowed after the first layer has completely dried. In this case, reinforcement will be required: first, a fiberglass painting net is fixed to the surface, and then plaster is applied.
 If the ceiling is being prepared for painting or whitewashing, it is important to get not just a flat, but a smooth surface. For this, putty is applied to the dried plaster layer. This composition has a more liquid consistency and forms a smooth surface.
 The video demonstrates the plastering of the kitchen ceiling.
How to fix a ceiling in a kitchen
The finishing itself gives the final look to the new ceiling. The options are as follows.
- Whitewashing and do not cause difficulties. To work you need a brush and a roller, it is even more convenient to use a spray gun. It should be noted that the paint is more durable and tolerates moisture better.
- You can wallpaper the ceiling. Washable are preferable, since even the best hood does not save from soot and fat evaporation.
- You can stop your choice on decorative plaster. In this case, instead of putty, the surface is finished with a mosaic, Venetian, stone plaster as in the photo.
- Suspended structure - rack or with a sufficient height of the room, it will not only decorate the room, but also serve as a method of dividing into a working and dining area. In this case, you can also refuse the putty, and it is not necessary to level it.
- Hem version easier to execute. , clapboard, drywall sheets... This is where the creation of a flat surface is required.
Repairing the ceiling in the kitchen includes 2 mandatory stages and 1 is not always mandatory. The former includes the removal of the old coating and the installation of a new one. Plastering is optional, since when constructing suspended structures, the state of the base surface does not really matter.
The ceiling in the kitchen is essential to the presentability of this multifunctional space. Today there are many building materials, with the help of which you can qualitatively and beautifully decorate the ceiling of the kitchen. Huge variety of colors and textures modern cladding makes it possible to create the desired ceiling in the kitchen, which will be combined with any interior.
But it should be borne in mind that all surfaces of this room are subjected to extreme loads. When deciding which ceiling is best for the kitchen, it is necessary to evaluate the proposed finishing material according to several criteria.
The main purpose of the kitchen is cooking. This process is associated with the release of a significant amount of heat, oil and fatty fumes. When washing dishes and walls, the kitchen ceiling is exposed to water and detergents. Romantic candlelit dinners are fraught with grime, which can completely cover the ceiling in small kitchens. Ventilation of the room is associated with low temperatures, the possibility of the appearance and freezing of condensate.
Therefore, when deciding which ceilings in the kitchen will better tolerate such operating conditions, you need to choose a material with the following qualities:
- waterproofness;
- durable surface that can withstand repeated cleaning;
- the resistance of the pattern to detergents;
- ecological cleanliness and safety;
- presentable appearance;
- long service life.


 An example of quality lighting working area

When choosing finishes for the kitchen, you should not focus on the most budget options. Repair is a rather troublesome business, but when deciding which ceiling is best to do in the kitchen, you need to dwell on proven and reliable cladding methods.
You can save on repairs if you spend it on their own... Most of the finishing methods do not require professional skills from the employee and the acquisition of complex expensive equipment. Before making a ceiling in the kitchen with your own hands, you should familiarize yourself with the types of building materials that can be used for this purpose. Right choice and the applied diligence will allow you to create a kitchen ceiling that will delight the owners for years.
Consider what, what and how best to make the ceiling in the kitchen on your own.
Video instruction for choosing a finish
Ceiling plate painting
If you are looking for the simplest, fastest and cheap way arrangement ceiling slab, then it is worth choosing the option with putty and staining. But this type of repair requires great skill from the plasterer. The surface must be perfectly leveled, as even the slightest flaw will immediately catch the eye.
To work, you will need the following tools and materials:
- wide and narrow steel spatula;
- paint brush and roller;
- abrasive mesh;
- liquid primer;
- starting and finishing putty;
- sandpaper of various grain sizes;
- water-based paint.
 Installation of beacons
  Filling (leveling) the flow
  Final level check
In order to be able to easily reach the ceiling with the tool, you will need a high ladder or other stable base. A plasterer who makes a ceiling of this type must protect the respiratory organs and eyes from dust, which will be released in abundance during work. Therefore, you should purchase protective goggles and a respirator.
The ceiling in a small kitchen is finished in a certain sequence:
- all are removed from the base plate lighting... All unstable fragments of the old coating are removed. The stove is cleaned of oil deposits and other contaminants;
- sealing in progress large cracks and holes. The slab is treated with a liquid primer;
- the starting putty solution is kneaded. It should be applied quickly even on a small ceiling, since this type of putty hardens very quickly;
- hardened plaster is treated with a primer;
- layer applied finishing plaster... After hardening, its surface is leveled with abrasive materials, cleaned of dust and covered with a primer.

Sequence of application of paint layers
The final stage of the repair is painting the leveled surface. If the kitchen is finished with high ceilings, then it is advisable to use paint in beige tones, on which dust and oil deposits are practically invisible.

 Painted ceiling plate options
Video instruction for painting the surface
Plasterboard suspended ceilings
Drywall is lightweight and inexpensive sheet material, which has a lot of advantages.
These include:
- the ability to mask serious defects in the floor slab without major repairs;
- the presence of space between the supporting plate and suspended sheets, which can be used for placement, communications, insulation and built-in lighting devices;
- a variety of volumetric structures in several levels, created from gypsum plasterboard;
- perfectly flat surface obtained after finishing work.


The best drywall kitchen ceiling you can create is a multi-level, curved structure equipped with concealed hangers, recessed and external lights. However, only a kitchen with high ceilings will look good with such a design. If the height of the walls is less than 250 cm, then it is better to limit yourself to a single-level surface. Applying imagination, you can create your own unique project, making it a reality with your own hands.
To do good ceiling from the GKL you will need the following:
- puncher;
- roulette;
- building level;
- screwdriver;
- scissors for metal;
- steel spatulas;
- ceiling drywall;
- steel profile;
- plaster;
- liquid primer;
- abrasive mesh;
- finishing finish.
The work is carried out in the following sequence:
- markings are applied to the walls and ceiling. Holes are drilled for the frame;
- fastening of vertical suspensions and a bearing profile is carried out. For this, self-tapping screws or dowel nails are used;

Surface marking for the frame
- the frame is assembled from the ceiling and arched profile. Longitudinal and transverse parts are connected using special hardware;

Wireframe creation
- the frame is sheathed with plasterboard. Self-tapping screws are screwed in at intervals of 15 cm and recessed into the sheet by 1 mm;
- sealing of holes from screws and joints between plates is carried out. After that, the surface is plastered, sanded and primed.
 Do not forget to put insulation, if necessary.
  All wiring must be completed in advance
  You can fix the gypsum board in parts
If the kitchen rests against the ceiling with a small gap, then the plasterboard structure can effectively hide it, creating the illusion of a monolithic structure of furniture and a suspended structure.
Video installation instructions for gypsum board
Wallpapering the ceiling
Today you can buy wallpaper that is resistant to the most extreme external factors. But it should be borne in mind that their front part has a volumetric structure. This provokes the accumulation of fatty deposits on the wallpaper, which is extremely difficult to get rid of.
To paste over the wallpaper on the base plate, you need the following devices:
- chop cord;
- roulette;
- scissors;
- stationery knife;
- paint brush and roller;
- pencil;
- wallpaper glue;
- spatula for removing glue;
- electric drill with mixer;
- rags.
When considering the best way to cover the ceiling slab, you should opt for non-woven wallpaper. it practical material resistant to moisture and chemicals.

 Ceiling after wallpapering
The sequence for gluing wallpaper to the carrier board is as follows:
- the main ceiling is leveled with putty and treated with a liquid primer;
- a plastic or foam baseboard is glued to the ceiling, it is painted;
- blanks of the required size are cut. Their length is calculated so that after gluing there is no gap left on the bearing surface;
- a line is drawn along which the first strip will be glued. The base plate is lubricated with glue;
- gluing the cut strips of wallpaper. Excess glue is removed with a spatula and rags. The joints are carefully aligned.

Self-gluing wallpaper method

The method of gluing wallpaper with a partner
The pasting should be done when closed doors and windows. Airing can be carried out one day after the end of the work.
To create a beautiful and original ceiling, you can make a surface from liquid wallpaper... This is one of the types decorative plaster, which is applied to the base with a spatula.
Liquid wallpaper looks very impressive and unusual, but the bill for the purchased finishing material can be very impressive.
Video instructions for gluing wallpaper
Suspended ceiling "Armstrong"
Despite the fact that tile suspension systems are accessories for offices and service premises, they can be successfully used for furnishing the kitchen. This is due to the fact that in addition to practicality, modern ceilings Armstrong have high aesthetic properties. The ceiling, made of glossy or mirrored cassettes and chrome-plated profiles, looks extremely beautiful and elegant.
In addition, communications, lamps, insulation and ventilation can be installed above the slabs. Maintenance of tiled structures is very easy. You need to reach the ceiling and remove the cassettes from the grill. After that they can be cleaned by everyone. available means and methods, including completely immersing in various containers with a cleaning solution.


 Types of Armstrong panels
Tiled suspension system has the following advantages:
- ease of installation with your own hands;
- masking the flaws of the floor slab;
- creation of additional space for the installation of communications, air ducts, insulation and lighting devices;
- a wide selection of cassettes of various colors and textures;
- the ability to quickly and freely access equipment located above the plates;
- affordable cost.
When deciding how to make a ceiling in the kitchen, you can stop at glass inserts... Transparent matte cassettes or plates with drawings of various themes are used. The colors of the Armstrong tiled ceiling can be changed at any time to match the renovated interior of the room.
For the construction of this system, you will need such devices and materials as:
- puncher;
- roulette;
- oil level;
- screwdriver;
- hacksaw for metal;
- modular lamps.
The ceiling can be made of slabs 60x60 cm or 60x120 cm in size. Modular luminaires are adapted in size to the frame lattice and have a size of 59.5x59.5 cm. They are equipped with fluorescent and LED lamps.
Arrangement of a tiled ceiling is carried out in the following order:
- markings are applied to the walls and ceiling. Is screwed to the walls corner profile... Vertical adjustable hangers are fixed on the floor slab;
- on carrier plate communications, air ducts and hidden lighting devices are fixed.


Armstrong structural elements
- the frame is being assembled. First installed, aligned and secured longitudinal profiles having a cross-section in the form of an inverted letter "T". After that, the cross members are mounted.

Assembling the frame
- slabs are laid on the frame. Connecting and fixing modular lamps and ventilation grilles to the frame is carried out. Sensors and video surveillance cameras are installed in the service premises.

Installation of plates and lighting
In order to decide which ceiling is best done in the kitchen, you should carefully understand the properties of each of the materials, find out all the pros and cons of its use. At the moment, there are many materials suitable for finishing a kitchen ceiling. This is wood, and the so popular PVC, and drywall and even metal. It is especially worth paying attention to the flammability of the materials used and their resistance to humidity, as well as to temperature extremes - these are the most common conditions in kitchens. The service life plays a significant role - it depends on it how long this or that coating will last.
One of the cheapest and most proven options for finishing ceilings in the kitchen is plaster. Decorating the ceiling in the kitchen with plaster eliminates damage to the coating due to changes in humidity. Among the additional advantages of this finish, it is worth highlighting:
- Plaster is not afraid of temperature changes - very coldy as well as the stifling heat, the coating is not affected in any way.
- The plastered ceiling in the kitchen can be washed countless times - it will not cause the slightest damage to the surface.
- Cheapness this coverage is also a rather significant advantage.
 Plaster is the most affordable and common option for finishing the ceiling surface
 However, plaster, with a fairly a large number pluses, has many disadvantages, in particular:
- The plaster gets very dirty, it also has the ability to absorb grease, so you will have to wash such ceilings quite often in the kitchen.
- Does not protect against flooding from above, from which even a small flood will result in stains on the kitchen ceiling, or even worse - peeling plaster.
- Another rather significant disadvantage is that such a finish strongly absorbs odors.
Plaster is a good budget option for decorating the ceiling in the kitchen. Cheap, reliable, without special efforts- this option looks pretty decent. However, if you plan to make ceilings in the kitchen more aesthetic and practical, it is better to give preference not to ordinary, but to decorative plasters.

Drywall
Plasterboard trim is an excellent solution to the question of how to trim the ceiling in the kitchen, provided that there is a hood in it. One of the main advantages is the ability to create multi-level structures, thanks to which the overall design of the room can be emphasized. Also, due to the design features of plasterboard ceilings in the kitchen, the surface does not need to be leveled, which can significantly reduce costs.
 Multilevel plasterboard ceilings - affordable and beautiful
 Such a kitchen ceiling also has disadvantages - it cannot be washed, and in the absence of a hood in the room, it will quickly lose its appearance. This option is very popular due to its aesthetics, comparative budget, and the ability to significantly diversify the design.
PVC panel trim is a fairly popular option due to the variety of textures, as well as ease of installation. This ceiling finish in the kitchen has many advantages, in particular:
- low cost;
- water resistance;
- durability;
- ease of care.
 Plastic panels – a budget option for finishing kitchen ceilings
Moreover, this type of finish can be easily replaced if damaged. Moreover, the damaged area is replaced, and not the entire coating, which significantly reduces the cost of repair.
The plastic ceiling in the kitchen also has its drawbacks. One of them is high sensitivity to damage. Any impact, even a slight blow, can break the coating. In addition, plastic is easily flammable, and during combustion it emits toxic gas, which is especially important for such a fire-hazardous room as a kitchen.
When deciding which finish to use, one should not forget about the metal ceilings in the kitchen. They are quite popular due to their high strength and low cost. At the same time, there are different options executions, in particular of aluminum or other metal. Among the additional advantages of such a ceiling, it is worth highlighting:
- long service life;
- the coating is not afraid of humidity and temperature changes;
- such a kitchen ceiling is easy to clean;
- the material is not subject to combustion;
- not afraid of flooding.
It is worth noting that the last point is applicable exclusively for finishing - water will not affect it in any way. But it will get into the room, so the metal ceiling will not be able to protect the interior from the consequences of flooding.
 Metal panels - practical option for finishing the ceiling in the kitchen
This choice of ceiling for the kitchen is really reliable and practical. Metal or aluminum coatings do their job perfectly, are easy to clean, and are completely immune to the influence of time. However, to name given view ecological ceiling covering is quite difficult.
When choosing a ceiling for the kitchen, they are in great demand tension structures- and for good reason. Their appearance can be safely called flawless, and the cost has long passed into the category of affordable. The structure consists of a decorative profile to which a fabric or film is attached. Which of the materials to choose is up to you. We will dwell on each of the types in more detail.
Fabric ceilings in the kitchen are initially considered more durable than film ceilings. Among the features of fabric options, it is worth highlighting:
- High resistance to mechanical damage.
- Partial water transmission during flooding.
- The need for a complete replacement of the canvas during the forced dismantling of the ceilings in the kitchen.

The film version has the following characteristics:
- Subjected to mechanical stress, easily torn from contact with a sharp object.
- Retains water, so you can not be afraid of leaks when flooding from above.
- It can be removed and stretched many times without changing the material (for example, to drain water and dry).
In addition, both film and fabric tension options can be matte or glossy, satin or transparent. This ceiling finish in the kitchen has many advantages:
- resistance to moisture changes;
- ease of installation;
- the ability to install spot lighting;
- the possibility of combining with other designs;
- easy care.

Stretch ceilings have their own disadvantages:
- the structure cannot be installed independently;
- the material is exposed to sharp objects;
- heating contributes to deformation of ceilings, including sagging, which is especially important for kitchens, where temperature drops are common;
- if the structure is severely deformed, it must be completely replaced, it will simply not be possible to apply a patch.
Painting ceilings
Many types of ceilings in the kitchen, including plastered or plasterboard, need painting. That is why the question of how to paint the ceiling in the kitchen is also quite relevant when decorating this room. You can answer it based on the requirements that are being put forward. If you are not in danger of flooding, ordinary water-based paint will do. Such a ceiling covering is easy to wash and, if necessary, just refresh it by applying a layer of paint. But experts advise using for kitchen facilities more stable facade coloring compositions that can easily withstand constant temperature changes and even a small flood.
 Paint for kitchen ceilings must withstand temperature extremes and wet cleaning
 Other finishes
There are quite a few options for finishing the ceiling at the moment. In addition to the common ones listed above, there are also exotic designs - including those made of laminate. However, such a ceiling in the kitchen is susceptible to moisture, mildew and mildew and is created with the aim of amazement rather than practical reasons. Moreover, such options are quite expensive and often do not justify their cost.
It is also worth noting whitewashing, as a finishing option, and foam. But such materials can hardly boast of special aesthetic properties. The reliability and durability of such a design are also small, which makes them not very popular, but, nevertheless, a very affordable option. Their use can be fully justified if you need a temporary finish before undertaking larger renovations.
The choice of a ceiling for the kitchen should be made based on the characteristics of the room, the requirements put forward to it, and, of course, the budget. Today, there are many options for the design of kitchen ceilings that meet both aesthetic and practical requirements, while not requiring high costs. However, it is worth remembering that for the best quality of the installed finish, it is better to entrust its installation to professionals, who will also tell you how to finish the ceiling in the kitchen in the best way in your case.
Any renovation starts with planning. At this stage, they decide what the ceiling will be: painted, whitewashed, suspended or suspended. They choose the color scheme of the interior, they are determined with the lighting. After that, they begin a detailed study of each step to repair the ceiling in the kitchen - they choose materials and prepare tools.
Preparing the ceiling in the kitchen for painting
Preparing the ceiling for painting is one of the most time-consuming work that has to be done during a renovation. In addition, this is a rather lengthy process, so you need to be patient. The preparation of the base surface should be as thorough as possible, since after staining all the flaws will become noticeable.

There are two options to make the ceiling perfectly flat and smooth:
- level with gypsum mixtures;
- re-plaster with a cement-sand mortar.
In either case, in order to achieve an ideal result, skills in working with solutions and mixtures will be required. Professionals know many secrets that help them in their work. For a beginner in this business, there is only one way out: to gain experience and strictly follow step by step instructions, in which all the nuances of each action are revealed.
How to remove old whitewash, paint and plaster
It is impossible to make a new one without first destroying the old one. Therefore, before proceeding with the leveling of the ceiling in the kitchen, you need to remove the expired finishing coating.

How to remove old whitewash
It is easiest if the surface has been whitewashed. To remove lime, you need a roller with a long handle and a container of water (warm or cold), a spatula with a short metal blade. For the convenience of working at height, use a stable stand or step-ladder.
To moisten a small section of the ceiling with water and wait until it is absorbed. This process is not fast: it takes at least 15-20 minutes. Then they take a spatula and begin to remove the lime. If dry spots are found, they are moistened with a roller. Old wallpaper is removed from the ceiling in the same way.


How to remove whitewash from the ceiling - tips

How to remove old paint
The paint adheres much more strongly to base surface than lime, so it will be much more difficult to remove.
There are several options for accomplishing this task:
- mechanical;
- glue;
- thermal;
- chemical;
- electromechanical.
The first is the easiest to implement and not expensive from a financial point of view.
To complete the work you will need:
- personal protective equipment (gloves, mask and goggles);
- roller with foam rubber coat;
- container with warm water;
- spatula with a short and sharp blade.
Iodine is added to a container with water in such an amount that the liquid acquires a pale brown hue. Work begins by wetting the painted surface. When the paint absorbs water, it will begin to swell and flake off. At this point, it is removed with a sharp spatula.


There is universal way removal of paint and varnish coatings. This method uses PVA glue, which is diluted with water to the consistency of thick sour cream. Cover the ceiling with this compound and paste any newspapers or pieces of wallpaper. It is important that the paper is completely saturated with glue. After a few hours, when the newspapers are dry, they are removed with a sharp spatula. Old paint will come off along with the paper. Even stubborn paints and varnishes can be removed with this method.
Spatula prices

Using old newspapers to remove paint and varnish (in this case, from the walls of the room)
Thermal removal method old paint involves the use blowtorch or a portable gas burner. This method is useful for cleaning surfaces with a thick layer of paint. Firing is carried out, as a result of which the old coating begins to flake off and crumble. This method is dangerous not only by the use of open fire, but also big amount smoke. Therefore, in apartment buildings its implementation is fraught with certain difficulties.


The electromechanical method involves the use of a grinder and a special attachment - a metal brush. This method of removing paint is simple and straightforward: they turn on the tool and begin to remove the old finish coating. During work, it is necessary to protect the eyes and respiratory organs.

Using a grinder with special nozzle- metal brush
The chemical method for removing old paint involves the use of washes. They apply the composition to the ceiling and then act in accordance with the manufacturer's instructions: they wait for the wash to be absorbed, and proceed to remove the paint and varnish layer.
- DOCKER S5;
- Denalt Paint Remover 5001;
- Bio-Decap'Peintures Guard;
- Set Boya Sokucu;
- Gunter Gut Umsetzer.


"Antikras-Universal", paint remover
How to remove old plaster
Apart from mechanical, there is no other way to remove old plaster. But this task can be done different methods... In any case, care must be taken to generate as little dust as possible during work. To do this, the old plaster is regularly moistened hot water... Keeping the ceiling always damp will make it easier and easier to work.
Priority of actions:
- the entire surface of the ceiling is tapped with a hammer, trying to determine by sound those places where the plaster holds the weakest;
- hammer blows knock down the plaster in these places;
- using a hammer and chisel, they knock down stronger layers of plaster;
- clean the ceiling with a spatula, the blade of which is regularly sharpened.

If there are places that cannot be handled, use a power tool - a hammer drill or a drill with a drill. Several holes are drilled in the plaster and try to knock it down with a hammer and chisel. Or take off old layer grinder equipped with a stone disc.

How to align the ceiling in the kitchen
To level the base surface, you will need the appropriate tools and materials:
- rule;
- wide blade spatula;
- plaster falcon;
- drill;
- mixer for stirring the mixture;
- container for mixing the leveling compound;
- roller and tray;
- brush with long stiff bristles;
- aluminum beacons;
- front spatula;
- foam sponge;
- deep container for solution preparation;
- universal primer ("Concrete-contact", "Patrice-s", "Tex universal");
- leveling mixture (Rotband, Fugenfuller, Giplan, Osnovit T22, any gypsum plaster).

Stages of work on leveling the ceiling
Step 1. Surface preparation.
- The old finishing layer is removed: with a spatula, remove everything that crumbles under mechanical stress.
- Jointing is performed.
- Sweep the ceiling with a brush with long stiff bristles.
- If fungus or mold is found under the old finishing layer, the surface is treated with special disinfecting compounds: Olymp Stop Mold, Abedis 06, Fongifluid Alpa, Biozid Sanierlösung, Dali, Prospectors.


Composition "Olympus Stop-Mold"
Step 2. Priming - important stage works that should not be ignored. The primer not only removes dust from the surface of the ceiling, but also fills in all small cracks, thereby providing some leveling and enhancing adhesion to the subsequent material.
Prices for gypsum plaster
gypsum plaster

The primer is applied with a roller, rolling it in a special tray or on a piece of plywood. It is necessary to thoroughly moisten all sections of the ceiling, Special attention giving seams and chips old plaster... Corners and difficult areas are finalized with a brush. The ceiling is primed in two layers: in the longitudinal and transverse directions. Each next is applied after the previous one has completely dried.
Step 3. Installation of beacons. Lighthouses are necessary to bring the ceiling in one plane. It is rational to use aluminum beacons, as they do not rust and they can not be removed from the plaster layer. To fix these planks, use the same composition with which the ceiling will be leveled.
An important point! The distance between the beacons should be less than the length of the rule. This will allow you to perform high-quality plastering of the surface. Marks are made on the ceiling with a marker. Plaster is applied along the lines of installation of beacons. Beacons are built in, controlling the work with a rule and a bubble level.

Step 4. Ceiling alignment. This stage of work begins after the plaster that holds the beacons hardens.
- pour into a deep container the amount of water specified in the manufacturer's instructions;
- pour in a dry plaster mixture, observing the proportions indicated in the instructions;
- a metal mixer is installed on the drill;
- turn on the drill and stir the mixture, achieving a homogeneous thick consistency;
- wait 5 minutes and mix the solution again;
- put plaster over with a spatula, filling the space between the beacons;
- align the applied layer with the rule, pressing it to the beacons and moving it towards you.
In order for the alignment to be of better quality, the rule is moved by alternately shifting it to the right and left. It should be noted that the thickness of the plaster layer should not exceed the value recommended by the manufacturer. Different formulations have their own requirements. When using standard cement-sand mixture the layer of plaster should not exceed 2 cm. Gypsum compositions allow the application of a layer up to 8 cm.


Step 5. Smoothing. At this stage of the work, it is important not to miss the moment when the plaster has already begun to harden, but still has some plasticity. At this time, they begin to smooth the surface of the ceiling in the kitchen. For this purpose, a wide facade trowel is used with a blade width of 45-60 cm. With light pressure, it is moved along the areas between the beacons, trying to avoid the formation of waves.

Step 6. Finishing grout. After leveling, they are waiting for the moment when the drying plaster acquires a matte shade. Poured into a container warm water, take a foam sponge and wet the ceiling area. Finishing smoothing is performed with a front spatula, modifying all minor flaws with a damp sponge. Achieve ideal smoothness and evenness of the ceiling.


Decorative plastering
The ceiling in the kitchen can be finished with decorative plaster. This is an easier task than leveling the surface. In addition, the application of decorative plaster solves the issue finishing ceiling.

Market finishing materials offers a wide range of formulations for internal and external works... For the decoration of the ceiling, gypsum-based mixtures are optimal. They have a lot of advantages over cement ones: they harden quickly, are plastic, easy to apply and stir.
Any composition of decorative plaster includes three components:
- water;
- binder;
- filler.
Any of these ingredients are available, so you can make your own instead of buying the mixture. To do this, you need to know the exact proportions of the composition. You can familiarize yourself with them by studying the instructions on the packaging of any mixture you like for applying decorative plaster. Cement, gypsum or lime is used as a binder. The filler can be small pebbles, sand, marble chips. A pigment (dye) is added to the composition.
Prices for decorative plaster
decorative plaster

Features of the use of decorative plaster
Structural decorative plaster provides endless possibilities for creating surfaces with different kinds relief, emphasizing the individual style of the room. With the help of these mixtures, you can implement any option for decorating the ceiling: from creating a smooth surface with uniform grain to rough textures with clear lines and deep gaps. The layer thickness can be up to 2 cm.
The following compositions are suitable for decorating the ceiling:
- Alpina Expert;
- Buntsteinputz LF;
- Struktum ФеLux;
- Bolars.

For decorative plastering use as standard painting tool, and suitable tools at hand. To obtain the same type of relief, rolling with textured rollers is used.

The plastered surface can be tinted with any coloring compositions: dispersion paints, decorative glazes, tinting agents.
For finishing the ceilings in the kitchen, you can use decorative pebble plaster with grain granulation of 1-2 mm. These compositions are intended for thin-layer plastering, therefore it is necessary to perform the entire range preparatory work including surface leveling.


Table. Average consumption pebble decorative plaster.
The optimal choice is ANSERGLOB acrylic decorative plaster. You can use other mixtures - "Ceresit", "Bayramiks Gravol" and so on. All of these compounds are moisture-resistant, plastic, and crack-resistant.
Technique for applying pebble decorative plaster on the ceiling
To complete the work, you will need the following tools:
- drill;
- mixer nozzle;
- maklovitsa brush;
- Master OK;
- metal grater;
- plastic grater;
- gloves.
To enhance the adhesion of the plaster layer to the base surface, use adhesive emulsions ANSERGLOB EG 62 Quartz-grunt, Haftemulsion-Konzen, ANSERGLOB EG 62 SILICONE, Haftemulsion-Sopro HE 449.

Stages of work on the application of decorative pebble plaster.
Step 1. Padding. Apply a layer of adhesive emulsion to the ceiling with a brush. Leave to dry for 3-4 hours.
Step 2. Toning. If the mixture is not tinted, add pigment and mix the composition using a drill with a mixer.
Step 3. Application of the first layer of plaster.
- With a spatula, plaster is taken from the container and laid on a grater with a metal sole.
- Apply the plaster to the ceiling, holding the float at a 60 ° angle to the surface. Strive to obtain a layer of uniform thickness (2-3 mm).

Step 4. Smoothing. At this stage of work, a layer of the same thickness is formed over the entire surface of the ceiling. The work is performed with a grater with a metal sole.
Step 5. Formation of surface texture. This stage of work begins at the moment when the plaster mixture stops sticking to the tool. Take a plastic float and with light circular movements, holding the tool parallel to the ceiling surface, rub the previous layer. When there are no smooth areas on the ceiling, the work is completed. Leave to dry for 72 hours.
Stretch ceiling prices

Technique for applying textured decorative plaster to the ceiling
Step 1. A small amount of the mixture is applied to a spatula with a stainless steel blade.
Step 2. Apply plaster to the ceiling in an even layer up to 3 mm thick. Cover a section of 1.5x1.5 m.

Step 3. The surface can be structured within 15-20 minutes. After this time, the composition will begin to set. To form the relief, use the same or a different plaster mixture. You can use a cement-sand mortar. The mixture is applied in a layer up to 8 mm thick. There is no need for alignment.

Step 4. Moisten the plaster (spray with water) and give the surface texture with a float with a flat plastic sole. To do this, alternately press and tear the grater from the ceiling. Thus, a clear relief with randomly located peaked waves is obtained. Using stronger pressure and abrupt tears of the grater can make a coarser texture.
Step 5. With light touches, the float smooths out the relief of the decorative plaster. Achieve obtaining the same type of ceiling pattern. If the composition loses its elasticity, the plastered surface is sprayed with water.
Step 6. After 20-30 minutes, take a damp foam sponge and smooth the relief with light hand movements. Thus, a ceiling with Venetian plaster is obtained.
Venetian plaster prices
Venetian plaster


Since the kitchen is a room with elevated level humidity, the finishing layer can be coated with a moisture resistant primer. But most often this is not necessary, since most decorative plaster mixes possess the necessary resistance to external influences.

Video - How to align the ceiling. Ceiling alignment