The optimal step lag for the floor. Characteristics of overlaps and their installation Distance between lags under the board
Chernovaya Pol - This is a "lining" under the main coating. It is needed to align the surface and distribution of the load on the floor covering. Usually the draft floor is put on lagi(frame bars) with a certain distance from each other. If necessary, between lags, insulation and waterproofing are paved.
Fix the blackboards of the draft and main floor is better with the help of screws of the required value. Laying with small gaps is allowed, as the tree may be picked up and expand.
Step between lagami Depends on the thickness of the future coating boards:
Thickness - step (both values \u200b\u200bin centimeters):
2 – 30; 2,4 – 40; 3 – 50; 3,5 – 60; 4 – 70; 4,5 – 80; 5 – 100.
Paul Square \u003d floor length * floor width.
S \u003d A * b.
Lengot length equal to the length of the floor.
Number of Lag. \u003d 1 + floor width / distance between lags.
NL \u003d 1 + B / S3.
Materials Lag. \u003d Width Lag * Thickness Lag * Lag length * Number of lag.
V \u003d S1 * S2 * A * NL.
Volume between lagami \u003d Distance between lags / Width Lag * thickness Lag * Length Lag * (Number of Lag - 1).
V1 \u003d S3 / S1 * S2 * A * (NL-1).
Number of row of floorboard \u003d Length of the room / width of the floorboard.
NP \u003d A / O1.
The volume of geepboard \u003d Width of the floorboard * The thickness of the floorboard * the floor width * the number of rows of the floorboard.
VP \u003d O1 * O2 * B * NP.
Number of rows of "rough floors" \u003d 1 + floor length / (blackboard width + distance between boards).
NF \u003d 1 + A / (O3 + R).
Scope of the board \u003d Board Width * Floor Length * Board Thickness * Number of Boards.
V \u003d O3 * A * O4 * NF.
To the floor, made of such a popular material, as plywood, was durable, reliable and durable, it is necessary to preliminarily calculate the distance between the lags. Moreover, the correctness of this work depends largely common quality Construction or repair at the facility. About how to consider the distance between the power supports of the floors and the platforms, on top of which is located plywood, we will tell in this article.
What is lags?
First of all, you need to deal with definitions. Under the lags in construction traditionally understood the common basis or power element of the cereals and floors, which takes on the main static and dynamic loads, due to finding equipment or furniture, moving people, etc. They are traditionally used and if such as the floor is such wood materiallike plywood.
Make lags preferably from wood, and from coniferous rocks. Resin in their composition additionally protects the Phanera from moisture and extends the total service life. Sometimes a larch and other wood is also used.
In fact, lagows are wooden bars of the necessary (pre-calculated) section, which are located on the basis of the floor. They perform an intermediate reference element between plywood and tie.
The main functions of the lag include the following:
ensuring the uniform distribution of existing loads on the floor and the underlying elements;
an increase in noise insulation qualities (moreover, lags in a tandem with high-quality plywood provide additional thermal insulation of the floor);
the ability to hide various communications under plywood (Internet cables, wiring, etc.) while maintaining relatively convenient access to them and the minimum parameters of maintainability;
democratic lagging costs provided to ensure a smooth floor surface (this is true with respect to most outdoor materials - rolled or wooden).
Why calculate the step between lags?
Any constructive material has its own strength, reliability, durability, etc. It is true towards lags. So that afterwards the plywood does not rush or the floor did not lose its original parameters, you need not only to choose the supporting bars suitable on the cross section and the thickness, but also to choose proper distance (or step) on which they will be located apart.
If the correct and competent calculation is performed, the lags will effectively perform their functions, Fanora or hand board It will not have to proceed soon, and the total costs of setting the floor of the floor can be minimized.
In addition, it is important to take into account the specifics of the object. Lagi B. panel houses Installed on top of reinforced concrete overlap. In this case, the cross section of the bar can be chosen as minimal to just have the opportunity to fix the phaneer or other outdoor material. In frame wooden buildings, the support also performs a power function for floors, it can be associated with wall supporting structures, etc.
What is important to take into account when calculating?

To strip Phaneru, it is first necessary to determine the step between the support bars used in this case - the remoteness of one lag from the other. But before, it is necessary to collect the initial data that will be required in the calculations, namely:
plywood thickness;
land load on the floor (at the rate of 1 square meter Square);
distance between the walls and the number of support points.
Even these parameters are enough enough to determine the optimal step and laying a reliable and practical floor from the thickness suitable and other plywood parameters.
It is also necessary to determine the optimal section for lag. The total remoteness of one support (walls) to another is taken into account, this is the magnitude of the span and the necessary floor capacity. As a rule, when using plywood, the maximum load is accepted for 300 kg per square meter. After that, they are selected as a lag rectangular (the part that is wider, placed vertically) or square bars, and when the thickness of the bar is selected, only the size of the span is taken into account:
for 2 meters - width to 10-15 cm;
2-3 meters - 15 cm;
span 3-4 meters - Lagged width 18 cm;
5 meters - 20 cm;
6 meters - 22 cm.
Simultaneously with increasing widths gradually increase the height of the bar - by 1-2 cm, with the initial value for a 2-meter span of 6 cm. If the boards are so
oh no size, then on top of the bar, it is permissible to place a piece of plywood or other boards on top of the width and length. And even without a bundle or gluing, it is possible without prejudice to the floor to get the effect of full-scale lag.
Shada calculation
By defining the desired section of the lag, the remoteness between the supporting bars for plywood or other outdoor material can be considered. If previous calculations are carried out correctly - taking into account the loads and the values \u200b\u200bof the spans, then the step calculation is simplified. In order to determine the distance for lag, it is enough to consider only the thickness of the material used, that is, plywood, outdoor board, etc.
A direct dependence has long been determined in the construction sphere - the thickness of the material, the wider you can position the support bars. We recommend adhering to the following recommendations:
if the plywood thickness is 20 mm, then the step of lag must be 30 cm;
24 mm thick boards are used - a distance of 40 cm;
30 mm plywood is used - 50 cm;
board thickness 35 mm - 60 cm;
for thick materials, 40-50 mm thick, the pitch should be from 70 to 90 cm, respectively.
In this case, the calculation technique should change if as a rough outdoor coating A chipboard (chipboard), oriented chipboard (OSP) and other products are used. These building materials are actively used as grounds for masonry ceramic tile or the use of linoleum, laminate, etc. It is necessary to take into account the overall strength and bending rigidity, if they are lower, then the step must be less.
If there are doubts about the distance for supporting bars under plywood, then it is better to reduce step. In this case, the total durability of the floor will only be higher.
What threatens mistakes in determining the step between lags?
Wrong preparatory stage And errors with the choice of secting or remoteness of the support can directly affect the finish coating. The most likely consequence, if the step is set too much - this is the sagging of plywood, risk of cracks or deflection, cracks in the tile, clearly noticeable irregularities of rolled outdoor materials. This negatively affects not only appearance, but also on the general operational properties. And as a result, a complete or partial alteration will be required.
Even big negative consequences Errors in calculations may have in case of creation inter-storey overlaps. With a serious overpricing step (for example, in order to save on materials), the total strength of the structure strongly suffers, the risk of deformations and complete destruction is growing.
How to make calculations or who entrust this work?
 Not so important, whether you use toporie or other rough floor supports, any miscalculations and inaccuracies of measurements and preliminary calculations should be excluded. How to do it? Trust this work to those who understand it:
make independently, but carefully checking the standards and recommendations, checking the initial data and making roundings only towards an increase in the cross section of the lag or reduce the steps between them;
entrust the calculation of the project organization in which qualified professionals work;
apply modern software Or online calculators of calculating using several options for checking.
Only it is possible to mount both the supports themselves and the whole design with maximum reliability, and at the output guarantee the strength of the construction, its attractive appearance and durability.
So that the floor covering served for a long time and was durable, the floorboards did not creak and did not go under their feet, it is necessary to pre-correctly calculate all the design parameters, including at what distance laying the floor lags. Not only the durability of the floor covering will depend on the correctness of this calculation, but also the amount of material that has come to it, and therefore the cost of work.
- What does the choice of lag depends?
- What should be considered when calculating?
- Example of calculating the distance between floor lags
- Step lag depending on the floor covering
- What can error in calculations?
What does the choice of lag depends?
The size of the selected lag will depend on the place of installation. So, B. apartment houses With ready-made wooden or concrete overlaps As a lag can calmly serve a subtle bar on which the flooring will be resting. At the same time, in the frame building, the lags are usually simultaneously elements of the frame of the house, they take a significant load, that is, have bearing functions, so they must have a much larger cross-section.
What should be considered when calculating?

When performing the calculation, the following factors take into account:
- the thickness of the material of the floor covering (chipboard, boards, etc.);
- approximate step between floor lags;
- the estimated specific maximum load on the floor.
All these parameters will determine the cross-section of boards, timber and other lumber used for floor arrangement.
When it is calculated how much the distance should be between the lags of the floor, it should be remembered that the extreme lags cannot be located further than 30 millimeters from the walls, it is necessary to make an amendment in the calculations.
As a result, the calculations are usually not a whole number, but it should always be rounded in a majority so that the actual number of lags does not work less than the estimated. Otherwise, the strength of the floor design may be insufficient, especially if we consider that such savings will be completely insignificant compared to the likely risk.
The cheapest of the entire lags for the floor can be found on the sawmills, then there are construction online shopping.
When it comes to installing the floor, it is not recommended to save it over. Lags must have not only a suitable cross section, but also sufficient density. If you take a step lag for the floor from the boards too big, then the boards will begin to fuse, "play". Similarly, if the distance between the lags for the floor from the OSB do more than permissible, the plates will begin to crumble and crack.
Example of calculating the distance between floor lags
The distance between the lags of the floor under the board may be relatively large, since the thick board is more durable materialThan, for example, thin plywood. Accordingly, for more subtle finishing Materials It will take more frequent location of the lag.
For clarity, consider an example of a floor arrangement with such data:
- room 12 meters long;
- use of a bar 100x180 mm for lag;
- the use of 30 mm boards as an finishing coating.
Table of distances between lags floor under the board:

According to the table above, for a 30-millimeter board optimal distance Between the lags of the floor should be 50 cm.
Denote the total number of beams of the letter "k".
Then the total width of all lag will be ( 100 mm * k).
An indentation between the wall and extreme bars will be 30 mm.
Accordingly, the step between adjacent lags will be ( k - 1.).
The distance between all the elements will be ( 0.5 * (k - 1)).
The calculation of the distance between the lags of the floor begins with determining the step between the beams by such an equation:
room Length \u003d Total BROUSEW Width + Distance Amount Between Brussia + Indents
12 m \u003d 100 mm * k + 0.5 * (k - 1) m + 30 mm * 2
It is important to bring the equation to a single calculus system. As a result, we get:
12 m \u003d 0.1 m * k + 0.5 * (k - 1) + 0.03 * 2
Remembering the school course of algebra, solve the equation:
12 \u003d 0.1 * k + 0.5 * k - 0.5 + 0.06;
12 + 0.5 - 0.06 \u003d 0.1 * k + 0.5 * k;
12.44 \u003d 0.6 * k;
K \u003d 20.7 pcs.
Since the number of beams can only be integer, it is rounded up to the biggest, that is, it is required 21 Barlok..
The sum of all the gaps between lags will be:
12 - 21 * 0.1 - 0.06 \u003d 9.84 m
You need to divide the amount to the amount of gaps, and get the distance between adjacent lags:
9.84 / (21 - 1) \u003d 0.492 m
Thus, we managed to establish, after a distance, put lags for the floor in this example - 0.492 m or 49.2 cm.
Step lag depending on the floor covering
There is a linear dependence between the thickness of the coating of the coating and the lag pitch: the thicker the thickness, the greater the step can be.
This is what the distance between the lags of the floor should be done if the flooring is carried out by boards of different thickness:
- with the thickness of the boards of flooring at 20 mm, the lag should not exceed 30 centimeters;
- for boards with a thickness of 25 mm, a step is required 40 cm;
- for "thirty" - 50 cm;
- for 35 mm - 60 cm;
- for "forty" - 70 cm;
- for 45 mm - 80 cm;
- for "fifty" - 1 m.

The distance between the lags of the floor under Paneur or OSP is somewhat different. On the one hand, these materials have a smaller thickness, but on the other, they have a great resistance of bending.
- If the flooring will have a thickness of 15-18 mm, then step lag for the floor from plywood will be 40 cm.
- With a thicker flooring (22-24 mm), a step can reach 60 cm.

What can error in calculations?
What can threaten the wrong choice of cross section of the lag and the calculation of the distance between them? If the floors are put on a concrete base, then in this case the value of the step between lags, directly affecting the behavior of the floor covering. If on too rarely mounted lags plate chipboard, then she can prick and even break. If we are put on top ceramic tile, it will crack or fall out. The boards will just "walk" and felt. Any of these options will require alteration.
Much more serious will be mistaken, after what distance they put lags for the floor, which simultaneously serve as elements of inter-storey overlaps. If in this case establish an insufficient number of such carrier elementsThe strength of the building itself will decrease, which is fraught with the most serious consequences - from irreversible deformations to complete destruction of overlaps.
Do you have the experience of installing the lag? Do you make calculations or use only tables? Write about it in the comments.
Wooden floors for the bath were used for a long time. And today, despite the presence large number New technologies, this option is rightly considered optimal. We will look at several decisions of the arrangement of floors, we will tell about the technology of their construction, advantages and "problem" sides.
 Lags for soil
  We make wooden floors
  Under the lags of the floor only soil
  Floor lags in Siruba
It is understood that under the floor there is nothing but soil. The lags themselves, of course, on the soil or various subfers never fall, they need to install them on concrete or brick columns.
 Lags by brick columns
 Blocks from blocks for lag
The distance between the columns is calculated taking into account the thickness of the lag, the genital boards and the maximum load on the floor. During the construction of a bath in most cases, no one does such accurate calculations, but they are not needed. Middle universal values \u200b\u200bare selected, in our case we choose the thickness of the genital boards of 30 mm and lags 50 × 100 mm.

In this embodiment, the distance between the lags should be within 1.5 meters, the distance between the columns under each lag within 1.6 ÷ 1.8 meters. Multiple centimeters in one way or another way are not made, shift the columns with the specific size of the room.
The main thing - the columns across the area should be placed evenly.

 Step Lag Depending on the thickness of the genital boards
  Sizes of lag at step 70 centimeters
How are the floors with lags on the soil?
Step 1. Make the measurement measurements, decide on the floor level. Construction documentation has its own characteristics. One of them is a zero mark concerns not land, as some think, and the level of the floor. All that above the floor is denoted with the "+" sign, all that below the floor level is indicated with the "-" sign. This means that the location of the lag should be - 30 mm (below the thickness of the board). Another note on the documentation. The accuracy in millimeters is indicated in mechanical engineering, in construction, in most cases are indicated in centimeters. We will gradually move to the standard designations of the size of construction objects, while we use the usual, but not entirely correct notation.
 Supporting columns for lag on the soil - scheme
  Design wooden floors By columns
Step 2. Taking into account the distances, you will preliminarily calculate the installation sites of the columns and their number. The depth of the columns is approximately 20 ÷ 25 centimeters.
Make marking of columns. On the opposite walls of the room with a laser or hydroeer, we bulk the zero label (level of the upper surface of the genital board). He takes it 30 millimeters (the thickness of the boards) and 100 mm (the thickness of the lags). The level of the upper surface of the column is -13 centimeters. On the walls of the bath, make another label at this height.
On the rope at the right distances, dig small square holes of such sizes, the stem depth is enough to do in one spade bayonet. Conduct the bottom, remove the landpowed ground.
It is extremely preferably saturated sand pillow 10 ÷ 15 centimeters thick to compensate for soil swelling during freezing / defrosting. At the bottom of each hole, put a layer of sand and confuse it. There is a desire to fill the holes - do concrete solution In proportions 1 part of cement, 2 parts of sand and 3 parts of rubble. During the fill, make sure that the surface is smooth and horizontal.


Step 3. Prepare all materials. For columns there are several options: in the ground pour concrete or use concrete blocks. Above the Earth can be used red brick or blocks, between concrete base And brick necessarily make waterproofing rubberoid. Take better brickHis small size facilitates work on the output of columns to one level of the horizon. The blocks have to cut, it is long, the cut is irregular.

Column supporting brick - appearance
Step 4. Making columns. The sizes of columns are made under the brick, the standard length of bricks of 25 centimeters, take two bricks. This means that the side of the square of the column will be 25 centimeters.

Are there several concrete blocks in stock? Excellent, work will go faster and easier, lay the columns of them.

Concrete froze - you can put bricks. The thickness of the standard brick is only 6.5 centimeters, such dimensions will allow us to accurately set the surface of the columns to the necessary height due to changes in the thickness of the solution. You need to stretch new ropes, pull them on the tag height marks. Check the position of the bricks by the level, the columns should be located in a vertical position. With the help of cement-sandy solution, the surface of all columns on the thread is accurately poning.


Step 5. Lagges are stacked along the rubberoid, it is better to put two layers of waterproof.


The length of the lag must be 3 ÷ 4 centimeters shorter the length of the room, it is necessary to compensate for the expansion of the tree. Lags must be fixed to the walls with a moving way to exclude their overturning to the side, but allow a little to move in the longitudinal direction. It is better to do with the factory standard metal compounds, such are used during floating arrangement. rafter system. If there is no possibility to purchase such connections - not a problem, make them yourself. To do this, on one side of the metal corner of the opening, you need to be made oblong. This side will be fastened with self-drawing to lags, selflessness do not tighten with great effort, the lag should be able to slide. The second side of the metal corner is fixed to the wall of the bath.

Initially, you need to fix two opposite lags, pull the ropes between them and all the rest to put on it. If problems with the level - use different lining. The spread at an altitude of up to two millimeters can be allowed, these irregularities are eliminated by time finishing Sex coatings.

Step 6. Floating boards. Check the quality of the boards, the materials with visible marriage signs are better not to use. If the boards as a result of the violation of the production technology have a curved side surface - you need to purchase ready-made or make independently special devices for their tightening.

To this end, ordinary metal brackets and wooden wedges can be used. Prepare several wedges at once with different angle of slope. Metal brackets are driven into lags, an unnecessary board is placed between them, and the wedges are driven between the germ and it. Driving force should ensure surface alignment. The boards are fixed to lags in such a clamping position, after being sublinking all the nails of the wedges are removed and a new floorboard is inserted.
 BowRench - Floor Board Tool


Do not forget about the wall to leave a clearance of 1 ÷ 2 centimeter width to compensate for linear extensions, the gap is then closed by a plinth. For flooring, you can use both ordinary and t-shirts. If all operations were performed correctly and the boards do not have abnormalities in thickness - the floor is ready for finishing painting or varnishing. If there is a noticeable height difference separate boardsthen you will have to align them with a special hand-fugoval machine.


To improve the quality of the coating, the surface of the floor can be seized.

Step 7. On the perimeter of the room, the plinth is ready to use the floor.

Fastening wooden plinths
There are two more nuances of the furniture of floors in the steam room. The technology of laying boards changes slightly taking into account how water will be merged. If the gravity is in the gap - boards do not attract tightly, leave the gap between them in several millimeters.

If water goes into a drainage system - you need to make a hole. The best way - Have electric logsik. Drill in the "starting" hole with a drill in the board, insert the jigsaw knife into it and carefully cut down the hole desired size. No jigsaw - use the chisel and chisels. Works are slightly complicated, but it is not scary. Small irregularities made in this way holes will close with a decorative drain grid.

Lugi over concrete screed
More complicated I. expensive option Floor arrangement. Lags are put on a flat concrete screedFloors can withstand significant loads.

Step 1. Make the laying of the floor laying, set the labels on the wall. It is necessary to note both the position of the lag and the position of each cement base layer.
Step 2. Align the surface of the soil, remove the upper fertile layer. It is necessary to pour out the base from sand or gravel, the base will be found in special vibration mechanism or manually.

Example of a sandy pillow
Step 3. Prepare a concrete solution. During the manufacture of concrete, we recommend on one part of the cement to give two parts of the sand and three parts of the rubble. Such a recipe for concrete can be considered universal, it is suitable for the manufacture of most architectural structures of buildings using concrete.
Step 4. Make a filling of a concrete base. You need to pour under beacons.

For beacons you can use purchased metal or ordinary wooden rails. Reiki can not be pulled out of the solution, they do not affect the final performance features. Level Check the plane of concrete. If there are significant deviations - make a screed from above cement-sandy solution. Make the screed for all the rules, do not allow irregularities and deviations horizontally.
Video - installation of beacons under the tie
Video - screed for beacons
Step 5. Between the concrete base and wooden lags to put waterproofing.
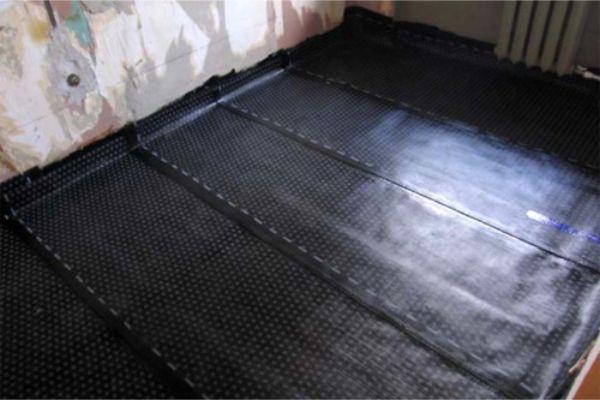

If you do not plan to warm the floor, then you can take 30 × 50 mm bars as a lag and put their plastics. The large area of \u200b\u200bthe lag fully eliminates their deflection, and the thickness is enough for solid fixation of the boards. Dina Lag must take into account linear extensions due to the change in the relative humidity of wooden structures.
Video - how to put lags on concrete floor
Step 6. The boards are put in the same way as we described above on the example of their laying on lags on the soil.

In cases of building a bath, this method of sexual coatings is infrequent. Such floors can only be done in the rest room, for a steam or shower method is not suitable. On the plywood, the floor of laminate or soft floor coatings are spilled. Plywood thickness is determined general loadsBut in any case, it must be more than one centimeter. Depending on the thickness of plywood, the step is regulated. Experienced builders We advise lags to mount them at a distance of no more than 50 centimeters.
Laying Plywood Lagas

Plywood must be moisture resistant, ordinary cheap varieties are unsuitable.
Important. During the markup of the placement of the lag, taking into account the size of plywood sheets.


The fact is that under all the joints must be lags. It is better to pre-draw on paper the layout of plywood sheets on paper, during calculations should be taken into account both the longitudinal and transverse joints. Fix the Paneur to lags can be carnations or self-drawing.


And, moreover, it has good heat-shield characteristics, which allows not to use for floors additional insulation. Do not forget the joints of the sheets of technical traffic jams to glue the scotch. Otherwise, on time, they will shift, which complicates the laying of the laminate and makes the work more "nervous".
Methods of insulation floors for lags in the bath

 Floor insulation on lags - scheme
For the insulation of pilaf you can use two types of insulation. None of them is the ideal option. Why?
Let's start with mineral wool.

It has high performance in many operational performance: it's great to work fine, it's easy to work with it, heat insulating layer No cracks. But there are wool and disadvantage - the material quickly absorbs moisture and gives it for a very long time. Long stay of wooden elements with direct contact with a wet wool significantly speeds up the appearance of rot and fungi. Wooden designs need to impregnate antiseptics, use mechanical methods Paro and waterproofs. Such construction measures are quite expensive.


The second insulation is plate foam plates.


This material does not absorb moisture. The fact that there is no comments on ecology, for premises in the bath is not critical, no one is going to live in them. "RUBIT" Polyfoam is not environmental friendliness and physical indicators, it "lies" rodents.

None of the manufacturers warns that this material for unknown reasons really like mice, they nibble with great pleasure and at high speed. Completely get rid of rodents on cottage plot No one else managed. We hope that this information will help you take optimal solution During the selection of medal insulation material.
How to insulate floors on lagas mineral wool
You can take both rolled and pressed material. The only remark - if you take a pressed mineral wool, then the size of the sheets should be taken into account during the location of the lag.
To the side planes of the lag, we live thin rails or bars, they will lie with a draft floor. For its manufacture, you can take unedged boards, segments of sawn timber, plywood remnants or OSP sheets. Mineral Wat must be reliably protected from the penetration of moisture from the bottom, the land under the bath will always have increased humidity rates.

For steam protection, you can take any of the existing materials, they all have excellent performance.
Win mineral wool on the draft floor carefully, do not leave slots and skips. Mineral wool thickness can not be greater than the height of the lag.


The upper surface of the insulation must be covered with waterproof and only after that begin to engage in finishing sex.

One of the floor insulation options. The film is fastened with brackets over basalt minvati
If you can replace mineral wool with glass, immediately use such a chance. Glasswater is much cheaper than the "branded" material, and in its physical and operational properties it is not inferior to her.

 Glasswater - insulation material

One of the disadvantages of glass gambled is considered to be "stabbing". This is not a problem, work in workers canvas mittens and nothing will "bite". To your information - fashionable mineral wool is made from the mining basalt, and this is the same glass, only with various impurities. Mineral wool "does not bite" only because the diameter of glass fibers is much smaller, they are very easy to break and cannot damage the skin coatings. But the shallow glass dust from it is much greater, and this is harmful to the lungs.


In this version, work is a bit simplified and needed. The draft floor is made in the same way as in the case of insulation mineral Vata.. But the vapor and water protection can not be done, it can significantly reduce the cost of manufacturing work. The problem with rodents will have to be solved independently. Some are offered on the draft floor to lay a metal galvanized grid with small cells, the second will appear that all the foam of rodents will not spoil. How to do - you will have to decide on your own.

Polyfoam perfectly cuts into a special carpentry knife. During circumcision, make sheets a few millimeters more. The sheet will easily be squeezed, due to this, the density of fitting to lags will increase significantly. With the right plot number of unproductive waste, the material is reduced, the work is performed faster and better.

Video - How to cut a foam knife

Schemes engineering networks You must have even before the start of the construction of floors, they need to be taken into account during the markup of the location of the Lag and laying insulation. Let's give a few practical Soviets on the installation of engineering communications.
- All connections need to be made as reliable and very carefully. This concerns as sewer pipeand electrical wiring.

- Electrical cables mandatory must be laid in plastic or corrugated metal pipes. In fact, we do not advise wiring to put under the floor, much more convenient to make a wiring along the walls. Moreover, they will still be triggered by clapboard or other materials, and under them you can hide all networks without any problems.

- For sewage you need to provide the most dangerous places From the point of view of clogging. Open pipelines in such places have special technological access, pipes in case of scoring with their help are easily cleaned. Most often, dirt accumulates in the knees and places of compounds. Position them as close to the walls of the room. Moreover, the boards in such places must be parallel to the direction of the pipeline. This will provide an opportunity in case of unpleasant situations to provide access to a problem place after dismantling only one or two boards.


Communication under floor
During mounting sewer pipelines It is better to make a stock for bandwidth, reinforce from clogging. Path pipes will be larger diameter, let their total length increase somewhat. The main thing is to have confidence in the long and reliable work of the entire system.
Video - Installation of rough floors
Video - Floors on the soil. How to make it right
Let's start with what is the overlap?
The overlap is such a design that separates adjacent rooms in height.
In simple language, the overlap is a design for the formation of floors, both for separating residential premises from the attic and basement and for the separation of residential premises. The intermediate, basement, basement and value of the redundant load are distinguished between them (it determines the type of beams and the distance between the beams of the overlap), as well as the beams.
Armature framework for monolithic interhesion
Requirements for overlappings
The design should have the necessary strength in order to withstand not only the load of its weight, and the additional - such as the weight of people, furniture, equipment. The value of the alleged load on one square of the overlap is determined depending on how the room is used.
The corresponding calculation is performed. Here are the loads:
- for the basement overlap and intergenerational - at least 210 kg of load on the sq. m overlap area.
Based on this, it is determined which to use the timber, and how to lay it.

The load on one square meter of the base overlap must be at least 210 kg.
Overlap must be rigid enough in order not to be formed by the defignments. Bar. wooden overlaps You can use as lags for the floor of the next floor. To determine how to use a bar, you need to get in touch a little with the routine. We carry out such a calculation of the lag, usually, architects, and those who want to build with their own hands - use tables.
During the reconstruction or construction of a new element of the separation of premises, it is necessary to take care of sound insulation. How to do it and what kind of sound insulation requirements are defined by regulatory construction documents. To do this, it is necessary to carefully close the existing gaps at the joints of the structural elements and apply the appropriate materials to fill the distance between the beams.
Overlappings that share the room having, with the difference in temperature, must comply with heat shielding requirements. regulatory documents. To do this, use insulation that are stacked between the beams. Their number determines the calculation. So that the lags do not become the bridges of the cold, the choice of material lag needs to be approached with the relevant knowledge.

Scheme boyful overlapconsisting of beams and internal fill.
Any design of the overlap must withstand a long-term fiery effect. Fire Resistance U. different designs hesitates from 15 to 50 minutes. Reinforced concrete floorsIn this sense, the most persistent, wooden is the weakest. Therefore, before using wooden bar., It is necessary to carry out the impregnation of timber timber with a corresponding fire-resistant material or use shocking of the finished design.
Back to the category
Types of overlap
By type of construction, two types of overlapping are distinguished. The first type is the beam. It consists of beams and internal fill. The second type is a boardless design. Silent is performed from homogeneous elements, such as plates-flooring or flooring panels.
Back to the category
Boyful wooden floors
The frame of such overlapping is wooden beams (Lags), which should be attached to a uniform distance from each other. The calculation of this distance is made depending on the cross section of the beam and the width of the span between the supporting walls.
Experts have long produced such a calculation. The distance between will prompt Table:
| Section (for wooden beam) cm x cm | Switch width overlap3 m | Width of the span of overlapping3.5 m | Switch width overlap4 m | Split width 4, 5 m | Switch width overlap5 m |
| Bar 5 x 16 | 0.8 M. | 0.6 M. | 0.45 M. | — | — |
| Bar 6 x 20 | 1.25 M. | 0.80 M. | 0.70 meters | 0.55 M. | 0.45 M. |
| Bar 10 x10 | 0.60 M. | 0.45 M. | 0.35 M. | — | — |
| Bar 14 x 18 | — | — | — | 1,8 | 1,48 |
| Bar 15 x 20 | — | — | — | 2,4 | 2,0 |
| Bar 16 x 22 | — | — | — | — | 2,5 |

The designs of beam wooden floors are perfect for the construction of a private country house.
Unfortunately, these are not all flaws of overlapping using metal construction materials. Back to the disadvantages of such overlaps include:
- The formation of rust in wet premises.
- The need for lifting mechanisms during installation.
- Good sound and thermal conductivity (with these shortcomings are struggling by wrapping ends metal structures felt).
Nutrition on such beams is not only from the boards, but also from the plates. These may be lightweight reinforced concrete plates or slabs from other light and durable building materials - their use regulates the calculation.
To avoid corrosion carrier beamsUse the reinforced concrete beams of overlapping. Such beams are laid at a distance of 0.6 -1.0 m. Fill the space between the beams of light concrete plates or light concrete blocks. On top of this overlap, they make a screed for the floor, and the ceiling is plastered under whitewashing, painting or wallpaper.
Back to the category
Boiled overlaps

Perform, at the same time, carrying, and enclosing (separating) functions. There are no beam balls in their design, and they are from monolithic plate or multiple plates or panels. There are three varieties of boiled overlaps:
- Prefabricated.
- Monolithic.
- Collected-monolithic.
Precast floors can not be installed with their own hands, as this requires a load-lifting mechanism and soloers. But this overlap is quickly going and withstands heavy loads. It is assembled from hollow or P-shaped reinforced concrete plates. Wood lags can be used for mounting coatings.
Do with your own hands, most often, manufactured. It can be done gradually and nele. The most time-consuming and responsible stage in its implementation is the installation of a suspension formwork and reinforcement. The fill of the layer of concrete at 8 - 12 cm, compared with these painstallile work, it seems to be rest. Pour the concrete M200 brand with their own hands, the reinforcement use any.
For flooring on such a construction, it is desirable to lay wooden lagows. For flooring linoleum or lagged tiles do not need.