How to make a tandoor with your own hands. Ready market offers with prices
Such ovens are widespread among the peoples of Central Asia. They differ from other designs in shape: outwardly they resemble a jug with a wide bottom and smooth walls tapering at the top.
The unusual geometry and special properties of the material allow the accumulation of heat in the walls of the oven, which is used to prepare various dishes. Most often, meat dishes (kebabs) are fried in it, various types of cakes are baked, and pilaf is prepared. The walls have the same temperature along the entire height, so there are no such troubles as an unevenly baked dish.
The original stove, made according to ancient technologies, is made only from clay, dried in the sun and burned at a fire from saxaul wood. It is easily built in Central Asia, but it is impossible to create in our latitudes. The reason is the lack of conditions for material dehydration.
In order for the furnace walls to acquire the required qualities, a very low humidity, a certain light spectrum, and a high firing temperature are required. Under such conditions, there are no internal stresses and cracks in them. It is impossible to completely remove moisture from clay in our conditions, it remains in large quantities even in a dry wall. Water begins to evaporate intensively during firing, which leads to the appearance of cracks on the surface, which worsen the heat storage properties of the structure.
Therefore, far from Central Asia, modified tandoors are built, for example, from bricks, which are covered from the inside with clay mortar. They are much thicker than traditional clay ones and require more fuel for heating, but in the middle latitudes there are no problems with firewood. Of all types of brick tandoors, the best are those built from fireclay blocks, which, after heat treatment, acquire the properties of ceramics.
Brick tandoor is used as follows:
- Make a fire inside the oven and keep it going until the walls are warm to high temperature... All this time, it accumulates heat.
- After the firewood burns out, wait until the walls cool down to a temperature of 250 degrees.
- Place the food inside and cover the neck with a lid. Clay bricks hold high temperatures for a long time and allow the preparation of several dishes.
How to make a brick tandoor
To build a furnace with heat-concentrating qualities, perform the work in a specific sequence and choose the right construction material... Let's take a closer look at each stage.
Choice of materials

For the construction of a brick tandoor with your own hands, you will need special refractory fireclay materials - brick and clay.
Fireclay blocks are made from a clay-fireclay mixture. There are several types of this building material, differing in density and fire resistance. For our case, samples with the marking ША, ШБ are suitable. Bricks are produced in three standard sizes: 230: 113: 65 mm, 250: 123: 65 mm and 300: 150: 65 mm. Due to the large dimensions of the blocks, there are fewer gaps in the walls, which makes it easy to obtain a smooth surface.
Fireclay blocks are more expensive than ordinary silicate blocks, therefore, in order not to overpay, make a drawing of a tandoor made of bricks, by which you can determine their exact number.
Choose a material for the stove good quality paying attention to some points. Suitable samples have an attractive appearance sandy color and grainy base. When tapped, they emit a metallic sound, and after being hit, they break into large pieces. Unfired bricks crumble into crumbs, and the sound after tapping on them is dull, it is impossible to build stoves from such blocks - they do not retain heat, have low strength, so the structure can simply fall apart.
Please make sure the material has been stored in a dry place before purchasing. it absorbs moisture well, after which it loses 75 percent of its qualities. When using outdoors, take measures to protect the structure from atmospheric precipitation.
Fireclay bricks withstand high temperature, therefore, silicate or ceramic samples should not be put together with them. Over time, the wall of the combined material will simply collapse.
For the same reason, do not use ordinary sand-cement mix to bond the elements. For such purposes, a special heat-resistant solution is intended - martel. It is made from crushed fireclay bricks and clay. The mixture has increased strength and adhesion, which will allow it to be applied with a thickness of no more than 1 mm.
Masonry mortar can be prepared independently from fireclay clay, which is sold dry in hardware stores. Available in 20 kg bags. One package is enough for laying 20-30 bricks. To build 1 m 3 of the wall, you will need 5 bags of material. When buying, make sure that the powder has not expired yet, but has been stored in a dry place. Wet material loses its quality.
Other substances are also added to the mixture that change its properties. For example, to reduce the setting time, add special means that are combined with chamotte - cement, salt or liquid glass... Quartz sand is added to the solution if it is too liquid.
Preparation of mortar for masonry and plastering

For self-preparation of the solution, you will need chamotte clay, salt and quartz sand in a ratio of 4: 1: 1. A common mixture based on clay and sand quickly cracks and does not adhere well to brick. The prepared composition is very plastic and quickly sets, does not exfoliate during operation.
The solution is kneaded as follows:
- Pour a bag of chamotte powder and all the components into a deep container and fill with water so that it covers the substance.
- Leave the solution for 2-3 days (check in the instructions attached to the substance), stirring occasionally.
- At the end of the period, mix everything again and check the viscosity of the contents of the container. It should resemble thick sour cream. If the mixture is too thin, add sand, if thick, add water.
- To reduce the setting time, add cement to it, no more than 2 kg per 20 kg of powder. Instead of cement, you can add ordinary salt at the rate of 100-150 g per bucket of solution or water glass in an amount of 1-3 percent by volume of the mixture.
- The amount of solution must be calculated in advance in order to use it before hardening.
Construction of the base of the tandoor

The stove is built on a solid foundation, which excludes the appearance of cracks on the walls during seasonal ground movement. Therefore, before building a brick tandoor, study its composition. The most favorable is the rocky and sandy soil. For safety reasons, the structure should be located at a distance of at least 3 m from buildings and plants.
On heaving and clay soils for a tandoor oven, it is necessary to cast a reinforced foundation, for example, a columnar one. In other cases, you can get by with a light base in the form monolithic slab.
To make the foundation, perform the operations in the following sequence:
- Draw a 120x120 cm square on the ground that will fit the oven standard sizes... Inside, dig a hole 10 cm deep, and around the perimeter select soil to a depth of 15 cm.In the corners of the pit, use a drill to dig holes 70 cm deep, 12-15 cm in diameter.Pour sand into the recesses with a layer of 10-15 cm.
- Install reinforcement welded in a rectangle into the holes and fill it with concrete, while it should rise 5 cm above the bottom. Concrete protrusion can be ensured using formwork. The mortar is prepared from sand, cement and gravel, which are taken in a 3: 1: 1 ratio. Gravel fractions should not exceed 1 cm. Choose cement not lower than PC-400. After the concrete has set, remove the formwork and fill the bottom with sand flush with the concrete belt around the pit perimeter. Compact the loose mass and fill it with water.
- Prepare the formwork for the monolithic slab, ensuring it protrudes 10-15 cm above the ground.
- Weld a reinforcing mesh with cells of 15-20 cm and put it in the pit. It is made from rods with a diameter of 10-12 mm. The rods can not be welded, but tied at the intersection with annealed wire. It will be ideal if it is at a depth of 5 cm from the surface of the plate.
- Fill the hole with concrete and check the levelness of the surface, wait 2-3 weeks for the mortar to harden.
- The base of the product is a circle, therefore, on the prepared site, draw a circle with a diameter of 75 cm, this is the most popular size of a brick tandoor.
- Fill in the layout interior circles in blocks, cutting off the excess from the blanks with a grinder with diamond disc or a special disc for cutting stones. Number each brick and record their location on paper.
- Free the area from the material, apply a layer of mortar over the entire surface and lay the blocks according to the sketch drawn up.
Erection of the walls of the tandoor

To ensure that all elements of the furnace correspond to the previously developed brick tandoor pattern, we recommend using a special template in the form of a frame. Without it, it is difficult to lay material in a circle with the same radius.
The dimensions of the fixture depend on the height and diameter of the oven. As a rule, the height of the tandoor is equal to its diameter, and the neck is 1/3 of this size. Make one side of the template, which is installed in the center of the base, from a pole 1 m high.To it, fix 3 strips perpendicularly, with a step of 25 cm: at the bottom - 30 cm long, in the middle - 25 cm, at the top - 20 cm.When rotating, it will show deviation of the wall from the specified shape at a given level.
You will also need a mold on which you can lay bricks. For this purpose, a lamella from the bed under the mattress is suitable.
Build the wall in the following sequence:
- To make the structure stable and have an attractive appearance, draw the order of the brick tandoor.
- Apply a layer of mortar to the outside of the circumference equal to the smaller side of the brick. Place blocks on it in a circle, placing them on an edge, upright. Set the inner edge without play. Seal the seams with mortar. After laying out the first row, pull it together with wire, and hide the ends between the bricks.
- In the second row, leave a small window through which air will flow into the structure. It can be closed with an iron door. It is also allowed to install a chimney in the opening.
- When you reach a height of 100-120, begin to form a neck, the height of which is 25-30 cm. To do this, slightly tilt all the bricks of the higher rows inward. Often, the hole is made not from above, but from the side, but in the classic version, the bookmark is made from above.
- After reaching the required shape, leave the structure for 2 days for the mortar to harden. If you plan to cook cakes in the oven, cover the inside of the tandoor brickwork with a mixture of chamotte clay. The layer must be thick enough - at least 10 mm. For cooking kebabs or pilaf, the walls inside can be left without finishing.
- Cover the outside of the oven with mortar, and then finish with stone to give the structure an aesthetic look. Wait 2 days for the clay to dry.
Often, poles with hooks are attached inside the oven, on which you can hang meat. In the Uzbek version, a lattice is provided. In addition to meat, you can cook fish and vegetables on it. All food will be evenly fried on all sides.
Rules for the operation of the tandoor

When using the oven, it is necessary to adhere to some rules that will extend its service life and facilitate its operation:
- Raise the temperature in the tandoor gradually. In winter, first burn not a large number of chips, and then add the main fuel. You can skip this procedure in summer.
- It is allowed to fill up with fuel to a height of no more than 2/3 of the structure. You should not stack any more, the heat will simply evaporate through the top.
- The type of fuel does not matter. You can use firewood, coal, brushwood, there are no temperature restrictions.
- If grease gets on the walls, do not remove it. It will simply burn out the next time you use it.
- Remove the ashes with a scoop and a poker through the hole at the top. This is the only drawback of the device due to the obvious inconvenience of the operation.
In some designs, a blower is provided, from where ash can be removed through the door, but this option complicates the device.
How to make a brick tandoor - watch the video:
No experience is needed to make such a furnace. construction works, all operations are quite simple. The main condition for obtaining good result is the fulfillment technological process in the specified sequence. The material used and adherence to the deadlines between stages are also important.

Many peoples have own species ovens for the preparation of everyday and holiday meals. The most famous of these accessories - barbecue, grill, barbecues, but not many people still know such a stove as a tandoor, which is used for cooking national dishes in Central Asia.
Build a tandoor with your own hands on summer cottage or in the courtyard of a private house - it is quite possible if you know what it is and follow all the stages of its construction step by step.
What is a tandoor and what can you cook in it?
A tandoor oven in Asian countries is used to cook literally everything, from baking bread to roasting meat. Therefore, this building can be found, probably, in every courtyard of a private house in those parts. Amazing taste Russian lovers of oriental cuisine could also appreciate the dishes cooked in the tandoor, so more and more such stoves appear on the territories of suburban areas and in Russia.
 From a culinary point of view, the functionality of the tandoor is enormous.
 Fragrant Uzbek tortillas different types, baked vegetables, shashlik, fried chicken - all this can be cooked in this relatively small but highly versatile oven.
In the Central Asian countries, there has always been a shortage of firewood for the furnace, since there are no significant forests and even rare plantings in these territories. Basically, there are low shrubs, single trees and grasses that do not require a lot of moisture. It was them that were traditionally used for heating the tandoor. It has a design that can be heated with a bundle of simple saxaul - a shrub that grows on sandy soils and gives a short-term intense heat when burned. The oven stays hot for a long time, which makes it possible to bake a large number of bread products, and therefore it can be called a very economical cooking device.
Flatbread baked in tandoor is called "tandyr-nan" in Asian countries, which means tandoor bread in Turkic.
Tandoor design
The construction of the tandoor is quite simple. The task of its construction is quite feasible for a beginner, and the presence of instructions for completing each step in the construction will not allow any mistakes.

In order not to think about the correctness of the composition of the mortar for masonry walls, you can purchase a special heat-resistant mixture for the construction of stoves and fireplaces in a hardware store. The instructions for preparation can be found on the packaging, and if you follow the manufacturer's recommendations, the solution will turn out to be plastic, and will not crack when dry.

It should be noted right away that this model is designed for cooking meat, fish and vegetable dishes, but it will not work to bake x lobs on its walls. If you are thinking about baking cakes, then the walls from the inside must be coated with clay, and the surface should be smoothed well.
When erecting this option, work also begins with the preparation of the foundation. But in this case, according to the builders, three layers can be used as a foundation. sand-lime brick laid in a dug pit. And, the laying of the first layer is made along the foundation pit, the second across, and the third - again along.
The first row of masonry of the tandoor itself should be continuous, and in the second layer, from the middle to one of the sides of the resulting platform, a horizontal channel is left, which will serve as a blowing chamber. The third row is laid out completely, blocking the blower channel, but a hole is left in the middle of the site, around which a tandoor will be installed.
The lower rows of bricks in the foundation are laid without mortar, but they are tightly pressed against each other, the pit will not allow the rows to move to one side or the other. In the upper layer, it is better to fasten the brick together with a mixture of clay and fix it on all sides with pieces of reinforcement 400 ÷ 500 mm in size. The reinforcement rods are driven into the ground, and on top there is a section equal in height to the top row of masonry.
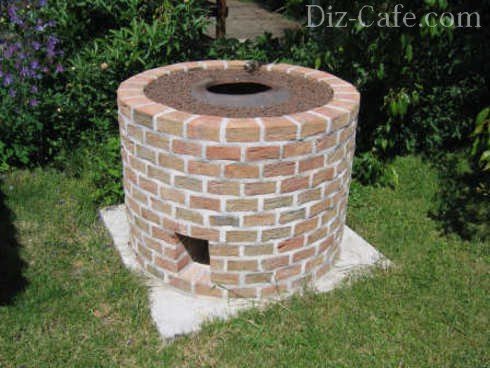
If the base for the tandoor is laid out only from one layer of brick (as shown in the photo data), then a hole is dug under it, about 200 × 200 mm in size, and a pipe is installed in it. But, it should be noted that this method of blowing device is not very reliable, since during the rains the earthen chamber will be washed out by water and over time the structure may sag.
On the site, a circle is marked around the blowing hole, within which the tandoor will be installed.

Having installed the first row of bricks, it is tied with two rows of steel wire, the ends of which are twisted and hidden in the gaps.
 For reliability - fixation with wire is made
 Further, on the first row, two more rows are installed in the same way. In total, 57 bricks will need to be found for the construction. Each of the rows is fixed, like the first, with wire ties. The total height of the tandoor, after its installation, will be 750 mm.

The next step is to cover all the gaps between the bricks with a mortar made from a fire-resistant mixture. Before applying the mortar, it is recommended to moisten the brick so that the water from the mixture does not absorb too quickly into the dry bricks, and drying takes place evenly and gradually.

After all the gaps have been sealed and the mortar in them has dried, the structure is "plastered" over its entire surface.

Next, you need to coat the entire structure with a layer of clay, to which finely chopped straw is added. There should be two such layers with a thickness of 15 ÷ 20 mm, and the second is applied after the first has dried, after about two ÷ three days. They should dry out evenly, without rapid evaporation of moisture, and for this the structure is covered with plastic wrap.

These layers should be applied evenly, but it is not necessary to smooth their surface as they will still be covered from above.

Then, the clay walls are wrapped in a reinforcing layer consisting of a metal mesh with cells of approximately 50 × 50 mm.
 Then the structure is reinforced with mesh ...
 A metal ring is installed around the furnace opening, which will separate the cover installation area from the rest of the surface. This part should have a height of 30 ÷ 50 mm. From the outside, to the edges of the walls, a layer of clay is applied equal to the height of the hoop.
 ... once again coated with clay with a hoop on the inlet ...
 After that metal grid on the walls it is completely covered with another layer of clay and left to dry.
 ... and after drying it is plastered with cement mortar.
 Further, when the surface is ready, a layer of concrete mortar is applied to it, consisting of sand and cement, in a ratio of 3: 1. Masters who are engaged in the construction of tandoors recommend adding one or one and a half teaspoons to the concrete intended for coating detergent- it will not allow the solution to shrink when it dries.
Drying of the surface of the structure takes place within a week. During this time, you need to make a wooden a lid with a handle that will allow for a long time to keep heat inside the tandoor when it is fired.

In addition, to hang the skewers, it will be necessary to make a metal crossbar, which is placed on the sides of the tandoor hole under wooden cover.
I must say that, if desired, the entire surface of the tandoor can be decorated decorative coating- for example, tiled flat natural stones... This layer, by the way, will become additional insulation for the oven, which will help maintain heat inside it.
Video: building a tandoor according to a simplified scheme
Refractory brick prices
Refractory brick
Ready tandoors
On sale you can find ready-made tandoors different sizes, and in order not to do unfamiliar work, you can simply buy such a stove and even firewood specially designed for its heating.

In addition to the wood-fired tandoor, even electric models are sold that do not require fuel, since heating is carried out by a heating element installed at the bottom of the stove.

Any of the ready-made factory products will allow a variety of any dishes, from baking tortillas and pizza to baking vegetables and roast meat. However, it must be warned that the taste of dishes prepared in electric ovens, significantly different from those that are fried or baked in a tandoor heated with wood. This is because the heating element , although and heats surfaces, but dries the air very much, and therefore also the products that are in the heated space. Firewood, by heating the walls and giving off its own moisture, which is absorbed into the porous clay surface, creates the necessary balance of heat and humidity. In this favorable microclimate, the products remain juicy, well fried and baked.
How is it cooked in a tandoor?
- In addition to flat cakes and shashlik, barbecues and pizza are prepared in the tandoor. But for the preparation of these dishes you need additional element- this is a grate, which is fixed on the neck of the stove on special fasteners and lowers approximately to the middle of the tandoor.

- On the same grate, you can put a cast iron or a saucepan with the necessary products and get fragrant pilaf or stewed cabbage soup.
- When cooking fatty meat, for example, lamb, a grate is installed over the coals, and on it is a container into which juice and fat from a piece suspended above it will drain - these components are necessary for cooking shurpa.
- When preparing a kebab or shashlik in the Uzbek version of a small tandoor, the skewers are simply installed in the hole of the oven or hung on an iron cross bar. And the neck is closed from above with a lid.
- All dishes are cooked in the tandoor much faster than in ovens or on. For example, lamb and pork will require 18 ÷ 25, beef 30 ÷ 35, fish or poultry 8 ÷ 12, and vegetables at all 5 ÷ 7 minutes.
- Eastern cooks advise: put a saucepan with tough meat in a not completely cooled tandoor, which has many veins and during normal cooking it will cook until soft for several hours. A covered pot is left inside the tandoor until the next morning, and then any dish can be prepared from this meat, in which it will "melt" in the mouth.
In addition to the above models of stoves, there are other options, but the most affordable construction for construction is a modern simplified tandoor. Even an inexperienced builder can perform such an oriental stove if he makes the foundation correctly, calculating the load, and adheres to the construction instructions.
Having a tandoor in your dacha, you don't have to worry that someone will be hungry, since you can cook almost all dishes in it. And most importantly, you don't have to stand over them. After heating the tandoor and putting prepared foods in it, you can go about your business, periodically checking the readiness of the dishes, and then it remains to serve them to the table in the right time hot.
Combustion, the fuel heats the clay located between the side elements of the device to a temperature of 250-400 degrees. Such indicators remain inside the structure for up to 4 hours due to the good properties of the rock to retain heat.
Food preparation is as follows. Hinged skewers or grates are installed inside the oven. They are loaded with products such as meat, fish, vegetables.
And if you do not know how to bake flat cakes in a tandoor, we will advise one method of preparation. After the clay walls are heated, it is necessary to wipe them from possible dust or combustion products. Then you need to sprinkle side elements water and attach dough products to them. Baking occurs due to the heat accumulated in the walls. You can get the bread out of the oven using a long-handled hook or a special bucket.
In this unique oven, food is cooked to completion due to the heat of the clay walls, which accumulates during the combustion process. This ensures that food cooks evenly on all sides and remains juicy. Cooking on skewers does not require turning, as these elements are arranged vertically. The cooking process in the tandoor is much faster than in other traditional grills or barbecues. 
Varieties
Modern units for summer cottages have various modifications: they can be stationary or portable, with a vertical neck or horizontal.
Summer residents use the classic type of unit for frying kebabs or any other meat dishes. Modernized tandoors with a vertical neck arrangement provide the ability to prepare any kind of food. In the regions of Central Asia, a device with a horizontal opening is common, which is suitable for frying flat cakes and samsa.
The main advantage of the vertical arrangement of the neck is the fact that such a furnace is equipped with a firebox. It can have a diameter of 200 mm and be located in the lower side wall.
The convenience of the device for burning fuel is evident. To heat the stove, there is no need to bend over to the hole with your whole body. After the tandoor is heated, its neck is covered with a flap, and the food is cooked as usual. You can remove burnt wood by simply opening the latch.
The vertical neck oven is easy to move with a special platform. 
This design should have at least one pair of swivel castors for better maneuverability. An old garden cart can serve as an ideal platform.
Unit modifications
Modern manufacturers offer designs for every taste. Today, furnaces with a forged design are quite in demand, which makes structures attractive, and also gives them some protection. In this design, the tandoor is pleasant to use both in summer cottages and in restaurants and open-air cafes.
You can make a structure with your own hands using clay, bricks or flower pot... Such devices are actively purchased in online stores and offline outlets. Modern modifications of furnaces are represented by the following varieties.
Electric tandoor "Master"
Options:
- height with a lid - 0.7 m;
- without a cover - 0.62 m;
- diameter - 0.53 m.
The set includes the following items:
- waste pallet;
- stainless steel skewers - 6 pcs.;
- a shelf device for meat and vegetables;
- electrical cord.
The kiln weighs 70 kg and has a power of 1.9 kW. The device is powered from a network with a voltage of 220 V. The price of an electric tandoor is 60 thousand rubles.
Portable tandoor "Sarmat Nomad"
This type of oven is characterized by its compactness and ease of transportation.
Options:
- height with a lid - 0.63 m;
- without a cover - 0.4 m;
- diameter - 0.43 m;
- neck diameter - 0.18 m.
- grate;
- poker, scoop;
- fastenings for the lattice.
The unit weighs 50 kg and costs 12 thousand rubles. 
Ceramic tandoor "Sarmat Premium Big"
Options:
- height with a lid - 1.05 m;
- without a cover - 0.7 m;
- diameter - 0.6 m;
- neck diameter - 0.22 m.
The kit includes the following items:
- grate;
- guide for skewers "sun";
- stainless steel skewers - 8 pcs.;
- poker, scoop;
- fastenings for the lattice.
The tandoor weighs 130 kg. Its price is 18.5 thousand rubles. 
Platform for the device of the unit
If you plan to build a tandoor oven at your summer cottage, then first of all you need to decide.
Whatever the device, traditional Central Asian or modern portable, the eastern part of the suburban area is considered the best location. Outbuildings, summer cottages, fruit trees and shrubs must be at least 10 m away from the selected site. It is desirable that the area be as flat as possible, since it is required to build a clay base under the stove on it.
If necessary, the foundation for the platform can be deepened into the ground.
For the safety of the structure and the surrounding tandoor, it is located far from gas pipes and electrical wiring. The area around the unit must be cleared of leaves and rags.
As a rule, the tandoor is installed outdoors, but it can also be placed under a roof or in summer kitchen by providing the structure with a chimney. 
A purchased unit is not a cheap pleasure. However, you can make such a stove from scrap materials yourself. It takes a minimum of time and effort to implement this idea.
Clay aggregate
The masters of ovens do not build tandoors, but mold from clay. Special material for traditional ovens is of Akhangaran origin with good heat-retaining properties. To prevent the mixture from cracking at high temperatures, stove-makers mixed with the wool of sheep or camels. The composition of the rock and its components is a secret of the old masters, which they carefully hide. Therefore, it is impossible to make a stove using traditional Asian technology on your own. There is only one way out - to experiment.
For a more complete picture, print out a drawing of a clay tandoor lined with bricks and use it during the construction of equipment.
Below is the do-it-yourself sculpting technology, which you should adhere to:

Option of the oven that can be transported
For the construction of a portable type of tandoor, the following elements must be prepared:
- large floor pot for flowers;
- middle vessel;
- small container with holes in the bottom;
- a metal disc with a hole in the middle (you can take a weight from the bar);
- decorative stones for flowers;
- hacksaw.
The process of making a device with your own hands consists of several sequential stages:

For more details, see the video:
Brick tandoor
If desired, at the summer cottage, you can make a stationary brick oven with your own hands.
It will take more effort to erect it than to construct a portable clay device. It is required to prepare the following materials in advance:
- fireclay brick;
- oven solution;
- kaolin or;
- concrete, sand, reinforcement;
- wood frame - template.
The order of the tandoor presented below will help when laying bricks.
Facts to consider when installing:
- Refractory bricks on clay solution or a special kiln mixture should form the basis of the inside of the kiln. From it are made under, arch and back wall. The inside of the device must be sized to reach all parts of the oven with your hand.
- It is customary to make the arch of the tandoor arched, which is a rather difficult task. Therefore, you can make a rectangular floor. During its construction, metal bookmarks cannot be used, since metal and brick have different meaning thermal expansion coefficients.
- As a rule, the block is laid on the edge, which helps to conserve heat. However, single brick laying is considered a more economical method. In any case, it is important to be able to handle the grinder in order to grind the material if necessary.
- A plywood blank will help make the walls of the unit even. For the template, you need to pick up short bars commensurate with the diameter of the tandoor, a long product and a plastic piece of plywood. To make a template, short products should be attached to a long bar, taking into account the reduction in the radius of the furnace walls. A sheet of wood-laminated board is fixed on top. The plywood blank is placed in the center of the base. With its help, bricks are laid in a circle.
- In order to prevent the laid out structure from mowing, each row should be checked by level and made with wire, which is removed after the solution has hardened.
- To round off the tandoor stove with the method of laying in the width of a brick, the first bar is sawn with a grinder in the shape of a trapezoid. All subsequent products are cut from one side. If the bars are laid on the edge, then the furnace is rounded using a template and sawed off the bricks from the bottom.
- To fasten the skewers, a metal ring is installed, which is put on top of the structure. This element is made removable or attached with clay. Using a grinder, it is recommended to arrange cuts inside the oven, which will be required for laying skewers.
To make a tandoor out of bricks with your own hands without hindrances in the form of a misunderstanding of the sequence of actions, it is most convenient to divide the entire construction process into several stages:
- Erection of the base. You need to dig a hole with a diameter slightly larger than the diameter of the tandoor. Is laid out on the bottom sand pillow 10 cm high. For strength, the foundation is lined with reinforcing mesh and poured with concrete. The surface is leveled using a rule. The base dries up within 1.5-2 weeks.


At the end of the third level, each next row must be narrowed until the neck becomes 0.5 m.This can be done by adjusting the slope of the brick by changing the thickness of the mortar to be laid or by cutting the blocks with a grinder.
- Coating the furnace with chamotte clay. After the completion of the masonry, the outside is coated with a thick layer of clay. Instead, the device can be lined with ordinary bricks. If you stick to traditional methods, sheep wool should be added to the mixture.
- Tandoor firing works. After all layers of the oven have dried out, it is necessary to start heat treatment. To do this, the device is heated in a moderate mode, using small armfuls of firewood.
- Decorating. In order for the heat not to leave the device, outside it can be overlaid with natural decorative stones... Another design method is as follows: insert small pebbles into the seams between the bars. A homemade brick tandoor is required to be equipped with a lid and a blower flap.

Conclusion
You can cook delicious kebabs and flat cakes without leaving your summer cottage. For the construction of a tandoor, choose the type of device that you liked, purchase materials and follow the order.

To diversify the dacha menu, you can lay out the tandoor with your own hands from bricks, spending very little time on the device of this unusual oven. The design of the tandoor has developed historically among the steppe nomadic peoples, who were forced to conserve fuel. To heat such a hearth, very little firewood is required, after which you can bake bread or cook food in the heat provided by the heated walls. In a dome-shaped oven, the desired temperature is maintained for a rather long time without fire, and if necessary, it can be maintained by adding chips or dry branches of plants.
Currently, Asian hearths are one of the types of exotic stoves. Traditional ways making them from clay is rather complicated and labor-intensive. Therefore, more and more often you can find country mini-ovens made of bricks. There are both electrical and gas models industrial manufacture.
But anyone who is a little familiar with the masonry technique can make a tandoor out of bricks with their own hands. There are several types of homemade hearths:
- vertical square;
- vertical cylindrical;
- horizontal (Central Asian).
Cylindrical vertical models are especially popular. They are made both submerged in the ground, and ground, and even mobile. This design allows you to use the hearth for different purposes: bake cakes or samsa, fry a barbecue, cook pilaf or another dish in a cauldron, and even just boil water in a kettle.
The vertical square tandoor is also quite versatile, but its design is less perfect, because the inner space of the oven will heat up worse in the corners. But you can also bake bread in such a hearth, although you will have to place the cakes closer to the middle of each side. In all other cases simple construction quite justifies itself, allowing you to bake meat in the same way or cook something in kitchen utensils installed over the hole.
The horizontal tandoor is traditionally molded from clay, which makes it possible to make an arched vault without much effort. But even a brick tandoor with front loading can be made independently. When cooking in a container, you will need to place it inside the firebox. This gives the horizontal hearth a distant resemblance to a Russian stove. In this case, flat cakes or samsa in Central Asia are still baked by attaching them to the walls of the firebox.
Preparatory stage
Before making a brick tandoor, you need to complete a row preliminary works... They depend on the design of the hearth, but in general they boil down to the preparation of the base and the selection of materials. An important point in the manufacture of a mini-oven of a cylindrical shape is the manufacture of a template. It is needed so that the rounded arch is smooth.
You can take the usual brick for the tandoor: solid red or even facing. But the best choice will be a refractory fireclay stone that is designed to withstand high temperatures. The heating and cooling times for all types of bricks are approximately the same.
In addition to building stone, a number of additional materials will be required:
- cement, sand and crushed stone - for the foundation of the ground variation;
- masonry mortar for stoves and fireplaces (dry mix);
- a pipe with a diameter of 10 cm (asbestos cement, sandwich, tin) - for some tandoor models;
- grate;
- clay;
- reinforcing mesh, wire;
- trimming boards and plywood;
- grinder and disc for ceramics;
- measuring instruments.
If you add decorative elements to the building, then you can even decorate the site with a tandoor. In this case, it is best to make a sketch of the building in color, and then make drawings according to the desired dimensions of the hearth.
The place for the mini-oven must be chosen so that the building is flooded with water as little as possible during the spring thawing of snow. If necessary, you can build a raised platform for its installation. For a ground model, you will have to fill in the foundation, and for an in-depth model, dig a hole.
How to make a land tandoor
For a furnace of this design, a foundation is required. Even a small tandoor will weigh quite a lot, therefore, during the period of thawing and freezing of the soil, it can lead and the masonry will simply crumble. But since the building is still not very large, you can do without slab foundation, the dimensions of which must exceed the oven diameter by at least 20 cm along the entire perimeter.
Under the foundation, you need to dig a pit up to 50 cm deep.A layer of sand or ASM should be laid on the bottom of the pit, leveled and tamped. The thickness of the pillow is 10-15 cm. After that, a solution is mixed from 1 part of cement M400-M500, 3 parts of fine sand and 4 parts of crushed stone, adding water until a plastic mass is obtained.
The concrete must be poured into the pit, filling it to the level of the soil. Then install the plank formwork along the contour of the pit and raise the concrete level by another 5 cm. If you want to protect a homemade brick tandoor from melt water, the site can be made higher. After preparing the base, work will have to be interrupted for 7-10 days until the concrete gains strength.
Cylindrical tandoor masonry
Before building a brick tandoor, you need to make a template. Traditionally, the construction of boards and plywood is used:
- Pick up a pole with a length of at least the height of the future tandoor (about 1.2 m).
- Attach the slats to it with a step of 30 cm (along the height of the pole). The length of the bottom and the next one is 30 cm.Then you need to make smaller planks, forming a bend: the length of 3 supports is 25 cm, and 4 bars are 20 cm.
- Attach a strip of plywood to the free ends of the strips, bending it in accordance with the profile formed by the shortening parts. The length of the slats can be chosen arbitrarily, depending on the size of the hearth, and be half of its diameter at the base and at the top. Convenient oven height - about 1 m.
The laying of a tandoor with a vertical configuration begins with the formation of its bottom. To do this, several chamotte bricks must be laid on the foundation without mortar. Draw a circle on them with a diameter equal to the future building. Taking out 1 pc., Cut off the excess parts of the stone with a grinder with a ceramic disc. After cutting, the bricks must be put in place. The end result is a round base. In order not to confuse the details during masonry, they should be numbered.
Remove the base parts from the foundation, prepare a solution. You will need a refractory mixture for laying stoves and fireplaces. Add water to the dry composition according to the instructions on the package, kneading the viscous clay dough. Apply the mortar to the foundation, lay out the numbered bricks, pressing down and lightly rubbing them to the base.
The construction of walls can be done in different ways:
- install the brick vertically, with a long narrow edge outward;
- carry out the usual masonry in 1 brick in a circle;
- place stones with the butt side outward (for this method, halves of bricks are usually taken).
If masonry elements are installed vertically, you need to slightly trim the ends (butt sides) of each brick. So they will easily form a vault.
Install the template on the bottom of the future tandoor. In this case, the pole should be located in the center of the brick circle, and the plywood strip should be 12.5 cm from its edge. A bed of mortar should be applied to the free space.
After that, the masonry is carried out by pressing the inner edge of each brick to the plywood of the template. Turning the pole, lay out 1 row in a circle. At this level, you need to leave small hole for blowing. Therefore, 1-2 bricks are not installed in the masonry.
The next level is raised according to the same principle, pressing the edge of the stone to the template. The details of the masonry must be displaced in relation to the lower ones in order to get the dressing of the seams. Block the blower hole, completely closing the fireclay brick ring. Tie and tie the row with thin steel wire or reinforcing mesh.
Continue to raise the walls of the tandoor, orienting the narrowing of each circle in a pattern. When laying bricks vertically or with a poke, be sure to make sure that the inner edges of each of them are in contact with the neighboring ones. As a result, small gaps are formed between the outer sides. You can fill the space between the parts with the same masonry mixture in the process.
After the construction of the brick tandoor is completed, the template must be removed through the upper hole. Align the inner surfaces by applying a clay mortar or refractory mixture to them. Cover with clay and the outer surface, finishing it to taste: with stone or tile cladding, decorative mosaics, or otherwise.
The edge of the hole on top must be carefully smeared with clay dough, to give it a roundness. Very often, at this moment, supports for suspensions are formed. To do this, you just need to make 4 crosswise grooves in the upper edge of the tandoor. It will be possible to put sticks in them, on which skewers with meat, a grill for baking vegetables, etc. will be hung.
Square tandoor
Highly simple model the hearth can be made by hand even without a template. To build a square brick tandoor oven, a rough order of 2.5x2.5 masonry stones can be used. If desired, you can choose other sizes, the principle of construction will not change. The rough circuit has a hole for furnace door... Since the vertical tandoor does not have this detail, you need to lay out bricks also where the door opening is indicated.
The slab for the foundation must be poured in the appropriate shape, and after the concrete has hardened, lay bricks on it, forming a base in the form of a square. Elements of the next level should overlap the joints of the lower bricks. In the middle, you need to leave a small hole for blowing, bringing it to one of the sides of the square. Raise 1 more row, install the grate.
At the next level, overlap the blower channel, laying out a solid underneath with a hole above the grill. For the walls of the stove, several rows should be laid around the perimeter of the square, carefully checking the verticals of the sides and the horizontalness of the upper edge. At a comfortable height, start tapering the canopy.
To get a kind of furnace roof, you need to move each element of the masonry a little inward. In this case, you will have to cut the bricks so that they fit on the shortening sides of the square all the time. When the upper hole reaches 20x20 cm, you need to slightly raise the board. Clean the inner surfaces of mortar flows, if desired, the stove can be plastered from the outside.
How to make a tandoor in the ground?
In a dry and elevated area, you can make a stove completely or partially submerged in the ground. Such a building can become the center of a recreation area, replacing the Scandinavian hearth. Before making a tandoor with your own hands out of bricks, for such a structure, you must definitely find a sufficiently long asbestos-cement pipe for making a blower channel.
Considering that the height of the tandoor is about 1.2 m, you need to be prepared to dig a pit of the indicated depth. With partial deepening, the pit may be smaller. Its width is chosen arbitrarily. At the bottom, you need to lay a layer of ASG, tamp it and pave the foundation pit with bricks.
1 row of masonry is laid out on this makeshift foundation. The shape of the oven can be round or square, and the building stone can be laid both with a spoon and vertically. After 1 tier has been formed, a blower pipe should be installed. To do this, a trench must be dug with a slope, which will allow the other end of the pipe to be brought to the ground surface. To fill the gap between the pit wall and the masonry, you can use excavated soil or ordinary clay, sand, crushed stone.
At the next levels, the walls of the firebox just need to be raised to the desired height above the soil. If the building has to perform decorative functions, the edge will be finished according to your own taste. In order for the tandoor not to cool down too quickly, you need to select a cover that is suitable in diameter to the upper hole.
What is a horizontal tandoor?
The Central Asian stove, in which there is no upper hole, is also very interesting. Its mouth is located on the side, which makes such a design akin to a Russian or Pompeian stove. The manufacture of a tandoor of this design is traditionally made from clay mixed with straw or sheep's wool. It is convenient to bask in the winter cold near such a hearth; it is often installed under a roof, indoors. But the construction of a brick tandoor is possible in this case as well.
To create it, you will need a circle, or a template from plywood and boards. He will help you quickly build a tandoor with your own hands, provide ease of laying the arch and give support to the bricks until the mortar grabs. A template is made in the form of 2 connected arches, the width of which is equal to their height. You can draw a circle of the required size, draw a horizontal diameter and omit 2 straight lines from the points of intersection with the circle. Transfer the resulting figure to plywood and cut out 2 identical parts.
Connect them with bars along the upper edge. The length of the slats is equal to the desired furnace depth. Sheathe the upper edge with thin plywood, bending the sheet along the contour of the arch and attaching it to the bars.
Prepare the oven base. Traditionally, it is built in the form of a table with a height of about 1 m.For the base, you can use a cinder block, brick, natural stone... You can weld a structure from a steel corner and put a metal countertop on top.
On the finished base, a layer of bricks is placed on an earthen solution, forming under the furnace with a channel for blowing. On the next row, you need to close the channel, leaving a hole in the center.
After that, install the circle on bars 3-5 cm thick and align it horizontally and vertically. For masonry, it is best to use wedge-shaped bricks specially designed for making vaults and arches. If they are absent, cut off part of an ordinary masonry stone, giving it the desired shape.
Lay out the uncut stone with a spoon in 1 row to the left and right of the template, close to its plywood arch. When displacing the bricks for bandaging the joints, raise both sides evenly to the beginning of the arch. After that, use only cut or wedge-shaped stones, gradually closing the arch in the middle. Leave a small hole for the chimney. Dry the masonry for 4-5 days.
Carefully knock the bars out from under the circle. At the same time, it will lower a little, which will allow you to freely remove the template from the firebox. Place the grate.
Lay the open back part of the arch with a brick. On the facade, you can make a shutter or decorative doors. Smear the chimney pipe and bring it outside if the stove is located indoors. For an outdoor stove, a chimney is optional.
Preparing the tandoor for operation
But the work on the made tandoor is not over: the hearth laid out with your own hands must first be burned. This is done only after the clay has dried, that is, a few days after the completion of the construction of the building itself.
Make a fire with paper and small chips. Heat the oven until the outer surface heats up to + 350 ° С (warm to the touch). Extinguish the fire and let the stones cool completely. Next time, bring the oven temperature to about + 700 ° C (hot). It can cool down for several hours, you can leave it overnight.
The last heating must warm up the tandoor to the operating temperature (+ 1500 ° C and more). After that, it is completely ready for use.
To bake bread and samsa, you need to heat the oven well and let the wood burn out to coals. Dough products are glued directly to the walls. Kazan can be installed on round hole from above, and skewers with meat are hung on sticks in an upright position. There is no need to turn them, as they heat up evenly from all sides.
Staying at the dacha is a unity with nature. I want to cook food on the fire, sit by the fire, listening to the twilight rustles. For cooking food on fire, grill or barbecue are most often used, and we suggest you make a tandoor with your own hands. What it is? This is an oriental brazier oven that allows you to cook a lot of delicious dishes that are simply impossible to cook otherwise. Samsa, lavash, oriental meat - all this can be done in the tandoor. Moreover, the meat turns out to be very tasty, because it is suspended in a horizontal position, as a result, the fat does not drip onto the coals, but flows down the pieces of meat, making it juicy and soft.
Kebab in tandoor turns out to be much tastier because of the vertically arranged skewers. On the grill, the meat needs to be poured with marinade or sprinkled with water, but here it turns out to be tender and juicy
It is very interesting, in the opinion of a European, that flat cakes and samsa are prepared in the tandoor - they are attached directly to the walls of the oven and baked in this way.

Oriental flatbreads and samsa are baked in a tandoor, stuck to the walls of the oven. This bread has a special taste. Having made a tandoor at home, you can bake samsa, lavash and delicious flat cakes
The traditional shape of such a furnace is round. It can be located both above ground and underground. Today, a brick tandoor is built by many summer residents, making it not so difficult, but oriental cuisine will bring a lot of pleasure to both family members and guests.
In the East, the tandoor can also be located in the house; it is installed in the center of the room to warm the air in the room during the cold season.
A small tandoor can be made on a platform with wheels, you can transport it anywhere in the garden.

You can buy a tandoor if funds allow. Such a ready-made tandoor with a platform on wheels can be installed anywhere in the garden or in the house.
If the stove is stationary, it is better to place it on rocky or sandy soil, away from buildings and green spaces. The ground under the tandoor must be dry.
How to make a tandoor? For construction, you can use stone blocks, ceramic clay bricks or white refractory brick... First, the base is laid out. The brick tandoor is quite heavy, so the base must be strong. The base of the furnace is like a foundation, in which an opening is made where the fuel is laid.
You can build a tandoor directly on the ground, in this case, you need to dig a hole in the shape of a circle with a diameter of 120-130 cm under the base. We fill the bottom with sand (layer 15-20 cm), and begin to lay out a brick well.

Base for tandoor - a sand cushion is made at the bottom of the base, the area around it is also covered with sand. It is convenient to place a grate at the bottom under the coals
As a mortar for masonry, you can use a ready-made oven mixture. It consists of plasticizer, red clay and quartz sand. The masonry can be both horizontal and vertical, in the first case, the stove will retain heat longer, the second is more economical - much less bricks are needed.

Tandoor, lined with vertical masonry with a pipe for exhausting gases. Less material is consumed for the manufacture of such a furnace.
Brick tandoor, laid out horizontal masonry- the wall is thicker, so it keeps the heat inside longer. In any tandoor, there should be an opening for the exhaust of flue gases at the bottom.
In order to visually see the dimensions of the future stove, you can first make an order - laying without mortar. We work with bricks with a grinder with a diamond cut-off wheel for ceramics.
The ordering is done for a visual representation of how your tandoor will look like. After such a calculation, you can start working with the solution. Tandoor can be built on the ground or on a brick base
It is not easy to make round masonry, a life-size drawing made with a protractor and a compass will help you, the ability to handle a grinder is not the last thing.

The diagram clearly demonstrates the device of a brick tandoor. Features of the manufacture of the furnace may differ, but the basic principle of construction is always the same - a base with a hole for fuel and a body, rounded up
A brick pattern is the basis for forming a circle. Do not feel sorry for mortar when laying, and use a level to check the horizontal position.

For the manufacture of tandoor, oriental craftsmen used a similar pattern. By laying out the bricks according to the template, the furnace will gradually acquire a rounded shape tapering upward.
The tandoor is narrowed upwards - this is done so that the heat is kept inside. In order to achieve this effect, the bottom layer of the brick must be cut off; when laid, the shape will resemble a vault. After the masonry is ready, the inside of the oven should be cleaned from traces of mortar. We use dry clay to fill the joints from the outside. The inner surface is also coated with clay, which is mixed with finely chopped grass.
When the oven is dry, it is first heated with paper, and then the firing temperature rises. This is the easiest way to make a tandoor, and if you want to refine it, you can coat the structure with clay. In the east, stoves adorn mosaic tiles, sandstone, ceramics.
The video demonstrates how to make a brick tandoor using the template:
Option # 2 - wooden barrel tandoor
Of course, a brick tandoor is the most durable and practical, but if you wish, you can use other methods, which we will now talk about. This requires the skill of working with clay.
We need to find a small barrel with poorly fitted hoops. The barrel is soaked from the inside with refined sunflower oil; we leave it overnight to soak it.
Then we prepare a solution - sheep wool for reinforcement (length up to 15 cm), fireclay clay, fireclay sand. The ratio, respectively, is 0.05 - 1 - 2. We make a thick solution and mold the furnace body on the inner surface of the barrel (thickness - 20-30 cm). The solution is smoothed and dried for a week using incandescent lamps. Then the hoops can be removed and the barrel disassembled. After that, the product is subjected to secondary firing.
Option # 3 - brazier using a plastic barrel
You will need plastic barrel classic form. We fill it with water, after filling the barrel slightly increases in size, its outer surface is coated fireclay solution, it is compacted, smoothed, until the contour of the furnace is formed. The product is also dried for a week, and then the water must be drained. The barrel will become smaller and can be removed from the new tandoor.
A cauldron can also be placed on top of the stove for cooking pilaf and other dishes, but for this you need to adjust the crown to the volume of the cauldron, the crown is coated with clay.
Furnace construction is a highlight, but you will also need to do metal mounts for the shamur. For example - these are three staples with a metal hoop in the center. The easiest option is to use a sturdy rod, put it along the crown, and attach the skewer to it.

If you have the skills of pottery, the tandoor can also be made as a decoration on the site. For example, to create such a “house” for cooking delicious oriental dishes
We examined several simple ways to make a tandoor in the country. These are the simplest answers to the question of how you can make a tandoor with your own hands. More complex options they offer the manufacture of a structure resembling a Russian stove, but this is a cumbersome structure and it is rather troublesome and difficult to build it, and a simple tandoor is quite suitable for a summer residence and the dishes in it turn out to be very tasty, try it and you will see for yourself.