Shed 3 on 6 wooden. How and from what to build a frame shed do it yourself
It is well known that it is almost impossible to live without a barn in the country, since there is always a need for storage various tools, Building materials for the period of construction country house, inventory collected in the crop site and much more. At the same time, the most popular format of such structures are 3x6 m dimensions, and the most common architectural decision performs wooden building with single Roof.

Select Place and Design
The barn is definitely a utility structure, so when it is built, architectural sizes are inappropriate, and it is not necessary that it somehow stand out in the overall landscape design.
Its most rational placement will be either its extension directly to cottage houseOr the construction of such a barn is somewhere on the edge of the site. The place for its construction should be comfortable, and the construction site is best organized where the soil is least suitable for landing.

The presence of a convenient entrance and approach to such a utility room should be a prerequisite, and it should be placed from the site of the main countryworks so that carrying the tool into it, sadovaya technology and other massive subjects were accompanied by the smallest physical costs.
Any construction, even not very complicated, should be started with the project.To treat such a question to professionals is quite expensive and inappropriate, but the own drawings and sketches will be quite by the way. Especially to calculate the amount of material and as a basis for technical solutions During construction, such a scheme is simply necessary.
Professional builders are also invited for this work, because such work, in essence, can perform every man who has a minimal set of construction skills. Therefore, the construction of the barn must be carried out with their own hands.


Main material
The most budget and technological option will be built by such a barn of OSB plates. This abbreviation is decoded as an oriented chipboard. Multilayer material consists of 3-4 sheets. It is made of wood aspen chips glued with resins with additive boric acid and synthetic wax filler.

Such plates for the walls of the walls are used, as a removable formwork for concreting, continuous roofing crates, the manufacture of floors and various reference structural elements by type of foreign beams.
This material has a significant mechanical stiffness and high level of sound absorption. It is distinguished by the ability to resist snow loads and wind sailboat. All of these qualities allow the use of OSB-plates in the form of a basis for various roofing materials.


Shed frames
After marking, clearing and aligning the construction site, it is necessary to equip the foundation. Most simple decision There will be a manufacturer of its foundation blocks laid out around the perimeter of the structure. You can build a column foundation. For this purpose, the holes are digged, and the pillow is placed on the installation of finished blocks in a vertical position.
Points can be made of concrete. They should be plugged by 0.4-0.5 m. Having placed the contour of the structure on the roulette, they drive pegs in the corners of the site and stretch between these stakes rope, after which there are places to install the columns.


The pits below them are shovel, or a bore is done in the soil of the holes. From above, the formwork is installed, towering above the surface of 0.2-0.3 m. Then the gravel-sand pillow is arranged, the fittings are constructed and filling is performed.
Another option can serve a ribbon foundation from concrete, filled into a formwork. The disadvantage of this method is a very long expectation of shrinkage and full grasp concrete mix. If desired, it is possible not to be limited to a rectangular design, but to build a barn with a veranda, observing the general dimensions of the construction of 6 x 3 m.


After the work on the base is completed, the bottom strapping is assembling and its antiseptic processing. On this strapping, the floor from an OSB or edged board is applied. The first frame rack is installed here. It is fixed with a steel corner. To enhance the stiffness of the design to the strapping, a temporary strut is attached.
After that, the OSB sheet is fastened to the base and to the first rack.To the lower part of the frame of the sheets, it should be fixed with an indent to 5 cm. For this purpose, a bar is mounted on the lower strapping, to which the OSB sheet opens. This sheet is fixed by transferring further this control bar.

There, on the site, an assembly of the upper brusade strapping is made, after which the entire structure is placed on the rack and is fixed, and then mounted stropil design, the doomle is attached, and the barn is covered with a professional flooring or some other roofing material.
Roof
It is embarked on the end of the framework of the framework. In this case, it is necessary to calculate the length of the rafter. To this end, the length of two-sided swells is added to the interconnect distance, equal to 40-50 cm.
Then proceed to the manufacture of the main rafting leg.To do this, the fragment of the desired length is cut off from the board, it is approaching and planned under the excavation of the mount, and the required number of rafters is manufactured.
The rafting legs are mounted to the frame and are connected one on the other with the help of a tight thread.
The installation of the remaining rafting elements is made according to the previously marked level. They are fixed with nails or corners.
Waterproofing is fastened with a stapler with overlayed 15 cm edges of the strip.


Then follows the device of the crates, cutting roofing material and installing it on the cozpostroy.
It should be borne in mind that the step between the individual rafters is 60-80 cm. Therefore, for a shed of 3x6 m, eight rafter feet will be required.
The final stage is the painting of the structure, the manufacture of shelves, the supply of electricity and the production of steps.
Thus, the construction of such a simplest shed own forces It is quite a complete task. The only thing that should be remembered is required by the Act indentation from neighboring possessions by 3 m and 5 m from the nearest road.
How to build a single-piece roof with your own hands, see the following video.
Hard to imagine vacation home or cottage without business buildings. In the sheds keep garden-garden equipment, summer swing, hammocks and folding furniture, here you can also settle the agricultural animals, bird, keep hay and feed. As a rule, economic buildings are built from those materials that remained after the construction of the house. The owner remains only to choose a drawing of the shed, to decide on its size and roof design.
Design Saraja
Most optimal size For a surplus business building - 3x6 meters. This area is enough even for the construction summer soul And toilet inside the construction, and you can still arrange a summer kitchen here.
You can make a drawing of a shed in the photo found on the Internet, or come up with your original barn, and then transfer the idea of \u200b\u200bpaper. It is not recommended to build even the simplest buildings without a drawing. After all, all sizes, inconsistencies will be visible on paper.
The roofs of Sarai most often make scanty. Flat roof delays too much precipitation, snow masses, requires careful waterproofing. Roofs complex form It is also inappropriate for Sarai, because this construction is designed not to decorate the site, but to serve in economic needs.
Single roofing will be the optimal solution for the shed. Unlike a two-tie here, it will not be necessary to improve the skate, you will need two times less rafters. To collect a single-piece roof is easier, and precipitation and snow from it go very quickly, not a threatening waterproofing.
Important! The angle of inclination of a single-table roof should be more than 18 degrees. Such a skate will allow precipitation to freely leave the roof, protect the construction from winds and cold.
The optimal value of the rope roof angle is 18-25 degrees.
The walls of the economic building can be erected absolutely from any materials, it can be:
- brick;
- foam concrete or aerated concrete;
- boards;
- plywood or MDF mounted on a wooden frame (construction type frame).
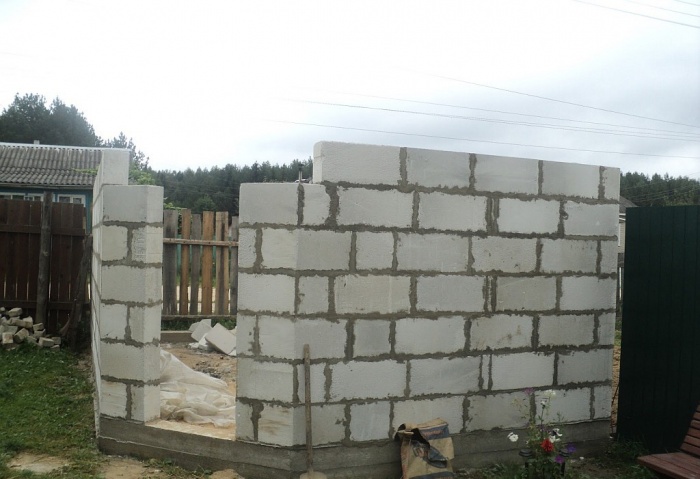
Shed from foam blocks
If the materials for the construction of the shed need to be bought, it is better to stop your choice on foam concrete. Porous blocks have plenty of advantages over other construction materials:
- do not burn;
- do not absorb moisture;
- have low weight;
- there are several sizes, from which it is easy to choose the best option for a small building;
- have higher strength and heat capacity than the brick;
- can pass the air no worse wooden walls;
- absolutely safe and non-toxic.

Despite the lightness of foam blocks, it is necessary to build a foundation for a barn. Considering the size of the construction (3x6) and the weight of the structures, it is better to choose the foundation of the ribbon type. For sustainable, dry soils will fit the bar base.
The ribbon foundation for a small economic building is poured into a depth of about 40-60 cm, while it is necessary to take into account the depth of the soil freezing on the site during the winter period.
The land on the selected area is purified from garbage, roots and vegetation. Make the markup of the perimeter of the shed, dig a trench for belt Fundament.
On the bottom of the trench, the "pillow" from sand, rubble and gravel, are thoroughly tamped. Now it is necessary to fasten the formwork for the foundation from old boards, plywood or slate. Inside the boxes are installed metal reinforcement, which should strengthen the foundation.

Poured concrete. In several places, they pierce a metal pin solution, eliminating the foundation from excess air. Now you need to leave the foundation for several weeks so that the concrete can gain the necessary strength.
When concrete dry, you can start the construction of the walls. First lay out the bottom belt.
Attention! Blocks or bricks of the lower row must be placed on a layer of waterproofing. The ribbon foundation is covered with a layer of rubberoid or deceive with bitumen mastic so that the moisture from the concrete does not fall on the walls of the barn.
In accordance with the drawing, the buildings lay the walls, performing window and doorways. The box of economic construction from foam blocks is ready.
Shed from wood
It turns out much more often that the owner has wood remnants, and he decides on the construction of a shed from a tree. For such a job, at least minimal carpentry skills are needed, because you will have to work with a saw, and with the plane.
The construction of wood weighs quite a bit, a column foundation may well be performed as its foundation. To do this, there are marking on the plot, carrying the perimeter of the future construction to the ground.
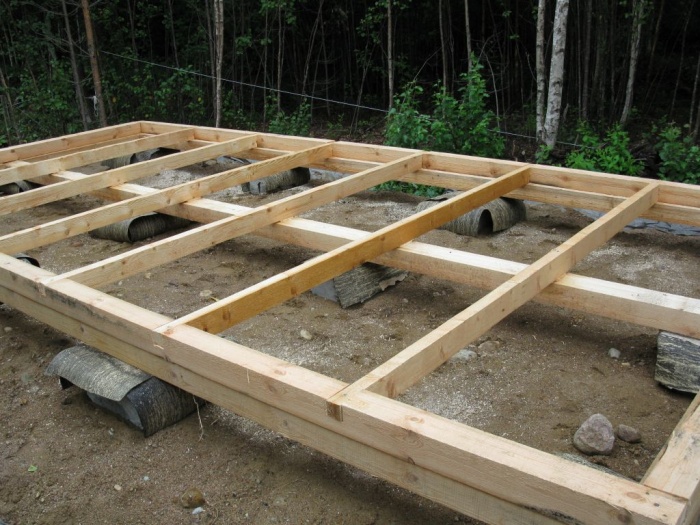
In the corners of the shed install pillars. A few more supports should be located in the center of the rectangle. The distance between the supports is 80-120 cm (depending on the size of the shed and the type of soil on the site).
The depth of the support depends on the level of the soil freezing in the construction region, on average, it is 40-60 cm. After the trenches are dug or drilled, it is installed in them wooden opal, the sand-gravel "pillow" is falling asleep, metallic fittings are stacked.

Now it is necessary to pour concrete. After 5-6 days, when the foundation freezes, you can disassemble the formwork and start building walls.
To begin with, you need to make the bottom strapping of the construction from the bar. Before laying wood, the support of the foundation is covered with a double layer of rubberoid. In the corners, the timber is connected by metal brackets, check by level.
Install vertical supports in the corners of the shed, be sure to check with the level. Fixed by their temporary struts. Taking into account the door and window Operactions Collected from wooden bars the entire frame of the barn.

In the country without a barn, it is not necessary to do. Here and materials are stored and working tools, and some settled in it for a while the house is built. Format 3x6 is the most popular. Most often it makes it with a single-sided roof. Order a project of the economic building is very not cheap, it is better to make drawings on your own. And from our article with photos and video you will learn how to build this building with your own hands.
Choose a place under the construction site
Since the shed - the construction is not needed, then special architectural delights are not needed here, but also in the overall design of the site, it should not be allocated. Optimal options 2:
- jam close to home;
- remove to the edge of the site.
Choosing the location of the building, should proceed from the following considerations:
- Soil by construction site It should be the least suitable for breaking beds. Perhaps there is a place where nothing grows due to a strong shadow or with such a relief that it is impossible to position anything other than the shed.
- The utility room should be a convenient entrance.
- Shed needs to be placed at such a distance from the site of work to transfer a heavy tool into it and the technique used on the site was not far.
There are many buildings quite a lot, consider some not very complex.
Attention! When building a hozblock, the presence of drawings or at least sketches made by hand, prerequisite. Without this, it will be difficult for you to correctly determine the place to build a future barn, you will not be able to calculate how much the material needs to be purchased.
Shed frame from OSB plates
Clearing and aligning the platform on the hydraulic level, proceed to the foundation device. The easiest way to put on the perimeter foundation blocks. You can perform a column foundation, digging the pillows for it and settling the pillow on their bottom, install vertically finished blocks on it. The second option is to independently perform the base by filling the concrete mixture. Further:
- collect lower strapping;
- process antiseptic;
- buttoning the floor from rotting the boards;
- install the first frame rack, fix it with a metal corner, attach a time strut for stiffness;
- attach to the rack and base of the OSB sheet;
- install the second rack, fix the previously installed sheet;
- remove the strut and repeat everything;
- collect right on the site upper strapping from timber;
- set the design on the rack and secure;
- assemble a rafter design;
- attach the crate;
- hold the shed by professional flooring or other material.
It will remain paint the building, make steps.
Council. Sheets to the bottom of the frame is better to fix, retreating 5 cm. For this, a bar is attached to the lower strapping, the height of which is 50 mm. The sheet is based on it, fix it, and the control bar is transferred further.
Shed 3x6 with a single-sided roof from what was found
It is easy to build an economic building with a single-table roof, it costs it inexpensively, especially if you use the existing residues of building materials, it looks interesting. To build such a building, you need to have only the minimum experience of carpentry.
Before starting construction, we collect tool and material in one place. You can perform everything manually, but if there is a screwdriver, electrical ruble and the jigsaw, the grinder, drill the construction will end faster times in 2. From the material you need to have:
- Bar 15x10 cm. Frame is built from it.
- 5x15 cm boards, 4x15 cm edged for string and plating, respectively.
- Unedged boards. Of these, they perform the crate.
- Material for roof.
- Waterproofing.
- Ingredients for the preparation of concrete mass.
- Self-tapping screws, nails.
- Ruberoid.
Shed from such materials is lightweight, but also under it is a foundation. Most rational solution - columns embedded on a depth of 0.4-0.5 m. Thinking all the nuances, start working:
- there are the contour of the future facilities using a roulette;
- drive around the corners of the pegs and stretch the rope;
- challenges the places where the installation of columns is planned;
- the drum is done by holes;
- make on top of a formwork, protruding by 0.2-0.3 m;
- suite the pillow of gravel and sand, put the reinforcement rods;
- perform fill;
- give to stand 4 days;
- wood is treated;
- remove from columns formwork;
- hold the head board twice as folded rubberoid;
- collect the framework from the bar, tighten it with brackets;
- install racks checking vertical levels;
- strengthen vertical bars With the help of temporary slopes, while the front wall racks should be higher to ensure the roofs on average 17 degrees;
- mounted lags with a distance of 0.6-1.2 m and the flooring is performed;
- the overlap is on vertical supports, fixing the beams with brackets.
Important! Optimal distance Between the elements of the column foundation - 120-150 cm. The amount of them depends on the shed dimensions.
Roof
When the frame is assembled, start to build a roof:

Council. Step between elements rafter system From 0.6 to 0.8 m. So, for the building 3x6 m, you need to stock up with eight rapid legs.
- If you plan to make a roof from galvanized iron, you can do without a crate. On the barn 3x6 there are enough 2 sheets, but they need to lay them with the allen.
- When trimming a shed board, the cutting should be made of about 25 mm. So that after drying the wood did not appear unpainted areas, better painting Run before covering.
- Painting consumption, if applied in 2 layers - about 15 liters with shed dimensions 3x6 m.
- On average, 7 days leaves for the construction of a shed of this type.
- On the device of a single-table design you need tools by 30% less than for a 2-stranded.
- If one direction of the wind prevails on your country, then the option with a single-table roof suits you more than others.
Construction of the simplest shed with their own hands - the task is satisfied. The main thing is not to forget to retreat from the neighbor's fence legitimate 3 m and from the road of 5 m, and there are no other restrictions.
Shedany Roof: Video
The first building that appears on the new cottage plot - This is, of course, a barn, big and spacious. At first, while the naked territory of the cottage does not "turn out" with full-fledged economic buildings, a house, summer kitchen and a garage, a simple shed with a single-sided roof will be long to remain the only refuge for inventory, building materials and country property.
What version of the barn to choose for giving
Depending on the plans of the future construction of the country area, the presence of free time and money, solve the problem of the economic room on country plot You can in several ways:
- Hire a brigade and build a major barrier from a brick or foam block, with a single-sided roof and basement;
- Pour the concrete foundation to the future building with your own hands, buy a five-tailed railway container and install it in the country area instead of the shed;
- Build from a bar and boards. An ordinary barn with a single-sided roof, size of 3x6, as in the photo.

Of course, experienced dacnis with experience without hesitation will give their votes in favor last optionThis is the most suspended and deliberate decision.
Tip! Immediately build a barn of foam blocks on the "clean" plot not sucking correctly in terms of planning, often the economic structures of this type have to demolish or transfer in favor of the cottage or garage.
In addition, the construction of stone, prefabricated, panel sheds, like buying a container, will require an order of large capital investments and time than necessary for a wooden building with a single-pate roof and a simple foundation. The main thing is, with considerable costs of tangible advantages over a single-satellite wooden shed size of 3x6, it does not work.
Optimal wooden shed 3x6 design
The most complex element of the homemade barn is its roof. Choose a single-piece roof for your shed, you will not be wrong. Even experienced masters Prefer to put single-car roofs on the sheds, they are not so beautiful, but easier in building and more reliable in operation. Especially since the shedding roof of the shed with your own hands is stepdown, even with minimal construction experience.
The only prerequisite is the correct orientation of a single-piece roof and the whole building of the shed relative to the wind roses to reduce the risk of rain water to the top ride and the roof frontones:
- The design of the shed, the dimensions of 3x6 m, with a single-sided roof is shown in the drawing;
- The construction is performed on a simple column foundation from 12 supports. As a material for pillars, a standard slagoblock is used, but it is better to pull the supports from concrete in the formwork;
- The base of the single shed is a frame of boards and a bar, the size of the structure of 3x6 meters, with the height of the ceiling in 2 m and the highest point of the rafted 2.7 m;
- Single roof is performed according to the classic scheme, on hanging rafters with shawlings stuffed boards and flat roof. As roofing You can use professional flooring, ondulin, or make a two-layer option from rolled material, for example, rubberoid.
The construction will be very simple and easy, if you correctly assemble the foundation, then a wooden frame of a skeleton roof can easily withstand the wind in 18-25 m / s. If there are no strong winds on the ground in which the installation is planned, then during the construction of the walls, you can restrict ourselves to vertical runoff from the board and the bar, as in the drawing. For open areas, vertical bearing supports are recommended to enhance the side sublocks, as in the photo.

The same applies to the design of a single-piece roof. For a quiet area, you can build a one-piece roof without using ceiling overlap beams, but in this case the upper strapping of walls and Mauerlat will be required to be adjusted by additional vertical supports from the bar. For windy terrain, a single-row roof must be reinforced by the beams of overlapping and supports in the middle part of the rafter.
We build a shed with a shed with a single roof
- For frame Material with a cross section of 50x150mm - 14 pcs., 25x100 - 23pcs., 50x100 -19 pcs.;
- For floor board size 25x100 mm - 27pcs.;
- For the crate and roof supports, 43 boards cross section 25x100 mm are required.
All joints and compounds are made of carbon black screws 50 mm, 70 mm and 110 mm. To reduce the maintenance of construction, you can use conventional nails and building corners, but such savings are not always justified.
We make the foundation under the shed 3x6
After choosing a place of construction, the shed will need to be planned and remove the ground on the platform size of at least 3x6 m. Making a stain building bigger size It makes no sense. In order not to displays vegetation, the stripped space can be covered with salt and sand.

After marking the location of the supports, at the points of installation of the column, they dig 12 pits, a depth of 15 cm and sizes under the standard slag block. At the bottom of mini-pitchers, we sleep with a layer of 5 cm, a mixture of rubble and sand, after which we lay out the column supports from the slag block masonry solution with the addition of PVA.
Before displaying, you will need to pull the horizontal cords for which you can control the height of each support so that the entire support surface of the pillars is in one horizontal plane.
A day you can install strapping bar. All angular joints and T-shaped inserts are performed with the ends of the "hardwood" ends, each compound is enhanced by self-drawing, screwed into the timber under different angles.

We collect a frame and a single roof
At the next stage, you will need to install the carrier vertical racks, they are highlighted in the drawing with orange. Next, we sew the floor and lay a single-piece roof rafyled.
Central bearing racks are made of 50x100 from the board, for the rear wall, it will be necessary to cut three racks of 220 mm, for the front wall - four racks 250 mm. Each support is pre-fixed on the bottom strapping with one self-tapping screw, then building level I exhibit an exact horizontal position and additionally secure in a small half-meter pink, as in the photo.

After all the racks are installed, we strengthen them with additional temporary pits and carry out the strapping of the upper bucket of the frame under the future single roof. To give the entire design of the shed extra rigidity, before the start of the assembly of the elements of a single-table roof, it is necessary to sew the floor with a circulating board.
Further, all the installed elements, floorboards, rafters, crate material, side racks, lower and upper strapping must be treated with antiseptic and preservative. During the time, the assembly of the rafter and the roof of a single-table roof will be completed, the procedure must be repeated twice.

For the upper sink of a single-sided roof, the installation of rafters and crates will need to fix an additional horizontal ram of the Mauerlat, as in the diagram.

Poked the landing site on stropile beam It is performed on the markup or by the prepared pattern. The ambulance and alignment of the position of each beam is recommended to score the space between the beams with short boards, they will fix the rafter from the horizontal displacement and at the same time will strengthen the base of the single-bed roof.
Roofing and finishing work
At the final stage of the sideling roof rafters, we sew the crate board. If bitumen materials will be used for the roof of the shed - flexible tile And the ruberoid, on the boards it will be necessary to put additional sheets of OSB or to score the crate of skidding with wooden clapboard.
It is easiest to cover a single-table roof using a corrugated floor. The metal surface will withstand any cataclysms, which only may occur in the country area, and lay and attach roofing material much easier and faster than erectifer or rubberoid. A polyethylene film is placed as waterproofing, the edges of which will be released from under canopies and nailed to the upper edge of the wooden walls of the shed.
Stacking the roof on a single-table roof starts from the left lower sheet, as in the diagram. Each element is joined with the previous one in the twist of two waves, it is 15-20 cm. Places of overhearsow, the lower and the top edge must be pierced with roofing nails with a silicone washer.
On sides roofing cake Burn wind strap, protecting a single-table roof from the waterproof of the water and the gusts of the wind. A similar rail for the device of the drainage gutter is nailed under the lower sink. The upper sink of a single-bed roof protect the screen of two wooden planks.
The collected shed frame, as a rule, do not be insulated for the winter, therefore, as a material for firing walls, it is possible to use a lining, a conventional cutting board or sheet panels of the OSB. To pack the facing, you will need to install additional vertical rails on the walls and soak. Joints and cracks between OSB plates and edged board It is necessary to blew the mounting foam, the surplus of the PPU cut and be sure to paint the weatherproof.

Conclusion
The selected view of a shed with a single roof, the size of 3x6 m, is able to simultane up to 15 years without repair, subject to a competent selection of protective paintwork materials. This design has one an indisputable advantage - Shed from a bar with a single-table roof can be relatively easy to disassemble and transfer to a new place, after the cottage or a new barn of foam blocks will be built.
In the farm of any particular home ownership there is always a garden inventory and tools that need to be stored somewhere. Lawn mower or garden sprayer with chemicals is not a place in a residential building. Where to remove these necessary things so that they cannot be exposed ambient And did not grieve the territory of the yard? You can solve this problem by building a small frame barn with a single-sided roof.
Advantages and disadvantages of wood frame
The construction of a frame household building from wooden bars has a number of advantages:
- In specialized building stores you can buy ready-made parts for assembly. frame design Shed.
- Build such a structure is easy to build, since the assembly of parts is based on the principle of the constructor. For this, it is not necessary to possess special knowledge of construction. All elements and frame connections are fitted in size, and the presence of instructions will make the construction process easier.
- A frame wooden barn will last for many years, if appropriate care is carried out, and with its construction, all the rules were observed.
- The construction of the design will not take much time. Usually enough of one week for the construction of the entire barn. At this time, it includes: setting the foundation, the assembly of all frames of the frame, the walls of the walls, the insertion of doors and windows, roof flooring.
- Wooden design details are easy to add additional processing.
- When building a shed with a single-table roof there is no need to install the solo system.
- The frame design of the shed is easy to disassemble and re-build in another place. In this case, we are talking about lung buildings, without foundation.
- The cost of buying materials for such facilities is much less than, for example, brick. Many adhere to the opinion that wooden design Brief and unreliable. However, if you take into account the life of these parts and the funds spent on the materials, then this option is much more profitable.
The disadvantages of this design are as follows:
- Wooden elements - flammable material.
- Details of the framework may be subjected to rotting and affecting with ancient insects. That this does not happen, all elements of wood must be additionally treated with antiseptic pastes, organic solutions or oily antiseptics.
- Wood, depending on its moisture, over time, has a breathtaking property, swell, rolling and cracking.
Preparation for construction: the drawings of the future barn, sizes
Before starting the construction of the frame shed, it is necessary to take into account some moments of its construction:
- Shed, as if carefully, it was built, remains a shopping building, which will not particularly fit into the architecture of a residential building. Accordingly, this building is better erected in the backyard.
- The input must be free. It will become particularly convenient when large-sized objects or furniture will be necessary, in the case of repair in the house.
- Locate the shed better on the hill (supports, piles, blocks). The distance between the base of the design and the earth will prevent: from rotting its wooden parts, the appearance of moisture indoors and damage to the metallic inventory corrosion.
- It is necessary to carefully design the shed so that in the future there is no need to make an extension to it. It will be convenient to divide it into two rooms: in one you can equip the workshop, and in the second - directly the shed or chicken coop.
Two shed premises will allow them to use them in different purposes.
- The land at the place of the future building must be dissolved.
- It is necessary to determine what materials walls and floors will be shifted. What will be interior decoration And what to apply the roof.
Length, width and height of the future barn is selected individually, depending on the location. For such purposes, the most suitable arrangement of medium size (see image).
Frame shed with typical parameters
Another version of the frame shed
Choosing materials and calculation
Qualitative procurement planning of all necessary materials will save from unforeseen embossed in the future.
When erending the shed frame, the following materials are needed:
- For Lower I. upper strapping It is necessary: \u200b\u200bsix 6 M length bars with a length of 100x100 mm and eight bars - 3 m in a cross section of 100x100 mm.
Buying a bar and boards should pay attention to the degree of their humidity does not exceed 22%.
- For flooring, the board requires a cross section of 40x150 mm, in quantity (minimum) 20 pieces. OSB sheets are used as the first floor.
- For vertical supports, the bars are needed with a cross section of 100x100 mm, in an amount of 12 pieces, each of which is 2.5 m long. Two such bars will be used as a doorway.
Wooden surfaces should not contain bitch, cracks, mold and injuries from insects-anchrels.
- You can make the inclination of the roof in two ways: in the first case, it is necessary from 4 to 6 bars with a length of 50 cm with a cross section of 100x100 cm, in the second - supports to which there will be a bias should be in the initial length.
- For the root, the board will require a cross section of 22x100 mm, in the amount of 16-18 pieces.
- For a draft ceiling, you can use a multilayer Phaneur, chipboard, fiberboard or OSB sheets.
- For the attachment of the bars at the corners in the way "in the paw" requires nails, and "in the floor of a tree" - metal corners and planks.
Nails are selected in length more than the thickness of the board so that they pierce it and entered the next one. This connection will be much stronger.
- When working will also need selflessness, screws, M-shaped metal plates for fixing the bar in the corners.
- In the case of insulation, the shed carcass may be needed heat insulating layer (Polyfoam, mineral wool or penoplelex), waterproofing (foamed foil polyethylene), vapor insulation (bitumen), rubberoid, polyurethane foam.
Required tools
For the construction of a frame shed, the following tools will be needed:
- The shovel (for digging the holes under the base foundation it is better to use a screw shovel).
- Yardstick.
- Marking cord with coated thread.
- Graphite marking pencil.
- Construction level (more convenient to use from 50 to 200 cm).
- Cornel and ruler.
- Stationery knife (for cutting insulation).
- Laser level (with this tool, the perfectly flat plane is determined).
- Chisel.
- Electric drill.
- Circular saw (with it, it is convenient to cut the boards of various lengths and sizes).
- Rechargeable screwdriver (to attach plywood, boards and OSB sheets to ceiling, walls and semi).
- Electric chokes (required when calibrating board).
- Screwdriver.
- The hammer of carpentry all-metal.
- Sledge hammer (used when fitting board).
- Manual clamps (for clamping boards in different places).
- Wooden hacksaw (for the grooves).
- Stapler construction (for fastening with a wooden frame of waterproofing and vapor barrier).
- Carpentry ax.
- Construction plumb.
- Nails. For a frame shed, it is necessary from 2 thousand to 4 thousand nails. In this case, three of their types are used:
- GOST 4028-63 Construction black and zinc nails. Zinc applied to external work with wooden details, and black when installing internal materials.
- GOST 4029-63 zinc nails for fixing runneroid and other sheet materials.
- DIN 1152 Nails galvanized for attaching t-shut-off boards, front panels and finish surfaces.
Step-by-step instructions for the construction of a shedron shed with a single roof
When all calculations are made, the project is ready and the necessary materials are purchased, you can proceed to the construction of a frame bar.
Foundation. What better and how to do
The basis for the frame is the foundation. For frame sheds and business blocks, a tape, wooden or column foundation is most often used.
To secure the moisture of a wooden shed frame, you can install a ribbon foundation. For this, a concrete base of 40-50 cm high is made. It is important to know that such a type of foundation is not suitable for sedimentary and peat soil. In these cases, screw piles are used.
For a ribbon foundation, it is necessary to drain the trench around the perimeter, a depth of 30-40 cm and a width of 40 cm. The bottom of the trench is covered with sand and tamper. As a result, a sand pillow is a thickness of 10 cm. A waterproofing layer is necessarily placed on a sand pillow, which will prevent absorbing liquid concrete in the sand.
After that, a wooden or metal formwork design is manufactured. It must rise above the soil and be equal to the height of the base. For the formwork of the formwork, they are fixed with struts and clamps, and its top can be strengthened with backups. The waterproofing layer stacked the reinforcement with a thickness of 10-12 mm, which binds to wire.
Formwork shields fix the substance of cement before solidification
When the frame of the reinforcement is ready, it is poured by concrete M200-250 brand.
Concrete pouring should be done immediately for the entire perimeter. In order to avoid cracks while freeing the concrete, it is not recommended to pour it into rainy weather or severe heat,
The concrete is frozen about two weeks and is gaining about 70% of strength by this time.
Tape fine-breeding foundation Suitable for small buildings
Under construction wooden foundation Using larch brices, about 300 mm thick, which are processed at least 2-3 times by bitumen.
In the ground, the holes will dig 150 cm deep and the diameter of 30-40 cm. On the bottom of the wells fall asleep sand with a thickness of 10 cm and tamper. Each log from its base is covered with a waterproofing layer at 140-145 cm. The resulting wooden pile is placed in the ground. The gaps between the waterproofing and the wall of the wells fall asleep ground. To thoroughly compact the soil around the pile, it is watered and tamped. For reliability, you can pour a hole with concrete.
The use of wooden piles can be an alternative solution for setting the foundation.
Most often apply a column foundation when erecting a frame shed. To do this, it is necessary to make it marking it on Earth, using a cord. On the perimeter of the markup and in each of its corners, the wells should be digging a depth of 30-40 cm.
Using a stretched cord markup will be more accurate
It is better to dig a hole with a depth of 70 cm and more, as it is below the waterproof point. The bottom is embanked to the sand, so that it turns out a layer of 10-15 cm, which must be tamped. For reliability, it is possible to pour a layer of gravel with a thickness of 10 cm. After that we put a brick, bonding cement mortar. For the barn, use laying of two bricks on the layer. If the building is larger, the foundation columnally makes three or more bricks.
The most commonly used type of foundation when building a frame shed
Brickwork must be treated with a bitumen waterproofing layer.
To ensure a flat surface, all poles need to be checked by level.
The space between brick masonry and the earth must be covered with sand or pour cement-sandy mixture. Alternative foundation of brick masonry are empty concrete blocks 400x200x200 size. Void in blocks are filled with cement mortar.
Video: Foundation Installation
Frame construction
Now you can proceed to the creation of a shed frame. For each brick pillar It is necessary to put two layers of rubberoid - to protect the lower part wooden carcass from moisture.
After that, start the installation of the bottom strapping. This requires a timber with a cross-sectional size of 100x100 mm. Boxes and lags are collected from a bar 50x100 mm. The distance between them should not exceed 60 cm.
Bakes and lags are connected by nails in the way "in the floor of a tree"
Vertical racks from a bar 100x100 mm are fixed on M-shaped metal connections or ordinary nails that need to be clogged. The distance between the beams should be no more than 1.5 m. For the stability of the design of the beam diagonally, it is temporarily strengthened with 40x100 mm boards.
Vertical and upper beams are fixed by M-shaped connections
The construction of the frame barn is carried out not only with wooden beams. It is widely applied to its manufacture of metal profile pipe.
Ease of assembling such a design attracts builders
This version of the material for the construction frame has a number of advantages:
- The assembly of the profile base is made without mud and the construction trash in the yard.
- Installation and disassembly of such a building will not take much time.
- If necessary, the shed from metal profile Easy to transfer.
- For such a design, the foundation is optional. Enough on the smooth plot, pour gravel.
- Withstand the severity of snow and resist the gusts strong wind Help the reinforcement, reinforcing frame.
- Due to the diverse color painting, the sheds from profile pipes has aesthetic appearance.
- Design S. metal carcasy very practical because it does not require the processing of its details and elements antiseptic means. It is enough to paint it once.
If the construction in the future will be enhanced loading pressure, the framework is built from more durable pipes. In this case, for lower strapping and racks, pipes with a wall thickness of 8 mm and a cross section of 100x100 mm are used. For additional spacers, a profile section 60x60 mm is used.
Special attention should be paid at the flooring of profile lags under the draft floor. The distance between them should not be more than 60 cm. Lags are fixed to the bottom strapping using welding.
After that, go to the installation of intergenerational overlap, which is a frame design from the profile, as well as beams. Bottom to these elements is mounted ceiling covering.
The final stage of the construction of the design from the profile pipe is the assembly of the rafter system. This element of the structure can be both solid and a separate part of the entire structure. The main roof carrier part is a powerful chaserler to which the other elements are attached.
After all welding work, it is processed.
Erectation of floor and walls (knots and docks)
When the base is erected, you must first make a draft floor. For this wooden lagows Covered OSB plates or plywood sheets with a thickness of 12 to 15 mm. Then, the entire surface is covered with a waterproofing layer on which the purple floor is installed. As this outdoor coating It is convenient to use tipped boards. They have at the edges of the deepening and protrusions that are ideal for assembling the jack. They are usually made from coniferous rocks Tree. The resin contained in this wood makes it waterproof. Laying of the floor with tipped boards resembles a laminate installation.
Dense board connection is ensured by protrusions and cuts around the edges
After that, you can go to the installation of the shed walls. So that in the future its design is strong and stood for a long time, temporary and constant drives are embedded in the frame.
Strengthening struts permanent and temporary dosnes will provide additional strength in places of high weight load
The drives are applied at mandatory, if the walls are not covered with plywood or OSP-3. Using the slab casing is five times more stronger than shosin (if an OSP or plywood is 12 mm). As a streamin, a cross section of 25x100 mm or 50x100 mm is used when a more stable design is required. The length of such a board by 30 ° should exceed the height of the wall. Temporary drives are used until the upper logs are installed. They help to fix the specified position of the walls and vertical beams.
Before starting their installation, the corners of the design are aligned. In this case, it is convenient to use a bubble or laser level. Time installation step is from 1.2 to 1.5 m. They will also help to correct design defects, if you use them as a lever.
When erecting a frame design of the shed, it is important to provide proper fixing of strengthening and nodes of the connection:
- The installation angle of shine must be 45 ° (this is the perfect angle that provides maximum stiffness of the design). In those places of construction, where it is difficult to withstand it, for example, windows and doors, is allowed 60 °.
- The use of hollow windows is permissible only in small structures (sheds, economic buildings).
- They must be tight (without cracks and gaps) to lay down to the surfaces of the racks and upper overlap.
- For Ukusin, it is necessary to make grooves in vertical racks, upper and lower strapping. The depth of the groove is done depending on the thickness of the drive. In a metal structure, they must go into the profile of racks.
- The junctions of the bars on the corners of the frame are stacked by the way "in the floor of the tree" or "in the paw". In the first case, 50x50 mm to half of its thickness are made on both sides of the logs. In the second case, similar propelles are made, but having a bevel. If it is necessary, the connection site of two bars is processed by the chisel.
Such compounds are fixed by nails and M-shaped connections
Floor insulation
Heat the floors of the frame shed can be as follows:
- Mineral wool.
This method is very popular due to the ease of installation and relatively low prices. Mineral wool is usually sold by packages for several plates with a size of 1000x600x50 mm or 1200x600x50 mm or in rolls. On the floors of the shed, the waterproofing layer is laid (pergamine, rubberoid or ordinary polyethylene film), To which the wooden cutter from the board with a cross section of 10x120 mm and a width of a step 60 cm. In the resulting compartments, plates of mineral wool are placed in the resulting compartments. All wooden elements of the root, before laying the wool, it is necessary to treat with antiseptic tools to prevent rotting. For additional insulation The floor is used by a double layer of such plates. During laying, the insulation must be lower than the level of the root. Mineral wool can not be tamped because she will lose his heat insulating property. To prevent wetting wool on top, lay polyethylene layer, fixed on the brackets with a stapler. Then the entire surface is covered with rigged boards, OSB or plywood sheets.
- Foam.
Floor insulation by this material is carried out by lags. As in the case of a mineral wool, a wooden lamb is needed, which is a waterproofing layer. The width of the step between the boards is about 60 cm. The thickness of the plates of the foam should be at least 10 cm. This material is very convenient, as it is not deformed. For foam, the fungus and mold is not terribly. Stop foam plates are needed tight. If the slots remain, then they can be filled with mounting foam. After its drying, the sheets of plywood or tipped boards are stacked on top.
- Clay.
For insulation of the floor of the shed clay, the lower formwork is needed waterproofing materialon top of which are stacked plates OSB.. Then it is installed onto this surface with a wooden drying of a cross section of 10x150 mm. In each section of this design, clamzit falls asleep. Its layer should not be less than 10-15 cm, since a smaller thickness will not give the desired heating effect. Ceramzit should be dissolved so that it does not rise above the bruises of the root. The top view of the vapor insulation layer of: diffuse membrane, a water-based bitumen-polymer cold emulsion, a polyethylene or polypropylene film. After that, OSB sheets are attached by self-drawing to lags. The finishing floor is stacked on top.
Materials for floor insulation in a frame shed
 it ecological materialWhen producing which chemical additives are not used, this material is easy to give fit form Inexpensive and reliable way of floor insulation
Heaters for walls
For the insulation of the walls of a frame shed, most often used mineral Wat and extruded expanded polystyrenex (PESEROPLEX).
- Waste with mineral wool walls.
The decoration of the walls of mineral wool does not differ from a similar method of floor insulation, but has its own nuances. FROM inner The barn it is covered with vaporizolation material (foil polyethylene), on top of which plywood or OSB sheets are fixed. Outside on mineral wool, perpendicular to the base may be installed wooden sheathing From the board with a cross section of 20x40 mm. These boards serve as a ventilation gap, which is attached to the exterior finish. Sometimes in front of the waterproofing layer ( exterior decoration) Mounted layer from OSB sheets.
- Penplex.
For insulation of the walls, this material it is necessary to pick up plates with a thickness of at least 6 cm. In the same way as in the previous methods, a wooden drying is needed in a step of 60 cm, which is placed under which the waterproofing layer is placed. Painoplex plates are more convenient to fix on polyurethane glue (it is well compatible with polystyrene foam) or metal anchors with plastic dowels. The stakes of the plates are additionally fixed on the mounting foam or metal scotch. The wall outside can be insulated with an additional focus on which the outer finishing material is installed.
When the walls are fixed with anchors or dried glue, placed on top parosolation material. In this method of insulation, foamed foil polyethylene with a thickness of 3 mm is used. As a replacement, you can use a polyethylene foil film. The finishing layer is fixed on top.
Materials for the insulation of the walls of frame shed
 Small wool weight is convenient when installing this material has a denser structure than foam
Video: All stages of construction
The frame barn on the territory of your home ownership will always be convenient for storing inventory and old things. Equipping his room under the workshop, you can do carpentry and repair workHowever, your yard will remain clean. Heated walls, floors and roofs will become comfortable conditions For the maintenance of pets and birds in the cold season.