Types of repair work. Beautiful ceiling with your own hands
At the entrance to the room in the field of view of any person, the ceiling falls in one of the first. It is from the ceiling, his type and state will depend on the impression of the interior as a whole. Therefore, it is so important to maintain the ceiling in good condition, follow its cleanliness and integrity. We want it or not, but the interior looks great, sometimes you have to perform a complete or partial repair of the ceilings. To do this, you can hire masters, and you can do everything yourself, especially since the repair of the ceiling is able to do anyone who can handle the tool.
I would like to immediately note that if you are not sure about your abilities, it is still better to appeal to professionals. Prices depend on the repair of ceilings depending on the complexity of the work. So cheap are priming work and the creation of isolation. For their execution, about 1 cu. for 1 m2. The most expensive are works on putty, plaster and applying liquid wallpaper. The price of these types of work fluctuates in the range from 7 to 10 cu for 1 m2. All other ceiling repair work is usually worth 3 to 6 cu. for 1 m2.
Types of Ceilkov

A variety of interior styles, building materials and creative designer ideas Reflected on the ceiling. Today in the premises can be seen different kinds Ceilings, from the simplest to complex multi-tiered with many lighting devices. Among the most common types of ceilings are as follows:
- painted ceiling;
- ceiling with whitewash;
- an estimated ceiling;
- suspended ceiling;
- stretch ceiling.
Each of these types of ceilings has its advantages and disadvantages, constructive features that affect the cost of repairing the ceiling and labor costs. It should also be noted that you can spend partial or full repair of any kind of ceiling. What kind of repair will have to do, the amount of work performed will depend on.
As with any other construction work, repair ceiling begins with training. At this stage, it is necessary to clean the ceiling from the old coating, immersing and level the surface, as well as view the joints and seams on the ceiling. The care of preparation depends on what kind of ceiling is planned to be done. For example, the surface of the ceiling under the spins or wallpaper must be made as smooth as possible, at the same time for suspended or stretch ceilings Such a smooth surface is not critical.
Cleaning the ceiling

If the repair is performed in the new room immediately after the builders, you can skip such a stage of work as the removal of the old coating, and immediately go to the repair of joints and priming. IN otherwise We start with cleaning the surface of the ceiling.
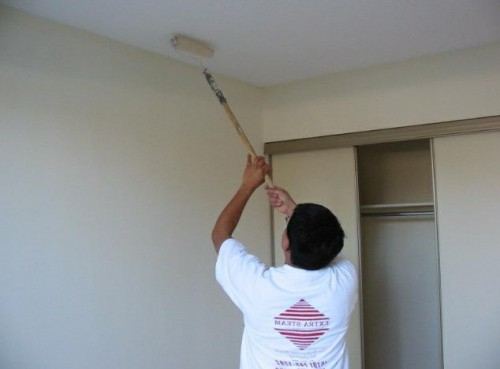
Most often ceilings beliy, plastered with lime solid or simply wrapped with wallpaper. Clean the ceiling from these finishing materials will not be much difficult. To do this, you need to take an ordinary painting roller and a bar for it. The roller must be moistened with warm water and squeeze it a bit so that water does not eat it, and he remained wet enough. After that, we roll a part of the ceiling, the roller at first we press not very much, but with each new rolling, we enhance the clamp. As soon as they noticed that the roller was almost dry, again dip it into the water and repeat the entire procedure on the new segment of the ceiling. After wetted part of the ceiling in size a couple of square meters, we take a spatula and begin to consider whitening, wallpaper or plaster to a concrete base or putty.
Important! Having found a layer of old putty under the finish, check it on strength with a spatula. If it is firmly held on the surface of the ceiling, then we leave on the spot. If the putty begins to crumble and peel, then we remove it and in the future we apply a new one.

Sometimes the ceilings stained Oilor water-emulsion paint. Deleting paint is a very laborious process. This can be done in two ways: mechanical and chemical. The first option implies purification from paint using a spatula or sandpaper. This is quite a long time and dusty. For the second removal option, a special washing will be required, which can be purchased in the store. After impregnation, the paint is easily separated from the surface, the process of softening the paint can take up to 12 hours.
If any ceiling was passed decorative elements or polystyrene tileYou can remove them with a spatula with a rigid metal blade. It may be that part of the glue will remain on the ceiling. To remove it will have to make some efforts, but as a result there should be a clean surface.
Performing overhaul ceiling with any suspended or stretch designYou will have to fully disassemble it and remove to get to the overlap. There are no special recommendations here, except to be extremely careful and make a maximum of effort so as not to damage the elements of the suspension or stretch ceiling.
Grinding ceiling

After cleaning the ceiling from the finish coating and decorative elements Go to the priming of the surface. It begins with checking the joints and seams on the ceiling. They must be filled with plastering or gypsum solutionwhich is firmly and reliably there. If the solution in the joints is partially scattered or falls off from a light blow on it, then we clean the joint and replenish them with a solution based on plaster and cement or a solution of special dry construction mixtures with the addition of fibra. Filling the seams, compare the protruding solution with the ceiling plane and give it to dry completely, only after that we proceed to the priming of the ceiling for further work. Applying deep penetration to the surface to achieve the best adhesion and strengthen the basis. To apply primer, you can use a roller or brush and worry about protecting the hands and eyes from the ingress of primer. After drying, the primers go to further work.
Puttail and plaster
The implementation of these works is a strict necessity, since the surface of the concrete base is far from perfectly even. This is especially critical if the ceilings are repaired with wallpaper or it is planned to paint or whitewash. Which of these two methods of aligning the surface to choose depends on personal preferences and masters skills. But there are a number of features that can increasing the scales in one direction or another. So the plaster reduces the useful height of the room at 2 - 3 cm and has a rather large mass. And putty gives a fairly large shrinkage and requires the application of several layers, which is reflected in the time and complexity of this type of work. The advantage of ceiling plaster is the simplicity of work and convenience in alignment of the surface. At the same time, the putty allows you to achieve perfectly smooth surface with minimum thickness layer and low mass.
Plaster

If you decide to make the ceiling plaster, then this will require: the primer "concrete contact", special dry building mixtures, for example, "Rotband" and plaster beacons with fastening. From the tool it will be necessary: \u200b\u200b1.5 m rule, drill or perforator and level. The works themselves are performed after cleaning the surface of the ceiling as follows:
- rates from the wall 15 - 20 cm, we put the label for the guide, the second label for the guide put with the same indention at the other end of the room. With the help of painting threads, we plan a line between these two tags;
- from the first line, we retreat 1.25 m and repeat the algorithm for applying markup for the guide;
- when the markup is applied, we depart the holes for fasteners;
- krepim guides to the ceiling by self-draws. With the help of the level, follow the guides to be strictly by horizon and in the same plane. If necessary, we unscrew or screw the screws, thereby adjusting the height;
- as soon as they put the guides, fix them with the help of a thick solution of the plaster mix and let it completely dry;
- it remains to fill the gaps between the guide plastering mixtures and to dissolve them on the guides using a metal rule.
The process of plastering the ceiling is very similar to the plaster of the walls, the complexity is only that the surface is unnecessary and is above the head. After complete drying, a smooth surface is obtained, which can be applied to a putty and finishing coating.
Ceiling Repair: Video - Ceiling Stucco Lesson
Putty

Puttooth ceiling also allows you to align its surface, but it can take a few more time than plaster. In addition, the works themselves are quite difficult to perform if there is no skill in handling the tool. For work, the following materials will be required: coarse wrathping "isogeps" and finishing "SANGIPS", primer "concrete contact", painting mesh. From the tools you will need: wide and narrow spatulas, tank for kneading. Puttailing the ceiling is as follows:
- if, after cleaning and priming the surface, large potholes or differences remained, then first of all we apply several layers of coarse putty. It has a smallest shrinkage, and its layer thickness can reach 5 cm. To align the ceiling plane and remove excess putty, we use a wide spatula or rule;
- on top of the raw coarse putty put the painting grid. Such a simple reinforcement will give the strength of the ceiling. We carry out a wide spatula on the grid with a small pressure so that it goes into a layer of putty;
- if the ceiling surface is relatively smooth, then you can immediately take advantage of the fine wipe "SANGIPS". It is applied to the surface of the ceiling with a wide spatula, and surplus are removed. For reliability, you can rein the painting mesh;
- after basic layer Puttles are completely drying, you can proceed to finishing spatlement and bringing to the ideal.
To get a perfectly smooth surface, we use special graters with sandpaper. As soon as it has achieved a flat surface, you can proceed to applying the finish finishing coat Ceiling.
Ceiling Repair: Video - Ceiling Puttle Lesson
Another option for creating a smooth surface of the ceiling is the repair of the ceiling with plasterboard panels. The entire surface can be simply seen by them, and then finally align with putty. Such a thorough alignment of the ceiling surface is required for it. further painting, blots or pastries with various materials.
This option is perhaps the simplest due to the availability of materials and simplicity of their use. In addition, painted paint ceiling in the kitchen or bathroom is much more practical than all other ways to finish the ceiling in these rooms. As previously noted, a significant feature of the ceiling painting is high-quality surface preparation. It should be perfectly smooth, otherwise the appearance of the ceiling will be spoiled.
Painting Ceiling Repair: Photo - Example
For painting, oil paints or water-emulsion are usually used. Painting preparation is reduced to careful stirring and bringing it to optimal density. After that, you can start painting. From the tool you will need a roller on a long barbell and brush. The process itself is simple enough. Paint from the edges that paint the tassel. The rest of the area is painted using a roller.
Sometimes a cosmetic or partial repair of the painted ceiling is performed. Initially, look at the surface on the subject of peeling or swollen paint, if there are places there are, they are cleaned with a spatula. After that, they again paint, but this option is only a semi-dimensional and in the future will require full-fledged repair. If the paint is dirty everywhere, then a new layer of paint is applied to the entire surface and leave to dry.

The plains of the ceiling is considered one of the most common. The whitewashed ceiling is suitable for almost any interior of the premises, but compared to painting the ceiling is somewhat more complicated. The blades material protrudes the smallest lime, which is diluted with water, filter through the sieve and then apply to the ceiling. To do this, use roller, brush, paintopult or vacuum cleaner. If you use a roller and brush, the application of lime will not be uniform, and using the technique you can achieve the best results. Unfortunately, the whitewashed ceiling is not so durable as painted. Required once a year to update the whitewash or completely clean and blot again. As in painting, it is necessary to prepare the surface with particular care. The indisputable plus whirlwind is its price and availability of material.
Casting ceiling
Not so long ago, the ceiling, hoveed by wallpaper, was on top of popularity. Later, in addition to the wallpaper, a special ceiling tile appeared. And today repair the ceiling with polystyrene tiles is one of the most popular finishing options. As well as for painting and blissing, the base of the ceiling under the wallpaper and the slabs must be made perfectly smooth.
Ceiling pasting wallpaper

Ceiling pasting wallpaper A somewhat complex process, as it is necessary to coordinate actions at least two people. Yes, and hold the wallpaper above your head - it's not a lung. We will need wallpaper glue and wallpapers for the entire ceilings area. From the tool: a wallpaper knife, roller, tanks for glue and rags. Wallpapers are glued as follows:
- after performing all the work on the preparation of the surface, we prepare glue according to the instructions;
- from the total roll, we cut a few cloths of the desired length, while watching the drawing coincided on the adjacent clutters;
- laying up the canvas on the floor in a pattern down, smear the glue on them with a brush and let me absorb a little;
- while the wallpaper absorb the glue, we smear the glue on the ceiling along the entire length of the canvas;
- now we put the canvas in the harmonica and, gradually folding, glit to the ceiling;
- running the cloth with a roller, watch the air bubbles under the canvas remain. Excess glue remove slightly damp rag.
The remaining canvas glue through the algorithm described above, while watching the drawing coincided at the joints. Let's dry in a closed room for a week.
Ceiling pastile tiles
Unlike pasting wallpaper the process of gluing tile It is much easier, and one person can cope with this. For work, it will take: tile, special acrylic glue. From the tool you will need: mounting gun, spatula, knife for trimming, painting thread. All work performed as follows:
- after surface preparation, we find the center of the room. For this you can spend two diagonals from the corners, after which it is carried out through the center two crossed at the right angle of the line from the wall to the wall;
- glue tiles start from the center of the room. On the tile itself dotted along the edges and a little in the center we apply glue and glue to the ceiling. Tile placing one corner strictly along the lines in the center;
- repeating the algorithm, glue the rest of the tile. If at the edges, the tile will not fit entirely, cutting it with a knife;
- the final stroke will be gluing plinths and borders in the corners of the room.
Ceiling Repair: Photo - Example

As part of this article, we reviewed the most simple options repair ceilings. Repair more complex structures Suspended and stretch ceilings are a rather extensive and complex topic that requires writing a separate article.
The ceiling is a place in each apartment, the repair of which causes a lot of questions. And taking into account modern options for finishing the head and can go around. Almost all of them really incarnate with their own hands - it is both whitewashes, and plaster, and wicker bolds, and the formation of plasterboard ceilings. True, in this case will have to at least consult with the omnipotent Internet. An option that will require the intervention of professionals is a suspended ceiling. Now about all this and we will talk.
Traditional options
Such includes putty, plaster, painting and salary by wallpaper. For these options, it is necessary to prepare the ceiling. Stages are:
- Removing the old finish.
- Stripping damaged areas, chips, cracks.
- Primer (in the case of ceiling leveling, it will be needed if there are tangible drops that can be eliminated by plaster).
If you plan to whitewash and painting, the ceiling is placed in any case to give evenness. It is advisable to apply two layers: start-up and finishing, they differ in the size of the fraction in the mixture.
This preparation will not be made out of the lungs, as in order to achieve perfect smoothness, you will have to sweat and after putty also to sand. It is important to choose the right and high-quality mixtures that allow you to achieve the desired result. After drying all the layers, you can start a whitewash or painting. Regarding the paint, then the choice in the market is just huge, there are those that are created specifically for the kitchen, you can wash them without any problems, and they do not absorb fat, and still moisture-resistant. Other options can make the invoice that will make the ceiling, for example, in the bedroom or living room deeper, and if you also make it in color, then rich. The modern building materials market specifically for those who want to have a stretch ceiling, but at the same time not to spend on expensive repairmen services, created such a paint that is capable of imitating the glossy surface of this type of finish, as well as other textures. True, the price of such delights will be more three times, at a minimum.
High-quality materials are not cheap, so if you want to make a ceiling beautiful, you will have to spend money, and as a result of this, such a finish option cannot be called budget.
As for watering with wallpaper, this option is acceptable only if the ceilings are smooth or require a minimum of their leveling. The modest appearance of such ceilings can be transformed by using unusual ornamental wallpapers instead of standard white. They will serve for a long time if only neighbors will try to experience your strength to water. Wallpapers have a fading property, but their replacement will not require many resources and time.
Just the plastered ceilings will look untidy, since the perfect white plaster does not happen. Another option, quite non-standard, is to apply to the ceiling of structural composition or creating it based on a standard finishing composition. But do not forget that it is difficult to take care of the trim on the ceiling, and here too deep structures you will not be happy after a few years, because dust and beauty will be accumulated there, such creation will not give the ceiling.
Plasterboard
Such a ceiling finish has many variations in terms of form. If you have a very curved ceilings, and you will passionately see smooth and neat, then you should choose the option of finishing the ceiling of the plasterboard. Simple smooth installation is easier than with any niches or ornaments. There is a special ceiling drywall, which has a smaller thickness than the wall. As a result, it can be mounted on the ceiling with less labor costs, and if you also choose a convenient format of the sheet, then alone.

Before mounting the ceiling of plasterboard, it is necessary to make a crate of profiles or wooden bars. It does not have to make a grid, since the longitudinal rails are enough for the walls of the drywall, the distance between them is 60 cm. If you have a standard sheet of drywall 120 x 250 cm, you will have to resort to helping comrades.
But the smooth plasterboard ceiling is not the only thing that can be done with this universal finishing material. From it, real architectural structures are replete, but notice that without special training with their own hands it is unlikely to do. In addition, if the room is small, then such creation on the ceiling will make it even less both visually and in fact.
If you decide to make a plasterboard in a bathroom or any other wet room, It is worth choosing special moisture-resistant plates.
Whatever you come up to create from drywall, the design is necessary after the installation to bring to mind, namely: to close the sheath joints with a special tape and launching. If it is decided to paint such a ceiling, then preparation for this is identical to the preparation of a conventional ceiling under painting. Also, structures can be coated with wallpaper or just plastering.
This option of finishes, so to speak, to an amateur, because polystyrene plates on the ceiling have a somewhat outdated look. The idea of \u200b\u200bcourse is not bad, because it does not require careful leveling of the ceiling, such will not be difficult, and the process is going fast.

But if you decide to use this particular finish, then there is no need to save, as there are improved options that are covered with lamination, that is, a special film, it will protect the ceiling from dirt, it can be washed, which makes it much easier to care. This option for finishes is easily realized, but there will be many seams, and this will not allow to achieve the monolith of the ceiling. More such plates poorly tolerate sunlight, if they are colored, then burned, if bright, then yellow.
Tile installation rules:
- Cleaning the surface of the ceiling from the previous decoration, dust and dirt.
- Surface primer.
- Laying tiles (it needs to be done, starting from the middle). For gluing, you can use both liquid nails and specialty glue for polystyrene.
To give the integrity of the ceiling of the edge between the wall and the ceiling is closed by plinths, the material of their manufacture is the same polystyrene.
This characteristic shine is not confused with anything, but this also concerns the glossy stretch. Matte will look like a simple whitewash. The installation of such a ceiling is quite expensive, and it will not work it with your own hands, but today it attracts more and more than the owners of apartments, and that is why:

- Stretch glossy canvases expand space.
- The use of such ceilings does not require pre-training, You can just remove the old finish.
- Dark tones in stretch ceilings make the interior of the apartment deeper and unusual.
- The service life of such a ceiling is 50 years.
- It cannot even damage the neighbors on top of its water leak.
- They can be easy to care for them, you can wash.
But, like any type of finish, has its drawbacks. Of course, this is a high price and complexity of installation. Both first and three will depend on the type of construction and the number of radius sides. Also such ceilings are afraid of sharp and piercing items. After all, minor damage will lead their cloth into disrepair.
Laminate
Yes, we are not mistaken, laminate today can be found as an option for finishing not only the floor, but also a ceiling and even walls. The unusual view of the laminate ceiling will probably enjoy people who love experiments in everything. It is necessary to mount it like plasterboard, on the crate, to nourish us with ordinary nails, while connecting the groove in the groove.We told about everyone possible options The ceiling finishes, which are used today in repair business. Regardless of the type of selected material, to achieve beautiful view The ceiling is important to use only high-quality materials, and if you are not sure that you can make one or another finish with your own hands, then it is better to trust the professionals, well, or at least, consult them.
Video: Mounting of a multi-rice ceiling of plasterboard
The final stage of the repair of the apartment - finishing works are performed from top to bottom, unless this is not a point repair of facing. The repair of the ceiling in the apartment is performed first not because it is the most visible of the enclosing structures, but in connection with the inevitable pollution in the process of its finishing of all grounds below. However, the finish design of the ceiling base is often encouraging before the facing of the walls and the floor - the ceiling, although not subject to abrasive effect, as flooringBut it turns out the effects of the effects of other negative factors - deformations and vibrations of the building, leaks from above, contaminants on its surface. Therefore, the repair of the ceilings in the apartment is sometimes fulfilled more often finishing other enclosing structures, that is, not as part of a large-scale renewal of the home interior, but as an operation, possible to self-execution - with a device for protection against damage to walls and floor. Accordingly, the need for frequent execution of this type of work forces to save the ceiling repairs with their own hands.
Consider how to repair the ceiling in the most common situations and the most available methods.
Types of repair of ceilkov
The types of finishing the ceilings are set, and the production of repair in the apartment can mean both restoration of the existing trim and the facing device for another technology.
When planning to perform the repair of the ceiling with your own hands, you need to take into account several factors: the expediency of applying the selected repair technology in specific conditions, the budget operations and the correspondence of its practical skills in the finishing method. If K. optimal combination Add to these circumstances qualitative materialThe success is provided.

We list the most common types of finish:
- whitewashed or painting;
- finishing with polyurethane or polystyrene foam tile;
- ohotyama wallpaper or self-adhesive film;
- cladding siding;
- stretch ceiling;
- finish ceramic tiles;
- dropped ceilings.

Most of the listed technologies, except for trimming with ceramics, it is possible to execute both directly on the enclosing structure and on the shell mounted on the frame. That is, the repair of ceiling grounds is carried out both without the use of the frame and the framework - the choice of technology depends on the conditions of operation, the planned level of the processability of the finishing, professional skills of the artist and budget.
Requirements for finishing ceiling grounds
Depending on the operating conditions, the requirements for the decoration of the ceilings of various rooms on the functionality of the premises may vary, but there are a number of common properties that the ceiling surfaces must have facing in an apartment or a private house:
- safety;
- environmental friendliness;
- sufficient durability.

Naturally, besides the listed characteristics, the ceiling coating should have heat-hydraulic and noise insulation properties, resistant to ultraviolet and bacteria, aesthetic and ease of everyday care, but the necessary degree of compliance with these requirements depends on specific operating conditions.
Preparation of ceiling surfaces for various repair methods
Ceiling repair technologies require appropriate base preparation. Not only the aesthetics of the final result, but also the functionality of the finishing depends on the quality of the preparatory work, but we will consider ways to prepare the surface with reference to a specific cladding method. Let's start with the works that need to be performed on a concrete ceiling base before any repair.
Ceiling revision and cleaning
The ceiling plane is confrontated by a hammer to identify areas with a suspiced plaster and putty.

Removal of the layer of emulsion paint
If there are no defective plastered sites, and the planned finishing finish is whitewashed or painting, then it is proceeding with the removal of old paint - as a rule, this is a water-emulsion composition, since the oil or enamel concrete in residential premises do not cover.
The ceiling is seized several times with water to impregnate the paint to the state when it is easily removed by layers with a spatula. On the ceiling, wetting is easier to perform the paintopult, for the absence of this device, a paint roller is used, better - foam.

Disassembly of worn out plaster
When identifying plastering layerswho lost adhesion with the base, the defective coatings are cut down by a hammer, chisel and spatula. If the plaster remains on the concrete, it also needs to be removed, even if it is planned to install stretch ceilings - a fallen fragment of the old finish, if it does not damage the decorative shell, it will be noticeable on it outside. Ideally, it is better to dismantle from the slab overlap all the old layers so that the new leveling coating is homogeneous on all areas of application.

If there was bare fittings under the detailed solution, it is purified from corrosion to pure metal and coated with two layers of iron or lead turbine solution in the olife.
Important! Cut bare reinforcement is not allowed - it is pre- stressful state, and removing even one site will lead to a change in stress balance in the stove.
Cleaning the seams between the plates and the cutting of the crack
After dismantling the plaster inspect the quality of the sealing of longitudinal stakes of the plates and pairing walls with the ceiling. As a rule, old filling materials have to be removed to the entire accessible seam depth - it is convenient to do with a narrow and long chisel or perforator.
Cracks on concrete plates are inspected for orientation and prospects for further disclosure. Longitudinal and diagonal cracks are not dangerous, transverse better to show experts from the construction department of the local authority. To study the dynamics of damage, they are installed control beacons from paper or plaster mixture with an indication of the installation date.

Repair of concrete base
After all worn coatings are removed from the slab slabs, proceed to the repair and sealing of the ceiling base.
Sealing joints between plates
If the depth of the gaps exceeds 3 cm, then it is better to close them mounting foam - elastic and sealing composition perfectly replaced in this situation. cement mixes.
For this joint, the jets of air are blurred or purified from dust with a vacuum cleaner, after which they are interior surfaces Washed water - adhesion of mounting foam with wet surfaces above.
To seal the joints of the plates, it is desirable to use a proven variety of foam, forming a dense homogeneous fine massage. The guide nozzle of the can with foam is inserted into the slot until it stops and pressing the dispenser to fill the seam on 2/3 of the depth.

Important! The balloon during operation should be located the bottom up, otherwise the gas will be released without the formation of foam.
After a day, the surplus of foam is removed by the stationery knife. If a framework is planned over a concrete base or frameless installation of heat-insulation, then the foam is cut into the surface flush. If the surface is to align the surface with mixtures, then the excess is trimmed in such a way that 1.5 -2.0 cm left to the plate level remains over the slab - to impose a cement mixture.

If it allows the width and depth of the walls of the interface of walls with the ceiling, they can also be built with mounting foam. If the cracks are narrow, they are filled with sealant using a mounting syringe or moisture resistant tiled glue Based on cement.
Filling the selection on the ceiling
If when dismantling old plaster Sections with a point discontinuation of concrete slabs of the ceiling were formed, they are primed by the latex-based composition and after drying, the following steps:

Waterproofing concrete ceiling
The one who ever has already made the repair of the ceiling after the leakage, at the end of all the work described above, will necessarily make waterproofing the ceiling base. This can be most effectively done using waterproofing compositions of deep penetration, for example, Penetron, "Water Resources" or "Lakhta", which, when entering defective cavities, the concrete seal them and at contact with water, initiate crystal formation in their mass with the growth of crystals towards the receipt moisture.

The surface of the ceiling after a complete curing and drying the repair cement formulations is abundantly wetted with water (until the absorption stops) and with a brush, roller or spatula are coated with two layers of penetrating waterproofing, which is prepared by the release of a dry mixture with water according to the instructions for use or sold already ready to use. After drying the insulating coating, the base is suitable for applying any other leveling or insulating mixtures.

The effective waterproofing of the ceiling can be performed by a more budget method - applying the composition on a bitumen basis, but the bitumen in the coating composition imposes restrictions on the subsequent use of leveling mixtures - on top of such waterproofing, an additional base from drywall or polystyrene washed.

At the production of waterproofing of the ceiling base, operations are completed, mandatory for execution before performing any ceiling surface finish from concrete. Subsequent types of work depend on the conditions of operation of the premises and the choice of the method decorative decoration Ceiling.
Methods of basic alignment of concrete ceilings
The output of the implementation of the ceiling base alignment procedure depends on a number of factors, including from the planned functionality of the ceiling finish. For example, if it is necessary to perform thermal insulation, then it is necessary to decide which insulation will be used. Installation on the ceiling of hard species of foam is possible in a frameless way, but the concrete base should not have drops at a height of more than 5 mm - the sheets of foam will repeat the defects of the surface profile, and the finish finish will have to be performed after an undesirable additional alignment that is significantly weighting it.
If you choose a soft material as a insulation (one of the types of watts), then for its laying in most cases, a framework with an additional outer shell will have to be installed. But at the same time frame method The insulation eliminates the need to perform a further-mounted frame to the frame in the horizontal plane, the defects of the concrete surface will hide the defects.

Important! Stone (basalt) cotton wool produces varying degrees of rigidity, and more rigid varieties still allow you to mount the insulation by a frameless way, followed by plastering on the reinforcing grid.
In the absence of the need for insulation and sound insulation of the ceiling (if this is quite efficiently performed on the floors of apartments), you can start aligning the ceiling base in one of the following methods.
Alignment of concrete ceiling shtown
Stucco - proven time and relatively budget way Alignment of concrete and brick grounds for finish finish. If the ceiling plates of the flooring in the room have significant differences in height (up to 5 cm), one of the ways to exclude them on the overall horizontal level is shuffling cement-sandy solution.

Without the skills of performing this type of work, especially the finishes of the ceilings, should not be taken for independent execution, especially on a large area. With your own hands, you can throw the cement-sandy solution and, after grappling it, hesitate small in the area potholes in the plaster. The plastering of the entire surface of the ceiling must be entrusted with professionals, pre-performing the waterproofing of the concrete base with a penetrating mixture. It is useful to know the technology of plastering to monitor the quality of this type of finish:

Important! The curing of the plaster coating must occur without drafts and additional heat sources (heating devices); For 5 days, starting from the third, the plastered surface must be saved.

Leveling ceiling by aligning mixtures
This method differs from plastering with the material and technology of execution - instead of cement-sandy solution, dry leveling mixtures based on cement are used, which, after the indion, is applied to the concrete surface with a spatula.

The advantage of the method is the simplicity of preparation of the composition, which does not require the proportions of the components, sieving and has increased adhesion. The mixture prepared according to the instructions on the package is easily applied to the ceiling with a spatula and does not break down from the base down as easily as it happens with cement-sandy solution. Aligning cement mixtures are made by many varieties, characteristics or their numerical values - degree of elasticity and tensile strength, waterproofing properties, the strength of the "living solution" and its "survivability time". A wide range of these materials allows you to choose a composition corresponding to specific operating conditions, and save on the purchase of a universal mixture, the price of which is always higher precisely by virtue of its versatility.

Cement-based mixtures equalize ceilings with plate drops at an altitude of up to 3 cm. If it is necessary to impose a layer with a thickness close to the maximum, produce layered alignment, waiting for a complete curing of the previous layer.
As for the preparation of the surface, the concrete base under the finished mixture does not need a notch - only in priming.
Smooth plasterboard ceiling
If the ceilings in the apartment have significant differences, but at the same time sufficiently high (3 m or more), it is possible to facilitate the process of their basic alignment, mounted on them an additional base of plasterboard sheets (GKC). Laying GLK is performed on a frame of wooden bars or a special steel profile with mounting fitting, which is attached to the walls and concrete ceiling.
Montage Karcasa
Making a frame begins with marking on the ceiling of its design and calculating the need for materials. There are several ways of layout of the framework, depending on the size and thickness of the standard leaf of GKL. Based on the most common size of drywall 120x250 cm, the framework of the frame design is performed with a transverse step of 60 and longitudinal from 60 to 80 cm.

Then the starting line is applied along the perimeter of the walls under the ceiling - the mark on which the framework will be mounted. The distance from the ceiling to the starting line should take into account the functionality of the new ceiling coating - with the planned performance of heat and noise insulation, and even with additional protection of the hygroscopic insulation from steam, this value should take into account the thickness insulating materials. If the target of the arranging ceiling from the plasterboard is only alignment, then this distance will correspond to approximately the cross section of the steel profile used.
Ud- profiles are attached along the walls along the starting line, the jumpers from the CD profile are attached to them, which are additionally fixed on the ceiling by the suspension on their span.

If execution is scheduled, the installation of the frame is performed on the vibrarity - special suspensions and gaskets that prevent the transmission of the vibration of the mounted design from the concrete base.
The heat-planned heat and vapor barrier materials are placed between the frame and the ceiling in a certain sequence - vapor barrier should be located on both sides of the insulation, and in the case of foil internal steam protection - foil towards the room.
Installation of plasterboard
After calculating the consumption of HCL (room area plus 15%), the material is acquired, and proceed to its laying on the frame with the help of metal screws (if the frame from the steel profile). Plasterboard sheets are cut by a stationery knife by performing an end with one of the sides and the hlock bend in the opposite side followed by a sharp opposite shell.

With the connecting edges of the GLC before assembly, you remove the face with a knife to ensure the possibility of filling the seam gypsum mixture For the whole depth. Sheets are arranged so that they are located along the jumpers of the frame, otherwise the constant appearance of cracks is inevitably on the seams.

At the same time, the sheets laid the "rotary", or with the displacement so that two sheets are not a continuation of the seam of two neighboring GLCs. Self-tapping screws along the seams are in a chess order, withsting a step within 12-17 cm and bleeding their caps flush the surface of the drywall.

After the installation of the GLC is completed, the screws of the screws of the screws and filling the sheets of sheets with a special makeup from KNAUF with the simultaneous schuch sickle with a 5 cm reinforcing ribbon ribbon width after curing and drying the sealing the surface of the joints is processed by sandpaper, and the ceiling after primer is ready to perform the finishing.
Common Finishing Technologies
After the end of work on basic alignment of the ceiling or installation of GLCs, the finishing finish, which there are also many options. Let's start with the classic - whitewings, but consider the independent preparation of the solution from lime and chalk, it makes no sense - there is a wide range of a wide price range of the widespread bands.
Teacions of the concrete ceiling of water-mounted paint
If the basic alignment of concrete slabs is made by plastering by cement-sandy solution or a ready-made mixture on cement based, then the finish alignment of the surface of the gypsum plaster is performed - depending on the qualifications of the artist and the quality of the basic alignment, it will require overlapping from one to three layers. The surface is pre-grounded into one layer on a latex basis, and each subsequent layer of the putty is superimposed after drying the previous one. Having achieved the fatality of the foundation, perform its grinding with sandpaper, after which they clean the ceiling from the dust with a vacuum cleaner and are straightened again.

Painting is performed by hand with a paint roller, stained with a brush hard-to-reach plots. Usually, the instruction for use is provided for the dilution of paint with water in an amount of 10% to obtain optimal consistency. Formulations for outdoor use are suitable for painting ceilings, their grain is slightly higher, but at the same time they are better to wash with water when necessary.
If you wish, you can add a color kel to the emulsion of white color, but the amount of paint after that should be enough for two layers - to get the same tone of the composition for the second time it will not work.

Painting is produced in two layers (with low quality emulsion - more), which are applied in perpendicular directions.
Important! Coloring is made in the direction from the window towards the opposite wall, and last layer Must be applied along this direction.

After drying, which should occur without drafts, perform decorative installation ceiling plinths Of the polyurethane foam, the size and profile of which is selected in accordance with the dimensions and the style of the premises.
If you use plinths, cast from gypsum, their installation is performed at the stage of the finish alignment of the ceiling by the installation on the gypsum rope solution, since higher demands are presented to the strength of these elements.
Fontoam plinths are fixed on pasty PVA or colorless glue silicone sealant, then close the joints finish putty. The installed plinths can be colored the ceiling or, on the contradiction, to make effectively contrasting. 
Operatoes of waterfront paint ceiling from GLC
The color of the base carcarter base is identical to the finishing of the aligned concrete ceiling. However, the gypsum hygroscopicity should be taken into account even in the moisture-resistant execution of GLC, therefore the priming of drywall latex composition is better to perform in 2 layers - hereinafter, this will allow without fear of cleaning the finishing finish using water.
Fucking ceilings with wallpaper
This type of finish finish is popular and possible to execute as on concrete baseand on the ceiling, aligned with plasterboard.
The choice of wallpaper material should be made from the segment of finishing agents for ceilings, since the width of the ceiling wallpaper is greater than the walls (to reduce the number of joints), and their thickness is less (in order to reduce weight). The most common wallpaper on a flieslinic basis.
Important! If the finish alignment of the plaster replacement is made with defects, it is advisable to choose ceiling wallpaper With an embossed texture that will hide small disadvantages of the surface.

The blending of the wallpaper on the ceiling is performed together by cutting the material with the bands of the required length and apply glue to one or both surfaces - depending on the material of the wallpaper and the type of glue.
Wallpaper bands are glued and placed along the rays of light from the light source - the transverse layout will show the joints of the material.
Punching is made on a special wallpaper glue, which does not leave the spots after drying from random contaminants.
Drying the wallpaper should also occur without drafts and additional heating devices. If the wallpaper material is white, then it is possible to paint, and two-time during operation, to improve the aesthetics of the finish.
After drying, the decorations perform the installation of ceiling plinths from polyurethane foam on silicone sealant.

Decorative ceiling decoration with polystyrene foam tile
If the finish alignment of the ceiling base is made with small defects that will not hide the color, and the decorative polystyrene tile will help to correct these flaws, the decorative polystyrene tile will solve the problem, which will simultaneously perform the role of heat insulating coating. It can be glued both on concrete and on the GLC-base.

The varieties of this material on the market are very many, they differ in density, surface texture, color and degree of decorativeness, from which the price of the material is generally available to a wide circle of consumer.

Other ways to finish the ceilings
There are many other ways to repair the ceiling in the apartment on their own or with the involvement of professionals, and their list is constantly growing with the development of technologies. These are stretch and suspended ceilings, decoration by siding and mosaic, upholstery with finishing fabrics and design gypsum stucco. The choice of the method must be thought out and rational.

There is a nuance, to take into account that is also desirable - the more funds are invested in the finish, the more difficult it is to part with it, and in the room any interior is annoying or wearing or wear out, not to mention a rapidly changing fashion.
Conclusion
Performing the repair of the ceiling, we should not forget that this is primarily the carrying design, the strength characteristics of which depend not only on the quality of the manufacture of the product, but also from the current care and maintenance. therefore redecorating The ceiling finishes for the purpose of disguise the wear of the structures are not intended and dangerous, besides on the restored concrete base, the finishing finish is more durable.
The main essence of the article:
- Foundation preparation is an integral part of the repair of the ceilings.
- Repair of lost aesthetics of the ceiling must be performed after restoring concrete structures.
- Hiding serious slab defects overlaid under decorative finish is dangerous.
- Quality basic repairs of the base is the key to the durability of the finishing finish.
- Selecting a method decorative finish Ceiling of set existing technologies Must be thoughtful.
- The correct repair algorithm is a necessary condition for the quality of the finish.
Sooner or later, but the moment comes when the ceiling in the house or apartment loses its aesthetic appearance and requires repair. It must be remembered that the appearance of this element of the room directly affects the entire interior. Even if the walls are decorated with one of expensive materials, and the ceiling will look inactively, the entire effect of repair will be lost.
This is a fully feasible event for any owners of housing. The main thing is to choose the way that will be able to fit the level of work skills and the material possibilities of the owners. And in order to determine this choice, it is necessary to consider the preparatory work initially, and then several options for the transformation of the ceiling surface.
However, you must first prepare all the inventory you need.
Ceiling repair tools
Any of the ceilings will require one or another surface repair. For plastering and putty, you need to prepare tools that will allow you to spend all the processes quickly and gently. Do not save on it and acquire a cheap low-quality inventory, otherwise you can nice well, leveling the applied compositions.
To work will be required:
- Falcon, on which it will be convenient to keep the solution during the fascination process.
- Stretch or plaster blades, for applying plaster and putty on the surface.
- Trucks for rubbing the applied and aligned solution.
- Scrapers for cleaning the ceiling and removal of the extra solution.
- The rule for alignment of the applied solution and control over the surface surface.
- Spatulas different sizes For applying and distributing a solution.
- Roller with a long handle for wetting the surface of the ceiling before cleaning and for priming.
- Construction level to control the level of ceiling.
- Brushes or brushes.
In addition to the listed, it may be necessary for other tools - depending on the choice of material for the ceiling finish.
Preparatory activities
Preparation of surfaces for repair and decoration, of course, one of the most unloved processes in the work, but absolutely necessary. From how efficiently it will be produced, the durability and the aesthetics of the results in the sech of other works depends. MoreoverWhatever material for finishing is chosen, the preparation of the basis must be carried out.
Preparatory work includes surface cleaning, sealing cracks, seams and junctions, if they are detected, the ceiling primer.
Cleaning the surface
From the surface of the ceiling, it is necessary to remove the old coating, if it has at least small cracks or even places began to separate from the base and disappear. If this is not done, then all work will go to the pump, and the repair will have to repeat very soon.

- If the ceiling was plastered and bitten, it costs it well moistened and remove the blotch with a spatula or a rigid sponge. The plaster must be removed completely, if it was covered with cracks during operation, emptiness appeared under it.

In the case when the plaster is applied efficiently, and only detachments appeared in some areas, then you can try to clear the basis only on damaged areas. When the detached plaster is removed, you need to carefully examine the edges of the remaining coating. If it is found that it is even kept, but between it and the basis there is even a very small gap, then the cleaning area will have to expand.

- If the ceiling was decorated with ordinary or liquid wallpaper, then they are also wetting them as well and believed with a spatula. The usual wallpaper should be given for some time for the blotting and lagging, then they will remove much easier. If they are glued qualitatively, they will have to wet several times, and without waiting for the burden, start cleaning the ceiling.

- If the ceiling was covered with polyurethane or polystyrene foam tile, then it is carried out with a spatula. It is necessary to remove all the material, without leaving even small pieces on the surface.
Seeling cracks
The cracks found on the ceiling, the exposed interlise seams, as mentioned above, will have to be elapsed, but their usual smelting will not bring qualitative results.
 Leave such cracks on the ceiling - in no case can not
 - To begin with, cracks must be separated, expand as much as possible in width and depth. This is usually carried out with the help of chisel and hammer, perforator, and in some cases, for example, on a direct junction of two plates, you can resort to the "grinder" with the installed stone around the stone. The extension is necessary in order for the repair makeup after filling the crack well in it, and it did not appear again through the new ceiling cover.

- A crack, after its expansion, you need to clear well from dust and pieces of plaster - this process is diverted using a brush.
- After that, the cracked crack must be processed, which will add the surface of the adhesion when it is disposed of plastering. Priming is carried out by brush, along the entire length and depth of the slit.
- Depending on the width and depth of the defect, it can be embedded with a sealant, plastering or even by mounting foam.
- If the gap will be swan, then it is necessary to wait until the foam expand and freeze, and then its excess is gently cut under the level of the ceiling surface.
- when embedding with a putty, sealant or repair solution based on cement or gypsum, if the crack is of a large width, then it is recommended to apply the fiberglass grid-sickle - it will become a kind of reinforcing "bridge", connecting two opposite sides of the crack, and will not allow this flaw through New decorative coating.

The composition is applied to the surface of the crack with an effort so that it penetrates the entire depth, necessarily capturing the edges. On the layer of the solution is glued and the serpecan is smoothed. It should be wider than crack clearance about 10 ÷ 15 mm with each of the sides of the defect.
 Special attention - seams on the joints of the ceiling slabs
 How to make seams on the ceiling?
If, when removing the plaster, it was found that in the seams between the ceiling plates, the old concrete composition crumbles and falls out, then, before repairing the surface, it is necessary to close this flaw.
How to spend the work of the software in the special article of our portal.
Protecting the surface of the ceiling
The final stage in the preparatory work is the surface treatment of the primer - it will be antiseptic processing, and giving the surface of the ceiling of high adhesive qualities

If traces of mold, fungal colonies were found on the ceiling, then before applying primer, it is necessary to process the affected area with a special anti-grab.
 "Treatment" of affected parts of the walls and ceiling
 After such processing, the ceiling should be good, and only after that it will be possible to move to applying the primer. The soil is applied using a roller and is evenly distributed along the top of the ceiling. In places where it is impossible to cope with the roller (for example, in the corners), resort to the brush.
It is recommended to apply two - three layers of the primer - then it will absorb well and create pLeanks, which will become an excellent basis for applying an aligning plastering coating.
Finishing work
After the surface is repaired and projected, before starting the decorative coating, it must be aligned, otherwise all flaws will be shown through the finishing layers.
Aligning the surface of the ceiling can be carried out in different ways - with the help of "wet" plaster (splashing), or by dry method - sheets of drywall.
"Wet" plaster
Plastering mixtures for "wet" ceiling leveling are manufactured on a different basis. Which one is more suitable for a particular case? To do this, it is necessary to think about such or that mixture will behave in the process of application and during operation. Some characteristics can be found in the proposed table:
The main characteristics of various types of plaster
| Properties | Plastering mixes | |||
|---|---|---|---|---|
| mineral | acrylic | silicate | silicone | |
| Main substance | cement | acrylic resin. | liquid glass | silicone resin. |
| Paroproposis | high | low | high | high |
| Water absorption | high | low | average | low |
| Pollution exposure | average | high | low | very low |
| Type of pigment | inorganic | inorganic, organic | inorganic | inorganic, organic |
| Elasticity | low | high | average | high |
| Resistance to ultravioleti | high | low | high | high |
| Microbiological resistance | average | low | high | high |
| Resistance to abrasion | low | high | high | high |
| Ozone resistance | high | low | high | high |
Alignment of the ceiling by plaster (splatter) is considered the most traditional wayBut this method is quite complicated for an unprepared person, and you need to carefully adapt to work to go fast. You can spend training on small individual sites - it will make it possible to understand. Forces, there will be such an operation on the entire surface of the ceiling.
If everything goes well, you can breed the required number of plastering mixture and proceed to operation.

How to make the ceiling plastering?
In detail, the entire process is set forth in the article of the portal, to which you can go to the recommended link.
After plastering, the final stage of the alignment of the surface is underway with spacion mixtures. This process is dying in order to make the ceiling perfectly smooth.

How to align the ceiling with a putty?
To such a state, it is necessary to reflect the ceiling under painting or under the wallpaper sticker. To study in detail the process, you can refer to the appropriate article of the portal. :
Leveling ceiling plasterboard
If there is no confidence that the traditional "wet" plaster will be successful, then it is possible to use the ceiling to use the "dry" technology - aligning the surface of the surface of the drywall. This approach is also good because it makes it possible not only to make the ceiling smooth, but also insulation or soundproof his.

In the case when the base of the ceiling is quite smooth, not having large drops and easy to screw the fasteners, then plasterboard sheets can be mounted directly on its surface. But in this case, insulation and sound insulation is excluded.
Therefore, the method of fastening of drywall on a specially prepared frame of a metal galvanized profile is selected most often - it is so possible to align even the most curve of the ceiling. In addition, between this suspended ceiling And the basis can be laid a thermal insulation material that isolates the room from the noise of the top apartment or the room is insulated with a private house.

The frame is lowered below the surface of the base is a maximum of 100 ÷ 150 mm, but if the ceilings are low, then you can omit the metal crate by only 50 ÷ 70 mm.
Work is carried out in such a sequence:
- First, the surface markup is marked, and the lines are denoted by which the guides will be secured. It is most convenient to perform marking with the help of painted blue of the twine. On both sides of the room, the points are measured, between which the twenty is stretched, then it is delayed, taking it around her middle and release. Thus, a color, absolutely smooth strip remains on the ceiling.
Perpendictive lines are also carried out in the same way. A large cell is obtained on the ceiling, as a rule, 600 × 600 mm. The extreme elements of the crates should pass at a distance of 50 ÷ 70 mm from the walls.
- Further, in the middle of the two parallel sides of each square, metal suspensions are fixed to which metal profiles will be bonded.
The suspension is nailed to the concrete ceiling with two dowels in pre-drilled holes.

- Guides are attached at the desired level to the suspension with the help of screws. At the same time, the horizontal of the established profile is necessarily monitored. In the process of installation, the correctness of the reciprocal placement of neighboring profiles is also checked - for this also use the construction level.
- The next step is the installation of jumpers on the marked sides of the square. The profile cuts out the segments of the required length. They are bonded with longitudinal guide special elements - "crabs", which will bring together the entire crate into a single design with exactly the extended lower level.
 The pairing node of the guide and jumpers using the "crab"
 At the end of the installation of the frame, the ceiling should turn out, approximately such a picture.

- The next stage is paired electric wiring To the locations of the ceiling lamps. Wires will then be hidden by plasterboard sheat.

- Further, the sheets of plasterboard sheets are screwed onto the crate. Fasteners are placed in a step of 200 mm, so that the screw was not closer to 10 ÷ 15 mm from the edge of the sheet. Self-tapping heads should be drowned in the thickness of the material 1 ÷ 1.5 mm
The installation of large sheets of plasterboard should be made at least together, as they are sufficiently heavy and can break down when lifting to height. One constantly supports the sheet, and the second spends screwing the screws with a screwdriver.
If there is no assistant, you will have to cut drywall plates into small fragments that will close each square of the crates separately. In this case, the work can delay, because you have to handle a large number of docking seams.
When installing cut fragments of drywall at its edges, the chamfer is necessarily removed - it is necessary for high-quality seams of seams.
- After completing the installation of plasterboard, all the seams between the plates need to be seal.

The process of the PR diversifies, as a rule, the primary (starting) plaque mixture using a sickle grid (the usual, which is interpreted into a freshly mounted sawing layer, or having its own adhesive base).
In addition, you need to smell all the wells with the heads of the screws, otherwise they can manifest a rust through the decorative decoration.
- The next step is the finish putty plasterboard ceiling With the final alignment until the perfect surface is obtained.

After graze, the ceiling is carefully stuffed, ground, and then it can be painted or finished with wallpaper.
Prices for plasterboard and sheet materials
Plasterboard and leafy materials
Video: Leveling ceiling by plasterboard
Painting ceiling
Today is not as popular as before, as it produces a large number of other modern materials for its decoration. However, many owners prefer the radiance methods for bringing surfaces in order.
Before the painting ceiling, you need to brand well and only after it is burned, you can proceed to painting.

Can stick on the joints of the wall and the ceiling after painting surfaces. However, if they are already glued, it is necessary to close them with painting scotch and scrolling the bog between them and the ceiling, as well as the distance of about 100 ÷ 150 mm using a brush. The main surface of the ceiling is covered with paint using roller.
It will be more convenient to work if the roller is fixed on a long bar - the paint can be applied to the ceiling, standing on the floor. At such a distance, it will be clearly visible, it is exactly the coloring composition on the surface.
After completing the application of the first layer of paint, you need to give the ceiling to dry, since only the quality of the coating can be seen on the dry surface. If necessary, on top of the first layer is applied another one, in the same way as the first.
For a ceiling, plastering "wet" plaster, the enamel or oil paint is usually selected, and for surfaces from drywall, water-based paints are better.
How to cut the ceiling?
What specifically the composition is better to use for - you can learn from the article of the portal fully dedicated to this topic.
Plastic Ceiling Ceiling
Some apartment owners prefer to wash the ceiling with plastic panels. They can be fixed directly on the ceiling, if it is trimmed by plywood or boards, but the same suit is suitable for them, as mounted for drywall, made of metal galvanized profiles or from wooden bars fixed on the surface of the ceiling or on the suspension.

- If the panels are installed onto a wooden crate, they are more convenient to fix them with the help of special mounting bits with small carnations or brackets.

- On metal profiles plastic lining We'll have to fasten short screws with wide hats.

- In order for the facing to look neatly, throughout the perimeter of the ceiling, on the same level, it is screwed or nailed to the brackets end (starting) plank.

When it is fixed, the installation of plastic panels begins, which are installed in its grooves.
- The first panel must be installed as precisely as possible, side and end sides are inserted into the starting planks. The spikes on the panels ride into the grooves already installed items tightly and until the stop, and if the first panel is installed with the bevel, then all the others repeat its direction.
 It is very important - to put the first panel correctly
 - You can encounter a certain problem when installing the last wallboard cloth, as it must be installed in the groove of the previous panel and accommodate in the end bar from three sides. It is recommended to first combine the panel with the already installed, and then snap it into the end bar.
Prices in PVC panel
PVC panels
Videos: How to put the ceiling with plastic panels
Fucking wallpaper
The ceiling is not as simple as it seems at first glance, since this process is not very convenient, but to withstand the flatness of the bands at the same time. If there is no experience in the wallpaper sticker, it is recommended to choose such type of material in which It is not necessary to combine the drawing, because such wallpaper glued is much more complicated.

If the material is purchased exactly as much as necessary for the surface of the ceiling, and there is no stock, you can practice on the remnants of old wallpaper or purchase for practice receipt The roll is the cheapest, and then try to glue one or two stripes to the ceiling. Such training will help get a little experience and not spoil more expensive material.
- Starting work, you need to close all the windows and doors so that there are no drafts in the room, otherwise the wallpaper will be on the floor on the floor.
- Better pursue wallpaper intwo, since the canvas, impregnated with glue, are sufficiently heavy, and under their weight can simply break. In this case, the masters get up with each other, the first one - leads, engaged in sticking and resurrection, and the second supports the not pasted side of the canvase. Both move back forward on the frequently installed torerers or a specially constructed platform.

In the case, when the helper failed to find, there is a proven way to help perform work and independently.
It can help a round rode, a length of equal width of the wallpaper roll - as a rule, it is 500 ÷ 600 mm. If there is no one, you will have to pull it out of the bar or find, for example, cuttings from the shovel by cutting it to the desired size. At the very end of the case, the old roll of wallpaper, which you need to overtake the tape.

- You need to start work with glue soaking, according to the instructions specified on the package.
- While the glue is soaked, the length of the room is measured and the desired amount of the canvase is cut. Making measurements, you need to consider some nuances:
- Wallpapers will be stuck online;
- the first and last sheet should go on the wall along its entire length and 100 mm width;
- The rest of the wallpaper sheets must be measured by 200 mm more than the length of the room, since they should also find on the walls 100 mm with each side;
- If wallpaper is selected, requiring alignment in the figure, this must be considered when cutting the bands, calculating the pattern of the pattern.
- Wallpapers are glued to the primed and dried surface.
- On the first gluable sheet that will be missed first of all, angle is cut, so that the web can be freely bend and find one side on the wall along its entire length, and its ends fall into two opposite walls per 100 mm.
- Then the outbreak sheet and two more canvas alternately decline on the table, and they are well absorbed by glue. Loose sheet, it is folded by the harmonica, the pattern is outward, not pressed at the corners. Folds should be approximately 500 ÷ 600 mm.
- While the glue impresses the paper, using a roller on the rod, you need to apply a layer of glue on the ceiling and walls for sticker of one canvase. Shakes and angle should be missed with a brush.
- Then the folded canvas hang on the rolling pin, rise with it under the ceiling, keeping the harmonica left hand.
- The sticker of the canvas starts from the wall, gluing it with 100 mm, pressing well in the corner, begin to stick and straighten into the ceiling and the wall parallel to it. All this work will have to be carried out with one right hand, since the left will be occupied by a rolling pin with a harmonica of wallpaper.
- On the ceiling, the canvas need to smack thoroughly, trying to squeeze all the glue and air from under it. Best do it the so-called "christmas tree"- in the middle, along the site of the canvas with a soft cloth gently takes place, and the glue is displayed on the part.

It should be remembered that, by gluing the first strip, the main thing is to direct the part that is located on the ceiling and walls in the width of the canvas, and the segment that is on the side wall can be in line and later.
To make a bend on the walls of the desired size, it is recommended to repel the smooth strips in advance - it will be easier for them to navigate.
- The following bands are glued with the previous web. Edges need to gently "pull up" to each other, smooth by soft fabric Their surface, removing immediately speaking excess glue. It is necessary to monitor that under the wallpapers there are no air bubbles. To remove them for each of the canvases, you can walk the rubber roller fixed on the rod.
- After the entire surface, the windows and doors can not be opened until the wallpaper is completely dry.
It is impossible not to say that in addition to ordinary wallpapers, the so-called liquid wallpapers are often purchased or manufactured, which can hide some small ceiling flaws. It's nice to work with them and simply, so any, even a novice master can be applied to the walls and the ceiling, a little learned. It is impossible to spoil the surface, as they can easily be removed by the spatula and even put into operation again.
 Very cool look at the ceiling "Liquid" wallpaper
 Already heard about liquid wallpaper?
If readers interested this option, then a lot of interesting things on how to independently make and make them a sticker on any surface, you can learn from a special article of the portal.
Ceiling pasting light plastic tiles
Another option to decorate the ceiling is the installation of polyurethane or polystyrene foam tile on it. There are various types of such a finishing material, so you can easily pick up the tile on the embossed pattern and in coloring for any interior style.
Unlike wallpaper, it is completely easy to mount alone, as it has a very small weight. For better adhesion ceiling in front of its sticker, as and when mounting others decorative coatingsis also processed by primer composition.

- So that the tile was glued neatly, markup is made on the ceiling. It can be different, but if the room is planned to hang a chandelier, it must become a "point of reference" to determine the location of the tiles.
- Whatever the method of location is chosen, two perpendicular lines perpendicular to each other are beaten, intersecting at the point where the chandelier will be hung. Focusing on the lines, it will be easy to install according to any tile location scheme.

- Installation of tiles always starts from the intersection of lines. Under the chandelier in each of the four tiles, the openings of the desired value are cut. When combining them on the ceiling, a square or a circle is formed, in the center of which will hang a chandelier.
- Further, the tiles are attached strictly along the battered lines, and the following rows will be twisted in the first, already glued tiles.
- To glue the tile, polymer adhesive on an alcohol basis is usually used, which is applied point to the edges of the tile. Adhesive points must be located at a distance of 100 ÷ 150 mm from each other.

- Further, the tile is pressed against the surface and sticks one ÷ two minutes - this should be enough for it reliably retained on the ceiling surface. If individual elements begin to lag in some places, then they should still hold them.

- The final stage, which will give the ceiling is finished, is the installation of ceiling plinths. They stick at the seat of the ceiling and walls or only on the ceiling. By purchasing this element, you need to immediately decide how the plinth will be installed, as it has different profiles, depending on how and where it will be glued.
Video: a visual lesson on the sticker of plastic tiles on the ceiling
There are many other ways to decorate the ceiling surface. However, if this process is enjoyed to produce alone, then you need to choose exactly such a technology that will be the owner of the housing.
March 16, 2018 no comments
The ceiling is the most noticeable part of the room, because it is not cluttered with furniture and carpets, interior items. It is decorated only with lighting devices, so the surface should be perfect. What does this concept imply? All the taste is different, and you should not consider the white canvas of the truth in the last instance.
The main thing is the quality of the finishes, depriving the surface of cracks, convex sites, stains and traces of untidy processing. How to make the repair of the ceiling with your own hands, not every master will tell. Work is painstaking, and complicates all the fact that each stage of finishing occurs on the elongated hands. Therefore, for this type of repair, not all is taken, and who learned this professionally, shares its secrets in this article.
Start standing with the fact that if you are not sure about your abilities, it is better to immediately refuse to repair the ceiling repair with your own hands. Here will have to work well before the finished result will delight the eye. Of course, the prices for services here will not please: quite expensive are all procedures affecting isolation, adhesion, priming and putting / plaster, painting.
Today, the most popular types are such finishing technologies:
- deposition of blissing;
- Painting;
- ceiling pasting with wallpaper;
— suspended design;
- Stretch ceiling.
Many are used for finishing and decorative plaster, however, nor budgetary, nor to the most practical options This method is not counted.
The cost of work can affect the height, length and complexity of the perimeter, the degree of complexity of repair (full or partial). If all the same you have chosen on self-actions, it is necessary to repair the ceiling in the apartment with your own hands in stages. Read more about each stage on.
Surface cleaning is performed only in the case of secondary repairs. If you are the happy owner of the apartment in a new building, this stage can be skipped. So, the most popular version of the old finish is whitewashed, limestone plaster or pasting with wallpaper. All these materials are easily wondering, and this stage does not bear elevated labor costs.

The malarious roller with a long handle dip in warm water, then pressed to a moderately moistened state. As water absorbed from the roller, it is wetted again and with a more intense pressure pass along the same place. It is important here to know that at the same time wet the entire ceiling is deprived of meaning. It is cleared by small areas, according to the scheme: Mocked 2-3 square meters, cleaned the spatula to the slab plate or putty - we wat the next site.
A well moistened layer of old finish is removed easily, but it is capable of polluting the room. The room should be absolutely empty before the start of work.
After cleansing small plot, It is worth removing from the floor to work out to allow yourself the opportunity to step on a relatively clean surface. If under the outer layer to be removed, you noticed the shaky plaster, it should be dismantled in whole or in part. It is possible to implement this with the help of the same spatula that all loose areas are knocked out.
Painted water-level or oil paint Ceiling will be cleaned much more difficult than blissing. There is a mechanical and chemical method for removing paint, where the first option is carried out by sandpaper or spatula. The process of time consuming, the ideal removal of the old finish is extremely difficult to achieve.
To implement the chemical method, you can buy a special wash, which in the interval of time from 4 to 12 hours softens the paint and makes it possible to remove it quickly. This composition is for sale in construction and housekeeping stores, when applied requires compliance with special precautions: avoiding eye contact and open areas of the skin.
The ceiling on which polystyrene tile was pasted can prepare its owner an unpleasant surprise in the form of glue residues. You can only remove them with a rigid metal spatula, and make it necessary. Wallpaper from the ceiling is easily removed in the tempered form, compared to all the listed types of finishes, are most practical when removing.
Primer
The first thing where the repair of the ceiling begins in an apartment or the house with your own hands is stages, it is checking seams and joints. If they are hollow, then it is necessary to fill them with a gypsum solution. After applying, the solution is compared with the surface of the ceiling and needs to dry out. Only after in the seams and on the surface there was nothing inhibitory, you can begin to the primer.

A solution for primer deep penetration is a kind of glue that increases the adhesion of all layers applied to the ceiling. It strengthens the base and has an antifungal effect, applied with a thin layer using a roller in one or two layers. It is enough to determine that the primers are enough, as it is absorbed by the surface. If after drying the wall does not absorb anymore, it means that you have applied a sufficient amount of solution.

These procedures are mandatory, since any basic surface cannot boast of perfect smoothness. Plaster usually reduces the height of the ceilings into several cm, but it displays it under ideal indicators building level. The putty gives a significant shrinkage when drying, therefore it is always applied to several layers. And even taking into account the time spent and strength, it looks better and serves a putty at the expense of a small thickness of the applied layer, its low mass and homogeneity.
Instruments
If you decide to make plaster, then prepare:
- primer;
- special building mixes;
- Plaster beacons with fastening;
- Rule width to 1.5 m;
- perforator or drill;
- Level.
Now it is necessary to put labels, fasten the guides and fill the space between them with a solution for plaster. The process is completely similar to the wall plaster. The complexity consists only that the work is made above the head, and all tools need to be kept in the elongated hands. After drying, it turns out a fairly smooth and smooth surface that you need to handle with a putty and apply the finish coating.

If the repairs are taken as the basis of the repair, then be prepared to spend much more time for it. The mixture applied in several layers requires complete drying, so here you will have the opportunity to relax between the stages of application. For this procedure, you will need:
- rude putty;
- thin, finish putty;
- primer;
- painting mesh;
- tank for the kneading solution;
- Spatulas: Wide and narrow.
The first layer is applied with a wide spatula or rule, and aims to eliminate small defects base surface. Even on the crude layer of coarse putty, we laid a layer of reinforcing grid. This will make a guarantee that the ceiling will not crack in the future. We spend the spatula on it, slightly indulging in the soft layer.
After a complete drying of the coarse layer, the finish part of the finish is applied, which is designed to bring the surface to the ideal. For this option It is appropriate to use a special grater with sandpaper, which will help to carefully poll the surface before painting. Another option for alignmenting the ceiling is the trimming of its plasterboard, which is putting on and perfectly gives back painting or salary.

By the availability of materials and ease of performing this operation, it can be called the most practical one. Some cheaper will cost the whitewashing, which can be applied using roller, brushes or sprayers. However, the lime quickly loses the external gloss, and is subject to regular removal and upgrade. Painting, just for a long time, will not be too expensive and will be simple in daily care.
Even if you decide to glue the ceiling with tiles or wallpaper, the preparation process invariably contains all the steps listed above. A smooth and smooth ceiling is the basis for any finish, where exception can only be a tension or suspended design. And it is impossible to realize it with your own hands and without the presence of special equipment. All options considered as an independent implementation require some skill and perseverance.
Video: Repair of the ceilings in the apartment do it yourself: