Slate compost pit. Simple rules for arranging a compost pit in the country
The purpose of the compost pit is to turn household waste into an excellent soil fertilizer. That is why compost pits are widely used by summer residents and gardeners: a compost pit solves the problem of utilizing organic waste and at the same time improves crop yields.
In order to do compost pit in the country, first you should choose the right location:
You should not place the hole in a sunny place, you should avoid direct sun rays and overdrying;
It is better to equip the pit on a flat surface or a hill so that water does not linger in it in rainy weather.
How to make a compost pit correctly is difficult to say, because there are many different options devices and each of them has certain advantages.
The simplest compost pit in the country is not even a pit, but a heap. Many summer residents do not bother with the construction of any structures, but simply dump the source material into a heap, where the process of compost maturation takes place. Often such a heap is covered with a film and enriched with special preparations - bioactivators.

In order to understand how to arrange a compost pit in the country, you need to figure out how the compost matures. Dry foliage, tree branches, weeds, soil and manure are the main elements for composting. All these components saturate each other, decompose and rot under the influence of air and moisture, and the result is an excellent fertilizer.

This whole process takes about two years, which is why the most common design of the compost pit has become a two-section one. The two-section compost pit has two compartments. The first compartment is filled with components, left for maturation, or after two years it is actively used, and the second is regularly replenished with fresh waste.

Compost pit materials
To create fertilizer, only decaying substances are suitable, such as:
Any vegetables and fruits, fresh and boiled;
Tea, coffee, compote;
Grass, hay, leaves, weeds;
Bark of trees, branches, roots;
Wood ash;
Paper products;
Wood waste;
Very often, the remnants of cooked food are thrown into the compost pit, which is quite acceptable if all the components of the dish are capable of being processed, rotted, and decomposed.
Objects made of plastic, rubber, bone, iron, artificial fabrics must not be used for compost.
Making an open compost pit

To set up such a pit, it is enough to do a few simple operations: dig a hole of the required size (depending on the expected amount of compost) and a depth of about 50 cm. The walls can be overlaid with roofing material, linoleum or slate. Put branches, foliage, weeds and other plant components at the bottom of the pit, and pour waste on top. All this is covered with grass or tarpaulin.
Making a closed compost pit

Such a pit is the most difficult structure of all possible, since it requires some building skills.
First you need to mark up the future structure and remove upper layer soil 25 cm thick over the entire area.
Then a hole is dug up to a depth of 50 cm, along the perimeter of which wooden frame... The height of the box should not exceed one meter, otherwise it will be very difficult to get ready-made compost. The frame can be mounted on columnar foundation for strength, but you can not do this. Further, the frame is sheathed with boards. The timber used for the frame should be treated with something to prevent rotting, and the walls of the box should be sheathed with linoleum or rolled roofing material.
From above, the structure must be equipped with a lid with enough large cracks to improve air circulation in the drawer.
Remains of old buildings: foundations and walls can be used as the walls of the compost pit.

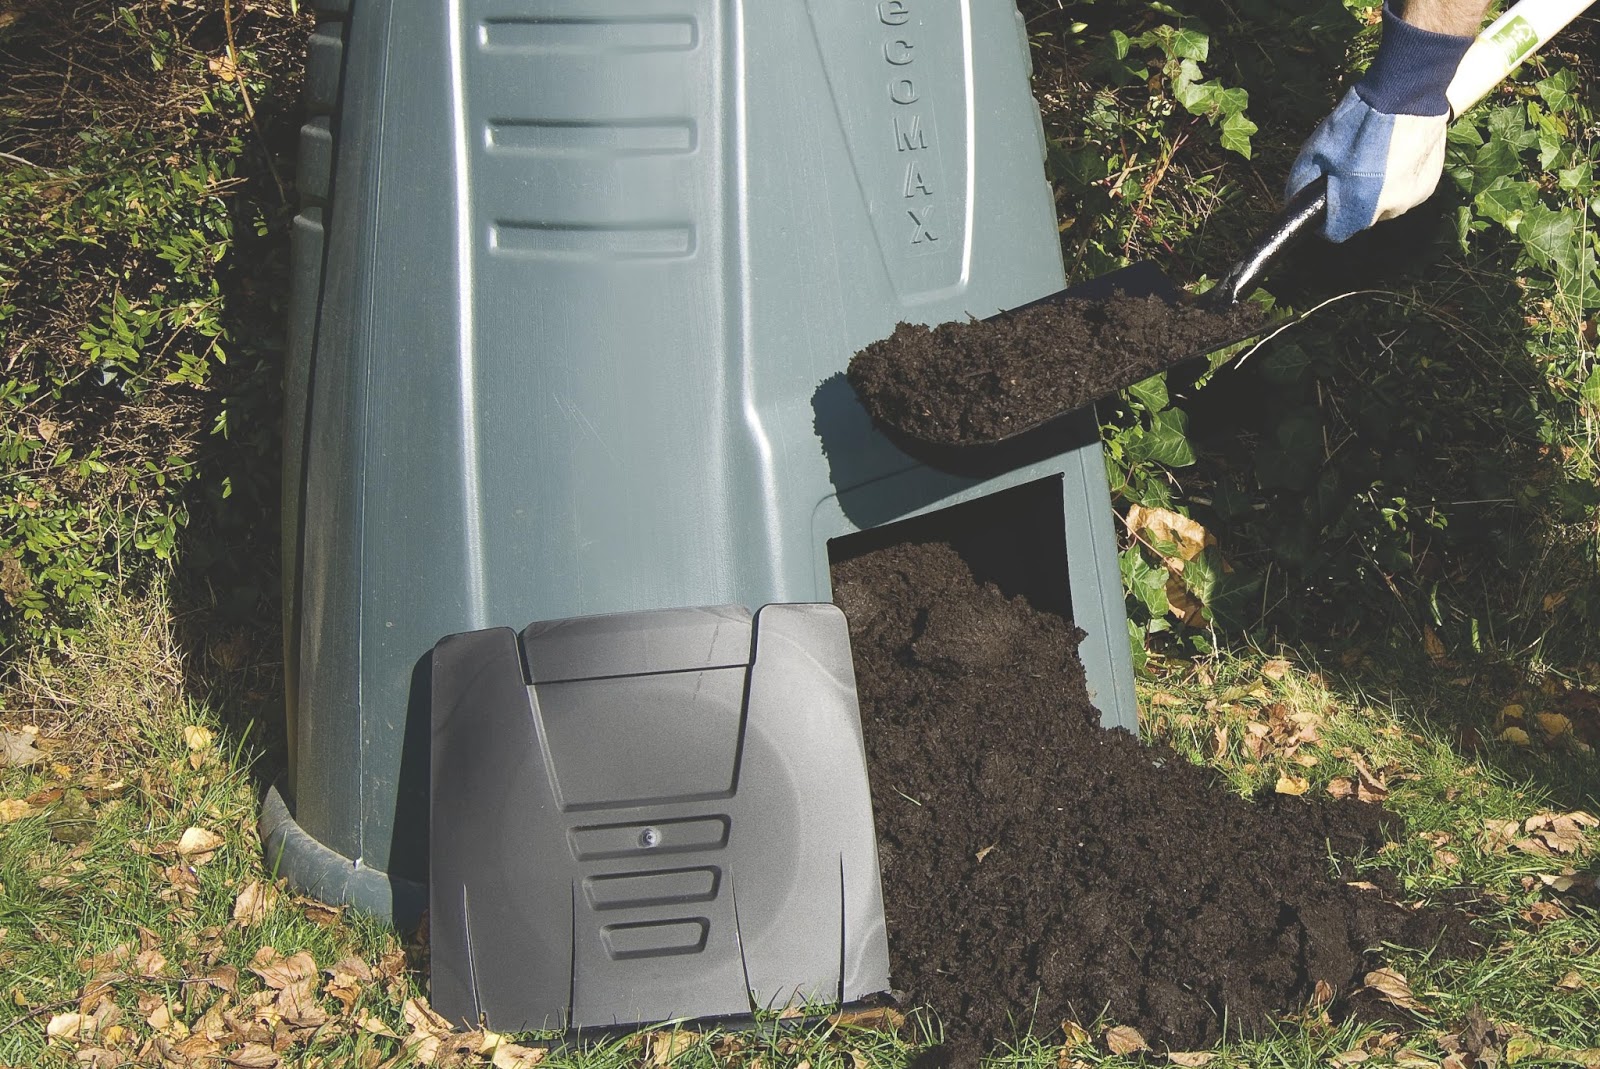
If you are not satisfied with the do-it-yourself compost pit, you can buy a ready-made composter - a plastic container. The best maturation of the compost in it is achieved by adding preparations for the decomposition of organic matter.

Having built such a simple device on your site, you can provide yourself with a rich harvest without any financial costs for fertilizers.
Before starting the construction of the compost pit at the summer cottage, think about whether you need it and for what purposes. Such a structure performs the functions of utilizing household organic waste. A compost pit will also come in handy in order to produce the fertilizer necessary for the garden and vegetable garden, in case you are not going to plant siderats on your land plot to fertilize the soil.
You can, of course, put the waste together with the remnants of vegetables and fruits, in bags, and then take them to the city dumpsters. But don't do it - it's pollution environment... If you build on summer cottage compost pit, you can recycle the vast majority of organic waste into a wonderful nutrient mixture for your plants called compost. And time will not be wasted on waste disposal.
Purpose of the compost pit
Each compost pit has a set of matching design features, which depend on the needs for which it will be used. If you don't know where to throw your garbage, you may be interested in a pleasant bonus that you can get in a few years - valuable compost. Then you need to arrange a compost pit using the appropriate layout.

Getting and using compost.
If you want to short term to prepare fertilizer from improvised materials, which can serve as leaves, mown grass, manure, then the compost pit will have a different design. There are some requirements to be followed when setting up compost pits.
How to set up and use a compost pit?
When choosing a location compost pit try to keep in mind some pretty important points:
Arrange a pit at a distance of at least 25-30 meters from sources drinking water- wells, boreholes, streams or other bodies of water.

In suburban areas with a slope, the pit is placed at a level below the well.
Observance of such precautions is necessary because otherwise rotted waste may end up in the drinking water, which is dangerous and undesirable.
When building a pit, consider the wind rose so as not to poison yourself and your neighbors with unpleasant odors.
If you place the compost pit in an open, sunny area, the contents will overheat. This will stop composting. That's why the best option pit equipment will be arranged on an area shaded by tree crowns.
The best place for a compost pit is the corner of the land plot adjacent to a fence or blank wall.
It is also necessary to decide what kind of waste is placed in the compost pit, and which must not be thrown into it.
Waste that can be used to fill the compost pit
- Raw vegetables, fruits, berries, tea, cereals, coffee, cleaning residues;
- Hay, mown grass and straw;
- Foliage;
- Branches, bark of trees, roots of shrubs and trees, which need to be chopped a little;
- Weeds;
- Wood ash;
- Needles;
- Napkins, cardboard, paper bags (paper must be natural) - all this is crushed;
- Unpainted wood waste;
- Second-year manure of herbivores.

How can you fill a compost pit at a summer cottage.
What is forbidden to fill the pit?
- Bones;
- Experiments with pets, because they can have helminth eggs;
- Insect pests and their eggs;
- Affected plant diseases (tops of tomatoes, late blight, pumpkin and powdery mildew, and others);
- Plants from earthen plots that have been treated with herbicides;
- Inorganic waste, which can be in the form of plastic, iron, rubber or synthetic fabrics.
Any waste that cannot be composted is best incinerated or disposed of if it is excreted.

Rules for sorting household waste for use in a compost pit.
Organic waste is handled by microorganisms and earthworms. Do not insulate all walls of the compost pit that are below ground level, because if you dig a hole in the ground at a depth of 50 cm and then enclose it with an impermeable material, worms and microorganisms will not enter it. In this case, you need to share them on their own.
As you can see from the above, the rules cannot be called complicated, but they must be followed.
Setting up a compost pit or heap
The most important thing when setting up a compost pit is to ensure good moisture and friability in case you want a good quality composting process. There are no specific recommendations on this matter.

Arrangement of a compost pit at a summer cottage.
To maintain the moisture content of the compost heap, it can be watered regularly or covered with a film that will create a steam effect. The looseness of the structure of the contents of the compost heap is maintained by the fact that it is periodically broken up with a conventional pitchfork, or materials with different densities are stacked in layers.
Optimal dimensions of the compost pit
- Width - no more than 1.5 meters;
- Length - up to 2 meters;
- The maximum height is 1.5 meters;
- Go deep into the ground no more than 0.4 meters.
There are several different compost pit structures that can match the preferences of any hosts.
Compost pit with two sections
It takes about 2 years to re-heat and compost organic waste, if you do not use the services of additional effective microorganisms along with those that are present in the soil at your site. In order to make the use of the pit more convenient, a two-section structure is built:
- Fresh waste is put into the first section;
- The second section contains waste that has been composted since last year.
Prepared in the second section compost carried out and laid out in the beds, where they want to improve and saturate the land useful substances... The compost pit can be fenced off from all sides, making it in the form of a box, but only use material that allows free air access.

Wooden box for arranging a compost pit.
The box can be made of wooden picket fences, which are nailed with a small distance between them. In this case, the contents of the pit will not rot and will not smell unpleasant. Such a compost pit can be built independently in just 1-2 days - the duration of the work depends on the material chosen for the fence.
Compost pit with free access from the bottom of the structure:
Such a pit will perfectly replace the first option, because it does not require breaking into sections. Shield the pile 30 cm from the ground. At the bottom there is an accumulation of ready-made compost. If necessary, it is easily selected with a shovel and is used to fertilize the garden.
Building such a pit is very convenient and little hassle. Constantly, when the compost is reached from the bottom, the contents of the heap sinks lower, and takes up the vacant space, and is simultaneously saturated with oxygen. There is no need for special loosening and throwing.
Compost heap equipment
Not all summer residents love the artificial creation of unnecessary complications. The best way out from such a situation there is nothing to do, in which nothing is digged, not fenced in, not divided. Only a certain place is selected where organic waste is deposited, gradually forming a heap.

Food waste for the compost pit.
If desired, this pile is watered with EM preparations, or covered with an opaque film to speed up the composting process. If you have nowhere to rush, then you should not cover the pile - its contents will be overwritten on its own, it only takes time.
Using plastic containers and barrels
The use of plastic containers for composting is convenient for those who do not spare money and want their compost pit to look presentable. The container is installed in any convenient place, since there is no risk of contamination of drinking water due to the tightness of the container. In addition, the container has special ventilation in order to prevent water from stagnating.

Usage plastic barrels for making a compost pit.
When using this option, you need to know that it is necessary to use drugs that accelerate the decomposition of organic waste, or to add earthworms to the pit.
Self-construction of a compost pit
An example is a self-equipped compost pit on one of the summer cottages... If the structure is fenced off on all sides, and has a height of one and a half meters, its contents must be shaken periodically, but this is a very inconvenient task. Therefore, it was decided to arrange two heaps, or rather, one heap on two sides.
After choosing a successful place - the corner of the site near the fence itself, organic residues were piled into the corner. It is very good if an alternation of grass, manure and soil is made. First, before the formation of a heap, a place for it is laid by branches of trees and shrubs.

Build a compost pit with your own hands.
When the heap reaches 1 meter in height, deep holes are made (several pieces), into which the EM preparation is poured (this can be "Oksizin", "Emochki", "Bokashi"). On the advice of experts, you can cover the compost heap with an impermeable film - this will maintain constant humidity and temperature in it, but not everyone does this. When covered with foil, the compost will become ready in 2-3 months, and composting of uncovered waste takes at least six months or a year.
You don't need to use EM drugs. Californian worms or prospector worms will do a great job. However, there are disadvantages to using worms. Worms love warmth, so they don't work during the colder months of the year. And it is enough for microorganisms to raise the temperature in the compost heap to only + 4 ° С.
It is necessary to water the pile with a hose during dry times. If you need to obtain ready-made compost for transferring it to the beds, you can transfer the upper part of the heap to another place and select the ready-made humus accumulated at the bottom of the heap. After the humus runs out, waste is again thrown over this place.
It occurs to some summer residents to spread on the ground when arranging a compost heap plastic wrap on which they then dump organic waste. They make such a design, believing that in this way there will be no leaching of useful elements into the soil. However, they are wrong, this cannot be done for the following reasons:
By isolating the base of the compost heap from the ground, conditions are created that cause moisture to quickly evaporate from the heap. At the same time, moisture does not rise from the ground, despite the fact that even on hot days, thanks to a natural mechanism, moisture must rise from the depths of the earth upwards using special capillaries.
If the pile is isolated from the ground, it prevents the humus from leaching out of the compost. Washed out mineral fertilizers, since trace elements are combined with organic matter and are constantly in the upper soil layer.
But these properties are quite convenient for use in vegetable gardens - neither rain nor downpour is terrible. And when limiting minor leaks that may nevertheless occur, add a 10 cm layer of peat, which perfectly solves these problems: prevents the leakage of nutrients into the ground. Peat also allows groundwater to rise in the heap.
Requirements for a proper compost pit
If, after reading the article, you still have questions about building the right compost pit, get some advice - don't build it at all. Why?
Extra and pointless work can be considered the work of moving grass and other organic waste from one place to another. When composting, carbon dioxide vapors are formed - this is an indispensable plant nutrition, which is ineptly lost on a heap, simultaneously acting on the nerves of you and your neighbors with an unpleasant odor.

Proper arrangement and use of the compost pit.
You may be called an eccentric, but it is better to lay out organic waste directly on the beds, where they perfectly heat up and do not emit unpleasant odors. In addition, microorganisms will multiply in them right on the beds, earthworms will crawl, which will appreciate such an abundance of work for them. The cut grass can be used as mulch. Chop and lay in paths in the aisles of the branches, and scatter the cleaning of fresh vegetables and fruits in the garden.
This will allow:
- Retain moisture in the beds;
- Feed the plants with carbon dioxide;
- Do not allow weeds to germinate in the beds;
- Prepare compost in places where it is needed;
- Prevent the leaching of humus;
- Reduce workload.
The proposed above work on the implementation of organic and food waste is simple and does not require additional skills or efforts.
A compost pit is a place where organic waste is disposed of. All garden waste here is decomposed under the influence of microorganisms. This later becomes the basis for organic fertilizers. How make a compost pit with your own by hand covered in this article.
There are such heaps in some way on everyone personal plot... These are ordinary heaps to which garbage is dumped. But this waste can be turned into valuable fertilizer. To do this, it is necessary to design the pits correctly or make special boxes. In this case, you can increase the amount of valuable fertilizer and the speed of its creation.
Making a compost pit correctly is easy enough using available tools and Construction Materials that will be found in the country and any personal plot.
Compost pit construction principles
Why make these pits and what is the use of them? In such pits, optimal conditions for the vital activity of microorganisms, bacteria and worms, which contribute to the early formation of compost and an increase in the rate of its formation. These organisms live under certain conditions:
- sufficient moisture;
- elevated temperature;
- sufficient oxygen.
What is needed for all of the above conditions to be met.
- The required volume of the composting facility must be at least 1 cubic meter. This will keep the high temperature stable.
- Gaps on the sides of the structure are made for regular oxygen supply to the inner layers of the compost heap.
- The top cover must be removable so that moisture can flow in sufficient quantities.
- The bottom of the structure should be on the ground so that worms and bacteria can make their way inside.
- The front wall should be removable or discarded so that the finished compost can be removed.
Watch the video! Making a compost
For the manufacture of a compost pit, you can use those materials that are found at their summer cottage: remnants of slate, corrugated board, boards, mesh or car tires... It is possible to build a pit with more durable materials, for example, kick out of the brick. Special structures made of plastic or metal are also sold; they are easier to install and transport.
Important! The compost pit should be installed at least 20 m from drinking water sources. It is not permissible for the water to flow from the pit towards the well or pool.
Choosing a place for a compost pit
The compost pit should not become a source of groundwater contamination. It is not necessary to make a hole in places where water stagnates.
Things to remember when choosing a pit location:
- 20 meters to the places where drinking water accumulates. These are wells, wells, ponds. It is imperative to ensure that it does not drain from the compost pit rainwater towards them.
- 10 meters to residential buildings. We must also take into account the buildings of our neighbors. Be sure to follow the direction of the wind so that bad smell did not overshadow the rest. An excellent option the location will be the far corner of the garden so that the pit does not interfere and is not conspicuous.
- Maintain a distance from trees and shrubs so that they do not eat rotting products that enter groundwater... This can damage both the plantings themselves and the fruits.
- A good place is partial shade. The bright sun will dry out the contents too much, it will have to be constantly moisturized.
- In order not to spoil the external impression, the pit is installed in an inconspicuous place. It would be nice to lay a path to it so that you can bring the filling into the pit on a wheelbarrow.
Advice! The compost pit can be decorated if desired. Plant curly flowers or fence.
Making a compost pit with your own hands
To make a compost pit with your own hands, they use improvised tools and materials that can be found in most yards. Good construction will last a long time, helping to turn garbage and waste into fertilizers that will be beneficial to plants. There are several types of structures, consider the design of each of them and the manufacturing options.
Compost pit in the soil
To create a compost pit in the ground, you must:
- Choose the right place.
- Remove the top layer of soil of any length, 1.5 m wide.
- Deeper 0.5m.
- Pour sand pillow to drain excess water from the bottom.
- Cut branches (for drainage and aeration of the heap);
- Grass;
- Dry leaves;
- Sawdust;
- Food waste;
- Manure;
- Weeds.
It is necessary to sprinkle earth or peat between layers and spill water. If you need to speed up the process, you can chop it with a shovel before stacking all the contents.
The pile should rise a maximum of one meter from the ground, its total height will be 1.5 m. From above you need to cover with something, you can slate. When the temperature outside is very high, it is necessary to water it with water.
In just two seasons, the whole pile will turn into fertilizer under the most normal conditions. This method is the most economical and simplest.
In addition, EM preparations can be used. In order to process waste to microorganisms in the pit, a temperature of +4 degrees is sufficient.
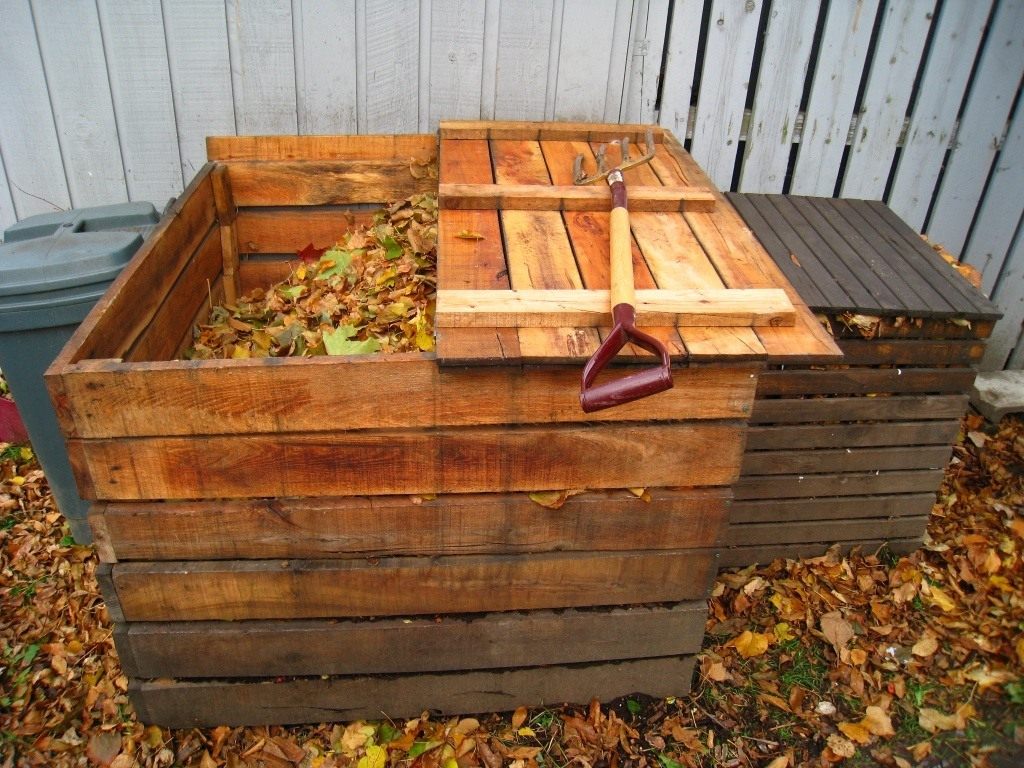
Compost pit made of boards
A compost box is made from the boards for ease of use and acceleration of the disposal process. The size 1 * 1.5m is the most convenient and suitable for these purposes.
Phased construction of a structure made of boards:
- Determination of the place.
- Markup.
- Removing the top layer of sod 10 cm thick.
- You need to dig in the corners copper pipes, insert the bars that will serve as supports. If necessary, they must be propped up.
- Wood materials to be used are recommended to be processed protective equipment... When decaying, substances are released that will damage the boards.
- It is necessary to choose boards that are stronger and fasten them with self-tapping screws. A distance of up to 5 cm is left between the boards so that the air can pass in a heap.
- A distance of about 30 cm is left below, so that ready-made fertilizers can be selected, and new ones will be reported from above.
- As an alternative to boards, use construction pallets... They can be connected together or disassembled into separate boards from which to build a box.
- It is necessary to ensure that the pit is covered from heavy rainfall and bright sun... To do this, you can make a convenient lid on which you can adjust the handle. It will be convenient to fix it on the back wall.
It is necessary to put the contents there through the top, and get ready-made fertilizer from the bottom. The order remains the same as when laying a hole in the ground.
Slate Compost Pit
 One of the positive properties of slate is its strength. The material will not suffer from decay of the contents. You can choose the one that is convenient or available.
It can be either a flat or a sheet version.
How to make a composter:
- Make markings and deepen the sheets prepared in advance. WITH outside they are fixed with a crate made of wood or metal.
- A more durable option would be to use deep metal pipes in the corners, to which a frame made of bars is attached and sheathed with slate.
If there are wooden parts, they are covered with special products so that they do not rot under the influence of the contents. The lid can be made from plywood or planks. In such a device, the front wall is made 2 times lower than the others. You can also use a film or cover material, because it is very convenient to fix them on solid bases.
Compost pit made of corrugated board
There is one plus in using corrugated board for making a compost box - you can immediately choose a material that is not afraid of corrosion.
How to make the construction correctly:
- Choose a location and make a base. You can use metal or wood.
- The size of the box can also be adjusted to the size of the sheets. In it, if you wish, you can build several sections.
- The base is made in the same way as in a wooden box.
- The corrugated board is fixed from the outside, self-tapping screws with gaps of 3-5 cm are used for this.
- The top is made of boards or plywood. Can cover the frame protective compound to extend its service life.
Advice! In the warm season, the metal gets very hot, so it is necessary to monitor the level of moisture in the contents.
Wire mesh compost bin
 From metal mesh you can also make a container for waste. Then you need to make it in the form of a cylinder. Undoubted advantages such a design that air gets into it well, the contents are ventilated, and not rotted. These structures are easy to manufacture, lightweight, can be transported and assembled.
Procedure:
- The net should be of the required length and with a 20 cm margin for entry.
- Wrap or garden textiles must be the same size.
- You can fasten the mesh with wire, put textiles or film inside.
- To make the structure more stable, it is strengthened from the outside with beams. Sometimes they are added in drops.
- Secure the edges of the material that is on the bottom from the outside with simple stationery clamps.
To simplify the task, you can use huge garbage bags. You can use special bags available from gardening stores. Fill in the same way general principle starting from the branches.
Compost pit made of concrete
 This pit has several advantages:
- its walls will maintain the required temperature for a long time;
- she is not afraid of any environmental influences;
- she is not afraid of excessive moisture or sun.
If you make such a pit with several departments, then the use will be much more convenient and practical. For example, in one compartment there is compost from one season, in another from the next, and in the third - ready-made fertilizer.
Procedure:
- The pit should have a proportion of 1.5m * 3.5m already in finished form. A depth of 70cm will be the most comfortable.
- It is necessary to make the formwork, leaving a distance of about 15 cm to the edges of the pit. You can use plywood or boards.
- Walls finished structure should be 40 cm above ground level.
- The iron mesh is installed inside and poured with concrete.
- To make concrete, cement, screenings and crushed stone are needed in a proportion of 1 * 3 * 3.
- You can tamp it with a shovel or fittings so that there are no voids left in the walls.
- Remove the formwork when the concrete has hardened to the end, after about 14 days.
- As a cover, you can use a special covering material or wood.
It is worth remembering that when using a concrete pit, the process does not go very quickly. To speed it up, you can purchase special means and manually add earthworms.
Conclusion
There are no particular tweaks to the construction of a compost pit. The materials that are used are in any garden or cottage.
The benefit of a compost pit is that household and household waste will be disposed of in it.
When the compost pit is set up correctly, fertilizer is formed in it, which does not contain any harmful substances, it is environmentally friendly. Its use will increase the yield. Rational use and an economic approach will help reduce material costs and improve the environmental situation.
For achievement better result in the manufacture of a compost pit or box, you can use the tips from the article, get acquainted in addition with the photo and video of the manufacture.
Watch the video! How to make a compost pit with your own hands
At their summer cottage, where vegetables, fruits and berries are constantly grown, additional feeding is always needed. It is not advisable to use ordinary mineral fertilizers for your family, except in small quantities. They change the physical and chemical parameters of the soil and contribute to the acidification of the site.
Organic fertilizers are more expensive, but they restore soil well and stimulate crop growth. One of them - compost - can be made from components that can be found in abundance in any summer cottage, and making a compost pit with your own hands will require small financial costs and a little time. But at any time on the site there will be something to feed the plants.
The benefits of compost and how fertilizer works
Compost is plant residues processed by soil microorganisms and earthworms. Passing through the digestive tract, beneficial nutrients- nitrogen, potassium, phosphorus and other trace elements receive an organic shell.
In it, they are better preserved and better absorbed by plants. People have learned to produce such fertilizers artificially. They are called chelated, but they are expensive. A large plot requires a lot of complex mixtures, which significantly increases the cost of the crop.
If you make a compost pit correctly and learn how to place the compost for maturation, you can significantly reduce the cost of land renewal and increase the yield for free.

Composting raw materials
Anything can be composted:
- leaves;
- green freshly cut grass;
- manure;
- branches, sawdust, bark, paper;
- algae and other pond plants;
- peat;
- fecal matter from the sewer.
It is better to take several components. It is desirable that the composition includes nitrogen and carbohydrate ingredients, as well as land from the site. Nitrogenous substances include: fresh grass, manure or dung, fresh vegetables, fruits. Carbonaceous components include paper, dry grass, sawdust, straw, cardboard.
Adds nutritional value to ash. To make the compost more saturated, you can add mineral complex or single-component fertilizers at the end. In any case, compost will help increase the amount of humus in the soil and revitalize the soil with the help of bacteria.
Composting methods - with and without oxygen
There are two methods of composting - aerobic and anaerobic. In the first case, microorganisms work, which need oxygen for life. Such bacteria live in the soil and decompose plant residues - grass, roots, manure.
To obtain aerobic fertilization, you need to know how to properly make a compost pit with your own hands in order to provide air access. In addition, the mixture must be loosened and inverted periodically to allow oxygen to flow to all components. The disadvantage of the aerobic method is that some of the nutrients are eroded or oxidized and are not beneficial, as well as in the waste of time.
Video: How to make a compost pit with your own hands
Another method is anaerobic. This is the fermentation of components without air access. How to make a compost pit in the country so that oxygen does not penetrate inside:
- the material should be tightly knocked down, and from the inside you can make a lining with a film;
- the components are packed tightly and compacted to remove excess air.
From above, such a shoulder is closed with a hermetically sealed film, which is pressed to the ground with heavy stones or earth. Further, the process takes place without human intervention. The advantage of this method is that almost all nutrients are preserved. Minus - it is difficult to achieve complete tightness of compost pits. Sometimes it is better to buy a container for storing raw materials.
Varieties of composters
A simple DIY compost pit can be made in one day. No special materials or tools - everything that is at hand will do - boards, slate, plastic panels, plexiglass, mesh.
It is necessary to decide which method of composting will be in priority: aerobic or anaerobic. If the first, then there are more options for making a compost heap with your own hands. If it is anaerobic, then every effort will have to be made to make the structure airtight. It may be necessary to apply concreting, but such a collar will serve for a long time.
Classic earthen pit
Compost pit in the ground is done as a depression no more than 50 cm, so that it is convenient to care for the ripening mixture. The sizes are arbitrary. You can make any length and width.

More often, this design is used for anaerobic fermentation, but for this you need to concreted the walls and bottom. The fact is that during the decomposition of plant residues, the liquid flows down. If the bottom is left open, the nutrients will be lost and absorbed into the soil. But if a layer of earth, straw or peat is laid on a closed bottom, then they will be preserved and will benefit the plants.
The easiest way to make a compost pit is concrete ring. For this:
- Digging a shallow hole - 60 cm.
- The bottom is poured with a solution and allowed to dry.
- A concrete ring is installed using a crane or tractor height 90 cm.
- Plaster the connection between the bottom and the ring.
Convenience is that the edges will rise above ground level and prevent sediment from entering the compost. Concrete can be painted in any color or decorated as you wish to create a beautiful compost pit - you can plant it yourself tall plants around a concrete ring and they will hide the vault. If desired, an overlap with a hole for a hatch is installed on the ring.

Slate shoulder
If lying around old slate, it can be fixed on boards and made walls for the compost pit. It will not be quite a pit, since it is located on the surface of the earth. Rather a pile or a heap, but framed and protected. The do-it-yourself slate compost pit is suitable for the aerobic (oxygen) method of composting.
Stages of work:
- Choose a place and carry out preliminary markings - length, width. The height of the shoulder should be not higher than 1.5 m. At higher altitudes, it will be difficult for air to enter and maturation will slow down. Raw materials can even rot or sour.
- Dig holes in the corners with a drill and put pillars.
- Between the posts, nail the boards on which the slate will be held.
- Using a drill, carefully make holes in the slate and attach it to the boards.
On the one hand, the height is made less so that it is convenient to get the finished compost. The roof must be made, because the rain will disturb the maturation of the mixture.
The bottom is made at will - open or closed. Peat, soil, chopped branches or sawdust, straw can be used as drainage.
DIY board composter
A do-it-yourself compost pit from boards is the most common method. First, markings are made and corner posts are installed. Then one of the options:
- the arrangement of the boards is dense, without air holes - more suitable for cold storage of manure or anaerobic composting;
- with air holes - they can be up to 5 cm wide.
It is better to make the composter mobile - on wheels, so that on winter time it could be hidden in a warm place. With a decrease in temperature, bacteria slow down their activity and the maturation of the mixture is disturbed. In the warmth, the process continues and by the spring the fertilizer will be ready.
If used for composting worms, then the most effective view are the red Californian worms. They multiply quickly and eat a lot, but cannot tolerate low temperatures... They die in the middle latitudes. Vermicompost is prepared in a warm room with good ventilation. In the summer, the box is put out on the street, and in the winter it is put away in the warmth.
Compost pile made of mesh
An economical version of the composter is made of ordinary metal mesh. It is fixed on poles or metal pipes buried in the ground. The plus is that the shoulder is completely open from all sides for air. In order to accelerate the maturation of the compost, it is advisable to add a solution of EM preparations while forming the layers.

Sealed plastic container
Sealed containers are used for anaerobic fermentation of ingredients or for silage of grass. Such composters look presentable and aesthetically pleasing, do not spoil appearance plot. Minus - you cannot increase the volume, and you will also have to loosen the layers when preparing aerobic compost.

Sump well as a composter
There is a technology in which fecal matter is processed by anaerobic bacteria and becomes organic fertilizer... But for this you need to comply with the condition: do not drain water into the well from detergents and chlorine, since these substances cause the death of microorganisms.
Before you start doing in the country do it yourself compost pit, it is worth considering, why do we actually need it?
The main functions of such a structure are the disposal of household organic waste, as well as the production of fertilizer for the vegetable garden and garden, unless, of course, you simply intend to plant green manure on your site to fertilize the soil.
Rules for the arrangement and operation of the compost pit
When choosing a place where we would like to make a compost, several very important points should be taken into account:
- The distance to the source of drinking water: a well, a well, a stream, a reservoir should be at least 25 - 30 m.
- Also, if the site has a slope, the pit should be located below the well. Such precautions are necessary to ensure that rotting waste streams cannot enter the drinking water.
- It would not hurt to take into account the wind rose, so as not to annoy the neighbors too much.
In addition, I want to clarify that in open sunny areas the contents of the pit can overheat, then the composting process stops, so it is advisable to shade the structure with trees. It is better if the compost pit is located somewhere in the corner of the site, adjacent to a blank wall or fence.
Let's also define what can and cannot be thrown into the compost pit.
Suitable for composting:
- Raw vegetables, fruits, berries, tea, cereals, coffee. Cleaning residues incl.
- Hay, mown grass, straw.
- Leaves.
- Branches, bark, roots of tree shrubs, lightly crushed.
- Weeds.
- Wood ash.
- Needles.
- Napkins, cardboard, paper bags made of natural paper, shredded.
- Unpainted wood waste.
- The manure of herbivores is second year.
Cannot be used for composting:
- Bones.
- Domestic animal excrement. They may contain helminth eggs.
- Insects - pests and their eggs.
- Plants affected by diseases (tops of tomatoes with late blight, pumpkin and cucumbers with powdery mildew, etc.).
- Plants from areas treated with herbicides.
- Inorganic waste: any plastic, iron, synthetic fabrics, rubber.
Non-compostable material should preferably be incinerated or disposed of in cesspool if it's excrement.
The decomposition of organic matter is carried out by microorganisms and earthworms. Therefore, do not insulate all pit walls that are below ground level. If you dig a hole 50 cm deep and enclose it with impenetrable material, the worms will not be able to get inside. You will have to add them yourself. The rules, as you can see, are quite simple, and the benefits of following them are extremely great.
Compost pit construction
The main thing to consider when setting up a compost pit is the need to ensure a good composting process good humidity and looseness. How to do it - of great importance does not have.
The moisture content of the compost heap can be maintained with regular watering or covered with foil to create a steam room effect.
In order for the structure of the contents of the compost to be loose, it is necessary either to crush it from time to time with a pitchfork, or to lay materials with different densities in layers.
The dimensions of the compost pit should be approximately as follows: width - about 1 - 1.5 m, length - 2 m, maximum height 1.2 - 1.5 m, it can be buried in the ground by about 0.2 - 0.4 m.
Moreover, the design can be completely different and depends on the preferences of the owner.
Compost pit in two sections
If you do not use additional effective microorganisms, in addition to those present in the soil at the site, the organic matter will be overheated and composted in about 2 years. For ease of use, you can make the design two-section:
in one section - what we add this year, in the other - what is composted from the previous year.
When there is ready-made compost in the second section, we will take it out and lay it out on the beds, where we want to improve the saturation of the soil with useful substances. The compost pit can be fenced on all sides like a box, but always with a material that allows air to enter, for example, wooden picket fences nailed at a distance from each other. So the contents will not rot and give off an unpleasant odor. Such a compost pit with your own hands is built in about 1 - 2 days, depending on which fence material is chosen.
Compost pit with free access at the bottom of the structure
This will be a good replacement for the first option - you do not need to divide into sections. The heap fencing begins at a level of 25 - 30 cm from the ground. At the bottom, ready-made compost accumulates, which, if necessary, can be easily picked up with a shovel and used in the garden. Convenient and less hassle. Each time compost is taken out from below, the contents of the heap will descend, occupying the empty space, thereby saturating with oxygen. You do not have to specially throw and loosen.
What should be the correct compost pit?
If, after all you've read, you are still wondering: how to make the right compost pit, then here's your answer - don't do it at all.
Firstly, dragging grass and other organisms back and forth, from plot to heap, from heap to garden, is unnecessary pointless work.
Secondly, carbon dioxide formed in the process of composting, which is an irreplaceable food for plants, is ineptly lost on a heap, making you and your neighbors nervous with its not very pleasant "amber".
If you are not afraid to be known as an eccentric, lay out organic residues right on the beds. There they will be remarkably perepryat, will not emit an unpleasant odor, such as in a closed heap. Microorganisms will multiply on their own, worms will also come, they know their job - and here there is such an abundance.
Use cut grass as mulch. Even branches can be chopped and laid in paths between rows. Take cleanings from fresh vegetables and fruits to the garden. Thus, you:
- Retain moisture in the beds;
- Feed the plants directly with carbon dioxide;
- Prevents weeds from germinating in the garden beds;
- Prepare compost right where you need it.
- Prevents the leaching of humus.
And most importantly, there is less work!
As you can see, the compost pit I have proposed with my own hands is a completely simple task. It does not require any additional effort or skill. Now all that remains is to dispose of what is not compostable next to food. I think you have already guessed by yourself that this is ...