What to build a bath. How to build a budget bath in the country
From a long time, the bath was a place where you can relax and relax. These ancient buildings are in popularity by even vacation in nature.
How to build a bath yourself?
Construction of a bath with your own hands The case is difficult and for its implementation will require a certain luggage of knowledge that you will soon find out.

To build a bath with your own hands, you will need to get acquainted with the action plan:
- Design a bath;
- Understand the stages of construction;
- Acquire a building material;
- Connect communications;
- Equip the bath S. inner.
After familiarization with the stages of the building, it is necessary to determine the place where the bath will be located, since it also depends on the location.

The best option will be if:
- the bath will be on the hill, it will significantly simplify the installation of water drain;
- next to the bath will be a river or water;
- the window in the bath will be located opposite the house, which will allow you to observe it.


For garden house The distance will be no more than 3 meters, and for such buildings as a bath, this distance should not exceed 1 meter.


The design and drawings of the bath are best to order from local designers, it will cost about 5,000 rubles. You can also search ready sketches And the photo of the baths on the Internet, which are most suitable for your preferences.

Brick Bath, Stone or Blocks
As materials for a brick bath, you can use directly brick, stone or blocks.

For the construction of the bath, it is necessary to dug a pit and fall asleep 20 cm of sand, then it must be poured with water to seal.

The second step will be the laying of rubble on top of the sand with a thickness of 10 cm, which after you need to cover with sand again.

The last step will be the installation of a system for drainage and drainage construction.

Bath of bar
The first layer for the base of the bath is the sand of a 20 cm sand, crushed stone is applied by the second layer, and concrete fill Located by the third layer. The key stage will be the reinforcement of the construction.

In the layers you need to insert rods made of metal for more sturdy construction And as an additional sustainability, in the middle need to lay metal plates that bind with wire.

Note!

The next stage of work is a break, which is needed so that the foundation of the bath is not washed with water.

It is best to make a piece of clay, it is much stronger than concrete, and also does not forms cold seams in the process. Over the scene must be pouring a layer of rubble.

Next you need to set the drain in the bath. First you need to drench the pit and bring it to the chute to the edge of the building of the building, the walls of the pit covered wooden boards With reinforced wire, and then pour all concrete.

Frame bath
The foundation for such a structure of the bath is made on simplified technology, which is the advantage of a frame bath. It is necessary to make a foundation from asbestos-cement pillars, which after installation are poured with a concrete mixture.

The next step is the markup of the walls. Then you need to start connecting the boards using nails. From the board is going to the upper and lower strapping. Walls for such a bath are manufactured in a lattice structure.
Note!


Materials that are needed for walls is, bars, insulation, and materials for the outside, for example OSB plates or a house unit, and inside you can use the clapboard.

Materials for insulation and vaporizolation
Warming the bath from the outside only with the condition of heating in the construction.

For a wooden bath, you need to make a grid that will be inserted into the insulation. In the paper I need a mineral wool width of the layer of which will be 50 mm.
Paul in bath
In the case of a frame bath, when the floors remains to be insulated, and the installation of floorboats remains, in addition to this, you need to install lags, rough floors, and secure the design for steam removal, then lay the insulation and check the waterproofing.

It is best to make the floor of the concrete, as this will allow the bath to dry faster, and it will last much longer. On the concrete floor laid shields made of wood. They can later be taken out for drying and calmly leave for their affairs.

Note!

Photo of baths do it yourself


Build a bath from a log of a difficult task, however, the technology of construction, the choice of materials and even the exact sequence of actions have long been known and worked with many masters. In this material, all key points are explained in the construction of a bathroom from a log cab: from bookmarking foundation to interior decoration.
The steam bath is known since the times of Scythians who have grown with them special bath tents and hiking chambers. And in the XXI century, the Russian bath did not become a certain archaism, successfully withstanding age-old competition with bathrooms and shower. Get rid of a variety of pigeons, remove from the body harmful substancesaccumulated in urban weekdays, give a body a full-fledged rest - all this is achieved when visiting the bath for more than one and a half thousand years.
What a design is preferable how to choose a place to accommodate it, as it works in general - answers to many "bath" questions you will find in this article.
Bath Place and Planning
One of the important additions to the bath itself at all times was fresh water water, located nearby - in the absence of another source of water, the water was taken from it. A special charm in the proximity of such a reservoir lies in the possibility of contrasting ablution - rushing in a Russian bathhouse, to run out of it and plunge into the cool water of the reservoir. In addition, the natural reservoir allowed to quickly cope with the fire of the bath, which arose quite often due to disorders during the furnace device.
Today in binding dacha bath There is no particular need for natural reservoir, but still it is convenient if it is located near, say, artificial reservoir - The final decision always remains for the owner of the cottage.

The main criteria for choosing a place for a bath: removal from the road, the presence of natural or artificial fence from foreign spectators (thick bushes, crowns of trees, fence, economic buildings), fire-fighting distance from the main residential building at least 15 meters.
Basic bathrooms - pre-banker, washing and steam room (the last two rooms can be combined into one). The size of the pre-banker is determined by the calculation of 1.4 m 2 per bathing, the size of the washer is 1.2 m 2 per person. In addition, there should be a place for furniture (locker for clothing, benches for seating) and for storing fuel (coal or firebox). In the washing, you will need a place for capacities with hot and cold water, furnaces and place for sun beds.
For example, for a small family (no more than 4 people) the bath of the following sizes will suit: external size - 4x4 m; Pregnant - 1.5x2.4 m; washing - 2x2 m; The steam room is 2x1.5 m. True, in the bath of such sizes it will not be particularly unfolded - but the places it takes a little.

In general, the sizes of the bath are directly related to the size of the site, which can be allocated under it. If the site is significant, then the bath can be expanded by adding a shower cabin, restrooms, etc.
In moderate and cold climatic zones It will be right if the entrance to the bath is located in the south, and the window peres - on the Western (south-western) side. Such an entry arrangement will greatly simplify the use of bath in the winter season, since the southern side drifts are faster, and the direction of windows will allow longer to cover its premises with sunlight.
Building Baths - Stages
There are several of them:
- Blanks of basic materials.
- Select and bookmark the foundation.
- Creating a foundation for a stove-heater (if necessary).
- Creation of Paul I. sewer system Bath.
- Build a shruck bath.
- Roof construction.
- Formation of the scene around the perimeter.
- Canopate wall baths.
- Laying or installation of the furnace, chimney mounting.
- Electrician and water supply bath.
- Installation of doors and installation of shelves.
Preparation of basic materials for the bath
Classic and most successful structural material For the Russian bath there was a tree - wood easily copes with the revenge of the bathrooms, weighing an excess moisture out.
What wood is suitable for building a bath? As a rule, the baths are built from the roundabout of pine or ate with a diameter of no more than 250 mm - only the tree will create an indescribable inner atmosphere in the steam room. However, in the design of the bath, it is better to turn on the wood of other breeds - oak, larch and lip. For example, the lower crowns and lags for flooring, made of oak, will allow you to get a truly durable bath. Nuance - Oak should be a spile "in the juice" (i.e., not a dry) and dried under the canopy. The lower crowns (no more than 4), following the first oak, it is better to perform from larch. The final crowns, the elements of the interior decoration and the trim should be made from the linden or white ate - their wood is better than the wicking.

When should I store wood for building a bath? Rounded, wood for interior decorations must be cut down in winter, in the period when trees trunks contain the smallest amount of moisture - dry easier. In addition, not the entire trunk of the tree is suitable for the construction of the bath - only the middle part of the trunk will suit, that is, the top and kolly are not suitable.
An important criterion in the selection of wood will be the absence of cavities and sweats of resin on rounding coniferous rocks, dryness, a siny surface, the absence of stunned sites and places of defeat by the beetle-tree.
Foundation for baths
The main types of foundation for building a bath are tape and columnar , depending on local soils. Regardless of the chosen type of foundation, it is necessary to lay them with maximum accuracy - better if the ground freezing depth. Preliminary work Before setting the foundation of any type: cleaning the platform from the garbage, the complete removal of the top layer of the soil to a depth of 200 mm (we remove the fertile layer).
To choose the right foundation, you need to determine the type of local soil, which may refer to one of the three main groups:
- Weak soil consists of peat, sludge, dust sand (contains plenty of water), clay fluid or teecolastic.
- Punching soil (susceptible to seasonal swelling) consists of sand (dustless or small), clay components (clay, loam and sandy).
- The weakly soil is formed by rocky rocks, medium and large sand grains.

Stamp (pile) Foundation for a bath
Suit on weak bunny soils: consists of pillars embedded in the corners of the bath, as well as in the connecting places internal and external walls. If the distance between two adjacent foundation columns is more than 2 m, another pillar is laid between them. The depth of laying a column foundation is at least 1.5 m.

Poles for such a foundation are easy to make directly on the site of the construction of the bath, the material for them can be red brick, buttone, associated concrete solution. Main (corner) brick poles For a column foundation usually square form, with a side of 380 mm, auxiliary - rectangular, cross-section 380x250 mm. If necessary, the main pillars are performed in two bricks - cross section 510x510 mm. The savings of the boob stone and the brick during the construction of a column foundation is achieved by filling the foundation yam sand - half of their depth, the large-phrase sand is laid in layers (each layer - 100-150 mm), poured with water and tram.

The foundation pillars when building a bath with their own hands can also be made independently. This will require a collapsible formwork from boards, missed from the inside with unscrewing lubricant type "Emulsol". Inside the collected formwork, you need to put iron fittings, then pour a concrete mixture.

For casting the foundation pillars inside the holes open to them, a sliding formwork is used, made of roofing iron, plastic, roofing or thick cardboard. From the material selected for the sliding formwork, a pipe with a diameter of 200 mm is created, placed in the foundation pit of a larger diameter - from 300 mm. The free space around the formwork is falling asleep - it will perform the role of lubrication and prevents the approach of the concrete pillar when the soil is frozen. Armature tied up with a thick wire is inserted into the formwork, then a concrete mixture is poured, which must be carefully sealing. For wire handles pre-fixed on sliding formwork, it is lifted by squeaking at 400 mm, sit down outside the sand and pour a new portion of concrete.

As a bar foundation, asbestos-cement pipes can be used, they are durable not subject to rotting, and their outer surface Smooth enough, which allows them to not change their position when the soil is frozen. Asbestos cement pipes are also filled with concrete, their underground part It is necessary to cover with a mineral-based construction lubricant, to reduce the threat of faulting.

In the intervals between the foundation pillars of the exterior walls of the bath and inland walls The steam room is laid out of the brick walls, sufficient thickness - brick and even the Pollipich. Such brick walls It is necessary to burst into a soil for 250 mm.
The foundation pillars and brick walls between them are displayed at a height of 300-400 mm on the level of the soil, they need to be aligned with the cement mortar and clamping the rubberoid for waterproofing. In the ends of the pillars, when casting, the mortgages of the required form of metal are installed - they are designed to fasten the shrue bath to the foundation.
When building a bath on bunched soils will require the creation ribbon monolithic foundation.
Sequence of work:
- Marking of the construction site of the beeps, stretched between the pegs.
- Digging the trench of the required depth (its size is associated with the characteristics of local soils, not less than 400 mm) and 300 mm width.
- Running on the bottom of the trench of the sand layer, then gravel (each 70-100 mm).
- Installing formwork.
- Bookmark fittings.
- Pouring a concrete mix.

The reinforcement stacked on the bottom of the foundation trenches must have a cross section of at least 12 mm; it is placed along each of the two sides of the trench and knit in the framework , Raising it up to her middle with brick debris.
The composition of the concrete mix is \u200b\u200bcalculated by the proportion of 5: 3: 1 (crushed stone: sand: cement), the sand used should be dry and clean (washed). Calculate the volume of concrete needed to fill the tape base, it is enough simple, you only need to measure the width, depth, and the total length of the foundation. For example, with a width of 0.3 m, a depth of 0.4 m and a total length of 22 m is required by such a volume of concrete mix:
- 0.3 x 0.4 x 22 \u003d 2.64 m 3

One of the difficulties in the preparation of a dry mixture of concrete is the lack of weights on construction sites. Therefore, it is useful for you to calculate the dry components for concrete: in one 10-liter bucket, it is contained from 15 to 17 kg of rubbish, sand - from 14 to 17 kg, cement - from 13 to 14 kg.
The formwork is placed in such a way that the cast in it concrete foundation He performed over a soil level by 100 mm. As the concrete mixture is poured into the prepared formwork, its mass must be repeatedly pierced with a bayonet shovel or wire probe, to overtake the hammer of the formwork (eliminate the air sinuses). Then you need to wait for a complete rejection of the foundation, from about 5 to 7 days. When conducting fundamental work during the cold season, the formwork after the fill of the concrete you need to cover the PVC film and fall asleep on top of sawdust or other insulation.

After the expiration allocated to the drying of the cast foundation, proceed to it waterproofing and lifting with brick rows (if the bath rise is not required, then, after waterproofing, go to the cement screed). The following materials will be needed:
- Ruberoid.
- Pipe is about 2 m (plastic or metal), cross section from 32 to 57 mm.
- Masonry mesh.
- Red brick.
- Masonry solution.
Ruberoid (only) cuts into stripes sufficient for flooring on a concrete foundation, then laid out on top of the foundation on bituminous mastic (for roofing - tar mastic). Brick is put on a single-row dressing way: a layer of rubberoid is laid out a masonry solution, it is the first brick row "in the post" (across the foundation axis), then the masonry mesh is settled, the solution is put on the solution and the next brick range, but already "in spoons" (along the axis foundation). Each new series brick masonry It is accompanied by a filling masonry mesh, laying "in spoons" and "in the pump" alternate with each other. In the 3rd or 5th chip rows of masonry, you need to install ventilation products from pipe cutting - 5-7 of the foundation is enough. The number of brick series depends on the desired height of the foundation.

The last row of brick masonry is covered with a cement screed (the composition of the sand solution: cement as 1: 2 or 1: 3), a 20 mm layer.
Independent Foundation for Kamenka and Paul Bath
Create a foundation for stove-Kamenka and collect a bathhouse. If a major layout is assumed - it is necessary for it an independent foundation, that is, not related to the main foundation.

The floor in the bath can be clay, earthwood, wooden or concrete. By and large, it does not need heat insulation, since the temperature at its level is practically no higher than 30 ° C. A wooden lattice, cork mats or mats are usually laid on the surface of the bath floor - their task to save visitors to the baths from a sharp feature of a cold caused by touch to the floor at the outlet of the steam room. For self-hazing, the flooring is raised above the main floor.

The main minus of the wooden floor of the bath is its frequent convergence - water, penetrating through the slots between the boards, will accumulate in them, causing rotting and the appearance of an unpleasant odor. Wood coating The floor quickly wear out, acquiring an unsightly appearance, after 6-8 years it may require replacement. A tile is more practical for a bath flooring - it is easier to care for it, it is not exposed to moisture, easily flowing on its surface.
Floors in the bathrooms need to be located at different levels: Paul steam room - above the floor level is 150 mm (we save heat), the floor washing - below the floor level in the pre-banker by 30 mm (we take away from water from entering water).
Since a coated concrete device ceramic tiles In the washing and steam room more profitable than the wooden floor - we will consider this option.

You can arrange a concrete floor in a bath in several ways. First of all, we prepare the reason for the formation of a warm floor - it consists of 100 mm layer of sand and 100 mm layer of a crushed stone of the middle fraction laid sequentially. Each layer should be well tumped and aligned. Then to wave on top of the runneroid, closing the walls to the height of the future floor.
Next steps:
- First option - 50 mm layer of felt layer, clamzite or slag, on top of 50 mm layer of concrete with the formation of a slope to the drain hole. After setting the concrete, it should be aligned with a solution of cement, after which you can start tiled.
- Second option - 50 mm cement strainercontaining perlite (strolled sand). The composition of the mixture: perlite: cement: water like 5: 1: 3. After a complete week, from the moment of laying a pelitobetone, we apply a layer of concrete on top of 30 mm with a slide slope. When dealing with perlit, you need to respect special caution - this material is extremely lung, even a light breeze blossoms, so it is necessary to work with it in a closed room without drafts. Meet the proportion of water!

With a significant approach of the base of the bath above the ground level (from 300 mm), for flooring will be required wooden lagows Square section (side 150 mm). If the size of the rooms of the baths do not exceed 2000x3000 mm, then the owls for lag will be bricken salary. For large sizes Additional support for sexually lags will be required, they are pillars from concrete or brick (250x250 mm) and are placed at a distance of 700-800 mm. The support pillars for lag should be set on a multilayer base from sand, rubble and concrete - each 100 mm.

Important! Before forming the base for the support of the lag, you must perform the foundation for the Kamenka stove and build a sewage system.
Wood for lag may be oak, larch or coniferous breeds, lags should be treated by tar or antiseptic before installation.
Decision outdoor coating In this case, such: the concrete space between the foundation is covered with the rubberoid with the walls of the walls to the height of the floor, falling asleep by slag or clay (between the mains of the rubberoid and bulk insulation You can pave a layer of 200 mm foam), to the bottom side of the lava, the draft floor of 29 mm is mounted edged board. Then the PVC film filling, foil mineral insulationAgain the layer of the film - for vapor barrier. On top of the 5 mm layer of concrete with a shallow fraction filler, create a slope under the drain hole - after 3-4 days we put the ceramic tiles.

Do not forget to bring the foundation for the furnace to the floor level.
The floor in the pre-tribades are created from a 19-29 mm t-shutty boards of coniferous wood.
Important moment: when finishing clean floor, and all the room steam and washer, do not use synthetic construction Materials - The condition is especially relevant for the room of the steam room!
Sewage system bath
To remove wastewater from the bath, it will be necessary: \u200b\u200ba veil with a hydrotherapy, a wastewater well and pipes, removing dirty water into the veil on and then into a waste well.
The pit is broken outside the foundation of the bath, from the premises of the steam room and the washer in it are becoming self-reading pipes from plastic, cast iron or ceramics ( metal pipes Quickly rust).

The pit should defend from the foundation by 500 mm, its depth is 700 mm, the cross section is 500x500 mm. The veil walls are covered with 100 mm layer of concrete, in it under the foundation there is a drain 110 mm tube (pipes) from a bath. The main well well, containing at least 2 m 3, must be opened at a distance of at least 2.5 m from the pit - the further, the better. The tube was supplied to it from the pit, laid under the slope at a depth of 1.5 m (below the depth of the freezing), its output from the pit should be located 100 mm from its bottom. After input drain pipeThe mainstream well is filled with gravel or sand 1 m from the bottom, the soil is poured - a layer of at least 500 mm. When laying, carefully confuse each layer.

Before conclusion of the drain pipe in the pit, the hydraulic was installed from galvania, located under a stupid angle to the plum pipe from the bath. Its edges and the upper side are hermetically attached to the pitches of the pit, the distance from its lower edge to the bottom should be no more than 50 mm due to such a design unpleasant odors And the cold air will not penetrate into the pair (washing) through the waterproof hole.
To exclude freezing in winter The veils must be closed with two caps of the corresponding size (wooden or metal), the felt is made between them, and the upper cover is filled with a grainsite, slag or sawdust.
Circuit, Roofing and Soul
The bathhouse for the bath is better to order from professional performers, its manufacture is quite difficult. The finished log house in a disassembled form must be brought to the construction site and assemble it according to the numbering brica . The attachments of the crowns are performed by steel 25 mm brackets-spikes with a total length of 150 mm, a length of the tooth is up to 70 mm.

The roof design of the bath includes rafters, the lamp is attached to them, then the roofing material. The choice of the final design of the roof depends on roofingwhich she will overlap. The rafters are attached to the last crown of a church (better to the penultimate) using brackets. As a rule, the construction of a bath involves the arrangement of one- or duscal roof, angle of slope (from 10 ° to 60 °) of which depends on the abundance and amount of precipitate in this area. Consider - the steep roof, the more the material is required to create it.

Single rafters located at an angle are attached two outer or internal and outdoor supports. If the length of the span of the rafter exceeds 5 m, they are supported by additional subtairs. The rafting of the bartal roof is based on the bottom ends on the walls, the tops are connected to each other, forming a horse.
The roof of the bath can be covered with any material (slate, tiled, rubberoid, galvanized, etc.), with a wall at a wall at least 500 mm.

An attic room must be done ventilated, i.e., to equip two doors at opposite ends of the roof.
On the perimeter of the foundation, we carry out a break: completely remove upper layer Soils, deepen a 200 mm at a distance of 600-800 mm from the base of the bathhouse, lay 100 mm layer of gravel (rubble, clay) with its subsequent alignment. We lay the temperature seams (19 mm board coated with a resin or bitumen, with a pitch of 2-2.5 m perpendicular to the foundation), pour 100 mm layer of concrete. Before setting the concrete, its surface is needed to eliminate - fall asleep dry cement with a layer of 3-5 mm. After 3 days, the line of contact with the breakfast and the foundation of the bath must be covered with bitumen for its waterproofing.
Canopate Ban Srub
Performed for the warming of a church - sealing gaps between his broth The material for the cacopa traditionally serves linen pack, red moss, hemp from cannabis, woolen felt. Natural materials for cacopate can be replaced by factory, produced from jute and flax fibers: flanutin and felt - jute and flax. The advantage of factory materials for cacopate before natural is the resistance to the damage to the mole and fungus, and it is easier to work with the factory material, since it is produced in the form of a solid tape of a given thickness and width.
The cutting of the cutter is performed when it is assembled - the pure material is paved between the logs during their laying. After the construction of the roof, a complete cacker is performed - from the outer and inside of the log cabin, after a year - repeated cavulus (the log house is hesitated - the brica will dry).

Basic tools for cacopate - a blade and a beater, they can be made or purchased ready for them. Both of these tools are made of wood (ash, oak or beech). The shovel for the cacopa looks like a wedge with a handle with a length of 200 mm and a pointed blade of 100 mm, the thickness of the handle of 30 mm, the width of the blade at the base is 65 mm, at the end - 30 mm. The wooden beater has a rounded shape: the diameter of the handle is 40 mm, its length is 250 mm, the diameter of the shock part 70 mm, the length is 100 mm.
Konopka is performed in two ways - "in a set" or "stretching". In the second way, cavalid so: we collect panties in a strand, we deprote in the gap between the logs and pushing there with the help of a blade, filling the gap completely, without spaces. Then we collect a roller with a roller, we apply to the cocointed groove, take out small strands of the material from it, wind the roller and drive it into the groove with the blades and roller - with force, to complete confidence in filling the groove (crack).

The first method of cacopate of the log cabins is designed to overlap the grooves (slots) of a large width. The material for cacopate is twisted by 2 mm strands, of which we form several loops and drive them into the gap. The loops are recruited in an amount sufficient to fully fill the gap.
Rules for carrying cavity:
- initially, the material is clogged on the upper edge of the log and only after - at the bottom;
- work on cacapatka is starting with the slits of the lower crown, on both sides. Then go to the lower crown of the next wall and so on. Having finished the pants of the slot lower vents, We begin work on the next height, moving from this crown to neighboring in the nearest wall (right to left or left to right, no matter).

In no case, do not carry out the caispite of only one wall - it will rise and cause a soul break, it will have to disassemble it / collect again. Recall again: the cachatka is performed in the direction of "bottom-up" along the perimeter of the cut.
Put a stove
Embodiments of furnaces furnaces for baths set, they can be heated with firewood, gas, liquid fuel Or use built-in tanes and heat from electricity, may be brick, cast-iron or metal. Brick furnaces in the baths are performed with a wall thick "in Polkirpich" or "into a whole brick", the masonry seams need to be tied up especially accurately, striving for their lowest thickness to achieve the greatest efficiency of the furnace. For masonry stoves only red bricks are used. The furnace furnace is removed into the pre-banner, its remaining three walls are in the washing (steam room), while the distance from them to the walls of the washing should be at least 250 mm - in this case the heat will not leave "into the wall".

For cast iron or metal oven The formation of an independent foundation is not required - only for the brick.
Kamenka, installed for lovers to shake, are equipped with a chamber containing stones of various weights (from 1 to 5 kg). To fill the chamber of Kamenok fits boot, goats, boulders and granite. The design of these furnaces is extremely simple - similar to the kitchen stoves, the stones differ from them with a pipe of greater width or the presence of a chamber with stones.
To get the highest temperatures in the steam room, you need to add cast-iron pigs over a percentage of 80:20 (stones: khushchi). For each 1 m 3, the steam rooms will need not less than 6 kg of stones and cast-iron saues.

Under the observance of 40-50 mm distances in the furnace between its walls and a water heating boiler, the effect of a comprehensive blowing of the boiler with hot gases and the speedy water heating is achieved.
For better thrust you need to withdraw smoky pipe As close as possible to the rod of the roof. Conducting a smoke pipe through the attic room, be sure to perform a 380 mm tube roller. Remember that the pipe should not take place near the roofing roofing and rafted closer than 150 mm (fire standards).
Electrician and Water Supply Bath
To wash a single user bath requires at least 8 liters of hot water. You can provide such a number in several ways: heating the capacity with water on the heater, use gas columnInstall electric heater - Boiler. If there is central water supply, the pipeline to the bath lead from the main house - water from such a system of the pipeline must be drained to winter timeOtherwise she will leave and rupture the pipes.

Water can be taken from the well or well by installing submersible pump For its injection and supplying such a water supply system with cleaning filters. And in this case, in the winter time, water should be either merged after each use of the bath, or insulate the supply pipes.
To the bath you need to stretch an independent line for the supply of electricity and the easiest way to do it through the air (air). For the air will need a special cable - "naked" aluminum We note immediately, stopping at two versions: SIP (self-supporting insulated wire) and WEGN. The first type of cable is very good, he has long term Services (more than 30 years), it is durable and does not need a support for the carrier cable. But it is extremely difficult to spend mounting work, since it is too thick (the minimum cross section is 16 mm 2). Aluminum SIP can not be stretching through the attic bath on fire standards, it is necessary to fix it on special anchor clips - in terms of costs and hassle with its installation, its value will cost expensive.

A simpler solution is a Copper Cable Bulk Cable, fixed on the carrier steel cable. The cable is suspended to the cable on the insulated plastic wire, its service life is up to 10 years, after which it needs to be replaced (!). For a single-core BBN cable (of course, there should be two veins - each of them should be in an independent double overtake), the aircraft extended to the bath, the optimal cross section will be 2.5 mm 2 - it is unknown exactly what electrical equipment of the dacha wants to drive from it Future.
All Tuso-wrinkle boxes, sockets and switches, electrical stops should only be outdoor installation. According to the rules of the counter fire safety It is forbidden to install splash boxes, switches and sockets in the washing / steam room - only in the pre-banner. Do not joke with the possibility of a short circuit in a wooden structure - the entire inner wiring of the bath must be performed only in a non-combustible corrugation, fixed on special clips, the passage of cable through partitions is only through the steel pipe.

Try to locate cables in a sawn box, a socket or lamp so that they come there from below or side, but not from above - a drop of condensate, sliding on a fever, can cause a short circuit.
All electrical appliances must have a waterproof class not lower than IP44 (better maximum - IP54). Install simple lamps - metal case, only glass ceiling. All connections of the inner wiring of the cable - only on the terminal, no twists. And install in the shield of the RCD, exposing it to 30 mA.

For work in the electrical protection and installation of the UZO, be sure to invite a qualified electrician if you are not available!
Installation of partitions, ceiling, interior decoration, installation of windows and doors
Internal partitions in the bath can be brick or wooden, followed by heat and moisture insulation in both cases. The partition between the washer and the pre-bake, in which the furnace is installed, must be brick, or it takes brick inserts with masonry in one brick - on the sides in contact with the furnace housing.

Interior decoration is usually performed in cases where the bath itself is built of bricks, stone or timber - here the classical decoration scheme: insulation, vapor barrier film and lining. In addition, when performing an external and interior decoration, you will have to re-arrange ventilation system Baths, because the cutting birings will be closed with trimming and will not be able to carry out full ventilation.
The ceiling is formed by two layers - rough and finishing. The draft ceiling is attached to the horizontal lags of the roof, if necessary, the reinforced intermediate beams. Its area is covered with insulation - clay or slag. From the inside of the room washing / pair to the rough ceiling, the insulation and vapor barrier film is attached, after which the ceiling overlaps finishing - Linden, pine tipped board (20 mm thick - the thicker the board, the longer it will save the woody smell).

In the bath you need to arrange the windows of a small size (on average 500x700 mm) and to embed them low - enough so that through them you can look out to sit on the bench. The windows in the bath always perform with double glazing, depending on the size - with the window or fully swinging - to carry out fast ventilation.

Doors in the rooms of the bath must be installed so that they open up - for the reasons of fire safety. Material for door flaps is a pinned board (40-50 mm) or a board with a chosen quarter, the attachment of the boards is performed on the key. The size of the sash should be intentionally reduced by 5 mm - more than it is necessary for the actual distance between the quarters of the jambs - otherwise, with increasing humidity, the sash will swell and open (close) it will be difficult. The optimal size of the door in the washing bath of the bath is 600x1600 mm, in the pair - 800x1500 mm, with a threshold height of about 300 mm above the floor level (walking uncomfortable, but heat will keep). Loops for hanging door leafs - brass, leaving for a prebator (room washing) and in the washing room (pair room). Door handles - wooden (especially in steam room).

The shelf material is linden, pine, poplar or aspen. The minimum length of the regiments is 1800 mm, the width is 500-800 mm. Distance between "floors" double row regiments must be at least 350 mm, the minimum distance from the second row to ceiling coating - 1100 mm.

The surface for lying is formed by a black-width of 80 mm wide, from 40 mm thick, a lumen of 15 mm width is formed between the boards. From the wall to the shelf, a distance of 10 mm is withstanding. The boards for the shells of the regiments are attached to the frame from the bar with a cross section of 50x70 mm in two ways: from above - with the help of nails whose caps are taken into a tree; bottom - with screws. For mounting, nails and screws are chosen from of stainless steel or copper.
All angles in the design of the regiments are spinning, the surfaces are carefully cleaned with zero sandpaper.
For more convenience, the shelves in the steam room are equipped with headboard: the height at the beginning of the rise is 30 mm, the head of the head of the head - 460 mm, the final highest height is 190 mm.

When choosing a material to create regiments, be careful - it is believed that the bumping sections have greater density and can lead to a skin burn. Therefore, try to pick up the boards and a bar at all without dumping sites or with the minimum amount.
Fire fighting measures
Confine bathrooms from the threat of fire - Sleep in front of the furnace steel sheetMake sure that the fastening of the furnace door is relieved, set the fire extinguishing facilities near the water, sand and fire extinguishers). Make sure you can freely open the pair and washer doors during the battery. Do not block the passages, space in front of the doors and windows.
Almost every owner of the land plot, sooner or later, thinks about the construction of a bath. After all, the bath is not just a wash room, but also important element Dacha rest. The construction of the "turnkey" bath can be ordered from professionals for a round sum, or try to build a bath with your own hands.
After reading this article, you can choose a project, learn the sequence of the construction process, get acquainted with the boilers models and find the best option for your cottage.
Because to proceed with construction, it is necessary to develop a banani project. To do this, it is not necessary to turn to the architect, a simple project you can develop and ourselves, especially since there are many computer programs For design.
Think what size bath will be optimal for your family. What premises will be inside the bath. From which materials to make the foundation, walls and roof, do not forget also, about the trim. An important point in the design is the placement of the boiler and the method of its firebox.
Below you can familiarize yourself with the popular Ban projects:

- Bath project size - 4x4 meters.

- Bath project - 4x6 meters.

- Bath project - 5x6 meters.

- Bath project - 6x3 meters.

- Bath project - 3x3 meters.
After you have determined with the sizes and materials for the bath, you must create an estimate of expenses.
Foundation
For the construction of the bath, use several types of foundations. Depending on the weight of the walls and the characteristics of the soil, the foundations of the following types are manufactured:

- Foundation from plates.
- Foundation columnar for light walls.
- Pile foundation.
- Concrete belt foundation.
As practice has shown, the most reliable foundation Practically for all types of soil, is a concrete belt foundation, reinforced by reinforcement.
For the manufacture of a ribbon reinforced foundation for a bath you will need:
- Cement.
- Sand.
- Gravel.
- Armature.
- Formwork.
- Ruberoid.
- Wire.
- Shovels.
- Concrete mixer.
- Harness.
- Stakes.
- Tools (pliers, hammer, roulette and others).

In the place selected for the construction, make the marking of the trench for the future foundation. For marking use the harness, stretched between the pegs. Trench width is based on the weight of the material for the walls. For a single-storey bath of wood or brick, it is enough to make a trench width of 30-40 centimeters. By setting markup, make the following:
- Focusing on the markup, haul a trench with a depth of 50-80 centimeters.
- Failure the bottom of the trench and fill it with water to shrink soil.
- Ship the bottom of the tale tale for waterproofing.
- Put the trench by gravel by third of its depths.
- Install the formwork at the edges of the trench.
- Make a fountain-enhancing framework, from reinforcement rods connected with a wire.
- Install the reinforcement frame in the formwork.
- With the help of concrete mixers, make a cement solution in proportion: one piece of cement per part of the sand and two parts of gravel.
- Fill cement to formwork, trying to prevent air emptiness.
- After drying the concrete, remove the formwork.

The foundation for the bath is ready!
Walls
The following materials are used to build walls:
- Wooden timber.
- Brica.
- Boards.
- Brick.
- Blocks from different construction mixes (slagoblock, aerated concrete, arbolit and so on).
Since the construction of a bruis or brick bath is already quite widely described on the Internet, let's consider the construction of a frame bath from a bar 15x15 and 5x10 centimeters and a cross-section of 2x15 centimeters:

- Making low strappingTo do this, take the bars with a cross section of 15x15 cm. And install them on the foundation, connecting with each other with special metal plates and corners. There is another way to connect bars, by drinking on their ends of spikes, grooves and subsequent fastening with screws or nails. Doing the strapping, do not forget to put waterproofing under the bars.
- Install the vertical racks from the 5x10 vertices. The distance between the racks is usually made 50-60 centimeters. First, determine the position of the window and door openings And install the rack framing them.
- In the process of work, fix the temporary struts already installed racks so that they do not bother.
- Make upper strapping, securing it at the ends of vertical racks.
- Making the final fastening of the upper strapping, take care of the position of vertical racks, checking their levels levels.
- Be sure to strengthen all the angular connections with diagonal racks, it will help to avoid carcass throwing.
- Make a ceiling cut.
- After making a frame, produce external trim Walls of a bath with a cross section of 2x15 centimeters. If you do not want the appearance of the gaps between the boards, then make the skin - "flashes", laying the bottom edge of the boards on a nithe board. In appearance, this method resembles the walls of the walls by siding.

- Having a bath S. outside, go to the installation of the insulation. Foam or mineral wool sheets are installed along the vertical frame racks.
- On top of the insulation, it is necessary to install a layer of vapor barrier which is attached to vertical racks with thin regions.
- After installing vapor barrier, produce internal trim Bath with clapboard or slats.
- Heat the ceiling by setting on the inner covering sheets of vapor insulation, then the insulation. Cut the ceiling from the outside, plywood sheets.
Note that the manufacture and insulation of the ceiling can also be performed after mounting the roof.
Roof
The roof for the bathhouses is three species:
- Single.
- Double.
- Complex - consisting of four and more rods.
Usually for the baths use the first two options. Let's look at a variant of a bartal roof covered with metal troops: 
The manufacture of the roof begins with the installation - Mauerlat. In case of frameless wallsThe role of Mauerlat performs the upper stroke.
- Install the vertical stands on the layer.
- Connect the racks using runs and tightens.
- Install the rafter legs by attaching them to Mauerlat, run and connecting the upper ends. The distance between the rafters should be 50-60 centimeters.
- Install metal tile sheets.
- Cut the frontoths with wooden slats or leaf iron.
For more visual acquaintance with the roof mount, drawing is shown: 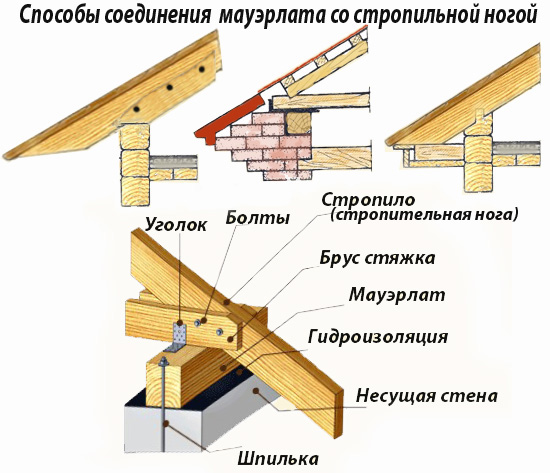
All sizes of roof elements are listed: 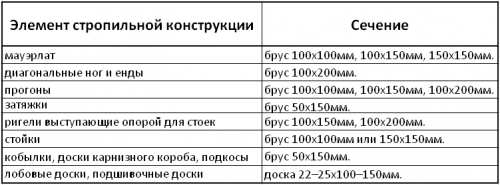
Please note that the less you take the root slope, the more snow loads will have to have snow. Also, a small tilt of the roof can lead to poor water plum and leaks.
Floors
Floor design depends on the type of room. In the room of rest, ordinary wooden floors are manufactured. In the waxing and steam rooms, the floors make out of two levels:
- The first level is made of concrete, it has a bias towards the drain hole.
- The second level is the purple floor of the boards with gaps for draining water.
If you want to make a floor stoneward floor or tile tile, they simply fit on the first level under a slope to the drain hole. 
In order to make concrete floor and draining in the bath you need:
- In the center of the steam and wetting, install plastic pipes with a diameter of 5-10 centimeters with a field at the end. Pipes should pass into the street through the foundation and connect to the sewage system.
- Put the layer of waterproofing material.
- Throughout the area of \u200b\u200bthe rooms, pour a gravel layer 10-15 centimeters thick.
- Make a cement solution and fill the floor with a bore slope mounted on a plug-up pipe.
- Install on drainer The grille from trash in the sewer.

In the second stage, wooden floors are made:
- Install wooden lags in all rooms. Distance between lags Make 30-40 centimeters. As a lag, you can use the bars with a cross section of 3x5 cm. Or 4x6 cm.
- On the lags, approach the board with a cross section 2x15 cm. Or 5x20 cm.
- In the rooms, where water drain is assumed, leave the gaps between the boards at 0.5-1 cm.
Do not forget, before installing wooden floors, handle all the parts impregnated for wood. Maching floors, note that they must be higher, or at the level of the top edge of the foundation.
Boiler
The boiler boiler model will largely depend on your financial capabilities and fuel that you will use for heating. If you know how to use welding, then a simple boiler can be made from thick sheet iron. If you prefer more advanced colas on gas or electricity, they can be purchased in specialized firms.
The boiler in the steam room is installed in such a way that loading the combustion chamber with fuel, was carried out or from the street, or from the rest room (pre-banker). The boiler itself, for the purpose of fire safety, is located in 10-15 centimeters from the nearest walls. Walls on the height of the boiler are closed with iron sheets. A successful solution will make the boiler brick, there you most reduce the time of cooling and secure the walls from fire.
Arranging the chimney for the boiler special attention Take the place where the pipe comes with the ceiling. Hole for chimney, it should be isolated with refractory material. Also, pay attention to the place where the chimney pipe goes through the roof. Usually, this place is subject to leakage, so it should be carefully smeared. Below are options for boilers for a bath:

- Homemade metal sheet boilers.

- A gas boiler.

- Electric boiler.

- Boiler on hard fuel.
Bath arrangement
After the sauna is built, it is necessary to equip it:

- Move to the bath all available on the site - electricity, sewage, plumbing.

- Place inside the sink, shower cabin, light sources, leisure furniture.

- Finish the walls with curly slats and make stepped shelves.

- Buy wooden tubs, hayk, buckets and brooms.
After the arrangement, you can safely invite guests, shake in your personal bath!
Miniban assembly instructions for giving without foundation, you can also look in the video:
Options for beautiful and unusual baths
Besides traditional Materials And design for the bath, there are many alternative solutions. Below we will give photos of the most unusual bath:

- Mobile bath from "Lining", built on a car trailer.

- Bath in a huge wine barrel.

- Bath of plastic bottles.

- Bath dug, built straight in the ground.

- Bath arranged in an iron container.

- Forest bath from raw logs.
![]()
- Beautiful sauna sauna.

- Bath of non-edged board.
At the end of the article I would like to remind you that the heating of the bath is associated with fire and high temperatures. Therefore, building a brick bath, brica, slagoblock or boards, pay great attention to fire safety. This warning also concerns the electrical wiring device, since the rooms inside the bath have high humidity The air and the risk of closing the power grid due to condensate is very large. 
We hope that reading our article will push you on independent building Bath!
If you wish to spend a good time at the cottage, then you need a bath. A small bath with their own hands, built on the plot, will save and money, and square metersIf you do not have a lot of free space for the construction of the bath. In this article, we will talk about how to design and how to build a small-sized bath itself.
Size of a small bath

Bath size should be determined depending on the number of people who will regularly visit it at one time. If your family consists of 2-4 people, then you can manage the budget option of this building. In this case, the length of the bath will be 6 m, the height is 2 m, and the width is 2.2 m. Inside there must be four separate rooms. Each of them will perform its function, and have certain dimensions. For example, each room will have some dimensions. The width of the bath is 2.2 m, and the length:
- earbank 1300 mm;
- restroom -2100 mm;
- shower -1000 mm;
- parium -1600 mm.
For wage and shower, it will be necessary to perform individual calculations on the area, because the shelves must be placed in the steam room, and in the shower - pallet.
A small bath must be built in the usual sequence. The rules of construction for its construction are no different from those for which the rest of the buildings are erected.
Construction of foundation

The construction of each building begins with the construction of the foundation. To determine which foundation is to lay as the base of the bath, first determine the quality of the soil to which it will fit. If the soil is solid enough and is dry dry, then you can build a simplified type foundation. To do this, put flat stones on the intended perimeter. Next, similar stones fill interior foundation. The gaps should fill the clay and tamper. Top to put a layer of wood bars from a tree pre-treated with hot bitumen. You can, in fact, do not use clay. To do this, you can make a waterproofing layer, which will cover the stones.
As a rule, for the bath mainly choose a column foundation. For these purposes, you can use stone, ready-made concrete pipes, bricks, or asbestos pipes, the internal space of which is filled with concrete.
Another option is to install a bath on wooden, metal or concrete piles. However, with such a situation, it will be necessary to take care of the heat insulation of the floor.

Ribbon foundation is the most common and reliable. For its construction, you will need to roll out the trench and make a pillow from rubble and wet rammed sand. After it is necessary to make a mating of reinforcement and pour with concrete solution. Ruberoid can be used for the waterproofing layer.
If sand prevails in the ground, the groundwater is very high, then to arrange the base of the bath should be applied reinforced concrete structures Block type. For the bag of mini-size, it will be enough to use ten such blocks, the dimensions of which are 20 × 20 × 40 cm.

After the foundation is ready, install the carcass of the bathhouse and take its walls, then partitions separating the pre-banker. Recreation room and shower should be insulated with a mixture of sawdust and clay. The insulation should be closed by polystyrene sheets, after which the walls should be listed with the clapboard. To prevent the penetration of rodents inside the bath, you can add broken glass to the ceramzite. Before laying the lining, you need to carry out heat and vaporizolation, as well as insulate the walls mineral Vata.. After that, shelter their clapboard.
Walls in the shower do from polystyrene or galvanized. These materials are more durable than wooden lining, they better tolerate temperature and moisture drops.
Feeding and draining water. How to do?

If you are equipping a bathhouse for giving, but you have no pressure water pipe, you can organize a samotane water supply. To do this, it is necessary to build a design that will consist of:
- two galvanized tanks (50 l);
- hose.
Tank s hot water With respect to the cold, you need to install half the meters below. One end of the hose fasten the at the bottom of the tank with cold water, and the second connect to the top of the tank with hot water. Water circulation will be possible due to the temperature difference in the pipes. To organize water supply to shower, the tanks must be combined with a separate pipe. At the end of the pipe, a mixer is mandatory.
To organize the drain of the water, the installation of sewage pipes, which will divert the drains in drain pit, dug and equipped. For quick sampling, the pipe must be laid with a sufficient bias.
Installing the heating system

Water in the bath is heated due to the stove, which is in the steam room. In addition, a TEN can be used, which can be bought in a specialized store.
If you decide to heat the water with a stove, then install the U-shaped pipe in the hottest point of the furnace and wore the foundation of the chimney. Water supply must be on the housing, and the output is 5 cm above it.
If you decide to use a TEN to heat the water, then install it under cold water tank, connecting with stainless steel pipes and hoses.
Lighting and ventilation device

In a small bath, ventilation is placed simply. For this on the wall opposite entrance doorMake a hole that will be easy to open and close the damper.
To organize lighting in a small bath, it will be enough to establish several halogen lamps having a heat-resistant case. To reduce voltage from 220 to 12 V, use a small transformer. Now your small sauna is ready!
Features of a single street mini bath

To assemble a bath for one person, you will need to purchase lightly insulated panels, which are a frame from BRUSEV, covered with thin boards. Standard size The frames are 185 × 60 cm. This will require a timber, the cross section of which is 1-1.5 cm and 3 × 6 cm. To insulate the bath and provide vaporizolation, fill the panel with minvata or foam. On the inside, the material is trimmed by a special foil from aluminum and polyethylene film. As for the outside, it is covered with a pergamine or rubberoid. The panel can be sewn.
In one of the panels, the door should be made, the size of 160 × 60 cm. Install in it small window, preferably with double glass. The bath must be hermetic, door constipation at the bottom and at the top provide it. At the bottom of one of the panels, on the side where the heating device will be installed, make ventilation hole With a plug.
To build a single bath you need to assemble the design and most importantly - ensure its heat and waterproofing.
For the construction of the steam having an area of \u200b\u200b1.8 × 1.3 m, you will be enough 10 panels on the walls and 2 on the roof. Seams fill in Vatin and close their wooden planks on both sides. To protect the ceiling from atmospheric precipitation, cover it from the street with a triple layer Ruberoid. If you enjoy the bath in the warm season and only, then the floor is not worth the insulation. If it is planned for year-round use of the bath, pour the ribbon foundation and insulate it. To warm it up to 90 ° C, you can use an indoor electroflit that has a power of 3 kW. On the slab, install a metal bucket with stones and turn it on for several hours. Then proceed to bath procedures.
Little bath indoor

You can equip a small steam room in the house, for example, in the bathroom. It is possible to implement this two methods. In the first case, you will need to install a removable shelf on two bars. From the floor height should be no more than one meter. Bruks are fixed to the wall of reliable anchors. Over the bathroom, the height of the shelf must be within 400-600 mm.
To climb the shelf, you will need to make several steps or stairs, using rubber spyers. The staircase tie to the shelf by the twine. The width of the shelf must be 600 mm. It is heated by such an electric stilt steam. It can be installed on a special stand, for example, above the washbasin. As a heater, use a pelvic or a bucket of metal, which should be filled with stones and installed on the stove.
In another embodiment, make a sedent steam on the bath. It will be closed with removable wooden shields. The shelves will be used as a seat, and you can rely on the durable shields. In order for the room reminding you with a bath, walls and ceiling over the bathroom, we cover the wallpaper or install removable shields. They can be installed and removed without special efforts. Heating is performed electric stove With a container with hot stones.
Choose your Little Bath version, pay your actions and proceed!
Video
Bath minimum dimensions built in full size 2 part \\ sauna small
Photo


