Build a brick oven with your own hands. The simplest kitchen brick oven-stove (detailed ordering diagram)
Those who have a house or a summer cottage think about heating the room. The sales market has a large number of such products, but not everyone can afford to buy what they want. All the more expensive thing in a small room and not everyone wants to buy. Although it is possible to solve the issue with heating, install the usual rough with a stove bench, which can be done with your own hands.
This is a small brick oven that will heat the room and make it possible to cook food, you can equip the oven with a stove bench, and plaster or cladding will harmoniously fit the unit into the interior.
To make the rough with your own hands, you will need to prepare materials. Try to take all components for the manufacture of a stove with a stove bench good quality, because the design will serve you for more than one year.
- The brick is ceramic. This will be the facing of the product. Take without chips and one color. It has various configurations, so first you should draw up a drawing of the product and decide what kind of appearance it will have. Instead of lining the stove with a stove bench, decorative or ordinary plaster... If plaster is used, then the surface can be painted.
- Refractory bricks. It is able to withstand high temperatures. Calculate how much you need to make a combustion chamber with your own hands.
- Clay and sand will be required in the manufacture of mortar for masonry structures.
- Fireclay powder will be used as an additive to the solution.
- Grizzlies. It is advisable to take made of cast iron. Metal, when using coal, will burn out very quickly.
- Furnace door.
- Blower door.
- Smoke valve.
- For waterproofing, you should take roofing material.
Editing rough
The stove is rough with a do-it-yourself stove bench begins to build from the foundation. A brick stove with a stove bench has a fairly large weight and the foundation must withstand it. When planning to build a rude with a couch with your own hands, you first need to draw up a work plan. Keep in mind that rough with a couch can be different. If a stove with a stove bench is being built, then it makes sense to equip a separate firebox for the hob. Since in the summer it is unlikely that anyone will use a hot stove, and the presence of a separate firebox will save fuel.
This is what the furnace design is like:
- The lining is just two rows made of ceramic bricks. Serves as the basis for further installation of the furnace.
- The ashtray chamber occupies approximately four rows of brickwork.
- The firebox is a chamber where fuel is burned, approximately eleven rows (selected individually).
- Convector - special channels in which the outgoing gases give their heat to the furnace structure. This will take about seventeen rows.
The ash pan is made of solid ceramic bricks. When making a firebox with your own hands, refractory bricks are used.
Foundation
Determine the location of the oven - and you can start. Building a foundation with your own hands is not a very quick process.
- We make markings at the installation site.
- We dig a hole 25 cm larger than the size of the product.
- We fill it with rubble. You can use a brick break and any stones that are on the site.
- We ram it all in the hole.
- We make a liquid solution. We take cement grade 300 and mix in a container with sand in a 1: 2 ratio. Add water and bring to liquid state... We pour crushed stone until it is completely filled.
- After drying, put a continuous row of bricks over the pouring area. When laying, we use a building level, the area of the foundation must be parallel to the ground.
- We put roofing material after the masonry has dried. This will be waterproofing.

Masonry rough
To make a structure with your own hands, it should be used with the addition of chamotte powder. The cement mortar does not hold the temperature well, so it should not be used. First, you need to determine the proportion of clay that should be used when mixing the solution. To prepare a solution with your own hands, you need to mix clay with sand in different proportions and mold balls.
Put it on and let it dry completely. After drying, each of the balls is dropped onto a hard surface from a height of one meter. One that does not break or wrinkle, and will be the correct ratio of components.
- Before preparing the solution, all components should be sieved through sieve with a mesh of about 5 mm... Carefully feel the entire dry mixture with your hands and remove excess debris and unnecessary stones.
- Pour the resulting dry mixture into the box for preparing the solution. Pour water and let the clay brew (sour). It is better to start preparing the solution in the evening. The solution will be ready by morning. Such a mixture will fit well on the brick, with light pressing, all the seams will be filled.
- In the morning, stir the solution again and bring it to the state of sour cream. For mixing, it is better to use a drill using special attachment for mixing the solution.

Attention: before doing the masonry with your own hands, lay the first row on a dry one and determine the correctness of the design.
Masonry technology
This will allow the whole structure to work correctly:
- It is necessary to choose the correct cross-section of the chimney, which is indicated in the manufacturer's instructions.
- The chimney should not be less than five meters.
- Horizontal sections of the structure should not be more than 1 meter.
- Provide areas for cleaning and maintenance of the structure.
- The total wall thickness of the chimney must not be less than 0.5 mm.
- There should be no more than three turns in the channel structure.
- During the transition, there should be no connections, and this part is fenced off with a special pipe.
- The joints are fastened with clamps and treated with a sealant. The ingress of exhaust gases must be prevented.
- After installation, the pipe must be insulated, this will reduce the amount of condensate and retain heat.
The finished brick oven is finished. The easiest option is plastering followed by painting. Can be used and decorative plaster... For finishing, ordinary plaster based on clay, sand and cement is used. But it is even easier if the plaster is done using a ready-made mixture.
It should be noted that plaster is used not only to improve appearance... Correctly applied plaster provides additional airtightness to the brickwork.
And in order for the plaster to adhere well, the composition must be applied to the cleaned surface with preliminary cleaned seams. After the plaster is dry, the surface can be painted over.
The proposed design will completely satisfy the heating needs of a small room. After working, everyone can make it with their own hands. Although for a large room you need to do something more serious.
This article contains an understandable, very detailed photographic instruction for masonry. brick oven do it yourself, tips on how not to make a mistake when choosing the necessary materials and how to properly place the stove in a private house for optimal heating of a larger area.
Options for installing the stove in the house
The placement of the stove depends entirely on what the owners expect from it. If it is installed in a small house and will be used as a fireplace for friendly gatherings, you can use the first scheme. Such a stove is a good option for grilling barbecue or kebabs.
Brick oven placement options
The second scheme is for a solid square house. In this case, the front side of the fireplace stove goes into the living room, the stove walls heat both bedrooms, and the heat in the rest of the rooms is maintained by means of heat exchange.
The third scheme with an oven for heating and cooking - a budget option housing for a bachelor or small family. Pros - a warm bed and the possibility of placing a dryer in the hallway.
Important: it is worth taking care of external insulation at home, because it greatly increases the efficiency of stove heating.
Selection of bricks, sand, mortar
In order for the oven to serve for a long time, you need to correctly select all the materials. There are three types of bricks:
- Ceramic - can be used to build a furnace.
- Silicate - generally not suitable in this case, even double M150.
- Refractory - ideal, but they are often used only for the firebox and fireplaces, varieties: fireclay, refractory bricks, etc.

Advice: when choosing a brick for a stove, you need to completely abandon its hollow types.
The mortar is made from clay. Red clay is suitable if the stove is made of red brick; when using fireclay, a special one is required. fireclay... Some stove-makers still make their own solution in the old fashioned way from river sand with a grain of 1-1.5 mm, clay (in a ratio of 2.5: 1) and water. At the same time, it is advisable to use angular quarry sand without foreign inclusions and the so-called oily clay. However, it is easier and more reliable to buy a ready-made oven mixture in a store, preparing it according to the instructions.
From accessories, you need to purchase grates, blower and furnace doors, soot cleaners, latches or dampers.
Preparation, tool list
Before starting work, you need to determine and mark the place that the new stove will take.
The chimney pipe must be located from roof rafters roofs no closer than 15 cm.
If the laying is done by you for the first time, professional stove-makers advise you to practice in advance by making a model of the future stove from the prepared brick. Naturally, no solution. This minimizes possible risks in real laying, allowing you to learn from your mistakes, which can still be corrected in the layout.
The stove foundation requires preliminary waterproofing, in terms of area it should exceed the area of the stove.
When laying a new row, you need to control the absolute verticality of the walls.

To build a brick oven, you need the following tools:
- plumb line;
- trowel;
- roulette;
- putty knife;
- Bulgarian;
- knitting wire;
- building level;
- metal strips, corners;
- containers for cement and clay mortar.
Step-by-step instructions with a photo on laying the stove
Different stove-makers have their own masonry technologies and their own secrets that have come from years of experience. Here is information about enough easy way creating a fireplace stove for heating two-story house, the process will not seem extremely difficult even for novice stove-makers.
Foundation laying
A basic row of brickwork will serve as the foundation. It is made with any brick, some stove-makers even cover this level with rubble.

When laying the base row, it is used cement mortar.

The foundation is completely filled with mortar, the layer is leveled.

Erection of the furnace body
The first oven row is marked. The horizontal from which they are repelled when marking is the wall of the room.

Where the fireplace is planned to be placed, a grate is placed. From this row, bricks are already laid on the oven mortar.

An important stage of work is the scrupulous leveling of each new row.

Laying the second row. The stove wall, which is closest to the wall of the room, is reinforced with additional bricks to increase fire safety.
The place where it will be located in the 2nd row remains empty, the rest of the furnace is laid completely. A door is being mounted through which the owners will clean out the ash.

The door is installed on the mortar, leveled off. For a more reliable fixation, it is fixed with wire, which must be laid between the bricks.


The grating is not laid on a simple brick, but on a refractory brick. Holes are cut in the fireclay bricks so that it lies on the same level as the bricks.

The size of the brick can be easily adjusted - the excess is measured out and neatly cut off.

The large door is mounted next to the installed grille.

The large oven door is similarly secured with wire fasteners.

The first furnace row is placed exactly above the fireplace; it is reinforced with metal corners and a strip or thick sheet metal. So that the masonry can lie on them, it is cut through with a grinder, then the slots are manually adjusted to the desired size.

The next brick row is laid.

A fireplace grate is laid on the fire brick along with the brick row.

The door is fixed, the brick is strictly adjusted to fit it.

The firebox of the new stove with a fireplace is ready.

Fire-resistant fireclay bricks are placed over the furnace firebox.

The stove body is built.
Chimney creation
The place left for the chimney is divided into wells. The design requires reinforcement with metal plates.

Brick chimney wells are being laid.

Soot cleaners are installed above the roof of the firebox.

The wells are again divided, the first rows of the walls should be reinforced with metal strips.

After strengthening, the ceiling of the furnace body is erected. The chimney space remains empty.

The cornice of the body is laid out, then the chimneys are laid.

The final stage of work on the ground floor. The stove is located at the bottom left, the smoke inside the chimneys moves in a spiral and comes out at the top left. The final division of the wells is covered with a tin sheet. In order to compensate for the pressure inside the fireplace, 2 brick rows are laid on the sheet metal.

Two chimneys stretch to the second floor of the house - from the fireplace and the stove itself, they are separated from each other. A separate damper is required for each chimney.

Floor level of the second floor. Waterproofing is installed here, the chimney is reinforced with metal corners again. To save money and not build a heating stove on the second floor, the chimney of the stove under construction is again divided. The smoke will go along it like a snake, having time to warm up the room. In order for the chimney to warm up much faster, it is placed in the area of the second floor with a thickness of 1/4 or 1/2 of a brick.

A hole for the chimney is carefully cut out in the roof.

Before removing the chimney to the roof, it is reinforced with metal corners.

If the chimney is located in the immediate vicinity of the roof ridge, it must be laid out above the ridge by at least 0.5 meters. If further, then the height of the chimney is allowed, equal to the height of the ridge, but not lower. In this case, the wind increases the draft of the stove, raising the smoke upward.

Even a small stove in the house is coziness and comfort. Stoves bigger size require increased dexterity and additional materials, however, the principle of their construction is similar to the one described above.
Heating the house in winter time with the help of stove heating is suitable for those who have Vacation home... This heating method is not very suitable for apartments. Unfortunately, it will be quite difficult to fold the stove with your own hands, but after carefully studying the layouts of brick stoves, it is possible. If you want to save your time, it is better to turn to a professional in this business - a stove-maker. He will tell you what kind of masonry is suitable in a particular case.
The main types and device of brick ovens
1. Gate valve;
2. Cast iron plate;
3. Clean door;
4. Oven;
5. Firebox door;
6. Blower door.
There are two main types of brick ovens:
- Heating stoves... The scheme of the brickwork of the heating stove is very simple, which is why the installation does not take much time. They are intended only for heating the room.
- The most widespread and demanded type of furnaces is heating and cooking. They allow you to both heat the house and cook food.
There are many schemes for brickwork stoves. The main structural elements of any furnace are:
- Toplivnik- where the fuel used to heat the house is loaded. The dimensions of the firebox depend on the type of fuel used. For its laying, only refractory bricks are used, since it is in direct contact with fire.
- Chimney- designed to remove smoke and gases that are formed during the combustion process. Its design should not have a large number bends, if possible, it is better to make it completely vertical. The fewer bends, the better the room heats up.
- Ash pan or blower chamber Is also one of the important parts of the furnace design. Ash accumulates in the ash pan - a product of burning wood and coal. Air enters the firebox through the blower, as a result of which the draft improves, and therefore the quality of heating the dwelling. The ash pan chamber is located under the firebox and has a separate door for easy ash cleaning.
The design of the heating and cooking stove is characterized by the presence hob or even an oven.
Sauna stove: features of masonry
Brick sauna stoves are usually drawn up for specific cases. The dimensions of such ovens directly depend on the dimensions of the room in which they will be installed.
A distinctive feature of the design of the sauna stove is the presence of a heater. This is a special compartment in the oven, with a lid through which water is supplied and stones are laid. The order of laying stoves with your own hands should be agreed with a professional, because for sauna stoves, safety, first of all

1 - brick oven on a separate foundation,
2 - firebox, 3 - boiler with water, 4 - backfill from boulders (heater), 5 - latch, 6 - door for giving, 7 - shelves, 8 - leaking wooden floor (plank, log) on waterproof beams.
When choosing a project, it is necessary to take into account some features in the device of sauna stoves.:
- Toplivnik in sauna stove definitely needed big size... The blower door and it itself must be large in order to ensure a good flow of air into the firebox.
- The grates should be laid along the blower channel for better traction. But due to the problematic nature of purchasing long grates, most often you have to buy small grates and lay them across.
- If flammable structures in the bathhouse are not protected by refractory materials, the distance from them to the stove should be more than 30 cm.
- If the stove is located above the firebox, the height of the stove should be at least 55 cm. This is necessary for better heating of the stones.
- Before laying a brick bath stove on a mortar, it is better to lay out the rows first dry. And only after leveling them, use a masonry mixture.
- The horizontality and verticality of the masonry can be checked with a level. If there are minimal deviations in the masonry, they need to be corrected.
- All doors must be properly secured. For this, during installation, steel wire is used, which is attached to specially made recesses in the bricks.
- Where the flue pipe passes through the ceiling or wall, there must be a fireproof insulation.
- When mixing the masonry mixture, only high-quality clay and fine sand are used.
Square oven with bottom heating

Square oven with bottom heating
Distinctive design feature square oven with bottom heating, is that the height of the fuel compartment is relatively high. On both sides of the firebox, two cavities are symmetrically located for exhausting gases into chambers located on the side, in the outer walls of the stove. From these chambers, gases enter the risers and then rise upward, where the upper dome is formed from the cavities, consisting of three U-shaped cavities. These cameras are located parallel to each other.
In the upper section of the rear and middle cavities, heated air is retained, and the cooled fuel combustion products are removed through special openings into the cavity, which is connected to the chimney. Then they are taken out into the street.
Any kind of coal and wood can be used to heat the room with the stove of this device. But, when using coal and anthracite, the walls of the furnace must be laid from fire-resistant bricks.
The scheme of laying a furnace with a bottom heating consists of 3 hoods: an upper section and 2 large cavities.
Masonry and design features of the furnace V.E. Grum-Grzhimailo

Furnace designed by V.E. Grum-Grzhimailo.
A feature of the VE Grum-Grzhimailo furnace is that it has the shape of a cylinder and is enclosed in a steel case. There is no gas turnover in it. The movement of gases in such a furnace occurs under the influence of gravity, and not with the help of traction. Heavy cold gases go down, and heated light ones go up.
The design of this oven consists of two parts.:
- The upper chamber, in which there is no smoke circulation. It looks like an upside-down glass or cap. Therefore, these furnaces are called channelless and bell-type.
- The lower section is a firebox, in the ceiling of which there is a hole (hailo) for the outlet of smoke and gases to the upper section.
The heated flue gases do not move from the high to the chimney, they reach the ceiling, and after they have cooled down, they go down to the base of the firebox. From there, they will enter the chimney and be discharged outside.
The brickwork of this oven with your own hands is quite simple. The advantage of the VE Grum-Grzhimailo furnace is that it cools down for a long time and uses 80% of the heat generated by the fuel during combustion.
For a furnace designed by V.E. Grum-Grzhimailo, anthracite and hard coal are most suitable as fuel. When using wood fuel, the gaps between the buttresses are clogged with soot. Cleaning the soot is a rather complicated process, because it is difficult to reach all the cracks through the cleaning doors.
Bunk oven for home: masonry and features

Layout diagram of a bunk oven for a home. Typical.
A bunk oven is essentially two identical ovens, one above the other. To facilitate the construction and save materials, layouts with empty chambers are made between the ovens. The masonry, filling the gap between the two structures, serves as the basis for the top.
The chimney pipe of the stove, which is located at the bottom, passes through the upper one, so its heating area is slightly smaller. The chimney of the upper stove is brought out separately. Laying a bunk oven is quite simple to perform. Doors for cleaning the furnaces from soot are located: in the back - in the lower, and in the side wall - in the upper structure. It is best to use anthracite or hard coal as fuel.
When overlapping the top of empty chambers, it is often used reinforced concrete slab... Due to this, the level of strength and stability of the structure increases. Bricklaying for the stove must be done very carefully. Indeed, in the event of a malfunction, the repair will be difficult.
A two-deck oven is ideal for a two-deck country house... For its construction, you can use furnace schemes, which are made in the form of a square or rectangle.
Video instruction for laying a bunk oven
What is better to use for masonry: materials and tools

Tools for laying stoves: a - mrlotok-pick;
b - oven hammer; c - rule; g - wooden shovel;
d - building level; e - wet brush; g - pliers;
h - cycle; and - stukalets; k - scribe; l - rasp;
m - square; n - plumb line; o - sledgehammer; p - chisel;
p - trowel; c - jointing
For laying furnaces, in most cases, fire-resistant fireclay bricks are used. Its main advantage over the rest of the brick is that, although it heats up for a long time, it keeps heat for a very long time. This allows the room to warm up evenly and maintains a constant temperature in it.
When, the main thing is to pay attention to the quality of the material. If the brick is burnt too much, its refractoriness and quality will decrease. This brick is best used for laying out the base of the oven. It is not very suitable for a firebox, since heat exchange will be disrupted.
But, fireclay bricks are best suited for laying out parts that are in direct contact with fire. As facing material ceramic brick is suitable.
For laying the structure, you can not use silicate brick... It does not stick to the solution, and absorbs moisture under heat loads.
Bricklaying technology is not complicated. Good enough to be able to fold the stove yourself, or ask for help from a specialist.
The clay, brick and sand used for masonry must be of very high quality. After all, a stove is a device that is created for many years, and its use should not be flammable.
Tools that will be needed for laying a brick structure:
- A trowel for laying out mortar.
- Pickaxe hammer, for leveling and splitting bricks if needed.
- Shovel for mixing mortar.
- Grooves for smoothing convex and concave seams.
- Ordering tool, to check the evenness of laying out the rows of bricks.
Basic principles of laying brick structures:
- The bricks must be laid only one at a time. For the inexperienced, it is better to lay out the row without mortar and only then use the mixture.
- Each brick is thoroughly cleaned of dust and chips with a brush.
- For better adhesion of the solution, the ceramic brick is immersed in water for a short time.
- Fireclay bricks should not be wetted with water under any circumstances!
- After laying, the brick cannot be moved and tapped, therefore it must be laid in one confident movement.
- If it was not possible to lay the brick right away, then it is removed and the solution is cleaned.
- The solution that has been cleaned off can no longer be used.
All now more people make their choice in favor of stoves in their homes. This is due, first of all, to the efficiency of this heating method. It is in the pursuit of fuel economy and better heat transfer that all new designs of stoves are being created. The most important thing is to carefully study and choose a scheme that is suitable for a particular home.
The disadvantage of the furnace is the need to constantly maintain combustion or smoldering in the furnace. But, when using quality materials and choosing correct scheme, which is suitable for the home, the need for constant tossing of fuel is significantly reduced. Another disadvantage is the inability to use the stove in the summer for cooking.
Despite the fact that very many today are equipped with one or another heating system, brick heating structures do not lose their popularity. On the contrary, engineers and craftsmen are developing more and more new models of stoves, more compact, including various functions. Indeed, stove heating will never be superfluous for a private house, as it can help out the owners in different situations. For example, in autumn or spring, when the nights are cold, but it seems to be too early to turn on heating system, a heated stove will create a cozy atmosphere in the rooms and relieve them of excess moisture. The stove will help maintain an optimally favorable atmosphere in the house and a temperature balance that is comfortable for a person.
Therefore, a search query about how to fold the oven with your own hands, the drawings of which will tell in detail about correct sequence masonry work, does not leave the Internet. Today, even those people who have no stove-maker experience at all show a desire to try their hand at this craft. If a decision is made to install a stove in the house on their own, then beginners are advised to choose a simple version of this structure with an understandable order.
In addition to the availability of the structure, when choosing, you should pay attention to its heat capacity, that is, what area it is designed for heating. It is important to consider functionality structures and decide what you would like to get from it.
Varieties of brick ovens
There are several basic types of ovens - some of them perform only one main task - it is heating the house, others are used only for cooking, and still others include several functions in their "set of possibilities". Therefore, in order to determine the desired model, you need to know what each of the varieties is.
- the structure is able not only to heat one or two rooms, but also to help prepare food and boil water. If the model is equipped with an oven and a drying niche, then it becomes possible to bake bread and dry vegetables and fruits for the winter.

The heating and cooking stove is often built into the wall or it acts as a wall itself - for this, it is turned with the stove and firebox towards the kitchen, and the back wall into the living area of the house. Two problems can be solved at once - heating the premises and getting the possibility of cooking in a separate room.
If the structure is additionally equipped with a fireplace, then the stove will work not only as functional building but will become decorative decoration at home.
- The heating type of stoves is designed only for heating the premises of the house. Some models have not only a combustion chamber, but also a fireplace. Thus, the oven can operate in two modes - when only one of the functions is used, or they are both involved at the same time. Most often, heating stoves are built into the wall between rooms or are installed in the middle of one large hall, dividing it into zones.

A similar structure is being erected both for the main heating of the house, and as an additional one, which is used in the spring and autumn to maintain normal temperature and humidity in rooms. Heating stoves are usually installed when the kitchen has already realized its own possibility of cooking, or in a house with a large total area, where several stoves are being erected that perform various functions.
On summer cottage v small house it is better to install a multifunctional structure that can help out in several situations at once.
- The cooking stove is erected in the kitchen, and its design is designed specifically for quick cooking food. However, this function does not deprive it of its heating capabilities, since its entire body, back wall and cast-iron stove warm up well, giving off heat to the room.
 The main function of this stove is cooking.
 The cooking stove is usually compact, so it is perfect for installing it in a country house or in a small kitchen of a private house.
Having such a compact, but functional unit, you can eliminate the risk of freezing or being left without dinner and hot tea, even if the electricity and gas supply is cut off.
Many different models of all the listed types of furnaces have been developed. They can be quite miniature and take up a large area. Therefore, stopping at one of the models, before stocking up on materials for its construction, you need to measure and draw its base on the floor of the room in which it is planned to be installed. Thus, it will be possible to visually determine how much free space will remain in the room.
How to choose the right place for installing the oven?
In order for the stove to work efficiently and to transfer heat to the premises of the house as much as possible, as well as to be fireproof, it is necessary to choose the correct location for it.
It is especially important to consider this point in the event that the stove is built into a finished building, since the chimney must pass between the ceiling beams and not accidentally stumble upon them, therefore the installation option must be calculated as accurately as possible.
Stove brick building can be installed in different places of the room or between two rooms. Which place is better to choose will be discussed later.
- To obtain maximum effect from the oven, do not install it near outer wall buildings, as it will quickly cool down and is unlikely to be able to heat more than one room.
- Some models of stoves are installed in the center of the room or offset from it to one side or the other. This location is chosen if the room needs to be divided into separate zones. Moreover, different sides of the furnace structure may have a different decorative trim, made in a style corresponding to the design of a specific area of the room.
- Quite often, the stove is built into the wall between two or even three rooms, which makes it possible to use the generated heat as efficiently as possible. In this case, for fire safety purposes, it is very important to provide reliable insulation of walls, ceiling and attic floor at the place of passage
- When choosing an installation site, it is necessary to provide for the fact that each side of the foundation for the furnace should be 100 ÷ 150 mm larger than the base of the furnace itself.
- In order to accurately determine the size of the base and the height of the oven, it is recommended to always select the model to which the ordering diagram is attached.
Having chosen the place for its installation, you can purchase everything necessary materials and prepare the right tools... The number of materials will depend on the size and functional features stove models, and the masonry tools are always the same.
Tools required for masonry work
 For work, you will need to prepare a very "solid" set of tools
 From tools for laying bricks and pouring the foundation you will need:
- Rule - This tool is used to level the surface of a concrete-poured foundation.
- A pick hammer is needed to split and cut bricks.
- Veselka is a wooden spatula used for grinding clay and lime mortar.
- The kiln hammer is used to split bricks and remove dried, protruding mortar from the masonry.
- A broom made of bast is designed to clean the internal channels of the oven from sand and solution that has got into them.
- A lead scribe is needed for markings in the event that the stove is finished with tiles.
- The building level is necessary to control the evenness of the rows and the surface of the walls.
- Scribe - a rod used for markings.
- A plumb line is a cord with a load designed to check the verticality of the output surfaces.
- Building angle with a ruler to check the correctness of external and inner corners since they must be perfectly straight.
- Pliers are used to bend and nibble the wire to fix the cast iron elements of the furnace in the seams of the masonry.
- Rasp - This tool is used to remove sagging and lapping lumps in dry masonry.
- The chisel is used for splitting bricks and parsing old masonry.
- A rubber hammer is required to level the brick laid on the mortar by tapping.
- (trowels) of different sizes are used to apply mortar when laying bricks and remove the mixture protruding from the seams.
- Joining is a tool for leveling the mortar in the joints of the masonry. It is used in the event that the masonry is made "for joining", without further facing.
- Manual ramming is required to compact the soil and backfill layers into the foundation pit.
- Containers for mixing solution and clean water.
- Sieve with metal mesh for sifting sand.

- A stand for the convenience of working at a height, called "goats". The surface of this device is of sufficient size not only for comfortable movement of the master, but also for installing a container filled with solution.
Arrangement of the foundation for a brick stove
The foundation for the furnace is usually prepared together with the foundation of the house, but they should not contact each other in any way, and even more so - be combined into a single structure. New foundations tend to shrink, which can deform one of them, and this will cause damage to the other. That is why they should be installed necessarily separately from each other.
In the case of erecting a stove in an already built house with a wooden floor, a fairly large-scale work will have to be done. In the place where the stove will be installed, the floor boards will have to be removed by cutting a hole to the size of the future foundation.
If the foundation under the house is monolithic, and the chosen model of the stove is not too massive, then the structure can be erected on it, having previously laid a waterproofing material on the installation site.
The foundation should have the shape of the base of the furnace, however, as mentioned above, each of its sides is made larger than the side of the furnace by 100 ÷ 150 mm.
- If the floor in the house is wooden, markings are made on it, along which the boards will be cut.
- Then, a foundation pit is dug in the subfloor soil according to the shape of the future foundation, the depth of which can vary from 450 to 700 mm, depending on the composition of the soil.
- The bottom of the pit is compacted, and its walls are lined plastic wrap or roofing material.

- Then, a sand cushion with a thickness of 100 ÷ 150 mm is laid on the bottom, depending on the depth of the pit, and compacted well with the help of a manual rammer.
- The next layer, on top of the sand, is filled with crushed stone, which, if possible, is also compacted. This layer can be from 150 to 200 mm.
- Further, along the perimeter of the pit, a wooden formwork in the form of a box is installed. Moreover, polyethylene or roofing felt remains inside it, and then fixed to the walls with a stapler and staples. This waterproof material will keep the mortar poured into the formwork, preventing moisture from leaving it, which will allow the slab to dry and harden evenly.
- The foundation should have a height of about 250 mm below the level of the "clean" floor, that is, two rows of bricks will need to be placed on the finished base so that it rises flush with the floor surface.
- In order to save bricks, some craftsmen, on the contrary, raise the foundation above the floor by 80 ÷ 100 mm. The convenience of such a solution also lies in the simpler joining of the side walls of the foundation with the surface of the floor covering.
- The next step into the formwork, to its entire height, is a reinforcing grid made of steel reinforcement with a thickness of 4 ÷ 6 mm. The rods are connected with each other by wire twists.
- Further, in the lower part of the formwork, for a thickness of 250 ÷ 300 mm, you can pour a rough concrete mortar, mixed from cement and gravel in proportions of 1: 3, or cement, crushed stone of the middle fraction with the addition of sand, in a ratio of 1: 2: 1. But, in principle, you can use ordinary concrete mortar from sand and cement.
- If a coarse mixture is poured down, then immediately, without waiting for it to set, a thinly mixed solution is laid out on top.
- The poured one is leveled by the rule along the upper edges of the formwork boards, after which it is recommended to lay and sink a reinforcing mesh with 50 mm cells into the solution and sink it by 15 ÷ 20 mm.

- The surface of the foundation is leveled again, and, if necessary, concrete mortar is added to the formwork, on top of the mesh.
- Further, the foundation is left to harden and gain strength - this process will take from three weeks to a month, depending on the thickness of the layers of the poured solution. To make the concrete more durable, it is recommended to spray it with water every day for the first week, starting from the second day.
- On top of the frozen foundation, waterproofing is laid, consisting of two or three sheets of roofing material, which are stacked one on top of the other.

- To start laying the first row, it is recommended to make markings on the waterproofing material, indicating the location of the furnace base. Thanks to the outlined perimeter of the base, it will be much easier to install the first row of bricks and keep the sides and corners even.
After these preparatory work, you can go to the masonry.
Dry masonry
Even experienced craftsmen, starting the laying of a previously unfamiliar structure, first produce it dry, that is, without mortar. This process helps to understand the intricacies of the internal channels of the oven and not make mistakes during the main masonry. The entire structure rises dry, and each of the rows must be laid out in accordance with the order applied to the furnace model.
When performing dry masonry, it is necessary to observe the thickness of the horizontal and vertical rows. To keep this parameter the same throughout the entire masonry, you can use strips 5 mm thick. Of course, it will be difficult to measure vertical seams in small pieces of laths when laying dry, so they will have to be determined visually, but for horizontal seams Reiki must be used. By applying them, after laying out the last row of the structure, you can see the real height of the furnace.
As an example of the use of rails, you can consider this photo.

It is especially important to adhere to a uniform thickness of the seams, if the laying is done for joining, and will not be finished with additional decorative materials in the future.
When laying dry, it is important to understand the configuration of the channel through which the smoke will leave the firebox and rise to the chimney. If, when laying out this passage, a mistake is made, then part or even the entire structure of the furnace will have to be shifted, since a back draft can form, and the smoke will go to the room when kindling.
Having raised the stove dry before laying the chimney, the structure is disassembled. Moreover, if not only whole, but also their small fragments were used in the rows, then during disassembly each of the rows can be folded in a separate pile, placing the row number on one of the bricks. Sometimes, in addition, the number of the brick is put down in each of the rows. Such a system will speed up the work, since all the material will be fitted and laid out in the right order, and all that remains is to soak it one by one and put it in the rows of the oven, but already in the solution.
Carrying out the main laying, two strips are installed on the edges of the previous row, between which a solution with a thickness of 60 ÷ 70 mm is applied. Then a brick of the top row is placed on it, leveled and tapped until it rests against the slats. It is necessary to have such calibration devices for three rows, since it can be pulled out of the seam only after the mortar has set. So, having laid out three rows, the slats are pulled from the lowest seam, cleaned and placed on the fourth - and so on. If you are not sure that the vertical seams will be of the same thickness, you can also prepare a short strip for them, which will be rearranged into the next seam immediately after aligning two adjacent bricks.

After pulling out the calibration strips from the seam, a sufficiently deep gap will remain between the bricks. It is filled with a solution, the excess of which is removed with a trowel, and then put in order with the help of jointing.
 Processing of seams "for joining"
 If the calibration strips were laid on both edges of the brick, then with inside the walls will also remain indentations between the seams. They also need to be carefully repaired, since the seams must be airtight, filled with mortar over the entire width of the brick.
It is very important, when laying on a mortar, to check each of the laid rows. building level so that the whole structure does not skew.
Simple accessories such as gauge strips will help you masonry neatly with the same joint width. Therefore, the entire surface of the oven will look as if the design was made by a professional master.
These nuances will help to simplify the process of erecting a furnace structure, to avoid mistakes that can lead to the need to redo all the work.
Schemes for the construction of brick ovens
Yu. Proskurin's stove with heating and cooking functions and a drying chamber
The model, developed by engineer Yu. Proskurin, can be called one of the simplest designs of heating and cooking stoves, which even a novice master can easily master. Despite the compact size of the structure, the stove is capable of performing all the functions necessary for a small house, since it is equipped with a hob and a drying chamber, which, if desired, can be replaced with a water-heating tank.

Such a stove is capable of heating one or two rooms with a total area of 17 ÷ 20 m², therefore it can be built into the wall between the kitchen and one of the small rooms of the house. In this case, it, of course, must be oriented in such a way that the structure is turned by the stove towards the kitchen area.
Dimensions of this heating facility, without height chimney are 750 × 630 × 2070 mm. The stove has two operating modes - winter and summer, which allows you to use only hob, without unnecessary heating of the whole house. Heat transfer from the furnace with its full firing is 1700 kcal / h.
For the construction of this heating structure, the following materials will be required:
| Name of materials and elements | Quantity (pcs.) | Element dimensions (mm) |
|---|---|---|
| Red brick M-200 (excluding pipe laying) | 281 ÷ 285 | 250 × 120 × 65 |
| Fireclay refractory brick, grade Ш-8 | 82 ÷ 85 | 250 × 120 × 65 |
| Furnace door | 1 | 210 × 250 |
| Doors for cleaning channels | 2 | 140 × 140 |
| Blower door | 1 | 140 × 250 |
| Summer gate valve for chimney | 1 | 130 × 130 |
| Firebox shutter | 1 | 130 × 130 |
| Hob latch | 1 | 130 × 130 |
| Grate | 1 | 200 × 300 |
| Single-burner hob | 1 | 410 × 340 |
| Steel strip | 1 | 40 × 260 × 5 |
| 1 | 40 × 350 × 5 | |
| 1 | 40 × 360 × 5 | |
| Steel corner | 1 | 40 × 40 × 635 |
| 3 | 40 × 40 × 510 | |
| 4 | 40 × 40 × 350 | |
| Roofing iron | 1 | 380 × 310 |
| Pre-furnace metal sheet | 1 | 500 × 700 |
To fill the foundation, it will be necessary to prepare cement, crushed stone, sand, gravel, roofing material, reinforcing bar or steel wire 5 ÷ 6 mm thick. If it is decided to replace the drying chamber with a hot water tank, you will have to purchase or manufacture it as well.
In order for the work to be successful, it is strongly recommended to study the order very carefully before starting it, and during the laying process, keep this scheme always at hand.

In this illustration, this oven is schematically represented in several sections. Here you can clearly see how the chimney channels pass inside the structure, trace the movement of smoke from the firebox to the chimney.
| Illustration (ordering) | Brief description of the performed operation |
|---|---|
 | The first row is solid, it is laid out according to the configuration shown in the diagram. The row should be perfectly even, since the reliability and durability of the entire structure will depend on its correct masonry. The row consists of 15 bricks. |
 | Second row. At this stage, the shape of the ash pan (blowing chamber) and the bottom of the two channels are laid, which will run vertically. Laying out a row, openings are left for installing the doors of the blower and cleaning chambers. They are installed on the same row. The row is laid out with 13 bricks. |
 | In the cast-iron doors, for their fastening in the masonry, special ears are provided, into which the prepared pieces of wire are inserted. Further, their ends are twisted together and embedded in the seams between the rows of side walls. To prevent the door from moving from the installation site until it is fully fixed, it is temporarily propped up with bricks. |
 | The third row is laid out according to the scheme. In it, the walls of the blower and cleaning chamber rise, and the ends of the wire are fixed in the seams between the rows of bricks, with the help of which the doors are fixed. For laying a row, you will need 13 red bricks. |
 | Fourth row. The chamber of vertical channels is divided into two, since then they will be laid out separately. The cross-section of the channels along their entire height will be 80 × 120 mm. In addition, the installed doors overlap in this row. You need to prepare 13 red bricks. |
 | Masonry of the fifth row is made of fireproof fireclay bricks, as the formation of the lower part of the firebox takes place. In the bricks that determine the place of laying the grate, from their inner edge, a cut is made at a right angle. The cutout should be approximately 10 x 10 mm ± 1 mm. The prepared bricks are laid over the blowing chamber. For laying a row, 16 fireclay bricks are required. |
 | After that, on the fifth row, a grate is installed in the prepared recesses in the bricks. It is sometimes mounted on clay mortar, but often - completely without solution. In the latter case, the gaps between the grating and the brick, which should be about 3 ÷ 5 mm, are filled with sand. |
 | Sixth row. The walls of the two vertical channels continue to form, and the walls of the furnace begin to erect. Laying is carried out only with fireclay bricks. The row consists of 12 fireclay bricks. |
 | Further, on the sixth row, is mounted furnace door, which, like the blower, is fixed with a wire in the seams of the side walls. However, before installation, the furnace door is equipped not only with wire fasteners, but also wrapped around the perimeter with an asbestos cord. This process must be carried out to create a thermal gap that will allow the metal to expand when it is strongly heated. |
 | The seventh and eighth rows are laid out from 12 refractory bricks each and correspond to the ordering scheme. During their laying, the walls of the firebox continue to rise and vertical channels form. It is clear that the brick laying in the rows is tied. |
 | When laying the ninth row, the door of the combustion chamber is blocked. To relieve the load from the cast-iron door, from the bricks installed on the side walls, the edges, turned towards the combustion chamber, are cut off at the same angle of 30˚. These cuts will serve as a kind of support for the middle brick, cut from both sides at an angle of 60˚, that is, it should fit perfectly between the two outer bricks. A row will require 12 fireclay bricks. |
 | On the tenth row, the fuel chamber is combined with the extreme vertical channel, since the smoke formed in the firebox was directed into this hole. In order to ensure the smooth running of the hot air, a cut of the protruding corner is made on the middle brick separating the furnace hole and the closed channel. This row will require 11 fireclay bricks. |
 | On the eleventh row, the masonry going around the combustion chamber differs in that bricks with a cutout to a brick depth of 10 × 20 mm are used for it. This step is for laying hob. For masonry, you will need 11 fireclay bricks. |
 | After the 11th row is laid out, the step on the bricks is covered with asbestos strips or a layer of clay, 3-4 mm thick (provided that the hob is 5 mm thick). These spacers will serve as a cushion and thermal gap for the hob. Then, the hob is installed in the place prepared for it. From the side where the cooking chamber will be formed, the corner part of the masonry is reinforced with a metal corner. |
 | From the twelfth row, only red bricks will be laid. At this stage, the walls of the cooking chamber are laid, and the previously opened vertical channel is again closed with a lintel. For laying this row, you need to prepare 10 bricks. |
 | The 13th row is laid out according to the scheme, but in the outer part of the first vertical channel a place is formed for installing a valve designed to switch the furnace modes to winter or summer operation. For this, cutouts are made in the brick to deepen the metal element. Further, on the prepared place, the stationary part of the chimney valve is fixed on the clay-sand mortar. The row is laid out with 10 bricks. |
 | 14th ÷ 18th rows - 10 bricks are required for each of them. The masonry on these rows has the same configuration, taking into account the dressing, and forms vertical channels and a cooking chamber. |
 | On the 18th row, the cooking chamber is overlapped by three steel corners, which form the basis for laying the next rows. One of these elements is installed on the edge of the "ceiling" of the cooking chamber, the second turns to the first and is installed at a distance of 250 mm from it (brick size), and the third corner back side presses against the second. Looking at this structure, it is quite possible to understand how the bricks should be laid. |
 | 19th row. Laying it out, they block the cooking chamber with 12 bricks, but a steam exhaust hole is formed above it, into which a valve will be installed. To mount this element, cutouts are made at the edges of the bricks installed on three sides, and a layer is removed from the outer brick, making its thickness smaller. Further, a valve is fixed to the prepared site on the clay mortar. |
 | The 20th row is laid out according to the presented scheme. At this stage, the installed valve is closed and the channel openings are formed. The side brick in the first vertical channel is compressed for smooth overflow of heated air. A row will require 15 bricks. |
 | On the 21st row, the first vertical channel and the opening for removing steam from the cooking chamber are combined into a common space. The brickwork is carried out along the perimeter of the kiln, the brick is installed in the form of walls, and a second vertical channel is framed. Moreover, the angular inner brick is cut to ensure a smooth escape of steam into the chimney. For masonry, you need to prepare 11 bricks. |
 | Further, on the same row, the resulting space is overlapped with steel strips, which will provide a basis for installing a metal plate and laying the next rows. |
 | The next step, which is performed on the same row, is the installation of a roofing iron plate. With the help of it, a chimney hole is formed, located on the opposite side of the window for steam out of the hob. |
 | On the 22nd row, a metal plate is overlapped with brickwork. Further laying is carried out according to the scheme. Only the channel openings remain open. Then with outside a metal corner is installed in the oven, which will strengthen the front part of the bottom of the drying chamber. 15 bricks are required for laying a row. |
 | 23rd row - the walls of the drying chamber are formed. Its back wall is made of brick, installed to one side - it will separate the chamber from the opening of the chimney duct. 12 bricks are used. |
 | On the 24th row of 11 bricks, the walls of the chimney and two vertical channels, as well as the drying chamber, are formed. |
 | 25th row - work continues according to the scheme, the masonry is made of 12 bricks. The second brick of the rear wall of the drying chamber is installed in the same way as the first brick on the side. |
 | 26th row. At this stage, the vertical channels are prepared to be combined into one space, so the bricks in the vertical channels are cut at a slight angle to direct the smoke in the desired direction. For laying a row, 11 bricks are required. |
 | On the 27th row, with the help of masonry, two vertical channels are combined, and a cleaning door is installed on this common chamber. The rear wall of the drying chamber is raised by another brick, which is installed on the side. The row consists of 11 bricks. |
 | On the 28th row, consisting of 10 bricks, laying is performed according to a scheme similar to the 27th row. And then the drying chamber space is covered with three metal corners. |
 | On the 29th row, almost the entire area is covered with brickwork, which is mounted in accordance with the scheme. Only the hole above is left open drying chamber, where the valve will be installed in the cuts made on the bricks framing this opening. The outer brick is cut, making it less thick. A gate valve is installed in the equipped "nest" on the clay mortar. The row consists of 17 bricks. |
 | The 30th row, consisting of 16 bricks, completely covers the surface of the furnace. The only exception is the chimney hole, the size of which is equal to half a brick. |
 | The chimney begins to form on the 31st to 32nd rows. |
If it is decided to do it yourself, then the work should be carried out slowly, approaching each stage of the process with all responsibility and maximum accuracy. Provided you follow all the recommendations and the provided ordering scheme, even a novice master will be able to cope with this work and gain experience for new creations.
And at the end of the article - another example of laying a miniature brick oven for a country house.
Video: compact brick oven for a small kitchen
For heating houses, completely different elements and equipment are currently used. However, the most traditional choice is considered to be a stove that can operate on a variety of fuels and can also have different sizes and other parameters. Even fireplaces can be created, but they are not intended for permanent heating of the building. Especially often stove heating is created in a private house, since often structures are built in a fairly large away from central heating systems.
Autonomous stove option is considered an excellent choice, and at the same time a special heating and cooking surface can be formed, with the help of which the stove can be used not only to heat the structure, but also for cooking and heating food.
Also different options ovens can be made by hand, so the cost of this process will be minimal.
The main types of equipment
There are many types of stoves, which differ in different parameters. The most popular are:
- , which can be used not only for a private house, but also for a bath or other small structure that needs heating, and they can be equipped with various elements for comfortable sleep or cooking;
- that can be used exclusively for space heating;
- rude being pretty interesting option, they have, which allows them to be used both for cooking and as a heating system.
What makes products equipped with coarse
This oven has interesting parameters and features... This includes, first of all, the fact that the most popular material for creating a structure is one with excellent parameters. These include excellent heat dissipation, so in the house such equipment will be provide fast and uniform heating.
This material is considered very attractive, therefore the products obtained from it fit perfectly into any interior. The stove created by do it yourself from ceramic bricks, v rustic style... This stove is well suited to buildings made of wood.
If desired, such equipment can be additionally decorated with help that has the same heat transfer rates as brick made of this material... However, due to a more attractive and interesting appearance, the resulting design will fit perfectly into absolutely any interior. In this case, it is possible to build equipment that will have the desired color and texture.
Constructive elements of the stove
 Coarse furnaces are an improvement over straight-through elements. But, at the same time, creating them with your own hands is not so difficult, but their very the device is considered simple... However, in order to make a really high-quality and reliable design, you must follow the instructions exactly, and also have at least initial skills in working with bricks.
Read also: Stove heating in a two-story house
To complete all the steps with your own hands, you need to have an idea of what structural elements are part of the equipment. These include:
- The blower, which is a special chamber designed for the passage of air. It usually contains matching door which allows the person to regulate the air supply. As a rule, there is a grate between this element of the stove and the chamber where the fuel is combusted.
- The fireman is the most working chamber, which is intended for loading and combustion of fuel, in it there is a door.
- presented in the form of vertically located channels through which passes heated gas from burnt fuel.
- The sponge used for cooking can have different sizes and parameters.
- The chimney serves as a convector, but its main purpose is to remove exhaust gases from the room to the street. It is important that it has a door that allows cleaning of the pipe, as well as a damper.
Before creating a structure, a diagram of the future equipment must be developed and drawn, and this issue must be approached with all responsibility and seriousness. After all, it is the drawings that are the basis for creating the stove itself... If there are mistakes or shortcomings in them, then this can lead to the fact that with your own hands you get a structure that will not cope with its main tasks, and it can also be completely dangerous to use.
What materials are used to create a stove
 Do this design can be made from completely different materials. These include:
- Brick, which is used for masonry, is used to create not only stoves, but also fireplaces. It is best to choose a ceramic brick, the appearance of which depends on attractiveness of the final design.
- Clay and sand used to create mortar used for brickwork in the house.
- A cast iron grate used for storing fuel, it can be used for both firewood and coal.
- Roofing material that allows you to create high-quality waterproofing of the furnace.
- for various structural elements.
Read also: How to properly heat the stove with coal
In order to build good and reliable equipment, all materials must be of high quality and beautiful, so their choice should be taken very seriously.
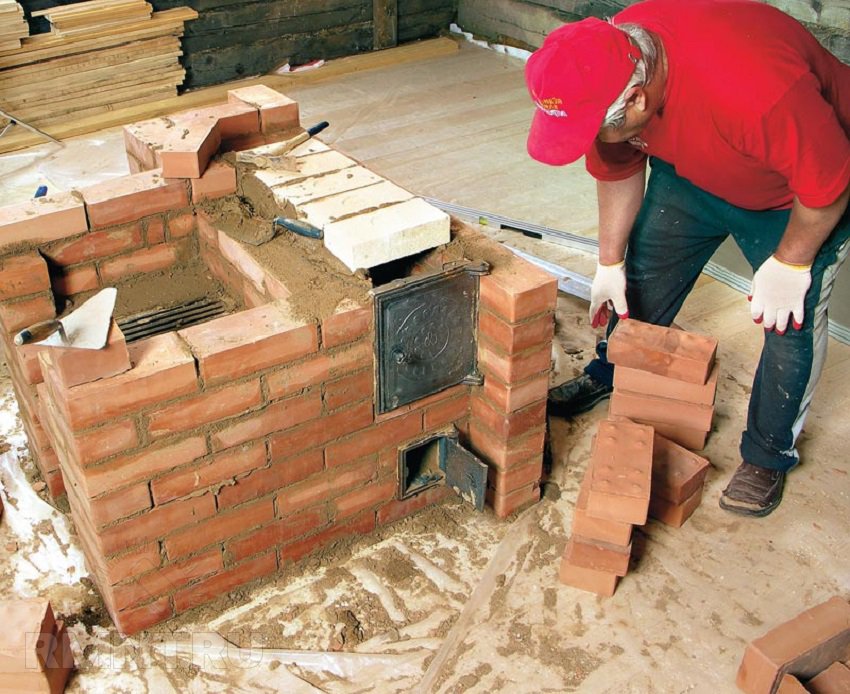
Stages of creating a stove with a rough
It is actually not so difficult to make this design, but it is important to know what stages should be performed for each you need to pay a lot of attention:
- A diagram of the future structure is created. Drawings can be generated independently or with the help of specialists. They need to be given a lot of attention, since the reliability and safety of the final design depends on them. The diagram should contain dimensions and other the main parameters of the stove, and everything should be detailed in it. Even if standard fireplaces or designs are created without rough, there should still be drawings. The circuit is usually formed using special computer programs, however, if you have skills and experience, you can make it on paper.
- Creation stove foundation. Since fireplaces and stoves are most often formed from bricks, they should only be installed on a reliable and solid foundation. It must have the optimal dimensions and parameters for the furnace, which you are planning to build... A place for the structure is determined, a trench of the required thickness and depth is pulled out, after which the bottom is well compacted, and a cushion of sand and gravel is also laid. Next, the concrete solution is poured, after which the trench is filled with brick. The resulting foundation should be covered with roofing material for high-quality insulation. All work is easy to do do it yourself without any problems.
- The formation of the structures themselves. Stoves or fireplaces are laid from ceramic bricks, and cement mortar must be used. When creating structures in the house, it is best to use while working with fireclay powder which will not allow the oven surfaces to heat up too much during use. The oven can be created using different types masonry. Bricks should be soaked before use about 10 minutes in water... During masonry, it is important to do so that there are no cracks and gaps, however, it is also not necessary to use too much mortar for masonry, otherwise you can get a poor-quality and uneven oven.
- Installation is rough. The blower body is placed on the created row of bricks, and a door is attached to it... It is best to wrap all the elements with an asbestos cord, after which about 4 more brick rows are placed. This is necessary to close the oven door. Next, the grates are mounted, and after laying the last row of bricks, you can proceed to the installation of the slab, which stacks with mortar.
- Installing a chimney, which is usually a pipe that goes outside. It is important to use a thermal barrier where the element passes through the wall.