Birch salas. Option # 1 - Double slush
We all love to relax in nature. And no matter where we want to relax, in the flat forest, or in the rocky mountains. Naturally, planning your vacation, you know in advance where you will spend the night, in your car, in a tent or sleeping bag. However, there is another option for overnight.
This option is convenient because you will not only feel protected in it, but also be able to breathe fresh air in a pleasant atmosphere. This option is the construction of a slag. From this article you will learn how to build a shala on a tree.
Definition
Shalash - universal shelter, which is constructed for a short time. First of all, it is built for overnight stay, as well as to protect against snow, protracted rain, temperature drops, strong wind, and a scorching summer, sun.
There are such types of sluts:

How to make a slut in the forest with your own hands
To begin with, you need to find a suitable place to facilitate a shala. This place should be safe for your life. We do not advise you to build slashes, on the banks of the river, in narrow gorges, at the bottom of the canyon. Since in the case of flooding or heavy rain, this place can be unsafe. Also, do not build slashes under the sagging cliffs, and near steep mountains.
Build chalas can be built without any tools. However, you need standard set for work:
- Ax.
- Rope (Scotch).
It is noteworthy that these tools are most likely, you will always have with you. They will significantly reduce the time of the robots, and the process itself will be more enjoyable.
As you can see in the photo, most salas can be built simple weaving technique from branches. In order to make high-quality roof And the walls that will be reliable under all weather conditions, you only need to use those materials which is in the forest almost at every step, it is branches, bark, moss, leaves, grass. Having collected all these materials you can do a good slag with your own hands.
Shalashi are of different shapes And size, it all depends on how many people in it should be accommodated, as well as what its purpose - it will be a shelter for you from the sun or protection from the cold and wind. But with all this you need to take into account the type of terrain, weather conditions and season.
Making a single chalash
Single chalas is only one wall made directly by you. This wall must rest on something, it can be a rolled wood or a large stone or two growing trees. You can make this wall or visor from the branches, and cover it with leaves. This type of shala will serve for you protection from a small rain, the scorching sun or under other circumstances. However, you will not be able to fully protect yourself from strong wind, snow or rain. Also, this building is not so practical. Since in it you can relax well, but you will not be able to spend the night there.
In order to build the construction you need two durable logs with branching upstairs, 2-2.5 meters long. At an angle to the base, learn these logs into the ground and secure at the top of the crossbar. At a distance of 30 cm you must arrange a branch (thrill) that one end is depressed in the ground, and to others to rely on the crossbar.
Production of a bantal shala
Shalas of this type is more convenient and practical. The bartal shala is made on the same principle as a single one. But the difference is that the thrills that are installed from the crossbar to the basis of the Earth should be installed on both sides. It can be seen in the photo.
One side should be completely closed with small branches or leaves, and the other will be used as an output. If you have a film or tarpaulin with you, then use it as an additional protection against rain and wind.
After you finish with outdoor work, proceed to the inner. What is meant? You need to take care of the floor covering. Especially if you do not have sleeping bags with me, or other warm things. If you had to spend the night in cold and wet weather, take care that you are not on earth. Do it yourself something like a stretcher and stack them with dry leaves and grass that you can find, or not necessary things Which can be in your backpack.

Tip! If you are making slags in rain weather, do not forget that water can get inside the tent. In order not to happen so much, dig around the tent ditch.
Important note: In order for the shelter to not let heavy rain, its thickness should be 20-25 degrees, and the angle of inclination should be at least 45 degrees to the basis of the Earth.
Remember, if there is a question about the preservation of your health or even a life should not look for the most comfortable views Materials. Use what you have at your hands. The main thing is that the material you choose is dry and reliable. But probably, few of us may need to build slashes in the forest because of different extreme situations. Therefore, in the next part of this article we will talk about how to help our kids in the construction of their own shala.
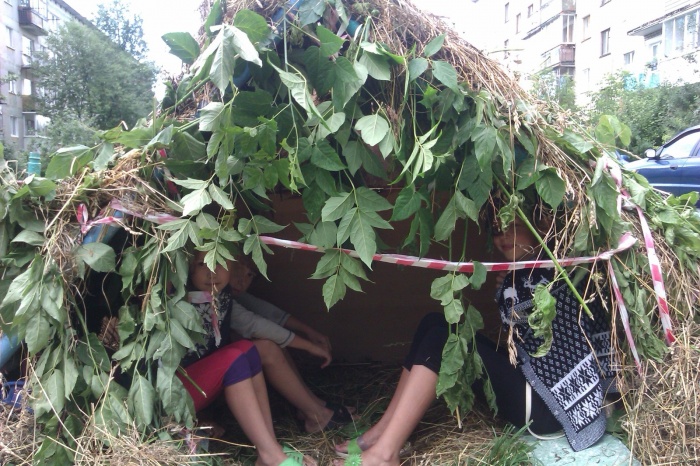
Shalash Vigvam
Construct the frame: on a flat grinding a circle. In a circle, you need to insert a row of sticks. The upper ends of the sticks need to be combined with a rope, tape or wire. However, everything should be very reliably that our children are safe. At this stage, you can say that the frame is ready.

After making the frame, you only need to strip the viguses with a colorful cloth or film, as you see it in the photo.
If you have a cottage or your garden, then do not lose such an opportunity to make the original and very beautiful vigvam from sunflowers for children. For this you just need to plant a few sunflowers in a circle. And when they grow to tie them together. You can only imagine how happy your child will be glad, playing in such a hala, which was built by you.
Let's summarize
There are also other species of children's salars. For example, if you have a lot of trees, think about how to make shala on a tree, or how to build big Shalash From branches for games with friends. You can even make a small slag, in the nursery, from the remedies. Remember: Joint work - he always unites the family. Before building a chalash in the forest with your own hands, it is important to think about everything, stocking tool and start crabity.
Any construction person knows that sometimes I want to build something "for the soul." Let not quite practical but the pleasing eye. This desire is particularly strong if the site is in a picturesque place, in the forest or on the hill, which offers a wonderful view of the surroundings.
It is for such cases when it seems that the standard house simply will not fit into the landscape, the yield can be so-called. A-FRAME HOUSE, or, more familiar to us, house-slash.
In this article we will tell:
- How to independently build a house-slash.
- Is it possible to improve the design of the house-shala.
House-slash do it yourself
The design of houses in the form of the letter "A" is known in many countries. On the expanses of the USSR triangular country houses called shala or tents.
In North America, they are known as A-frame (A-Frame House). Such houses in the form of a slag were built when it was necessary to quickly and inexpensively build a house from what is "under the legs".

A-houses are experiencing a real Renaissance, and through the use of modern building materialsThe projects of the most unusual design appear.

The house shown above is complicated for independent repetition, therefore, speaking about how to build a house-shala, we will tell about more budget, but not less interesting optionsthat can be built with your own hands. Good examplewhy the developer chooses the house-slash - the history of the portal user construction with nickname eglis.

eglis Member Forumhouse.
I have a plot of 5 acres near the city. From the site opens a wonderful view of the Taganrog Bay. The place is very beautiful, breathing easily, the smell of the sea is feeling. Together with the site was sold old brick house. He has no foundation, so cracks were formed in the walls. At first, I wanted to bring this house to mind: to expand, inspire, etc., but, I calculated everything, I came to the conclusion that the construction of a new construction would be cheaper. Because Building, I will be alone, without assistants, I needed a stencil and inexpensive technology. Therefore, the choice fell on the frame house-shala.


Before we tell about the stages of this construction, we list the main advantages and disadvantages of A-houses.
Pros and Cons of A-houses
The main advantage of the house-shala is saving building materials, time and effort. In fact, the "legs" of this vigvama are simultaneously and wall racks, and roof rafters.

Accordingly, the need disappears in the construction of a classic "box", on which the liner system is then mounted.

Also note the small weight of the frame of this beautiful hut, which leads to a decrease in the material consideration of the foundation and the simplification of its design. There is no need to build a serious base of construction, you can do.
Among the main minuses of the house-shala: less effective area, with an equal building stain, with a house built by classical technology. Therefore, the second floor of the "triangle" is most often used to accommodate bedrooms or "attic" where you can store different things.

When erected in the house-hood stairs, you will have to break your head, how to place it and how to make comfortable. But all the flaws go to the background, if approaching the case with fiction and fantasy. If you do a house-slab not as it goes, but adhering to a well-developed project, it turns out a truly unusual and beautiful structure that organically fits into nature.

That's what ultimately should get eGLIS.


Work on the construction of the house-slag began with the construction of the cellar.

eglis
I live in an apartment, so an acute is the question where to store pickles-jam. I decided to build a cellar right under the house.
For this, the user on its own, shovel, pulled a pit with a size of 1800x3500 mm and a depth of 2800 mm.

I dug "Kotlovan", eglisaligned the base with concrete, which simplified the blocking of blocks.


The cellar overlap is made of asbetic pipes with a diameter of 11 cm.

The corner "50-ka" went to LAZ, which in the middle rests on the "beam" of the overlap, made from the "12th" chaveller.

The user also provided the ventilation of the cellar, laying "gray" sewer pipes.

From above, the overlap was covered with clay, shed water and gave a "screed" with a thickness of 80 cm dried under the hot southern sun.

Now it has come to build a-frame. First of all, the user erected foundation columnal. The technology is classic - the fossa rushes, then it is filled with rubble and sand. All this is shed water and thoroughly tamper. Then put on the prepared foundation concrete block, sand-cement, etc.
So that rubble and sand with time do not mix with the soil and did not go into it, the base from the soil should be separated by geotextile, which is stacked at the bottom of the pits.
Foundation columnal Eglisit is the twelve concrete blocks with a size of 30x30x30 cm. Waterproofing is packaged on the blocks, which was put on the cutting of the frame - the timing section of 15x10 cm.

Because, according to the user, the height of the blocks was not enough to raise the strapping above over the earth, there were spacers between the larch and blocks.

eglis
Having finished the foundation, I switched to the construction of the carcass. The dimensions of the triangles of the house-slag are as follows: the base is 5400 mm, the side is 6130 mm. The distance between the triangles is 59 cm, taking into account the laying of the driver of the insulation, whose width is 60 cm. On the "legs" went the board with a cross section of 15x5 cm. Triangle I raised myself, using temporary stops for this - three boards. I will say right away, to do it one physically hard, and if you consider that several times the triangles have broken with stubborn boards - dangerous. But everything went around, and I raised the frame.

For the strength of the carcass, the triangles were additionally strengthened with construction brackets.
1. Installation of the vagation-proof membrane and doomles under the finish roofing - Wave slate.

The feature of the membrane - the film produces water vapor, which comes out of the room outward, but does not give the wind and atmospheric moisture to get into the insulation.

2. Laying insulation - stone wati 5 cm thick, in two layers. Because "Feet" are made of a $ 15x5 cm board, and the overall thickness of the heat insulation layer is 10 cm, it turned out a double ventilation gap. Those. The distance between the insulation and the membrane is 5 cm, and due to the brucks, the second ventilation channel, between slate and film.

3. In a similar scheme, the floor insulation was carried out, with the only difference that the galvanized grid with the 2x5 cm cells is additionally enshrined between the lags.


4. The wave slate leaf shared on 3 parts. According to the user, so the roof looks original. It is easier to climb a clash with a piece of 7 kg than trying to fix a whole sheet.


Sheets are pre-cut to reduce the docking "hump". Sheets were attached to slate nails. Holes in slate a little larger diameterthan the "body" of the nail, the screwdriver was filled in advance.
5. Installing Fronttones from OSP sheets. Installation of temporary staircase and doors.

6. Installing windows.

To bend from the "galvanized" sheet element of the skate, the user of several boards and loops made sheet bending. Constructive adjustment, available for self-repeat, clearly demonstrate the following photos.


In the future, it is planned to improve the labab and the installation of metal guides and presses.
7. A tipped board with a thickness of 2.8 cm.
The boards before laying were processed by flame-painting. The boards were mounted in a groove with a 5 cm long with a self-sufficient, which screwed at an angle.

The floor of the second floor is an aircraft with a thickness of 18 mm.

eglis
In the future, I want to cover the floor with waterproof varnish. The pipe coming from the cellar will go up and sideways through frame extensionwhich I erected on the site of an old brick house, after his sieve. In an extension (I will not warm it) I will be a shower and shed for the storage of garden inventory.
The user's house-shala is still in construction stage, but now it is clear that it turned out a cozy "country" structure, well-fitted into the site.
IN further walls Outside, we cost siding, and the base closes the base siding or professional flooring.
How to improve constructive A-Frame House and build a beautifulhouse-Chalash
If Dom eglisstill completed, then A-FRAME HOUSEsergioLakky.already completed: the beautiful and cozy house-shala "turnkey" is waiting for guests to a virtual excursion.


sergioLakky. User forumhouse.
My plot of 18 acres is on the banks of the Volga. It offers a magnificent view of the river and on the terrain. I decided to build a "cottage", but with all the amenities. He failed electricity, gas, drilled a well to water. There was a question that build. I didn't want to put in such a place in such a place. I did not want to be difficult: and expensive, and does not fit into the landscape. Stopped at a and-house. Although places on the second floor with this constructive a little, but I actually do not need me. All you need posted on the first floor.
Now we will demonstrate the photo, inspired by the user on the construction of its "Shalash".

It is worth noting that the house shown above is as well as the cottage sergioLakky,not classic A-Frame Houses. pay attention to right part drawing. Part of the "legs" of the support is cropped, and the rafters are based on an extension.

Such asymmetry, on the one hand, gives the house "highlight", and on the other hand, it significantly expands its functionality due to the addition of additional area.


Thanks to the roof, under it managed to place a vestibule, toilet and to build a pre-banker. Also in the house there is a bedroom, a bath with a lounge and a veranda.
All children love to play, building asylum for themselves, shala, or just covering a few chairs with bedspreads. Some parents scream and scold kids for mess. Others, trying to properly organize space, and make children's games safer prefer to build slashes together. So, from ordinary routine work the process turns into an exciting game in which children will gladly take part. How to make a good, high-quality and steady chaolars for games, and how to equip a gaming place, we will understand the article.
How to choose the right place?
One of the main stages of work - the choice right placewhere the slags will be located. The main criterion is safety.
In any case, looking carefully, every parent will find a place for such a simple building, which will certainly enjoy all the kids.
Options for rods for middle-aged children
Conditionally, all shalas are divided into three groups:
- Constructions that are separate from other buildings
- Constructions adjacent to other buildings
- Shalash-dugouts. These are structures that are installed in the recess.
When choosing a shag, which you will build, you need to take into account the peculiarity of the terrain, the time of year, the possibility of precipitation, and many more factors. But, halars in the forest for survival, now they are building enough scouts, in other cases, the construction is made for children's games in the country area or in a private house. There children spend mostly summer holidays because the best choice There will be either the withdrawal structures or separately worth it.
Shalashi with a deepening in the form of dugouts more like to build teenagers who came for the summer to the village to the grandmother. Usually, such a secluded place is kept secret from all, and serves as a kind of cache. But, of course, every responsible adult must always know exactly where the child is, and whether he is safe there. At the same time, to disclose the mystery of the guys at all, otherwise they will disappear all interest in such games.
Options for creating sharks
But, this is all the theory, and now let's consider in practice several chaolars options that everyone can build.
Normal bantal shala
The basis for the construction of this type of shag is two horns and poles. It is from their sizes and will depend on the size of the resulting buildings. Adhere to this sequence of actions:
- Measure the length of the ride, and it is at such a distance to the Earth of Hattina. It is necessary to do it until they are by a third in the ground. It is important that they are at one height, otherwise the slashes will be overwhelmed. It is from the stability of the basic elements that your slurry will be durable and durable.
- Horgana is placed on the horror. If you consider it necessary, you can strengthen it with a rope or wire.
- Further, it is tedious to find several stiffers who will serve as a support for laying natural material. If there are no such, you can take the rods, or, even, thick branches, first cleaning them from knots and leaves.
Their quantity depends on the size of the shag, and the step rate. If you have a lot of material, you can put it back to each other, thus obtaining dense walls that will not need to complement the branches, fir legs, reed, or other natural materials.
But, most often, the side supports are installed about 25 cm from each other. If you consider it necessary, you can additionally strengthen the walls with transverse branches recorded on with the help of a wire, or even ordinary bee.

- The final stage of the work is the laying of the huskien, or any other material, the main goal of which to strengthen the walls, and make them whole, without holes and cracks. Start work is best with the bottom, gradually moving towards the top. In this way, upper layer It will cover the lower, and in the case of the rain moisture will not fall inside.
Single chalas
This kind of device is very common, since it takes quite a bit of time and materials for its construction. To build it, follow the algorithm:
- Make the base of the rhe and two Rogatin as in the past version.
- Put the supports only on one side.
- Cover the side supports with the material that you have chosen for the design of the walls.
In some cases, parents instead of the walls stretch the tarpaulin, or any other water-repellent tissue. From above it is attached to the frame with the help of ropes, and the bottom is fixed with a log or bricks. So moisture will not be able to penetrate into the middle of the shelter.
This type of shagola can be used as a separate structure and make it adjacent to the house or other construction.
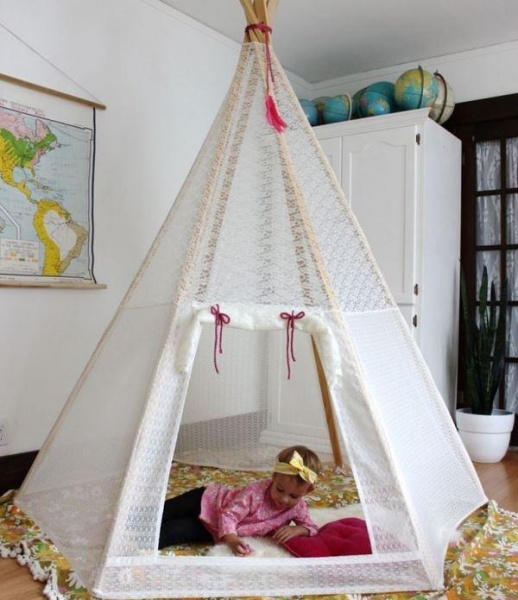
Wigwam
This type of shala has become actively used in our country relatively recently. According to the form of the structure really very much resembles the Indian Wigvam, and it is very simple:
- Choose a convenient and spacious place, and draw a flat circle. Its size should be enough for children to play freely there, so that they are not confused.
- Sign in the ground several poles or thick sticks (their number directly depends on the size of the shala).
- Top to collect all the thrills in a kind of "beam", and secure with wire, rope, or ordinary tape.
Frame ready. Now you need to make walls. To do this, you can use any of two options:
- Close around the perimeter curly plants. Of course, it will take some time so that it turns all the walls, but it is difficult to overestimate the beauty of the shelter for children's games. Perfect for these purposes, beans, wild grapes, or flowers are suitable.
- More fast option - Use dense tissue. In this case, you will get to finish the work on the same day. Very nice looks like Wigwam, wrapped in colorful and bright fabric, but you can use any, what is your home in stock.
Secure the fabric on the top, and then press the bricks or logs, and the tent for children is ready.
Wigwam from Sunflows
This is one of the easiest, and aesthetically. beautiful solutions. But, for its creation it will take some time until the plants grow.

The essence of the work is to still in early spring Draw a circle for Wigwam in the selected place, and at its edge to plant high sunflowers. It is better that they grow not in one row, and in a few, thus the "walls" of the shala will be stronger, well, they will be shunning.
When the sunflowers grow up, and throw out the color, you need to gently tie on top of their heads using a rope. Do it carefully, so as not to damage the plant.
Pottalny Chaolash
This is the most simple designSince the reason does not need to do. It uses the wall of the house, fence, or just a tree. Branches or rhe side mount rely on the base, and then covered with branches, to others natural material, or dense cloth. Of course, the advantages of this shala in the simplicity of manufacture, and the minimum of materials and time spent.
Among the options described above, each will find what will have to do it precisely.
Fast-based slashes for small children
For young children, you can make chalas for games in just a few minutes, if you prepare for this process in advance. To do this, you will need:
- Covenage of dense tissue size 2x4 meters. Excellent if it is colorful and bright, so children will be even more interesting to play.
- Two supports that will be located opposite each other at a distance of two meters. You can insert them in advance to the ground about a third of the length, so that they were resistant.
- Strong rope, long at least 2.5 meters
- Pegs or hooks to stretch the fabric.
- Tension the rope between the two bases. It must be in the maximum tension, not to sag.
- Pail through rope fabric. At the same time, the same canvas should be on both sides. It is important to align the edges so that the slashes turned out to be smooth.
- Secure the edge to the ground with a peg. In order to make it it was more convenient, you can make small cuts in the tissue, and insert rings. Thus, it will be possible to use a cut back more than once.
In our article you will learn how to decorate a plot by creating.
And then the case is behind your own fantasy. You can decorate a chalash, to lay a bedspread or an old blanket, to reorganize the walls, put your favorite toys or books there. You can even conduct educational classes in such a hut, and the child will be engaged with pleasure.
As you can see, make a shala for a child each can do it at all difficult. But, you need to have enough patience and desire, allocate on the assembly a few hours of time. Choose optimal optionand start boldly to work.
In return, you will get a lot of joy and gratitude from the kids who now have a private corner, where they can play, to adventure, and do everything that they do.
In contact with
For lovers of outdoor activities in nature, knowledge and practical ability to build a hut is extremely necessary, because one day this skill may literally sleep the word. We are talking about those who like distant tourist expeditions in the forests and mountains, riding in kayaks on rivers or skiing on snow slopes, fishing, hiking, berries and mushrooms.
In order to build a slash , It will not be necessary to apply great efforts. Having an understanding of the principle of the construction of temporary designs, depending on the locality and the nature of the weather, it will be erected in a matter of hours.
Types of salashes and choice
Exists three types Possible structures:
- Standing separately - Classic Type of Chaolash in the forest or outdoor area.
- Pottal - Live trees, shrubs, steep slopes are used as a support.
- In-depth - A peculiar blend of a hood with dugout.
In survival conditions it may be necessary to make chalash for:
- arrangement of the place of bed;
- shelters from strong wind or exhausting sun;
- conservation of heat and dryness of things during rain, hail or snow;
- protection against predators and insects;
- warehouse for temporary storage of things.
If a person got lost and stayed for the night alone, then without the construction of a temporary slag in the forest he could not do. It offers a place to relax from foliage, dry moss or clothes. If necessary, inside it can even dilute the fire.
Where is it better to build a slash?Erect similar temporary structures is preferable to smooth wooded areas among dense plantations - lush shrubs and spreading trees. They will protect against drafts and excessive attention from the country's inhabitants and other tourists.
Places where shala do do not do it:
- open Polyany;
- under sandy or rocky slopes;
- near mountain rivers or other stormy reservoirs;
- near single standing trees.
After selecting the most suitable place, it is necessary to clear it from fallen leaves, branches, stones, barns and other things. This will ensure greater comfort of finding inside the chaolash in the forest. As well as security, if the fire will be sought inside the structure.
What you need to build a shala
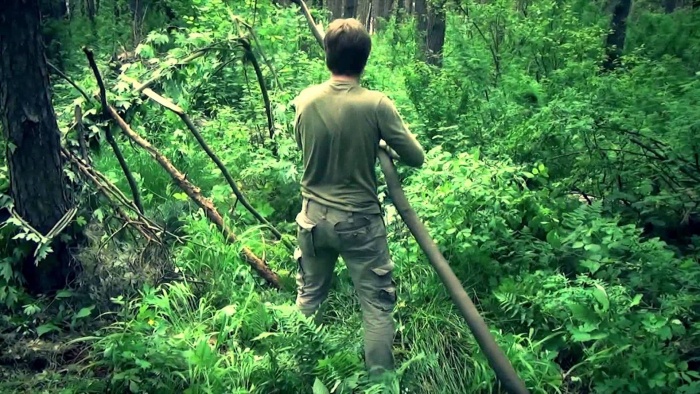
Such a simple temporary housing is easy to build at any time of the year. Going on a trip away from civilization, it is useful to have a folding saw, a paint, a knife and a rope with it. BUT B. extreme situation They can not be at hand. In any case, to make a chalash, the main thing is to get a certain amount of building material.
For example, in the snow-covered steppes, it would be snow and branches of shrubs if they would be found. And in the forest of material a lot: fallen trees, broken bruises, broken branches, troops, stones, bark, fallen leaves, moss, grass, bumps, sweets coniferous plants, etc. Unfortunately, in modern forests there is a lot of garbage, such as plastic, pieces of fittings, polyethylene film, fabric - all this, too, can be used to be used to build a slag in the forest.
In search of building materials for asylum, first of all, attention should be paid to the legs. It is not worth the sowing head to break and twist all living things: young trees, healthy branches and foliage of trees and bushes. It is necessary to respect the forest to respect, and such a good attitude will return with a hundredfold: the predatory animals will bypass the side, the plants will tap from the cold, winds and precipitation, and the fire will warm up and does not burn.
Types of salas and their arrangement
All the most ingenious ideas in the construction of humanity gives the nature itself. Stunning durability and modifications of dwellings are built by beavers, wasps, ants, weaver, red-chucky whistles (or in a different "Bird-shade") and many others. People remain just carefully climbed and try to catch the essence of the construction method.
The most common 3 types of slashes are most common: single-sided, duplex and circular. Each of them have functional featuresIt should be distinguished in order to build the most appropriate shelter in each case. For example, in winter it is better to make a pyramid or semicircle shala pyramid, in conditions strong winds He will serve good protection. Among other things, the type of construction depends on the terrain and the number of people for which it will be erected.
Single chalas
This is a shelter, which has one inclined wall, simultaneously performing the role of the roof, that is, a peculiar canopy. Cuts from the sun, stratum rain or wind, which blows in one direction. From the cold, this kind of shag is not protected, because one side is completely or partially open. You can spend the night in warm weather, but there will be no comfort to differ comfort.

How to make a single chaolash with your own hands:
- Find 2 trees standing near each other. Or drive into the ground 2 rods with ramifications at the desired distance.
- For the development from above to lay the crossbar. If necessary, you can strengthen the compounds, linking the crossbar with trees or jerles of the vine.
- Lean it under sharp angle Several long poles with a pitch of about 25 cm (so that a triangle is turned out when looking at the side).
- Using the branches of leaning sixteen, horizontally put thin bars on them - it will evenly distribute the weight of the future flooring.
- Stop on the finished frame of coniferous or deciduous branches, fern, leaves, straw or other material.
- Cover the skate and side sides by branches, clothing or something else.
For such a design, the gealash type is most often used.
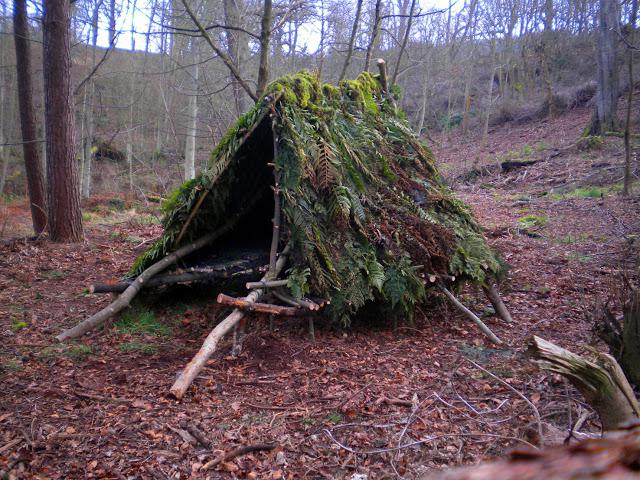
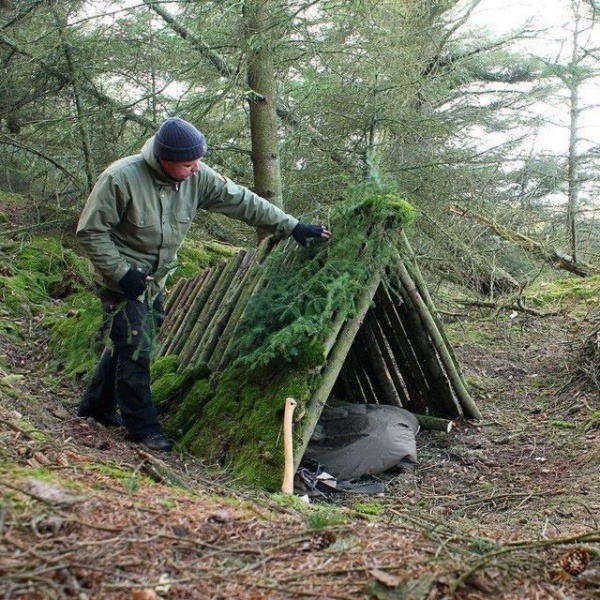
Two-tight shala
More cozy shelter compared to one-sided. It can protect against rain, hail, snow, wind, soaring sun or cold. You can use for overnight stay or storage of things. Make a two-tie slash with your own hands. Few is more complicated than a single one.

It is also built as a single one, only long rods are installed under an acute angle to the upper beam on both sides. The "rear" part should be completely closed with rods, branches, sweetheart or leaves. The "front" part will serve as an entrance, it can be covered partially for greater comfort and better heat conservation inside the chaolash in the forest.
For sheltering from the rain, the thickness of the flooring should be at least 20 cm (non-flashred hardware or coniferous branches) so that the moisture is not leaked through them. And it is better to build a chalash from rain using a tent or plastic film.
In rainy weather along the side walls, it is better to dig a small groove to divert water flowing away from the structure.
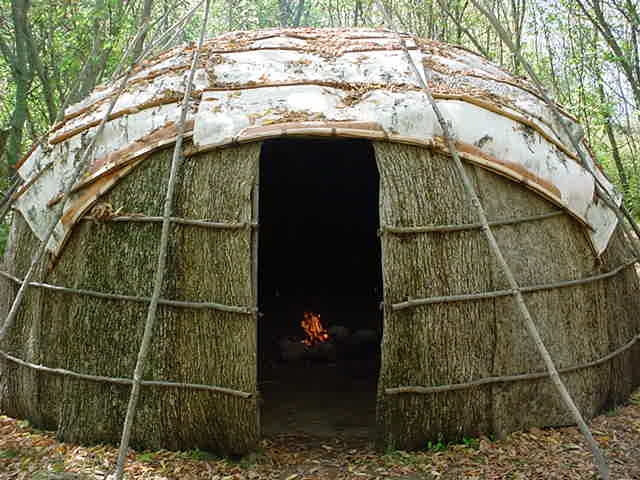
Circular Chalash
The design resembles Vigvam or Chum in a simpler variation. Such a building effectively protects against bad weather, as well as from the cold. Inside the shelter, a fire can be organized, but in this case it is necessary to build a chalash with a hole in the roof so that the smoke could freely leave it. For the construction of such asylum as a support, a tree can be used, having previously convinced that it is durable and there is no, for example, ants. But then the fire inside will not be possible - only at the entrance.

Many lilators in nature are sometimes staying for the night in the forest. In this case, you can get to sleep in the cab cabin, in a tent or in a sleeping bag. but the best option Will spend the night in a hood, built from undergraduates. On the fresh air With a pleasant odor of a tree in good weather, a comfortable atmosphere for sleeping in this uncomplicated construction is created. But many people have a question about how to make a slut. The instruction on the construction of this facility will be lower below. About this further details.
Definition
Shalash is a universal short-term refuge. It is used for overnight stay, protection from the sun, strong winds, temperature and atmospheric differences, precipitation in the form of rain and snow.
Shalash varieties
There are many variations of this facility. However, there are three types simple Shalyas. Namely:
- separately worth it;
- power;
- shalashi in recess.
Each view has its own design features that have a lot of common. They depend on the time of year, weather conditions and the type of terrain.

How to make slag with your own hands?
First you need to choose a suitable place to build this temporary asylum. It cannot be installed in narrow gorges, on the banks of the rivers, at the bottom of the canon. Because flooding, flooding, or sudden shower may occur. Danger represents the creation of a hut under rocks that hang over the parking lot, as well as the foot of the steep mountains. When choosing a place for parking, it is necessary to consider the sides of the world. Consider the main locations.
- How to make a slut in the mountain forest. For this area, the specified construction of an appropriate type is well suited. This means that one of the walls or even two walls will be made of wood or stone - parts of the cliff. In this case, it is necessary to try to avoid precipitation. That is, do not put the chalas in hollows with obvious traces of water flows. Since if it rains, the flow of water flows down. The rest of the installation rules for the specified structure are the same as the tent. The entrance to the slab should be in the opposite top side. Around it around the perimeter it is necessary to make grooves so that water flows in case of rain.
- How to make a slush in the flat forest? The answer to this question is quite simple. In the forest where there is a plain, there is the possibility of building an in-depth, classical or appitable chaolash. At the same time, the place is chosen, focusing on the weather. This is important. With cold weather without rain, it is necessary to find such a deepening, which will serve as a place of temporary refuge. With rainy - the specified structure is placed on an exalted place.

Choose type choose
1. Classic salas. The construction of this type is made in the form of a fire for cooking. At the same time, two ride or branches are installed vertically. The third is placed horizontally. The dressing is produced by appropriate means: flexible branches, herbal stems, lianami.
In this case, there are several types of installation. For example, 2 stiffe or smooth branches cut off with a knife are installed to each other at an angle at the outlet of the shag and the rear wall with a distance of 2-2.5 meters. It is easy to do. Then they are horizontally placed the main helper. The next option is the Vigvam. In this case, you can put the thrill in a circle at an angle to each other in the form of a fire, as well as use as a point of support for them a lively growing tree.
2. Pottal shala. This also includes a type in the form of Wigwam around the tree. In this case, there may still be a chalash, created on the basis of poles, which rest on the rock in the mountainous area. Walls are made, as well as the specified classic structure.
3. In-depth slab. This type Building looks like a classic in a hollow or represents something average between dugout and slag. That is, when only the top (roof) is covered.
Main principles of building
Before making slag with your own hands, you need to know the following:
- Location.
- Type of shala.
- The basis of this structure should serve several pellets with acute ends, drilled in the ground. One of them is set as carrier beam Ceiling.
- Harie walls of a slag are installed with a bias of 45-60 degrees. In addition to the case, when one wall is vertical.
- The roof is necessary to flash the branches (jerles) into several tiers parallel to the ground around the perimeter between the installed beam and the earth. Then lay the huskie or branches will be easier.
- In solving the question of how to make a slush is necessary proper holding Styling the fabric on the base of the pole. In this case, it all depends on the individual desire. It is necessary to do this so that the upper part of the lower saucer should be laid under the appropriate side of the layer located on top. It is carried out as at then the rain drops will roll out freely down.
- Instead of the noodle, branches with large leaves will go, as well as polyethylene with a tarpaulter.

Interior arrangement of shala
This process is also an important point. In the forest, when there are no familiar sleeping bags, folding beds, air mattress And the litter, you need to be able to adapt to such conditions. There are two types of arrangement outdoor coating: With the presence of a focus without it. In each case, a separate approach is needed. Usually in the cool time of the year, as well as when it is necessary to protect against mosquitoes and mosquitoes, it is necessary to protect the walls and trees from the sparks of the focus. Therefore, it is laid out in the center, limit the stones, wake up between the stones of the earth, and around it the quarantine zone is about 15-20 cm. On the floor of the chaolash (on the ground) laid a dog - last year's leaves with branches, shoots. Material in the form of tarpaulin, unnecessary clothing, polyethylene will also be consolidated.
Fragrance Chaolash in the forest
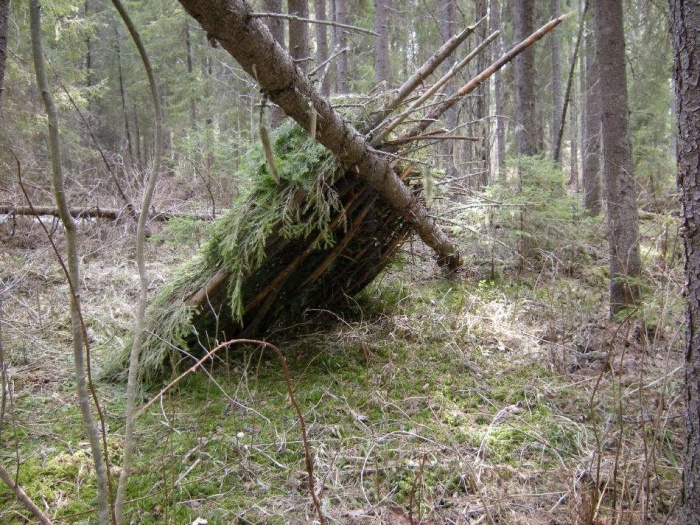
In this case, there are also their nuances. Experienced travelers know how to make a salash in the forest. In this case, you can build shelter different types. Most. simple option Classic Shalash is considered. Any lying tree will suit For the construction of this facility. It will serve as a kind of coolant coil. The branches of this tree will be the retaining agent for those rods that the roof is created. Before making the chalas, the photo of which is provided in the text, it should be remembered that before the start of this process, you must make sure that the lying tree does not presid you. Next you need to cut off with a knife or tear off the extra branches, which are inside the structure. It is important to do for convenience. The resulting branches are folded so that the sheolas roofing was formed. The thickness of the layer depends on whether the rain drops will be involved. With a lying tree, it is possible to build one-, and two-tie slas, depending on which position it is in. Single chalas can easily complete the second specified option. Next, consider it in more detail.

Construction of a single chalash
This process is not difficult. The simplest single-sided shelters begin to build a frame from the frame, and the film or tarpaulin is attached on top. The lower edges are pressed with stones or log. Such a shelter serves as a screen. From spruce branches you can make a bed like a bed. The fire must be divorced at a distance of about one meter from the sun bed. This is important. Firewood is thrown over the bonfire. At a temperature of about +5 degrees, it is necessary to stock up in advance of 2-3 dry thick two-meter logs. Of these, you can make a bonfire "Noda". For this, two or three logs are put on each other with smoldering coal between them. This ensures heat all night.
Double slush
In this case, there is also nothing complicated. You can apply any firing agents in the form of fir branches, reeds, hay, grass or straw. It is necessary to start with the preparation of thin rods, the support stiff and two durable tricks on the basis of this structure. In this case, you must have some skills. Installing flyers with a vertical strong drive into the ground by a third of the length, so as not to be watched. On top there is a durable horizontal helper on them, on which the thin rods are stacked with a sling. Then the material is stacked on them. It is necessary to do this so that the top row overlaps the bottom. Similarly, the back and side walls of the chaolash are covered. At the entrance to this building there is a fire with a thermal screen. In this case, it should be borne in mind that the specified thermal screen should be inclined towards the entrance.
How are Shalashi do it yourself from branches?
Consider this process more. Before making shala from branches, you need to prepare:
- big knife or ax;
- tree branches;
- solid rope;
- stakes from thick branches.

First you need to decide on the form and materials of construction. The optimal is considered a batch option, that is, in the form of a tent. To do this, it is necessary to prepare 6 thick branches of length about a meter with a diameter of 5-7 cm. In this case, two of them should be a little shorter. These branches will become the basis of the shala frame, serving the back and the front wall. After choosing a flat place, stakes are installed, sticking them into the ground in the form of a two tripod one against the other. The distance between the stakes will be a shala length. At the same time, tripods should face one side of the imaginary triangle to each other. Then on the formed empty walls horizontally attach thin twigs or rope. Also in this case, you can use curly plants. There are many of them in the southern regions of Russia. The distance between vertical branches should be about 20 cm. These crossbars will be used for fastening the trim branches.
In general, Nature itself suggests how to make a shala with their own hands in the forest. Properly laid branches will shield each other. Croon tree will be shelter from the rain. Walls also erected. In this case, fluffy branches or sweetheart from coniferous trees should be taken. After that, it is necessary to break them so that hooks formed in the broken end. It is needed to subsequently mount the branch for crossings. At the same time, it is necessary to start the construction of the walls on the underside. It is necessary to do this in such a way that the upper branches are located on the lower flashes from above. Then raindrops will roll. If there is a desire, the floor can be fastened from the branches. As a result, the question of how to make chalas from branches, will be very simple.

Construction of the specified construction for children on a tree
Many of the children wondered how to make a shala on a tree. In this case, everything is also quite simple and understandable. For proper approach You can build a chalash for children and grandchildren on the tree. If on cottage plot Nearby are 2 trees, there is a good construction between them. This will require not so much time and building materials. Before making shala on a tree, you need to stock up the following fixtures and tools:
- plywood sheets: one with a thickness of 18-20 mm and two - 8-10 mm;
- bolts;
- bar with dimensions 50x150 mm and 50x100 mm;
- with a hacksaw or disc electron;
- galvanized nails;
- rubkeroid;
- best.

Based on the design of the shag, it is necessary to use 2 boards 50x150 mm. In this case, attach to two thick trees. There is nothing complicated in this regard. It is necessary that the diameters of the tree trunks are approximately 20 cm. The bottom of the plywood is peaked out of the side walls with side walls, as well as triangles for brackets. It will take a lot of patience and scrupulousness. Further, triangular sidewalls are collected from previously prepared and drowned in drags. After that, they carry them out bolted bolts. Then the process of connecting the collected triangular sidewalls of the skate timber will follow. It has a cross section should be 50x100 mm. After that, it is necessary to connect the specified sidewalls with two bars below. Next, using brackets, the resulting frame is attached to two supporting boards with a cross section of 50x150 mm, which are already fixed in advance to trees. Now you need to take the bottom, drunk from plywood. It needs to drill holes under the nails. After that, you need to nourish the bottom to the lower bars and lags with galvanized nails with large hats. Now we need to think about the roof and windows-hatch. Best of all in this case it turns out the roof of the multilayer. This will ensure reliability. In 1 layer, a plywood with a sheet thickness of 8-10 mm is used. The second can be from rubberoid or pergamine. And for the third layer will go berst.
Outcome
After reviewing the foregoing, everyone can solve for themselves the question of how to make chalas from boards, branches and other subframes or building materials, and also to learn what types of these structures exist.