How to build a big slab. How to build a country toilet-slash with your own hands
If you decide to build own house or cottage, then in addition to traditional houses and standard planning you should consider alternative options. For example, the slash house can be used as dacha house or housing for permanent residence. If you know some nuances of these buildings and accurately comply with the construction technology, then you will get not only beautiful and unusual homeBut also a comfortable cozy dwelling.
Features of the construction
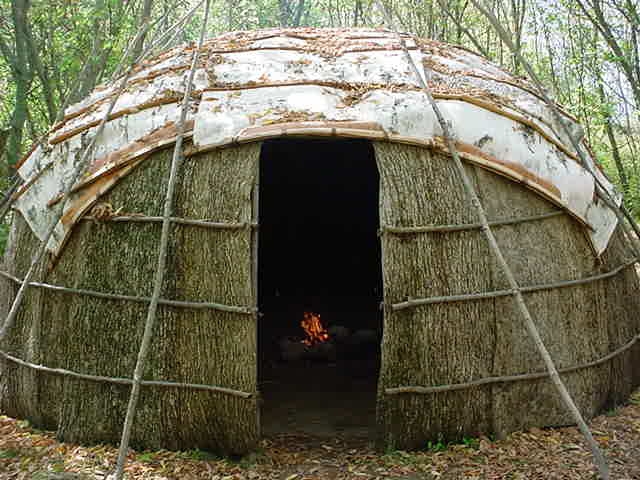
Externally, this building resembles a triangular prism laid on one of the side faces. That is, the two facades of the Shalash house are triangles, and the function of the side walls perform the roofs of the roof. In fact, the construction consists of a frame that is made of several frames of the triangular configuration. the main distinctive feature Constructions are the lack of side walls. According to the photo, it can be understood that the row roof of the building begins directly from the foundation or low base.
Such houses began to build in the 70s of the last century. Since then, a house in the form of a slag won many fans and began to enjoy great popularity. Especially often, the buildings of such a form are elevated as a country house, houses for recreation sites and campgrounds.
Advantages and disadvantages

Slasha houses have many advantages for which they enjoy so popular. Among the advantages of such buildings should be noted the following qualities:
- Easy installation. In the process of building a house, you will not need the help of specialists, because all the work is quite realistic to do it yourself.
- Since there are no walls at such a house, the deadlines for the construction of the construction are the shortest, because you do not need to carry out masonry work or pour concrete to form walls.
- Double roof, reaching the fundamental or base, is the most suitable option For regions with a wet climate, long-lasting rains or abundance of snow in winter. The whole thing is that such a roof reliably protects the base and other designs of the house from wetting in conditions of high humidity and abundance of precipitation.
- Just look at the photo of such houses in order to understand how harmonious they fit into any country landscape. Such buildings are appropriate in mountainous areas, among high pine or deciduous forests, in ordinary countryside, among country buildings or on an open landscape with low-voltage plants.
- The price of houses of this type is relatively low, since there are no costs for masonry work, buying a solution, and the foundation for such a light construction can be made lightweight, which will also significantly save money and time.
- Triangular building, how can it imply better saves free space on a small cottage plot. Moreover, such a structure configuration gives a minimum shadow, so light-loving plants on your site will feel beautifully.
- If you want to spend a minimum of strength and money for construction country house Or buildings for year-round accommodation, then a house in the form of a shala is exactly what you need.
Important: This type of construction was very popular during the Soviet Union, therefore ready projects And the photos of such buildings should you look for the era of the era. Building such a house, do not be afraid to seem old-fashioned, because retro style Always in fashion.

However, the construction of Slasha's houses has its drawbacks, which is also worth mentioning so that you can add your own opinion about the need to build such a house. So, among the minuses of these houses it is worth lifying the following points:
- Since the main enclosing structures are the roof, the protection of the structure from the cold is not very high. So that in such a house it was comfortable in winter, the roof must be carefully insulated.
- Due to the fact that the roof raids form the side walls of the house and narrow the upstream, there is a significant loss. useful Square premises inside the house.
- The duct roof is very heated in summer, because its surface is significant. It is warmly transmitted to premises inside the house, so it is impossible to do without air conditioning in such a house.
- Too high and steep roof contributes to the stacking of roofing material is very difficult.
- The rafter design due to the large inclined roof requires the use of extended non-standard rafters. Such products will have to be made to order from high-quality wood.
- The same applies to panoramic glazing (If such is used in the ends of the house). Not only needs to be ordered, so in addition to this it is worth using energy-efficient double-glazed windows. It is not no one.
- When forming the interior of the room due to inclined walls, there will have to use non-standard approaches and individual furniture.
- The seeming at first glance is the cheapness of the house may pour out in large costs of arrangement of high-quality well-insulated roof.
Independent construction

If you decide to build a house-shala house with your own hands, then one beautiful photo You are not enough. Needed a carefully developed project, because considerable attention should be paid to the settlement carrier ability rafted.
First of all, you need to prepare construction site, clearing it from unnecessary green plantings and various garbage. It is worth preparing the place of storage of building materials, provide access to the entrances and temporary building for storing the tool.
Foundation

The optimal basis for such a building will be ribbon foundationwhich can be made from boot concrete blocks. If you are planning to do open veranda, I can undermine the columnar supports.
Work on the manufacture of the foundation is in this order:
- After leveling the site for the construction of the house, we carry out a breakdown of the axes of the future facilities on the ground. To do this, use cords and pegs.
- Next, there is a corop of trenches under all the outer and internal carriages.
- At the bottom of the trench, we make a layer of gravel and sand, which is carefully trambed.
- After that, proceed to the installation of the formwork. The top of the formwork design connects the boards so that its width is 30 cm.
- Masonry from boot concrete blocks are made with the dressing of the seams by means of horizontal rows.
- The first row of stones laid dry, trambed and poured with concrete of a hundred stamps.
- All subsequent rows need to be stacked, slightly combing into a solution that covers the previous row. Thus, we carry out styling of stones until the base is raised above the surface of the Earth by 23 cm.
- When laying the last row, it is necessary to lay down the details for the installation of the runs. In this place it is advisable to use a smaller filling of the foundation.
- After that, the foundation is maintained in a formwork for 3 days with regular wetting with water.
- After dismantling the formwork, all empties are filled with sand, the scene is performed.
ATTENTION: At the stage of installation of the foundation in the basement, it is necessary to provide products for the ventilation of the space under the house.
Frame

On the built foundation set the roof frame. To do this, on the foundation, horizontal waterproofing of two layers of runnerdoor bituminous mastic. Mortgage parts are skipped in slots, made in waterproofing, and flooded with bitumen. They are attached to the supporting runs.
Mounting the framework in such a sequence:
- At first, the pairs of the rafter feet are folded on the ground and combine the skate linings. The compounds are slightly fixed with a bolt with a diameter of 10 mm.
- After that, accurately measure the gap between the free ends, finally fix the beam and tightly tighten the bolts.
- Similarly, they collect other pairs of rafting legs.
- Next, first of all, we mount the extreme pairs of rafting legs, those that form the front and rear facade frontones.
- We check the verticality of the elements using a plumb and fix the backups. Bottom corners with metal lining and bolts with a diameter of 12 mm.
- We mount with the help of nails skateboard to the frame.
- All other rafting couples will be taking under the horse and install with an equal step between extreme pairs.
- Temporary backups can be removed after the top stropile design Windlines will be recorded. Thus, we connect three frames with both edges.
Roof

On numerous photos on the network you can see that as roofing For such a house, you can use any material: soft tile, slate, metal tile, professional flooring, etc. In our case, we will use sheet slate.
Installation of roofing in this way:
- First make a doom. For this, the bars of 30x40 mm mounted the rafter with a step of 40-50 cm.
- We make the issues of these bars beyond the boundaries of the extreme frames by half. So we get the skell roof.
- On the cutting of the rubberoid, and on top of it fastened with nails with rubber gaskets slate. Works are starting to keep the roof from the bottom, moving to the skate. So roofing sheets will overlap each other.
- The skate part is closed by a lane of roofing material.
- From the inside between the rafters lay heat insulation material (Mineral or basalt cotton).
- Close all design vaporizolation membranewhich fix the stapler to the rafters.
- Below the roof we like woody sheet Material, plasterboard or clapboard.
Floor

Work on the manufacture of sex We behave in such a sequence:
- Lags are placed on the rows of rafting races with a step of 0.5 m. Brepping them with nails.
- In the lower part to the side surface of the lag, the cranial bars are concerned.
- These bars are placing the black boards.
- Above the whole design on top waterproofing film So that she enhancing lags. Plighte fastening stapler to beams.
- In the lumeges between the bars, we are placing thermal insulation material so that it is to be flown with the surface of the lag.
- From above, the floor cover the vaporizolation membrane and secure it to the lags in the stapler. We are doing the crawling of the film and additionally fix the place of connection with scotch.
- Now you can put the blackboard boards, moisture-proof fane or OSP.
After installing window and door blocks, engineering communications laying can be proceeding with internal finishing work.
Summer has come, which means that you can safely be accepted for the construction of a slag. But here is the problem: you do not know at all what to start. You should not lose heart, because in today's article we will look at the main types of these structures, as well as we describe the installation instructions, thanks to which you will quickly and easily build a slag.
Where is the best building to build slas?
Immediately it is worth noting that building chalas around the mountain rivers, on open glades, near single standing trees and under the rocky slopes strictly-setting is prohibited. It is not only unsafe, but also extremely uncomfortable. Basically, these structures are built on a flat forest area, where there is a lot of thick plantations, which will greatly cope with the protection of the chaolash from drafts. However, the dear site is still the ideal option for the construction. Here, if necessary, you can ask for help from parents, as well as at any time go to the house.
An excellent place to build a slag is a forest lawn
Options for children's salashes
The most popular among children are bantal, single chalashes and wigwams. They are greatly suitable for both forestry and country areas, and their construction does not seem difficult and takes at least time.
First option - Double Salus
Building duscal shala It is necessary to start with the construction of a carcass, which, in turn, will be made of Peregi and Hthins. The dimensions of the construction will directly depend on the size of these items, so they immediately count on how much people will be calculated by the slag. Rhobhins need to be vertically driven into the ground by one third of their lengths. This is done in order for these items in the future, it is staggering and resistant.
Design Scheme Difficult Shala
After that, it is assigned to Horthine and, if necessary, fasten the place of connecting the elements with a wire or durable rope. Well, part of the work is already behind. Now you need to collect a few more thick branches of trees (Zherdin), which will continue to lay the roofing material of the roofing material, hay, straw or spruce laps. By the way, we advise you to put stiffers in each other. In this case, it does not need to cover the walls at all. However, in most cases, lateral porses put at a distance of at least 20 centimeters from each other. If you notice that the frame is not valid enough and at any moment it can collapse, the effected by the transverse branches that must be attached to the jerse.
Now it is time to lay a sweetheart (or another grain material) a doom. At the same time, it is necessary to start work from Niza himself. This is done in order for each subsequent row to cover the previous one. As a result, it turns out reliable protection indoor space Shalash from moisture. In the same way, the construction and the rear wall of the structure, leaving open only input.
As a result, you should get such a building.
Second version - Single Chaolash
The construction of a single chalac will pass much faster and takes away from you less forces. First, act on the same principle: Of the two Rogatin and the long ride install the reference frame of the design. After that, make the wall of the slag, again, as described earlier. To accelerate the structure of the structure, you can replace the mapberry with any water-repellent fabric or tarpaulter. Top view of custodial material to the framework of the frame using the rods, bottom of the cloth with a stone or a log. Ready!
Purchase material of the skeleton chaolash frame is better to fasten with ropes
Third Option - Shalash Vigvam
With its name, the Salas-Vigwam is obliged to Indian buildings of the domed form. For its facilities, you first need to draw a circle in an even place, whose area is enough for you and 2-3 friends. After that, on the edge of the circle of the inside of several poles, connecting their tops in the form of a beam and necessarily engaged in a few layers of tape, a wire or reliable rope.
It will be very cool if the Branches of the Balus-Wigwam Supports to plant curly plants
On this framework is completed. Now the shelter remains. There are two options here:
- All branches of supports to plant curly plants. For this task, decorative beans will be ideal, the gentle greenery of which is perfectly combined with white and red inflorescences. The result is a very pretty building.
- A bright shade fabric can also be used as a covering material. If there is no colorful fabric, take a monophonic cloth and paint it with waterproof paint. The canvas will need to be carved in the form of a semicircle, the radius of which should be equal to the length of the side pole-supports. According to the rounded edge of the canvas and in the center of the rigging, as well as attach them to stuck in the Earth.
By the way, as supports Karaca-Wigwama Karcas, and ... Sunflowers. It is necessary to start planting them in the spring and do it along the circumference of the circle, leaving several centimeters to enter the shelter.
Children's chaolars from fabric - Building in a few minutes
Children's chaolars from fabric is done in just a few minutes.
Children's Fabric Shalash - perfect option For rest for a few days. If you prepare all the materials in advance, its construction takes just a couple of minutes! You will need a two-meter (width) and a four-meter (in length) of a tight fabric, two vertical supports that need to be placed at a distance of two meters from each other, a strong rope of at least three meters long, as well as pegs to stretch the canvas.
For the fabric fabric fabric, it is enough to pull the rope between the two supports and secure it. Through the strained rope, the tissue canvas and align his ends. After that, cover the edge of the canvas to the ground, using pegs. It is done!
That's all, choose the option you like and run to erect Shalas with your own hands. Do not forget to connect fantasy and build an interesting and colorful building, where you and your friends will have a comfortable time.
Temporary construction made of submitted means is called Slash. Such a shelter is used for several situations: for children's games, as temporary shelter from negative weather conditions or for overnight stay during travel.
In order to make Slash do not require special skills.
The article describes how and from which materials you can make a simple slag for children.
A step-by-step instruction on a shala device in the forest while traveling. Tells about the options for the construction of tourist shelters.
Device of a slag for children with their own hands step by step
Chalas for children's games can be built on its private site. In appearance and for the intellectual development of children, such a structure is desirable to build as much as possible by appearance.
Materials
Important! In the process of the construction of a shalya must necessarily attract children.
The process will cause their interest and purchase of certain skills and skills in handling the instrument and materials. It is necessary to give the full possibility of the implementation of children's ideas.
Assembly
Do not necessarily insert the frames and door leafThese materials can be replaced with tissue curtains. So it will be even cozy. The floor is desirable to cover to prevent the penetration of dust and moisture from the ground.
It is necessary to make from one-piece material to protect the inner space from rain. There is no need for the ceiling device. The shape of the roof in the form of a house, perfectly serve and the ceiling.
Attention! All materials for the children's chaolate are taken only by natural quality, with a smooth surface.
Cannot be applied metal sheetsIn order to avoid injuries during construction and in further operation.
Nails and self-tapping screws should not be over the boundaries of materials, the hats must be drown in Patay, and sharp ends cut off.
Build chalas is better on Earth, there is a danger from a height on the tree. In such places safety above all!
Painting
Ready house-shala need to paint in bright colors. Applies for this water-emulsion dyes for facades.
They are the most harmless, do not wash off with precipitation, do not dear, have a wide color gamut In standard sets, you can mix the caloring additives to obtain new options. Children for creativity offer infinite spaces.
Arrangement
It remains to provide slashes furniture and toys.
Construction of the shag of children can be pleased with it. In the country, work is constantly underway to improve and cleaning the territory from the pins of trees, shrubs and herbs. All this can be used in construction.
The form will already be more similar to the classic forest slag. The place is desirable to choose the most secluded. You can assemble the construction of thick branches on the frame. Thin thin branches to be emitted for fastening underfloor material. The locations of the details are fastened with the turning of the rope.
With the classical form of the object, the walls are and. You can cover them with trimming branches with foliage or grass. Laying begins with the lower rows to the top. The material is located on the scene to the precipitate to light towards the ground and did not fall inside. The floor is better to fasten dry grass and cover the fiberboard or linoleum.
Shalash in the forest
For travel travel, there is a need to stop for the night to relax in the following way.
To preserve health and even, in some cases, and lives are built by chalas from the girlfriend. If you are in the forest, there are no problems with the choice of material.
Set of tools
Multime tools are required:
- sapper shovel,
- big knife, type machete,
- tourist ax,
- rope.
Most often, such a composition of the tool is purchased in a universal set.
Materials
For the material of the execution takes:
- trunks small trees, fere, for,
- trees branches with foliage or husknik, moss. Alternatively, the rod is cut out for the protection device against precipitation and night cooling.
Options for salars in location and with detailed instructions
You can arrange asylum in several ways.
Ground way of a slag device in the form of a shield
Use some other trees growing near each other as the main support. Such a distance must be at least 2 meters.
With the help of the ax, we harvest the trunks of the trees with a diameter of no more than 8-10 centimeters and a length of 2- 2.5 meters. By number of at least 26 pieces.
It is necessary to fasten the horizontally pole between the trunks of the trees with the help of a rope at an altitude of 1.8 meters. Then at an angle of 45 0 from the ground to the installed part we apply alternately 20 pcs. Pranki.
The surface of such a shield is coated with branches, moss or cake. Under the base, inside, from the remaining trunks are satisfied with the sun bed, above the ground level. That sleeping place You can hide a sweetheart or dry moss, on top of laying fabric. For heating, a fire is divorced before the burden in the deepening.
In such a shelter, it is not afraid of rain, wind and warmly sleeping. The construction time goes no more than 1 hour.
Such an object, the next day, you can easily disassemble and hide all traces of overnight chairs, bury the fire and return the ride on your place.
Separate shelter with full frame
A similar option of the ground slag can be built a separate shelter with a full frame. A more complex and reliable construction. The frame is also assembled from the jeres in the form of a cone or triangular prism, all the details of the ropes are attached.
Outside the surface from all sides, except for the entrance, is covered with branches or moss laid flashed from bottom to top.
The floor serves as a layer of fabric or grass on Earth. You can use thinner stiffs to the walls and with large gaps between them, which are then tightly packed with freshly cut branches.
There will be warmth and no fire in the hood. The heat of the body is enough to warm out the room. But for construction it will take more time and strength.
Shelter from rope
Most. fast option The terrestrial chaolash is the shelter collected from the strings stretched between the trees and laid the branches or herbs laid on them. For heating in such shelter, a fire is required.
Shalash for large branches
In the area of \u200b\u200bS. high humidity or the presence of dangerous reptiles, it is advisable to make chalats on the fork of large branches of trees or between several small tree trunks.
To do this, you need to carefully choose a place. Fasten horizontally ride on the trunks using a rope. Reliable fastening It will contribute to the presence of branches of the trunk, which rely on the poles.
There are enough two parallel fastened parts at a distance of 1-1.5 meters. They are tightly stacked trunks of a long 1.5 meter perpendicular to the main veins. Fasten enough not every detail.
The overlap is made of branches laid tight on stretched ropes. Sun bed is hidden or grass.
Height from land is sufficient 1.8 meters. Distance from sun bed to overlap 1 meter. These sizes are calculated for a simple and safe bed.
Conclusion
Unified shape for the construction of a shala does not exist. It should provide maximum comfort and protection against insects, animals and weather conditions minimum costs time and strength. An important element Only the location of the device and the material of execution is considered.
9 best construction and furniture stores!
- Parket-Sale.ru - a huge range of laminate, parquet, linoleum, carpet and related materials! - Furniture presented on the site is manufactured in its own factory in Moscow, as well as proven manufacturers from China, Indonesia, Malaysia and Taiwan. "
- Mebelion.ru - - the largest online store selling furniture, lamps, interior decor and other goods for a beautiful and cozy home.
How to build temporary shelter over your head during the campaign, everyone should know. After all, it is not always a ready-made tent or sleeping bagAnd the roof above the head is the main, in addition to food and water production, what a person thinks in the forest, especially if the journey passes in the conditions of winter nature. How to build a chalash in the forest with your own hands, you can learn more.
Refuge in the forest should protect against wind, rain or snow. In the forest, the fault is easiest to build slas, since there are all the necessary materials for this. There are three varieties of temporary shelter: separately standing chaolars, downtime, and also built in the recess. In addition, according to the design, they are tent, single-sided and duples. Before starting to build slashes in the forest, you need to find a suitable place. This should not be a deepening in a narrow gorge, the river bank or bottom of some canyon, as well as the foot of the mountain.
If necessary, make a slut in the mountain forest, you need to select the shelter of the appropriate type, one or two sides of which will be made of wood or parts of the cliff. Installation is done in such a way that the entrance looks in the opposite top of the side. Around perimeter homemade tent You need to dig up the deepening for the drain water.
If the slabs need to be built in the flat forest, the place to choose from the weather conditions. With cold dry weather, you need to choose a place in the recess, and with rainy weather - on the hills. In order to build a shelter, you will need an ax, rope, knife. If there are no ropes, fir roots will become excellent replacement. Other tools are not so important, and with it usually besides the listed nothing.
Chalash
Single-type shelter is a vest that protects against wind and reflective heat from fire as a screen. Constructs shala between two trees. Between them, it is necessary to secure the crossbar of Pilia, to which rafters are closed at an angle of 45-60 degrees. On them parallel to the earth, it is necessary to fix a few more stumps so that it turns out a peculiar lattice, the framework of which needs to be covered with vegetation that protects against wind and precipitation. For this, the coniferous sweetheart or branches with large leaves is well suited. The branches are attached to the crossages, starting from the first lower level to the top. Thus, the water will drain along the wall, without falling through the foliage. Several short logs are installed on the ground, on top of which thin rings are stacked. From above, you can lay a spruce husk, "bed" is ready.

Another option of single-sided shelter is built in a broken tree. It is necessary to find such a tree so that the dome was at a height of no more than two meters above the ground. The part of the barrel lying on the ground is covered with long branches as a roof flooring, the land under the barrel is also littered by branches.
One of the variants of the bartal shalya can be built if you add a second side of the sideline to the one-sided shelter, crossbar coated with snacks or branches.

The second version of the binary type consists of a sequence of actions:
- It is necessary to find two strong rigatine racks, thin rods and a long stupid as a support.
- Racks are installed in the ground about the third part of their length.
- A horizontal thrill is installed on the rack.
- Floor tilt to the troops are fastened with thin branches that perform the function of the rafted.
- Top view of rafters are covered with branches with foliage, sweetheart, grass.
- The covering material is located below up to prevent water penetration inside.
- At the entrance to the slas, you need to place your bonfire.
Tental shala
Tental slabs are built of young, thin, long jeres, which are cut from extra branches and foliage, are installed by a cone. They can be attached to both each other and around the tree trunk. From above it is covered with grass, branches. If the tental shala do big size, inside it you can place a bonfire. To exit smoke from above, you need to leave uncovered part. But at the same time the fire should not be too large, with extracts to use only deciduous firewood, so that there is no spark.
Shelter in deepening
Temporary shelter, built in the deepening, is something average between dugout and slag. To do this, find a small deepening in the ground or dig it yourself. Top of the shelter is mounted thin branches with observer material (husk, grass, reeds, leaves), inside the structure the surface of the earth should be covered with the same if there is no sleeping bag.
 Strike winter
 In winter, you can also build a slash that protects against snow, wind. The main thing is to be a warm sleeping bag in winter. To build a winter slab, you need to find a suitable place on the hill, clear it from snow so that there is a small recess. Next, you need to prepare the amount of coniferous sailberry and poles. Napnik need to be cut from the lower branches of the trees. Pilia can be used from old, dry trees, not necessarily it should be young trees. Part of the naked coniferous husk need to postpone the floor of the future structure in such a way that there are no sticking branches. With two sides of the future slashes are installed pants, top on the frame fit additional supportsIn places of application of the load of Peregi are associated with a rope. Then the skeleton without lumen and cracks is laid on top of the frame with dense rows. On the sides of the slas, you also need to clean the coniferous sweetheart well, in parallel with this covering the walls with snow bricks, if it is dense. The entrance to the shelter can be covered with a hanging bag. Such a facility will be quite warm and spacious to spend the night.
From generation to generation, the experience of creating your own chaolat, which children are so dreamed of different age. In today's article, consider the most common options for the Wigwam fabrication in the forest, in the country or private territory. We will tell about what materials it is better to use, as well as build step-by-step instructions work that will allow not only to eliminate possible mistakes, and accelerate construction process. Let's talk in detail about how to make a salary with your own hands for children, stopping at budget materials, embodying the most sought-after ideas into reality.
Shalash in the country with their own hands from the girlfriend
As a rule, parents prefer to organize a children's zone in a prominent place, but you want to rapid champions and princesses, and play your favorite games, feel independent and adults. Therefore, the practice of a diverse shagish structures is so popular among children.

Of course you can build a chic, expensive cottage for children's entertainment as on the street, cottage territory, in the house, etc., but everyone understands that this construction is temporary and put in it a big budget somehow immensely, precisely because of this Children and adults use the most infirmized materials that are in the farm: cardboard, fabric, boards, branches, live plants, tarpaulin, polyethylene film etc. The choice of the base depends on the purpose of the construction, because it is believed that high-quality slashes do with their own hands should be protected from bad weather and have sturdy construction. Consider several options most common among families with children.
| Interesting ideas Create a shala with your own hands from girlfriend | ||
| 1. | Indian Chalash | Shalash in the country with their own hands for children It may have an Indian style, so it is necessary to prepare six bamboo sticks to build such a plan or replace them with wooden slats, the length of which should be about 2 meters. It is from these materials that the framework of the future child house will be made. Additionally need a rope, roulette, drill and drill. Having gathered into a bunch of logs and connecting them at the top, the master can go to the next stage of work, actually, to the attachment of the awning, which should be used strong, dense fabric, can be linen or cotton. You can arrange the shelter in several ways: one awning is divided into stripes, others wrap the skate frame, leaving the entrance to the halabud on one side. |
| 2. | From hoop | Shalash for children with their own hands You can do and using all the famous hulahup, or the hoop is made with their own hands from the metal base. Such a plan design is suitable for installation both indoors and in the garden, and is the maximum budget option. To implement this entry, parents are enough to choose a branch, or establish a support in the form of a horizontal bar on which it should be fixed with rope round element, with a cloth previously attached around the perimeter. The internal situation of simple Wigwam is recommended to be issued according to thematic sympathies of the child. Personal space for children is not only a way to have fun, it is self-development, and sensations of independence. |
| 3. | From cardboard | From cardboard do great amount A variety of decorations for holidays, actively use this material in the theater sphere, and often build shalash for children with their own handsBy imitating real accommodation. It is necessary to initially note that such buildings do not differ in durability, as they are too fragile, because all parts are connected to each other or glue or scotch. However, this material allows you to implement the most unusual ideas. For example, for boys, you can build a halabud in the style of car enthusiast from the cardboard, for the princesses, the slut can become a children's hairdresser or a nautical castle of a small mermaid. The focus of this process is paid to the billets, of which the construction is assembled by parts as a huge puzzle. |
Thus, it can be said that children's house - This is a construction that is actually created even from ordinary chairs or a simple plywood sheet, separating actually a small street or house area, to entertain the younger generation. Next, let's talk about how to make slag with your own hands from the branches.
Summer Shalash for children with their own branches
Many country house owners practice the creation of salars for children by natural landscaping, that is, on a specially created wooden or metal carcass Several growing wound plants. But as practice shows, this process takes time to ensure that the bushes have grown, besides, children are often allergic to this type of flora. Therefore, with this option it should be especially attentive. But there is a lightweight way to build a chalac and this construction of summer halabuda from branches of bushes and trees. What is needed for this, and where to get started?
Shalash in the country with their own hands from the branches is often called an analogue of the hut on the couch legs, as it has a similar appearance. For its invention, weaving skills can be used from a vine, which can play the role of a frame, and you can simply collect the base from wooden Reques or boards, led them with each other in the form duscal roof And cover with green branches. This option does not require large financial investments and does not take much time to work. Optionally, summer halabuda can be made of large dimensions, but in this case the framework must be a little shop in the ground. If there is such a place on the summer site as, for example, the roof of buildings, metal ties, or just a distance between the trees, which allows you to pull the frame from the rope by placing a kind of grid, then branches different lengths You can simply lay out along and across a wicker base.
Types of street halabud. Single chaolars with your own hands - stages of construction
Highlight three main types of street halabud:
- circular;
- single one;
- double.
All listed designs are often found in life, having every time the innovation made by one or another master. Additionally, the above-mentioned row includes dugouts that are peculiar street hartes. Listful information on how to build a halary with your own hands, the user learns that one-way facilities are just considered the simplest option, to create which several hours of operation will be required.
In essence, a single halabud is a canopy that allows you to hide from zhugochi Sun., wind and even rain. In order to such a plan, the design was sufficiently strong, it is usually located between two trees that are connected by the frame, can be metal, can be wooden, based on the materials available. On top of the carcass, it is recommended to lay out tin sheets and secure them with self-draws. In order for the construction of a symbolic, natural character, the roof is organized from the coniferous sheets, the roof of straw is considered more popular theme.
Instructions for the construction of a bartal shala in the forest
Shalas in the forest with their own hands most often build during hikes, hunting, etc. To do this, often use the standard method of manufacturing a double halabuda. If this building is considered unplanned, it is built without the use of such fasteners as nails, self-tapping screws, etc. Experts offer newcomers as a whole instruction on the construction of a batch slag in the forest. So,
- At the initial stage, you must choose a place under construction. It should be safe, away from the boat, smooth and clean. Make sure that there are no antics or bargains of predators. They advise you to pay attention to the territory under the crowns of overall plants, the branches of which are additionally protected from possible precipitation and sharp blows of the wind.
- This design maximally resembles a standard tent, so the master must be prepared two straight horns and drive into the ground at the same distance. And then on the branched upper part to lay a long helper and fasten it with the help of a rope, rope or durable threads.
- In order to build a chalashi on the street with their own hands of such a plan, from Rogatin we assume the thrill at the angle that need to be buried into the ground so that the design becomes stable and it can be completely covered with protective material.
- After the construction has found a view of a conventional duplex roof, you can cut it in a circle or cover polyethylene cannut, leaving a place to enter inside.
If the sluts plan to use for a long time, spending overnight cars in it, then it is recommended to flip the construction around the perimeter, in order, in case of rain, the room has not flooded.
Circular shala for children with their own hands
DIY house-slab is simply necessary during a picnic with children when the fire is planned and the like. Such halabudes should have a hole, the so-called chimney, so a tree should be taken as the basis, which would play the role of support. Long rods should be driven in a circle, so that you can connect them to the top into the peculiar bundle. For strength this design It is equipped with horizontal jerseys, after which it can be supplemented with branches, moss, foliage, or to sew an awning of a film and other materials.
Thus, in the finished form, it turns out reliable wigvam, which, with a dense trim, can not only be covered from the cold, and from the rain, at the same time does not protrude at all. Having at its disposal his own shala, children will be able to actively implement their playing time, as well as to conduct it in a family atmosphere with interest.
How to build a country toilet-slash with your own hands
Toilet halars with their own hands in the country, they are often elevated according to the standard instruction using a variety of materials. It should be immediately noted that such a plan of construction can be like a rectangular shape, and have an appearance similar to Vigvama, that is, to be equipped with a triangular riding. Why do many dackets choose exactly buildings? The answer is simple, it is original and such "special purpose houses" have an attractive appearance.
Since the construction has a permanent character, before starting work, the owner needs to create a drawing, to highlight the main components, such as: the construction cover, the rear wall, support as an element of fixing, toilet, cesspool, the front wall of the house, the base of the toilet. A pre-composed working project will make it possible to carefully plan the purchase of the required materials, as well as to prepare required set Tools. Step-by-step construction process can be described as follows:
1. Preparation of a cesspool, which is actually considered the foundation of this construction facility. Dropping the pit it should be equipped concrete blocksas well as two layers of rubberoid.
2. Assembling frame frame. For this purpose, used edged boardswhich are superimposed on the rubberoid pre-treated with an antiseptic for a long operational period, which is approximately 10 years.
3. The walls are embarked separately and are connected at the installation site. After pinching interior surfaces Recommend to trim the clapboard. Next, they are exhibited and secured specially designed technological boards. Next uses a chalkboard with a subsequent trigation.

4. For the roof, boards are used in the area of \u200b\u200bone meter, while their length should be more than 1, 5 meters. The roof is mounted on ready-made front and rear walls, covered, as a rule, a galvanized sheet, for the attachment of which the screws are required. Next, the lip of the roof is fixed. In a row additional elements include hooks, handles, shatter, etc.
The hole above the cesspool is cut into the floor by individual layout, after which the toilet itself is installed and fixed. It is worth noting that in the presence of a waste capacity, the design of toilets-shalyas can be portable, not stationary. For more information on the topic, watch the video: