We build a bath with our own hands. Construction step by step
Building your own bath on the site country house, the matter is quite serious and troublesome, so you need to approach this issue with full responsibility. In this article we will try to highlight the main points of construction, and in general, talk about how to build a bathhouse with your own hands on own site making the most rational use of their capabilities.
Self-construction of a bath, from start to finish
Any construction begins with the preparation of design and permitting documentation. With the construction of a bath, the issue is solved a little easier, since it is a non-residential auxiliary premises.
According to Article 51. "Issuance of construction permits" of the RF Urban Planning Code of December 29, 2004 No. 190-F3, a separate permit for the construction of auxiliary structures is not required. However, after the construction of the bath, you need to contact the BTI in order to register a new building on the master plan of your site.
A project for the construction of any structure, first of all, is necessary for the owner himself for:
- objective budgeting;
- development planning;
- competent construction of the building;
- laying all the necessary communications.
In addition, for an understanding person, the project contains ready-made instructions, which will tell you how to properly build a bath with your own hands. Therefore, this item is mandatory for the construction of objects of any complexity, including baths.

Start of construction
After the project has been selected, the time frame and budget for the development have been established, the necessary materials have been purchased, you can start construction work.
The first stage, as a rule, is planning work on the ground and digging a pit, while it is recommended to observe some conditions:
- During the planning of the territory, it is necessary to remove the fertile soil layer, and save it separately, until the end of the work, and then return it to its place.
- When renting earthmoving equipment, in parallel with the pit, it will be advisable to immediately dig trenches to bring communications to the bath (water supply, sewerage, electric cable).
- During construction, equip drainage ditches to remove rainwater from the pit.
- Install fences at the work site, and provide walkways and walkways for the safe passage of people.

Advice! It is best to start excavation work in the second half of spring, when the snow melts, the earth dries up and warm, clear weather sets in, and try to finish before the beginning of the period of prolonged rains, snowfalls and autumn frosts.
Foundation selection
For the construction of a bath, there are several types of foundations. All of them are made on the basis of reinforced concrete.
Which of them to opt for depends on the characteristics of your site.
- Shallow tape foundation, the most common option. Suitable for sandy sustainable soils, at a low level of occurrence groundwater... Work on the manufacture of a strip foundation consists in digging a trench, about 400 mm deep, installing formwork, filling a layer of sand at the bottom of the trench, then a layer of gravel, installing a reinforcement strapping, and pouring all this with concrete to the upper level of the formwork.

- Column foundation, is a pillars of reinforced concrete installed at the corners of the building, and at the junction of the internal and external walls. Instead of reinforced concrete, brick, or rubble stone, connected with cement mortar, can be used. It is used on slightly loose soils. The deepening of the pillars, as a rule, can reach one and a half meters. The work consists of digging holes, erecting formwork, filling crushed stone, installing reinforcement, and pouring concrete into the pillars. As an option columnar foundation, you can also consider bored piles.

- Screw piles, another type of columnar foundation, are used in the case of weak peaty or fluid-clayey soils. The deepening of such piles can reach several meters until its base reaches solid soil layers. The screw pile is a thick-walled steel pipe with metal blades at the base, which is screwed into the ground manually or with the help of mechanisms. After deepening, the pile is cut to the required height and poured with concrete.

- Monolithic concrete pad, used in case of difficult hydrological conditions of the ground with a high level of groundwater occurrence. It is a monolithic reinforced concrete slab, which is poured in place, over the entire area of the pit.
Advice! The distance between the bearing supports of the columnar foundation should be no more than 2 meters. If there is more distance between the corners of the building and the intersection of the walls, an additional intermediate support must be installed.
External and internal walls
Before you build a bathhouse with your own hands, you need to decide on the material of the walls. Most often brick and natural wood are used for these purposes.
In addition, sometimes the bathhouse is performed according to the principle of frame-panel construction, where a prefabricated structure of a wooden bar is used as a frame, and the sheathing is performed composite materials on a chipboard basis with expanded polystyrene core. Also, in some cases, the walls of the bath are built from materials based on lightweight concrete, such as foam concrete, or wood concrete.
For those who are wondering how to build a cheap bathhouse with their own hands, it would be most appropriate to make internal walls and walls, from the same material as the external ones. The difference is mainly only in the thickness of the walls.
Each of the materials has its own advantages and disadvantages.
- Brick, characterized by easy accessibility, fire safety, durability, resistance to high humidity and exposure to rodents, pests, molds. The construction of a bath from it does not require any special skills, and is available for doing it yourself. Among the shortcomings, it should be noted the low thermal insulation capacity, high weight, relatively high cost of material and construction costs.

- Natural wood, environmentally friendly, due to its porous structure, has good thermal insulation and breathability, has a small specific gravity... In our latitudes, it is an affordable and relatively inexpensive building material; the construction of walls takes a little time. However, a long time is required for the shrinkage and shrinkage of the log house, practical work skills are required for construction, the tree has an increased fire hazard, does not resist water well, is unstable against mold, rodents and various pests.
- The advantages of frame-panel construction are the simplicity and high speed of the construction of such objects, their mobility and versatility. If necessary, the bathhouse can be converted into a barn, living quarters, or even moved to another place. In general, this one is relatively new way, has recently begun to gain popularity, and you can learn more about it from the materials on how to build a shield bath with your own hands.
- Structures made of lightweight concrete or wood concrete, which replaced foam concrete, are structures made of blocks made from a mixture of chopped wood fiber materials with cement mortar. This relatively new material combines the properties of natural wood and monolithic bricks... It is characterized by high strength, durability, fire resistance, low specific gravity, good thermal insulation and breathability, resistance to moisture, rodents and mold. However, it is better to protect it from direct ingress of water.

Based on the above characteristics, everyone can make the best decision for themselves what to build a bath from.
Sauna stove
As you know, one of the most important elements of any bath is its stove. From ancient times, and until today, the most widespread is a brick stove-heater, which is heated with wood or coal.

The firebox of such a furnace, folded from refractory bricks, in its lower part has a grate made of thick-walled metal, through which, from the blowing section, air is supplied to the furnace, which ensures stable combustion of the fuel and quick dial temperature.
It has some features that are not inherent in a regular home stove.
- The stove is usually equipped in such a way that it simultaneously heats the steam room, the washing compartment, and the relaxation room, which is often combined with a dressing room.
- From the side of the washing compartment, a heat exchanger enters the oven, into which from below is fed cold water, warming up, goes up and falls into the container for hot water. Thus, by constantly circulating, it heats up to a high temperature.
- On the side of the steam room, there is a compartment for stones on the stove. In the process of firing the stove, the stones heat up, and during the adoption of bath procedures, after supplying small portions of water to them, they give off heat in the form of superheated water vapor to the steam room, which is the whole process of steaming. The more stones there are on the stove, the longer the bath can keep warm.

With good insulation, it makes sense to use electric heaters-heaters, the price of which will be lower than the cost of building and operating a wood-burning stove. In them, stones are heated by the heat of powerful electric heaters.
The advantages of such stoves are the simplicity of installation and operation, a fairly rapid heating of the room, no need for the preparation of firewood, and periodic tossing of fuel. Also, they are lightweight and compact.
Of the negative qualities of such stoves, it should be noted their high consumption of electricity, and in some cases, for their operation, a three-phase power supply is required, which is not available in every country house.

Note! requires the arrangement of a separate foundation for it, which has nothing to do with the supporting foundation of the bath. For electric ovens no installation is required.
Engineering communications equipment
In order for the bath to serve as a full-fledged resting place and satisfy all the needs of carrying out sanitary and hygienic procedures, it must be equipped with all the necessary communications.
The water supply can be connected using a conventional metal-plastic pipe, laying it underground in a protective sheath with thermal insulation.
The sewage system also needs to be equipped with underground laying plastic fan pipe for outdoor use, connecting it to the common drain collector of the house, and directing the drain from the bath to the septic tank.
The electricity supply can be performed using both underground and overhead cable power lines. For this purpose, you need to use a special cable of a suitable cross-section, connecting it after laying to the switchboard of your house.

Conclusion
Many owners of suburban areas are concerned about the question: how to quickly build a bathhouse with your own hands? This article, as well as other materials on a similar topic, are aimed at helping readers get an answer to their question. If this theoretical material is not enough, you can watch the video in this article.
Since ancient times, the bathhouse has been a place where you can relax and unwind. These ancient buildings bypass even outdoor recreation in popularity.
How to build a bathhouse yourself?
Building a bath with your own hands is a difficult task and its implementation will require a certain amount of knowledge, which you will soon learn about.

To build a bathhouse with your own hands, you will need to familiarize yourself with the action plan:
- Design a bathhouse;
- Understand the stages of construction;
- Get a building material;
- Connect communications;
- Arrange a bath with inside.
After getting acquainted with the stages of construction, it is necessary to determine the place where the bathhouse will be located, since a lot also depends on the location.

The best option would be if:
- the bath will be located on a hill, this will greatly simplify the installation of the water drain;
- there will be a river or a reservoir next to the bath;
- the window in the bathhouse will be located opposite the house, which will allow you to observe its firebox.


For a garden house, the distance will be no more than 3 meters, and for buildings such as a bathhouse, this distance should not exceed 1 meter.


It is best to order the design and drawings of the bath from local designers, it will cost about 5,000 rubles. You can also search ready sketches and photos of the saunas on the Internet that best suit your preferences.

Bath made of bricks, stones or blocks
Brick, stone or blocks can be used directly as materials for a brick bath.

To build a bath, it is necessary to dig a pit and fill it with 20 cm of sand, then it must be filled with water to seal.

The second step is to lay the crushed stone on top of 10 cm thick sand, which then needs to be covered with sand again.

The final step will be to install a drainage and drainage system for the building.

Bath from a bar
The first layer for the base of the bath will be 20 cm of sand, the second layer is crushed stone, and the concrete fill is laid in the third layer. The key stage will be the reinforcement of the building.

Metal rods need to be inserted into the layers for a more durable structure and, as additional stability, metal plates must be laid in the middle, which are tied with wire.

Note!

The next stage of work is the blind area, which is needed so that the base of the bath is not washed out with water.

It is best to make a blind area of clay, it is much stronger than concrete, and also does not form cold seams in the process. A layer of rubble must be poured over the blind area.

Next, you need to install a drain in the bath. First, you need to dig a hole and bring its gutter to the edge of the building foundation, cover the pit walls with wooden planks with reinforced wire, and then fill everything with concrete.

Frame bath
The foundation for such a bath structure is made using a simplified technology, which is the advantage of a frame bath. It is necessary to make a foundation of asbestos-cement pillars, which, after installation, are poured with concrete.

The next step is to mark the walls. Then you need to start connecting the boards using nails. The upper and lower strapping is assembled from the boards. The walls for such a bath are made in a lattice structure.
Note!


The materials that are needed for the walls are bars, insulation, and materials for the outside, for example OSB boards or a block house, and inside you can use the clapboard.

Materials for insulation and vapor barrier
It is worth insulating the bath outside only with the condition of heating in the building.

For a wooden bath, it is necessary to make a grate that will be inserted into the insulation. The work will need mineral wool, the layer width of which will be 50 mm.
Bath floor
In the case of a frame bath, when it remains to insulate the floors, as well as to install floorboards, in addition to this, it is necessary to install logs, a rough floor, and fix the structure for removing steam, then lay the insulation and check the waterproofing.

It is best to make the floor of concrete, as this will allow the bath to dry faster and it will last much longer. Shields made of wood are laid on the concrete floor, they can subsequently be taken out to dry and calmly go about their business.

Note!

Do-it-yourself bath photo


During the construction of a bath, actions should be taken in stages, erecting a reliable and warm structure. A solid foundation is created on which wooden walls are attached. Interior decoration and ceilings are made with insulation and moisture-resistant materials. The roof is covered insulating layers and is equipped with a ventilation outlet.
We build a bath with our own hands - a step-by-step display of construction
The entrance to the bathhouse is equipped from the south side. This is prudent, since in winter the drifts from this position accumulate in the smallest amount and thaw at an accelerated rate. In order for the room to be illuminated to the maximum by the sun, it is advisable to arrange the windows from the west.

When a place for the construction of a bath is chosen near a reservoir with clean water, it is advisable to locate the building no further than 20 m from the water body. Thus, you can get a huge supply of water and avoid saving fluids during water procedures.
Sauna with a swimming pool
If there is an opportunity to attach a pool, you will get a full-fledged bath complex. You can carry out the construction of such a structure with your own hands. A special bowl is purchased in a hardware store, and a separate place is equipped for it. It remains only to supply and drain water. Having shown their imagination, many owners carry out design mosaic decoration and equip bright lights, which create a fabulous effect at night.

The pool can be placed in a room adjacent to the bathhouse, if you pre-equip a polycarbonate visor or roof, options with glass walls look beautiful. Also, the pool is convenient if it is located in a room adjacent to the steam room. The pool is designed to instantly plunge into cool water after a hot steam room.

The creation of a "cascade pool" is the most fashionable idea at the moment. This is a kind of cascading waterfall, which is found only in natural areas. A closed water circulation system is created, and the edges of the structure are lined with special stones, which are usually used for alpine slides. To create a real beach atmosphere, you can create a 3D drawing on the walls, which will depict your favorite beach or a beautiful tropical area. At the design stage, it is necessary to provide for a developed power grid, large-scale water sources with the possibility of continuous water supply and drainage.
Bath foundation


To create a high-quality foundation, you need to select technically pure components. The mixture is made up of cement, water, sand or gravel. The listed components, in addition to water, are mixed in a ratio of 1: 3: 5. The liquid is added gradually with constant stirring until the mixture becomes liquid.

The procedure is shown in the table below.
| Procedure | Description |
|---|---|
| The construction site is being marked. The location of the external and internal walls is marked with a cord stretched between strictly vertically stretched stakes. |
| It must be deepened based on the height of the foundation with the addition of layers of sand cushion and waterproofing. |
| The sand cushion is 15-20 cm high. Coarse sand is used to fill this space. An alternative to this material is gravel. It is advisable to create a backfill layer by layer, wetting the material with water and tamping at each stage. |
| For this, the sand cushion is completely leveled. When it dries, you can install a kind of fence in the form of long boards, plywood, or use a special permanent formwork. |
| On the inner surface reinforcing chairs are placed or stones are laid out that are stable enough to withstand the reinforcing rods. You cannot create a reinforcing cage directly on the sand, otherwise, when pouring with cement, its bottom faces will remain uncovered. Reinforcing bars are purchased. The largest section should be for elements that are driven in like pegs. They serve as the basis for the entire structure. They should be installed on reinforcing chairs on both sides, parallel to the formwork line. The horizontal bars make the frame complete. Longitudinal pegs should be fastened to transverse pegs at all intersections by welding parts or fastening with thin wire. |
|
|
| Immediately after mixing the mixture, it is necessary to pour the foundation. It is advisable to do this in one step, however, with large volumes of work, first the first row is formed, and after a while the second. |
| During the filling of the mixture, it is necessary to work in parallel with a deep vibrator. It is needed for the fastest compacting of concrete. If you do not use it, the mixture will settle when it dries, and air bubbles will remain inside, which will make the base of the bath less durable. |


 Foundation type - strip. Longitudinal bottom layer of reinforcement


Brick prices
Video - Foundation for a log house
Bath water supply
The water supply system is organized taking into account the basic requirements:
- the possibility of filling water in one structure;
- protection of water from freezing at subzero temperatures.

The work of the steam room should be provided in several versions:
- "Russian" steam room, in which a constant supply of wet steam is maintained;
- a sauna where vaping is carried out exclusively with dry steam.
How to find the optimal water source?
The best option for a bath is an artesian well.


There are wells for the sand. Their drilling is estimated at a small amount, but it is necessary to install special filters, which is also a costly undertaking.


Before drilling a well, it is necessary to make sure that there are no radioactive substances in the soil. Often, a high percentage of radon gas is found in the ground, which is a completely radioactive element that is harmful to health. The study can be ordered from special companies or check information about the area in the regional fund.
The best and least expensive option is to pull out a conventional well.


Once the decision on the method of water delivery has been made, it is possible to find the aquifer by observation, through experimentation, or by performing verification drilling. To equip the well, special rings with a thorn-groove system are needed, which can be quickly fastened to each other. This technology ensures that the rings will not move horizontally. It is advisable to additionally use metal rings to tighten the elements so that the fastening is more reliable.
A bottom filter should be formed at the bottom of the well. For this, stones, crushed stone are used, you can also use geotextiles.
Water from the well is supplied to the bath through the outlet pipe. It should be completely sealed. Bituminous mastic is not suitable for this. It is advisable to perform a multi-layer waterproofing, where elements of silicone, concrete or liquid glass are used.

Work performance technology.
- The hole is closed with silicone, which is plastered tile adhesive... It must be 100% water and frost resistant.
- The glue dries completely. Then fibrous rubber is applied to it. This material is usually used to protect the shower from leaking.
- After this layer has dried, the glue must be applied again, but in a greater thickness.
- Plaster is applied with tile adhesive.
- After a day, the surface is covered with blue clay, on which the foam should be laid.
- Loams make the well more decorative.
- All of the above actions should be done in the exact order both from the outside and from the inside of the structure.

If you need a silent system, you need to install submersible pump, which descends directly into the well.

TO pumping station the receiver should be connected so that it can be easily used without additional inclusion every 3-5 minutes. Also, this device will help to normalize the pressure in the system.
Pumping station prices
pumping station
Choice of pipes
The most comfortable are considered metal-plastic pipes however, they are often not optimal for a bath. In winter, their gaskets dry out, which can cause a temporary interruption in the water supply. Propylene pipes do not corrode, have excellent wear resistance and are equipped with a one-piece structure without additional gaskets.

Plumbing is carried out from the pumping station to the design of the filter, tank and collector. A tee is installed inside the well, which serves to conduct a drain valve and a check valve, which is necessary for installing a strainer. Additionally, a mesh filter is placed in front of the pump. It is advisable to ensure that this element of the system is designed for at least 30 tons of liquid and has a carbon cartridge.

Most often, baths are made from a bar. Logs are completely natural material, do not lose their properties for many years, therefore they make the room "breathable", provide natural thermal insulation with constant air exchange. Ventilation of the room takes place in automatic mode, however, a special opening for air outlet is provided without fail, as required by building codes.
Log walls are automatic humidity controllers. If the bathhouse is used for its intended purpose almost every day, the walls almost never dry out, so a light smell of fresh wood is constantly felt in the building.
It is necessary to choose the most straight logs that do not have defective particles, damage, and the presence of knots is also undesirable, since such material requires additional processing. Before use, the logs are cleaned, then special protective compounds are applied to them, with the help of which the material becomes fire-resistant and not susceptible to damage by insects.

The strongest species are pine and spruce, growing in northern regions... In order for soaring in the bath to be accompanied by a pleasant aroma, you need to erect walls of linden. If you need to purchase a tree with a persistent resinous smell, you need to choose a material with a high content of knots or cavities filled with this substance. With constant use of the bath, the resin will flow out, which will affect the aesthetics. appearance walls. It is advisable to compare the smell from different materials, choose solid elements without cavities with resin, but with a pleasant aroma.
Rounded log prices
rounded log
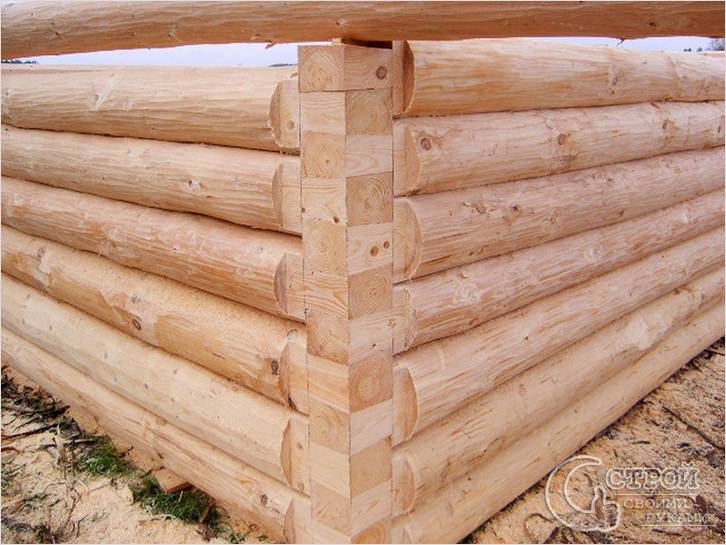
Construction of a log house "in a paw"
Select logs of equal thickness. The ends of the paws are marked according to a pre-drawn template. The length of the protruding ends depends on the width of the logs. The bars should be chipped before laying, however, in most cases, for the first crown of the building, the material is left completely solid. The highest quality samples are selected for it, since it is this place that is most exposed to negative factors that can lead the tree to rot.


 On the sketch the following designations: 1 - method of cutting "warm corner"; 2 - edging; 3 - a wooden spike or nail for attaching adjacent crowns; 4 - cutting (sawing) of wooden inserts for tightness of joints; 5 - a layer of waterproofing (roofing material); 6 - mezhventsovy insulation (for example, jute); 7 - the first crown; 8 - foundation or strapping; 9-10 - arrangement of the opening On the sketch the following designations: 1 - method of cutting "warm corner"; 2 - edging; 3 - a wooden spike or nail for attaching adjacent crowns; 4 - cutting (sawing) of wooden inserts for tightness of joints; 5 - a layer of waterproofing (roofing material); 6 - mezhventsovy insulation (for example, jute); 7 - the first crown; 8 - foundation or strapping; 9-10 - arrangement of the opening
The felling of logs is carried out when laid out in two equal shares, which differ in the shape of the cut.
- Root thorn.
- Plug-in thorn.


Creating a template for felling
When creating a template, the following scheme for fastening beams is provided:
- Formation of a small hole.
- Beam installation.
- Fastening of both beams.
 Paw chopping - marking


Video - Log felling "in the paw"
To make the crowns stiff, they are fastened with thorns in increments of 1 m. This procedure is necessarily applied for the two highest crowns, which serve as the basis for cutting down the ceiling beams. Nests for spikes are made at a depth of 0.2-0.3 m, while the thickness of these elements is 0.25 cm with a width of 0.6-0.7 cm. When these parameters are observed, a height of up to 150 mm is provided.

Video - Fastening logs with dowels
Video - Nageli. Terms of use and errors
A seal should be laid between the bars to insulate the structure. Moss, felt or tow is used as insulation. It is installed after the creation of the wall structure. For this, the seal is installed using a padding. Popularly, this action is called poking. This procedure should be performed twice. For the first time after the completion of the work on the construction of the walls, and then after a year and a half, that is, after the shrinkage of the structure.
Video - How to dig a log house
Timber walls: construction features

Bar walls are rated as the easiest to build. Structural elements must have a section of 150x150, while initially they are made of logs. They are shaped by filing. Slabs, excluded in the process of harvesting the beams, should not be thrown away. They are used for arranging the floor in the attic.
The bars can be fixed "in the flash", "in the paw", however, the joints should be strengthened with thorns, placing them in an upright position.


Stages of cutting walls from a bar
- Cut out the corner shape for attaching to an adjacent structure and making a connection with a tenon.
- Punching out the corner on the dowels with the participation of plug-in dowels.
- Fastening the bars during the formation of the structure on the dowels.
- When using tongue-and-groove beams, the connection is made using plug-in rails.
- Keyed connection.
- Fastening the structure with dowels.
Timber prices
Video - Construction of a bath from a bar
Video - Erection of walls from a bar (part 1)
Video - Construction from a bar (part 2)
Stages of work in the construction of a bath
The log house of the bath must be assembled subject to the right technology installation of all parts. Only then will its high quality and durability be ensured.
Waterproofing is applied to the foundation.
Video - Foundation waterproofing

 Log house foundation waterproofing
For protection lower rims from destruction under them is enclosed wooden plank at least 5 cm thick, and at least 20 cm wide. The tree undergoes an antiseptic procedure. The board is covered bituminous mastic or special resin on three sides. The exception is the top surface and end parts.

In the photo - a board laid on a foundation under a log house
In the absence of the materials listed above, roofing material should be used. Three sides of the board are lined with it, after which it lies on the waterproofing layer. When there is a loose fit of the board to the waterproofing, it is necessary to level the surface. To do this, all the gaps are measured, small pieces of roofing material are cut out for the obtained parameters and laid out on the surface. When laying additional layers, they should be tightly joined so that there are no significant gaps, protrusions are also unacceptable.

If roofing material is not used in the structure, it can be replaced with any material for waterproofing, in particular, tow, felt, hemp, while these elements should be pre-cleaned and covered with an antiseptic compound. If all these measures are carried out, the formation of drafts is excluded in the area of the crowns. Also, the wood will be completely protected from decay.
Thermal insulation should be placed on the lining, which serves as the basis for the first crown. In order for the wood to fit snugly against the lining, it must be trimmed or trimmed. These measures are carried out only if the quality of the material allows cleaning the edges. When there is a risk of wood decay, the contours should be left intact, only to smooth out too noticeable irregularities.

The second row of logs of the cap is located perpendicular to the first. These logs are above the lower ones by 50% of their diameter. The resulting space must be tightly laid with brick or decorative stone.
Thermal insulation should be laid between the logs, trying to fill all possible gaps. At the end of the work, you need to make sure that there are no places with a draft. To prevent precipitation from affecting the lower part of the bath structure, it is necessary to choose a groove between the second and third row. A drain board is installed in the hole. You can replace it with roofing steel. This material covers the base along the entire length, and should hang down by at least 5 cm.


Bath floor
Even at a high air temperature in the bath, the space near the floor rarely heats up to more than 30 ° C. The quality of the insulation is not particularly important, but remember that a strong temperature contrast should not be allowed.
Recommended flooring materials: fiber mats, cork boards, planks. To organize constant drying of the floor, it is necessary to raise it on the logs. When you need to fix the flooring on a wide floor, it should be done in several stages, having marked out individual sections in advance.


First, wooden logs are mounted. For this, pillars of massive brick are installed in advance directly on the base of crushed stone or soil. Logs are laid with an approximate step of 1 m. To create a log, it is advisable to use grooved boards.
The floorboards are made from hardwood and must be at least 3 cm wide.
The floor can be left wooden in all compartments, except for the steam room. This room is constantly maintained under the influence high temperatures and in high humidity conditions. The best material the floor is covered with ceramic tiles. To ensure comfortable movement without slipping, you can equip wooden grates, which after vaping, it is advisable to take out for drying.
A drain is equipped in the place of the greatest slope of the floor so that there is no stagnation of moisture in the room.

When the building is fenced with walls around the perimeter, you need to select separate rooms, which should also be reliably separated from each other.
For the installation of partitions made of wood, special wooden blocks... When the partition is outlined between the already laid floor logs, it is mounted anywhere, fixing it on the crossbars.
Sometimes partitions are mounted in the opposite direction to the floor beams. In this case, a purlin is installed on the intended space, which is a reliable basis for the partition.

There are several types of partitions.
- Single solid boards.
- Double solid planks.
- Double with a gap, that is, the possibility of free air circulation.
- Double with full filling, i.e. no drafts.
- Frame sheathing.
If you choose the most simple construction partitions, they are made from boards 4-5 cm in thickness and 10-20 cm in height. They should be pre-planed. This action can only be performed from one of the sides. The use of boards with a wider diameter is not recommended, as they tend to deform. To guarantee complete closure of the cracks and the possibility of long-term operation, you need to choose a tongue-and-groove material.

The bars are connected by steep spikes of 10-12 cm. The pitch of the boards is calculated from the height of the boards, it is optimal to take breaks of less than 1 m.If round spikes are not available, nails without heads are used instead, but it should be checked that their length is within 6- 8 cm.
On the walls next to the partition, it is necessary to draw vertical lines and mark them with a cord. It is advisable to use a plumb line to check the evenness of the mountings. In addition to the walls, they should subsequently be drawn along a line to the ceiling and boards of 4x4 cm should be nailed to them. Then grooves are formed, corresponding in width to the design of the bars.
A gap should be left in front of the place where it is planned to insert the boards for the partition, that is, do not fasten the bars at a distance of 20-30 cm.On the beam, only the rails are allowed to be fastened wooden structures... Natural shrinkage of the structure should be foreseen in advance. For its maximum compensation, the partitions are measured a few centimeters shorter than the main walls of the bath.

The bars are first placed in the grooves, then moved until they close. The partition is provided without holes, therefore, the fastening should be carried out as tightly as possible, using spikes or quarters.
Skirting boards are nailed down along the perimeter of the space separated by the partition. Small holes are usually formed separating structural elements... They should not be overlooked. They must be caulked with tow or gypsum.

A double partition is made with the connectors left or when they are filled with a material that plays the role of thermal insulation. It is advisable to use mineral wool in any configuration for this, including in the form of slabs.
The thickness of the boards is about 2-2.5 cm. With such parameters, the gap between the rows will be about 0.4 cm. The double partition is constructed by alternately assembling the first and second sides. When the creation of gaps is not planned, insulation should be laid between each row of beams in parallel with the assembly of the walls. The upper edges of the boards are held by inserting them into the grooves. The lower edges are nailed to the boards with long nails.
To save on the construction of partitions, they should be erected using a frame-sheathing method. For the assembly of the frame, a choice is used: thorns, cuts or nails. The main material is boards. The frame is supported by a beam. Alternative fastening is carried out on the ledgers when inserting structural elements into the grooves.

The upper edge of the structure should not reach the ceiling by 1-2 cm. The remaining gap should be filled with tow, which mixes with the gypsum solution. You can also use boards that completely cover the connection, leaving no gaps. To insert the door frame into the partition, additional boards should be placed next to them, closing the frame canvas.
Video - Partitions in the bath
Creating a bath roof
The ceiling in the bath should be equipped with maximum heat and vapor insulation, since the most humid air always rises upward and accumulates under the roof.

Boards are mounted as floor beams.

A vapor barrier is laid between the boards.

Vapor barrier of the ceiling in the bath with foil
Insulation is laid above the vapor barrier.

The structure is closed with boards laid in a direction perpendicular to the beams.

The gap between the insulation and the waterproofing will improve the characteristics of the insulation "pie"
The ceiling consists of the following elements:
- hemming boards;
- bars that serve as beams;
- primary skin;
- hydro and vapor barrier;
- thermal insulation.
When arranging attic space, the design of the ceiling is slightly changed. A layer of clay coating is created on top of the boards, approximately 1-2 cm thick. Wood chips can be used as insulation. Its thickness should be impressive, more than 15 cm, and it should also be pre-mixed with a weak cement mortar. If too much condensation subsequently forms on the ceiling, then the thickness of the insulation is insufficient. It should be increased by applying the backfill a second time.
Video - Thermal insulation of the bath cloth
A wooden floor is constructed with this sequence of actions.
- Initial laying of beams.
- The imposition of cranial bars.
- Installation of roll-up boards. They can be created from low-grade wood, but they must first be hammered together.
- Vapor barrier lining. Glassine is usually used.
- Insulation installation. Recently, mineral wool has become popular.
- Ceiling board laying.
- Their filing is in progress.
- Parts are held together with anchors.
- The final waterproofing is being carried out, for which roofing paper is excellent.
The beams should be no more than 10 cm deep into the structure. The rear wall of the nest forms a gap with an end, the optimal width of which is no more than 3 cm. Inner part the nests are filled with cement mortar.
If the beams are too strong against the walls, they should be shortened. A cross section is unacceptable, as abrupt actions can lead to cracking of the part. Cut at an acute angle.
Mineral wool prices
mineral wool
Video - How to make a reliable roof on the bath
Video - Do-it-yourself sauna roof
Small bath with your own hands - great option when the territory near the house or in the yard of the summer cottage is limited. In addition, with such a solution, you can significantly save your budget, but as a result, you get a full-fledged resting place, which will not only allow you to relieve stress after hard day, but improve your health and have a good time with family and friends.
Examples of projects
IN ideal option the bathhouse includes 4 rooms in its design:
- dressing room;
- restroom;
- washing;

You can expand the functionality of some rooms by combining them with each other. At the same time, the comfort from the stay is not lost. The overall size of the building will largely depend on how many people will be inside at the same time.
- 1.20 mx 2.50 m. Very compact solution. In this case, the bathhouse consists of only two rooms: a steam room and a dressing room. The dimensions of the first are 1.20 mx 1.50 m, the second - 1 mx 1.20 m. There is no rest room, and in the dressing room you can easily change clothes. The washroom can be combined with a steam room. This size will be enough for one person.
- 2.50 mx 2.50 m. In terms of the number of premises - the same as the first option. The size of the steam room is 2.50 m × 1.50 m, the dressing room is 1 m × 2.50 m. At the same time, it will be possible to organize additional storage space for firewood. In such conditions, two people can easily fit.
- 3 m × 3 m. This option can be planned in different ways. If there is a desire for three people to fit in the steam room, then it can be made 3 mx 1.50 m in size, the washing room can be made separate by placing a shower stall there. The size of this room will be 1 m × 1.50 m. There is also a dressing room of 2 m × 1.5 m. You can combine a washing and a steam room, then there is a space that can be used as a relaxation room, which will also serve as a dressing room.
- 4 m × 3 m. In this case, 4 m 2 can be separated for a steam room (eg 2 m × 2 m). The washing room will occupy 1 m × 1.50 m, 2 m × 3 m will remain for the rest room.In such conditions, four people can easily fit. They can simultaneously be in the steam room, as well as enjoy communication in the dressing room.
- 4 m × 4 m. In such a territory, it is already possible to turn around well. The steam room can be left 2 mx 2 m in size. A separate dressing room should be 2 mx 1.50 m in size. The rest room in this case is 4 mx 2 m (one of the sides will be 2.50 m). The washing room can be combined with a relaxation room; for this, an electric boiler and a shower stall are installed. They can be placed in one of the corners of the room, which does not take up much space.


These are indicative examples. You can easily vary the size of the premises within the available limits. You may want to make the steam room smaller, because there is no need for 4 people to be there at the same time. At the same time, it will be possible to expand the space of the rest room.
Note! All measurements are in ideal values without taking into account the thickness of the walls. This is done for clarity. In the case when the bath will be adjacent to the house, then it can be made in the form of one steam room. At the same time, the bathroom will act as a washing room, and the rest of the territory is available for relaxation.
Choosing a material

For the construction of walls, you can use a variety of materials. Much will depend on which project you have chosen, as well as on the planned amount of money. For example, you can use a regular brick. You can read how to build a brick bath. In this case, the following points will be positive:
- availability;
- ease of delivery;
- relative ease of construction;
- long service life (with proper care - up to 150 years);
- ease of maintenance;
- the possibility of combining with the main structure;
- when using new bricks, there is no need for cladding;
- freedom to choose the shape of the building.
TO negative sides can be attributed:
- high cost of material;
- the need for good ventilation, because the brick has poor steam permeability;
- kindling such a bath takes more time than wooden buildings;
- high costs for interior decoration.

Along with brick, foam block is often used. This is a more progressive material, it has properties characteristic only of it:
- small weight with large size;
- high laying speed;
- ease of fitting block shapes;
- good thermal insulation;
- relatively low price;
- excellent sound insulation;
- environmental friendliness;
- if the recommendations are followed - a small consumption of glue.
There is also a fly in the ointment:
- uneven pores can be a problem when hanging furniture;
- shrinkage may occur for several months;
- poor bending resistance.

The most favorite manufacturing method is the rounded log. There is a lot to say about its benefits, here are just a few:
- high environmental friendliness;
- pleasant appearance;
- low heat capacity;
- no need for interior and exterior decoration;
- pleasant inner atmosphere.
The negative side is:
- it is unprofitable to use in small buildings;
- some complexity of construction;
- high cost of material;
- long shrinkage time.

One of the cheapest and quick options is the construction of a frame structure. Minimum construction skills will be required for this method. The advantages are:
- no need for a massive foundation;
- availability of materials;
- relatively low cost compared to other options;
- ease of care;
- very fast heating of the steam room with good insulation;
- ease of laying communications;
- seismic resistance;
- no shrinkage.
Of the minuses, we can note the need to organize good sound insulation. High level of echoing - transmission of various vibrations, which can be inconvenient. It is also important to ensure good ventilation so that moisture does not accumulate inside, which will lead to the development of mold and mildew.
Strip foundation

In the case when a really small bath is planned, it makes no sense to sink the foundation to the level of soil freezing. This will only increase the overall cost of the project. With proper manufacturing and waterproofing, you will not have to worry about the walls being cold. This type of foundation will be relevant for any of the listed building options.

At the stage of laying the foundation, the supply of the necessary communications is provided. This can be a water supply system and a sewer drain for water from a washing room.

Note! If it is known that soils in your area are highly mobile, then an unburied foundation would be a bad option, because it can easily collapse under the pressure of layers. In this case, it is better to assess the possibility of installing piles.
Pile foundation

There are several ways to build a foundation. Piles can be bored and driven. In the first case, a well is drilled, the formwork is made, the reinforcement rods are lowered and the entire space is poured with concrete. In the second version, ready-made concrete, wooden or metal posts with a pointed end are hammered immediately. Most suitable options for a small bath will be screw. They consist of a metal base in the form of a pipe and blades, which facilitate the immersion of the supports into the ground. They can be purchased or made by yourself. If you chose the second option, then you need to act like this:


In each of the options described, separate support elements for the stove should also be provided, especially if the use of a heater is planned. This is very important, because its weight can be large, which can lead to damage to the floor and log.
Note! Such a foundation will ideal solution for frame structures, buildings made of logs, as well as small baths made of foam block. If the soil in the area where construction is planned is sufficiently strong and stony, then you can apply something in between a pile and strip foundation - columnar. In this case, individual pits with a size of 50 × 50 cm are dug out every meter to a level below the freezing of the soil. Formwork, metal crate is installed inside and mortar is poured.

Erection of brick walls
For a bath, it is better to use red brick, which has undergone heat treatment and has a lower thermal capacity. To calculate the amount necessary material, you need to calculate the area of each wall. To do this, the width is multiplied by the length. Then it is necessary to divide this number by the area of one brick. The area of the masonry seams can be neglected, because you will still need to make a reserve in case of a fight or marriage.

The wall can be built using several methods:
- in two bricks with external insulation.
- with air gaps, they are about 6 cm;
- with a layer of insulation between two rows of bricks.
Work begins with the construction of corners. This is an important process because it is they who will subsequently ensure the correctness of the entire structure. To comply vertical level future walls, two are dug in at the corners metal profile 5 × 5 cm and a length equal to the height of the future walls. They are set in level and secured with jibs. The fishing line is stretched between them to the height of one row. After it is laid, the line is rearranged to the height of the next one. The seam thickness should be about 20-25 mm. It must be applied at a distance of no more than a meter so that it does not have time to dry. Additionally, the plane is checked with a bubble level. If the second and third type of masonry is selected, then it is necessary to provide a dressing between the two walls. This is ensured by the transverse laying of two bricks opposite each other at regular intervals. Also, each row should go with an offset of half a brick, so that the overall weave of the entire plane is ensured.

A lintel must be installed over windows or doorways. Usually it is reinforced concrete. You can buy it ready-made or pour it directly on the spot. It should go beyond the openings by at least 25 cm. Supports are installed, a wooden board is mounted on them. Two rows of bricks are laid out per edge. Between them are reinforcement rods, which should also extend beyond the opening by 25 cm, while it is better to bend them in order to intertwine with the existing masonry. Concrete is poured inside. After complete hardening (usually 10-12 days), the lower supports can be dismantled and the logs removed.

Walls from foam blocks
The general installation principle will be the same as in the previous case. You should also start with corners, which should be precisely and clearly set.

In the same way, guides from a profiled pipe are made. But there are some nuances:
- In order to achieve the best adhesion, the base row is laid on cement mortar... It is better to make the ratio with sand 1: 3. It is very important to maintain a horizontal plane so that all other rows also lay down correctly.
- All other rows are fixed with special glue.
- The thickness of the adhesive layer should not exceed 5 mm. Only in this case will it be possible to achieve ideal thermal insulation.
- Every 3 rows in the seam is placed metal grid, which serves to give additional rigidity.
- Foam blocks are placed on the edge.
- Lintels over doors and windows are made in the same way as in the case of brickwork.
Log walls

It is this option that pops up in the imagination when it comes to the bath. To make it, you will need to stock up on a rounded or profiled log. It is better to make from this material outer wall... Because the structure is small, then it is good if the partitions are frame.

After the construction of the walls is completed, the initial caulking is performed. In the process, the hanging insulation is simply hammered into the joints. Complete shrinkage of a building can take more than 1.5 years.
Frame walls
After the construction of the foundation for such a structure, an additional base is made. It is carried out following the example of the grillage mentioned above. For the corner posts, we need exactly the same timber as for the base. In addition, it will be necessary to stock up on an edged board with a length equal to the height of the future walls, a width equal to the width of the grillage and a thickness of 5‒10 cm.


Roof erection
For small buildings, a pitched roof is an ideal solution. It is necessary to plan its production at the design stage. It is very important to be able to raise one wall higher than the other. When this is done, in the case of a wall of brick and foam block, waterproofing from bikrost or roofing material is laid on the upper end. Additional beams are mounted on it, which will serve as a Mauerlat. They are attached to the base using anchor bolts or embedded studs. Beams are laid on top, on which the crate will be stuffed. They can be fixed to the Mauerlat using metal corners.

In another version, the walls are made the same. They fit on the Mauerlat ceiling beams... On one side are installed vertical boards, which will form the pediment, the rafter legs descend from them to the other wall. At the junction with the Mauerlat, they are cut to the required angle. Fixed with metal corners. To make it easier to support the roof in one plane, first, two extreme elements are installed. A string is stretched between them, which will serve as a level.

The ceiling must be insulated. A vapor barrier is mounted on top of the ceiling beams. This role can be played by dense foil. Insulation in the form of mineral wool is placed in the space between the beams. Additionally, it closes plastic wrap... From the inside, filing is done using a wooden lining or polished edged boards... Read more about insulation of the ceiling in the bath.

Note! For a house made of timber, when attaching the rafter legs to the Mauerlat, it is better to use floating corners. This is necessary so that during shrinkage the roof does not skew.
Home stretch
An integral part of every bath is a stove. You can make it yourself from sheet material or metal pipe large diameter... In another version, it is laid out of bricks, but in this case it can take up a lot of space. For small space it is better to use electrical options that are purchased ready-made.

A shelf is mounted inside the steam room. For him, it is better not to use coniferous woods, because when heated, it can release gum and cause burns. Good material for her there will be aspen, larch, linden or oak. With a small space, a width of 40 cm will be enough, it is more convenient when there is a footrest. The fastening material must be flush-mounted to avoid scalding the skin (it must also be made of stainless steel). It is better if the whole structure is assembled on dowels.

Double-braided cable must be used for wiring. It is better if it is non-flammable (usually there is a prefix "ng" in the marking). Be sure to place the conductor in a corrugation. No switches are installed in the steam room itself. The luminaires are waterproof with an IP68 index.
Provide good ventilation. To do this, you can install an adjustable inlet valve, as well as anemostats with an outlet to the gable through the roof. This will be enough to remove all moisture after taking steam baths.
As you can see, there is no limit to what you can build from. small bath... Choose the option that works best for you.
Schemes
 Frame-panel sauna with a porch
The bathhouse, built in Russian traditions, is considered ideal place to cleanse the soul and body. By visiting it regularly, you manage to maintain health, maintain youth and get real pleasure. It is not surprising that many decide to build a Russian-style bathhouse with their own hands.
Features of the Russian bath
The Russian bath, which was built by our ancestors, includes two sections: a dressing room and a steam room. Most big size of this room - 2.3x4 m, the smallest - 5x6 m. Baths with such dimensions are again popular.
1 - dressing room; 2 - steam room and washing room; 3 - shelves; 4 - oven
The device of a primordially Russian bath implies:
- creation of an unburied columnar foundation based on boulders, devoid of a base;
- assembly of a log house from selected wild logs, that is, material that has not been subjected to any processing, except for removing the bark and drying;
- construction without the use of nails;
- plugging cracks with moss and tow;
- installation of a flat ceiling;
- insulation of floor and ceiling coverings with moss and peat;
- waterproofing the structure with resin and boot pitch;
- making a sod or shingle roof;
- creating a furnace from bricks.
Preparation for construction: drawings and dimensions
When composing a bath project, one should not forget that several people will use the steam room and the washing room at once. Therefore, the area and dimensions of the bath should be determined without making serious mistakes.
The second version of the bath differs in the arrangement of the shower
To make it convenient for each user to be in the bath room, he needs to allocate at least 1.8 m² in the dressing room and 1.5 m² in the steam room. Average overall useful area family baths - 10 m². In this case, most of the space should be in the dressing room, and less in the steam room and washing department.
In order for people of any height to wash in Russian, the ceiling should be erected at a height of 2.4 meters.
When determining the height of the ceiling, take into account that soon the building will sit down
At the planning stage of the construction, it is necessary to reflect in the drawing the area for arranging the vestibule. This room may be needed as a place to block the path of cold air from the street.
For the vestibule, 2.32 sq. m
Adherents of tradition are recommended to build a bath from quality wood conifers... This material is not fragile, and most importantly, it serves for a long time. And the needles are also environmentally friendly and have low thermal conductivity, that is, they do not release heat and at the same time interfere with air exchange. Unique property this tree is considered to be resistant to various manifestations of the climate.
Such a wooden building must stand on a solid foundation.
For construction, you can take one of two types of coniferous wood:
- rounded round logs;
- solid bars.
Experienced builders advise to build a bathhouse from beams, since this material is cheaper, and it is much easier to build walls from it. In addition, a timber structure does well without a bulky foundation.
The timber structure looks simple, but it is easy to assemble
If you opt for rounded logs, you can be severely disappointed: the log structure settles for a long time, which is why it will not be possible to put it into operation earlier than a year and a half after construction. Unlike a log bath, a log structure can be safely used six months after the completion of construction work.
When buying bars, you should use a tape measure to check the material for compliance with the specified dimensions, and then make sure good quality construction raw materials. To do this, you need to do the following:

List of materials and tools
To build a Russian bath, you need to stock up not only with beams and bricks, but also:

To carry out construction tasks, you should arm yourself:

DIY step-by-step construction of an object
Construction takes place in stages:
- along the perimeter of the future structure and under its load-bearing internal walls, pits are created to form a strip foundation;
- sand is poured on the bottom of the trench, the finished "pillow" is pressed and poured with water;
- the pits are filled with reinforcing rods and liquid concrete, the layer of which is smoothed with cement mortar;
Before pouring concrete from the boards, formwork is built
- concrete is used to form the base for a brick oven;
- several layers are placed on the platform waterproofing material processed with bituminous mastic;
- the frame is assembled by connecting the beams according to the method "at the corners in the paw, and the ends are in half a tree without a remainder", laying a heater between them and through each row setting the dowels at a distance of 20 cm from the edge;
The corners are connected in 4 steps, and the ends - in 3 steps
- prepare a platform for the floor, that is, a 10 cm layer of sand is poured, pressed, and then covered with a 10 cm layer of crushed stone;
- crushed stone is covered with roofing material canvases with adjoining edges for several centimeters;
- cement is placed on the roofing material, creating a screed with a slope, thereby equipping the waste water flow towards the sewer pipe built into the ground and leading to a separately dug hole;
- on the hardened cement screed cladding material is glued, on top of which a wooden crate is placed;
Wooden battens on the floor keep your feet from touching the cold floor
- floor beams are attached to the upper bars of the walls in a horizontal position;
- the installed beams are connected with iron brackets to the rafters - with thick beams;
- fasten the rafter legs to each other using ridge bars;
- the rafters are covered with a roll-up waterproofing sheet and wood flooring- the basis for the roofing material;
- create a ceiling, that is, not load-bearing walls boards are laid out every 2.5 meters;
- lay over the ceiling vapor barrier film and put insulating material.
Finishing
TO finishing works start after the shrinkage of the structure. First of all, all surfaces inside the bath are covered with an antiseptic compound.
Interior decoration implies the performance of such tasks as:
- installation of the lathing directly on the walls and ceiling;
- laying insulation and vapor barrier material in the gaps of the crate;
- flooring lining or other facing material.
Lining is laid on the ceiling and wall
If only lining has become the most popular building material for interior decoration of a bath, then many materials are in demand for facing the outer walls of a building:
- vinyl or metal siding;
- plastic lining;
- block house imitating the view of a log house;
- edged or unedged boards at a low price.
The material extends the life of the building
Finding stones for the bath room
It is customary to use igneous rocks in the steam room. Formed during a volcanic eruption, they are resistant to extreme heat. Igneous rocks that have a positive effect on the energy forces of a person include:
- polished or chipped jadeite, the main feature of which is beauty;
- talc chloride, capable of absorbing moisture and evaporating it, creating the desired steam in the bath;
- basalt that can withstand high temperatures.
In addition to its benefits, this stone provides aesthetic pleasure.
Metamorphic rocks can be placed on the stove, which tend to normalize blood composition and improve well-being. We are talking about such stones as:
- white quartz, called hot ice, and when it cools sharply, it releases ozone;
- crimson quartzite, the second name of which is the royal stone.
Such a stone is ideally combined with brickwork.
To create steam in the bath, you can use full-crystalline rocks, for example:
- dunite;
- serpentinite.
These stones are able to regenerate cells nervous system, increase immune strength and have a beneficial effect on the functioning of the thyroid gland.
The length of such a stone is about 20 cm
If you want to move away from tradition, then it is better to use cast-iron stones - balls produced by industry - as steam generators in the bath. They instantly heat up the room and keep warm for long hours. True, cast iron stones are subject to rusting after short term services and carry any properties useful to humans.
Sedimentary and siliceous rocks should definitely not be put on the furnace. Their structure is porous, which means that, when they cool down sharply, they become covered with cracks and small particles scatter in a zone of one meter.
Exploitation
The main requirement for using a bath is to create the right temperature. In a steam room, this physical value should be within 55–77 degrees. The temperature indicator is selected individually, that is, it depends on the preferences of the owner of the bath. It is customary to heat the washing room to 40 °, and the rest room to 20 °.
In order for the bath to serve for a long time and properly, you need to use it according to the rules:
- put in the firebox exclusively any dry fuel, except for firewood from coniferous wood;
- keep the door of the combustion chamber closed, thereby avoiding the escape of hot sparks;
- do not allow the chimney to glow until it becomes red;
- do not touch hot surfaces, including the walls of the water heating tank;
- monitor the cleanliness of the bath rooms;
- ventilate the sauna sectors after each firebox for four hours;
- try not to splash water on glass surfaces in the room (on windows and doors);
- clean and inspect the chimney for holes at least once a quarter.
The owner of the bath will have to carefully look after wooden surfaces... The elements inside the bath, made of wood, are supposed to be covered twice a year special means to protect against fungi and decay. External treatment of the wooden walls of the building is recommended to be carried out after two years of operation. To do this, it is better to use antiseptics, which include wax.
Wood deteriorates over time and therefore needs careful maintenance
To bake a Russian bath the right amount heat, you must be able to regulate the traction force. To do this, open the ash storage chamber door more or less. Excessive thrust will cause the furnace to heat up too much, and this will bring the time of equipment failure closer. If the force forcing air to enter the firebox is normalized, then the stones in the bath heat up to a standard temperature.
During the heating of the stove, the operation of the chimney should be monitored. It will be possible to reduce the consumption of firewood to a minimum, and increase the efficiency of heat supply, just not completely covering the chimney gate. But this is allowed to be done only after the absolute closure of the ash chamber.
Video: building a bath from scratch
You can get real joy from the construction of a Russian bath. It is clear that this work is impossible without skills and labor, but the result is a source of pride. This feeling is even stronger if the object was built on their own.