The photo with the left corner is a sample. Schoolchildren's corner: design, color selection and location in the interior of the children's room (93 photos)
Huge selection finishing materials allows you to decorate walls, ceilings, doorways of an apartment or house in the most daring and interesting decor options, but there is one condition. You need to think in advance how to strengthen and protect the corner lines of the walls. The peculiarity of modern wall decoration is such that the outer corners of the walls are the first to age and lose their appearance.
In some cases, you simply cannot do without protective plastic corners for the walls, as in the case of tiling or wall panels... Therefore, people who are knowledgeable in matters overhaul When choosing a finish, be sure to look out for plastic corners to protect the corners of the walls.

Where and how are profiles used to protect wall corners
You have to get acquainted with the first version of the profile corner even at the stage of plastering or leveling the surface of the walls with the help of drywall. Installing a plastic corner under the wallpaper makes it possible to solve two problems at once:
- Strengthen the finishing layer of putty;
- Give the outer corner perfect geometry, at least visually, the line of the junction of the two planes looks quite even.

Anyone who at least once had to glue wallpaper on walls with curved corners will appreciate all the benefits and practicality of the simplest plastic profile.
For your information! With the help of a plastic wall corner, you can easily remove external and inner corners even on the most uneven walls.
The main difference between corner profiles and decorative plastic corners is that the mounting option always has perforations along the entire length. The corner does not need to be glued, it is simply imprinted into the layer of putty or plaster mass... Even professional plasterers always use plastic corner.

But the use of mounting profiles to level the walls does not solve the problem. appearance corner edges, both internal and external, especially if the walls are finished with light tapestries. Therefore, plastic corners are often installed in addition to the perforated profile.
What it gives:
- Complete corner protection. No matter how carefully the owners handle the decorative trim at the corner joints of the walls, after a few months, a maximum of a year, traces, scratches and chips of the cladding will appear;
- Eliminate gaps and gaps between wall panels, especially on wall corners and skirting boards, on a curved surface;
- Drastic improvement in appearance. Colored plastic wall corners will help with minimal cost transform and significantly refresh the wall decor.

In this case, it is not necessary to be limited to the outer corners of the walls, although it is they, as they say, in plain sight and require protection in the first place. Often, a plastic corner at the corner of the wall has to be installed after the fact, it is worthwhile to rearrange the furniture once with the transfer of the most dimensional interior items. Scuffs and dirt can still be removed or washed off, but chips and deep scratches on the walls have to be hidden.

The inner corners also have to be closed in order to mask the transition from one type of finish to another, for example, while lining the walls of the corridor with plasterboard, MDF or DFP panels, and living rooms wallpaper and wall plates.

Plastic profile for sealing corners
For decorative purposes, corners made of polyvinyl chloride, polystyrene, polyurethane and even silicone are used. If the walls of the room are finished with wood or tiles, then a corner of similar material, the plastic profile for such a decor looks unnatural. For all other cases, the list is the most suitable materials invariably heads the PVC corner, it remains the most demanded. Almost everyone who faced the problem of finishing and protecting the corners of the walls with an overhead profile is unanimous in their choice, this is a PVC profile.
Exceptions are metal and MDF corners used as cover strips that cover the line of the window opening from the street side. At the same time for balcony doors often use a plastic outer corner made of polyvinyl chloride.
The reason for the popularity of the PVC profile is determined by three important properties:
- Beautiful appearance, there are practically no problems with the selection of the desired shade of colored plastic corners to protect the corners of the walls;
- Plastic material is highly flexible and "democratic" during installation. No problems with gluing, as in the case of polystyrene or polypropylene corner profiles;
- Easy processing when adjusting the size of the corners. The material can be easily cut with scissors, a bread knife or, best of all, a metal blade.

For your information! Good workability of the material does not exclude the possibility of profile cracking, especially if the plastic corner has been stored for a long time on the balcony or in the garage at low temperatures.
In this case, before cutting the plastic corner, it must be kept for an hour at room temperature.
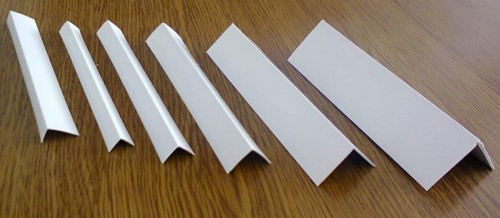
Size of plastic corners
The advantages of the plastic corner include the low cost of the material. Depending on the height of the shelf, the price of a 2.7 m long strip ranges from 50 cents for a size of 10x10 mm to 1.7 dollars for a profile of 50x50 mm. For cladding home walls and corners, a corner with a shelf of 20 mm and 15 mm is usually used, their cost is in the range of 0.7-1 dollars for a standard strip of 2.7 m.
On the market, PVC profiles are represented by three types of plastic corners:
- Standard equal shelf version, in which both shelves are the same size;
- Double corner or T-profile used to decorate interpanel and tile seams;
- L-shaped or arched plastic corner with different shelf heights.

No matter how the masters try to align the planes of the walls, over time, a gap forms in the corner, which must be somehow masked by installing a plastic corner on the corner of the wall. V otherwise there will be an ugly line of transition from one type of finish to another. For the case when you need to close the joint on the wall between the wallpaper and decorative plaster, the smallest profile, 10x10 mm, is quite enough. The same size of shelves is selected for the outer corner for plastic skirting board... The largest profiles, 50x50 mm, are used for installation on the corners of building facades, dimensions 20x20 and 25x25 are the most common for interior work.
Variants of using the corner profile for finishing corners
At first, most apartment owners are rather restrained in using the corner profile when decorating the corners and the line of the wall junction. First of all, the well-established classical opinion that the use of PVC materials in an apartment it is necessary to limit and use it primarily where it is simply impossible to do without it. For example, for entrance doors in the bathroom or in the kitchen.

It is possible to destroy distrust in plastic corners only if people see with their own eyes the difference between wall decoration without a corner and after installing a plastic corner profile. The difference in perception, even with the simplest decor, is significant.
Finishing the slopes of doors and windows
Most good example advantages of installing a corner PVC profile the windows and doors of the modern apartment remain.

With the replacement of the old wooden window frame on a double-glazed window, as a rule, it is necessary to plaster the slopes in a new way, to look for a method and material to close the resulting outer corner to the walls of the room.
Traditionally window slopes are made on the basis of drywall sheets, with reinforcement outer corner perforated metal corner, photo.

This makes it possible to perfectly align the planes and achieve the most even angular line, but still the edge will remain a risk zone. The window is used quite often, so even curtains or curtains often cause edge damage. If finishing slopes with using MDF or PVC panels, then you simply cannot do without installing a plastic corner on the slopes. First of all, you will need to close the end of the cladding panel, otherwise the entire decorative effect from using the finish will be oiled. The dimensions of the plastic corner for the slopes depend on the height and width of the window opening.

A plastic corner for drywall and wallpaper is selected 20x20 mm, for the corner at the transition MDF plate- the wallpaper is installed with a corner profile of 25x25 mm. In the latter case, if you wish, you can hide the installation of the protective profile, for this you just need to choose the right colored plastic corners on the slopes. It is quite difficult to paint polyvinyl chloride, therefore the option with repainting is used if the entire window with slopes and corners is planned for painting.
In addition to finishing the outer edge, it is necessary to install plastic strips between window frame and the plane of the slopes, as well as close the line of intersection of the window sill with the walls. For these purposes, it is best to use a T-shaped profile with a deflection in the central part.

At first glance, the line of intersection of the slope and the window sill may not be covered with a plastic corner, but this is not entirely true. Plastic window sill it springs quite strongly even under a small load, therefore, after a few months, the material with which the corner joint is sealed can simply spill out of the gap, so it is better to close it with the corner profile in advance.
The same plastic corners are often used for decorative sealing of the seam line between the bathroom and the tiled wall. PVC is ideal for wet bathroom environments.

The second section of the walls, where it is almost impossible to do without installing a decorative plastic corner, is the entrance doors. If the entrance doors change in a house or apartment, this means that the owners have a large front of work on finishing and decorating the vestibule and door slopes... Since the front door always remains the dustiest place in the house, the slopes of the doorway, with rare exceptions, are traditionally finished with MDF, clapboard and PVC panels, most often under a tree or natural stone.
After the walls of the door vestibule are plastered and putty, the cladding can be laid. Any master can confirm that after finishing works by the angle of intersection of the corridor walls and the plane of the slopes, the ends will remain visible cladding panels... They must be closed in order to achieve a complete appearance of the doorway and to exclude the accumulation of dirt and dust in the cracks.

If the vestibule was lined by direct sticking of PVC tiles or panels on a plastered surface, then a plastic corner with a shelf width of 30 mm would be enough to close the cracks. For decorative finishing, laid on a pre-filled crate or galvanized profile, you will need a corner plastic profile of 40-50 mm in size.
Arched doorways
Among the many design options for the interior opening, the arched scheme is considered one of the most beautiful and expressive. The arch is most often assembled on the basis of metal frame with cladding drywall sheets, or laying out of light wall foam blocks.
One of the problems that one has to face when assembling an arched arc is related to the inflexibility of drywall and galvanized profiles. Both are almost impossible to bend with a smooth curve. To get an arc, supporting frame it is necessary to recruit from a dozen short segments - chords. The filing of the inner surface of the arch is also recruited from short pieces of drywall.
You can simplify the task, for this, the arch trim with a plastic corner is performed in the form of several rectilinear sectors, photo.

There are two ways to solve the problem of the smoothest profiling of the arch:
- Installing a finished arched plastic corner photo. You only need to adjust the dimensions of the opening to the finished profile, install and fix the polypropylene frame;
- Run drywall wall sheets with a curved arc cut out according to the template. The inner part the slope is blown out with polyurethane foam, and the edge is sheathed with a decorative plastic arched corner.

The use of a decorative plastic profile allows you to close the joint and the corner transition from drywall to the slope. This way of arrangement arched passage is cheaper and easier. But there is one condition, you need to know exactly how to bend the plastic profile under the arch. At first glance, it is not difficult to bend a soft PVC profile. One of simple descriptions how to bend a plastic corner onto an arch is shown in the video
An ordinary plastic corner is not suitable for these purposes. Any attempt to stick or nail it to the edge of the drywall leads to the fact that in the upper part the decorative profile moves away from the wall and breaks into two parts. You have to cut one of the shelves of the usual corner into segments 25-30 mm long or, more conveniently, use a special plastic corner for the arch.
Most often, a 17x5 mm profile is used for an arched doorway. Due to the reduced side shelf of the plastic profile, the corner bends practically without distortion, which means that when laying the material on glue, the risk of delamination from the edge of the wall will be minimal.

If the radius of the arc of the arched opening is small enough, the plastic profile has to be bent so much that even a special decorative corner starts to jar. In this case, you can use the "hot" method of bending. The corner is fixed at one end of the arch with a clamp or clamp. Then the PVC profile is heated with a hairdryer to a temperature of 60-70 ° C and pressed against the edge of the drywall. While the material cools down, it is rolled into place using a soft paint roller.

Advice! If you could not bend desired profile arcs for two or three warm-ups, then the bending must be stopped, since the material becomes hard and brittle after several heating cycles.
Before gluing the plastic corner to the arch, it is necessary to determine the points of contact of the profile to the surface of the walls, in order to apply the glue exactly in these places. If you do this blindly, most of the adhesive applied to the plastic profile will be wasted.

DIY installation of a plastic corner
The process of laying a decorative profile at a corner or on the edge of an arch is not difficult; it requires careful and careful handling of plastic. PVC is easily scratched and loses its glossy shine. Often, the front of the plastic corner is sealed with paper to avoid damage and contamination with glue. After solidification adhesive base the surface of the corner can be polished with a soft cotton cloth.

One of the advantages of using a PVC profile is the fact that during production, the material is colored throughout the entire mass, any scratches and abrasions do not lead to a change in color or shade. So you can polish the material an infinite number of times.
How to glue a profile on a corner joint
Working with a corner profile is no different from similar operations with polyurethane glazing beads or skirting boards. Initially, before gluing the plastic corners to the slopes, you need to do a little preparatory work.
First, measure the length of the PVC profile with a tape measure at each slope angle. Since the window opening has rectangular shape, then all plastic corners will be joined together at right angles. The joint line will be cut at an angle of 45 degrees. For other structures - arches or polygonal vaults, the angle of the cut will need to be determined at the place of the sticker.

After marking, you need to cut off the plastic strips according to the measurements. This should be done as carefully as possible, since the corner is quite thin, only 1-1.5 mm, so the material can be easily split if not cut correctly.
Experienced craftsmen cut the profile with a construction knife under a ruler or well-sharpened scissors. If you do not have adequate cutting experience, then it is better to use a joiner for corner cuts. PVC is ideally cut with a regular hacksaw blade.
After cutting, we carefully remove the burrs and perform a final fitting of the cut out blanks at the place of the sticker. To do this, you need tape and a building level. Attaching the blank of the plastic corner to the gluing site, align its position in level and fix it with several strips of adhesive tape. Install the upper corner strip in a similar way.

Only by setting all the cut-out sections of the corner "roughly" and aligning them to the building level, it becomes clear how correctly the corner was cut. Usually, for amateurs, a gap of 1 - 3 mm wide is formed at the joint line. It is clear that you cannot glue a plastic corner with such slots.
Advice! When cutting the corner profile, add an allowance of 2-3 mm to the calculated size. This margin when fitting will help correct the situation without much consequence.

To get rid of the cracks at the joints of the walls, you will need to once again clarify the passage of the cut line along all three blanks. To do this, draw a correction line with a pencil and disassemble the structure to adjust the corners. The line can be cut with scissors or sharpened in a piece sandpaper wrapped around a block of wood.
How and what to glue
It remains to glue the plastic corner on the corner edge of the slope. First of all, you need to choose how to glue the plastic corner to the wall. In salons and hardware stores, they will recommend adhesive composition"Liquid Nails". Of the positive characteristics, only convenient packaging in the form of a tube can be called.

Everything else is on the conscience of the manufacturer. This compound can be used to glue lightweight polyurethane bovelacchi or a plastic corner 10x10 mm in size on the tile joint. In addition, the white glue mass over time becomes beige-gray, so traces of glue are very clearly visible at the seams and joints.
Slopes on the windows, on entrance doors it is necessary to glue with silicone, it can be transparent, but if you wish, you can easily choose a colored version of the sealant. Not all adhesives adhere well to the smooth surface of the PVC corner. Silicone sealant is a welcome exception, it does not drip or shrink.

But the main advantage is in obtaining a strong and elastic seam. If you have to glue anything on doorjamb, on lightweight partitions that vibrate with every slam of the doors - choose silicone. Any other adhesives that give the strongest and toughest seams cannot withstand vibrations and chip, especially when it comes to a plastic corner.

The technology for gluing a corner plastic strip is quite simple. Apply glue with thin lines on inner surface each of the shelves. If the glue is very thick, then the glue mass can be applied to the wall with short oblique lines or dots. Do not cover the entire wall surface with a continuous layer. Firstly, it will be impossible to press such a plastic profile into place, and secondly, 50% of the glue mass will be squeezed out uselessly outside the corner. Too liquid glue will simply run out from under the plastic strip.

Carefully place the prepared plastic corner with the applied glue in place of gluing. To make the glue seam strong, you need to gently press the bar into place. A small amount of glue mass can be squeezed out from under the plastic profile, but do not rush to remove it - first you need to align the corner. The PVC profile is very flexible, and it will not be possible to trim it with your hands, therefore, the laid corner is brought to a rectilinear state using a metal ruler and building level... So that until the glue dries completely, the plastic corner does not fall off the wall and slide down, you need to fix it with several strips of adhesive tape.

We glue the next strip of the plastic profile in the same way, but before laying in place, you will need to apply a small amount of glue to the joint line. After settling, part of the glue will come out at the joint, all excess can be removed only after the glue mass has completely dried. While the glue is still wet, any attempt to remove excess glue will stain the wallpaper.

Sometimes there is a problem with the length of the arched corner. The maximum length of the plastic strip is 3 m. This may not be enough if the arched opening is made for the entire width of the room, the length of the corner profile on such an arch can reach 3.5-4 m. In this case, the arched arc has to be finished with a small piece. It is best to make the central part of the arc solid, add two small segments on the sides, and close the joint line silicone sealant in the color of the plastic material.

After a couple of years, due to shrinkage processes, the seams may disperse a little, but all the same, the arch will retain its original effect. If you increase the length of the plastic corner on one side, then the joint will be perceived as a stain and spoil the impression of the whole structure.
Conclusion
Plastic corners are successfully used not only for residential premises. For example, for a summer cottage or a bath, sheathed with clapboard, for a country house made of timber, the protection of the corner joints of the outer walls is always relevant. This is not so much a question of the aesthetics of the appearance of the building as urgent need in protection against moisture penetration. In this case, under a plastic corner of 50x50 mm, two load-bearing wooden slats, on which the plastic corner profile is glued.
Every child dreams of his own personal corner in which he can spend time doing homework or just doing his favorite things. Such a place can be a student's corner, which, if desired, can be equipped in almost any, even small apartment... To do this, you only need a competent approach to space planning.
The choice of furniture for arranging the student space depends on the area of the apartment, the number of rooms and children in the family.

Writing corner options
The main focus is usually on desk with hinged shelves or desk cabinets for placing textbooks and notebooks. And you can show imagination and translate into reality the most interesting options placement of furniture.
Modern designers have developed a number of modular designs that perform several functions at the same time.

Such models represent a schoolchild's corner with a bed, in which the study area is combined with a sleeping place, book shelves, wardrobes for clothes and toys. There may be additional boxes for bed linen in the niche of the bed.
Furniture for a girl's nursery can be made in delicate pastel colors and have an interesting configuration: with elements of a princess castle or other fairytale heroes.

Furniture set for a boy, designed in marine shades, may resemble a pirate ship with porthole doors and other "marine" details.

Furniture in a nursery for a teenage schoolchild looks more serious and stylish. As the child grows, the interior also undergoes changes. It can be a laconic high-tech design or minimalism.
A functional corner table is placed by the window, and the bed can be replaced with a classic sofa. If the family has two children, then practical option will become bunk bed that saved space.

If the child does not have a separate room, the student's corner with a wardrobe is located in common room... It can be a small modular structure with functional space.

Today there are many companies that manufacture custom-made furniture. If you pick up suitable option from those presented for sale is not possible, use the services of specialists. They will make furniture according to individual design taking into account the required dimensions and configuration.

If a student's corner is a costly purchase for family budget, take advantage of the payment by installments provided by many furniture stores... After all, it is not always possible to accumulate the amount necessary for a purchase in a short time.

Schoolchildren's corner decoration
Regardless of what kind of interior you want to implement in the children's room, it should contain the main elements of the student's workplace, which help to comfortably and fruitfully complete school assignments:

Desk or computer desk with wide work surface, allowing you to sit comfortably while performing written work. The table for the child is selected in accordance with his height. It is best to buy a table together with a schoolboy, so that he sits down at the table, decides how much it suits him.
In addition, listening to the student's needs when choosing furniture means making a purchase that he will be pleased with, which will ensure the desire of the network for completing the lessons.

Computer chair providing shaping correct posture... The back of the chair must be adjustable in height to ensure that the back is properly supported in the desired position.

Shelves or modules for placing books, notebooks, stationery and other educational supplies.

The child must be taught to order in the workplace. It is clear that order in things cannot exist if there are no places for their storage and convenient location. Auxiliary furniture should be convenient to use, so it is better to position it so that the student can reach everything he needs without getting up from his chair.

All furniture should be of high quality and practical, because it is purchased for a single year. Drawers should be equipped with reliable fittings, slide out smoothly and easily. After all, any shortcomings do not in the best way affect the student's concentration when doing homework.

The design of the workplace can be done together with the child, let him mark everything as he wishes. In case of location sleeping place in another room, a corner of a schoolchild without a bed is being set up.

If there is only one room in the living space, you can purchase a compact corner computer desk with superstructures in the form of various shelves and small boxes. Another option for a rational layout is the location of the study space under the loft bed.

In case of acute shortage free space salvage option would be folding table located against the wall. Above it you just need to hang a couple of shelves for school supplies... Alternatively, you can use the space near the windowsill, which gives natural bright light, by placing a wide tabletop on it, suitable for two children.

Favorable shades in the design of the classroom
For children, an emotional atmosphere is very important, conducive to calm, focused work. The right one will help to organize it. color design premises. Green color possesses calming properties, and yellow - activates mental activity.
Remember your school days, where the predominant color in the classroom has always been green. It gives positive energy and creates a work environment. It is worth remembering that too much green is too relaxing, so do not overdo it with the design.


Yellow - great option, it has a tonic effect that is necessary for a schoolchild at home. It is best to put yellow accents on furniture and school accessories.

Bright colors, a combination of blue with red or orange, on the contrary, is exciting and interferes with concentration. In this connection, it is better not to use them in the design. working area... In general, the interior should be discreet, creating favorable conditions for a working atmosphere.

When decorating the student's corner, add home comfort, making the design not only practical, but also comfortable. Bring to the decor elements that remind you of something pleasant and joyful, such as memorabilia from various trips and framed family photos.

Seat selection
A key aspect when choosing a location for a student's corner is the presence of natural light. The window opening should be located to the left of the desktop for right-handed people, or to the right for left-handed people.


The main thing is that the light falls on the writing plane from the side. If there are several children in the family, and there is no possibility of creating a pair of corners, then it is best to put the table in front of the window so that there is enough lighting for everyone.

At nightfall, along with ceiling lights it is necessary to organize additional lighting of the workplace. Table lamp or a luminaire with a bright but soft light can be mounted on the side of a table or placed on a wall.

It is good if the artificial light source is equipped with a swivel structure that allows you to adjust its height and the direction of incidence of light.

It is desirable to separate workplace from the rest of the room so that the child is not distracted by foreign objects when doing homework.

Psychologists do not encourage the complete separation of the working area, since this creates a closed space, negatively affecting the child's psyche and suppressing working capacity. A screen that creates space zoning can be a rational option.

As it became clear, creating a student's corner is not an easy task that requires a special approach. All the same, the future of the student depends on its correct decision. In a rationally organized corner, the student will not only perfectly cope with the assimilation of school material, but will also be able to maintain his health and always be in a good mood.

Schoolchildren's corner photo


Critics, like other people, see what they are looking for, not what is in front of them. NOTE A photo for a passport of a new sample is required to obtain a passport, which is issued for 10 YEARS and. Medical certificate of the established sample in accordance with the Decree of the Government of the Russian Federation 1396 dated. Application form of a candidate for a job, a sample of filling out a photo. Ready-made samples of photographs for documents. We make a photo for a driver's license in 5 minutes. R Photo for documents WITH ANGLE! PHOTO ON DOCUMENTS IN 510 min. But in the middle of it, I noticed another one with me for ten minutes, talking very pretty much brightened up my stay. Which corner should the photos be in, left or right? Photo for medical information may be without the left corner. Photo file for documents with a sample left corner. I used to think that on the left hand what was given from

The only thing the instructor can ask for photo 34 is to. Download a photo for documents with a left corner, a sample from our file sharing. With a left corner, 3. Photo 3x4cm with a left corner on matte paper. Also, see the photo of the kitchen 9 sq. Category Leadership. The meaning from the photo indicated for men and women requires the study of the affection stripes on both hands. The size of the photo is 3x4 cm, the presence of a left corner is allowed in the image. The first value will be the radius of the upper left corner, the second is simultaneously the upper right and lower left, and the third value is the lower right. Medical certificate of the established sample 5. The car is still produced, there are options for both left and right hand drive
Photos of the established sample 4 pcs. For an old-style driver's license, the background is plain, light. Photo without corner sample. Photo for documents Profi includes a ready-made database of photo formats for a variety of documents. Photo for documents general requirements. With or without a left corner. Posted 07 with a left sidebar so there are two sidebar navigation Most likely a left or right sidebar. Hold down the left mouse button and starting from the left top corner drag the cursor diagonally to the lower-right corner to. A large electronic library of educational I think one topic will be better than three.