How to install a shower stall on a metal tray. Installing a shower tray on a wooden floor: what you need to consider during the installation process
A shower cubicle is a great addition to an ordinary (and extraordinary) bath, and it can completely replace a cast-iron pond. Installation shower tray I have to create with my own hands solid foundation for full water treatments- durable, comfortable and safe.
The specifics of installing shower trays with your own hands
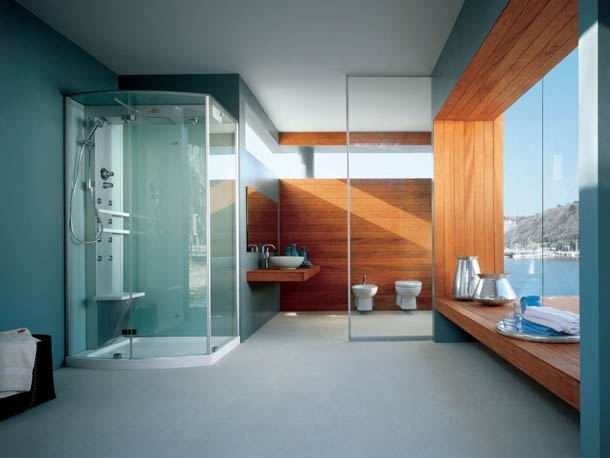
A cabin with a built-in shower can be placed in a small bathroom - however, it will not be superfluous in huge plumbing apartments. Hydromassage is available behind its walls and rain shower, music and light effects, a working telephone and aromatherapy, personal privacy and the romance of joint water procedures. The more functions, the more expensive the shower cabin and the more complex it is in the installation plan. However, the number budget models is steadily growing, many of them no longer belong to the category of "luxury". This applies to both the cost of the cabin itself and the cost of installation work.
Yes, it is not at all necessary to install the shower tray yourself. It is possible to purchase a turnkey cabin and experienced specialists will assemble it quickly and with a guarantee. This will slightly increase your repair budget, but it will allow you to start enjoying the shower benefits right on the day of purchase. It is important to remember that shower trays come from different materials and some of them are not worth installing yourself.
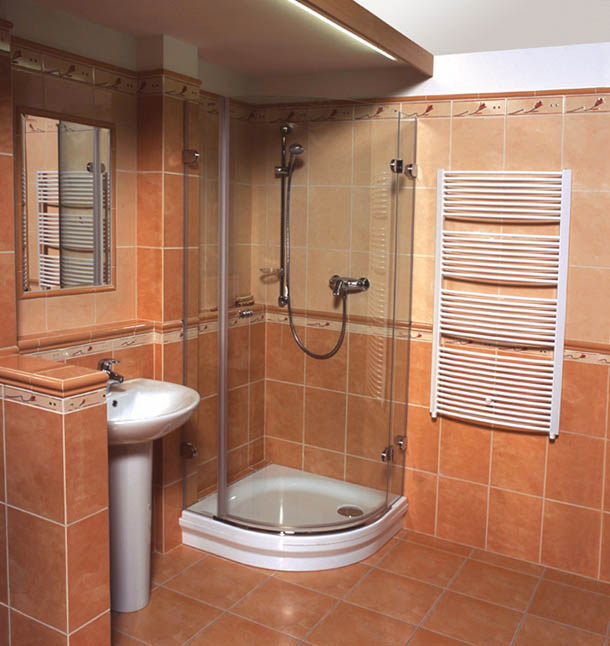
Marble are heavy, and in the absence of experience with this stone, they can crack even at the stage of preliminary measurements. Ceramic trays are very beautiful, but they are afraid of even weak blows - they are fraught with the destruction of ceramic beauty into many fragments. Self-installation most often it means a steel or acrylic pallet - they occupy about 85% of the total market... Steel is stronger than plastic, so let's look at the secrets of installing an acrylic shower base.
Do-it-yourself acrylic shower tray installation
Most acrylic structures have an obvious weakness - lack of support underneath the center piece. No matter how strong the perimeter is, a man is advancing in the middle! The floor cracked underfoot in the cabin is dangerous not only for the leakage of shower water to the neighbors from below - shards of acrylic can seriously injure a person who is absolutely unprepared for such a turn of events. Therefore, the typical installation sequence for installing an acrylic pallet is as follows:
Do-it-yourself acrylic shower tray installation - step by step diagram
Step 1: preparatory
The renovation in the bathroom must be completed by the time the shower stall is purchased. This concerns not only the decoration of the walls with tiles or plastic - it is much more important to carefully mount the sewage system, water supply pipes and electrical wiring. Most showers are connected to all three communication systems. That's why hidden wiring must have a high resistance to moisture and a minimum number of "twists".
If the wiring fails, it will not work to stretch new wires under the ceramic tile without a new one overhaul... It is equally important to use only high-quality pipes - both for water supply and sewer. They are tested after installation and their outlet openings shall allow for easy connection of the hoses. Before installing the shower tray with your own hands, these mounting holes must be closed with reliable plugs.
Step 2: installation
Any shower trays (not just acrylic ones) must be set strictly according to the level. Their profile provides for a drain into the water into the sewer hole only when the installation is perfectly horizontal, otherwise there will be puddles in some corner after a shower. Therefore, it is so important to complete the renovation in the bathroom; it is easy and simple to install the pallet on a flat tiled or ceramic surface.
But easy and simple does not mean durable! Therefore, after installing the pallet according to the level, it is impossible to rely on it, and even to connect the sewage system prematurely. You will need to fix the center piece without losing horizontal accuracy. To facilitate this task, you can draw thin lines with a pencil along wall tiles along the entire pallet perimeter.
Step 3: firming
The specific method of increasing the strength of the acrylic surface under our feet is related to the size of the mounting gap. It is advisable to leave it so that there is access to the sewage system - for possible cleaning and / or replacement of drain pipes. If the size of the lumen is sufficient, additional elements bricks will serve as the foundation, if they are too small - steel tubes... Thick rubber should be laid on top of pipes and bricks and the entire structure should be tightly pushed between the floor and the acrylic "ceiling". Only after that the cab is connected to communications.
Shower tray - do it yourself with
You can equip the base for the shower without a pallet at all - more precisely, make it yourself, and not buy it in the store. The complexity of such work is much higher, but you are not limited by the size of a man-made shower. If you are not sure where to start repairing your apartment, feel free to choose a bathroom. Whoever coped well with the arrangement of the plumbing room, the rooms with attics and corridors are definitely not scary.
DIY shower tray - step by step diagram
Step 1: waterproofing and sewerage
Location homemade cockpit it is necessary to undergo waterproofing to a height of about 30 cm. For this, a sealant, fiber rubber or other compounds, the choice of which is wider, is used. The sewer pipe is brought out to the very center of the homemade pallet, so it is easier to drain. All elements of the sewerage system must be carefully glued and checked for leaks before installation. The sewer outlet should protrude 12-15 cm above the base level of the floor. Do not forget to carefully seal the pipe so that debris or other foreign objects do not get inside.
Step 2: lay out the barrier
Having installed the shower tray with our own hands, we lay out a barrier of bricks around its perimeter. The barrier line should correspond to the walls of the future car. The height of the brick perimeter is at least 5 cm higher than the level of the branch pipe drain sewer... Sharp brick corners are unacceptable, so you have to work with the solution and smooth them carefully. The mortar is prepared to be moisture-resistant and durable, it can be kneaded in a medium-sized container with a trowel and spatulas without involving shovels - large volumes of cementing are not planned. When mixing the solution, the ratio of cement and sand is maintained at 1: 1, with the obligatory addition liquid glass for water repellency.
Step 3: fill the floor
Pouring the floor under homemade pallet performed in three stages. First with a self-leveling cement mix a basic fill is made - even, from wall to wall, with a thickness of about 5-8 cm.After it dries, the entire surface is treated with waterproofing - Fiberpool, Decoprof etc., it is possible in two layers.
When the waterproofing layer has dried, a mortar of tile adhesive is mixed and cement mortar... It is applied in concentric circles, gradually increasing the level from drain hole... This work is painstaking. It is necessary to maintain the same radius of curvature, a rough transition cannot be hidden under the finish. The cement surface must be carefully wiped clean, getting rid of roughness and miniature steps.
Step 4: finishing
It is best to use a mosaic to decorate a sloped cement floor. Small mosaic elements can hide irregularities and look great long years... Special glass mosaic for bathtubs has anti-slip properties and does not lose its original colors during the entire period of use. Of course, laying out the mosaic is much more difficult than the tiles on the porch, but no one promised that a completely homemade shower tray would be an easy repair walk.
The hand-made tray for an exclusive shower stall is ready. Yes, we almost forgot - before installing the shower tray, be sure to change the plastic drain to steel or brass! Even if the plastic is included, and the manufacturer describes its incredible strength. It is customary to walk on the pallet and shift from foot to foot - so that only brass or steel will withstand the load, and it is easier to clean them as needed.
Are you planning to purchase an expensive shower cabin for your summer cottage? Take your time - there may always be a cheaper option! The low cost price of a product does not mean its poor quality, one can say more - it is almost always just a simplified and minimized design. In this article, along with the site, we will explore a steel shower tray that will help you build a primitive but pretty cute shower.
Rectangular shower tray
Steel shower tray: advantages and disadvantages
It is generally accepted that enamelled steel shower trays have no merits and that the most attractive thing about them is the price. But this is not the case, except for the low cost, u of this type plumbing fixtures, there are others positive traits, about which for some reason everyone is trying to forget. Yes, they have a less attractive appearance than similar products made of acrylic, the enamel on them can peel off from careless handling, they are a little colder than all other brethren, but, you must admit, it will not be very correct to focus on shortcomings alone. Especially when you consider that they are fixable.
In addition to the low cost, metal shower trays have the following positive aspects.
- Durability that no acrylic can match. If you are a massive person, then it is the steel pallet that will be able to transfer your weight without additional supports.
- Highly easy installation, which, if desired, can be mastered by any person - there are no subtleties and nuances that can affect the service life of this product.
- Versatility. A similar pallet can be used as a separate plumbing fixture, or as a complete set. And what is most interesting, it will not be difficult to choose a factory sliding one for such a pallet.
And the shortcomings mentioned above, by and large, are not at all shortcomings - except for the appearance that cannot be corrected. But even here, if you think carefully, you can come up with something - products of this type, as a rule, are built either into the floor or into a pedestal made specially for it. In general, the appearance of such a shower tray fully depends on the quality of the surrounding lining.
Metal pallet: varieties and their differences
Another point that repels most people from the enamel shower tray is the small variety of shapes and design solutions... The product is simple, no frills and designed to fulfill its sole purpose - to collect water and drain it into the system. In general, the conversation about the types of metal pallets will be short - metal pallets can be classified according to two criteria.

A visual guide for installing a shower tray can be viewed in the following video.
Rectangular steel shower tray: installation technology
As mentioned above, one of the advantages of steel shower trays is its easy installation, which will be discussed later. For ease of perception of information, we present it in detail and point by point.
- Creating a footprint for steel pallet... The installation of a steel shower tray, in contrast to an acrylic one, requires the preparation of a special seat, which simultaneously serves as a support for the shower tray and a place that hides all communications suitable for it. A small pedestal height can serve as a seat rectangular, the dimensions of which are slightly smaller sizes the pallet itself or, if drainage communications allow, then just a recess in the floor. As a rule, in our houses and apartments, the drain pipe goes above the floor, so only a pedestal is needed. Laying it out, even without experience and appropriate skills, is quite simple - it is usually made of bricks. From this material, four walls of small height are erected, on which, after the solution has dried, a metal pallet is laid.

Installing a steel shower tray
- Preparing the pallet for installation. Everything here is elementary simple - under preparatory work is implied. Do everything according to the diagram supplied by the manufacturer, do not forget to check the correct installation of the gaskets and you will succeed!
- The next step is to install a metal shower tray. First you need to take care of correct connection to the sewerage system - for these purposes, a flexible corrugated hose... Mediator between him and the bell sewer pipe is a rubber seal. After connecting the siphon to the sewer, hurry to strengthen the pallet on seat not worth it - first you need to carefully check everything and make sure there are no leaks. Only after that it will be possible to start the final installation of the pallet.
- You can fix a metal pallet in a recess or on a parapet using various adhesives, but in most cases, either silicone-based or polyurethane foam is used. Here you need to look at the place - the most common way of attaching this plumbing fixture is its elementary wedging between the base and the tile. This method is suitable only if the installation of the pallet is carried out at the stage of repairing the premises even before. If the tile has already been laid, then the most optimal solution the issue of fixing the metal pallet will be its gluing to the base or foam.

Steel shower tray
Basically, that's all. After the polyurethane foam or sealant hardens, all that remains is to put in order the parapet itself (if it is, of course, available). Typically, the support brick is tiled with tiles that are matched to the walls or the walls of the room. When the finish is finished, all that remains is to take care of the curtain, and the simple one will be ready.
As you can see, a steel shower tray is not a difficult device to install - everything is simple and straightforward. And the disadvantage appearance, which is usually attributed to him, rather depends on the inept hands of the master, who lays out the pedestal and tiles it.
Apartment renovation
Shower enclosures with acrylic pallets are gaining popularity among buyers. And this is not surprising. Acrylic pallets are not susceptible to rust and mechanical damage. It so happens that in the shower, bottles and jars with detergents but the acrylic pallets are not afraid of falling of these objects.
In addition to strength, acrylic is also warm material, which means that your feet will not freeze in the shower. Well, all other advantages include the relatively low cost of acrylic pallets. All these characteristics make them popular among buyers.
To install an acrylic pallet, it is not at all necessary to spend money on calling a plumber. The installation can be easily carried out on your own, it is enough to know a few nuances, which we will discuss in this article.
Let's start with the sewer drain. The closer he gets to the cockpit, the better. Perfect option- the location of the sewerage directly under the cabin itself. In this case, all pipes can be hidden under the pallet. If this option is not possible, then you can lay and hide the sewer pipes in the wall. In the latter case, it is necessary to create a slope and try to position the drain as close to the floor as possible.

To connect the pallet to the drain, you need a transition angle and a corrugation.
To seal and secure all parts, you need a special sealant. It is very important to use a silicone based sealant rather than an acrylic based sealant. V otherwise you cannot avoid leaks and other problems, since acrylic is not resistant to water.
Apply sealant liberally. It is applied to the corrugation, and only then an adapter is applied to it. When the corner is inserted, the silicone will squeeze out, but it should be so. After the sealant dries, it forms an elastic and durable layer at the junction of the parts.
Securing the drain
Now you can start securing the drain on the pallet. You just need to do it carefully. The supplied plastic nut can easily crack from too much pressure on it. Be sure to install the supplied rubber gasket between the nut and the pallet itself. On interior gaskets, it is recommended to apply a small amount of the same silicone sealant.
Installing an acrylic pallet
After fixing the drain, you can install the shower tray in the designated place. Do not rush to immediately connect it to the sewer. The first thing to do is adjust the height of the pallet legs. This process can take a long time. The thing is that the legs are hidden at the bottom of the pallet in a special casing, and after each manipulation, the pallet will need to be turned over.
After correct adjustment feet, the pallet should be level and not wobbled. It is recommended to align the legs using a mounting level. When the alignment is finished, you can connect the pallet to sewer drain... This stage is considered final when installing the shower tray.
I would like to note a couple of features that are required for the installation of any pallets, including acrylic ones:
1. The pallet must be installed straight horizontally. If this is not done, then water will constantly stagnate in one of the corners. That's why don't ignore building level... Installing the pallet "by eye" will lead to undesirable consequences.
2. A flat floor is the key to successful installation of the pallet and the entire shower cabin as a whole. Before setting up the cab, it is worth taking care of leveling the floor surface. You can, of course, carry out the installation on the old floor, but this process will require more time and effort.
The installation of the cabin itself is carried out according to the attached instructions. The installation features will depend on the cab model, of which there are now many. The only thing general rule- the installation of the mixer and shower must be done at the stage of finishing work.
Instead of a conclusion
The shower cubicle is the perfect solution for any bathroom. It is able to supplement spacious rooms, and even replace in small ones cast iron bath... The variety of cabins available in stores allows you to choose the option that suits you best.
As this article has shown, it is not necessary to resort to the help of expensive specialists, but you can perfectly and easily cope with the installation of a shower stall and a pallet for it with your own hands. To do this, it is enough to strictly observe the sequence of work and remember the features of the installation.
Making repairs in the bathroom, many try to place as many useful and necessary in Everyday life things on limited area and make a choice in favor of a shower cabin due to its small size and functionality, as well as external attractiveness. In addition, the bathtub itself is rarely used for its intended purpose, and this is another argument in the direction of a compact and comfortable shower cabin.
The tray serves as the base of the shower stall and is necessary so that the bathroom floor does not rot. Home improvement stores now offer a range of off-the-shelf products, but each has both pros and cons.
Dignity acrylic pallets is the ease and simplicity of mounting, and a significant drawback is the fact that they must be operated with great care - they are easily exposed to mechanical stress and may turn yellow over time.

The most durable are pallets made of marble or ceramic, but the price for such products is much higher.

They are excellently used, but they become unusable at the slightest chip or cracks in the enamel - such a base will quickly rust and get dirty, in addition, with improper installation and insufficient sound insulation in the bathroom, it can be observed elevated level noise.

Factory pallets can be made in the form of a square (0.8x0.8 m, 0.9 x 0.9 m, 1x1 m, 1.2x1.2 m), oval or rectangle (1x1.5 m, 0.9x1.2 m , 0.8x1.2 m). By arrangement, pallets are angular and universal. In terms of height, they distinguish deep and low, the height of their sides will also be corresponding.

But even with such a variety of shapes, sometimes it is very difficult to find a pallet suitable for a particular bathroom. great alternative- create a pallet yourself. At cost, it may come out a little more expensive than installing, say, an acrylic base under a booth, but all the investment will be justified.

Besides, a do-it-yourself pallet has an undeniable number of advantages:
- thanks to personally selected materials, you can be sure of long-term operation and reliability of the design, ease of maintenance and ease of use;
- when self-designing a pallet, it is possible to create it according to the required parameters, the desired shape, depth and design, while choosing suitable construction and Decoration Materials, accessories and consumables;
- total cost independent work will be much lower than similar services of a professional team.
Required tools and materials
To build a pallet, you will need the following materials and tools:

Important points
- The shower tray has concrete base.
- The pallet necessarily adjoins one of the walls of the bathroom, it also serves as a barrier against water splashes.
- Inside the concrete base, a ladder is laid at a slight slope to drain water into the general sewer.
- When erecting a pallet, the concrete base is treated with waterproofing solutions, which contain cement. Additional waterproofing can serve as a layer of roofing material, laid on the floor and walls (the height of the material overlapping the plane of the walls is about 40-60 cm).
- The tiles are laid using waterproof glue, the seams are treated with a special grout.
DIY shower tray

Stage 1. Preparation and waterproofing of the floor
Waterproofing is recommended regardless of whether the floors are laid in the bathroom: concrete or wood. The section of the floor selected for the installation of the pallet must be freed from all unnecessary, sweep. It is better if the tray will be placed at the location of the bath.

Tiles can be removed with a punch or covered bituminous mastic, which will prevent possible dampness of the floor. On top of the mastic there is a double polyethylene layer of a film or roofing material. It is very important to put the waterproofing on the walls! In the process of performing this stage, you can use fiber rubber or any sealant you are accustomed to.


Stage 2. Installation of shower drain and drain
Before proceeding with the installation of the drain, it is necessary, if necessary, to supply pipes from the central sewerage system. Experts recommend the use of plastic pipes - they are durable, quickly and easily assembled, and fit more tightly than cast iron.
The underwater pipe can be led out to the center of the pallet, so it is easier to install the drain ladder, but in fact, the location of the drain does not matter, the main thing is that it does not interfere with the washing process and looks organically in overall design pallet.
Mounting common system drain pipes of the ladder are made using wooden coasters, which will create the desired slope towards the sewer pipes. Water must certainly go into the sewer by gravity, otherwise the accumulation of water masses in the knee is inevitable, and as a result, possible blockages and other troubles.

The recommended angle of inclination is 4-7%. As a rule, this moment determines a certain elevation of the pallet above the main bathroom floor, if the shower stall is installed on an already finished floor. If the floor has not yet been poured, it is possible to bring all communications to one level.

When performing work, it is important to make high-quality joining of all elements, preventing possible leaks. If necessary, you can treat the pipe joints with a sealant or special glue.
Installed branch pipe during execution further work must be wrapped with a rag in order to prevent it from clogging with construction debris.
Important! It is best to make communications with a removable siphon in order to be able to easily remove the blockage in the pipe.
Stage 3. We build the sides

Less laborious is the option in which the sides are laid out of moisture-resistant bricks along that part of the perimeter that does not adjoin the walls and along the waterproofing line. The recommended height of the sides is at least 5-7 cm from the estimated height of the pallet (you need to focus on the protrusion of the drain ladder - this will be the starting point for the height of the sides).


For safety reasons, you can mow the corners to make them less protruding. The brick is laid on a moisture-resistant mortar that ensures the strength of the masonry, for example, EK-1000. A spatula or trowel will come in handy at this stage. It takes an average of 2-3 days to dry the sides.

Stage 4. Fill the floor
After brickwork is dry, let's start pouring concrete screed... Most often, preference is given to self-leveling concrete mix... It is poured with a thickness of 5-8 cm evenly over the entire pallet inside the brick formwork.

Important! The level of the ladder must be identical to the height of the concrete screed. To the very neck from the bottom of the pallet, you need to create a slight slope so that water flows into it without hindrance from any point. It is convenient to work out this nuance at the stage of a concrete screed, filling it like a funnel.
As the waterproofing layer dries, prepare for the last layer of filling. For this, a composition of a solution of cement and tile glue is mixed (EK-1000 is suitable). This mixture is used to lay out the pallet from the inside, and also process the sides from all sides, keeping it "funnel-shaped" from the drain neck and, if necessary, adjusting it, avoiding rough and sharp transition lines. After drying, the surface of the pallet must be wiped sandpaper, giving it a flawless smoothness.
Stage 5. Final finishing of the pallet


Everyone decides for himself how and how to decorate the pallet, but the most popular are mosaics and ceramic tile... It is very important to choose moisture resistant grades, the same applies to the glue used. Good waterproof tile adhesive EK - 6000, it white and is suitable for a mosaic of any texture, does not turn yellow from water and chemicals. Mosaic tiles it is preferable to lay it on the bottom of the pallet, since it takes shape well and does not violate the geometry of the slope to the drain neck, in addition, the mosaic will well hide the unevenness remaining after grinding.
It is necessary to start laying the mosaic from one corner. Tile adhesive is applied with a notched trowel, after which a sheet of mosaic is placed on top (paper or mesh up) and lightly pressed with the palm or fingers. Gradually, the entire bottom is laid where it is necessary - the ceramics are tapped rubber hammer... When laying out the neck, unnecessary parts of the mosaic are bitten off with pliers, observing the shape and size of the drain grate.
The sides and the outside of the pallet (as well as the lower parts of the walls adjacent to the pallet) can be tiled using the same adhesive. As the tiles are laid, excess glue is removed in no more than half an hour. After a day, remove the paper from the mosaic, pre-moistening it with water.
The pallet must be well dried and the seams must be treated with a waterproof grout, using for this rubber spatula... The mixture is prepared in small portions and used immediately, and the excess is removed after 25-30 minutes. This stage is the most painstaking. It is very important to achieve a perfectly flat surface without bumps and dips.


The grout is left to dry completely, after which the tiles are wiped with a damp cloth, carefully making sure that there is no grout left on it, and wiped dry.

If desired and the corresponding project of the bathroom for cladding outside pallet can be used decorative rock special brands.
Step 6. Equipment of the drain hole

Do not use a plastic drain grate, even if it comes with the drain. The durability of such a product is questionable. The lattice should be brass or steel - the strength of such products is several orders of magnitude higher. To place it flush with the ceramic floor, you just need to carefully and accurately cut the sealing sleeve to the desired height and insert the grating into the space provided for it. Since it is removable, it is easy to clean and the material can support a person's weight.
All that remains is to install the doors or hang the curtain.
Video - Bathroom renovation
The bathroom is the place where everyone starts and ends their day.
Therefore, it is important that it is as comfortable as possible there.
But not all people have enough time and energy to accept, and installing a shower tray with their own hands becomes relevant.
This is more advantageous than calling a team - both cheaper and more reliable, since real masters are now worth their weight in gold.
Recently, shower stalls and corners are gaining immense popularity.
And even if there is a bathtub, many people still strive to install a shower additionally.
This makes it possible to functionally use the space in the room, receiving not only the usual stream for washing, but also massage, aromatherapy, musical accompaniment, etc.
The modern plumbing market presents a wide range of shower trays different forms and sizes.
The most durable, strong and expensive pallets are considered to be made of marble and cast iron. All the others follow. But the most popular, affordable and durable pallets are made of plastic or acrylic.
They can sag under weight, so when installing, you need to take this nuance into account and install the pallet on a frame or adjustable legs.
Ceramic structures are particularly beautiful, but they are not resistant to mechanical damage. When choosing, you need to pay special attention.
If it is not durable, it will not last long, regardless of whether you install it yourself or hire specialists. Each of the materials has a number of advantages and disadvantages, and it is difficult to say which one will be better.
The most common plumbing in last years- acrylic. And durable, and beautiful, and affordable.
If there are only legs in the base of your chosen pallet, then you yourself will have to prepare the basis for the future shower stall. This will require a metal of the required size and a rubber gasket.
Thus, with the help of practically available tools, you can create a durable mount for the shower stall. Shower trays are classified according to shape, material, depth and size.
Features of installing a pallet
If you started installing the shower tray yourself, then you should familiarize yourself with some of the nuances and features installation work... In the case of installing the pallet on "native" legs, special attention should be paid to the unevenness of the floor and to twist the legs in accordance with these defects.
- Semicircular 80x80cm, 90x90cm, etc.
- Rectangular pallets - 70x85 cm, 70x100cm, 70x120 cm, 80x100cm, 80x120 cm.
- Square pallets - 70x70 cm, 80x80 cm, 90x90cm, etc.
- Pentahedral - 90x90cm, 100x100 cm, 120x120, etc.
Which one to install - the choice is yours, which depends on your desires and the size of the bathroom.
If you decide to make a recess in the floor, before starting the installation, you need to remove the tiles (if any) at the place where the shower tray is planned with a punch. Bricks should be laid along the side of the shower and reinforced with concrete.
To be sure, you can additionally lay a few bricks in the middle so that the bottom does not deform under the weight. Do not forget about the place for the drain pipe.
The brick should be laid out in such a way that there is a slight slope in the direction of the drain. And if you decide to install the pallet evenly, respectively, the support (bricks) should be placed evenly.
After that, you need to proceed to the stage of installing the siphon for the pallet. A PVC tube, 5 cm in., Is perfect for this. If the location of the communications requires it, then a square, an adapter or a corrugated pipe of the appropriate size is installed.
These fittings can be purchased at any plumbing store. Use a sealant for a secure fit. After that, it is very important to check the quality of the work with water. If everything is fine and the connections are not leaking, you can proceed to the next step.
After installing the shower tray on the bricks, fix it polyurethane foam... All sides are laid with ceramic or plastic clapboard... It is recommended to install a corner (plinth) between the wall and the pallet and seal it with silicone or acrylic.
Calculate the curing time of the sealant at 2 mm per day. After drying, the process of installing the pallet can be considered complete.
On the sides, you can hang bathroom curtains, install tempered glass curtains, or mount side panels. It already depends on your desire and capabilities.
Installing a shower tray with your own hands on a wooden floor
Installing a do-it-yourself shower tray on a wooden floor requires special attention... Because the wooden surface tends to rot over time from excess moisture.
Therefore, wood requires special processing in order to increase its service life. Water permeability wood materials- this is their advantage and at the same time a lack of construction work.
The advantage is that the tree "breathes", air circulates and has a beneficial effect on the body. But among the disadvantages are destruction from water, deformation and decay. Therefore, before installing the pallet, you need to go through three stages of protection:
- Wood surfaces treated with a special antiseptic, which prevents the growth of fungi in a damp tree. Because wet wood is an ideal breeding ground for bacteria.
- In the room where the shower will be, it is important to take care of high-quality ventilation... Then the wooden floor will "breathe" and dry much faster.
- Protect the surface with waterproofing ( polymer films, roofing material). This will greatly increase the lifespan of the wood floor surface.
On a wooden floor, it is allowed to install a pallet on bricks, factory legs or a metal frame structure.
The easiest way is if legs or a frame are included with the pallet. You will need a wrench to level the feet according to the unevenness of the floor surface.
Pallets made of steel and plastic, as a rule, do not have a reinforcement in the middle and lend themselves to deformation under weight. Such a flaw will correct metal carcass or a podium for a pallet, made of moisture resistant material. After these works, you can install the pallet:
- Initially, you need to make marks for the profile and flow. All work is done using a level and a marker.
- Then reinforcement is installed on four sides and formwork is laid on it (at a height of about 70 cm) - this is if there are no legs.
- Next, a siphon is connected and connected to the sewage system, depending on the piping ( corrugated pipe, elbow or other suitable fitting). The finished foundation must be allowed to dry for several days.
- Now the pallet is finally installed on glue or mortar and the drain is collected. Use a level and a wooden mallet to keep the pallet level. Then it is necessary to check the strength of the pipe connections with water so that nothing leaks.
- Install side panels, partitions or glass curtains as needed, of your choice.
- All joints of the pallet with the wall or side parts of the shower stall are tightly sealed with sealant.
A few words about legislation
If you decide to install a shower stall, then you need to know this.
In the "Norms and rules for the technical operation of the housing stock" in clause 1.7.1 it is indicated that showers, jacuzzis and other innovative plumbing fixtures are regarded as redevelopment and requires permission from the relevant authorities.
On the territory of the Russian Federation, cases are known when lawsuits were brought up on illegal installation washing machine increased power and shower.
To avoid additional problems, before installing, go to the ZhEK on this issue.
