Which apron is more practical in the kitchen. Which apron for the kitchen is better to choose: plastic or glass? Apron for white and beige kitchen
So that readers do not have disagreements about the word apron, the authors consider it their duty to tell respected visitors to our portal that the article will focus on the surface of the wall between the desktop and wall cabinets, and not about a piece of clothing. Although neither can do without one or the other modern kitchen and not a single modern hostess.
When repairing an apartment or building a house, people experience the greatest experiences not from the fact that they have to part with significant amounts, but from the incredible pangs of choice. The number of proposals for materials, colors and design solutions, various services - so huge that their choice takes much more time than, in fact, the repair itself. This also applies to the kitchen apron. But the authors can immediately answer the main question of readers - what is the best apron? The answer is unequivocal: the best apron is a hand made apron, regardless of what material. About how to make an apron in the kitchen with your own hands, and there will be our article. And, of course, attention will be paid to "insignificant little things" in the form of a review of materials and technologies for their installation.
Requirements for kitchen aprons in terms of combining functionality and beauty
If we consider the etymology of the word apron (translated from Polish and German it means an apron or hem), it becomes clear that it was originally conceived as an item of work clothing needed to protect against pollution that inevitably accompanies the cooking process. Polish and German linguists are still arguing over who rightfully owns this word, although this handy thing used not only by them, but by most peoples in the world. Therefore, let the etymological battles pass by the world of reasonable people, that is, you and me. The main thing is to understand that the first and main purpose of the apron is protection.
However, who said that protection should be rough and ugly? It can be beautiful, it can please the eyes of its owners, while not forgetting about its main function. And the modern variety of materials and technologies allows you to harmoniously get along with both functionality and beauty. But if suddenly there is a choice of what to sacrifice, then the unequivocal answer is this - you can sacrifice a little beauty in favor of functionality, but you can’t do the opposite.
What is a kitchen apron for?
Glass kitchen aprons
Most people have a subconscious fear of glass. It is associated with something extremely fragile, brittle and sharp. However, glass to glass is different. Now tabletops, chairs and even stairs are made from it. Not bypassed this wonderful material and kitchen aprons.
Glass for aprons is not used ordinary, but tempered, 6-8 mm thick, which is several times stronger and can withstand heating up to 300 ° C. Triplex glass is also used, where two layers are glued together with a special film or laminating liquid. Glass can be either glossy or matte, painted in any color, or colorless, with or without a pattern.
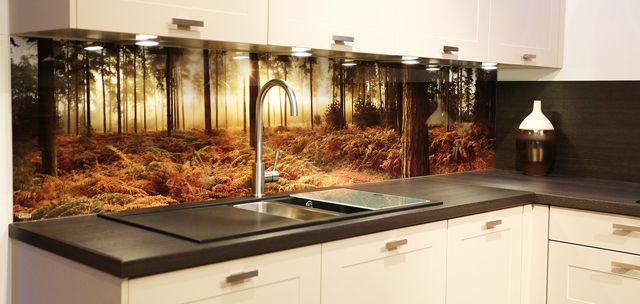
It is best, of course, to use all the possibilities of a glass kitchen apron and order it with a pattern. Such aprons are also called skinali. But it should be noted that it can be performed in different ways:
- Firstly, transparent glass can be used, which is fixed on a wall pasted over with photo wallpaper. This is the most a budget option, but it should be noted that moisture can penetrate into the gap between the wallpaper and the glass, which will ruin the wallpaper or contaminate the glass, thereby ruining the whole look.
- Secondly, the image can be printed on a vinyl film, which is pasted with back side. This solution is better, but the film can also peel off over time.
- Thirdly, the image can be printed on the glass itself from the back of the apron using UV (ultraviolet) printing technologies.
- Fourthly, the image can be printed with UV ink inside glass - triplex. This is the best, but also the most expensive option.
- And, finally, modern technologies make it possible to print three-dimensional 3D images on kitchen aprons as well. These aprons look very unusual, they are very expensive.

Glass aprons can be "revived" by competently using LED lighting mounted both outside and inside the glass. Illumination can be either monochrome or color. You can arrange different lighting scenarios for different moods. Modern market materials for the repair and design of premises offers so many options that you can implement both a beautiful and competent solution, and any design madness. If only there was enough money for everything.
The advantages of glass aprons are obvious, they are moisture resistance, chemical inertness, strength, ease of cleaning, beautiful and original look. Of the shortcomings, it is worth noting the high price and the fact that this is still glass, which can collapse under shock loading. Aprons made of tempered glass or triplex do not form sharp traumatic fragments when broken. But it still will not return the spent a lot of money.
Glass kitchen aprons can also be fastened both through fasteners and with the help of special elements. When taking measurements and planning the working space of the kitchen, it is always worth considering everything that will be installed on the backsplash. It can be several sockets, switches, holes for attaching railings - a hinged system for placing all kitchen utensils. Just like with MDF panels, it is better to entrust the entire range of services for measurements, manufacturing and installation to those who have done this many times, that is, professionals.
Metal kitchen aprons
For those who intend to create for real, metal aprons are specially offered. They look very unusual and in some cases even beautiful. Fans of the "techno" or "loft" style may well use metal in the kitchen, but for this you need to really have a subtle artistic taste or invite a designer with such qualities, which is rare. The line between harmony, beauty and madness in metal aprons is very thin, about the same as in mirror aprons.
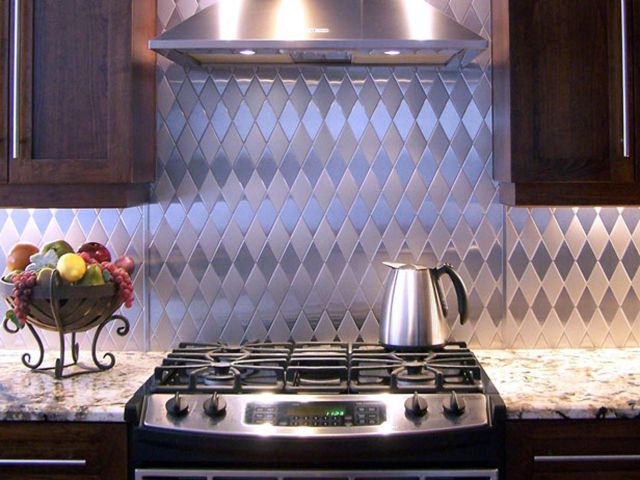
Metal aprons can be made as large sheets of of stainless steel, and tiles and even mosaics. The functional qualities of the metal are questionable. With good hygiene, the metal has excellent adhesion to all types of kitchen dirt and is very capricious in choosing cleaning products. It does not tolerate abrasives.
It was previously noted that it is better to completely entrust the installation of an apron from MDF panels or glass to those who, in fact, will manufacture them. Therefore, we will consider other options that the owner can do with his own hands. But before installation, you need to decide at what stage you need to make an apron, and what requirements the room must meet.
Room and surface requirements
Installation of aprons made of MDF, glass or plastic panels can be done even when the kitchen set is installed. Not only is it possible, but even necessary, since a very high measurement accuracy is required, which will allow you to perfectly fit the apron into the workspace. The only thing is that during installation you just need to move the furniture away from the wall, and with through installation, you won’t even have to do this.
If the apron will be made of ceramic tiles, porcelain stoneware, mosaics, natural or artificial stone, then here without wet processes not enough. Therefore, the furniture should not be next to the walls where the apron will be, but the exact dimensions of the furniture and how it will be installed (the height of the countertop, the height of the cabinets, the distance between working surface and the bottom plane of the cabinets).
What are the requirements for the kitchen for the installation of an apron.
- Windows should be installed in the kitchen.
- Must be mounted, all sockets installed.
- The walls must be plastered and leveled. On the wall where the apron will be mounted, the use of gypsum-based putties is unacceptable; only polymer-cement mixtures can be used.
- The floor must be leveled with the topcoat already applied. Naturally, it should be flat and horizontal.
- The temperature in the kitchen should not be lower than +5°C and not more than +30°C, humidity should not exceed 60%.
In other words, the room must be completely ready for finishing- wallpapering, applying finishing decorative plaster or painting. The surface on which the apron will be mounted must be dry and perfectly flat. If glass, glass or smalt mosaic will be used for the apron, then the surface must be puttied with white cement-based polymer-cement mixtures.
Kitchen apron layout
On a wall completely ready for facing, it is necessary to mark the position of the future apron. But for this, there must be a clear idea of the placement kitchen set. It is best if it is already purchased and a scheme for its placement is drawn up. What you need to consider when marking a kitchen apron.
- First of all, the apron should be located in the space between the table top and the bottom plane. wall cabinets, and it is desirable that the apron go behind the countertop and cabinets by at least 2 cm. Most often, the distance between the countertop is 60 cm, but it is permissible to do it in the range of 45-70 cm, it all depends on the height of the people who will use the kitchen.
- The height of the countertop of a kitchen set also depends on the height of people, but in the same family there can be people of different heights, and they are often built into the set household appliances: washing machines and dishwashers, freezers. Therefore, in most cases, a height of 88-90 cm is made, and people with “outstanding height” (more than 200 cm and less than 150 cm) will not have to bend over or bounce, there will just be a slight inconvenience that they get used to very quickly.
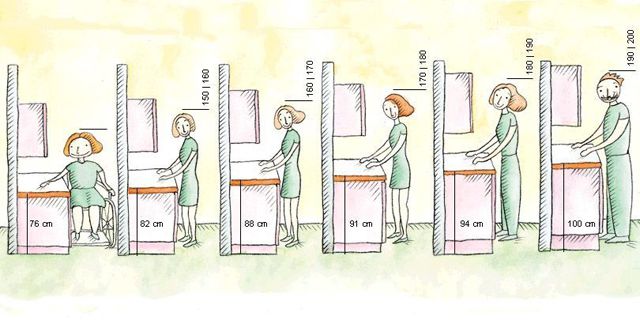 Most of the manufactured kitchen sets are made for the convenience of people of average height.
 - If a standard hood is used dome type, then the apron should continue in height across its entire width and reach its lower edge, and it is better if it goes under the hood at a distance of at least 5 cm or, even better, reach the ceiling. At the same time, for the side surfaces of the cabinets, it is recommended to start the apron also at a distance of at least 5 cm.
- The height of the lower edge of the hood dome above the countertop must be at least 65 cm for electric stoves, and 75 cm for gas stoves.
- The standard width of gas or electric stoves or hobs can be 30 cm, 45 cm, 50 cm or 60 cm. There are sizes and more, but this already applies to stoves for professional use. The most commonly used slabs are 60 cm wide. The dimensions of the hood dome should not be less than the width of the slab, but it is better if they are one step larger. For example, for a stove or hob with a width of 60 cm, a hood should be selected at least 80 cm. The distance between the wall cabinets should allow the hood to fit freely.
- The apron in the kitchen does not have to be located only between the countertop and the upper wall cabinets. Sometimes it needs to be done with a call to the side walls, this is especially true in the area where the sink or stove is located, if they are located at the edges. It can also be influenced by nearby window or door openings.

To mark the position of the apron on the wall, you will need either a laser or a hydraulic level. Laser, of course, is more convenient to work, but hydraulic also gives very high accuracy. It is desirable that the kitchen set has already been purchased, but not yet installed on site. As a last resort, you can measure the future kitchen in the store where it will be purchased or have documentation indicating all sizes. For markup you need:
- On the wall where the kitchen set will be installed, a mark is made from one of the edges of the position of the upper plane of the countertop.
- The level mark is transferred to the other edge of the wall.
- With the help of a paint cord, the horizontal line of the countertop position is beaten off.
- If necessary, if the kitchen is angular or the apron will go to other walls, then similar markings are made on other walls.
- A mark is made on the position of the lower edge of the wall cabinets based on the dimensions of a particular kitchen set, which will be subsequently installed in the kitchen.
- The position marks of the lower edge of the wall cabinets are transferred to all walls where the kitchen apron will be installed.
- On the marked parallel lines, the location is marked cooker or hob.
- The position of the lower edge of the hood dome is marked (minimum 65 cm for electric stoves, 75 cm - for gas stoves from the countertop).
- The position of the side surfaces of the wall cabinets is noted at the location of the hood dome, it should freely enter the space between the cabinets, it is better if there is a gap of 1-3 cm on each side.
- The upper edge of the apron located in the hood area is marked. The apron should go at least 5 cm under the hood, but it is better to do it up to the ceiling.
After these actions, the location lines of the future kitchen set will be marked on the wall. But, as noted earlier, it is desirable to make an apron so that its surface goes a little under the countertop or set. For the countertop and the lower edge of the wall cabinets, it is advisable to deepen the apron to a distance of at least 20 mm, and in the area where the hood is located on the left and right, the apron must be deepened under the cabinets to a distance of at least 50 mm. Therefore, parallel to the horizontal and vertical lines of position kitchen furniture apron position lines are beaten off
When planning and marking the apron, the size of the tile or mosaic to be used should also be taken into account. For example, if the tile is 20 cm high, then it is completely logical that it is beneficial to make three rows of tiles of 20 cm each, and make the gap between the table top and the lower edge of the wall cabinets 56 cm, taking into account that 2 cm from above and below will go under furniture. If tiles of other sizes will be used, then this must also be taken into account. If applied decorative elements- friezes and curbs - then you need to ensure that they are visible. What is the point of using expensive items that will be hidden from view under the furniture. Each case is individual and requires its own differentiated approach.
After applying all the marking lines indicating the position of the kitchen furniture and the apron, you need to calculate the area of the apron. The authors of the article recommend using a calculator in which you only need to specify the clearance between the countertop and the bottom edge of the wall cabinets, as well as the distance between vertical surfaces cabinets and the height of the apron above the bottom surface of the cabinets in the hood area. All entries of the apron under the furniture (2 cm on the horizontal section of the apron and 5 cm in the area of the hood) the calculator automatically takes into account.
Ceramic tiles are one of the best and most popular materials for decorating a kitchen backsplash. But far from the only one. Let's take a look at the pros and cons alternative materials- wall panels, skinali (tempered glass). And with the nuances of the calculation tiled apron which you may not have guessed.
1. Laminated wall panel
For whom:
- for those who want a quick change in the kitchen without a messy renovation.
- for those who renovate the kitchen in supereconomy mode;
- for tenants of apartments in the style of "grandmother's chic", when it is important to close the old apron in the kitchen, and the owner does not agree to expensive repairs;
A rich palette, including stone, wood, tile, with the possibility of ordering fantasy patterns; are matte and glossy, textured. Usually laminated panels are ordered as a companion for a laminated worktop - they are made in one color.
budget material; the price is comparable to the cost of inexpensive ceramic tiles.
Very easy to install and dismantle - no need to "dilute the dirt." And tired - you can replace it in just an hour. Can be glued directly on top old tiles(if the thickness does not interfere), it will not be necessary to prepare the surface in some special way.
This is sheet material and the sheet may be undersized. At big size kitchens, joints will inevitably appear, which (in best case) will be decorated with an aluminum profile, as in the photo. Unlike a tile seam, it is intrusive and not always aligned with the lines of the upper and lower cabinets.
- For the joint in the corner, metal corner guides are used. It is also better to close the end of the panel with a metal overlay to make it look neat. Unlike countertops made of chipboard, the ends of the laminated panel are not covered with an adhesive edge. So, these will be places unprotected from moisture. If you do not treat them with a sealant during installation, the panel will quickly become unusable.
- Cannot be placed next to gas stove. Only if the plate has a cover (and it is she who will protect the wall in the raised state) - this option is possible. But in kitchens hobs without a protective cover, it is better to stop at other materials.
Fact: The width of a sheet of a laminated panel rarely exceeds 60 cm. If you need to put an apron behind the hood, a horizontal joint may form.
2. Artificial stone wall panel
For whom: for those who are looking for an option for a “shortened” apron of an unusual shape, as in the example in the photo; for those who need an apron without a "skirting" (inevitable in the case of chipboard wall panels). Price: from 3000 rubles. for p. m; depends on the brand and composition of the artificial stone.
The panel is glued to the countertop during installation, which eliminates gaps and water ingress. No plinth needed.
The apron can be made figured, not brought to the upper cabinets.
The artificial stone wall panel is glued and sanded in such a way that the joints are not visible - for any length of the kitchen. + Repairable: artificial stone is returned original view with simple sanding.
- Material release and bright colors, but it is always monophonic or has stone inclusions different kind. The texture can hardly be called "rich".- Such a panel costs at least twice as much as a laminated wall panel.
3. Flexible veneer (artificial stone in veneer, flexible stone)
For whom: for those who need an invoice natural stone or natural wood at a relatively affordable price.Price: from 5000 rub. per sq.m. A flexible stone consists of a saw cut of sandstone 1–2.5 mm thick, a binder polymer and a textile base. In the photo - spruce veneer based on Corian.
Flexible veneer is practically indistinguishable from the original.
Subject to local repair.
Easy to install without the help of specialists.
- Limited number of shades.
- Requires special care due to its hygroscopicity: treatment with protective impregnations once a year.
4. Skinali: tempered glass wall panel
For whom:
- for those who want to dissolve the kitchen into the living room;
- when there is a task to use wallpaper (covered with glass) instead of an apron;
- for those who are looking for a durable version of the apron without seams, but with a non-speckled / non-stone pattern.
Quick installation option.
The ability to make any color and apply any pattern, you can make it transparent or mirror.
- Due to the limited size, it is best suited for small kitchens.
- It requires a perfectly flat wall surface, since the installation is carried out on special fasteners, and if the wall is uneven, the glass may crack.
— The glossy surface of the glass requires constant care.
5. Boiserie: wooden wall panel
For whom:
- for those who want to visually extend the suite without upper cabinets;
- for those who need to integrate the kitchen into the surrounding interior;
- for owners of a spacious kitchen in a classic style.
Boiserie is a modular design consisting of narrow panels different heights, mounted in a groove. For installation, external and internal corners, as well as end elements are used. Boiserie panels are often used in combination with artificial stone, for example for decorative finishes buffet areas.
Beautiful option for an interior that flows into a residential one.
Boiserie can be ordered in an unexpected finish - aged, tinted, unexpectedly painted.
- Difficult to clean due to the presence of grooves.
- Pretty high price.
6. Mosaic apron
For whom:- for lovers of colorful decors and brilliance;
- for owners of a small kitchen.
A wide variety of sizes and shapes: from squares and rectangles to circles, pebbles.
Variety in materials used: glass, ceramics, stone, metal, wood.
Supplied in sheets of approximately 30x30 cm, which facilitates installation.
Possibility of use on radius elements.
The ability to cut the sheet and use undercuts.
- High consumption of grout.
- Some elements may shift or peel off the base during installation, which requires painstaking restoration work.
7. Ceramic tiles
For whom: for those who choose proven and understandable solutions - most workers can work with tiles, laying an apron will not cause difficulties.Price: from 1000 rub. per sq. m - consists of the cost of tiles, grouting and installation services.
+ Rich in patterns, formats, thanks to which you can achieve various effects by styling or choosing a bright collection.You can choose both expensive and budget tile options.
Not sheet material. No need to cut and work with large parts.
- Requires care and accuracy when laying out, skill from a tiler. - Assumes dirt during repairs.
- An overpayment for extra meters is possible when buying tiles in boxes.
What is important when laying a tile backsplash
1. Choose the right format
In a small kitchen, a large format will look out of place, as well as in a spacious one - a small mosaic. The most economical to work with is the medium format. If we compare the price of laying, the small format is more expensive. If we talk about the price of the material, then you are more likely to overpay for large-format tiles: more tiles - more leftovers (which means unnecessary expenses). But an apron made of large format tiles is easier to keep clean: there are fewer seams and a chance that fungus will start in them. Tip: Order the kitchen first. You just need to order - in this case, you will finally decide on the project and will no longer change anything. When you pay for the order of furniture and receive a project with dimensions, you will clearly understand which areas will be tiled and what area they get. And then you can more accurately calculate the consumption of tiles (and afford more expensive collections).2. Decide on the size
The fact is that 60 cm is not the only possible size apron for the kitchen from tiles. First, it is the visible size (the actual size should be larger). And secondly, in order not to get the effect “we didn’t have enough money”, the tiles should be behind the hood and “somewhere upstairs”, behind open shelves.How to determine the minimum size of a tile backsplash
linear kitchen
Starting day, we are looking for the estimated lower border of the apron (determines the kitchen set you ordered). We add the height of the base (legs) and the height of the frame (cabinets) and subtract 2 cm. To determine the upper limit of the apron, add 65 cm to the sum of the heights of the base and frame. It turns out that the apparent height of the apron is 60 cm from the countertop to the wall cabinets. And another 3 cm will be at the bottom of the wall cabinets. We put the tiles on all open surfaces where there are no cabinets, but add 5 cm to each side. For example, if the kitchen has a dome-type hood 90 cm wide, and the distance between the cabinets is the size of the hood, then the tiles must be laid out to a width of 1 meter. If the kitchen ends with a refrigerator or a pencil case, then we continue the 5 cm apron for it.corner kitchen
If it's about corner layout, then along one of the walls we will get a visible adjoining of the end of the cabinets to the wall. And the tile wound under them will create a visible gap (since the tile has a thickness). For a corner kitchen, I advise you to calculate the end of the kitchen by the cabinets - not by the countertop. That is, you should not start an apron under the top row. Second important nuance- take into account the thickness of the tile when laying it on another wall: it may happen that it will annoyingly go 1 cm beyond the boundaries of the headset just because you did not take into account the thickness of the coating on the adjacent wall.
For the corner kitchen, the calculation is as follows: we find the upper border (where the cabinets begin and the apron ends), we count down 60 cm from it and add a margin of 5-10 cm. Tip: Think about the symmetry and beauty of the styling. For example, you can lay out the tiles symmetrically with respect to the hood, sink or other central element headset. Ideal when furniture and tiles come to door frame(as in the photo in this interior). Ends and cracks are not visible - tiles can only be laid on the apron.
Linear kitchen by surprise
Option one: do not lay tiles on the end wall at all. This option is acceptable if the sink is not located in one of the corners, and the wall covering without tiles will be resistant to washing (as in the photo above).Option two: laying tiles on three walls.
We start the tile beyond the borders of the lower cabinets and upper wall cabinets. But to what depth? It all depends on the format of the tile. If it is large format, you can lay tiles from the bottom to the top of the kitchen along the depth of the lower cabinets. If the average, you can lay out the apron to the depth of the lower cabinets, as in the example in this photo. If the tiles are small, you can make a smooth transition from the depth of the lower cabinets to the depth of the upper ones. But in this case, practicality is lost. If the end wall is small or is the sidewall of a technical box, it can be fully tiled. And in order to save money, choose a companion tile to the main tile on the apron.When to Break the Rules
If you lay out the backsplash with small-format tiles (for example, honeycombs), you can not put the tiles behind the upper cabinets, but “cut off” it without trimming. Get the original uneven edge. Going into the work area without a sink and a stove, you can reduce the number of rows of tiles, reduce them to nothing, or make a “stretch”, skipping more and more tiles, and finally reduce them to nothing.In order not to lose practicality, trim the gaps in the tiles with decorative plaster and cover with a special protective compound. Tip: If the stove is far enough away from end wall(as in the photo), tiles can only be laid along the main wall, leading it behind the cabinets and the hood. Important:Don't forget to tile behind the sink cabinet and behind the dishwasher and washing machine. To do this, you can take any budget tile or trimming from tiles for an apron.
Olga Nikitina
Reading time: 14 minutes
A A
The kitchen in the house is like home. All family members spend a lot of time there, but especially women. At the same time, any hostess dreams of a cozy and beautiful kitchen, which, moreover, in no case should take a lot of time to wash. Therefore, everyone thinks not only about that, but also about the design of the apron. After all, it can be functional and aesthetic at the same time.
Why do you need an apron in the kitchen?
 An apron for the kitchen is called the space of the wall above the countertop, sink and stove. It tends to get dirty very actively during cooking and washing dishes. Therefore, not only the beauty of the design of the apron is considered important, but also convenience
in his cleaning. After all, few people want to spend time on constant cleaning after cooking, which could be devoted to family or recreation.
An apron for the kitchen is called the space of the wall above the countertop, sink and stove. It tends to get dirty very actively during cooking and washing dishes. Therefore, not only the beauty of the design of the apron is considered important, but also convenience
in his cleaning. After all, few people want to spend time on constant cleaning after cooking, which could be devoted to family or recreation.
The apron protects the wall from splashes of grease and oil from hot pans, from particles of food that can fly apart during cooking different dishes, which is not uncommon.
Kitchen apron material - what to choose? Pros and cons.
Ceramic apron for the kitchen - cheap and practical option for economical housewives
Pros:

Minuses:
- Relatively intricate styling, taking up a lot of time.
- Not everyone can handle styling on their own and with high quality. Usually requires a hand masters .
- The cost of such an apron is higher costs for an apron made of plastic or MDF.
- Difficulty of removal after a certain service life.
Apron from MDF - great design kitchens for little money
Pros:

Minuses:
- negative reaction to water and cleaning products , which over time spoil such an apron both externally and in shape.
- Weak fire resistance and the release of toxic substances during combustion.
- Low degree of aesthetics .
Glass apron - for kitchens with good ventilation
Pros:
Minuses:
- Doesn't have versatility in combination with interiors.
- Easy to get dirty and requires frequent washing.
- Hardened will not save from scratches with time.
- high cost .
Mosaic - an exclusive and stylish apron for your home
Pros:
Minuses:
- Difficulty in cleaning due to the large number of seams and joints.
- Craftsman required for wall surface preparation and quality styling mosaic elements.
- High costs for the purchase of all materials and payment for laying work.
- The need to use the best moisture resistant grout for seams, in order to prevent their darkening.
- Difficult removal when changing an apron.
Savings and ease of installation - plastic apron for the kitchen
Pros:
Minuses:
- May stay indelible stains .
- Weak stability to scratches and deformation due to exposure to water and cleaning agents.
- The most less aesthetic .
- Selection harmful substances some types of plastic.
- High fire hazard upon contact with fire.
- Isolation of poisonous poisons when burning.
Mirror apron - an exquisite decoration for a well-ventilated kitchen
Pros:
- Visually increases space small kitchens.
- Uniqueness and attractiveness such a design.
Minuses:
- Low practicality .
- Mirrors prone to sweating when exposed to hot air.
- Difficulty keeping clean .
Metal apron - modern high-tech monochrome
Pros:
- Originality in high-tech style.
- Fortitude before the fire.
- Enough acceptable price .
Minuses:
- Clear visibility which requires regular cleaning.
- Weak combination with different interiors.
- Required correct addition individual elements from other material to give home comfort.
- Some types of metal hard enough to wash leaving no streaks.
Apron color in the kitchen
There is no unique recommended color. Here everything depends on personal desires . But still, you should not choose a very bright color if it is not supported by the presence of other details in the interior of the same color. And in the event that there are difficulties in choosing the desired color, then the designers are advised to give preference white as appropriate to any other color and design of the kitchen. In practicality, this color shows itself from the good side.
Thus, when choosing an apron, it is best to be guided by your own needs and opportunities, and not the desire to follow the trend or be "on the wave." Sometimes completely impractical things created for beauty and admiration turn out to be in fashion. At the same time, you should not prefer cheap materials if you want to get from an apron long term services, given that it occupies only a few square meters, but at the same time, it plays an important role in giving beauty, personality and comfort to your kitchen.
What kind of apron do you have in the kitchen?
What kitchen apron do you have? What to choose? Need feedback!
Elina:
We have a mosaic apron. Something has bothered me for 9 years. Comfort is average. Such a pattern that drops and dirt are not visible much, but washing is not very convenient. Now we have decided to put new kitchen decorative rock. True, at first you need to at least somehow roughly imagine, then it will come out of it.Tatyana:
Three years ago we made our own kitchen. Decided on the countertop and wall panel black color. At first, it was somehow scary that it would be ugly in the end or impractical, but I liked everything.Ludmila:
And you can immediately buy a ready-made apron, and not assemble it yourself. We did just that. Bought a ready-made wall panel gray color. By the way, it's really convenient.Svetlana:
When my husband persuaded me to get a glass apron, I was not very happy. I was getting ready for the upcoming regular cleaning, everyday you can say. After some time, I had to admit that I was pleasantly surprised. For 3.5 months, I have never made a big marafet. So I just clean it sometimes. Although water splashes constantly from the sink, when. But for some reason, the drops are not visible after drying.
A working apron in the kitchen reliably protects the wall from moisture and dirt, with which it is constantly “bombarded”. Thanks to the smooth surface of most aprons, they are easy to care for - wipe and wash. And some materials of the kitchen apron can also serve as additional heat and sound insulation of the wall.
What about the dimensions of the working area?
The size of the working wall in the kitchen is a rather extensive question. As a rule, its dimensions are selected based on individual preferences and financial capabilities. A working apron in the kitchen can occupy both the whole wall and part of it (for example, only the sink / sink area).
The standard option is to install an apron from the top of the countertop to the bottom of the wall cabinets, from the stove to the hood. More reliable, there will be an apron that will protect the wall under the sink, stove and in places where moisture can accumulate.
You can make an apron on the entire wall. This approach will be more expensive financially, but more practical in everyday life:
- The wall is protected from moisture (especially under the sink / sink, near the washing machine or dishwasher);
- The wall surface is easy to clean;
- In the case of rearranging furniture in the kitchen, you do not have to shift the tiles.
Popular materials for a kitchen apron
With today's variety of materials, the choice of protection options for your kitchen will not leave indifferent both the ultra-modern person and the inveterate conservative. Here are the most popular variations of materials for kitchen aprons.
Tile kitchen apron
Ceramics / porcelain stoneware - perhaps the most popular material for decoration working area. Basically, it is presented as a ceramic tile. The size and shape of tiles can vary greatly, ranging from square shape(10x10 cm, 15x15 cm) or rectangular (20x30 cm, 25x40 cm) and ending with non-standard form, for example in the form of a six or octagonal honeycomb of any size.
Apron tiles are popular for a number of reasons - they have high mechanical strength, a wide variety of colors and patterns are on the market, different textures (such a wood-like kitchen apron is especially popular), roughness (with or without glaze), tiles are not afraid of moisture. Such a working apron in the kitchen is easily wiped from dirt and grease, resistant to household chemicals.
Among the disadvantages of a tile kitchen apron are the high cost of material and work. Moreover, the work can be much more expensive than the material itself, in terms of square meter(For example, normal tile from 120 - 150 UAH, styling from 150 UAH). Also, without experience, it is difficult to make an apron from ceramic tiles with your own hands, although if you set a goal, you can.
Stone kitchen apron
Mostly use various types of marble or granite. Due to its beautiful natural texture and strength characteristics, the material is very popular in designer "expensive" repairs.
A working apron in a kitchen made of stone is a solid slab or separate parts (tiles) about 2 cm thick. The stone is resistant to high temperatures and their differences, inert to household chemicals, alkalis and acids, and the service life is unlimited.
The main disadvantage of a stone apron is its high market price.

Kitchen apron fromMDF
Social option for arrangement kitchen area. For such aprons, MDF with increased moisture resistance is used. The material is easy to attach to the wall, it is lightweight, and its price is quite acceptable. The wooden texture of the surface looks quite harmonious in any combination and will suit most ideas for decorating the kitchen. But, do not forget that this is a tree, albeit in the form of chips. And like any tree, it can rot, be a site of fungus/mold growth, and burn.

Glass kitchen apron
A glass work apron in the kitchen is often used in modern or high-tech repairs. It is made of heat-resistant, impact-resistant or plain glass (budget option). The surface can be transparent, matte or have a pattern on the glass (for example, sandblasted). Such an apron looks very impressive in combination with LED lighting and high quality photographs / drawings behind glass (skinali).

The surface does not absorb odors and is easy to clean. The panel is easy to install on your own, without much experience (the main thing is to have tools), so you can save on the services of an installer.
The disadvantage of such a working apron is the fragility of the material (except for impact-resistant, reinforced). If you accidentally damage the surface, you will have to change the entire section of the apron, which is almost equivalent to buying a new apron. The high price is another drawback.
Kitchen apron from metalla
Working areas are made of stainless steel, chrome-plated steel or galvanized. It can be polished or matte, with a print, engraving and similar decor. The surface is hard to damage (scratch, break), it is not afraid of moisture and high temperature. You can attach a metal panel or a series of panels without any special skills, just on point mounts to the wall.

The disadvantage of such a surface is the limited choice color palette and drawings. On the polished surface, stains and dried drops are very noticeable, therefore, it must be carefully looked after and wiped regularly.
There is also a variant of a metal apron made of copper.

Plastic kitchen apron
Plastic panels are another great way to save on renovations. The low cost and relative practicality of the material (moisture resistance, durability, chemical resistance) are undeniable merits such aprons. The panels are easy and quick to install yourself.
The appearance of such a working area, as they say, is not for everyone, since even the “under the tree” structure looks very unnatural. Do not forget about the combustibility of plastic, so it is better to combine it with a fire-resistant material.
The best apron for the kitchen
It does not matter what material of the apron you choose. If the work is done to the conscience, and the interior design is in harmony with the work area, you would hardly notice the difference between various options. Just find your style.
Photos of Shutterstock (6) and interior design studio Zooi (1) were used in preparing the material
When questions arise, what is better to make an apron on the wall in the kitchen, you should first of all pay attention to the materials used. They differ in cost, shade, dimensions. At the same time, there are a number of other parameters, but the main ones are such characteristics as wear resistance and strength. When choosing an option, the quality of the wall surface is taken into account. The rougher it is, the better the adhesion with the adhesive will be. This is taken into account when choosing tiles, MDF plastic panels, stone (natural, artificial). 
Similar articles:
What is a kitchen apron for?
This element of the interior performs 2 main functions:
| Decorative. | Kitchen apron will decorate any room. It is made of attractive materials, which additionally allow you to hide the defects of the draft wall. Thanks to the creation of accents, the interior acquires originality, brightness, and completeness. Finishing the working area in the kitchen is carried out in different variations: pattern, photograph, drawing, relief surface of the coating. The choice is made taking into account the color scheme and style direction of the interior. |
| Protective. | To exclude the possibility of exposure to moisture on the rough surface bearing wall, near which the working area is often equipped, you can make an apron for the kitchen. In this case, on materials such as concrete and brick, water has Negative influence, and ceramics, natural stone or plastic are characterized by moisture resistance. For this reason, the walls near the sink and stove are lined. In addition, the apron tolerates exposure well. chemical substances(detergents). The use of this interior element helps to increase the service life of the load-bearing wall. |
Requirements for kitchen aprons in terms of combining functionality and beauty
Choose a material that is suitable in terms of properties and appearance for the room. For example, it is inappropriate to use wallpaper for this purpose, because. they serve for a short time and poorly cope with their main task. If the question is being decided what is better to make an apron in the kitchen, you should pay attention to whether the selected material meets the requirements for this type of interior item:
- Moisture resistant. If you install an apron made of hygroscopic material on the wall, it will not last long. The appearance of finishing the working area is largely determined by such a property as moisture resistance.
- The material from which the apron is made must withstand exposure to high temperatures. This is due to the fact that the coating is located in close proximity to the plate, the source hot water, which means it will be in contact with the steam. The apron must tolerate not only high temperatures, but also sudden changes in the value of this parameter, which leads to the appearance of condensate.
- Ease of care. It is not necessary to use materials with a smooth surface. They are easy to remove limescale, fat, water drops. However, this section of the wall gets dirty pretty quickly. If the question is decided which is better to make an apron, you should pay attention to materials characterized by a finely porous structure. Dirt lingers on such surfaces less intensively.
- Resistant to mechanical stress. A durable apron lasts much longer.
- Attractive design. With the help of this element of the interior, you can decorate the room, affect its visual perception.
Features and Benefits
The sizes of the apron can be different:
- a large-sized interior element occupies a section of the wall from the level of the hood to the floor;
- a standard apron is characterized by a height in the range of 55-75 cm.
The second option is more common, because. material in this case is spent more economically. If the kitchen cabinets are located at some distance from each other, it is recommended to make an apron from the hood to the floor. The choice of material is determined by the requirements for it, personal preferences and financial capabilities.
Often, for this purpose, the usual ceramic tiles. More expensive analogues are natural / artificial stone, mosaic, glass. Wood-based materials are used less often. Of this group, MDF is most often used. Economy class materials include plastic panels. If the user is limited in funds, or there is a desire to create an original apron, any available options, for example, a canvas wine corks, which you can make yourself from improvised materials.
When choosing an apron for the kitchen, you should decide whether it is appropriate to finish the working area and take into account positive traits this element of the interior:
- low material consumption - you do not have to close the entire wall, but only part of it;
- protection of the partition, which is more exposed to aggressive factors than other surfaces;
- improvement of interior design;
- multivariant execution;
- provided that the apron for the kitchen is correctly chosen, you can count on a long period of its operation;
- relatively simple installation;
- ease of care.
We select the color and design of the finish
There are such solutions:
- With the help of finishing the working area, they create a background for the kitchen set. Here the color of the apron should match the shade of the furniture. Often they finish the wall in light colors, and the front panels in darker ones. There is also the opposite option: the apron is a dark shade, and the headset is light.
- Focus on the apron. In this case, the finish of the working area stands out in color, contrasts with the coatings of other interior elements. The wall is decorated with a bright pattern, photograph.
- Original design. You can make an apron in the kitchen with your own hands, using improvised materials. Unusual design the working area attracts attention, decorates the room, makes the interior unique.
If you use a neutral range (beige, white tone), such an apron is suitable for a kitchen in any style. Finishing with black material is performed if the room already has design elements in the same design. To visually enlarge the space, the design of a small kitchen and work area is done in light colors.
What are kitchen aprons?
Finishing the wall section near the stove / sink is carried out in different options excellent in design, color and material. The last of the parameters is the most important, because the type of coating determines the properties of the apron. Today it is possible to finish with laminate panels for the kitchen, and you can do it yourself. There are options from glass, tile, plastic, porcelain stoneware, stone, use sheets of polycarbonate, plywood. If wood-containing materials are taken, then they must be moisture resistant. The second most important parameter is mechanical strength.
Plastic
Panels of this type endure the impact of water. They withstand moderate mechanical stress. However, intense pressure on plastic of small thickness is fatal - the product cracks and cannot be restored. The advantages of this material include low cost. In addition, do-it-yourself plastic kitchen apron is relatively easy to mount. It can be glued on liquid nails or other adhesive composition suitable for the type of material.
In addition, plastic panels hide surface imperfections well. They can be installed even on a curved wall. This possibility is due to the flexibility of the material. However, he is not attractive. Panels lose color in the sun, exposed to high temperatures, so they are not recommended to be installed near the stove.
Budget from MDF
If the question is being decided how to make an apron from MDF, the positive qualities of this material should be taken into account:
- low price;
- attractive appearance;
- a wide range of options;
- simple installation;
- it is possible to replace the coverage area;
- environmental friendliness.
Wherein MDF boards are not resistant to high temperatures. Although slightly, they are still susceptible to moisture. The service life of the material under conditions high humidity will be short lived.
But in this case, there is no need to purchase special glue for installation. If the question is being decided how to install an MDF apron in the kitchen, you should know that for this it is enough to fix the panels on the wall using self-tapping screws / dowels.
From ceramic tiles
The material is durable, non-hygroscopic, withstands ultraviolet radiation, moderate mechanical loads. Due to these properties, tiles are often used for finishing an apron. Flaw this option- the need for careful alignment of the wall. When installing tiles, surface flaws will be visible.
In addition, you need to choose an adhesive mixture. If the question is being decided how to properly lay the tiles, you should pay attention to the universal compositions. To finish the working area, you can use glue that can withstand high temperatures, because. the apron will be in close proximity to the hob.
From mosaic tiles
Such material is represented by different types, which differ in the method of installation, dimensions. Exists small tiles. If you plan to make an apron for the kitchen from a mosaic with your own hands, you need to take into account that the installation process of small-sized products will take a lot of time.
Alternative option - laying tiles standard sizes with mosaic decoration. Such products are mounted quickly, and in appearance it is difficult to notice the difference. The material is characterized by similar properties as a tile, but requires more careful maintenance. This is due to the presence of a large number of grooves (seam joints) between the mosaic. The main advantage of the tile is the ability to perform any pattern or pattern.
- increased strength;
- moisture resistance;
- easy care;
- long period of operation;
- attractive appearance, resemblance to granite.
An apron made of porcelain stoneware is attached with glue. The laying technology is practically no different from the principle of installing tiles. This material is offered at a lower cost than the natural counterpart. However, in appearance, these finishes are not much different.
From glass
Panels made of this material are called skinals. Plain or tempered glass can be used. The second option is preferable, but it costs more. Installing a glass apron made of tempered material will provide a reliable coating that is resistant to high temperatures. Panels of this type are not afraid of aggressive agents, damage.
Simple glass is cheaper, but does not last long, because. subject to mechanical stress. The main disadvantage of this type of panels is the need for frequent maintenance. Do-it-yourself glass apron for the kitchen is not easy to install, because. you need to make holes for fasteners. The pluses include an attractive appearance, due to the possibility of inserting a bright photograph, a picture between the glass panels.
Made of artificial stone
Porcelain stoneware is included in this group of materials. This also includes acrylic stone. The last of the options is characterized by a sufficient level of strength, moisture resistance. The material of this type is not exposed to high temperatures, ultraviolet, is characterized long term services. If the question is being decided how to lay out an apron made of artificial stone, you should know that with its help you can get a seamless coating. In addition, there is a large number of finishing options of this type, excellent in color, texture.
From natural stone
This is the most expensive option, so it is not used as often as its counterparts. This group includes granite, marble. According to the properties, natural stone corresponds to porcelain stoneware. Panels of this type differ in shade. Today, a wide range of products is offered in black, pink, red, yellow, blue, gray, brown and white. The disadvantages include the complexity of installation. The fastening of the apron made of natural stone is carried out using a special glue.
Do-it-yourself installation
First of all, you need to remove the old coating. Then the surface is leveled. If necessary, the wall is re-plastered. In the case when the surface is not smooth enough, and there are obvious defects, they are eliminated by filling with putty. Then the wall is treated with a primer. At the next stage, the actions may differ, it all depends on the type of material that is used:
- a mounting grid is attached or notches are prepared on the wall, which will allow you to securely fix the tile;
- holes are made in the wall for dowels.
Installing an apron in the kitchen requires application building level, with its help check the quality of the coating. Holes for sockets kitchen apron done before installation finishing material. If it is planned to conduct lighting, wall chasing is performed at the stage of preparing the rough surface.
What do you do with old furniture?