What paint to paint rubber tires for a flower bed. Do-it-yourself tire flower bed: photo of a flower bed made of wheel tires and step-by-step tutorials on how to create it
The easiest way is to put the old tire on the site, throw in the earth and plant the seedlings. It is, of course, simple, but it doesn’t attract an exclusive adornment. Well, let's try to improve the situation. Let's take bright acrylic or oil paints, we will choose from them a few of the most compatible in color and paint several tires. Then we put them on top of each other and get a wonderful multi-level flower bed.
Original vertical flower bed DIY made from tires from several tires different diameters stacked on top of each other like a pyramid. You can put a pot of flowers on the top if there is no small tire on the farm. After painting and filling interior space tires with soil, you can grow ampelous plants in the resulting flower bed, for example, petunia or strawberries.

Tire beds can also be suspended. Attach a strong metal chain (thick cord, rope, etc.) to the tire and hang it from a tree. In order to be able to fill up the soil in the flower bed, the bottom of the tire must be closed. For example, fix a planter inside with a diameter slightly larger than the inner circumference of the tire. Or put inside dense piece rubber - think for yourself, for sure there is a material suitable for overlapping on the farm.

A snow-white suspended flower bed made of a car tire is a spectacular highlight of a modern style
And if you fantasize a little, then you can build a composition out of tires on the theme of ... well, for example, home tea drinking. Several tires will perfectly play the role of a teapot and a cup - it is enough to supplement them with simple details - a pipe cut and bent pieces of metal tape.


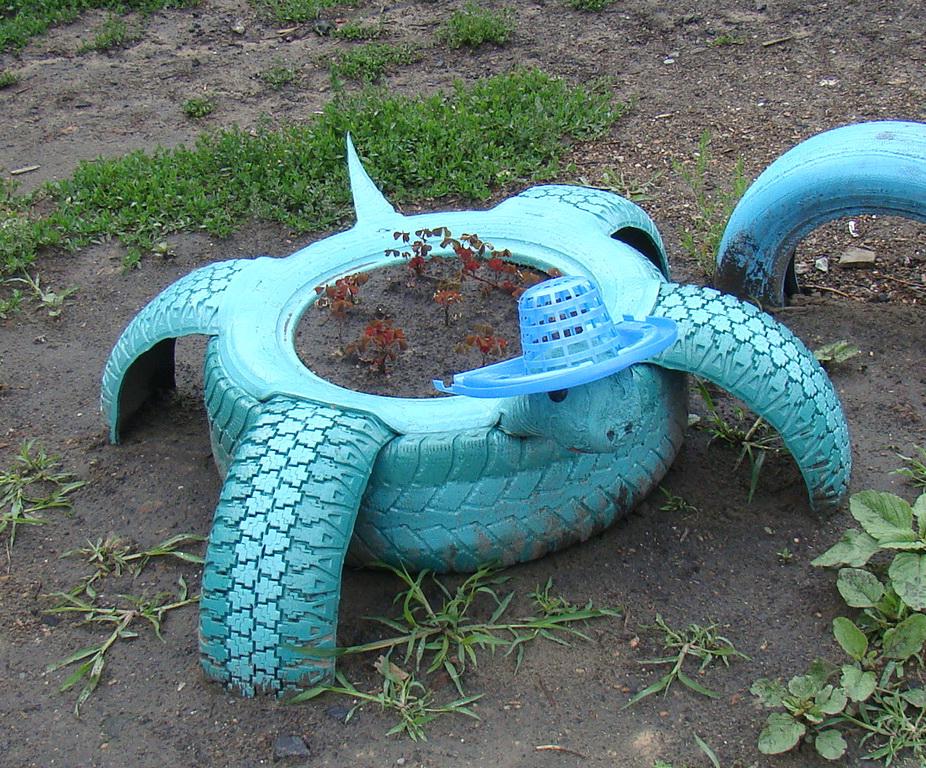
Turtle flower bed - fun creative
From a tire and a tread, cut into equal 4 parts, you can make a flower bed in the shape of a turtle. We make cuts in the tire on the sides and insert tread trims there - these will be the turtle's paws. We fix them with wire staples. Cut the tail from a piece of rubber and also fix it with staples. Take a piece for the turtle's neck plastic pipe, on which we fix the head from crumpled newspapers with tape. You can wear a straw or plastic hat on your head.

This flower bed of tires with your own hands must be painted according to all the "turtle" rules, otherwise it will not be clear what you wanted to portray. Draw the eyes, mouth on the head, paint the torso and legs in a bright color.
A flower bed from an inverted tire
Beds of inverted tires resemble round-shaped pot-bellied flowerpots, which will require:
1. Cut the pattern of the flower bed petals on the top of the tire
Petals can be rectangular, triangular, rounded, and even wavy. To begin with, draw them with chalk or soap, and then cut them out with a sharp knife, hacksaw or jigsaw. If you decide to use a knife, we recommend that you wet it with soapy water during work - this will make it easier to overcome the resistance of dense rubber.


Carefully cut out the petals using any sharp cutting tool
2. Turn the tire inside out.
Many are interested in how to turn a tire for a flower bed inside out, because this is not an easy task and requires considerable effort. To do this, turn the tire upside down with the side on which we did not cut anything, grab the cuts from the bottom with your hands and, pressing on the tread, gently turn it out. After you've finished about half of the tire, flatten it into an oval and twist out the rest lightly.

3. Paint the flower bed in a spectacular color
We paint the resulting flower bed in any color that will be in harmony with the rest of the landscape objects of your site. You can stop at a single color, but multi-colors will look more impressive, for example, in the form of stripes or a bright pattern.

Flowerpots on a leg - a more complicated option
Let's look at how to make a flower bed out of a wheel. This means that to create a flower bed, we will use a tire with a metal disc in the middle. To do this, put the wheel on a flat surface and cut out a pattern of petals, reaching with a knife (or other cutting tool) to the tread.

Then we turn out both the upper and lower parts of the tire, without removing the disc. As a result, you will get a kind of flowerpot in the form of a flower on a leg, into which the soil is poured and plants are planted.

After that, you need to take care of how to paint the flower bed from the wheel. The upper part can be painted in a bright "floral" shade, and the lower - in green. Then a huge rubber flower with living plants in the middle will bloom on your site.

Master level - swan-shaped flower bed?
A swan flower bed is made in the same way as a flowerpot flower bed made of a tire, the only difference is in a more complex cut out pattern. If for a flowerpot flower bed it was necessary to form the same type of petals, then here - the wings, tail, neck and head of a swan. We transfer the scheme to the surface of the tire and start cutting out the shape of a swan. The head and neck are cut out along the black contours, the tail along the red ones, and the wings along the blue ones. After that, the tire is turned inside out in the same way as in the two previous cases.
.jpg)
We make a beak from a piece of rubber (wood, plastic or other material) and paint it with red paint. We put the two halves of the head together, insert the beak between them and fasten all parts of the head together with the help of self-tapping screws. We screw in the self-tapping screws from both sides of the head in the places of the future eyes of our swan. Then, so that the screws are not visible, they are closed with two circles cut from black electrical tape - these will be the eyes. Raise your head straight and up, slightly pressing it into the tire. In this case, a fold is formed, which must also be fixed with self-tapping screws.
.jpg)
On the last stage the work of the swan is painted - here you can show your imagination and come up with any color for the bird's plumage.
Currently, there is an opportunity to buy a summer cottage flowerpot in special garden stores. However, such an element of decor for a summer residence can be made independently.
Typically, plant pots are made of clay, wood, plastic and plaster. They are of high quality, of various shapes and colors, and also possess long term service. The cost of such garden fixtures depends on the type of material, size and manufacturer. An alternative solution to save money is a flowerpot that looks no worse on personal plot... Such unusual craft can be made from car tires.

To work, you need to have:
- a tire from a car;
- cement with sand and primer;
- paint and soap solution;
- plaster mesh or wire;
- small crushed stone or pebbles.
You should also have the following tools in your arsenal:
- knife, hard brush;
- electric jigsaw;
- brush and trowel;
- Grinder;
- concrete bucket.

Master class pot made of tires
First, we cut off the side part of the tire, giving the contour a figure for originality, the second part is left intact. Before starting work, draw a border, you will need to cut off the tire along it, then lower the knife into a soapy solution so that it cuts better. For a more complex curly edge of the flowerpot, use a jigsaw.


Now you can start making the legs of the flowerpot. For this, a disc from a wheel is suitable. We mount two parts of the tire (sidewall and the remaining piece) on the disc. The base of the flowerpot is ready.
Let's start decorating the base. To begin with, the rubber and the disc must be coated with a primer, then painted with the desired tone. It is worth noting that light-colored paint does not fade so much under the sun.

In the first case, an ordinary flowerpot made of a tire is already ready for use, but for a more attractive look, we advise you to start decorating the disc with a solution of concrete and pebbles.
First, you need to wrap the disc with wire or a plaster mark so that the solution is securely attached to the rubber. It is necessary to knead a solution of water, cement and sand - 0.5 / 1/3. Make the solution thicker, then it will better attach to the disc. Using a trowel, apply the solution as if scattering it. During the priming of the disc, the flowerpot should be removed to the side so as not to stain it. Immediately after applying the cement, you can decorate the leg of the flowerpot with pebbles.
To do this, you need pebbles or broken glass of various colors. After fixing the solution, the pebbles must be washed and the excess cement must be removed with a stiff brush.
To prevent the concrete leg from cracking, you need to moisten it with water for 3 days. Now fill the flowerpot with black soil and plant the seeds of beautiful plants!
Also see a photo selection of how to paint flowerpots from tires

A little imagination, favorite paints and colors - and the old tire is no longer garbage, but an important part of the decor or artistic image... If desired, with the help of a flower bed made of tires with your own hands, you can change the entire appearance of the garden.
The dream of making his garden beautiful and cozy leads his owner from the beds to the design of flower beds and various flower beds.
Flowers are planted:
- in a pots;
- on a flower bed;
- into a container;
- in hanging baskets.
Simple plastic containers or pots look pretty boring and monotonous. The flowerbed seems unfinished without a border and border decoration. Creativity must be realized, because the gardener wants to express his fantasies in interesting ways.
Sometimes a money question arises, and the owner of the garden has to make a choice between buying interesting specimens of plants for a collection, a rose garden, a flower garden and purchasing ready-made forms for planting them.
In this case, ideas about creation will come to the rescue. Even if there are no such materials on or near the site, at any tire changing station or service station, workers will be happy to get rid of unnecessary and waste old tires of any size.


Old tires become soft from time to time and can be processed quite easily. The sides of such a flower bed look better when the tire is turned inside out. In this case, they resemble flower petals or carved leaf edges. Difficulty may arise at this stage, but fantasy or masculine strength will help to cope with it.
Let's summarize all the advantages:
- cheapness;
- availability;
- the opportunity to show creativity;
- a large number of manufacturing options.
And one drawback in the form of little physical effort is unlikely to outweigh them.
Converting an old car tire
Each garden, be it a summer cottage or a manor, is decorated in the same style.
The gardener's artistic preferences will tell you which style direction to choose when making a flower bed.
Animal-shaped pots filled with flowers will decorate a country-style garden.

A multi-tiered flower bed of tires, in which it is planted ampelous petunia or surfiniya of the same color, will become a wonderful flower cloud and complement any color composition, giving it lightness.

Suspended tire pots filled with bacopa and calibrachoa add flavor to the Provence style.


What tires are better to take
Any work in the garden, especially creative work, should be enjoyable. It depends on the degree of preparation for it. To create an exquisite element of landscape design, you need to understand in detail how to make a flower bed from tires with your own hands, choose wheels and prepare them for work.
The softest for cutting shaped parts and creating shapes is considered an old imported rubber intended for use in winter time... How older tire, the easier it will be to deal with it.
The treads on such a tire are almost worn out. When painted, they will paint over completely, and you get a smooth surface, on which it will be difficult to determine the source of inspiration.
There are a lot of ways to implement fantasy ideas:
- just a flower bed made of an old tire;
- ladybug;
- cup and saucer;
- dog;
- a donkey made of tires, harnessed to a cart with a tire-flower bed;
- multi-level flower bed made of tires of different diameters.


Preparatory process
Before making such a flower bed with your own hands, you need to go through several stages. The role of a visual aid is best played by a similar sculptural composition of neighbors. But!
Every gardener dreams of creating his own garden. To do this, it makes sense to watch a video about creating a flower bed from old tires, and make adjustments for the individual taste and style of the garden.
There are several options for flower beds, photos of which it is desirable to see before starting work:
- just a flower bed made of tires without turning it inside out and any decorative experiments;

- a flowerbed with the upper part removed and decorative design top;
- complex construction with an inverted tire and nicely cut edges;

- a very complex design, for which it is necessary to dissolve the tire into narrow strips.
The gardener's artistic intention has already been put into words, an approximate plan of the masterpiece has been drawn. The next stage is preparation for the fulfillment of desires.
Successful implementation is guaranteed if available:
- Old car tire.
- Sharp knife.
- Gloves.
- Paints.
- A wish.
There are other variations of this formula. Instead of a knife, you can use a jigsaw. This tool will make it easier to cut out the design and help you make more intricate curls, which are quite difficult to make with a knife.
To all of the above terms, you can add an electrical grinder... With its help, the old tire will take on a new look, bumps and scuffs will disappear.

Purchased tires must be washed from dirt, dust and stones stuck in the treads. This is necessary for better paint application and decorative elements for the future work of landscape art.
In some photos showing how to make a flower bed out of tires with your own hands, sometimes the used tire is not cleaned of dirt and dust. It is unpleasant to work with such material.
Having decided on the appearance of the future masterpiece, a drawing of future flowers or petals that must be cut out is applied to a clean surface with chalk. Clear markings in the future will get rid of flaws, and it will be much easier to work.

How to make a flower bed out of tires with your own hands and fill it beautiful plants you need to think about on long snowy evenings. It is in winter that petunia and viola are sown on seedlings. Phlox Drummond for seedlings should be sown in March. Having landed it in the ground in May, you can admire the blooming oasis all summer long.
For the design of such a flower garden, almost any plant is suitable. General rules flower beds are also suitable for a rubber miracle:
- the composition should be attractive from any point of view;
- more tall plants planted in the background or in the case of a round flower bed in the middle;
- at the feet of a tall and beautiful, but ankle flower, it is necessary to plant groundcover, which will disguise an ugly bare stem;
- the number of species should correspond to the size of the flower bed;
- three different plants are enough for a small flower garden;
- harmonious color combinations plants of the same species look more interesting than a mishmash of different plants different colors.

For a large flower bed, you can even pick up a coniferous set of dwarf forms of juniper and spruce.
We plant on a flower bed
After all the preparatory and decoration work, plants are planted in the flower bed. For planting, a mixture of fertile land, sand and humus in a ratio of 2: 1: 2. At the bottom of the flower bed, if any, drainage is poured with a layer of about 5 cm.
If the flower bed lies directly on the ground, then drainage is not needed. In this case, excess liquid will be absorbed into the ground.

A small flower bed made of tires requires a more careful approach. A small amount of soil picks up moisture more easily and partitions faster with it. Plants suffer from such fluctuations in moisture. This can be avoided by adding vermiculite to the soil mixture for the flower bed.
Work wonders for your garden!


Most summer residents strive to decorate the site so that it looks stylish, modern and neat. However, not everyone can afford to allocate enough funds to purchase. finishing materials... An excellent solution would be to use car tires as a flower bed decoration. Products that have served their life have a chance to live a second life.
With old tires, you can make many options for flower beds and flower beds for the garden or suburban areaCar tires allow you to create flower beds for giving a variety of shapes and colors. Such compositions near the house will serve as a decoration of the site, as well as in a good way dispose of old tires. The only condition for successful work with them is the availability of a set of tools and auxiliary materials. So, you will need:
- old car tires;
- tape measure, ruler (metal);
- marker;
- jigsaw, grinder, hacksaw;
- primer;
- exterior paint;
- mesh (metal);
- decor: stones, wooden elements, seashells, colored glasses, etc.

 Brightly colored tires - an easy way to organize a flower garden
 Choice of tires
Despite the fact that in any case wheel tires are used for decorating flower beds only those that have served their time, some of them are easier to work with, others are not. In this regard, it is better to choose:
- those that are rather worn out - they are softer, if necessary, it is easier to turn them inside out;
- for the same reason, it is more optimal to use imported rather than domestic products;
- if there is an opportunity to choose between summer and winter tires, it is better to take the latter.
Before starting work, the tires must be washed so that the dirt does not interfere with the work process. Regardless of the softness of the rubber and the wear of the tires, cut them more convenient grinder or a jigsaw. If there is no such tool, you can use a knife. First, it must be well sharpened and dipped in soapy water from time to time.
 The best tool for cutting tires is a jigsaw
 Tire painting rules
After the final arrangement of the flower bed and its decoration with tires, it is recommended to paint them by all means. This procedure will create a picture saturated with color, and give the flower bed a neat, well-groomed look.
In order for the paint to fit well and remain bright for a long time, it is advisable to treat the tire with a layer of primer before painting the tire. You can start painting only after the primer is completely dry. Do not neglect this procedure, because after it the paint will not crack, bubble and lag behind the rubber surface.
The choice of paint is quite wide: you can choose any weather-resistant coatings. Nitro enamels, oil, car paints look great. Acrylic enamel is very popular - it is odorless and can be diluted with water. Plus, this paint is commercially available in spray form, so it's easy to apply. Besides, this way coloring is quite economical - as much material is consumed as necessary.
Some summer residents paint the tire curb only with outside assuming that the inside will not be visible. This is a mistake, since some unpainted parts of the tires will certainly be visible at a certain angle and will ruin appearance flower beds.
The most successful and uncomplicated flower beds made of tires
Plain tire curbs
If there is no time and special skills for decorating a flower bed, you should try to create a couple of simple compositions. The simplest version of a flower bed made of a wheel tire is a separate flower bed, inside which sand with rubble, earth is poured, and planted flowering plants... A more complicated option is a tire with “legs” attached to the bottom, which allow you to install a portable flower bed anywhere in your yard. The legs should be fastened to the flower bed from the old wheel securely so that the entire structure does not collapse at the most unexpected moment.
The next type of simplified flower beds is several bus flower beds stacked on top of each other in a specific order. Compositions in which tires painted in different colors look like a "checkerboard" look good, forming a kind of wall. Such a flower structure can be used as a divider that will allow you to zone the garden.
Having at your disposal tires from wheels of different diameters, you can build a pyramid from them near the house. Climbing plants can be planted at each "step" of the composition, which over time will turn the pyramid into a garden decoration entwined with leaves and flowers. The pyramid looks spectacular, the components of which are painted in different colors.

 Tires can be stacked in any in a convenient way, but it is important to make the bottom in the wheel, otherwise the earth will simply spill out
 Flower garden in the form of chamomile
Such a flower bed is suitable for those owners of private houses who have a fairly spacious area. You only need 4 old tires and paint in different colors. One tire should be placed in the center of the composition, and the remaining three should be cut in half so that crescents are obtained. Six semicircles should be placed around the uncut tire to form a flower.
The pre-painted tires must be dug into the ground to a depth of about 5 centimeters. Then fill them with drainage and soil, plant the plants. It is recommended to plant flowers of the same color in the center of the chamomile, and fill the semicircles with plants with petals of contrasting shades.
 Two-tier flower bed - chamomile from tires
 Suspended flower bed
Our master class on step-by-step production flower beds will help even a beginner to cope with the task. First, you need to find a strong tree or canopy on the site that can hold a structure filled with earth. The tire from the wheel must be hung on chains or a strong rope, having previously made holes in it. The bottom of such a planter can be drowned out with plywood, or a flower pot can be fixed in the tire.

 Figures made of tires can serve not only as flowerpots, but also as independent garden decorations.
 A suspended flower bed can be made in the form of a cartoon character or an animal. For example, a parrot, a dolphin can be cut out of a tire, then the pots are suspended vertically. If it is decided to make a bird, the beak for it is cut out separately from wooden board... The tire is cut according to the template, the parts are fastened with a stapler, nails. They draw eyes, paint the tail, feathers in bright shades. To make it easier to cut the rubber, the tire can be heated under sunbeams in two hours. Before attaching the planter to a branch or roof, it should be painted. Various options hanging figures can be estimated from the photo.
Swan

 Pair of tire swans
 The noticeable and graceful figure of a swan on flower plot makes a pleasant impression, children like it. Several figurines of noble birds look especially stylish. The "Swan" flower bed is easy to make with your own hands, you just need a good knife, a template and our instructions for beginners:
- First you need to put on the tire the lines along which you want to cut.
- Then cut out the head, wings. Turn the product inside out.
- The neck will have to be reinforced with wire to help the rubber keep its shape.
- The bird is covered with white paint, the beak and eyes are isolated.

 Approximate markings for making a swan
 Merry turtle
You will need two tires to craft a turtle. One of them needs to be cut - to separate the round side parts with a knife, you only need a protector. It needs to be cut into 4 pieces of equal size - these are the legs of the turtle. If you wish, you can make the edges of the paws with teeth to indicate the fingers. In the second tire, 4 holes are made on the sides, into which the legs are inserted, they must be fixed with wire. The tail must also be made of rubber, and the neck of corrugated pipe, fasten these parts to the torso. The head is made of tightly crumpled newsprint, fixed on the neck. Once you've painted your turtle, you can dress it up with a matching hat. The paper must be securely coated with several coats of ink to ensure it is protected from moisture.
 Flower garden "Turtle" will be an excellent decoration of the garden
 To create a frog with your own hands, you need to take three whole tires, you will need additional tire trims and an unnecessary hose. Put two tires next to each other, the third - in the center between them, it will represent the head of a frog. From scraps of rubber, you need to make paws and attach them to the pieces of hose. The arms and legs are attached with wire to the "body". Further, the entire composition can be simply covered with green paint. You can fantasize and go further - make the frog eyes, mouth and even attach a crown.

 You can plant such a frog next to a pond, where it will look most impressive.
 Cup of coffee
This composition is ideal for small summer cottages, it is obtained from two tires from the wheels different sizes... First you need to put on the ground the one that is smaller, on it - the one that has larger diameter... At the top tire, you can slightly expand the planting area by cutting the rubber from the inner ring. From these scraps of rubber, you can build a handle, securing it with wire. It is advisable to paint the cup with bright colors.

 The tire cup can be colored in different ways
 Vase with Flowers
A flowerbed looks very impressive, imitating a vase in which there are flowers. If you take a tire with a disc, you can make a flowerpot with a leg, if not, you will get a simpler vase. The edge of the vase can be cut along on their own- Serrated, wavy or cut into a fringe. In order to decorate the edge of the flowerpot, you need to draw the desired pattern on the rubber with chalk or a marker, cut out the outline with a jigsaw or knife, and then turn the tire inside out. If we chose the disc option, the trimmed part of the tire remains on the base of the structure.
After this procedure, you get a pretty pretty flowerpot that you can paint. It makes sense to decorate such flowerpots: it is easy to apply a drawing on a smooth surface, glue a decor made of stones, glass.
Beautiful structures are obtained from several flowerpots of different sizes. One of the options involves the installation of flowerpots on top of each other, from larger to smaller, like a pyramid. It turns out original flower bed, which saves the area of the site.

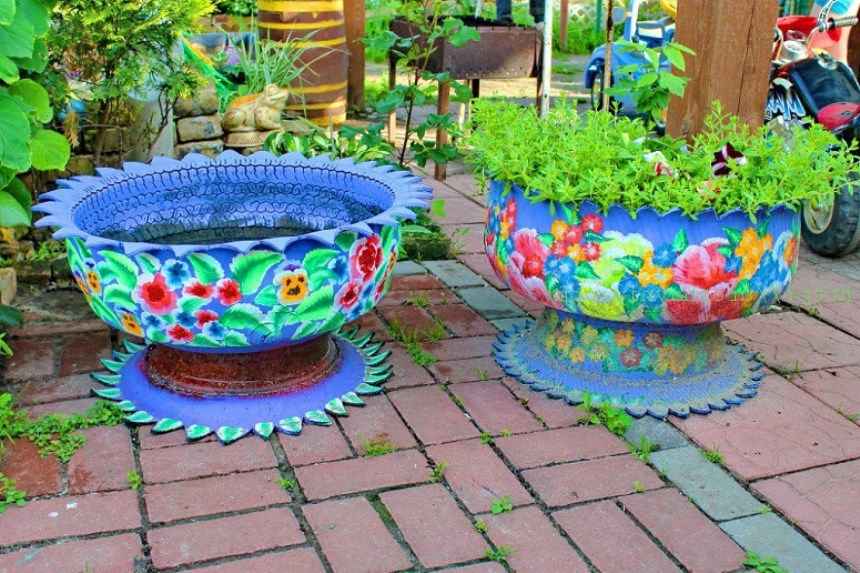 Despite the simple design of the flowerpot, this decoration can be made original thanks to its bright unique color.
 General principles of planting
After making the base of the flower bed, it is useful to fill it with sand and crushed stone to about 1/3 of the depth. This filler will serve as a drainage, which will keep the roots of flowers from waterlogging. The soil is filled from above, and only then the plants are planted.
Climbing plants or those that bloom with a thick "cap" are usually planted in simple flower beds. If there is a desire to get a multi-level blooming ensemble, it is worth planting petunias, marigolds, pansies... It is advisable to plant plants with tall flowers in the middle of the flower bed: iris, dahlias, phlox.
Bright and unusual flower beds, decorated with tires, are doomed to become a stylish feature of any garden. It is pleasant to relax near such a flower garden on a summer evening, chat with friends and family members. A photo gallery of the most unusual and simple-to-use flower beds will inspire you to create your own composition. Try and build one of them with your own hands in order to appreciate all the attractiveness of a budget design.
It's always nice to make something useful out of a junk thing, and if the craft is also beautiful, it's a double pleasure. One example is tire crafts. They are used to make decorations for a summer cottage or garden plot, various flowerpots and flower girls, build rides for children and even make country furniture- tables and chairs.
Beds and flower beds made of tires
Let's start with the most, perhaps, simple flower beds and flower beds. Do you think it is difficult to make a multi-tiered one? Maybe, but not from tires. Take several pieces of different sizes, paint in bright colours and fold it in a slide - one on top of the other. To prevent your slide from falling apart, fasten the tires from the inside with a screwdriver and self-tapping screws. Two for one connection will suffice. You fill up the soil inside, plant the plants. To prevent the soil from spilling out, you can cover the tire inside with a piece. It will remove excess water, but will not let the earth get enough sleep. A beautiful tiered flower garden is ready.
If you like flower beds of the correct shape, you can make these. For example, by folding a flower bed in the shape of a chamomile from tires. First, the tires are laid out and fastened together in the lower tier. Fill the middle of the tires with earth, as well as the free space inside the circle. Broken brick or other construction waste can be placed there for better drainage, sprinkled with earth a little on top and tamped. The second tier is laid out on the prepared surface, stepping back from the edge by more than half the diameter of the tire. They are also fastened together, the middle is covered with soil, and the core is placed on top. Tall flowers can be planted at the very top, and curb or low-growing flowers on the lower tiers.

Another option for a flower bed made of tires in the form of chamomile is in one tier. To complete it, you will have to cut the tires.

How to cut tires
In general, when making crafts from tires, they often need to be cut. This is far from easy. It is more or less easy to cut the side surface from the tread. People with strong hands and good knives do it manually. A good workout, by the way, for the hands and the entire shoulder girdle. If you are going to cut with a knife, grease the blade with grease: rubber constantly "wedges" the metal, and the blade covered with grease slips well.
You can also cut off the sidewall with a jigsaw or a grinder. Cutting with a grinder is relatively quick, but the stench is wild. Therefore, with a grinder, even if there is one, only the first cut is made so that the jigsaw file can be inserted. Then they work with this tool. For cutting rubber, take a reverse tooth blade made of good steel.

If you have to cut the protector, doing it with a jigsaw, or even more so with a knife, is useless. Anyway, with an ordinary knife. Blades made of special steel can cut even an iron cord, but hardly anyone wants to disfigure such a tool about old tire... Therefore, they work most often with a grinder. To avoid trouble, the protector is fixed: always think about safety. If the sidewalls have already been cut off, the tread band is quite elastic and can be squeezed with a clamp. When cut, it will not spring back.
Flowerpot from the wheel: turn out the tires
If you have a tire with an old rim, you can make a flowerpot with a leg out of it.

To do this, cut one sidewall along the tread. And they turn it inside out. This is not an easy matter: considerable physical strength and perseverance are required. Rubber is elastic and you can't turn it out the first time. If nothing at all, notches are made on the outside across the tread. They should be quite deep, but not cross-cutting. It will also help if you make cuts along the edge with a depth of at least 5-7 centimeters. They will look like a fringe on an inverted tire.
Why do they turn it out? Inner surface smoother, and the shape can turn out to be more interesting, especially if the edge is not linear, but jagged. You will get a gracefully bent decoration.

For details on how to turn the tire out, see the video.
Likewise, you can turn out a tire without a rim. The sequence of actions is the same. First, cut off one of the sidewalls - straight or zigzag. To make the "petals" even, it is advisable to mark them. It is convenient to do this with chalk. At the mark, they are then cut with a jigsaw or a knife (if the cord is synthetic).

Turn out like this: step on interior tires, grasp the edge with your hands and pull up and towards you. It is important to achieve the first result: when at least some part bends. If the tire looks like the photo below, it is already a success. It is developed by sequentially turning the edge inside out and standing on the already turned out part - so that it does not turn out back.

Watch the process again in the video. This time, the tire is turned inside out without a wheel (cut, by the way, with a knife).
Even in itself, such a tire turned inside out looks good. If you paint it, it gets even better. If desired, they can be combined - different colors, sizes, differently set: on the bus or on the legs.

A high flower bed always looks beautiful. Especially with ampel plants... It can also be made from tires, and there are several possibilities. In the photo below, there are two ways to secure the trimmed tires at different levels. The first is to use hemp for this, to which the flowerpots are attached with nails or self-tapping screws. The second is to use fittings - three four rods, on which to put on rubber. Having set the tier at the required level, it must be fixed; on metal, this can only be done with the help of clamps.

It is not always possible to put a flowerpot on the ground: some areas are so developed that even one square meter to highlight is problematic. For this case, the people came up with various hanging flowerpots, and also - from old tires. Only a small part of the whole tire remains, so you have to cut a lot ... be patient. For example, you can do hanging planters in the form of a dolphin, parrot, rooster and other outlandish birds. See not a photo for a few ideas.

Tire cache-pot - parrot, rooster and dolphin
All these crafts are made from tires. Only a small part of them - the heads - are often made of dense foam. By cutting and grinding the part the desired shape, it is fixed with self-tapping screws, greased with glue (this is a secret, remember), and then paint. How to make a parrot out of a tire, see the video.
Laid out below step by step photos, which capture the main stages of creating a table or ottoman from a tire. You will need two more circles of plywood or fiberboard of a suitable diameter; hemp rope is used for finishing. From the materials at hand, you will need glue and a glue gun, as well as varnish and a brush for applying it. To connect the circles with the tire, you will also need self-tapping screws - 8-10 pieces on each side.

Next we take glue gun and warming up the glue, apply to the sidewall. If there is no such luxury in the household, take the glue that is in the tube bigger size, like " liquid nails". It's easier for them to work with assembly gun... Apply a strip to the sidewall, glue on the hemp rope. So - to the very top.

Using the same technology, we decorate the table cover (ottoman). You need to start laying from the middle: apply glue, lay the rope.

Finishing work - applying varnish. We do it slowly, soaking well. This is what you should get as a result. If you made a table, you can put glass on top - a rope, even varnished, is not the most best coverage for the table, although beautiful ...

Variety can be achieved with the cover. It can be sewn from the vending dense material.

Nice ottoman ...
Can be knitted - large knitting looks interesting.

Knitted large knit cover - looks interesting
If you don't feel like sewing and knitting, you can use old knitwear cut into strips. They are cut into long strips 3-5 cm thick, wound into balls and then wrapped around an ottoman. It turns out interesting, especially if several colors are combined.


If you need a taller ottoman, twist the two tires together with self-tapping screws, and work with them in this form.


See another option in the video.