Rules for connecting heating radiators. Connecting heating radiators in an apartment - one-pipe and two-pipe schemes
Arrangement of a heating system (hereinafter referred to as CO) in a separate apartment or in a private house is carried out by connecting heating radiators to the mains supplying hot water coolant from an external heat source. In constructions of standard cast iron, bimetallic or aluminum batteries threaded sockets are provided at the ends of each section for assembly connections between themselves or for connecting pipelines for supplying and removing the coolant. The illustration shows a traditional cast iron radiator with plugged top and bottom end sockets.
Cast iron heating radiator
In order to properly ensure the tightness of the connection of steel or polymer pipe thermal wiring to the battery, welding and threaded connections are used. The photo shows an element of a section of a cast-iron radiator with a case for threaded method connections.

A fitting for connecting a heating distribution pipe to a cast-iron radiator
Coolant circulation through radiators
Heating of the room in which the heating radiator is installed is carried out according to the following principle:
- the water coolant heated to the required temperature is supplied through a one-pipe or two-pipe system of pipelines to one of the end sockets of the radiator, intended for the inlet of hot liquid in accordance with the selected scheme for connecting heating radiators in this house or apartment;
- heating medium supplied to the inlet heating battery, circulates in all its sections, giving off the brought heat to the material of the radiator walls;
- the walls of the radiator heated from the inside radiate outer surface warmth into the environment, thereby heating the room;
- the coolant, which has completely cooled down inside the radiator when passing through its sections, leaves the battery through the upper or lower end socket, designed by the selected connection scheme for the cold coolant outlet;
- The cooled water that has left the radiator is directed through the outlet pipeline (commonly called the "return") to the heat source for subsequent heating and passing through the next circle of circulation.
The presence of four input / output sockets at the ends of the mounted battery (two on each of the opposite sides) predetermined the existence of several options for movement hot water inside the radiator, depending on how they are connected. With any scheme of liquid circulation inside the volume of batteries assembled from 6-8-12 or more sections, an uneven distribution of heat fluxes is noted both along the height and along the battery. The figure shows a thermogram of a cast iron radiator at bottom flow. The spread of temperatures along the height or along the length can reach 10 degrees.
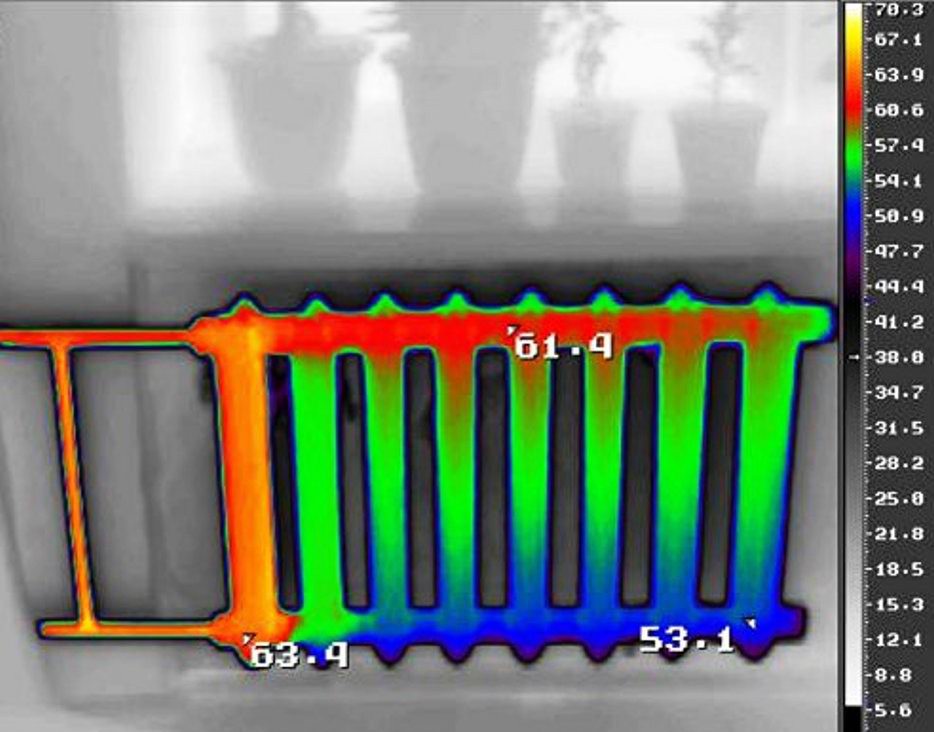
Thermogram of a cast-iron radiator at bottom flow
In reality, the temperature spread is much greater, since scale and lime deposits settling in the lower cavities of the sections prevent the passage of hot water at the bottom of the radiator. The hot coolant immediately rushes along the free upper ducts to the exit, without even washing the distant sections. In fact, the temperature of such clogged, remote from the entrance of the sectional sections can reach only 25-30 degrees.
The efficiency of each heating device separately and of the entire heating system of the house depends on the connection diagram of heating radiators, which sets the route of the coolant movement inside the assembled sections and affects the intensity of hot water circulation when it is washed internal surfaces sections.
Heating agent supply systems
Organization of heating in a private or apartment building carried out by installing one-pipe or two-pipe systems for circulating a water coolant.
One-pipe heating circuit
In the one-pipe version of the heating system of the house, the water coolant is supplied in series to the connected sectional batteries. This option eliminates the division of the main heating main into circuits for supplying hot water and returning cooled water. A closed one-pipe circuit encircles the entire house along the corresponding trajectory of the heating main. The figure shows circuit diagram one-pipe heating option for a two-story house.

Schematic diagram of a one-pipe CO of a two-story house
The circuit works as follows:
- hot water coolant comes from a heat source (in this case, a boiler, in other cases, a central heating main) through a pipeline (red lines in the diagram) to sectional radiators;
- red arrows mark the branches of the movement of hot water supply to each battery separately;
- in batteries, the hot liquid gives up the brought heat to the walls of the battery sections and leaves the radiator, already cooled;
- blue arrows show the movement of cold moisture along the outlet branches of the pipelines towards the vertical section of the main line that returns the coolant to the main heating main;
- cold water comes to centrifugal pump(or pumping group) to repeat the circulation.
Serial connection heating appliances condemns radiators to unequal temperature of heating batteries not only on all floors of the building, but also in each apartment, since the coolant gradually loses its originally obtained temperature as it passes through each point of heat consumption.
Two-pipe heating circuit
In a two-pipe heating system two independent pipeline branches are used:

Schematic diagram two-pipe system heating
- hot coolant is supplied through one pipeline (red line);
- the cooled coolant is received through the other pipeline (blue line).
This scheme ensures an even distribution of the hot coolant at all points of heat consumption. The main advantage of a two-pipe heating heating main over one-pipe scheme is an:
- the ability to control and adjust temperature regime in each separate room;
- the ability to repair each heater without stopping the entire CO.
When comparing heating systems, one should take into account the fact that for a two-pipe system there is no need to supply hot water at high inlet pressure. In a single-pipe CO, for uniform heating of radiators along the entire circuit, it is necessary to pump high pressure, which leads to emergency leaks in the network and equipment wear.
Heating water supply to radiators
An unambiguous criterion that determines how to correctly connect the battery to the heating main with hot water, it is impossible to work out. Manufacturers heating radiators filled the market with devices with different schemes placement of inlet sockets for supply and outlet of the coolant. Architectural planning considerations contribute to the motivation for choosing the method of installing batteries and connecting them to the riser.
In many cases, the concept of “connecting the batteries correctly” means hiding all pipeline communications in the floor or in the walls as much as possible, without delving particularly into which method - diagonal or other method - you will have to connect. Models are available that allow you to connect pipes not only from the sides, but even from the bottom, using compactly located nozzles (in modern products, the distance between them is only 50 mm).
The only criterion that allows you to objectively assess the effectiveness of the connection according to the selected scheme is the ambient temperature in the room. A comfortable microclimate in a house or apartment directly depends on how correctly the number of sections of each heating device is determined, and on their heat transfer, the level of which can be varied by the method of installing wiring pipelines with batteries.
The connection of radiators to the heating main is carried out according to several schemes, among which the most common are:

Diagrams for connecting heating radiators to the main network
- pos. (a) - lateral one-way connection;
- pos. (b) - diagonal connection;
- pos. (c) - lower versatile;
- pos. (d) - bottom connection, the figure shows the options for connecting to one-pipe and two-pipe CO.
On the diagrams, red lines and arrows show the movement of the hot coolant, blue lines and arrows show the direction of the cold (cooled) coolant.
Features of connection diagrams
- The lateral one-sided arrangement of the inlet and outlet of the coolant is popular in high-rise apartments as the most convenient for installation with the accepted vertical passage of heating pipes. The best heat transfer is achieved when hot water is supplied to the upper branch pipe and the cooled liquid is removed from the lower branch pipe (item a in the figure).
The heat transfer parameters for lateral decoupling are taken as a basic standard when compared with other schemes (diagonal, bottom and their variations). The heat transfer of the circuit (a) is taken as 100%. In addition, when calculating the power of heating devices, a correction factor is introduced that increases or decreases calculated indicators... For radiators with side connection, we agreed to take K = 1.0. For diagonal connections K = 1.1-1.2, for bottom connections, the coefficient varies from 0.7 to 0.9.
When hot water is supplied to the lower branch pipe, heat transfer decreases from 5 to 10%.
- Correctly connected diagonal connection assumes hot liquid supply to the upper pipe on one side of the battery and a drain cold water from the lower opposite (diagonally) choke (pos. (b) in the figure). The circuit is most effective in multi-section batteries, its heat transfer is equated to 102% of the same parameter of the reference side decoupling. Diagonal connection better than other schemes provides an even distribution of heat over the radiator area.
- The lower versatile connection is realized by the supply and return connections in the opposite lower end pipes of the radiators (item (c) in the figure). Compared to the lateral circuit, the heat loss is 20-25%. But this scheme suits many owners due to the possibility of connections with trunk pipes hidden under the floor. Most often used in private buildings.
- The bottom connection through adjacent pipes is similar in terms of indicators to the previous scheme. Its use is due to architectural considerations, when all communications are sunk in concrete screed floor or under a raised floor.
Video about circuits
The options for connecting heating radiators are discussed in the video below.
Understanding the features different ways connecting the heating main to heating devices will allow the most efficient use of every square centimeter of the heat transfer surface of the heating radiator.

The battery heats up poorly due to an error in the choice of the wiring diagram
V otherwise instead of a heater, the owners will receive an ordinary piece of furniture, and they themselves will freeze all winter. The figure shows the heat distribution in a battery with an incorrectly selected connection option.
In contact with
The tasks of the heating system include optimal and uniform heating. various premises in winter, so the radiator must be connected in accordance with all the rules.
The purpose of the heating system
In a private house or apartment, it should be installed from 18 to 25 degrees. In winter, this indicator can be achieved only with a high-quality heating system. Its efficiency must correspond to the area of the building, it must be correct scheme.
Heating devices compensate for heat losses, which are mandatory in any room, because heat is escaping through windows, doors and even communication elements.
Especially you need to pay attention to what kind of heater connection schemes exist, and choose the desired option. It is advisable to make a choice even at the stage of building a house or apartment.
The best is to connect heating radiators to central system, since in this case we get an effective and reliable system providing uniform and constant heating in winter. Many private houses are located far from the city, so it is not always possible to use a connection to centralized heating.
That's why have to create their own autonomous systems, which:
- must have high efficiency;
- if desired, you can do it on your own;
- numerous nodes must be correctly formed and adjusted;
- installation must be carried out in accordance with all requirements and conditions;
- there must be a reliable and correct strapping systems.
To ensure uniform and high-quality heating of the premises in the house, it is important to know which elements affect it:
- Correct wiring of the network, which affects the efficiency of heating and how evenly the rooms will heat up, and the price for heating depends on this.
- The correct equipment for the system, for which it is necessary to make calculations that will determine what efficiency, power and other parameters the main elements should have. Fuel consumption depends on this.
- Correct installation of the main components and elements of the heating system, which include the pipeline, radiators, fittings, a boiler with a pump. If any actions are performed incorrectly, then the heating will work poorly or stop functioning altogether.
Read also: Power and number of sections of aluminum radiators
Before the installation of all heating elements is carried out, you need to calculate and select a connection diagram for heating radiators. It is necessary to select batteries that will have the required efficiency and other characteristics. Other installation materials must be purchased. The work itself should be performed independently only after careful study of the instructions.
How to choose a scheme
Initially, you need to know which ones exist. connection types heating radiators:
- (serial connection);
- (parallel connection).
 The very connection of the pipeline to the batteries can be done in the following ways:
- bottom;
- one-sided;
- diagonal.

All have their own characteristics. Some units are mounted in different ways.
If it is supposed to carry out the installation of a sequential circuit, then on one battery in the gravitational network there should not be more than 12 sections. If applicable circulation pump, then there should be no more than 24 sections. In this case, you can achieve the highest efficiency of the system and high safety of its use.
Installation rules
Before connecting a radiator, the following requirements must be taken into account:
- the distance from the floor to the battery should be approximately 10 cm;
- the distance from the window sill to the radiator is 10 cm;
- all nodes must be connected in accordance with the requirements specified by the manufacturers;
- from the wall to the product must be more than 2 cm.
Work process
When connected the following actions should be performed:
- At the place where the installation of the device is supposed to be carried out, markings must be applied, which will indicate the future areas for the brackets.
- Brackets are fixed to the wall of the room.
- The radiators themselves are strapped, which involves the installation of shut-off and control valves. Usually, Mayevsky cranes are used for this.
- Other additional assemblies and elements are installed, which include plugs or valves.
- The radiator itself is mounted, for which it is attached to the brackets. It is important to correctly adjust the device so that there are no distortions or other problems.
- The battery is connected to the pipeline in one of the following ways: diagonal, bottom or one-sided.
- The structure is pressurized, then water can be let in to check the tightness and correct operation of the equipment.
- Heating use.
Any modern batteries, whether aluminum, cast iron or bimetallic, are supplied with four open pipes for connecting to the heating main. In accordance with design features wiring, a diagram of the connection of radiators with supplied pipes is selected, and the remaining holes are closed with plugs or air vent valves.
In this article, we will explore possible options battery installation and tell you which circuit is better in terms of heat transfer efficiency.
It is believed that best results the performance of your radiator can be obtained using diagonal connection... In order to correctly implement this method, you need to connect the inlet pipe to one of the upper inputs, and the return pipe to the lower one from the opposite edge. Then the coolant will circulate through optimal route, capturing the largest part of the surface of the heater.
This combination is especially effective if the radiator consists of a large number(more than 10) sections. All other types of connections will lose noticeably in this case.
Therefore, the diagonal connection is considered a reference, and all manufacturers indicate the parameters of their equipment with respect to this version of the heating device.
The disadvantages of this method include:
- high consumption of pipes in the system;
- the inability to hide communications in a wall or in a box;
- complex layout geometry;
- inconvenient installation.
Applicable diagonal pattern in cases where maximum heat dissipation is the main requirement, and considerations of aesthetics and design fade into the background. Due to the inefficiency and complexity of the wiring, in multi-storey buildings this method of installing radiators is practically not used.
Bottom connection
In contrast to the diagonal, the lower way of connecting the batteries does not allow optimizing the heating system in terms of performance, but it makes it possible to make the radiator almost invisible.

Such a connection (it is sometimes called Leningrad), due to the peculiarities of the passage of the coolant between the inlet and outlet collectors, reduces the efficiency in the system by 10-15%. Moreover, these losses become so tangible only in apartment buildings with a long highway.
If you plan to install a radiator in own home(especially a one-story one), the lower connection diagram would be an excellent option.
The upper part of the battery warms up worse than the lower one, this becomes especially noticeable when the internal cavities are clogged or airy. In these cases, cleaning and air removal are required using Mayevsky taps.
Side scheme
Most often, the radiators of the heating system, especially in apartment buildings, are mounted in a side pattern. Its essence lies in the fact that both lines approach the battery from one side.

Advantages side connection:
- high efficiency;
- convenient installation;
- savings on pipes;
- the possibility of organizing a bypass between the lines for the installation of control valves.
If we compare diagonal and side wiring, the advantage should be given to the latter, since the difference in efficiency is only a few percent, and the benefits of side connection are obvious.
The diagonal circuit begins to win if you need to connect a radiator with big amount sections or organize a sequential arrangement of several powerful batteries. A correct understanding of these features will help to optimally distribute the radiators in the system.
Radiator location
The radiator is best placed under a window. This well-known rule is explained very simply: it is there that the heating battery will create best conditions preventing cold air from entering the room.

In a city apartment, windows and doors are the main sources of heat loss. In private houses, as we have already noted, a roof and a floor are added to them. The battery under the windowsill will create a curtain of warm air, which, as you know, tends upward when heated, and will not let the cold inside.
If there are several windows in the room, it is better to distribute the radiators between them and connect them in series. Also, experts recommend installing several heating points in corner rooms.
The following tips will help you to position the radiator correctly:
- The distance of the battery to the floor and the window sill should be at least 10 cm. Otherwise, its efficiency will decrease, and it will be inconvenient to clean under it;
- It is not necessary to deepen the radiator much towards the wall, it is better to leave a gap of about 5 cm;
- When decorative protective screens are used, the efficiency of radiators is reduced by 10-15%.
- From the point of view of heat transfer, aluminum radiators have an advantage, but in city apartments it is better to install bimetallic products.
And one more important point: it is forbidden to independently change the connection diagram of radiators, their connection to each other, or to install shut-off valves in the absence of bypasses in apartment buildings. All alterations in the heating system must be coordinated with the Management Company.
Installing radiators
Self-installation of radiators will not cause problems in the heating system in the future, if you correctly fulfill all the requirements for such work and ensure the tightness of all connections. In addition, some types of batteries require careful handling: aluminum and bimetallic radiators have a rather soft outer casing that can be easily wrinkled upon impact.
The installation process is carried out in the following order:
- We shoot old radiator (if necessary). Naturally, the heating line must be closed at the same time;
- We mark the installation site... Radiators are usually hung on a special bracket that is attached to the wall. The fasteners included in the kit are most often designed for concrete or brick walls... If you want to hang the radiator on a soft wall such as plasterboard, you need to use special wall plugs. Aluminum and bimetallic batteries will not create dangerous loads for such a wall, but it is better not to use the cast-iron version here. The bracket must be installed so that the radiator is positioned according to the requirements described in the previous section;
- Now you need collect battery... To do this, we screw the adapters included in the kit into all four mounting holes. Usually two of them are left-handed and two are right-handed, so care must be taken. Further, depending on the connection diagram, we plug the unused collectors, one with a Mayevsky tap, and the other with a special locking cap. All joints are carefully sealed;
- To prevent water leakage in the joints we lay sanitary flax... It is better not to use fum tape here. Flax needs to be wound correctly: clockwise for right-hand threads, and in the opposite direction for left-hand threads. In this case, when screwing on the threads of the connected elements, the flax will not be knocked out from under them. For reliability, the connection can be additionally sealed special means for example Unipak paste;
- We fasten to the places where the main pipes are supplied Ball Valves ... They will allow you to later remove the radiator for cleaning and maintenance, without stopping the operation of the entire system;
- Now only hang the radiator on the bracket and connect the supply pipes to it. The joints are sealed according to the above algorithm.
So we've covered everything possible types connections of heating batteries. If you are just planning the structure of the system for your own home, then you can choose the most suitable scheme. If you live in a city apartment, you do not have such freedom. In any case, understanding the principles and features of connecting radiators will allow you to independently service and install heating devices in my house.
When it comes to providing a room with heat, then first of all it is about. The comfort in the house depends on it, regardless of whether it will be private house or apartment. Naturally, in our time, this system should be economically viable. One of important points the device is how to connect the heating battery correctly. If they are not placed correctly, the heat consumption will significantly increase. In most cases, radiators are installed under windows so that warm air can be more efficiently combined with the air in the room.
It is necessary to correctly approach the choice of radiators and think over how to connect the heating battery properly. After all, if you don't do it according to the rules, you can get in big trouble. Therefore, during installation, you need to know some parameters:, purity and coolant temperature, and also its design should be considered.
Connecting heating radiators can be conditionally divided into several stages:
- Fastening the radiator to the supporting surface
- Installation work
Let's talk about this in more detail.
Choosing a radiator installation location

A heating radiator in a private house can be installed almost anywhere. It all depends on the owner's desire, his idea of comfort and design. However, it is more expedient to install heating devices "on the way" of heat losses, which will not only reduce their value, but also create a feeling of comfort.
The greatest heat losses in the house occur through the surface of the windows. Installation of modern double-glazed windows, triple glazing and application the latest technologies to reduce the thermal conductivity of glass, they reduce the level of heat loss, but still the thermal resistance of glass units is much lower than the thermal resistance of the walls.
In winter, when sub-zero temperature, even in the complete absence of drafts, there is a flow of cold air coming from window openings... For creating comfortable conditions indoors, the window surface is shielded by ascending streams of warm air. For this, heating radiators are installed under the windowsills. Moreover, the width of the heating device should be commensurate with its width (deviation in one direction or another by 5-10% is considered permissible)
If the installation of radiators under the windows is not enough, they are mounted on the surface of the outer walls.
For normal operation of the radiator and to ensure free circulation of air flows, the heating device must be at least 3 cm away from the wall.There must be a distance of at least 10-12 cm between the floor and the radiator, as well as between the upper part of the radiator and the window sill.
Fastening radiators to the supporting surface
Most manufacturers of heating equipment in technical passport radiator give comprehensive recommendations on their installation and method of attachment to base surface... Brackets and all necessary accessories for correct installation a radiator is usually also included.

The installation of the radiator begins with marking the wall, the surface of which must be completely finished (painted and prepared for installation). Perform any Finishing work under an already installed radiator is very problematic.

When installing heating devices with a large internal volume and a large mass, for example, cast iron radiators, special requirements are imposed on the quality of the wall and the method of fastening. To ensure greater reliability, cast iron radiators are supplied with additional support installed on the floor.
Installation of cast-iron radiators only on the floor is not practiced: it is imperative that the heater is mounted to the wall.

It is allowed to install specially designed radiators on the floor (without fixing to the wall surface): most often, the design of radiators is in the form of benches, benches and couches.
Connecting batteries to pipes of the heating system
The connection of heating radiators can be side or bottom. Information on this is contained in technical characteristics heating appliance. It is not difficult to determine what kind of heating device we are talking about, it is enough just to inspect it: at the radiator with bottom connection inlet and outlet are located close to each other and are located at the bottom of the housing.

Both pipes of the heating system (supply and return) are connected to the radiator at the bottom of the housing. Moreover, the feed is located closer to the center, and the return is shifted to the edge. The flow of the coolant inside a heating device with a bottom connection can be compared to the movement of water in a circle. The movement of the coolant along such a complex trajectory inevitably leads to a decrease in its speed, which negatively affects Radiator efficiency... As a result, the heat dissipation of a radiator with a bottom connection is always lower than that of a similar radiator with a side connection.
However, heaters with a bottom connection allow you to get rid of heating pipes in the interior by placing them under skirting boards or under a false floor, which inevitably arouses interest in them from the side of interior designers and explains the ever-growing popularity of this particular type of radiator.
Installation of side connection radiators
A conventional radiator has 2 pairs of holes located on one and the other side of the device, which allows you to connect them the most in a convenient way taking into account the real situation of heating installation, which is especially important when there is a shortage of free space (for example, a radiator in the corner of a room can be connected only on one side).
If the situation allows, you need to choose the most efficient connection methods with minimal losses of thermal power:
The best and the most effective method: diagonal connection, in which the flow is connected to the upper pipe and the return to the lower pipe on the opposite (diagonal) side of the radiator. This connection ensures the maximum heat transfer of any heating device.
The most undesirable connection option: a diagonal connection, in which the supply is connected to the lower pipe, and the return to the upper pipe from the opposite (diagonal) side of the radiator. Such a connection ensures the minimum heat transfer of any heating device.
The supply and return are connected to one side of the heating appliance. With this method of connection, a decrease in the efficiency of the radiator is observed by an average of 5%
The supply and return are connected to the lower branch pipes of the heating device. This method of connection reduces the heat transfer of the radiator by an average of 10%.
Features of installing radiators in a one-pipe heating system
One-pipe heating system can be vertical or horizontal. Its device is extremely simple: each heating device "replaces" a piece of pipe with a coolant, without changing the direction of its movement. This means that if the radiator fails (anything can happen: for example, a blockage has occurred, blocking the movement of water in the system), the entire heating system will stop, and this is already fraught with defrosting pipes or boiling the boiler. To avoid this, the radiators in one-pipe system heating units are installed with a bypass, the diameter of which must be less than the diameter of the supply and return.
We connect ...
As mentioned above, all the components necessary for installation are usually purchased together with the heating device. If they are not included in the delivery, it is better to buy all the elements for installation (lining, plug and Mayevsky tap) of the same brand as the heating device.
The radiator connection begins with the installation of liners, two of which are on the left external thread, and two with a right-hand thread. When screwing them in, the main thing is not to make a mistake and not to overdo it: if the part “doesn’t fit”, you don’t need to make efforts and try to install it in any way. It probably just has a different thread. You need to be especially careful with aluminum radiators where the thread breaks easily. All liners have a right-hand internal thread.
After connecting the radiator, two branch pipes will remain free, into the upper of which the Mayevsky valve is screwed in, providing air discharge and elimination air congestion, and a plug is installed in the lower one.
Video instruction - How to install a heating battery
The radiator installation is complete!
Types of heating systems
Before installing radiators, you need to clearly know which system it will be connected to. It can be one-pipe or two-pipe.

The simplest connection method is single-pipe. According to this principle, the heating system in multi-storey buildings is made, when heated water flows upward through the radiators installed in apartments. Such a system is inconvenient in that there are no devices in it that allow you to adjust the temperature of the heaters. Especially for this, it is necessary to install separate structural components.

The two-pipe system is especially good for those who are thinking how to connect a heating battery in country house... Its work is based on supplying hot water through one pipe, and its outlet through another in the opposite direction. In this case, the heat is distributed over the batteries in the same way. It can be controlled by a valve mounted in the radiator pipe.
Types of radiators
When choosing heating radiators, you need to know exactly where they will be installed, on which side, and whether they will fit the design of the room. Moreover, in our time, the choice of this equipment is huge:
- sectional;
- lamellar;
- tubular;
- panel.
Sectional batteries are easily constructed from separate sections into a radiator of the desired length, depending on how much heat is needed from them. In turn, they are divided into categories:
- steel;
- aluminum;
- cast iron;
- combined (bimetallic).
Heating done correctly is warm, comfortable and economical. There are a lot of radiator connection diagrams in practice:
- parallel connection (one-way circuit);
- diagonal (cross);
- one-pipe (apartment version);
- one-pipe with a jumper (apartment version);
- two-pipe scheme (apartment version);
- one-pipe bottom (autonomous heating);
- one-pipe bottom with a jumper or a tap (autonomous heating);
- two-pipe lower (saddle);
- two-pipe diagonal (autonomous heating, with and without a pump).
In the article, we will consider the above schemes for connecting heating radiators.
If in an apartment with methods of connecting radiators to centralized system We do not have a large choice of heating, that is, when replacing a radiator, repeat the existing wiring diagram. That for autonomous heating(houses, summer cottages, cottages, etc.), we will try to determine the most efficient and economical one.
Parallel connection of heating radiators (one-sided circuit)
Not good efficient connection as the radiator is not fully warmed up.
It is especially important when the size of the radiator is more than one meter in length (panel type), or more than ten sections (bimetal, aluminum). Heat losses are significant. Therefore, installing radiators large sizes in your apartment, use a diagonal connection. About him below.
Diagonal connection of radiators (cross)

More efficient than parallel (one-sided), since the coolant passes through the entire radiator and heats it evenly.
The heat dissipation of the radiator is increased, which contributes to better heating of the room.
One-pipe scheme (apartment version)

Such a connection scheme is very common in apartment buildings (from 9 floors and above).
One pipe (riser) descends from the technical floor, passes through all the floors and enters the basement, where it enters the return pipe. In such a connection system, it will be warm in the upper apartments, since after passing through all the floors and giving off heat to the bottom, the water in the pipe will cool down.
And if there is no technical floor (5th storey houses and below), then such a system is "ringed". One pipe (riser), rises from the basement, passes all floors, goes through the apartment last floor into the next room and descends, also through all the floors into the basement. In this case, it is not known who was lucky. On the ground floor, in one room, it can be warm, where the pipe rises, and in the next room it is cold, where the same pipe goes down, giving off heat to all apartments.
One-pipe scheme with a jumper (apartment version)

This option is slightly better than the previous one, since the goal is to heat all the radiators in the apartments, along the riser, evenly.
Reducing the resistance created by the radiators with such a jumper, the coolant passes through the entire riser, partially entering (mixing) into the radiator, thereby warming up all floors evenly.
The main thing here is to make sure that no one of the tenants puts a tap on the lintel (and closes it), otherwise the whole "idea" of engineers with a lintel will be covered with a "copper basin". In some houses, knowing about such cases, they simply reduce the diameter of the lintel.
The crane is on the jumper, here you need it in case of an accident or repair - if the radiator "leaks" (breaks down), it is removed for replacement. Then the jumper serves as a "bypass between apartments, no matter what the flow of the coolant stops."
Two-pipe (apartment version)

This option is almost ideal for apartment buildings... There is a supply pipe (supply) and a "return" pipe.
Heat transfer when using such schemes is greater. The heating of the radiator and the room itself is better. There is no need to install a jumper in case of an accident.
Do not forget to install the "Mayevsky tap" on the radiators to remove air from the heating system and remember the previous advice on diagonal connection when installing long radiators.
Let's move on from apartments in multi-storey buildings to autonomous heating.
One-pipe diagram with bottom connection (autonomous heating)

This way of connecting radiators is outdated and ineffective.
How many times, in practice, such heating had to be redone. The coolant in the pipes of such a system "flows" where it is "easier" (through a pipe that larger diameter). And does not want to "go" into the radiator (having resistance).
The radiator warms up badly, only from the bottom, and even then not always and not everyone. Cannot be adjusted. Heat loss is large (up to 30%).
Single-pipe bottom with a jumper or tap (autonomous heating)

The same version, only slightly improved (modified). Here things are already better (you can try to regulate).
Using a smaller diameter jumper on the "lounger" or a shut-off valve, we "drive" the coolant into the radiator, and if we also use a diagonal connection, then this option has the right to exist. It is necessary to begin to regulate such a system from the boiler, with the help of taps. Move on.
Two-pipe lower (saddle)

Two-pipe heating system with bottom connection.
This option is better than the previous ones, as it has a "feed" and "return". Works and is well regulated. But this option also has minor drawbacks and heat loss.
And so we came, in my opinion, "to the very effective scheme radiator connections.
Two-pipe system - diagonal connection diagram (autonomous heating)

For eighteen years of work as an installer, I came to the conclusion that such a scheme (see Fig. 9) is the most effective. Excellent regulation. There is practically no heat loss. Possibility to balance and save on pipe diameter.
Conclusion - I tried to reveal in detail the topic of all existing schemes radiator connections. And I hope you can evaluate all the pros and cons of each of the above, choosing the most effective and economical one for yourself. Good luck.