We make repairs in the kitchen suspended ceilings. Which ceiling is better to do in the kitchen? Technique application of textured decorative plaster on the ceiling
There is no eternal ceilings, and first of all it refers to the kitchen, where the human factor is largely affected by the service life.
Extreme cooking methods in saucepans without water or with a dropping pancakes, insect hunting using any submitted items, an unsuccessful attempt to keep a champagne stopper in hand - all these factors can cause damage requiring the repair of the ceiling.
Unfavorable environment In the kitchen room with high humidity, high temperature and fat discharge significantly reduces the service life of any ceiling, and the flooding, which experienced almost every resident apartment housesmay not only spoil the ceiling, but also lead to its replacement.
Optimally - it is necessary to update the ceiling coating, at least once every few years.
Often, the errors in the installation are pleased to deteriorate: poor preparation of the surface of the ceiling slabs for the ceiling device, errors when installing the installation profile, use in lamps of too powerful lamps, etc.
Solving how to repair the ceiling in the kitchen, you must proceed from its view. Depending on the type of ceiling, its repair can be made with their own hands or need help of specialists.
Surface preparation
In addition to removing the old coating before repairing the ceilings, it is necessary to prepare the basis for which will be applied ceiling materials. Preparation may include the following work:
- Remove contamination. Defects from rust spots, soot and fat, leakage divorces are removed using alkaline or acidic products, you can use and meansAfter removing the layer of polluted surface.
Often the ceilings in the kitchen after many years of operation have established yellowwhich is quite difficult to paint. In this case, you can use inexpensive means "whiteness", which has an active chlorine in its composition. It is divorced in water and applied roller on the ceiling several times.
- Alignment of recesses. For high-quality sealing cracks, it is necessary to expand it by 5 - 10 mm., Removing fragile or detached areas, after which it is projected. Filling in deep slots can be performed using alabaster, cement-lime or plaster plaster solutions, Rotband. After the surface, the surface is sweeping and inspired emery paper.
- Primer. Used in preparation for the repair of all types of ceilings with coating on the main one. To improve adhesion, low-penetration liquid primers are used (Ceresit CT 17), they are applied to the surface with a roller in two - three layers.
In the name of the primer there is a word "colorless", but in fact it is not entirely true. The primers have a yellow and white opaque color, for the ceilings it should be chosen only white, similar to milk.
- Putty. For alignment of the kitchen ceiling, seeding shells, very small cracks are used by spatlement. In this method, the special putty mixture is applied to the primed surface and after drying it is aligned with sandpaper.
In the construction sector for rubbing ceilings, small plastic graves are used for finishing works with a glued thin porous layer of rubber. The sandpaper or special grid is fixed on its working surface using special bolts with clamping plates on the opposite side of the grater.
Bled ceiling
There are two ways to repair a blurred ceiling: with removing the old coating or cosmetic repairs with the application of a new layer on the whitewash. If the ceiling has not been repaired for a long time and the coating is yellowed from time to time, having intimidated with kitchen fat and so much, then it is better to remove it.

The cracked ceiling is not only inestic appearance, but also the chance that over time, the whits will fall
Shaving the ceiling follows the same material that was used in the previous coating.
There are several ways to apply whitening: with the help of a brush, roller, or a pulverizer nozzle, each of them has its own characteristics:
- A brush could be used until the invention of the roller - the method of time-consuming, ineffective with low coating quality (leaves on the surface of the strip, bristles).
- The use of roller is suitable for most homeowners and gives an average quality with proper application.
- Sprayer - Method of Professional Application coloring materials. It gives the best quality, but the ceiling color requires professional skills. Also, the method has significant drawbacks - a large amount of suspended dust is formed during operation, which leads to increased consumption of materials, pollution of all surfaces, requires the use of protective agents.
Cretaceous coating
Repair of the kitchen with their own hands with the removal of the old ceiling coating it is easier to spend, pre-impregnating whining with water with a roller and then removes it with a steel spatula. The remaining small layers of the chalk are washed away with the help of a sponge. After drying, the ceiling surface is cleaned with sandpaper, after which it is ready for whitewash.

The ceiling purified from the chalk is not primed if it remains areas that need to be aligned with the spat, they must be cleaned as much as possible from the chalk to concrete base And to progress, otherwise the putty will not hold on.
It is fairly easy to distinguish chalk from lime: it is not evaporated when handing over the ceiling in the case of the use of lime, when using the chalk coating, its traces will remain on the hand.
For the preparation of a colorful solution for coloring 10 m.KV. 3 kg. The chalk is diluted with water depending on the application method in a certain relation (usually per 1 kg. The chalk accounts for 2 l. water), add 30 to 100 ml. PVA glue, 50 g. of the economic soap, 10 - 20 g. Sinky.
Before use, the chalk solution must be strained through the Capron, otherwise large solid particles contained in the chalk powder will remain on the ceiling.
Lime coating
It is rarely used in the kitchen premises, mainly used in the bathrooms.
When removing the old layer, it is necessary to use a metal spatula, pre-dumping the removable section with a hammer. The use of water in the case of a lime coating is ineffective, it is poorly dissolved, comes and smeared over the surface.

Lime is pretty hard to clean
After alignment and stripping of the limestone ceiling (it is not blocked on the lime), you can proceed to its painting with a roller or spray gun.
The solution for limeplains is 10 meters square. prepared by dissolving in 4 liters. Water 2 kg. Lime with the addition of 100 g. Salt and 45 sinks.
Repair of painted ceiling
The repair of the ceiling in the kitchen with their own hands in most cases will require repainting, even if the surface will be painted the same paint. This is due to the conditions of operation of the ceilings in the kitchen premises, at which their surface quickly loses its original snow-white look.
In the case of peeling paint, strong deep penetrating contaminants or mechanical damage to the ceiling, it is necessary to thoroughly clean from old paint or putty, to predict, and then align a new putty.
When scrolling out the emery paper, you can align not only putty, but also shoot old paint In problem places ceiling.
For painting kitchen ceilings use modern materials: Water-emulsion, acrylic, latex paintsthat are not flushed with water.
When conducting painting work With your own hands, it makes no sense to use a pulverizer: it will lead to a large consumption of paint without getting high, if not a specialist works.

Roller will not only save paint, but also will evenly distribute it on the ceiling
It is easier to use a roller with a synthetic nozzle - a fur coat, for the convenience of working it can be applied to the telescopic extension (fishing rod), which allows you to paint the walls and a floor ceiling. Another one an important element It is the use of a special bath where paint is poured. When working, the roller is lowered into the paint and rolled on a flat surface of the bath, which contributes to the uniform distribution of paint along the coat.
Before the main coloring corner of the room must be painted with a brush or small roller.
The surface of the surface is made at least two layers: the first is applied perpendicular to lighting, the second after drying the paint along the direction of light.
Ceilings in the kitchen are usually painted matte paints - It does not require high quality prepared surface and makes unnoticed small irregularities.
Repair of wallpaper or polystyrene foam tile
When damaged wallpaper or polystyrene foam plates As a result of flooding, negative impact Contaminated air in the kitchen or their spontaneous dugout can be attempted to re-glue the retired sheets, first cleaning and thoring the desired section of the overlap panel.
In most cases, wallpaper or tile during operation lose their appearance and is subject to replacement.
An excellent exit from the position is the coloring of the wallpaper. You can paint any types of wallpapers (even paper, if you do not strongly wasting their surface), it is suitable for water emulsion, acrylic, latex paints. The method is also convenient because after some time the wallpaper can be repeated, while getting a durable budget ceiling.
Repair of plasterboard ceilings
In case of damage to the plasterboard coating, small areas can be covered and cleaned with sandpaper, with severe flooding, the sheets will have to change and put all the joints and their surface. After carrying out preparatory work The whole ceiling will have to repaint.
PVC panels ceiling and wheels

After mounting the ceiling of PVC will not need to be repaired, if only you yourself damage it
It is difficult to submit a situation in which rack ceiling with 50. summer time Services will need to be repaired - except after the fire. PVC panels are more affected by external environmentOver time, they can change their color and deform. Main repair of robust and plastic ceiling It consists in replacing the panels, and everything will be changed in the plastic.
Repair of stretch ceilings
When subtoping or small damage to the tension ceiling, some options for its repair can be used:
- Using a special patch that is glued with inner The ceiling and sticks the hole, preventing its further distribution. Cosmetic repair can be made by setting the damage to the damage an additional lamp, an exhaust grille or by gluing the applique.
- If the hole is at a distance of no more than 10 - 15 cm. From the wall, the ceiling can be tightened, warming it with a hairdryer.
- If flooding occurred cold waterIt is enough to drain it through the holes in the lamps or simply dry the ceiling by dismantling the lamps and ensuring ventilation of its inner surface.
The best years of women pass in the kitchen. Joke, of course, but there is a certain proportion of truth in it. Here are the serious requirements that make a kitchen to choose a material on the ceiling, unsurprising: Even the highest quality extract will not save you from high humidity, temperature drops and raising evaporation. We started repair, but do not know which ceiling is better to do in the kitchen? Then we go to you - and offer detailed story About popular materials for designing vital for all rooms with specific photos in the interior.
10-15 years ago The problem of choosing the ceiling to the kitchen did not stand at all: in most cases, the fantasy of property owners has boiled down to a traditional whitewash or painting and proceeded primarily from the scant offer on the market.
 Now the situation has changed dramatically, and the rich selection of finishing materials is already perceived as a given. Well, there came a cross to the owners to perceive as a givenness and the problem that appeared!


 Above, we have already found out that the ceiling in the kitchen is permanently exposed to high humidity of air, hot vapors and soot, which is inevitable with regular cooking. From this follows the suggestion: determining with the question of which ceiling is better to do in the kitchen, it is necessary to repel primarily from the practicality of one or another option. Of course, no one has canceled aesthetic and decorative qualities - we have long been living for a long time in the Soviet Union, which means that the ideal version will be a logical compromise between the above categories.

 Consider options that are more or less suitable for the ceiling in the kitchen.
Whitewash
The solution that is in memorable soviet years It was considered almost non-alternative. It was catastrophically little attractive features and individuality, but tell me who those years thought about such trifles?
 Among the advantages whiskers:
 - cheapness
- excellent air exchange
- easy performance
- whits little hides either does not hide unevenness at all on the ceiling
- requires regular update
- under the influence of high humidity quickly cracks and crept
We do not recommend!

Painting
Externally, this version of the ceiling in the kitchen is very similar to the previous one. All the same classic white color. True, paint is more loyal to high humidity in the room, and this is a rare plus that distinguishes it from lime or chalk. The rest of the pluses of the minuses are strikingly similar. Pros:
Pros:
- does not require special skills and tools
- easy wash
- very quickly loses your color
- horrible shortness
- peeling from the ceiling
- exhibits low loyalty to local restoration (if a separate plot peelled - it will not work without irregularities without occurrence)


Wallpaper
Glue wallpaper on the walls is our all. We are ready to spend how much time on the selection of the most unique drawing, which, after sticking, is probably thoroughly under the subdet, after a few months of active contemplation. With the ceilings - the same story. If you think that the ceiling is better to do in the kitchen, and tend to wallpaper, then make a relatively good choice. Regarding whitewash and paint, of course.  Pluses of wallpapers for the ceiling in the kitchen:
- well hide defects
- inexpensive
- do not require cost-to-put tools
- easily repaired in separate areas
- impressive decorative potential
- the inconvenience of sticking - abundantly lubricated glue pieces difficult to fix without bubbles and various shortcomings
- under the influence of humidity, quickly dug in different places and deform


Suspended ceiling of plasterboard
From a designer point of view, such ceilings - hardly the most profitable solution. They allow you to implement the most complex and non-trivial structures, thus bringing your kitchen to the high standards of formulant art.

 We also note other advantages to use plasterboard on the ceiling:
- durability
- practicality
- high strength
- impressive decorative qualities
- wide conservation opportunities
- mechanical resistance
- perception of temperature drops
- require a frequent update of the painted layer
- quickly deteriorate in the case of flooding
- require professional mounting
 It should be noted that it is best to make the ceiling in the kitchen from moisture-resistant drywall and be sure to trust this business professionals. In this case, we declare above long term Operating is place in practice. In all other cases, you are quite expected to experience problems with a suspended design.
 Recommended with reservations!


Plastic panels on the ceiling in the kitchen
Popular material that is crowned in modern apartments and private houses. Solving a difficult question, which is best to make a ceiling in the kitchen, the hosts first pay attention to the relative efficiency of the specified option.

 Let's mention the rest of the advantages of using plastic for the ceiling finish in the kitchen:
- elementary and fast installation
- practicality use
- durability design
- environmental Safety
- a large number of variations in length and width
- unresponsibility to high humidity
- easy care with non-abrasive drugs
 Common variant of plastic panels - rush type. These are narrow and long panels that create in your room. pleasant atmosphere and easily fit even in the most difficult interior.

 Also in plastic white color There is one substantial minus - this is a rather fast appearance of yellowness as a result of the long and regular effects of ultraviolet rays. Fix such a color deformation, alas, no longer succeed.

 Otherwise, this is a relevant, inexpensive and very reliable option for kitchen.
 Hosteles note: The plastic panel with a glossy surface requires more intense care than with matte.
Stretch ceiling in the kitchen
Perhaps the most sought-after decision to date, about which we could only dream. Describe all the advantages of using stretch ceilings in the kitchen will be long and boring, but we will try to be laconic:
- moisture resistance
- flawless smooth seamless surface
- infinite number of decorative combinations
- reliability at flooding
- impressive service life
- rich Choice for Mounting Lamps
- simple care
- perfectly fit into any interior

 Manufacturers offer today wide selection The textures that the designer seemed to be confused even to the designer, not to mention the more landed people, for whom, in the first place there are primarily operational qualities. Therefore, if you have a choice of which stretch ceiling is better to do in the kitchen, you need to read in advance with all the options in the advertising prospectuses of the supplier of the relevant services in your city.


 Most often, the dispute is conducted around glossy and matte stretch ceilings.
The first is actively dominated by the market, offering a beautiful mirror effect that is capable of visually even modest in size kitchen seriously increase.

 The second is very similar to ordinary whitewashed ceilings and are less attracted attention, offering you and guests of your kitchen to focus exclusively at the interior.


 What do you choose? This is already a separate question, which must be thought to think well!


Summarizing
In order to determine which ceiling is better to do in the kitchen, you must first of all correlate existing aesthetic requests with your material capabilities and extrapolate the resulting compromise on materials with the best operational characteristics. Widespread accessibility different options Turns any repairs today in an amazing journey, the finite clause of which the individuality of your kitchen is becoming and undisguised facilities in the room. Look for your option, and we are always ready to offer you an ocean of incredible ideas, each of which can potentially push you on a successful solution! Photo: vk.com
Repair of the ceiling in the kitchen, alas, the process is inevitable, since the life of any coating is limited. If short-lived options are used - for example, whitewashes, they have to face at least 1 time per year. More durable finishes, for example, exclude the process of 10 years, but sooner or later repair the overlap will have to be reserved.
Preparation of the ceiling to repair
Repair the ceiling in the kitchen with their own hands always begins with the removal of an old coating. Depending on its nature, this process can be very laborious, long and in any case includes dirty, mostly wet works.
The next step is the preparation of the ceiling to install a new coating. Here options are more, but time and patience will still have to stock.
Tools and equipment
To repair the kitchen as quickly as possible and better, it is necessary to have the following devices at hand:
- a stepladder or goat sufficient height and stability to get to the ceiling surface without risk;
- employee film - any kind;
- malar or at least normal tape - you will need to fasten;
- respirator, gloves and glasses - a mandatory element. The dry method of cleaning the ceiling leads to the appearance of a huge amount of fine dust, strongly irritating mucous membranes and respiratory organs. Wet fraught by the formation of a large amount of dirt, so precautions are necessary;
- sprayer - ordinary, garden, wetting kitchen ceiling. It is possible to replace it with a sponge and a capacity with water or a wide roller on a long handle, however, the pulverizer is still more convenient;
- staple - preferably wide to remove the coating layers as quickly as possible;
- iron brush, chisel with hammer - required to remove a more durable old coating;
- perforator and Bulgarian - need to be needed if you need to remove the base overlap layer when infected with fungi, for example. Also, the old solid plaster can be removed by the grinder.

Removal of coating
The surface cleaning methods is determined by the nature of the coating. Most often in the kitchen, the ceilings are whites, stained, plastering or covered with wallpaper. Often there is a suspended design with plastic panels or clapboard. But in this case, before you need to disassemble the system, and then, if necessary, prepare the ceiling surface.
First of all, the furniture is removed from the room, if possible. Large items and equipment are covered with a film and fix it with a scotch. The floor, if its repair is not performed, also overlaps the film.
- Pokes - removed in two ways:
- wet method - With the help of a sponge or pulverizer, we smell a small piece of ceiling and expect about 10 minutes until the coating absorbs moisture. After that, the spatula is removed with a layer of chalk or lime. In complex areas, joints, as a rule, can be used and perforator. Lime is better bonded with the material, so it takes at least 20 minutes to "clarify";
- dry It assumes the use of a metal brush or a bladler with a disk, which pretty quickly cleans the surface from the blotch. This highlights the dust mass. After removing the blots, the ceiling should still be washed.
 2. The paint is removed in the same way as the whitewashes. For the kitchen uses a water-based composition, as it is safe for humans. This coating also absorbs moisture and swells. The process takes a few longer times. The paint can be removed both dry and wet.
3. Wallpapers - the simplest solution for repair. Even the washable is easily dumping, as the glue of their fastening, absorbs moisture. It is enough to moisten a piece of water, and then, picking up the edge of the strip, carefully remove it. Sometimes it is required to use a spatula.
4. Plaster It usually has a higher degree of adhesion and is removed with difficulty.
Options are as follows:
- the mechanical method involves the use of hammer and chisel. If the stucco is old and easily peeling, enough and a spatula;
- electric - used perforator or bollage with disk. This method is much faster and more efficient.
If, after removing the plaster on the base base, the mold is detected, the infected places should be deleted, and not to disintegrate.
In this case, the perforator is broken by concrete until they get to the unreleased material. Then the entire ceiling is treated with chlorine-based antiseptics or special anti-grain compositions. For reliability, you can re-process the area with copper vigor.
 5. Any suspended structures are removed by a single scheme: First, the finishing material is removed - plasterboard sheets, lining, plastic panels, and then disassemble the frame. The finish can not always be saved: when fixing with nails, for example, the material is damaged, but the framework elements are quite suitable for recycling.
How to make one of important stages Repair of the ceiling in the kitchen, in particular, removal of whitewings, you can learn from the following video.
Primary repair
The need for it does not always occur. The ceiling in the kitchen, with your own hands, you can build wheels, drywall, even install the stretch. In this case, the condition of the basic coating does not play a special role. If they are supposed finishing coatings or steer ceiling, Watching is required.
The procedure depends on the condition of the ceiling in the kitchen.
Preliminary shockting
If there are deep rusts and cracks on the surface - more than 2 cm in depth and width, their seal is carried out separately.

- Cracks are expanding with a spatula and purified from dust and dirt. It is best to use a vacuum cleaner.
- Processing the deepening of the primer for better clutch with the material.
- After drying, the crack is close to the mounting foam.
- A day later, the surplus of foam is cut and ride again.
- The spatula is applied to the recess, very tight and superimpose the reinforcing ribbon - sickle.
- Then a thin layer of plaster is applied on top of the tape to finally align the surface.
 If the height difference or the depth of cracks is more than 4 cm, special will be required metal grids And the special kind of sandy cement formulations. Such a repair is better to entrust specialists.
Basic shuttering
How to make the repair of the ceiling without shocking? Only if you install a suspension design. And even in this case, it is recommended to cover the surface with plaster, albeit without alignment and hardware, at least in order to avoid the accumulation of dust and dirt.
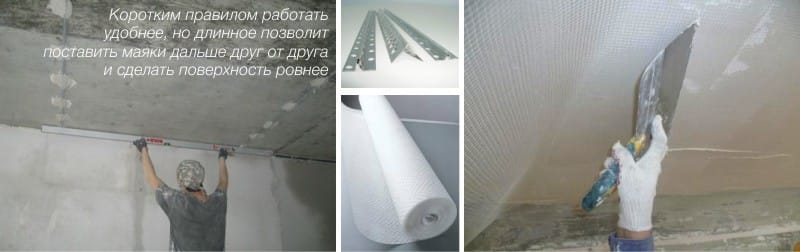
Walking - the process is not the easiest. It will require the appropriate composition, lighthouses, a rule, fiberglass stack and, of course, a spatula. It is impossible to use for the kitchen gypsum plasterSince it is hygroscopic and absorbs dyes.
 The sequence of actions is the following.
- processed by antiseptic.
- The base is drunk. Preferably the compositions for smooth ceilings, as they provide good adhesion. The primer must dry completely - it is about 12 hours.
- Laser level or usual, the lowest ceiling angle is determined. With the help of a painting cord from this point there is a markup.
- Lighthouses are fixed on the ceiling - self-tapping screws, located at the necessary height, that is, taking into account the irregularities of the base ceiling surface. Lighthouses are installed with parallel rows with a distance between them by 15-20 cm less than the length of the rule.
- The lighthouse profile is fixed on gypsum dyeing. The correctness of the placement is checked by a laser level.
- Plastering is applied between profiles - the spatula, literally throws onto the surface. Then, the rule of zigzag movements move between the rows: remove the excess mixture and leveled the surface.
- The layer of plaster reaches 2 cm - it is impossible. If irregularities on the ceiling are too large, then repeated shocking, after complete drying of the first layer. It will take reinforcement: the painting mesh of fiberglass is first fixed on the surface, and then apply plaster.
 If the ceiling is prepared under painting or blissing, it is important to get not just a smooth, but a smooth surface. For this dry plaster layer Apply putty. This composition has a more liquid consistency and forms a smooth surface.
 The video shows shuttering of the kitchen ceiling.
How to repair the ceiling in the kitchen
The final view of the new ceiling attaches itself. The options are as follows.
- Tells I. Do not cause difficulties. For work, you need a brush and roller, even more convenient to use the paintopult. It is worth noting that the paint is durable and better transfers the action of moisture.
- You can save the ceiling with wallpaper. Preferably washable, since even the best extract does not save from the soot and evaporation of fat.
- You can stop your choice on decorative plaster. In this case, instead of putty, the surface is separated by mosaic, Venetian, stone plasteras in the photo.
- Suspended construction - Wheel or With a sufficient height of the room, the room will not only decorate the room, but also serves as a separation method on the working and dining area. In this case, the putty can also be abandoned, and even align.
- Firmware Easier performed. clapboard plasterboard sheets. Here it is necessary to create a flat surface.
The ceiling repair in the kitchen includes 2 mandatory stages and 1 is not always mandatory. The first refers to the removal of old coating and installing a new one. Optional acts plastering, as when construeding suspended structures state base surface Of particular importance does not.
Each apartment needs periodic repairs, especially if various finishing materials come to unsuitability: panels, wallpapers or whitening on the ceiling. The ceiling in the kitchen is one of the most vulnerable places in the entire apartment: Daily cooking can quickly pollute it, and then the owners will have to think over its repair.
Requirements for ceiling covers in the kitchen
The kitchen is a room where the differences of moisture and temperatures often occur. Here we usually wash the dishes regularly and prepare food. Therefore, all materials for finishing must necessarily have the following properties:
- Hygienicity. In the kitchen should be as clean as possible, because it is a guarantee of household health. So, thinking about the repair of the ceiling, you should give preference only to those materials that you can wash and wipe.
- Moisture resistance. The ceiling finish should not lose the outer attractiveness and absorb moisture when exposed to steam.
- Practicality. Now few people want to spend a lot of time to maintain purity. For this reason, by planning the repair of the ceiling in the kitchen with their own hands, it is recommended to give preference to those materials that will not create difficulties during harvesting.
- Durability. Materials that can serve for a long time are always in preference. After all, their application moves the prospect of the need to perform a new repair.
- Aesthetics. The ceiling in the kitchen should be harmoniously combined with the rest of furniture and decoration, as well as please the eye.
Repair ceiling in the kitchen with your own hands
The ceiling, just like the whole kitchen, belongs to the room of increased risk. Sauce, GAR and steam will definitely experience the surface for strength even when modern system Ventilation. And below you will learn how you can repair the ceiling in the kitchen, and the photo and video will clearly demonstrate to you this difficult process.
Contact a construction and repair company or repair the ceiling in the kitchen on your own - this is the question that needs to be solved by the owners of apartments.
By performing repair with your own hands, you can significantly save your money, having spent them to decorate more expensive materials. And below you will learn how to make the repair of the ceiling itself.
Where to begin?
First of all, you need to assess the degree of damage and the scale of the upcoming work. The formed soot on the finishy whitewash requires much less effort to update the ceiling coating than the fastened plaster.
Depending on the level of damage to the ceiling and budget, which you select, you can perform the following repairs:
- Painting or whitewash.
- Stowing finishing panels or wallpaper.
- Installation of the suspended ceiling.
- Installing the stretch ceiling.
- Preparation for repair work.
Whatever the options you choose, will pre-prepare a working surface. To do this, you will need: a rigid brush, a spatula, finish spacure And the mixture for primer.
Pre-from the kitchen need to bring furniture (and the one that remains, just cover polyethylene film). You also need to be sealing the film and the floor, and if it is not, then use newspapers. This will significantly save time and strength on cleaning upon completion of the repair of the ceiling in the kitchen.
The old coating must be considered the maximum using a rigid brush or spatula. Any irregularities and cracks on the surface of the stream is important to be pricked. After the primer dries, the finish putty is applied. It will prepare the surface to further actions, and also lines the surface of the ceiling. In the event that, for one application, it was not possible to achieve a flat surface (checked by the level), after drying it is necessary to apply another layer. Finishing materials are applied to the aligned surface.Repair ceiling in the kitchen with your own hands: photo and similar instruction
Teaches or painting
Because of its briefness, these both ways go into the past, but on the other hand, these are the cheapest finishing materials.
If the repair of the ceiling in the kitchen must be done by whitewash, it is important to take into account the following subtleties:
- Before applying whiten, you need to thoroughly wash old bliss From the surface of the ceiling to the most concrete base.
- Preparing a mixture for blissing, it is necessary to add a certain amount of carbon black glue, as a result of which the finishing material will receive additional strength.
- Apply paint needed smooth smears perpendicular to each other. Thus, you can eliminate the formation of longitudinal "influx" paints.
Choosing the painting of the ceiling in the kitchen, it is worth preferred by waterproof high-quality paint. Her expenses depend on its characteristics.
Brushes apply for staining foam rollers or kraskopult. We advise you to apply at least 2-3 layers of paint.
Tip! Please note that the last layer of paint needs to be applied towards the light source, because so you will avoid traces of the brush on the surface of the ceiling.
Ceiling pastry cuisine polystyrene plates
The main advantage of this material is low cost and simplicity of work. Before proceeding with the ceiling salary, you need to place the plates so that the central is strictly in the center of the room. In addition to the attractiveness of such a cladding, you can accurately determine the number of incomplete tiles, to fit them to the necessary sizes.
Casting technology is very simple - a layer of glue with a thickness of no less than 1.5 cm is applied with a spatula on the tile, after which the tile is applied to the cell reserved to it and gently pressed to the ceiling.
PVC panels or shook wallpaper
It is a bit more complicated, but it is more convenient to apply the ceiling in the kitchen of the PVC panel. They are presented in a wide variety of colors and sizes.
PVC panels should be attached to special glue. They have protruding grooves and details for better docking with each other. And for them it is convenient to care for: periodically wipe with a cleaning agent.
Choosing a wallpaper for the ceiling to the kitchen, you should give preference washing optionswhich are designed for sticking in such a room. Specialists advise to give preference to wallpaper shades to visually increase the flow height, thereby expanding the kitchen space.
As for the wallpaper with the print, it is important to select them so that the drawing completely coincides throughout the perimeter of sticking. In this case, the sticker must be carried out in parallel with the wall, where the window is located, namely from the window to the door.
The process of pasting the ceiling by wallpaper implies compliance with such rules:
- Wallpaper strip length should be 15-20 centimeters more to overlap the ceiling connection with the wall.
- You need to stick the wallpaper in the direction from the window (in parallel to it).
- Slices of wallpapers are cut in advance for the exact fit of the pattern, after which they are nicking and stuck alternately.
- From pasting to drying wallpaper windows and doors in the kitchen should be closed to exclude drafts and, as a result, dug wallpaper.
Installation of suspended ceiling
Much more practical and more convenient in operation in the kitchen showed themselves dropped ceilings. And there is nothing surprising in this, because they are not exposed to deformation, easily wash and completely replaceable.
By installing the suspended ceiling, it is necessary to first organize the framework. But note that the instruction on its arrangement differs depending on which you decide to install the ceiling in the kitchen. Although the following general points can be distinguished:
- P-shaped metal profile fasteners.
- Preparation and fastening of suspensions to secure profiles, where the subsequent final fastening of the panels will be performed.
The panels you choose must be fastened with self-tapping screws on a predetermined frame (they are attached along the edges). Footprints from self-samples are hidden by special corners, which does not spoil the aesthetic appearance of the ceiling.
Plasterboard - material, even more hygroscopic than polystyrene tiles, so it is better for the kitchen to give preference to its moisture-resistant version, especially since it is not much more expensive.
But be that as it may, many owners choose this option for the kitchen, as it allows you to create the most original, multi-level structures.
Moreover, the suspended ceiling allows you to hide the communications and install the built-in lamps.
The disadvantages should include:
- Sufficient labor complexity.
- Reducing the height of the ceiling, which can be critical in a model planning houses, where the ceilings are so low.
- The need for various additional work. After mounting the plasterboard design, you will have to perform putty and surface coloring. Plasterboard allows you to spend the wallpaper sticker.
Rush ceilings in the kitchen
This version of the ceiling finishes has great amount positive qualities, among which include:
- Stability K. unfavorable conditions operation.
- Ceilings, like other types of suspended structures, do not need carefully preparation of the surface and allow you to put the communications secretly.
- Diversity decorative decoration. You can resort to options with open and closed type Rosek, use different combinations of colors inserts and rails.
- Rush ceilings are easy to leave, easily clean.
- If necessary, you will dissemble the design without any difficulties (for example, if you need replacing the lamp).
- The ceilings meet the requirements of fire safety.
Among the shortcomings it is worth allocating only a decrease in the height of the ceilings.
Installation of stretch ceiling
The installation process of the stretch ceiling is quite complicated, so it is better to charge it to those skilled in the art. It justifies a high price, without requiring serious effort when careing.
This option is quite expensive, but it is one of the most practical. Its main advantages:
- Long-term operating deadlines for ceilings. The coating will serve several decades without the need for repair.
- By installing stretch ceilings in the kitchen, you may not worry about flooding, which can arrange neighbors on top. The panels are capable of withstanding a huge amount of liquid, your ceiling and the kitchen interior itself will not suffer.
- Using different options design, installation of panels of different structures and colors, construction multilevel structures etc.
- If necessary, the ceiling is easily clean.
- Stretch ceilings do not burn out in the sun and perfectly carry the temperature differences.
Conclusions about repairing the ceiling in the kitchen with your own hands
So, the repair of the ceiling you can perform almost any technology. Choosing a finish material, the owner must take into account its durability, quality, cost, and, of course, the ability to serve in difficult conditions. Comparing all factors, you can choose the most suitable option.
The correct organization of repair in the kitchen leads to stunning results!
Before you start repairing in the kitchen, it is necessary to decide what to separate the walls and the ceiling, which materials are suitable for your kitchen, as well as evaluate the budget opportunities of your family.

Stylish modern kitchen After repair
Materials for wall decoration in the kitchen
Before starting the wall decoration, it is necessary to determine the choice of functional kitchen zones. Such kitchen zones are dining and cooking area. By defining their location, as well as the location of the apron, you can start working.

Cuisine Interior in Green Tones
For the design of the walls there are many different species Finishes:
Ceramic tile
Tile is one of the most leading materials for wall decoration in the kitchen. Its popularity is due to the following positive properties:

Attention!Having preferred this finish option, choose neutral pastel colors.
Wallpaper
This wall design is one of the most affordable, thanks to a democratic price. Modern technologies allow you to produce wallpapers that are withstanding extreme kitchen Conditions: temperature differences, high humidity, drafts, frequent pollution and washing with various detergents.

Wallpaper S. vegetable pattern in the kitchen interior
Paper wallpaper, of course, will not be able to withstand such loads. The best options for the kitchen can be:
This type of wall transformation allows you to get a surface that is not afraid of fat, soot and chad, it is easy to wash and serves a long time. The range of colors and textures is huge, so you can always choose your own option.

Wallpaper under painting
Due to the fact that acrylic paint is applied to the wallpaper, their water-repellent, decorative, protective properties are activated, and the practical coating for walls is ready to operate.

Textured wallpaper
Differ from the traditional the fact that they are not sold in rolls, but in special containers. Anyone who wants to recreate them on the wall and recreate an interesting drawing. They possess antistatic properties and do not absorb smells, which is very important for the kitchen. This finish option can be recommended to people suffering from allergies, since their components are natural fibers.

Liquid wallpapers - an excellent solution for modern kitchen
Vinyl
Very good choice for the kitchen. They are easy to wash, they are not afraid of sunlight, humidity, easily carry high temperatures.
Attention!If your walls are imperfect, then with the help of wallpaper you can hide small defects: cracks, irregularities, roughness.

Types of vinyl wallpaper
Decorative plaster
This type of surface treatment is distributed very widely and has a number of benefits:
- Under the compliance with the basic rules of application, the plaster is not sprinkled and will not crack and will delight you for many years;
- Behind the layer of plaster you can hide serious wall defects;
- This material is universal and can fit for any surfaces: wooden, concrete, brick;
- Such a coating has high moisture resistance and noise insulating properties;
- The plaster includes only natural ingredients, so the material is not worried about the environmental friendliness;
- Playing walls have a high fire resistance.

Decorative plaster "Coroed"
A negative point can be called the complexity of work that requires the mandatory presence of a professional, and dismantling troubles, if necessary.

Decorative plaster under the sandbloal in the kitchen interior
Paint
If you decide to choose a paint to design a kitchen, then it is necessary to remember that the walls before painting need to be prepared: alignment, putty, grinding and primer. Use paint in wall design - practical option, it is resistant to the effect of steam, well washes any means, eco-friendly. With it, you can implement any fantasy. The most common options for kitchen painting are:
- Water-emulsion paint;
- Acrylic;
- Antimicrobial moisture resistant.

Painted walls in the kitchen
Lining
This species interior decoration Very specific and applied only in kitchen premises. There are the following options for its manufacture:
Plastic
Having preference plastic panels, pay attention to the moisture-proof options that are most preferred for the kitchen. This option will help hide existing wall defects, and not worry about the formation of fungus and mold. Here it is necessary to remember that the environmental purity of this material is in question.

Plastic lining in the kitchen interior
MDF
Panels from MDF material are environmentally friendly pure MaterialAnd modern coatings allow you to achieve high moisture-resistant and fire-resistant indicators. In addition, material is easy to care: to maintain it in proper form, it is enough to wipe soft cloth with soap solution.

Lining out plate MDF. In the dining area of \u200b\u200bthe kitchen
In order to establish such panels, no pre-processing of the walls is required, there is no need to plaster or disrupt the remnants of wallpaper. All work can be held alone, without the help of the master. Low price will add bonuses to this material.

Walls in the kitchen from MDF panels
Finishing materials Apron
The kitchen apron is designed to protect the walls in the area of \u200b\u200bthe plate and the sink from splashing water, fat, soot and other contaminants. In addition, it carries and decorative function allowing kitchen interior, emphasize the overall stylistics of the room.

Kitchen Plastic Apron
Ceramic tile
Trim Apron Tile universal optionthat meets all the requirements of hygiene and security. Tile is not afraid of dampness, high temperatures, Hot drops of the prepared dinner is nipple. She is easy to maintain, not afraid of any detergents. Mass of design solutions allows you to choose the appropriate option for any interior.

Ceramic tile on kitchen apron
Firepress glass
Such apron has many advantages: absolutely water vehicles, not fuel, hygienic, is durable. The design of refractory glass panels is diverse, here can be: engraving, photo printing, overlaying photo wallpapers and so on.

Kitchen apron of refractory glass
This material is plates of compressed wood fibers. Special upper layerIt allows you to give it water-repellent and refractory properties. Thanks to this coating it is permissible to use it near gas plates and washes.

Apron from MDF panels
The advantage of finishing from MDF panels is a variety of options, it allows you to choose the appropriate design for the kitchen of any style. Panels possess wide decorative features: Reproduce the structure and shades natural tree Or stone, they can be applied to photo printing and so on. An apron-decked such panels will delight for many years.

Kitchen apron from the MDF panels
Laminated chipboard
This option is one of the most budget and short-lived. The chipboard is afraid of moisture and high temperatures. After some time, such a coating will lose its aesthetic properties and requires replacement.

Kitchen Apron from chipboard plate
A natural stone
The apron of stone will make your kitchen incredibly solid and status. This material is not afraid of fire, durable and moisture consists.

Tile for apron of natural stone
But there is one significant disadvantage that makes you think about the feasibility of its use - nonhygiennicity. For example, kitchen apron Mud is easily absorbed from the marble, and the removal of stains is associated with difficulties. In addition, such a finish has a lot of weight, which is not suitable for any surfaces.

Kitchen Apron and Tabletop of Natural Stone
Fake diamond
Unlike natural, artificial stone has a lower porosity. This property does not allow the dirt to penetrate inside, which means it will make it easier to care for it. The material has high refractory properties, durable and durable. Weight artificial stone Much less than a natural analogue, which makes it easier to work with it.

Artificial stone in the kitchen interior
Ceiling options
In order to repair the kitchen did not bring disappointment before rubing the ceiling, you need to think about harmonious combination Wall clearance materials and ceiling in your kitchen.
Tension
The stretch ceiling looks very aesthetically, has a perfectly smooth surface. And the design capabilities are so great that they admire any customer.

Multi-level stretch ceiling in the kitchen
This version of the ceiling is durable, for many years it will remain as smooth and maintain the original color. Environmental safety of the canvas is no doubt. To install the ceiling there is no need to stucked the rough ceiling. The disadvantage of the stretch ceiling can be called the fact that when mounting the ceiling "steals" from 10 to 15 cm of the room height, which is essential for low rooms.

White stretch ceiling in the kitchen
Plasterboard
The ceiling of drywall has a number of benefits: beautiful appearance, ecological cleanliness, fire safety. This finishing material allows you to create almost any forms and be acceptable to any design decision Kitchen. In addition, the installation of the ceiling will allow you to reduce heat leakage by 10-20 percent during the cold season. But at the same time, it has low strength and low moisture resistance.

Design multi-level ceiling from drywall in the kitchen interior
This embodiment of the ceiling is the sticking of polystyrene plates on the horizontal plane. As a result of the work carried out, a surface consisting of glued rectangular or square components. With qualitatively performed work, the ceiling will be perceived as a single plane. But such registration is short-lived, afraid of direct sunlight.

Ceiling tiles in the kitchen interior
Plaster
If you choose the most inexpensive version of the ceiling finishes, then simple shockting is that you are looking for. The finish will not reduce the height of the room and is environmentally friendly. But this is a rather laborious job and in case of insufficient experience it is unlikely to be able to cope with independently, the help of the repair team will be necessary.

Venetian plaster in the kitchen interior
Paint
Staining the ceiling does not require large capital investments and anyone will cope with work. The painted ceiling is easy to care, but will last long: such a coating will require updates every two or three years. The disadvantage is also the complexity of preparatory work.

Painted ceiling in the kitchen
Using high-quality finishing materials and adhering to the main technologies when repairing the kitchen, you are guaranteed to get exactly the result that will delight you for many years.


https://youtu.be/koutxpfeeos.