Wet facade slope installation technology. Warming a house under plaster wet facade for comfort and energy saving
Wet insulation of facades (sometimes called "wet facade" insulation) is one of the most popular methods of insulation in construction - it is used both in private and high-rise construction (of any number of storeys), in the construction of new and reconstruction of old buildings.
In the article we will list the main stages of installation.
A little about the history: wet facade insulation systems were invented in Germany in the 50s of the last century. Its German name is the WDVS system, or else "light wet method". It began to be widely used in the 70s of the twentieth century. During this period, the architects were tasked with solving the issues of energy saving in buildings. Every year such requirements are increasing, and if 30 years ago insulation was a rarity, now it is a necessity.
Features of the device of facades
Please note that any external insulation the walls is correct. Internal insulation used in cases where the external, for some reason, is impossible. More about this will be written in the article "Variants of the facade arrangement in a private house".
- the design of your home requires finishing the facade with plaster;
- the walls of your house require additional insulation.
So, let's consider what a wet facade insulation system is.
The wet facade insulation system consists of the following layers
Heat insulating layer - consists of insulation (basalt wool or foam) (2), glue mixture (3) and dowels (4), with which the insulation is attached to the base. This layer will perform its heat-insulating function only if it is protected from atmospheric influences. Insulation is not a structural material, that is, it does not have sufficient bearing capacity in order to attach a decorative and finishing layer to it.
Glue-reinforcing layer- consists of an adhesive solution (5) and a reinforcing facade fiberglass mesh (6) and a primer (7). The main functions of this layer are protection of thermal insulation from atmospheric agents, strengthening mechanical strength thermal insulation, imparting bearing capacity to thermal insulation.
Decorative finishing layer is a decorative plaster, different textures painted in different colors.
1 - base; 2 - thermal insulation; 3 - glue; 4 - plastic dowels; 5 - fiberglass mesh; 6 - adhesive solution; 7 - primer; 8 - finishing layer
Materials necessary for the installation of a facade insulation system
An important point to consider when purchasing materials is that all materials must be components of one system... And only a specialist can select materials in one system. Therefore, as a rule, materials for facades are sold as a "system" - this is a complex of materials with similar physical characteristics(thermal expansion, water absorption, frost resistance, vapor permeability) and taking into account those chemical processes that occur in the system.
On the basis of the project documentation developed by the designer, the supplier company finalizes the units and completes the materials for the facade, taking into account the technical, climatic, and architectural conditions of building operation.
When designing and installing the facade, and completing the materials, two points must be observed:
Continuity of the thermal circuit (that is, there should be no gaps, breaks, gaps);
Preservation of the vapor permeability of the system pie (a properly selected system is a system in which each subsequent layer of materials from the inside to the outside has more high rate vapor permeability, in other words, your house "breathes").
The choice of insulation for facade decoration
Since insulation most of all affects the cost of 1 m 2 of the facade, we will consider the main issues that arise when choosing it.
Important! The thickness of the insulation is calculated by the designer, it depends on climatic zone and the base (what material the wall is made of).
The stage of the beginning of the facade insulation
At what stage of construction is the facade work carried out?
- When the installation of the roof is completed;
- Completed external waterproofing foundation;
- The house has already shrunk;
- Installed windows, ventilation, air conditioning, other systems;
- The building is dry;
- Weather with a stable above zero temperature is expected for 2-3 weeks (early autumn or late spring, facade works "do not like" heat or frost).
It is desirable, but not required:
- Completed the initial finishing interior walls, concrete works, filling and screed floors;
- Electrical wiring, alarms, etc are installed;
- The building is heated (for the cold season).
Below are the main steps in order to understand how to insulate a wet facade. Each seller of the "system" provides installation instructions, taking into account the specifics of the installation of this particular system. Don't forget this.
How to insulate a wet facade (facade with cotton wool)
Installation is carried out at a temperature not lower than +5 0 С and not higher than +30 0 С; installation at lower temperatures is possible, provided that a thermal circuit is installed.
Thermal loop is when in the execution zone facade works a temperature is created not lower than +5 0 С, optimally +10 0 С, +15 0 С. It happens like this: scaffolding are sewn up with a special facade reinforced film and with the help of heat guns (heaters) are continuously fed warm air into the space between the film and the facade.
All layers during installation must be protected from precipitation.
Preparatory stage
To carry out the work, it is necessary to install scaffolding with protective film or netting (they will protect the facade from the sun and precipitation and prevent pollution of the yard).
The walls must be free of any dirt, old coatings, efflorescence, fungi.
Assess the surface on which the insulation will be mounted. It should be flat. Irregularities must be leveled plastering solution... Allowable wall differences ± 1 cm per 1 m length.
The crumbling surfaces are treated with a fixing primer.
Plinth profile installation
Its functions are a leveling element (horizontal alignment of the facade) and protection of the lower part of the insulation slab from external influences.

Application adhesive composition on insulating plates

Gluing
Produced from bottom to top, the first row of insulation boards rests on the basement profile.

The slabs are mounted with a "bandage", externally it looks like brickwork.
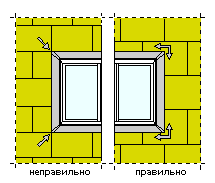
This is how the insulation is mounted in the area of window and doorways:
Fastening the insulation board with dowels
The glue must dry (see the time in the installation instructions), after which the boards are fixed with dowels. The dowels are selected, depending on the base on which the installation is carried out.


After that, the device of abutments to door and window openings, reinforcement of the outer corners and reinforcement of the tops of the corners of the openings are made.
Reinforcing layer device
Produced one day after the corners are reinforced,
First, create a base plaster layer, 3-4 mm thick

into which the reinforcing mesh is embedded

After that, a leveling layer is applied.

Plaster


An example of calculating the cost of a structure with mineral wool:
This system is based on Ukrainian-made materials.
Not included in the price, but you will need: basement, corner profile, abutment profile, basement dowel. Their cost is included in the cost of 1 m 2 of the facade (see below).
How to insulate a wet facade (facade with foam and EPS)
The sequence of work is similar, but of course there are many nuances associated with the installation.
The main thing to understand is that these are already other systems, with different characteristics, and you need to follow the recommendations of the suppliers of these systems, not to replace them with "random" materials. For instance, adhesive mixtures for cotton wool and foam they use different ones.
Cost of construction with foam
The cost of 1 m2 of the facade with work and material.
Price square meter- approximate figure, it depends on:
Facade installation conditions;
What materials are used (imported or domestically produced).
Estimated cost of insulation plaster facade taking into account materials and work, it ranges from $ 40-55 / m2 (mineral wool), $ 33-40 / m2 (polystyrene).
In addition, we draw your attention to the fact that there are a number of additional work, the cost of which is not included in this figure (installation of a heating circuit, cleaning the territory) and they will also require additional costs.
You can estimate your costs for insulation only on the basis of preliminary calculation the cost of installation and the system, which will be provided by the company performing the work.
- Choose only "systems" with a name on the market, the quality of which is documented;
- Trust the work only to specialists. It is much more expensive to fix errors, it is better to pay professionals.
Important! Experts necessarily have a number of completed projects and certificates from system suppliers.
How to check the quality of work performed
Of course, it is not your task to watch the workers continuously, but it is still worth taking a closer look at such moments and make sure that:
- Carried out preliminary preparation grounds;
- The adhesive composition is applied to the insulation correctly, according to the instructions;
- The insulation is glued exactly;
- Insulation plates are tightly joined to each other;
- The dowels do not protrude above the insulation;
- The reinforcing mesh is not laid on the insulation, but recessed into the base plaster layer;
- "Breathable" plaster is used, after application it does not crumble;
- The facade is protected from moisture from the window sills and the roof;
- The facade is flat, not bulging;
- There are no vertical, "spider-web" cracks on the facade, diagonal cracks in the corners of the door and window openings.
According to European standards, the service life of such an insulation system is 25 years.
Repaint it or change the texture of the plaster (re-plaster), if necessary, possibly earlier.
Brick is classic material for the construction of houses. It has a high thermal conductivity and does not protect well from cold. With time fake diamond and the joint material accumulates moisture and begins to deteriorate. Moisture and fungus appear inside the building. You can warm up an apartment by spending a large number of energy. To preserve the integrity of the walls and comfort inside the house, the wet facade is insulated. The walls are covered with moisture and frost-resistant material and plastered. Then decorative panels are painted or pasted.
Correct external insulation of the house will create comfort inside

To preserve heat in the house, it is necessary to insulate a wet facade, in which moisture will not accumulate in the wall and room. For this, materials are located with inside outward as the thermal insulation characteristics and vapor permeability increase. Then the dew point will move to the surface of the facade finish. Moisture from the room and walls will come out. The arrangement of materials and the technology of installation of the wet facade are standard.
- The load-bearing wall is made of bricks, gas blocks or concrete slabs.
- Insulation made of mineral wool, basalt wool, expanded polystyrene, sip panels or any other is glued to the wall.
- A layer of plaster with a reinforcing mesh inside, fixed vertically with an overlap.
- Nacerezite quartz primer or acrylic filler.
- Decorative coating acrylic paint, vinyl and clinker tiles, artificial stone.
Wooden walls are themselves a good heat insulator. The foundation for them is made light. Therefore, it is better to insulate such a building with a ventilated structure with a low-weight insulation. wooden house In addition to standard layers, it includes waterproofing along the wall and between the heat insulator and the putty. This is wood processing special formulations and fiberglass.
Installation of a wet facade starts from the foundation

Cold penetrates the rooms through the outer walls and floors. Insulation must be started from the foundation, especially if the building has a basement. The lower part of the house is cleared of dirt and removed around the perimeter excess soil... The blind area is made after finishing the wet facade. At the same time, a water drainage system is installed.
The technology of insulating the upper part of the foundation is more complicated than the facade, it requires additional waterproofing and durable finishing material. The basement level of the building is constantly exposed to destruction by rain, snow and frost. He receives blows from various objects. The load of the walls and the whole house falls on the foundation through the basement compensating layer, the lower part of which is in contact with the ground. Operating procedure:
- Clean the plinth from dirt, detachments and crumbling areas. Treat the surface protective compound from moisture, insects and rodents.
- Along the horizon - from the top point of contact with the soil, mount the U-shaped profile. Its width should correspond to the size of the insulation. It will prevent the glued plates from slipping and warping.
- Prepare the places for supplying pipes and wires. If the water supply and electricity and gas supply system comes out at the basement level, then protect such a place with special extensions and make a frame from the profile.
Installation of the facade is done according to the usual scheme. Basalt wool can be used as insulation, a layer is applied on top of the plaster waterproofing mixture Ceresit. It protects the basement of the building from moisture.
Decorative trim on the basement wet facade creates the basis for the image of the house and is made of solid materials. Clinker tiles, porcelain stoneware panels, polymer sand slabs, artificial or natural stone are glued on top of the primer. Above the entire perimeter, a profile is installed under the facade insulation, and ebb tides are attached to it.

Attention! Some materials indicate that it can be used in cold weather. Try to complete all work on the installation of a wet facade in dry warm weather. Moisture and cold from the wall after installing waterproofing and insulation can go inside the room. Walls and all materials must be dry.
Insulation of a wet facade with mineral wool: thin layer, short term

The main materials for insulating a building using the wet facade method are mineral wool and polystyrene. Both materials have small specific gravity and can be mounted on any foundations without reinforcement. You can compare the thermal insulation qualities, weight and service life of heaters and wall materials according to the table. The data are given taking into account the same degree of protection of the building and the basement level from cold.
| Material | Thermal conductivity coefficient W / mK | Density, kg / m | Layer thickness, mm | Service life, years |
| lightweight polyurethane foam | 0,019 | 35 | 50 | more than 25 |
| rigid polyurethane foam | 0,035 | 160 | 50 | more than 25 |
| light mineral wool | 0,052 | 15 | 90 | 5 |
| dense mineral wool | 0,058 | 150 | 90 | 5 |
| expanded polystyrene | 0,041 | 15-35 | 80 | 15 |
| foam concrete | 0,16 | 400 | 760 | 10 |
| silicate brick | 0,45 | 1000 | 1720 | more than 50 |

Wet facade... Installation of corners on windows
Mineral wool wins in comparison with other heaters in cost and noise absorption. It can be glued to curly facades, ground floor with bay windows and ledges to strengthen the foundation. Specifications for the system, the wet facade and its service life are the lowest. The consumption of glue is high, since the technology provides for strengthening the surface by spreading a layer of glue and, after drying, apply the glue again and press it against the wall. The profile is needed already the thickness of the wool slab for tight entry and fixation.
Do-it-yourself plaster insulation technology

The device of a wet facade does not require special training and professional tools. Sandwich insulation is carried out in stages with drying breaks. The layering system allows you to do this in separate sections. The profile is attached immediately to the entire facade of the building. The wet material quickly hardens and fixes the elements. Insulation of private houses is done independently. The technology and work procedure are simple:
- Prepare the surface of the walls and the basement of the foundation. Clean from dirt, efflorescence, exfoliation, stains oil paint... Align and check vertically with a plumb line. Gluing technology cement mixtures allows you not to prime the surface.
- Fix the basement profile along the horizon along the entire perimeter of the building and along the bottom of the wall, around the facade openings.
- Apply glue to the surface of the insulation and press it against the wall. The bottom row starts in profile. For mineral wool, the technology provides for a preliminary application of glue to strengthen the surface and, after drying, the composition is smeared again. It is advisable to mount the starting profile on the bottom of each row. Such fastening protects against material slipping.
- The glue dries for three days. One day is enough for adhesion and you can hammer in the umbrella dowels. The system of positioning at the corners of the slabs and additionally at the rate of 6 fasteners per meter.
- Ceresite filler is used to seal the dowel joints and caps. After 72 hours, a layer of plaster of about 2 cm is applied. The fiberglass mesh is embedded in it in vertical stripes with an overlap of up to 100 mm. The technology must be resistant to alkalis. At the corners it is installed corner profile... The plaster is leveled.
- After drying, the entire surface of the building is covered with a ceresite filler. A basement ebb is placed along the upper line of the foundation.
A decorative coating over plaster protects and creates an image of the home

When choosing plaster and adhesives, you must first decide on further finishing materials
The basement level is subject to additional mechanical damage. The lower part of the wet facade must be finished with solid durable materials... Most often I use clinker tiles for a low foundation. Tall building looks good with artificial and natural stone, terracotta panels, slabs of porcelain stoneware and basalt chips. The installation technology is the same, only the composition of the glue and the profile are different. I select ready-made mixtures suitable for the finishing material.
The technology of finishing the wet facade allows to minimize the formation of cold bridges, since the facing layer is a uniform, monolithic coating. Wet cladding of building walls allows the dew point to move outside the building walls, therefore, prevents condensation accumulation and increases the service life of the structure.
Wet facade installation steps
Preparatory stage
Surface preparation for the installation of a wet facade includes cleaning the walls of the building from contamination. If you intend to finish laying a wet facade on top of the existing finish, then the existing finish must be checked for bearing capacity and adhesive properties, that is, make sure that it can withstand the weight of the wet facade and ensure its reliable adhesion to the surface.
If outer cladding the building has badly damaged areas, then they will need to be replaced. Existing irregularities are leveled with a rough plaster layer. If the walls are finished with hygroscopic material, then they must be thoroughly primed before installing a wet facade.
Removing the existing plaster from the slopes of door and window openings will also increase the adhesion of the wet facade to the outer surface of the building walls.
Installation of the basement profile
To fasten the heat-insulating layer, as well as to protect it from moisture, a basement profile is mounted. In addition, the profile strip allows you to evenly distribute the load on the structure from the thermal insulation boards.

Mount the profile as follows:
- The distance from the ground to the basement profile should be 40 cm. A 3 mm temperature gap must be left between the basement profile and the horizontal slats of the frame;
- The profile is fixed with self-tapping screws and dowels, which are placed every 10-20 cm. If the mass of the heat-insulating layer is significant, then fasteners should be placed more often;
- A special corner profile is mounted on the corners of the building.
Insulation laying
As thermal insulation materials used for the construction of a wet facade, use or.
Siste  MA insulation of a wet facade implies the observance of some rules. The insulation is mounted on special adhesives, which should be applied in a uniform layer along the entire perimeter of the thermoplates, stepping back from the edge of 2.5-3 cm.
On the empty space of thermoplates, the adhesive is applied pointwise. As a result, about 40% of the material should be covered with glue.
Thermal insulation boards are mounted on the walls using a rolling method that resembles a device brickwork... Thermal insulation boards must be pressed tightly not only to the surface to be insulated, but also to neighboring boards. Insulation is laid in rows.
After the thermal insulation layer has dried (after about 3 days), it is necessary to additionally strengthen thermal insulation layer... To do this, use dowels, which, depending on the porosity wall material go deeper into the wall by 5-9 cm.
Before installing the fasteners, you must first make the slots, and the pressure sleeves must be flush with the surface of the heat-insulating layer.
Installation of a reinforcing layer
The reinforcing layer must be installed 1-3 days after installation

thermal insulation layer. First of all, it is necessary to strengthen the slopes of windows and doors, the outer corners of the building and the vertical joints of the slopes with lintels. Thereafter
the even surfaces of the walls are strengthened.
Reinforcement is carried out as follows:
- An adhesive composition is applied to the heat-insulating layer, on which a reinforcing mesh made of fiberglass is mounted.
- A uniform layer of glue is applied over the fiberglass mesh, which must completely cover the structure.
As a result, you should get a flat surface. The thickness of the reinforcing layer should not exceed 6 mm, while the fiberglass mesh is positioned in such a way that the distance between it and the outer surface does not exceed 1-2 mm.
Exterior decoration
The reinforcing layer should dry out within 3-7 days. After that, the walls of the building are plastered with facade plaster mixtures.
Quite high requirements are imposed on the exterior decoration of buildings. The plaster layer should be distinguished by high moisture resistance, vapor permeability, resistance to external destructive factors. The facade of a building must withstand not only temperature extremes and precipitation, but also take up mechanical loads.
The quality and properties of plastered surfaces directly depend on the conditions of the plastering work. It is necessary to apply plaster at a temperature of 5 to 30 degrees above zero. Moreover, if the plastering work is carried out in dry and rather hot weather, then the plastering surface must be additionally moistened with water.
To preserve the qualities of the facade plaster, it is necessary to plaster the walls in calm and cloudy weather, since wind and ultraviolet radiation negatively affect the adhesion and strength of the plaster layer.
Installation of a wet facade on the basement of a structure
When installing a wet facade on the basement of the structure, there are some features that should be taken into account during the installation process.
Before installing a wet facade on the basement of the building, it is necessary to provide high-quality waterproofing of both the basement itself and the blind area. To insulate the basement, you should use a heat insulator that has a minimum degree of moisture absorption. Hygroscopic insulation such as mineral. Basalt, limestone, dolomite and slag wool are not used to insulate the basement.
Thermal insulation boards are additionally reinforced with dowels only at a height of 30 cm from the ground.
It is necessary to reinforce the base in two layers.
For facing the basement, use facade or ceramic slabs... You can plaster the basement of the structure with a facade mosaic plaster mixture.
Video lesson on the installation of the Wet Facade technology ..
The walls of houses built of bricks, various wall blocks, and even more so - representing reinforced concrete structure, in most cases do not meet the requirements for regulatory thermal insulation. In a word - such houses need additional insulation to prevent significant heat loss through the building envelope.
There are many different approaches to. But if the owners prefer exterior decoration your home, made of decorative plaster, in "pure" form or using facade paints, then the best choice the technology of insulating a wet facade becomes. In this publication, it will be considered how complex such work is, what is required for their implementation, and how all this can be done on their own.
What is meant by a “wet facade” insulation system?
First of all, you need to understand the terminology - what is the "wet facade" technology, and how it differs from, say, conventional wall cladding insulation materials with further decorative cladding wall panels(siding, block house, etc.)

The hint lies in the name itself - all stages of work are carried out using construction compositions and solutions that are diluted with water. The final stage is the plastering of the already insulated walls, so that the thermally insulated walls become completely indistinguishable from the usual ones covered with decorative plaster. As a result, two most important tasks are solved at once - ensuring reliable insulation of wall structures and high-quality facade design.
An approximate scheme of insulation using the "wet facade" technology is shown in the figure:
 Schematic diagram of insulation using the "wet facade" technology
 1 - insulated front wall of the building.
2 - a layer of construction adhesive mixture.
3 - insulation boards of synthetic (one type or another) or mineral (basalt wool) origin.
4 - additional mechanical fastening thermal insulating layer - dowels - "fungi".
5 - protective and leveling plaster layer, mesh-reinforced(item 6).
Such a complete thermal insulation and facade finishing system has a number of significant advantages:
- A very material-intensive installation of the frame structure is not required.
- The system is easy enough. And it can be successfully applied on most facade walls.
- The frameless system also predetermines the almost complete absence of "cold bridges" - the insulation layer is obtained monolithic over the entire surface of the facade.
- Facade walls receive, in addition to insulation, an excellent soundproof barrier, which helps to reduce both airborne and impact noise.
- With the correct calculation of the insulation layer, the "dew point" is completely removed from the wall structure and taken out. The possibility of the wall getting wet and the appearance of mold or mildew colonies in it is excluded.
- The external plaster layer is characterized by good resistance to mechanical stress and weathering.
- In principle, the technology is uncomplicated, and with strict adherence to the rules, any homeowner can handle it.

- With high-quality performance of work, such an insulated facade will not require repair for at least 20 years. However, if there is a desire to update the finish, then this can be easily done without violating the integrity of the thermal insulation structure.
The disadvantages of this method of insulation include:
- Seasonality of work - it is permissible to carry out them only at positive (at least + 5 ° C) temperatures, and in stable good weather. It is undesirable to carry out work in windy weather, at too high (over + 30 ° C) air temperatures, from the sunny side without providing protection from direct rays.
- Increased exactingness to the high quality of materials and strict adherence to technological recommendations. Violation of the rules makes the system very vulnerable to cracking or even peeling of large fragments of insulation and decoration.

As a heater, as mentioned above, mineral wool or expanded polystyrene can be used. Both materials have their advantages and disadvantages, but still for a "wet facade" high-quality mineral wool looks preferable. With approximately equal values of thermal conductivity indicators, mineral wool has a significant advantage - vapor permeability. Excess free moisture will find a way out of the premises through wall structure and disappear into the atmosphere. It is more difficult with expanded polystyrene - its vapor permeability is low, and in some types it generally tends to zero. Thus, moisture accumulation between the wall material and the insulation layer is not excluded. This is not good in itself, but at abnormally low winter temperatures, cracking and even "shooting" of large sections of insulation along with finishing layers occur.
There are special themes of expanded polystyrene - with a perforated structure, in which this issue is to a certain extent resolved. But basalt wool has another important advantage - absolute incombustibility, which expanded polystyrene cannot boast of. And for facade walls this is a very serious question. And this article will consider the best option- technology of insulation "wet facade" using mineral wool.
How to choose a heater?
Which mineral wool is suitable for a wet façade?
As already clear from schematic diagram"Wet facade", the insulation must, on the one hand, be mounted on an adhesive solution, and on the other hand, withstand a considerable load of the plaster layer. Thus, thermal insulation boards must meet certain requirements in terms of density, in terms of their ability to withstand loads - both for washing (compression) and breaking of their fiber structure (delamination).
Naturally, not any insulation classified as mineral wool, is suitable for these purposes. Glass wool and slag wool are completely excluded. Only slabs made of basalt fibers are applicable, produced using a special technology - with increased rigidity and density of the material.
Leading manufacturers of basalt fiber based insulation in their product line provide for the production of slabs specially designed for thermal insulation of walls with subsequent plastering, that is, for a "wet facade". The characteristics of several of the most popular types are shown in the table below:
| Parameter name | "ROCKWOOL FACADE BATTS" | "Baswool Facade" | "Izovol F-120" | "TechnoNIKOL Technofas" |
|---|---|---|---|---|
| Illustration | ||||
| Density of material, kg / m³ | 130 | 135-175 | 120 | 136-159 |
| Ultimate strength, kPa, not less | ||||
| - for compression at 10% deformation | 45 | 45 | 42 | 45 |
| - for bundle | 15 | 15 | 17 | 15 |
| Thermal conductivity coefficient (W / m × ° С): | ||||
| - calculated at t = 10 ° С | 0,037 | 0,038 | 0,034 | 0,037 |
| - calculated at t = 25 ° С | 0,039 | 0,040 | 0,036 | 0,038 |
| - operational under conditions "A" | 0,040 | 0,045 | 0,038 | 0,040 |
| - operational under conditions "B" | 0,042 | 0,048 | 0,040 | 0,042 |
| Flammability group | NG | NG | NG | NG |
| Fire safety class | KM0 | - | - | - |
| Water vapor permeability (mg / (m × h × Pa), not less | 0,3 | 0,31 | 0,3 | 0,3 |
| Water absorption by volume at partial immersion | no more than 1% | no more than 1% | no more than 1% | no more than 1% |
| Plate dimensions, mm | ||||
| - lenght and width | 1000 × 600 | 1200 × 600 | 1000 × 600 | 1000 × 500 1200 × 600 |
| - plate thickness | 25, from 30 to 180 | from 40 to 160 | from 40 to 200 | from 40 to 150 |
Experimenting with lighter and cheaper types of basalt wool is not worth it, since such a "wet facade" will probably not last long.
How to determine the required thickness of insulation?
As you can see from the table, manufacturers offer a wide range of insulation thicknesses for a "wet facade", from 25 to 200 mm, usually in 10 mm increments.

What thickness should you choose? This is by no means an idle question, since the “wet facade” system being created must provide high-quality thermal insulation of the walls. At the same time, excessive thickness is an unnecessary expense, and in addition, excessive insulation can even be harmful in terms of maintaining an optimal temperature and humidity balance.
Usually experts calculate the optimal thickness of insulation. But it is quite possible to do this yourself, using the calculation algorithm presented below.
So, the insulated wall must have a total resistance to heat transfer not lower than the standard value determined for a given region. This parameter is tabular, it is in reference books, it is known in local construction companies, and in addition, for convenience, you can use the schematic map below.

The wall is a multi-layer structure, each of the layers of which has its own thermophysical characteristics. If you know the thickness and material of each layer already existing or planned (the wall itself, internal and exterior decoration etc.), then it is easy to calculate their total resistance, compare with the standard value to get the difference, which must be "covered" by additional thermal insulation.
It will not bore the reader with formulas, but immediately suggest using a calculation calculator, which will quickly and with a minimum error calculate required thickness insulation with basalt wool intended for facade work.
Calculator for calculating the thickness of the insulation of the "wet facade" system
The calculation is carried out in the following sequence:
- Determine the normalized value of heat transfer resistance for walls (purple numbers) according to the schematic map for your region.
- Check the material of the wall itself and its thickness.
- Decide on thickness and material interior decoration walls.
The thickness of the external plastering of the walls has already been taken into account in the calculator, and you will not need to enter it.
- Enter the requested values and get the result. It can be rounded up to the standard thickness of the produced insulation boards.
If a negative value is suddenly received, wall insulation is not required.
Making a wet facade is one of the most simple ways facing the front of the building. This option is used quite often, because the work can be performed without the use of complex equipment and professional skills. But the process has certain rules and the nuances, taking into account which allows you to get a reliable and durable coating.
From the name it is clear that this method involves the use of materials that have a liquid structure. That is, the final veneer is created by applying various types of plaster.
The wet facade system has many layers, so the construction is like a cake. This method has been used for a long time, which indicates its effectiveness. In contrast to the "dry" version, which is fixation finishing materials on the base or frame using special holding devices or self-tapping screws, wet has a completely different technology.
 "Wet facade" differs from simple facade plaster by the presence of powerful thermal insulation
 A feature of this method is the ability to completely level the appearance of the dew point. This is achieved due to the fact that all elements have a common bond, and the surface is almost completely devoid of joints.
Since the structure being created belongs to non-ventilated facades, all work is carried out with the obligatory thorough preparation of the base.
Pros and cons
System advantages:
- Decorativeness. The texture and color of the outer layer is solely a matter of design intent. The work is carried out different kinds plasters, which can have a variety of textures and be painted in the desired shade. An excellent result can be achieved using a stencil that creates an imitation of stone or brick masonry.
- Availability. All materials used in the work have a democratic cost. Naturally, costs depend on the type of plaster and putty.
- Low weight. total weight does not exert a serious load.
- Additional heat and sound insulation. The multi-level structure reliably protects against noise pollution, and also helps to retain heat and create a comfortable microclimate.
- Lack of condensation. It occurs due to the fact that a dew point appears on the inner sections of the walls. In this case, it moves into the insulating layer and the excess moisture evaporates without any problems.
 With external insulation, the dew point moves into the thermal insulation layer, respectively, there is no condensation
Significant disadvantages cannot be ruled out:
- Installation of a wet facade is carried out exclusively under favorable weather conditions. Temperature and humidity indicators largely depend on the specific product.
- If precipitation falls during the work, the process stops until the surface is completely dry.
- Hot sunny days after the end of all procedures also negatively affect the quality: top layer when it dries quickly, numerous cracks appear. This reduces the level of security of the object and reduces the service life of the coating.
The correctness of the work is also important, any violations can threaten with serious problems in the future.
 For city dwellers, a "wet facade" is, in fact, the only way to insulate housing well and for a long time without losing square meters
 System design
Wet facade device does not include complex circuits layout and arrangement of materials. It is important to accurately and consistently carry out the technological steps.
System structure:
- Insulation is attached to the base using an adhesive. The fixing solution must have good adhesion and not affect the material. Thermal insulation products are selected in such a thickness that is necessary for a particular case, taking into account the characteristics of the area. The best are considered modern species: polystyrene and polystyrene foam. Special dowels with a large head are used as the main fastening element.
- A layer of mortar is laid on top of the thermal insulation. A reinforcing mesh is fixed on it and is completely covered with the composition.
- Plaster is used as a cladding, which is applied with the required layer thickness, depending on the selected product.
On a note! The final coat can be paint, which will protect the surface from premature deterioration and give it an attractive appearance.
 The popularity of the "wet facade" external insulation system is largely due to the affordable cost of basic materials and ease of installation
 DIY installation
The technology of installing a wet facade assumes that the installation of insulation and all subsequent layers is started after other activities have been completed. This list includes decking or partial replacement of roofs and ceilings; protection of the foundation and preparation of the base for further actions; installation of all external and internal communications. It is recommended to start work after the building has shrunk. Object including indoor spaces must be well dried.
 There is an opinion that the walls must be carefully leveled under the "wet facade", in fact, drops of up to 20-30 mm can be leveled with mounting glue
 To achieve more quality result, the process is divided into several stages:
- Training.
- Insulation laying.
- Reinforcement layer creation.
- Finishing events.
It is necessary to strictly follow the sequence of all stages.
Preparation of material and base
Work begins with preparation and acquisition necessary materials and tools:

- The surface is cleaned of dirt and dust. If there is an old layer, then it is completely removed.
- Much attention is paid to checking the coating for traces of mold and mildew. If there are damaged areas, then the problem is preliminarily eliminated.
- Cracks and crevices are sewn up and covered with putty.
- If there is a strong skew of the base, then alignment is performed.
- The surface is primed.
 The initial treatment of the walls with a primer is mandatory, the composition is selected depending on the type of base (wood, brick, concrete, cellular concrete), if it was not possible to find specialized soil, then you can take a universal
 Further work is started after complete drying.
Insulation laying
Insulation is purchased with a small margin. The fixation is done as follows:
- At a selected distance from the ground (this parameter is due to further work with base) a starting profile is installed. It is fixed through special gaskets to ensure the mobility of the structure during thermal expansion. Alternatively, a suitable metal profile is used.
- Thermal insulation boards are laid on the prepared glue. Fixation starts from the first row. The upper parts are offset to avoid overlapping vertical joints, for this one element is cut in half.
- After the glue has set, holes are drilled and dowels are installed, which fix the insulation.
- If required, the joints are slightly foamed. Excess foam is cut off.
 If the facade is even, then it is better to apply the glue to the insulation with a notched trowel; when facing curved walls, the composition is applied with a thick layer fragmentarily, as in photo No. 1
 The next step is started after 2-3 days, depending on the type of adhesive.
Reinforcement layer creation
The reinforcement layer is created in the following order:
- Basic plaster mix or an adhesive.
- Application is carried out with a spatula. First, a thin layer is laid, equal in size to the first fiberglass mesh strip.
- The reinforcing fabric is pressed into the solution and coated with the compound. Mesh joints are overlapped.
 Assembly adhesive under the fiberglass mesh can be applied to the "bare" insulation, if it is decided to use starting plaster, then it is advisable to prime the insulation
 The total thickness of this layer should not exceed 5–6 mm. It is necessary to wait until the surface is dry, then cover it with a primer and leave it to dry completely.
Finishing works
For this stage, we select facade plaster... It includes many species, different in properties. The main requirement is vapor permeability.
 After the starting reinforced layer has solidified, they begin to apply the finishing composition, which can be any decorative plaster for facades
 Selected finishing mixture prepared and laid in a small layer with a spatula. The solution is applied consistently and carefully leveled with a rule. When working with decorative plasters the mixture is used according to the recommendations specified by the manufacturer. The final stage can be priming and staining. To achieve the best decorative effect a combination of shades is possible.
Installation of the wet facade system is not very difficult, but it takes time and effort.